What's In The Box :
The iDEA pre-amp comes boxed with everything you need to install it as a direct replacement into your OP equipped Ovation guitar: OPi-1 pre-amp, mounting hardware, 9V battery, USB cable, ear-bud type headphones, 1/8 inch aux jack assembly, Installation Instructions and Quick Start guide.
Your iDEA pre-amp comes loaded with several JAM TRACKS and additional tracks are available for download at the Ovation iDEA website.
No tools are required to install the iDEA pre-amp into the OP-style can of our Ovation guitar. See Installation Options below. If you desire to also use the optional Aux input jack you will need a Phillips screwdriver and a 15/16 inch drill. See detailed instructions below.

|
|
Installation Options :
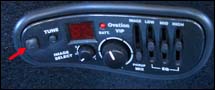
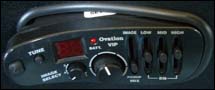
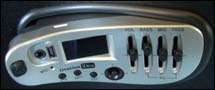
The iDEA pre-amp is compatible with OP style of pre-amp "cans" - OP10, OP-20, OP-30, OP-40, OP-50, OP-Pro, OP-Studio and OP-VIP5. So if your guitar is outfitted with one of these existing pre-amps you can simply pop it out and pop the iDEA in its place. Might be a good idea to install the battery. To remove the existing pre-amp just press the release button and the left side of the pre-amp will disengage from the can. Carefully remove the pre-amp starting with the left side. Once removed, sell the old pre-amp on eBay. Insert the iDEA pre-amp into the "can" right side first and press in the left side until it latches in place.
|
1. Press release button |
2. Remove pre-amp left side first |
 3. Install iDEA right side first 3. Install iDEA right side first |

4. Press in left side until it latches |
That's it, you're now ready to plug in and utilize all the features of the iDEA pre-amp with the exception of the AUX input. To utilize the optional AUX input you will need to install the supplied iDEA-specific pre-amp "can". See below.
|
|
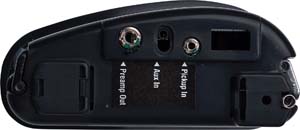
Installing The Can:
Although compatible with existing OP style pre-amp housings, to take full advantage of the iDEA pre-amp including the AUX input, you will have to swap out your exiting can with the supplied iDEA can. The new can has the additional internal connection for wiring the AUX input jack to the can. Required tools: Phillips screwdriver, 15/64 inch drill bit and drill. |
|
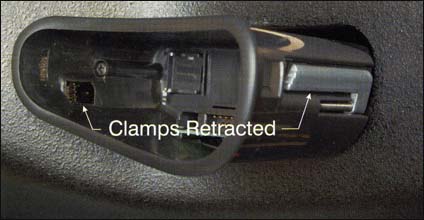
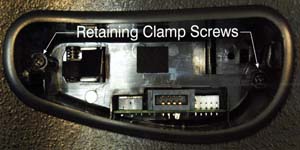
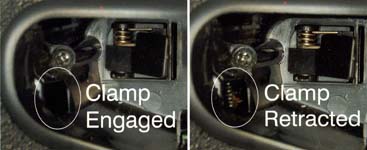
1. Remove the existing pre-amp (see above). Inside the empty pre-amp can you will see two retaining clamp screws on the left and right side. See photo below. Use a Phillips screwdriver to loosen the retaining clamp screws, turning counter-clockwise, until the clamps retract.
|
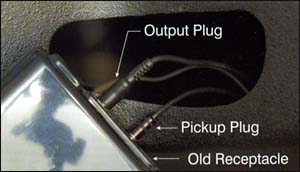
2. Remove the can from the guitar bowl. It may help if you can reach inside the soundhole (center soundhole models) or remove the rear access hatch (Elite type models) and you can gently push the can out from inside the guitar.
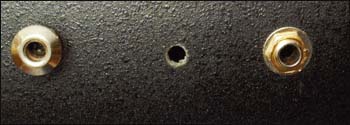
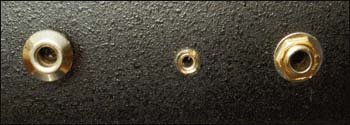
There will be an output cable and a pickup cable plugged into the rear of the can. See photo at right. Unplug both cables and set the old can aside. You don't need to worry about mixing up the cables as they are jack size unique. |
|
Installing The Aux Input Jack :
3. Once the old can is removed you will need to prepare the hole for the AUX jack housing. Mark a spot on the bowl about 1 inch away from the existing 1/4 inch or XLR output jack. Using a 15/64 inch bit carefully drill a hole in the bowl. Clean out any debris from inside the guitar.
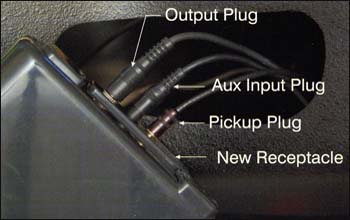
4. Working through the soundhole, or through the rear access hatch, install the supplied 3.5mm jack housing into the drilled hole from the inside of the bowl and secure it using the knurled locknut.
5. Route the Aux jack wire along with the existing output jack cable through the wire-management clip that is mounted on the inside of the bowl. Failure to do so will allow the Aux wire to rattle around inside the guitar.
|
|