| The Ovation Fan Club | ||
| ||
| Random quote: "There are more love songs than anything else. If songs could make you do something we'd all love one another." -Frank Zappa |
 Pandora II- The GCDB Restoration Pandora II- The GCDB Restoration
| View previous thread :: View next thread | |
| Member Communities -> Bottom Feeding Luthiery Guild | Message format | |
| seesquare |
| ||
Joined: November 2002 Posts: 3646 Location: Pacific Northwest Inland Empire | Made another clamp. This one is 7” tall, with a 12” throat. Should get all the way to the end of the bowl from the sound hole. Work on the splint patch tomorrow. | ||
| |||
| DanSavage |
| ||
Joined: June 2012 Posts: 2330 Location: Pueblo West, CO | seesquare - 2022-01-14 8:53 PM And I determined why the bottom edge of the bowl glows. The kerfing is actually impregnated fiberglass cloth, bonding the bowl to the top. Without the binding in place, light shines through the fiberglass strip. It does look like some of it is missing, likely from falling on its butt one-too-many-times. So, I might be able to paste in a small section of cloth & resin to provide a surface for the binding channel, at least. Yes. In the early bowls, the kerfing was molded fiberglass, not unlike the suspension ring used later on Adamas.
Edited by DanSavage 2022-01-16 12:15 AM | ||
| |||
| seesquare |
| ||
Joined: November 2002 Posts: 3646 Location: Pacific Northwest Inland Empire | Wow, that is some archive you have there, Dan. Thanks for the info. Interesting to evidence the evolution of materials & building techniques, as the product line was developed. I am currently humidifying the guitar to determine the extent the crack will resolve. I think I will have to clean the edges & glue in the splint, before applying the repair strip below the bridge. (mondoclamp- smaller image.jpg) Attachments ----------------  mondoclamp- smaller image.jpg (89KB - 0 downloads) mondoclamp- smaller image.jpg (89KB - 0 downloads) | ||
| |||
| seesquare |
| ||
Joined: November 2002 Posts: 3646 Location: Pacific Northwest Inland Empire | I see the crack closed up a bit with the hydration experience. I'm going to forego the splint scenario, for now. Damn the torpedoes........... | ||
| |||
| seesquare |
| ||
Joined: November 2002 Posts: 3646 Location: Pacific Northwest Inland Empire | Crossing my fingers. Wish me luck! (patch glued 1- smaller image.jpg) (patch glued 2- smaller image.jpg) Attachments ---------------- patch glued 1- smaller image.jpg (66KB - 1 downloads) patch glued 2- smaller image.jpg (62KB - 0 downloads) | ||
| |||
| Love O Fair |
| ||
Joined: February 2016 Posts: 1846 Location: When?? | And to think I considered patching dry rot around the laundry room plumbing to be a teetering endeavor. Mere child's play compared to the great clamp rig you fabricated there! Your pieces & parts ingenuity gets better with every project and post. | ||
| |||
| seesquare |
| ||
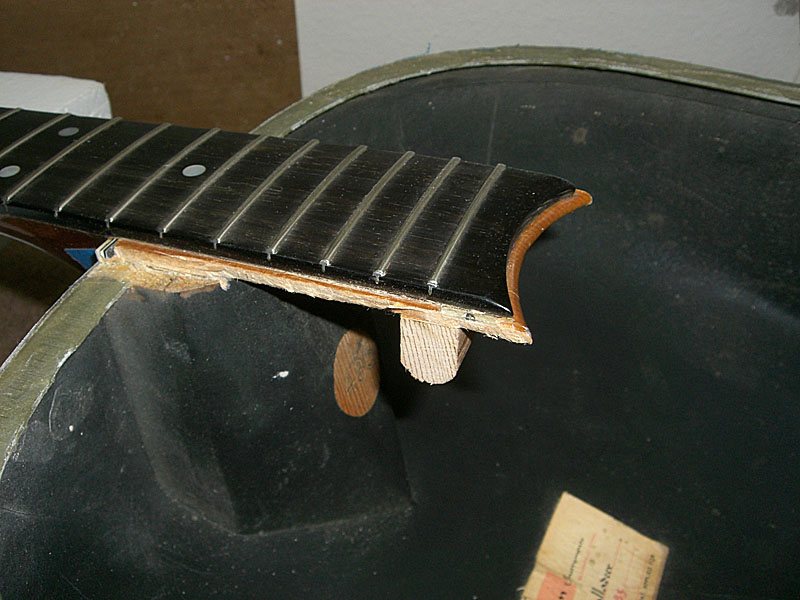
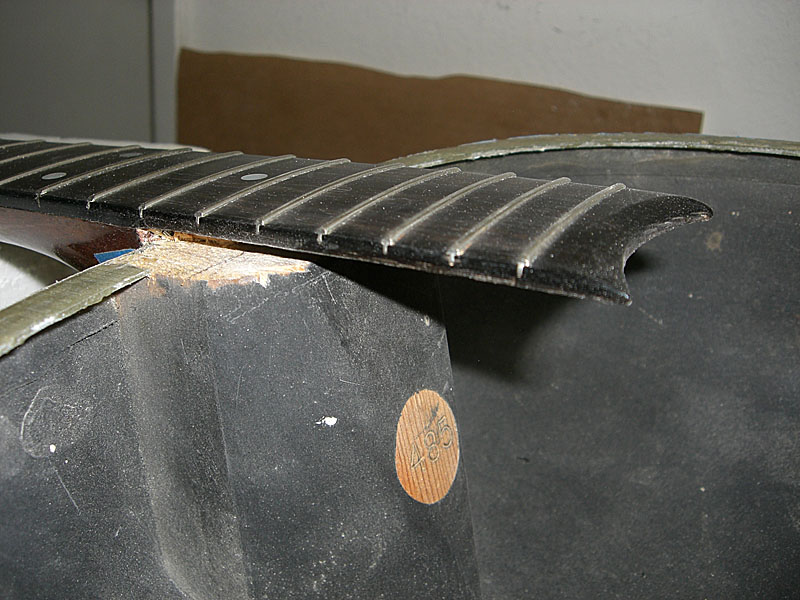
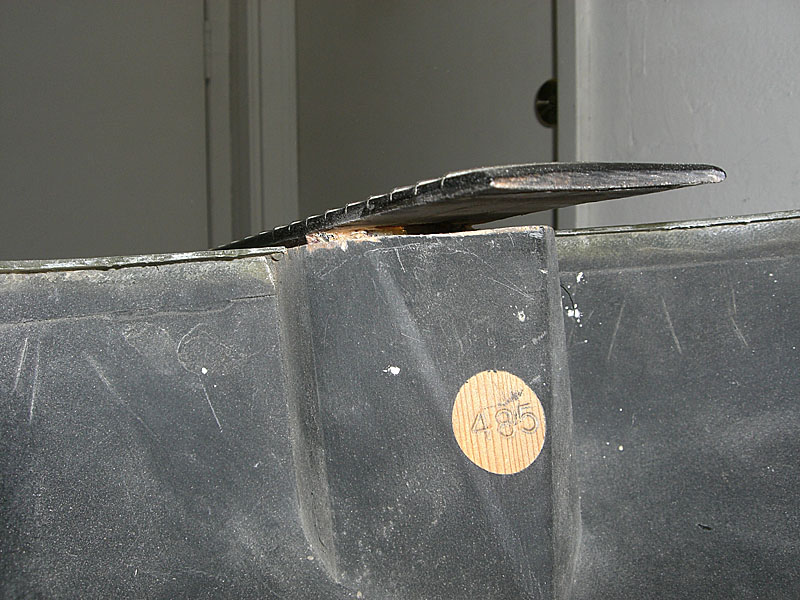
Joined: November 2002 Posts: 3646 Location: Pacific Northwest Inland Empire | Daily progress report. The center fissure has been significantly reduced (yippee-skippy!), and filled with some epoxy. Will scrape it flat tomorrow. put a patch under the crack near the soundhole on the treble-side. Replaced the binding at the fret extension arch. Currently, gluing in a patch under the bass-side lower bout edge. I have decided to go with wood bindings- mahaogany, walnut & basswood. I was tempted to get some herringbone strips, but that would be too "busy". (left lower crack repair 1- smaller image.jpg) Attachments ---------------- left lower crack repair 1- smaller image.jpg (99KB - 1 downloads) | ||
| |||
| arumako |
| ||
Joined: October 2012 Posts: 1072 Location: Yokohama, Japan | WOW! Maestro seesquare that is impressive work. Love your homemade clamps. Hope you keep that retro-look because in this case it's not just a 'look'! Beautiful! Edited by arumako 2022-01-18 7:56 PM | ||
| |||
| Love O Fair |
| ||
Joined: February 2016 Posts: 1846 Location: When?? | What is the wire going into the sound hole? | ||
| |||
| seesquare |
| ||
Joined: November 2002 Posts: 3646 Location: Pacific Northwest Inland Empire | I guess that's the concensus, Ken- "warts-&-all". Been drop-filling 6 cracks in the top today with Superglue (yeah, the actual brand). Slow process, but it will eventually get the top smoothed out. Probably be at this for a couple of days, I imagine. Also found the tip of the upper, bass-side x-brace needed a spot of glue, so that got done. (dropfill 1- smaller image.jpg) Attachments ---------------- dropfill 1- smaller image.jpg (85KB - 0 downloads) | ||
| |||
| seesquare |
| ||
Joined: November 2002 Posts: 3646 Location: Pacific Northwest Inland Empire | Uh, yeah, the wire. That is a small droplight I use to help line up the gluing cauls & clamps. There is also a mirror in there that is about 7x8-inches, unfolded. | ||
| |||
| Love O Fair |
| ||
Joined: February 2016 Posts: 1846 Location: When?? | How are the nicks and nacks on the bowl? I remain curious as to how well a shiny bowl can be buffed out when any abrasive and/or otherwise intrusive actions may have to be taken upon said nicks and nacks. | ||
| |||
| seesquare |
| ||
Joined: November 2002 Posts: 3646 Location: Pacific Northwest Inland Empire | Pretty much got the cracks filled & went over the top with some 150-grit sandpaper. This is probably as good as it gets, related to the oxymoronic "relieved distress". I will start the removal of the binding & cleaning up the channels soon. Another excuse to go to the hardware store- need some new router bits for both the 1/8" Dremel & the 1/4" Craftsman. (sanded top 2- smaller image.jpg) (sanded top 1- smaller image.jpg) (bottoms up view- smaller image.jpg) (side view 2- smaller image.jpg) Attachments ---------------- sanded top 2- smaller image.jpg (67KB - 0 downloads) sanded top 1- smaller image.jpg (59KB - 0 downloads) bottoms up view- smaller image.jpg (55KB - 0 downloads) side view 2- smaller image.jpg (66KB - 0 downloads) | ||
| |||
| seesquare |
| ||
Joined: November 2002 Posts: 3646 Location: Pacific Northwest Inland Empire | Sorry, forgot to address the shiny bowl issue. I'm not sure how to approach any refurbishment on the scars, gouges & dings. The Mr. Clean Magic Eraser did a good job on the white paint scuffs, at least. I have quite a bit of work to do, before the bowl finish rises to the top of the restoration agenda. | ||
| |||
| seesquare |
| ||
Joined: November 2002 Posts: 3646 Location: Pacific Northwest Inland Empire | Managed to get a few images inside the bowl of the gluing repairs. Those little cameras are pretty tricky! There are a total of 3 patches- center-below-bridge, treble-side-by soundhole, & bass-side-lower-bout. Edited by seesquare 2022-01-19 4:18 PM (bass x-brace end- smaller image.jpg) (soundhole patch 2- smaller image.jpg) Attachments ---------------- bass x-brace end- smaller image.jpg (20KB - 0 downloads) soundhole patch 2- smaller image.jpg (16KB - 0 downloads) | ||
| |||
| seesquare |
| ||
Joined: November 2002 Posts: 3646 Location: Pacific Northwest Inland Empire | Glued in the lower cross strip in the bottom end (I hesitate to call it a brace, it's so thin). Used a couple of my welding magnets & flat steel strips to clamp it in place. Fabricated a new saddle- boy, that is REALLY time-consuming! Since it is black, I surmise I am committed to making the nut black, also. That's about it for the day. Makin' progress. Addendum: I'm not real sure what the saddle material is. It doesn't smell like bone, and had a faint odor like rubber, at times. Is that micarta? There is no grain structure to it, either. Apparently, has some flexibility, but it isn't soft. Needs some more finishing & polishing, to-be-sure. Edited by seesquare 2022-01-20 9:02 PM (interior crossbrace gluing- smaller image.jpg) (new saddle 1- smaller image.jpg) (saddle & bridge 1- smaller image.jpg) (new saddle 4- smaller image.jpg) Attachments ---------------- interior crossbrace gluing- smaller image.jpg (78KB - 0 downloads) new saddle 1- smaller image.jpg (92KB - 0 downloads) saddle & bridge 1- smaller image.jpg (84KB - 0 downloads) new saddle 4- smaller image.jpg (98KB - 0 downloads) | ||
| |||
| seesquare |
| ||
Joined: November 2002 Posts: 3646 Location: Pacific Northwest Inland Empire | So, whaddya think? Does this look acceptable for the replacement? I have limited graphics expertise, so this is essentially a cut-&-paste job. On other fronts, the peghead scars & dents have been addressed, with a bit of Truoil to touch up the sanded areas. 3 coats, so far. I will see if I can iron out a few of the dents in the neck, itself. A little hot steam may do wonders on a few of those dents. (new label 1- smaller image.jpg) Attachments ---------------- new label 1- smaller image.jpg (52KB - 0 downloads) | ||
| |||
| moody, p.i. |
| ||
Joined: March 2002 Posts: 15674 Location: SoCal | Lookin' good Billy Ray....... Edited by moody, p.i. 2022-01-21 11:48 PM | ||
| |||
| seesquare |
| ||
Joined: November 2002 Posts: 3646 Location: Pacific Northwest Inland Empire | Feeling good, Louis! | ||
| |||
| seesquare |
| ||
Joined: November 2002 Posts: 3646 Location: Pacific Northwest Inland Empire | So, Esteemed Colleagues, and others with an opinion, what approach & process would you suggest in refinishing the bowl? I'm thinking a careful wet-sanding with about 600->1200-grit paper, then shoot it with some gloss black enamel. Not sure lacquer would mate well with the present finish. Some of the scratches are bordering on gouges, so some moderate filling may be required. There is evidence the bowl was repainted, at some time, as the sides are dead-smooth & truly shiny, while the bottom surface has a slight orange-peel pattern, like it was shot with a rattle can. Addendum: Yes, there is a small hole in the upper, bass-side bowl area. I have no idea what that was designed to do. I may try to fill it, as the whole bowl is being refinished, anyway. Edited by seesquare 2022-01-22 2:24 PM (lower bowl scuffs- smaller image.jpg) (upper bowl scuffs- smaller image.jpg) (whole bowl scuffs- smaller image.jpg) Attachments ---------------- lower bowl scuffs- smaller image.jpg (75KB - 0 downloads) upper bowl scuffs- smaller image.jpg (71KB - 0 downloads) whole bowl scuffs- smaller image.jpg (74KB - 0 downloads) | ||
| |||
| Love O Fair |
| ||
Joined: February 2016 Posts: 1846 Location: When?? | It seems the label looks as good as any you're going to find. Maybe you could experiment with different types of paper if you're interested in the aged look or something more custom than straight white. I am a paper collector, so let me know if you want me to ship you some of anything I... may... have here to suit. By what has been seen from your bench in the past I'm sure we all have faith that you and your skills can prep the bowl to a very nice surface. What type of spray rig do you have to use at your place? Recall when Patch sent a guitar to an auto body shop for a finish-up. My parents also once had a refrigerator shot at a body shop for a custom color and high gloss which turned out perfect to what they wanted. Just a thought should you be accepting of outside hands on your project. Edited by Love O Fair 2022-01-22 3:14 PM | ||
| |||
| seesquare |
| ||
Joined: November 2002 Posts: 3646 Location: Pacific Northwest Inland Empire | Thanks for the input, Al! In keeping with the spirit of the "primal" BFLG, I am economizing on everything, as evidenced by the crude tools & fabrications. I expect I will shoot the bowl with a good grade of rattle can gloss black. I wish I did have a good paint rig & dedicated spray booth! I just close up the workspace overnight, let all the dust settle, then shoot the 1st coat, first-thing-in-the-morning. Leave it at least 24 hours, sand it out, and recoat. Repeat 'til I'm happy with the finish. Then, not touch it for about a week. Same plan for the top, too. Except that will be a clearcoat. Haven't decided if it will be a gloss or semi-gloss, at this juncture. BTW, the clothes iron & wet rag did a pretty decent job of lifting the dents in the neck. I have drop-filled a few of the more recalcitrant dings, leveled it out with 320 emery cloth, and now working it over with some 1200-grit, dry. Should be applying the clearcoat pretty soon. Another aspect that gets redone, then not touched for a while, 'til the finish hardens up pretty well. As y'all can see, I'm procrastinating on the binding replacement. Oh, and thanks for the paper suggestion. SWMBO is a greeting & holiday cardmaker, of an accomplished nature, and definitively the resident artist in this abode. She has almost an unlimited variety of paper goods to choose from. Too bad she couldn't reproduce the Ovation logo for the label. Edited by seesquare 2022-01-22 8:40 PM | ||
| |||
| Love O Fair |
| ||
Joined: February 2016 Posts: 1846 Location: When?? | "recalcitrant" - Dang. Had to look that one up. | ||
| |||
| arumako |
| ||
Joined: October 2012 Posts: 1072 Location: Yokohama, Japan | seesquare - 2022-01-22 10:33 AM I expect I will shoot the bowl with a good grade of rattle can gloss black. I wish I did have a good paint rig & dedicated spray booth! I just close up the workspace overnight, let all the dust settle, then shoot the 1st coat, first-thing-in-the-morning. Leave it at least 24 hours, sand it out, and recoat. Repeat 'til I'm happy with the finish. Then, not touch it for about a week. Same plan for the top, too. Except that will be a clearcoat. Haven't decided if it will be a gloss or semi-gloss, at this juncture. Making really good progress seesquare! Thanks for sharing. I'm no finishing wizard, but polyurethane car paint has worked really well for me (especially on fiberglass parts) and it can be polished to a sparkly sheen with automotive waxing compounds. I know what you mean about keeping your work within a BFLG-ish budget; but IMHO, if you can get access to air brushing equipment that would really increase your chances of succeeding with a gloss finish. Gloss or not, she's gonna be a killer restoration! | ||
| |||
| seesquare |
| ||
Joined: November 2002 Posts: 3646 Location: Pacific Northwest Inland Empire | Okay Ken, I might be open to investing in some airbrush equipment. As my sainted father always instructed, "There's no substitute for the right tool." Do you have any suggestions or recommendations? I do have a 3-gal compressor for an air source. In keeping with the "BFLG-ish" budget constraints, of course! Edited by seesquare 2022-01-23 6:45 AM | ||
| |||


| Jump to page : < 1 2 3 4 5 6 7 8 ... > Now viewing page 3 [25 messages per page] |
| Search this forum Printer friendly version E-mail a link to this thread |
| This message board and website is not sponsored or affiliated with Ovation® Guitars in any way. | |
| (Delete all cookies set by this site) | |