| The Ovation Fan Club | ||
| ||
| Random quote: "One good thing about music, when it hits you, you feel no pain." - Bob Marley |
 1967 Balladeer Rebuild... 1967 Balladeer Rebuild...
| View previous thread :: View next thread | |
| Member Communities -> Bottom Feeding Luthiery Guild | Message format | |
| DanSavage |
| ||
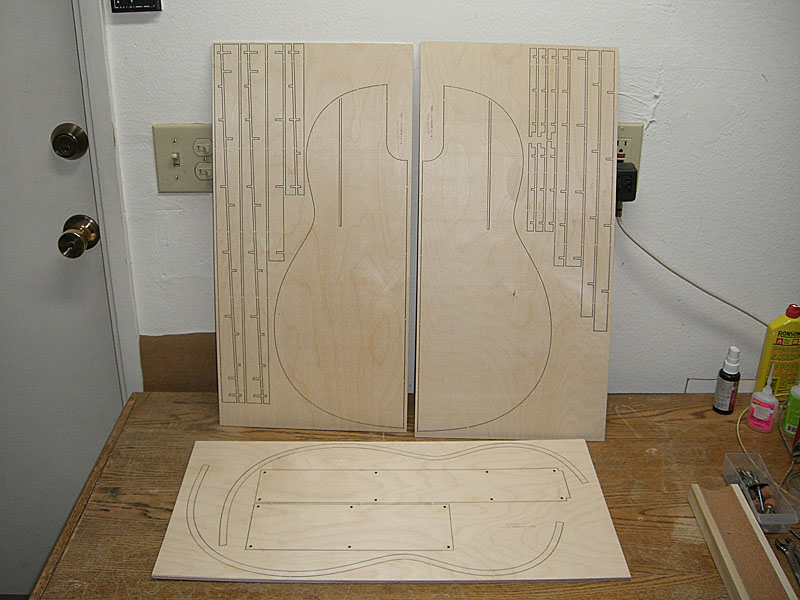
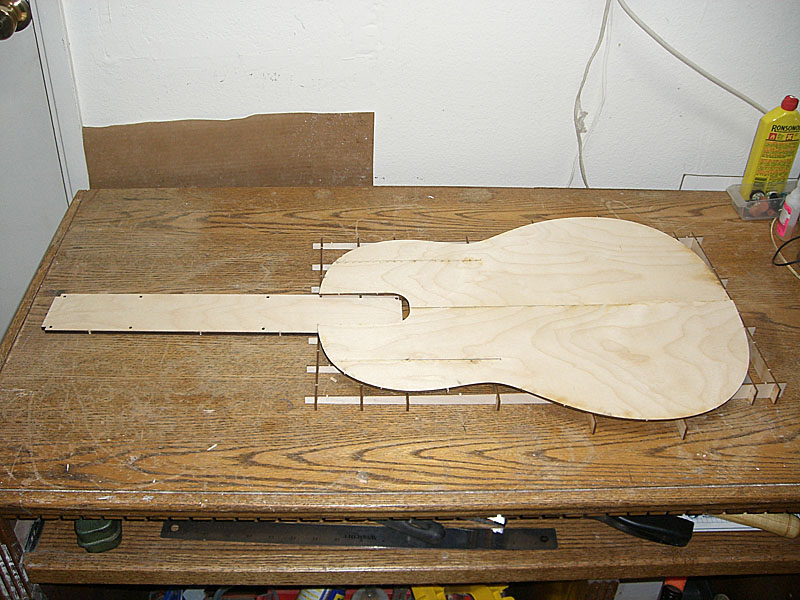
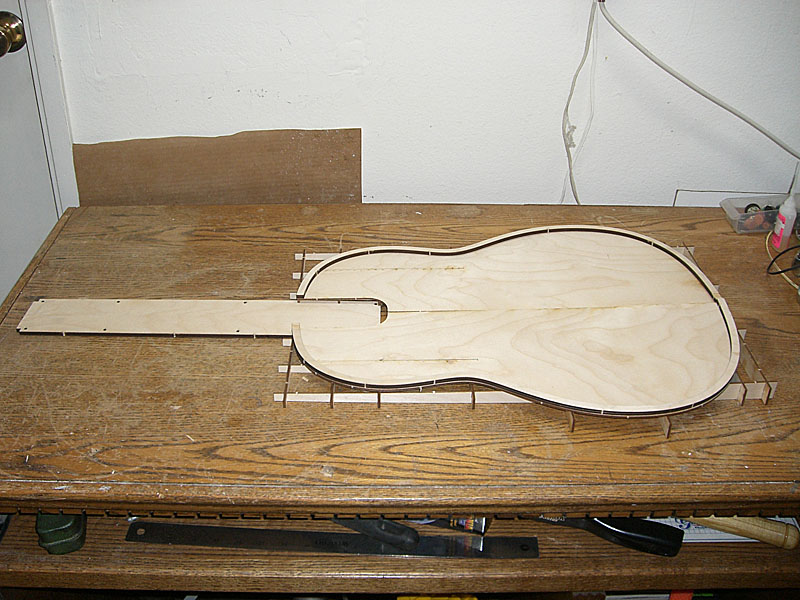
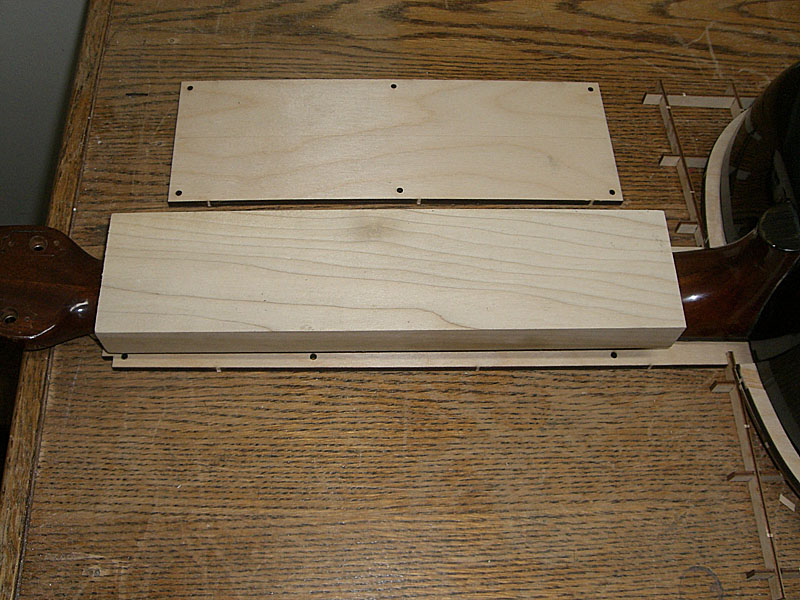
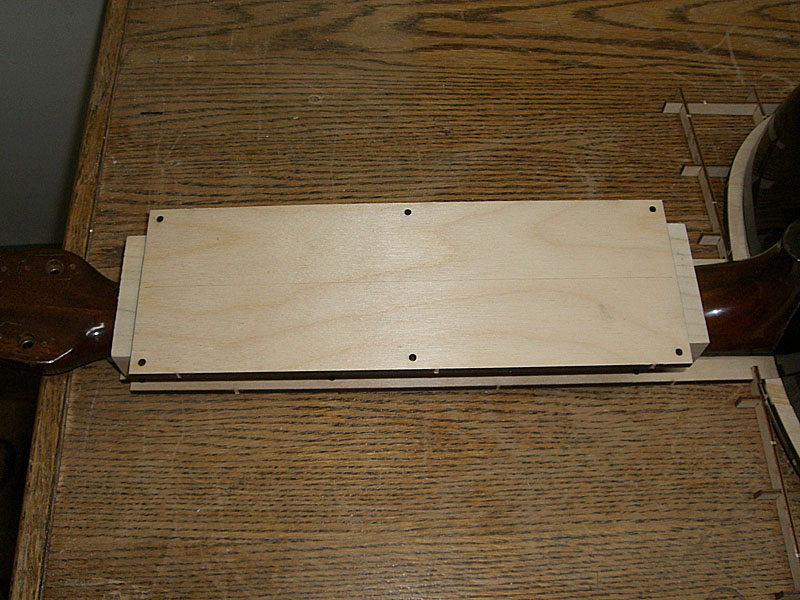
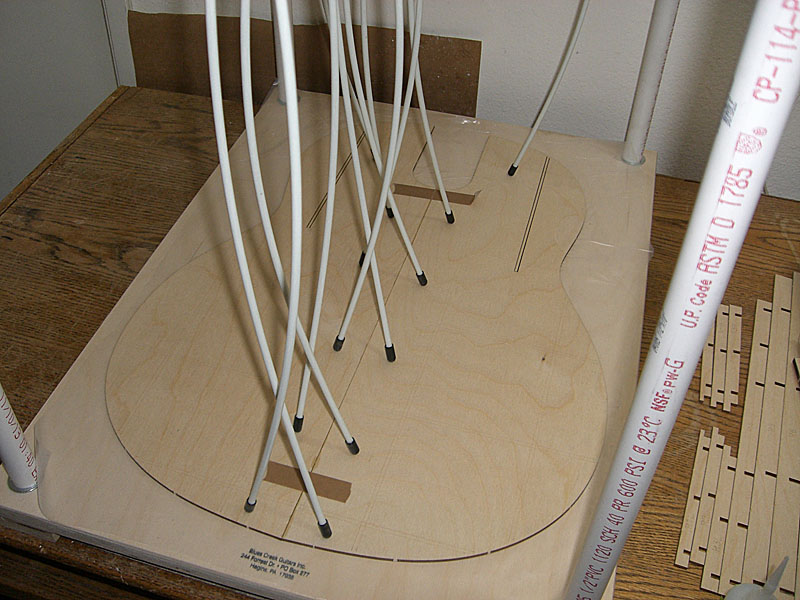
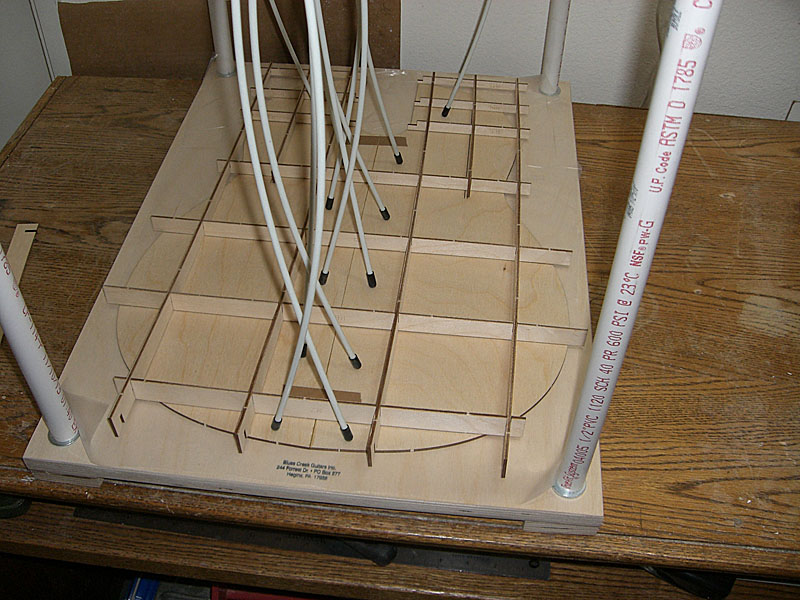
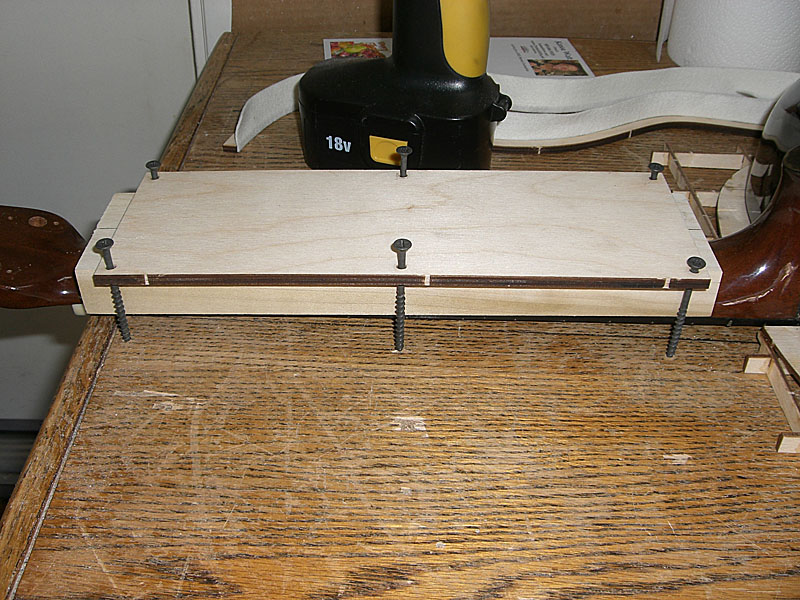
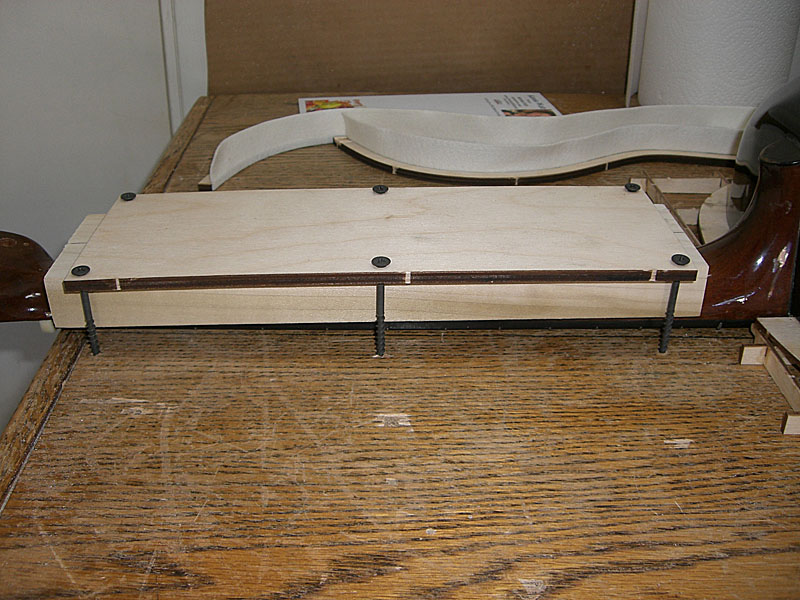
Joined: June 2012 Posts: 2303 Location: Lake Forest, CA | My laser cutting guy was able to turn around the order very quickly. I got the parts today.
This next pic shows the 1-1/2 degree angle of the 'table' top.
I slid the neck base into place.
| ||
| |||
| arumako |
| ||
Joined: October 2012 Posts: 1018 Location: Yokohama, Japan | Wow, that was quick! Laser cutting and CNC routing make wood working so much easier nowadays. Immaculate planning and preparation DanSavage! Will bowl bends work on old hand laid fiberglass bowls as well as new molded bowls? Once the bowl bend is complete, how long does it take to cool off and set into its new position permanently? Don't mean to pester you with questions, but this is really interesting stuff! Edited by arumako 2014-11-06 6:44 AM | ||
| |||
| marenostrum |
| ||
Joined: August 2007 Posts: 1008 Location: Tuscany, Italy | Dan you are a great source of ideas. Whatever it turns out, it will be a success. Edited by marenostrum 2014-11-06 11:45 AM | ||
| |||
| danomyte |
| ||
Joined: January 2014 Posts: 402 Location: Taxed To Death State | Dan, man not only is your work, your home made jigs, fixtures, and ingenuity amazing, your attention to detail in writing these posts is incredible. Doing an extensive rebuild like this is engineering art, and your posts are no less impressive. I dream of having the time and patience you have. Kudos Dan. Just f'n awsome stuff. | ||
| |||
| DanSavage |
| ||
Joined: June 2012 Posts: 2303 Location: Lake Forest, CA | Hi Arumako, Yeah, I wasn't expecting to get the parts until the end of this week or the beginning of next week. Sometimes he's able to squeeze these little jobs in. Fiberglass resin is plastic. Not the same type of plastic as say, ABS or polystyrene, but it's still plastic. And all plastics can be made to deform with heat. So, in theory, both old hand-laid bowls and the SMC bowls can be deformed. The hand-laid bowls are probably trickier because they're thinner and heat up more quickly which makes it easier to overshoot the maximum temperature. The TG or translation temperature (basically, the temperature at which the resin softens) on resin depends on the maximum temperature used during the curing process. The higher the curing temperature, the more heat-resistant the part. Room-temperature curing usually results in a TG temperature of around 160-180 degrees. SMC bowls are formed in molds heated to 300-degrees. Naturally, the SMC bowl would require higher temps than a hand-laid, room-temp cured bowl. Since this guitar is hand-laid cloth that's been vacuum-bagged, there's a minimum of resin. This means that I'll need to be very careful and monitor the temperature of the bowl very closely to prevent overheating the resin. Cooling times will vary, but generally the part only needs to cool to room temperature for the resin to take the new set. There is a little spring-back, but I'm planning to leave the guitar in the jig for 24 hours or so just to make sure the resin takes the new set. If it springs back too far, then I'l try another shot. I don't want to attempt this too many times because I'm afraid of crystallizing the resin. Luckily, I've got a small piece of molded fiberglass used as a reinforcement of the A-braces on my 1617. I'm going to pop that off the braces, then experiment with that before going after 485's bowl. This should give me a good idea of what kind of temperature and what effect the heat has on the molded part. Dan arumako - 2014-11-06 4:38 AM Wow, that was quick! Laser cutting and CNC routing make wood working so much easier nowadays. Immaculate planning and preparation DanSavage! Will bowl bends work on old hand laid fiberglass bowls as well as new molded bowls? Once the bowl bend is complete, how long does it take to cool off and set into its new position permanently? Don't mean to pester you with questions, but this is really interesting stuff! | ||
| |||
| DanSavage |
| ||
Joined: June 2012 Posts: 2303 Location: Lake Forest, CA | Thanks, Riccardo. I'll consider it a success if when I'm done I'm able to send back to Jay, a nice sounding, nice playing, nice looking guitar.  Dan maremagnum - 2014-11-06 9:42 AM Dan you are a great source of ideas. Whatever it turns out, it will be a success. | ||
| |||
| DanSavage |
| ||
Joined: June 2012 Posts: 2303 Location: Lake Forest, CA | Thanks, for the kind words, Dan. :D danomyte - 2014-11-06 11:56 AM Dan, man not only is your work, your home made jigs, fixtures, and ingenuity amazing, your attention to detail in writing these posts is incredible. Doing an extensive rebuild like this is engineering art, and your posts are no less impressive. I dream of having the time and patience you have. Kudos Dan. Just f'n awsome stuff. | ||
| |||
| DanSavage |
| ||
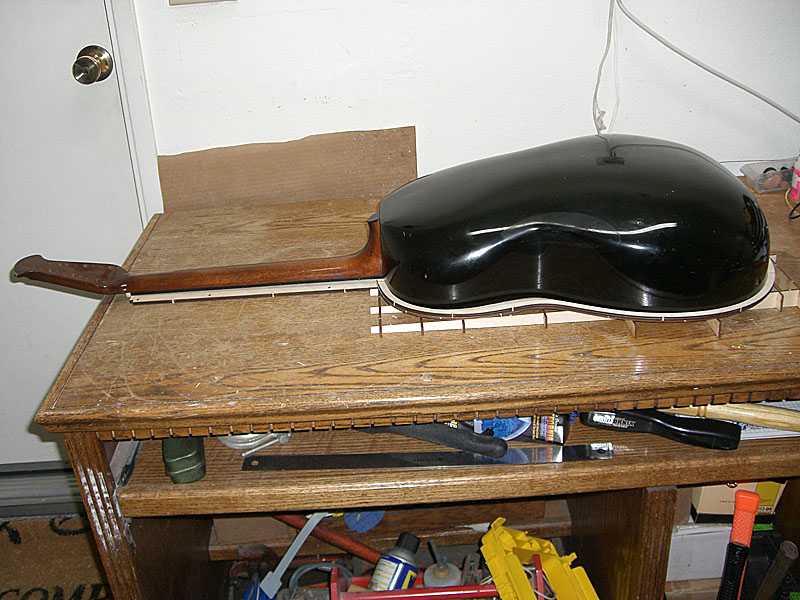
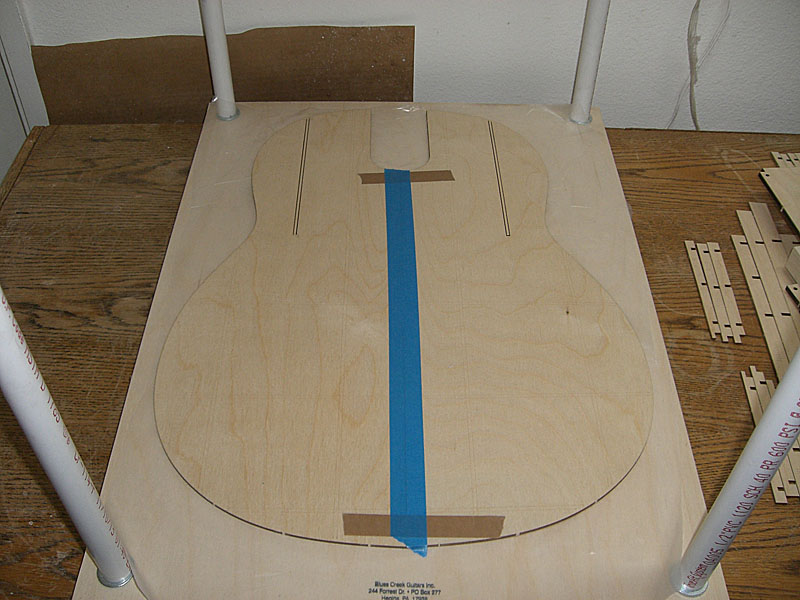
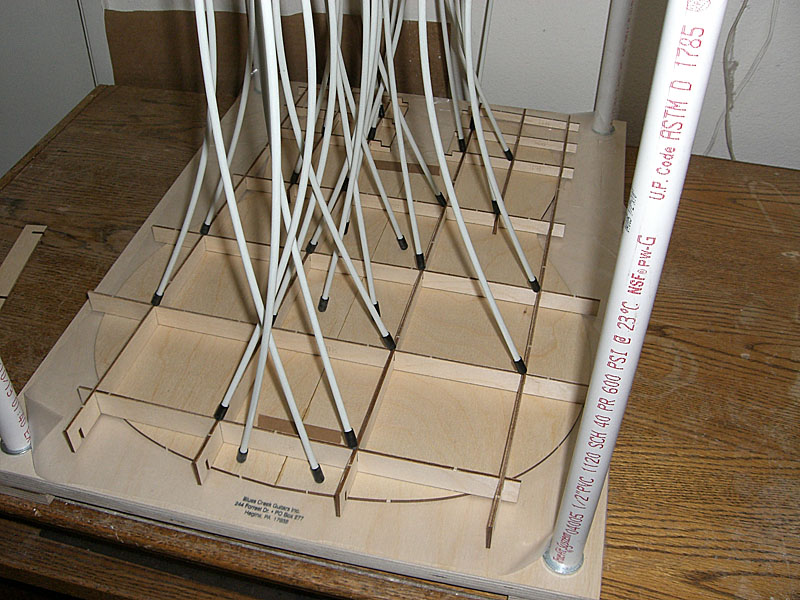
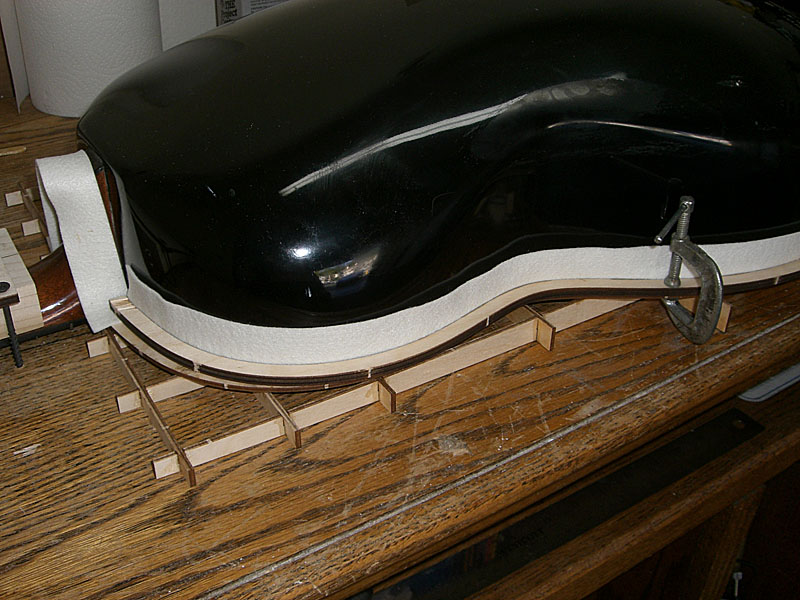
Joined: June 2012 Posts: 2303 Location: Lake Forest, CA | It's been a few weeks since my last post.
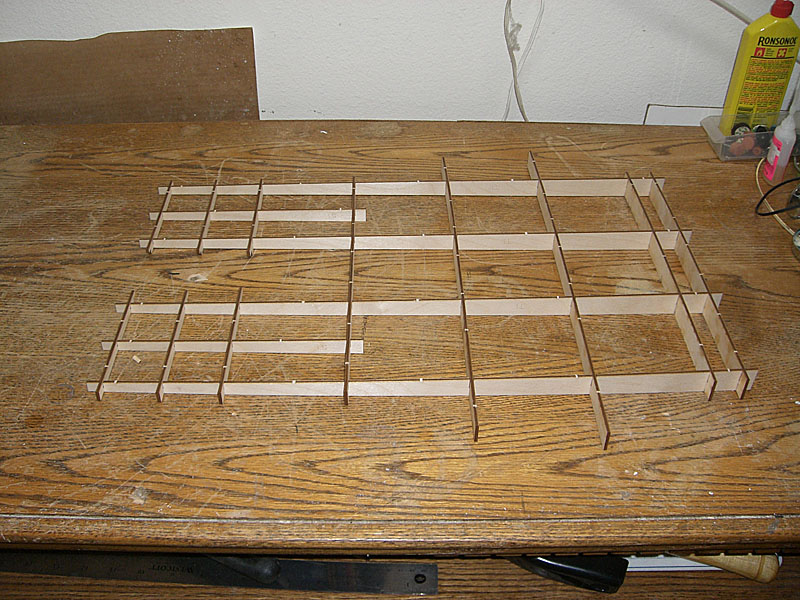
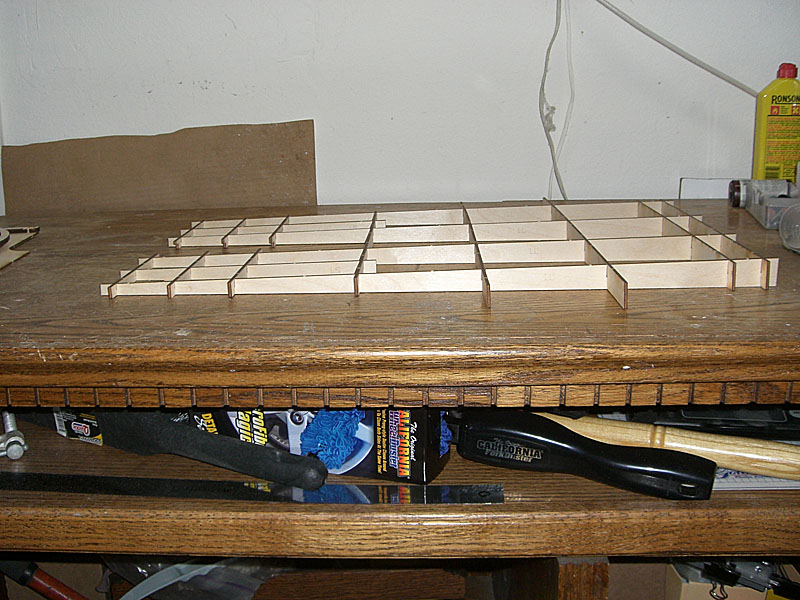
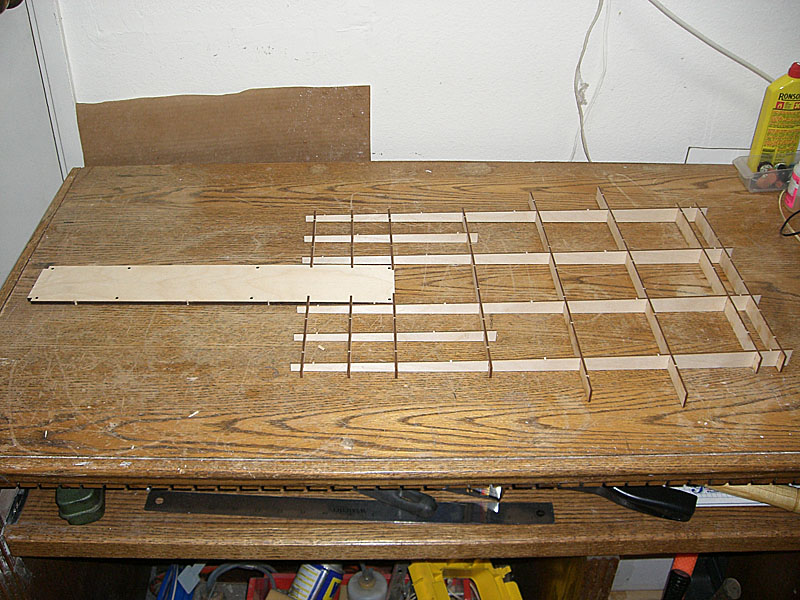
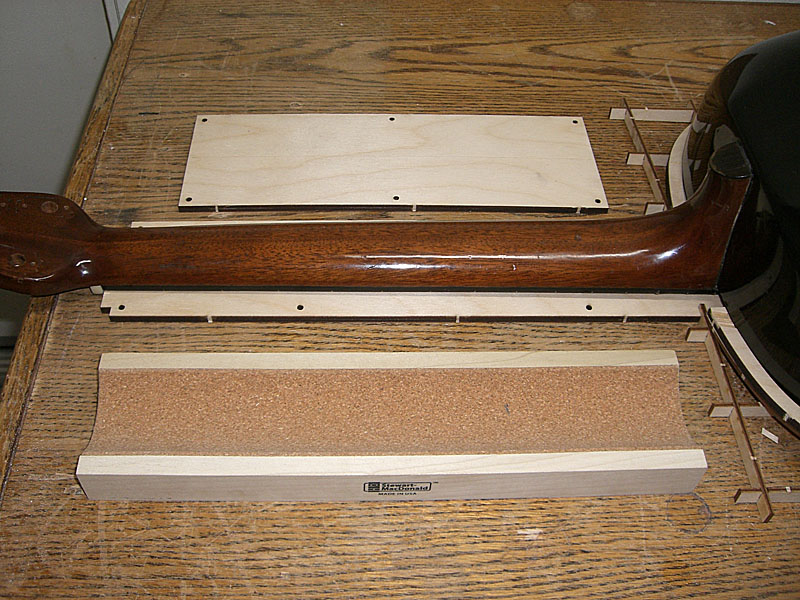
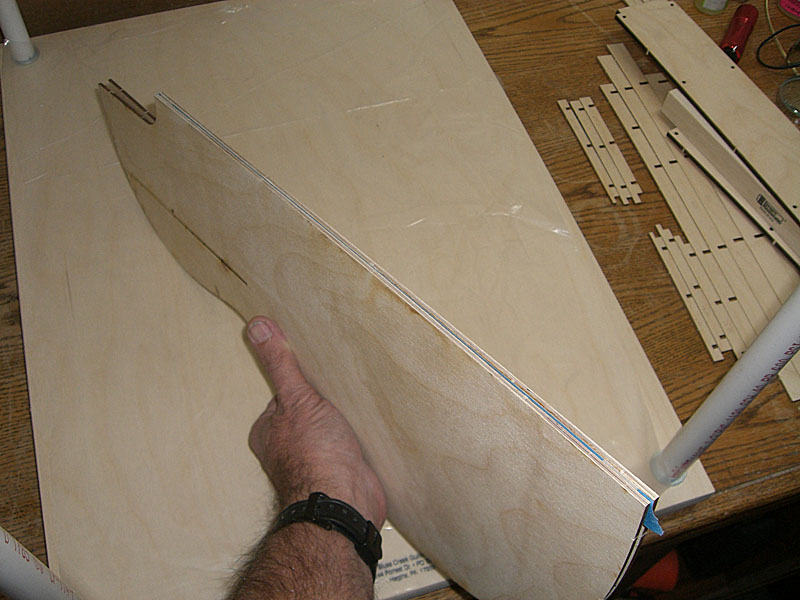
After all the glue joints were kicked, I laid the deck on each side so I could glue the lattice joints for extra strength.
The heat shields were clamped into place and an extra strip was used to protect the neck to body joint. These were only used during the first heating session. I actually found I didn't need to use the heat shields, so these were omitted during later heating sessions. | ||
| |||
| jay |
| ||
Joined: January 2009 Posts: 1249 Location: Texas | Nothing but incredibly awesome. So were you suprised that the bowl could take that much heat? Did you guess at the time the bowl needed to be heated, or could you visually gauge movement?
| ||
| |||
| moody, p.i. |
| ||
Joined: March 2002 Posts: 15652 Location: SoCal | This is so cool.... | ||
| |||
| arumako |
| ||
Joined: October 2012 Posts: 1018 Location: Yokohama, Japan | Man, that is good stuff DanSavage! Incredibly thoughtful and informative. 210 to 230 degrees is way up there... this Lyrachord stuff is pretty incredible stuff isn't it? Just awesome! | ||
| |||
| Mark in Boise |
| ||
Joined: March 2005 Posts: 12750 Location: Boise, Idaho | Love it. | ||
| |||
| moody, p.i. |
| ||
Joined: March 2002 Posts: 15652 Location: SoCal | Ok, I've got a couple of questions. First, how is the body of the guitar secured down, or is it? Second, when you heat the bowl, are you slowly applying pressure on the upper bout of the bowl, pushing it down to close the gap between the table and the top, which would push the neck back into proper alignment? Do I have that right? I'm looking forward to playing this guitar before it goes back to Texas...... | ||
| |||
| DanSavage |
| ||
Joined: June 2012 Posts: 2303 Location: Lake Forest, CA | amosmoses - 2014-11-23 7:02 PM Nothing but incredibly awesome. So were you suprised that the bowl could take that much heat? Did you guess at the time the bowl needed to be heated, or could you visually gauge movement?
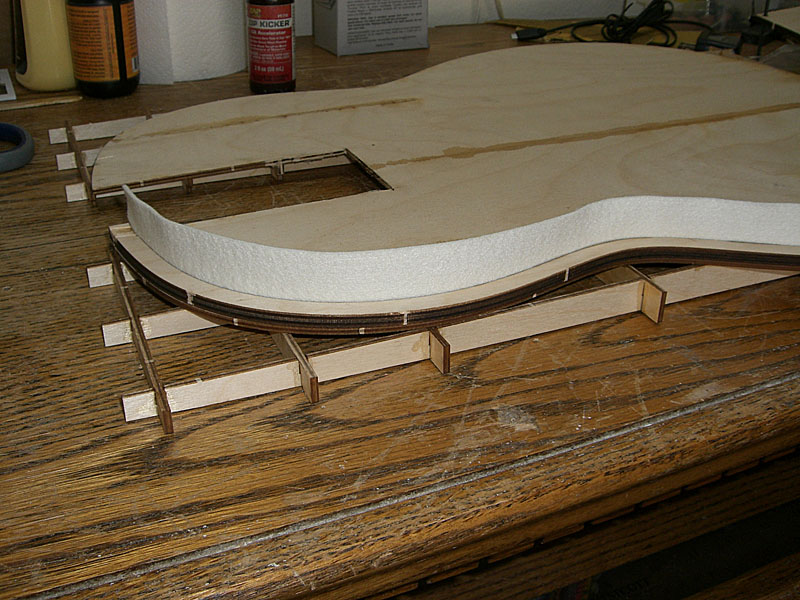
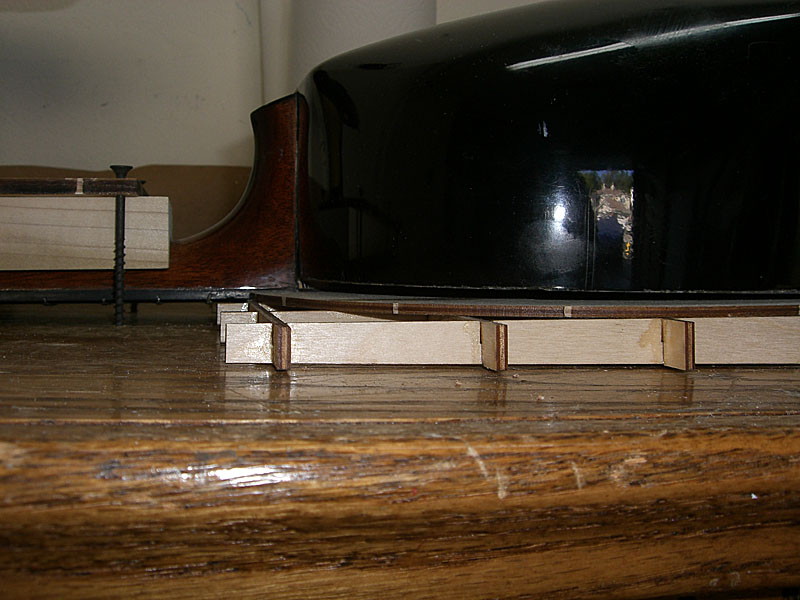
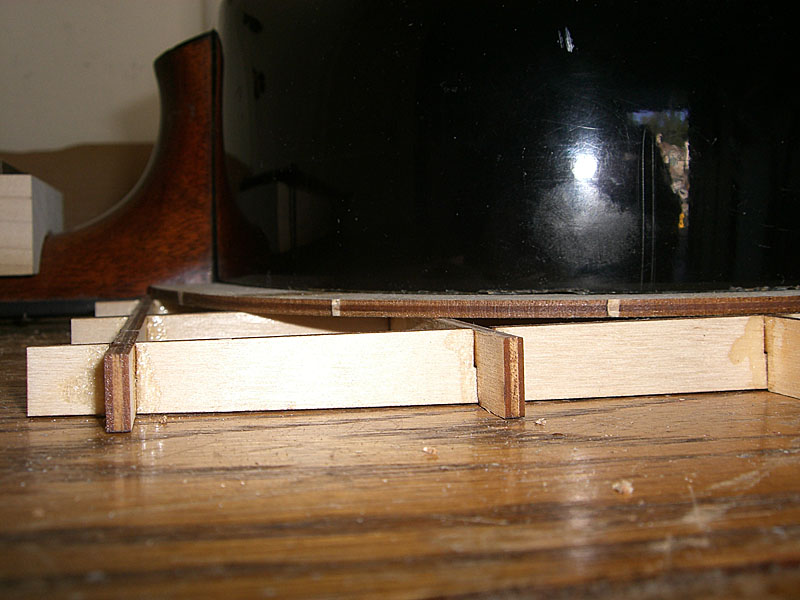
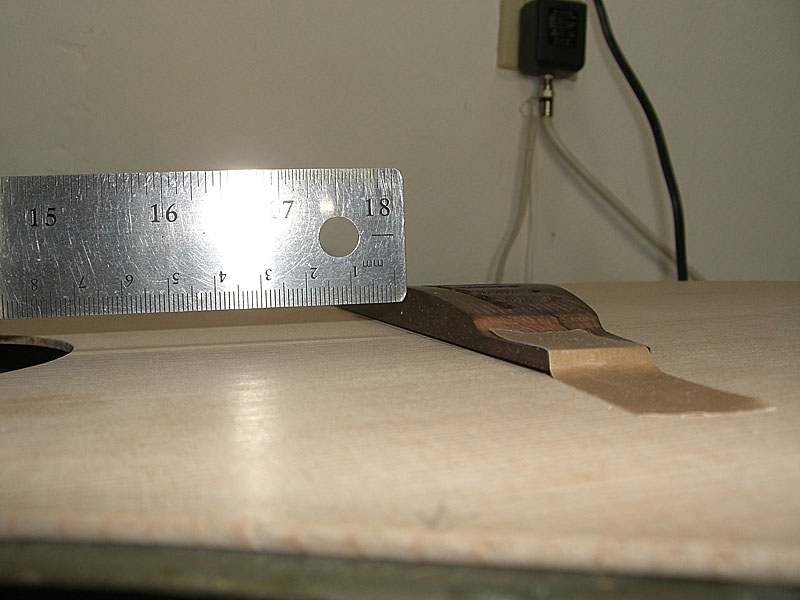
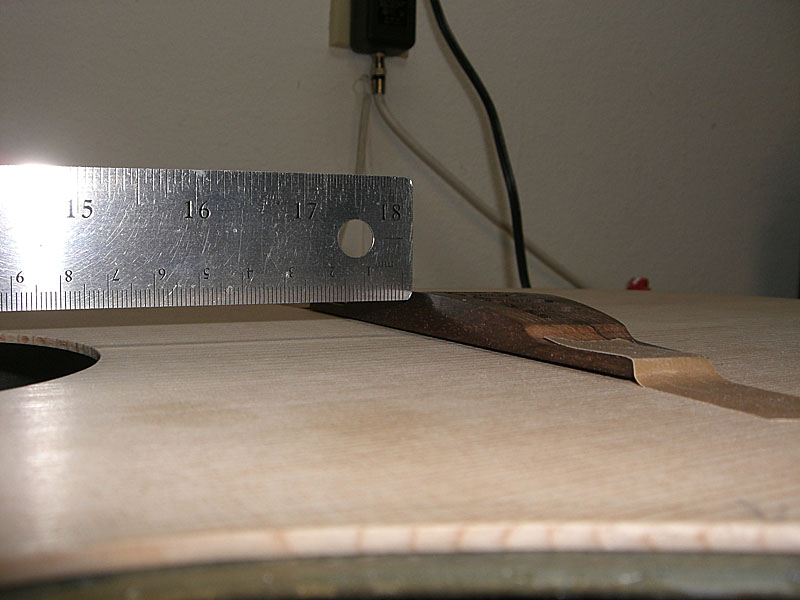
Thanks, Jay. Actually, I had no idea how much heat it was going to take because I didn't know what brand of epoxy was used during the lay-up. Generally speaking, epoxy used in a room-temperature lay-up has a Tg (glass transition temperature) of about 170° F or so. The Tg represents the temperature where the resin transitions from a solid state to a rubbery state. The Tg is determined by the initial curing temperature. If you know the piece is going to be used in an environment experiencing elevated temperatures, then you post cure the piece at a temperature of about 30° F higher than what you expect it to be. Post curing is done inside a hot box where the temps are raised a little at a time over the course of several hours up to the max temp, then kept there for a set period, and then brought down gradually so the piece doesn't warp. Post curing is usually done inside the mold, again, so the molded piece doesn't warp. Needless to say, in such cases, the mold is post cured before it's used to lay up any parts. Some epoxies are so-called high-temp epoxies that can be post cured up to 300°-400° F. That's usually about the limit an epoxy can take. If you want higher temps you need to move to different chemistry of resins. Getting back to the bowl, I wasn't sure what the Tg would be so I started at 160° F. I also didn't know what how much of the bowl would need to be heated to realign the neck. During the dry runs, I could see the area around the upper bout where the neck joint was warping, but I didn't think just heating this area would have the desired effect. At first, I clamped the neck, heated up sides of the upper bout, down to the waist area, then let it cool back to ambient temperature. Once it was cooled, I removed the clamps and checked alignment and didn't really see any perceptible change. So, I repeated the cycle raising the temps until I did see an effect. Once I found that the temp that the glass needed to be heated to effect a permanent change, (~200° F) I just worked to get the areas heated to that temperature. Rather than attempt to bend the bowl all at once, I effected the changes a little bit at a time. If you look closely at the clamped bowl pic, you can see the top of the bowl is about 1/2" or so from the table top. With each heating/cooling cycle I gradually moved the bowl down the table top to keep increasing the neck angle. By the last cycle the upper bout overhang the table top by about 1/4". | ||
| |||
| DanSavage |
| ||
Joined: June 2012 Posts: 2303 Location: Lake Forest, CA | arumako - 2014-11-24 6:15 AM Man, that is good stuff DanSavage! Incredibly thoughtful and informative. 210 to 230 degrees is way up there... this Lyrachord stuff is pretty incredible stuff isn't it? Just awesome! Thanks, Arumako. Like I've said before, Lyrachord is just a name Ovation marketing gave to the fiberglass bowls. By itself, there's nothing special about the fiberglass they used. The SMC bowls are made from the same materials as Corvette body panels and both use the same heated compression molds to make the parts. Speaking of Corvettes, it should come as no surprise to anyone what kind of car I drive.
Edited by DanSavage 2014-11-24 11:28 AM | ||
| |||
| DanSavage |
| ||
Joined: June 2012 Posts: 2303 Location: Lake Forest, CA | immoody - 2014-11-24 8:55 AM Ok, I've got a couple of questions. First, how is the body of the guitar secured down, or is it? Second, when you heat the bowl, are you slowly applying pressure on the upper bout of the bowl, pushing it down to close the gap between the table and the top, which would push the neck back into proper alignment? Do I have that right? I'm looking forward to playing this guitar before it goes back to Texas...... The body isn't secured to the 'table', per se. Rather, the table top raises the body above the work bench at a 1-1/2° angle, which is the angle needed to restore the neck geometry. Clamping the neck down to the workbench pulls the body down into full contact with the angled table. Because the bowl is flexible, clamping the neck distorts the bowl by the desired amount. Heating it, then cooling it causes the resin to take a new set. Since I wasn't heating the bowl to fully melt the resin, it retained some 'springiness', which when the pressure was relaxed caused it to pull back a little bit. This springiness is what required several heating/cooling cycles to walk the neck back into alignment. The last thing I wanted to do overheat the resin and cause the bowl or sides to sag, or worse, potato chip. Sounds good. Once I get it finished, we'll get together so you can play it. I know I would really like to try your 1537 and/or your 1987 CE, neither of which I've ever played and both of which I would like get an earful. | ||
| |||
| moody, p.i. |
| ||
Joined: March 2002 Posts: 15652 Location: SoCal | Sounds good Dan. When the factory was up and running, they had one guy in the repair shop who did bowl bends. Don't know if he still does them or how they were done. | ||
| |||
| DanSavage |
| ||
Joined: June 2012 Posts: 2303 Location: Lake Forest, CA | That's interesting to know. If I were to do this in a production environment, I would use several IR heat lamps instead of a single heat gun. This would allow the tech to heat a whole area of the bowl at once instead of slowly passing the heat gun over small sections. This would also allow the tech to better control over the temperature. It's pretty easy to overheat a section by lingering too long in one spot. | ||
| |||
| moody, p.i. |
| ||
Joined: March 2002 Posts: 15652 Location: SoCal | Wish you had been able to do this about 10 years ago. I had a 1763 that needed a neck reset and was told the factory couldn't do it. I still miss that guitar. | ||
| |||
| moody, p.i. |
| ||
Joined: March 2002 Posts: 15652 Location: SoCal | DanSavage - 2014-11-24 9:27 AM arumako - 2014-11-24 6:15 AM Man, that is good stuff DanSavage! Incredibly thoughtful and informative. 210 to 230 degrees is way up there... this Lyrachord stuff is pretty incredible stuff isn't it? Just awesome! Thanks, Arumako. Like I've said before, Lyrachord is just a name Ovation marketing gave to the fiberglass bowls. By itself, there's nothing special about the fiberglass they used. The SMC bowls are made from the same materials as Corvette body panels and both use the same heated compression molds to make the parts. Speaking of Corvettes, it should come as no surprise to anyone what kind of car I drive.
It's not a Mustang Bullitt, but not bad regardless...... | ||
| |||
| seesquare |
| ||
Joined: November 2002 Posts: 3599 Location: Pacific Northwest Inland Empire | "It's not a Mustang Bullitt, but not bad regardless......" Wrong town. That would be Frisco. Nice work, Dan. The IR lamp scenario would be ideal. Persevere! | ||
| |||
| DanSavage |
| ||
Joined: June 2012 Posts: 2303 Location: Lake Forest, CA | immoody - 2014-11-24 11:03 AM Wish you had been able to do this about 10 years ago. I had a 1763 that needed a neck reset and was told the factory couldn't do it. I still miss that guitar. IMO, the bowl bend success would probably be limited to hand-laid bowls. The SMC bowls would require so much heat that the paint on the bowl would bubble and scorch. | ||
| |||
| DanSavage |
| ||
Joined: June 2012 Posts: 2303 Location: Lake Forest, CA | immoody - 2014-11-24 11:04 AM It's not a Mustang Bullitt, but not bad regardless...... Thanks. My first car was a 1967 big-block Mustang coupe. (390cid) I really like the 2005-2010 Mustangs because they took a lot of their styling cues from the 1st generation. I rented a V6 convertible `Stang in 2005 and really liked how it drove. It felt light and nimble and was pretty peppy for a V6. Then, I rented a Shelby GTH in 2006 and it was really nice, too. When I was looking to replace my Chevy Astro last year, I seriously considered buying a Mustang convertible. In the end I decided on the Vette, mainly because I wanted a sports car. | ||
| |||
| DanSavage |
| ||
Joined: June 2012 Posts: 2303 Location: Lake Forest, CA | seesquare - 2014-11-24 11:35 AM Nice work, Dan. The IR lamp scenario would be ideal. Persevere! Thanks! | ||
| |||
| moody, p.i. |
| ||
Joined: March 2002 Posts: 15652 Location: SoCal | Dan, since 1996, Chevy has been building really great Vettes. Actually I'm not a fan of the new one, or the 2015 Mustang. Too busy looking on both, and I prefer the retro look of the pony. Your model Vette is one of the ones I really like..... | ||
| |||


| Jump to page : < 1 2 3 4 5 6 7 8 ... > Now viewing page 3 [25 messages per page] |
| Search this forum Printer friendly version E-mail a link to this thread |
| This message board and website is not sponsored or affiliated with Ovation® Guitars in any way. | |
| (Delete all cookies set by this site) | |