| The Ovation Fan Club | ||
| ||
| Random quote: "Believe me when I say that some of the most amazing music in history was made on equipment that's not as good as what you own right now." - Jol Dantzig |
 1967 Balladeer Rebuild... 1967 Balladeer Rebuild...
| View previous thread :: View next thread | |
| Member Communities -> Bottom Feeding Luthiery Guild | Message format | |
| DanSavage |
| ||
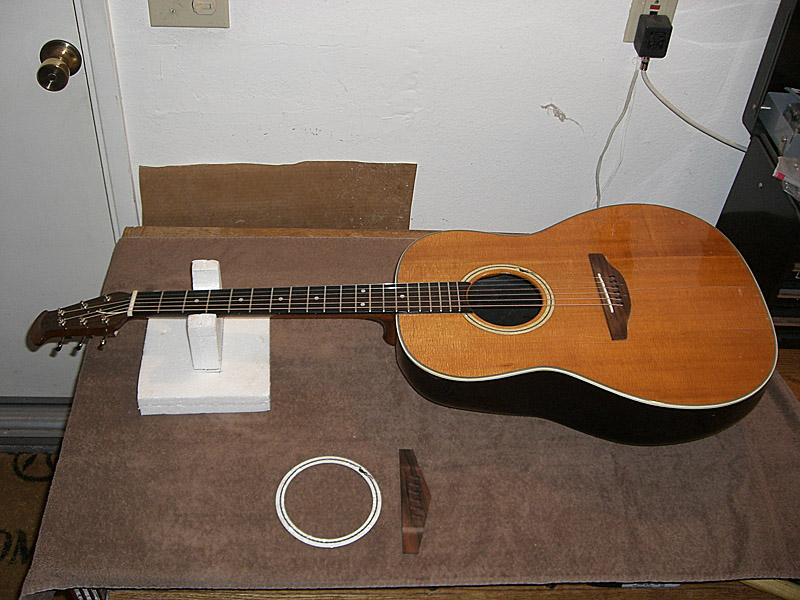
Joined: June 2012 Posts: 2332 Location: Pueblo West, CO | So, after my adventure rebuilding my 1619-4, Jay contacted me asking if I would like to take a stab at his 1967 Balladeer.
Also, for the 40th RI, it looks like they used the original printing plates because all the detail of the grapes seen in the original rosette is all but gone and all the lines are thicker, which is what happens as printing plates wear out.
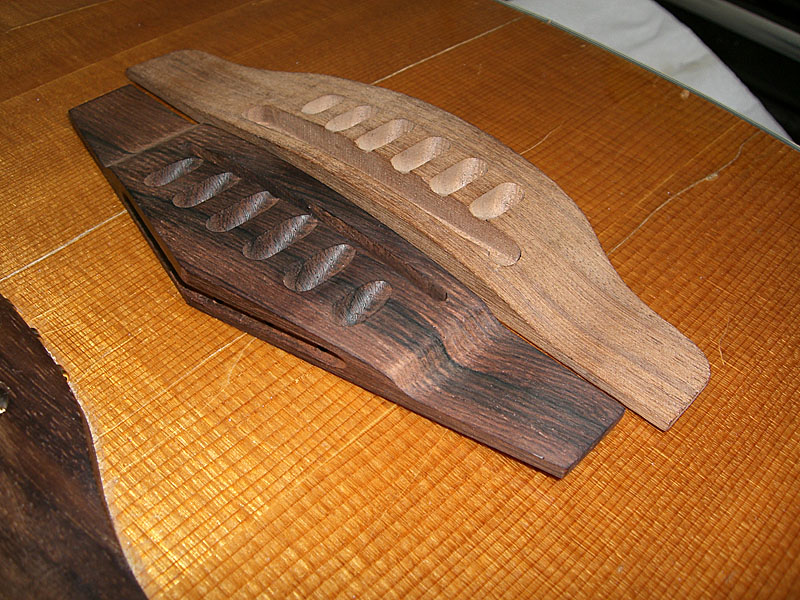
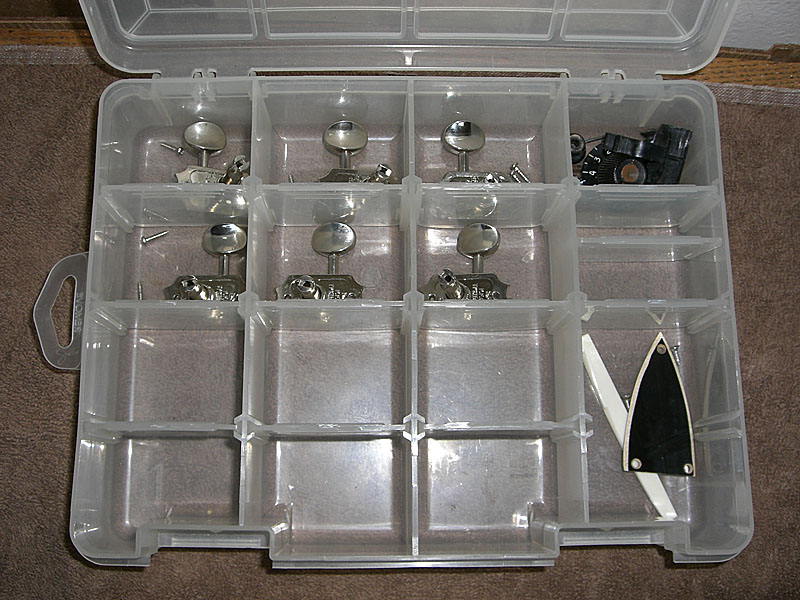
Jay already had a 5-point rosewood bridge, which he included in the guitar case when he shipped the guitar to me.
More to follow... | ||
| |||
| arumako |
| ||
Joined: October 2012 Posts: 1077 Location: Yokohama, Japan | Wow DanSavage! Another exciting project. Can't wait to follow your progress! As always, thanks for sharing! | ||
| |||
| marenostrum |
| ||
Joined: August 2007 Posts: 1008 Location: Tuscany, Italy | arumako - 2014-09-19 6:22 AM Wow DanSavage! Another exciting project. Can't wait to follow your progress! As always, thanks for sharing! +1 | ||
| |||
| BanjoJ |
| ||
Joined: September 2012 Posts: 813 Location: Thredbo, NSW, Australia | maremagnum - 2014-09-20 10:12 PM arumako - 2014-09-19 6:22 AM Wow DanSavage! Another exciting project. Can't wait to follow your progress! As always, thanks for sharing! +1 +1 | ||
| |||
| DanSavage |
| ||
Joined: June 2012 Posts: 2332 Location: Pueblo West, CO | Thanks, guys.
| ||
| |||
| jay |
| ||
Joined: January 2009 Posts: 1249 Location: Texas | I must say that this is extremely exciting, selfishly speaking. I cannot express how grateful I am that Dan agreed to 'restore" this early shiny. This guitar has been passed around between several folks on this board, I am pretty sure. I know that Nick Black owned it and then sold it to another gentleman on the board, after Nick realized it was a bigger restoration than he wanted to tackle $ wise. (I haven't seen Nick around in more than a year. I emailed him about this project and hopefully he will peek in). As it has gone through many hands, it has been triage'd here and there. Since it was in pretty poor shape, it was the house guitar. Thankfully the 40th RI came out. That made it possible to score the 5 point, Klusons and rosette from leftover stock, through the years, by some of the owners. You just don't see many 67's on the secondary market anymore. You certainly would be hard pressed to find an early one in playable condition...with a 2 piece neck. So, there are a couple of cool factors about this guitar and with Dan offering to take it on...it should see another 48-50 years of use, before I send it back to him. Thanks Dan! | ||
| |||
| DanSavage |
| ||
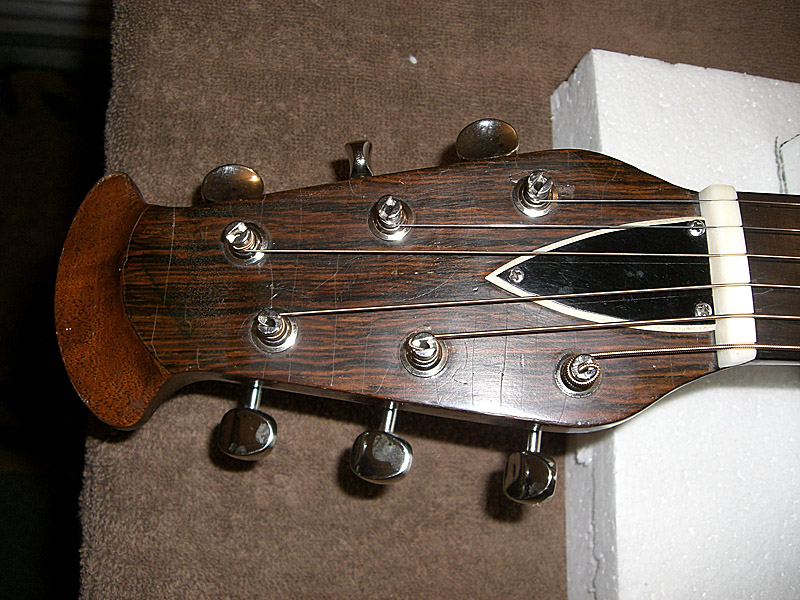
Joined: June 2012 Posts: 2332 Location: Pueblo West, CO | You're welcome Jay. I'm looking forward to jumping into it. I'm going to enjoy playing it with the new strings for a few more days, then start taking it apart and pulling the top off. I'm going to tackle this a little differently than the 1619. The kerfing inside is a different style than the 1619. It's molded fiberglass and is thinner, which means it's more delicate. Instead of simply ripping the wood off the kerfing, I'm going to split the binding from the top and bowl, then use an Xactco chisel to carefully split the top from the kerfing. I'm going to try to get the top off in one piece. FWIW, I think you can still get these Kluson tuners. They go for $60 a set. See: http://www.wdmusic.com/3_on_side_kluson_nickel_for_mosrite_double_r... | ||
| |||
| SOBeach |
| ||
Joined: April 2010 Posts: 823 Location: sitting at my computer | Dan, threads like this encourage voyeuristic tendencies. Yay!!!
"All I can say about these rosettes is: CHEAP!!! They're printed on pearloid paper which was glued into place after the guitar was finished." I've seen that guitar rosettes are commonly just paper labels, but it is a bit of a let down to see that this one is too. Now I wonder if that's the case for the other O rosettes also. ??
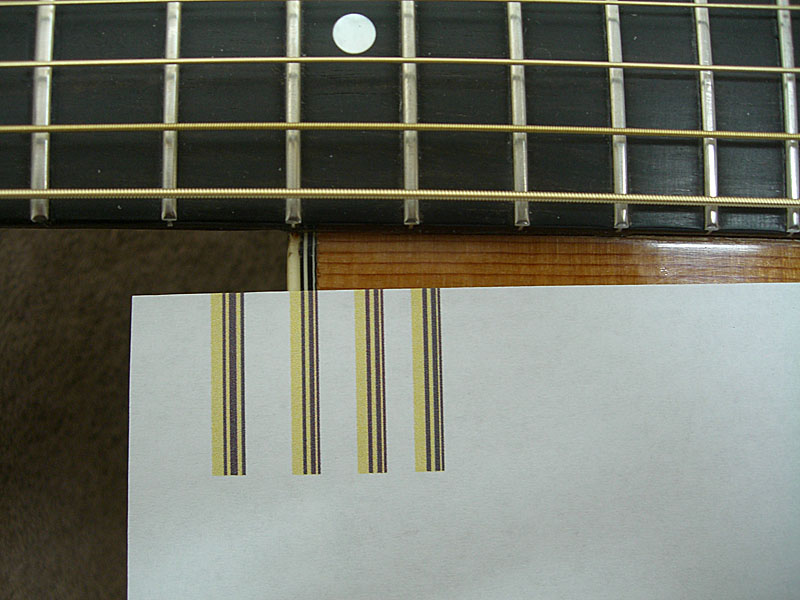
"Another thing is that the binding is narrower than on later guitars. The binding on this one is just under 3/16". The binding on later Ovations is ~1/4"." Did the early models have pop'd top problems that prompted the switch to wider bindings? Or maybe it was just a supplier / manufacturer change?
| ||
| |||
| DanSavage |
| ||
Joined: June 2012 Posts: 2332 Location: Pueblo West, CO | SOBeach - 2014-09-20 5:46 PM Dan, threads like this encourage voyeuristic tendencies. Yay!!! :laugh
I'm glad you approve. :D SOBeach - 2014-09-20 5:46 PM I've seen that guitar rosettes are commonly just paper labels, but it is a bit of a let down to see that this one is too. Now I wonder if that's the case for the other O rosettes also. ??
I hate to be the bearer of bad tidings, but it looks to me like all the O rosettes use the same cheap paper in their construction, even the (very expensive to buy) abalone rosettes.
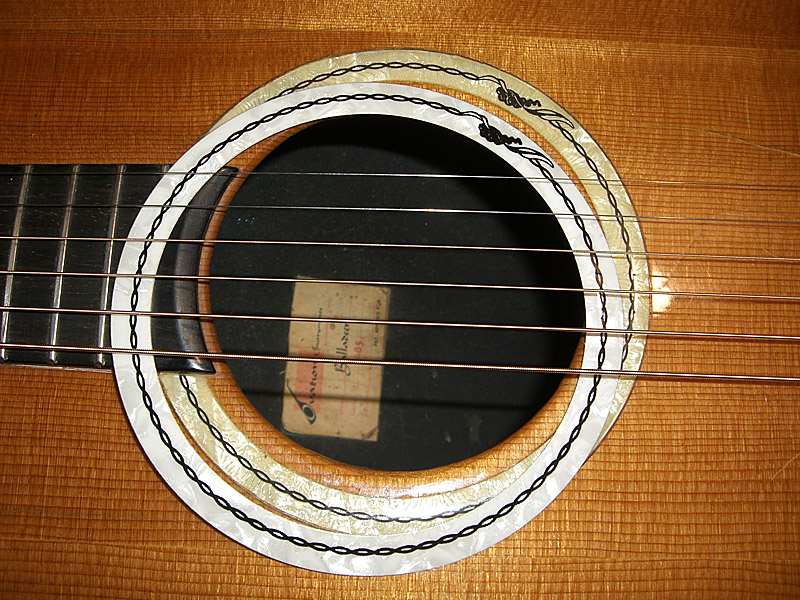
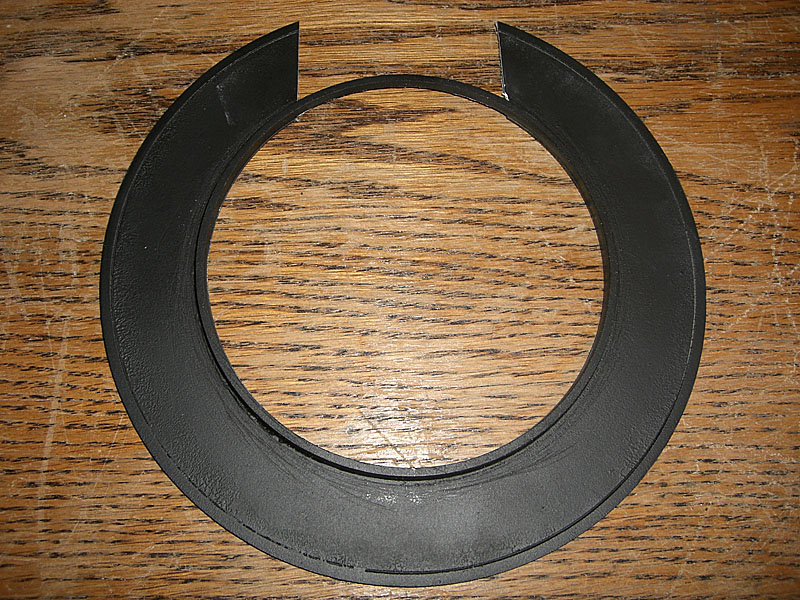
Here's a few pics: First, the rosette with which we're all very familiar:
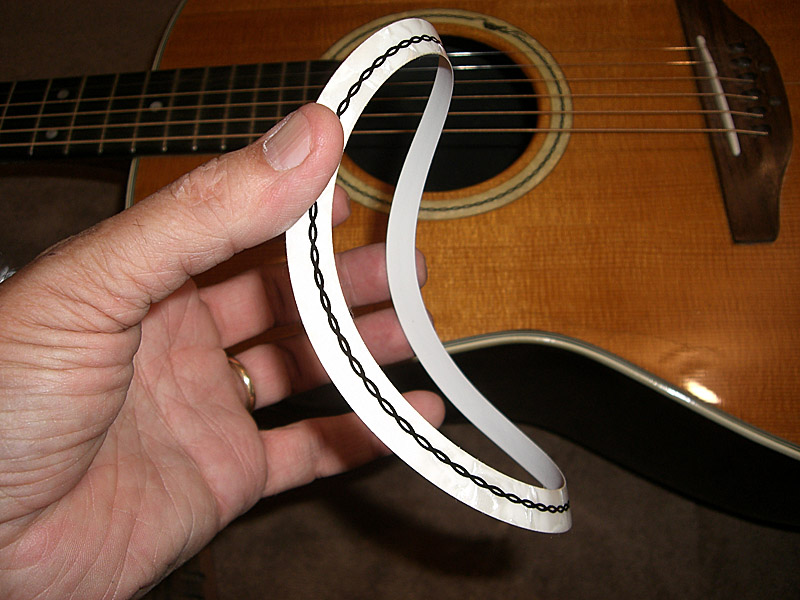
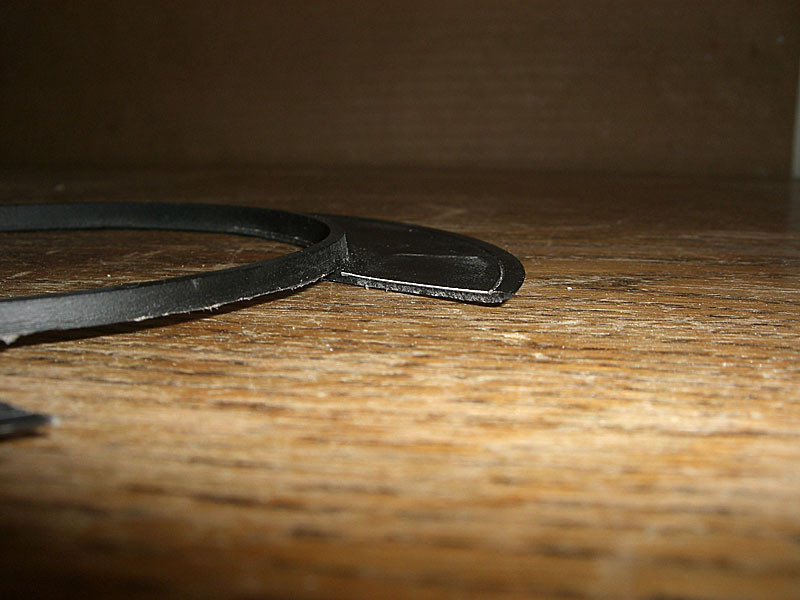
Next, the dark underbelly of the beast. (DUBOB):
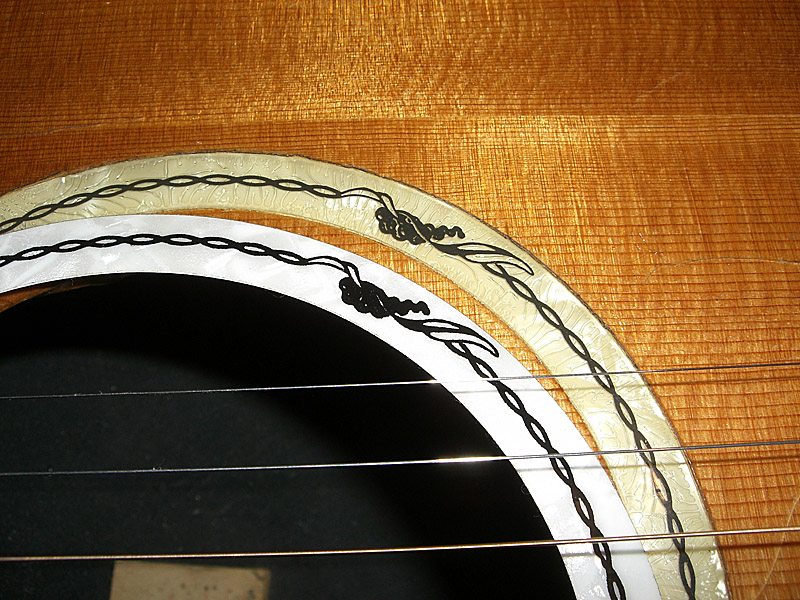
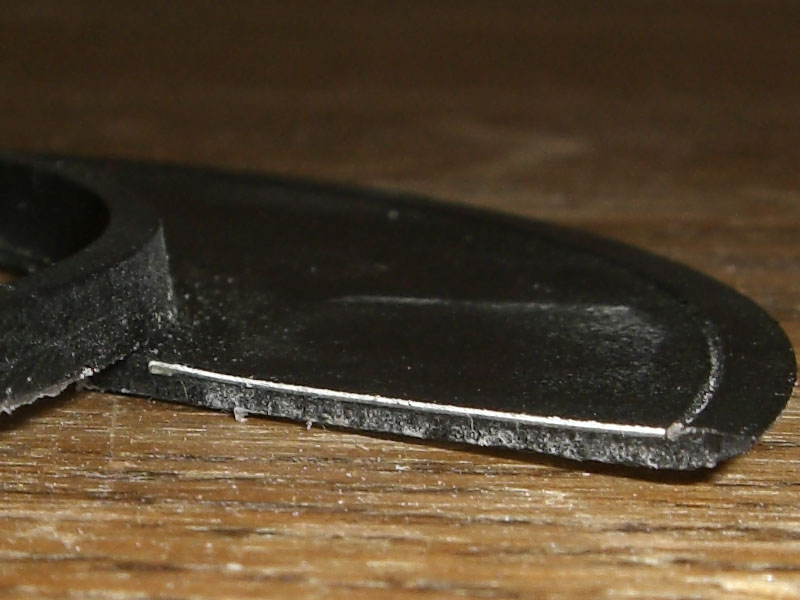
If we take a closer look at how it's constructed, we see that it's the same cheap pearloid paper glued to the back of the plastic rosette.
The oak leaf pattern is, either printed or silk-screened to the back of the clear plastic frame. The pearloid (or, abalone) paper is glued to the back of the frame, then the whole thing is sprayed with flat black paint.
The back of the abalone rosette I used on my 1619 looked just like this.
SOBeach - 2014-09-20 5:46 PM Did the early models have pop'd top problems that prompted the switch to wider bindings? Or maybe it was just a supplier / manufacturer change? I don't know the answer to that question. Going to the wider bindings could have been a result of using different molded kerfings. Once I get the top off Jay's guitar I'll take a couple of pics to show what the early molded bindings look like. They don't have the same radiused (filleted) underside as what I saw on the 1619.
Edited by DanSavage 2014-09-20 9:48 PM | ||
| |||
| TJR |
| ||
Joined: July 2002 Posts: 288 Location: Maine | The early abalone custom legend rosettes had sectional abalone pieces glued into the rosettes frame. The oak leaf pattern pretty much masked the butt joint of the individual cut pieces of shell. I'm my opinion they look a lot nicer than the later ones as it's a more subtle "bling " effect. | ||
| |||
| DanSavage |
| ||
Joined: June 2012 Posts: 2332 Location: Pueblo West, CO | Thanks, Talbot. I agree and it's too bad they had to resort to using artificial pearl and abalone instead of the real thing. Costs often rise quickly and a company can't always raise prices to remain profitable. | ||
| |||
| DanSavage |
| ||
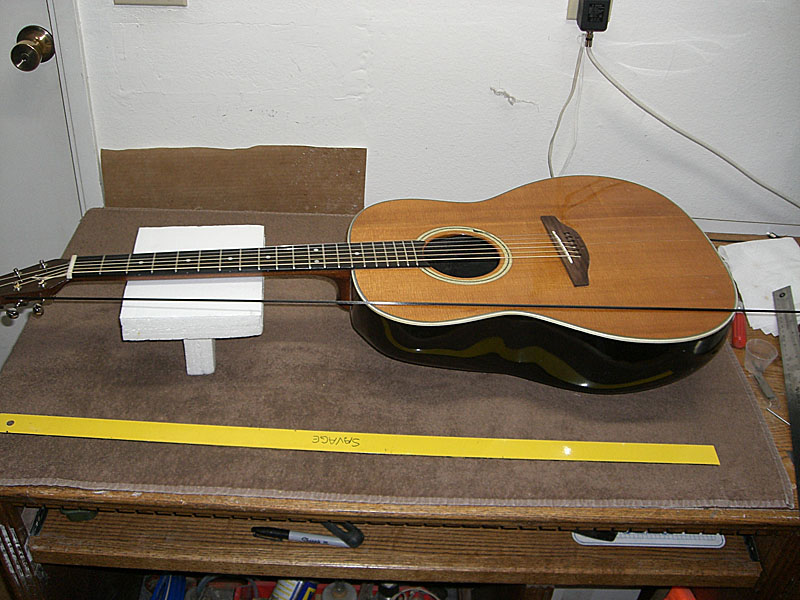
Joined: June 2012 Posts: 2332 Location: Pueblo West, CO | So, I'm back to work on 485. I wanted to finish up a 3D printed parts project for my brother.
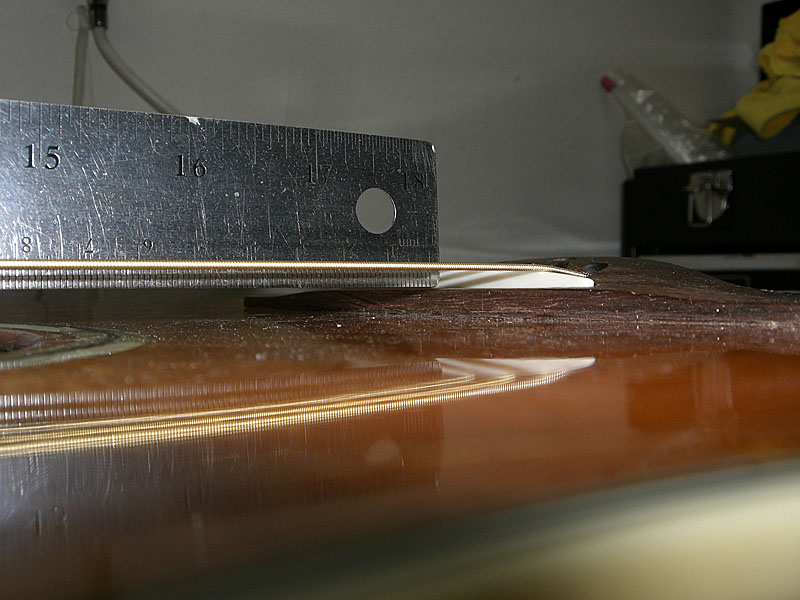
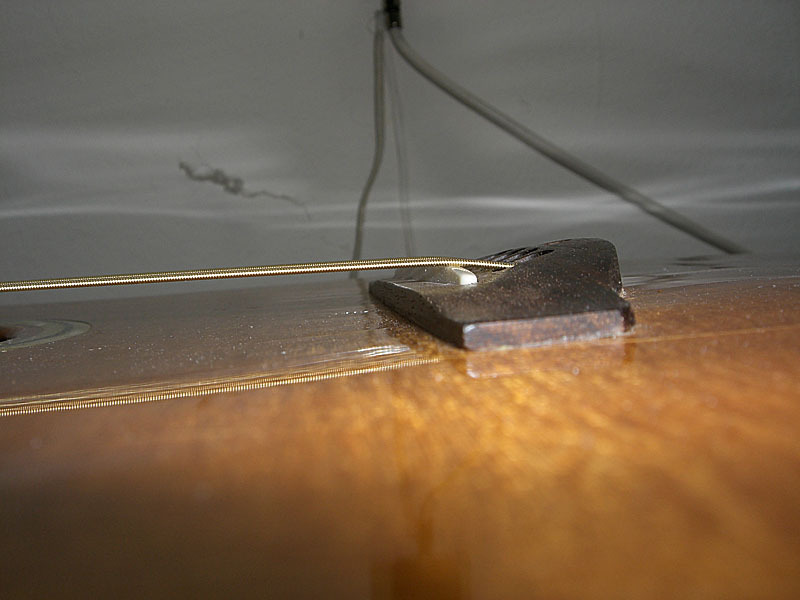
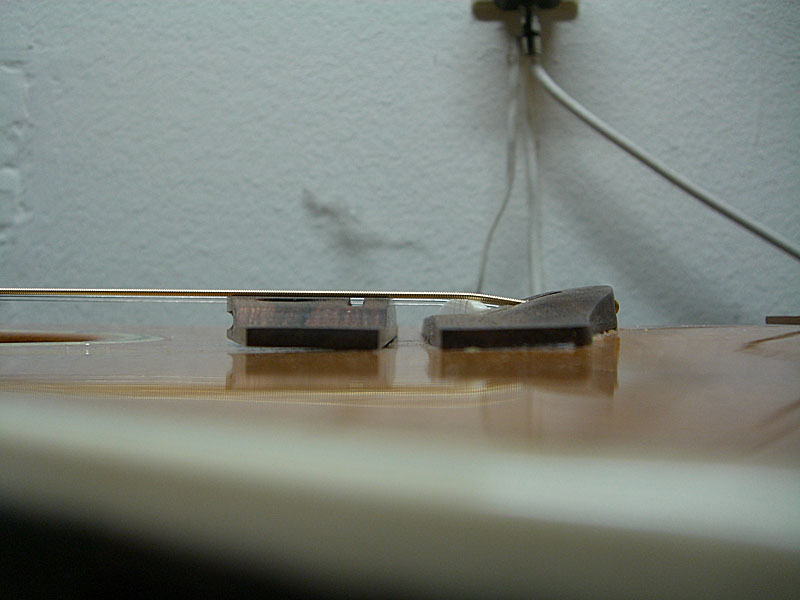
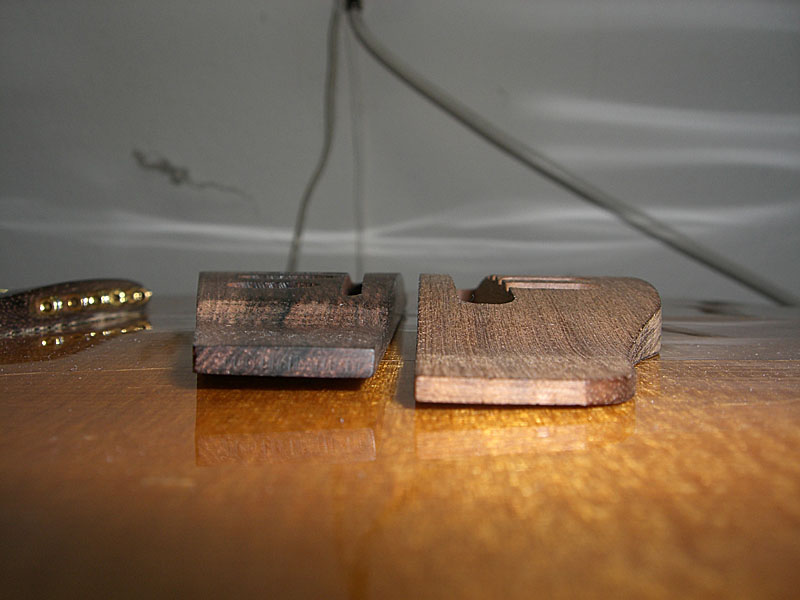
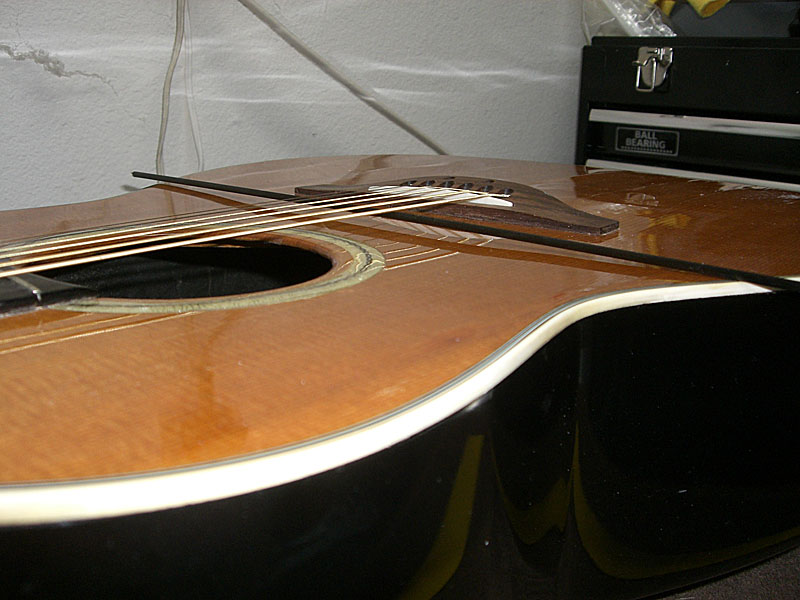
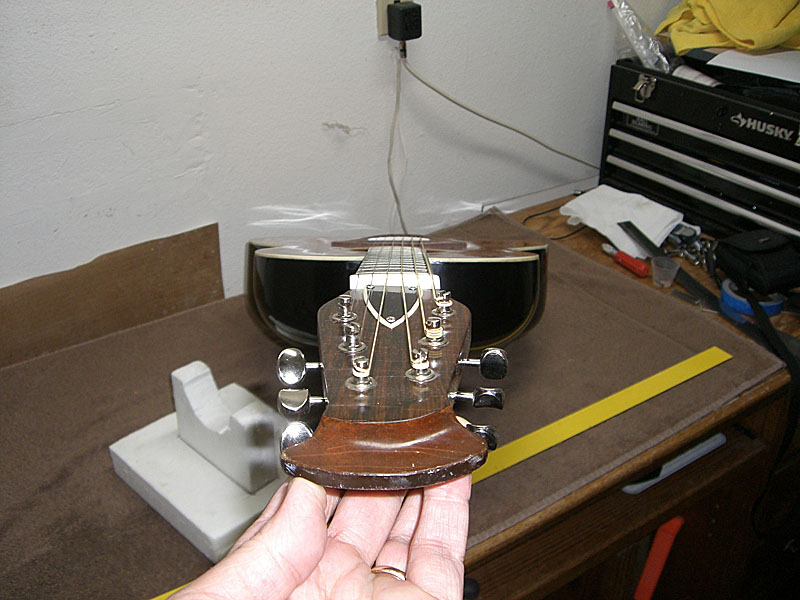
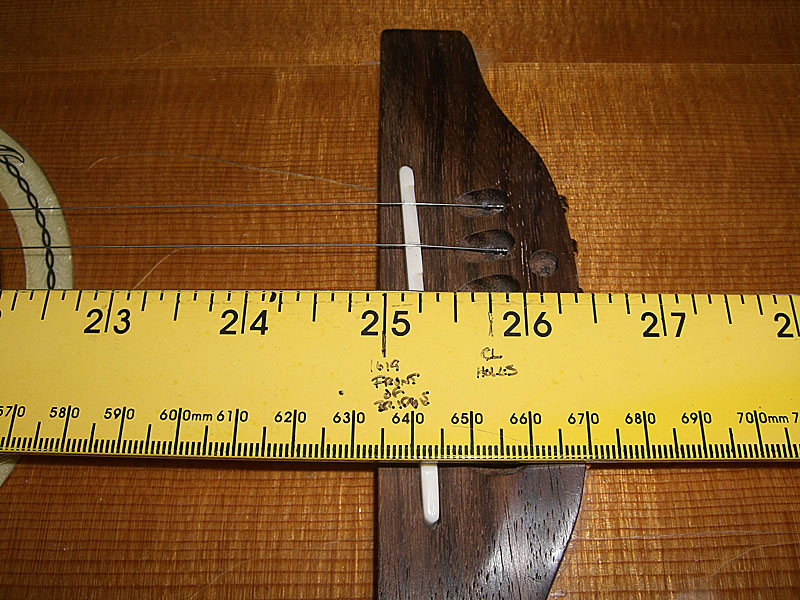
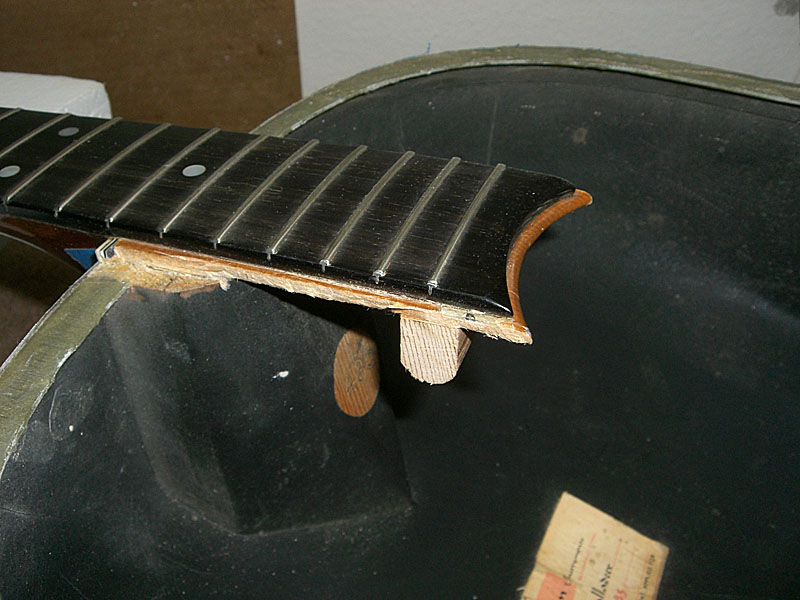
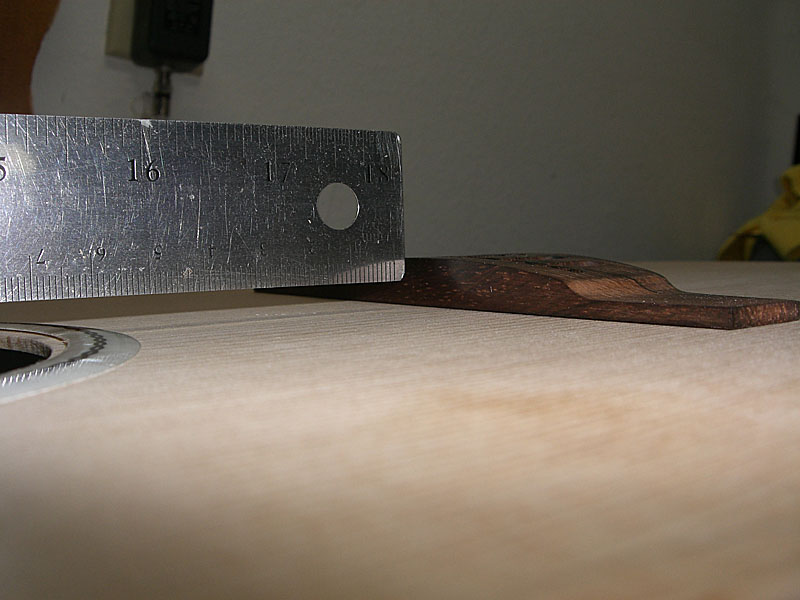
I compared the bridge height to the replacement 5-point bridge. =8^0 (Yikes!)
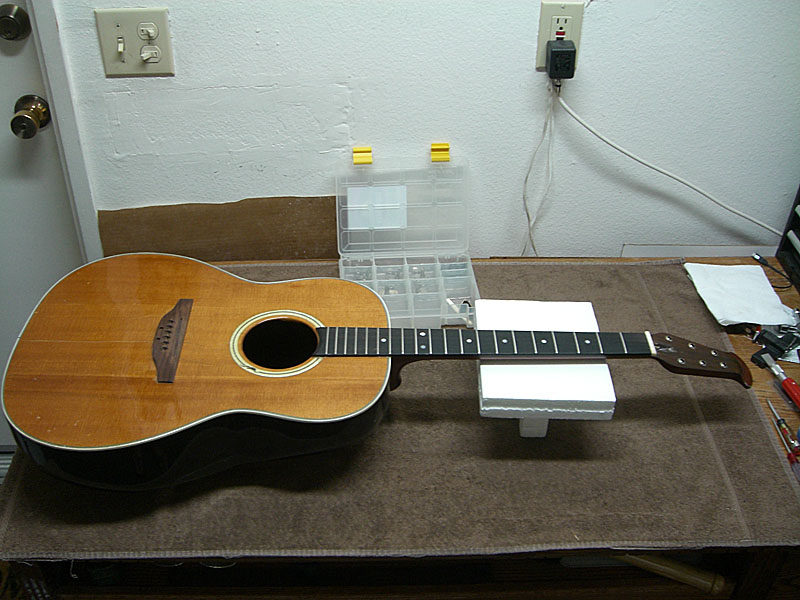
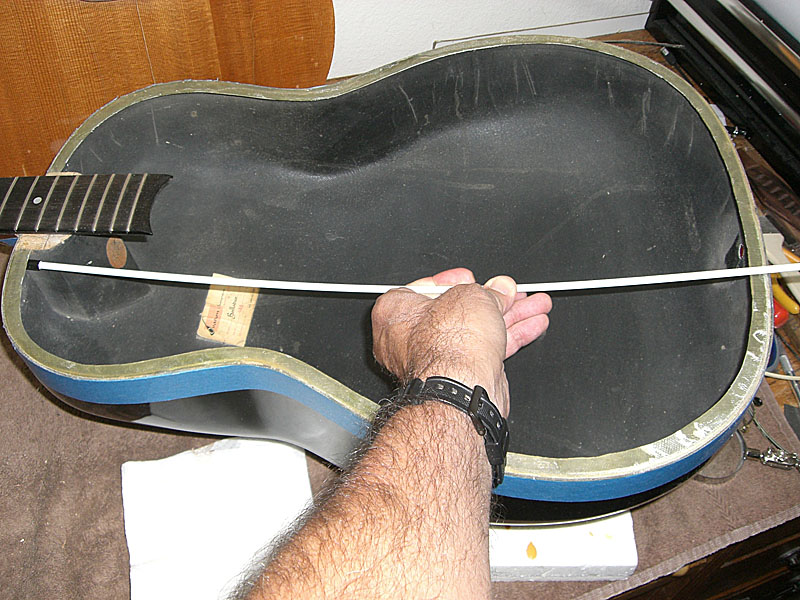
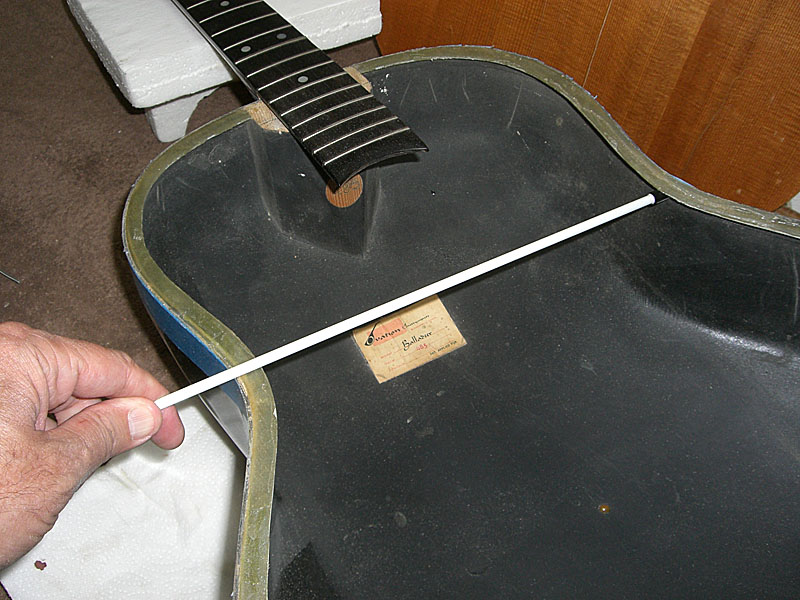
I used a small carbon fiber rod to get a basic idea of the neck angle. I laid it on the bowl.
I moved the CF rod to different positions to get an idea of how the top was warped. Overall, the top is cupped inward.
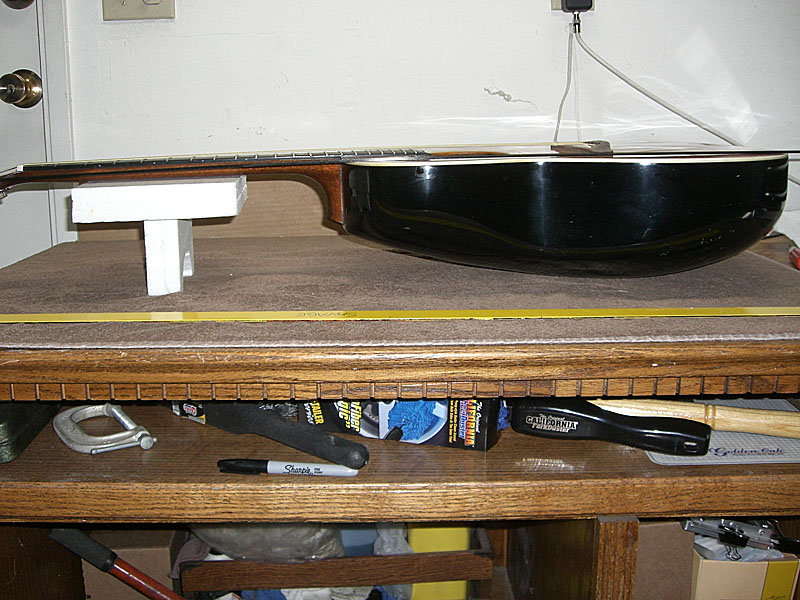
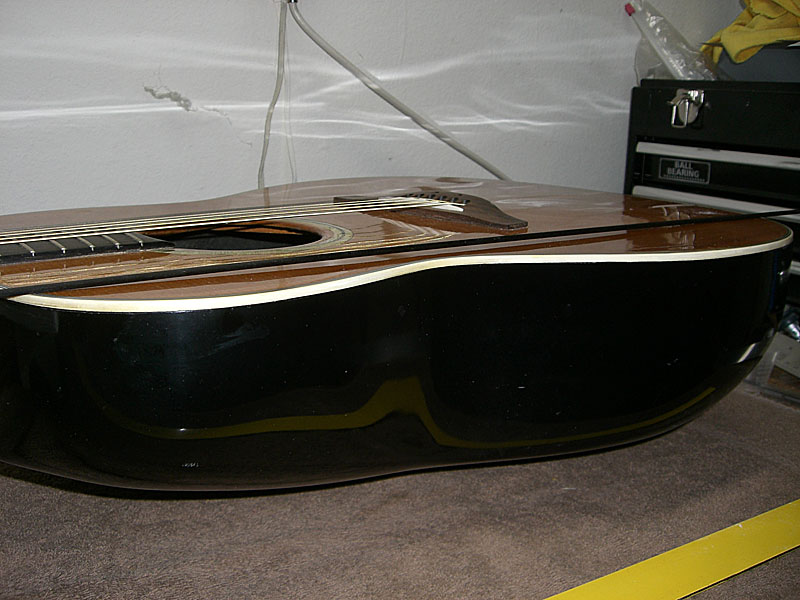
There is a noticeable bulge below the bridge.
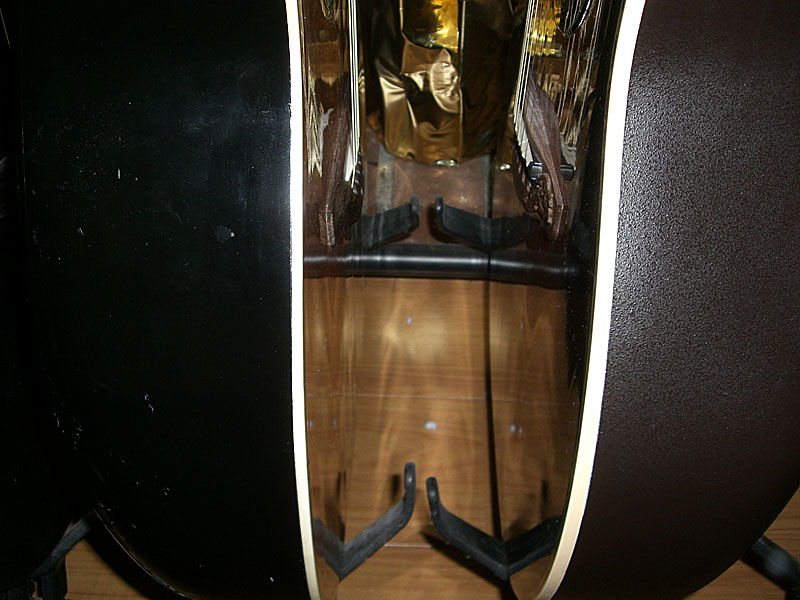
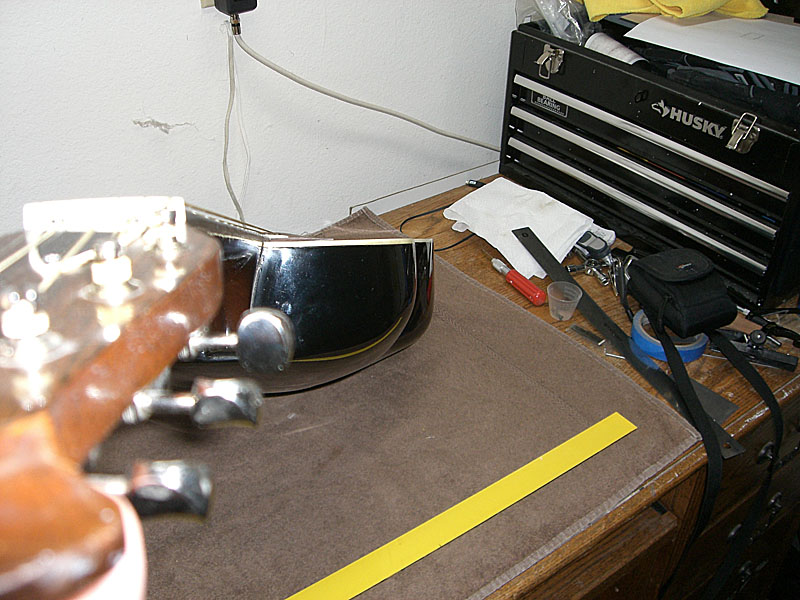
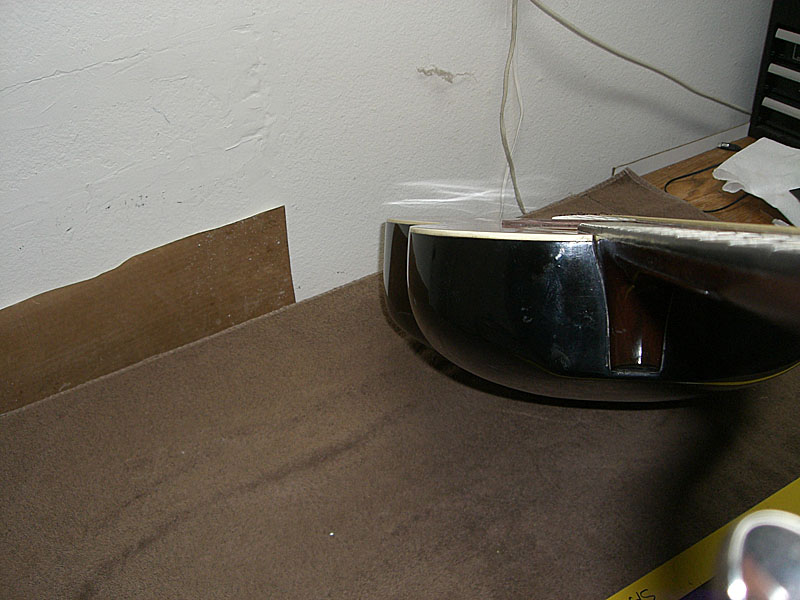
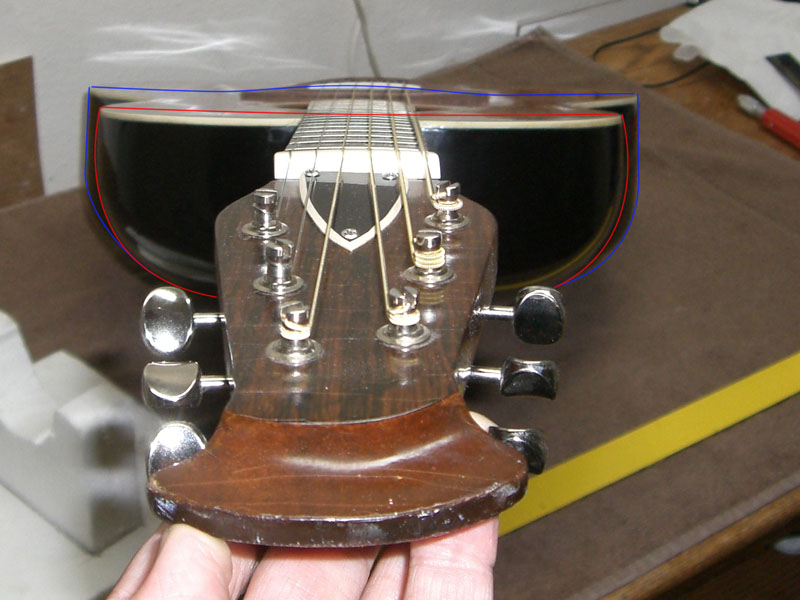
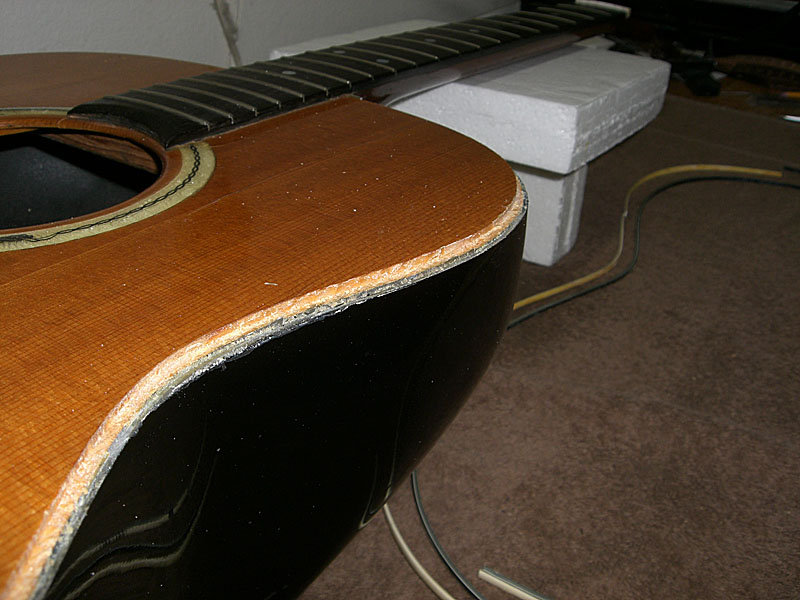
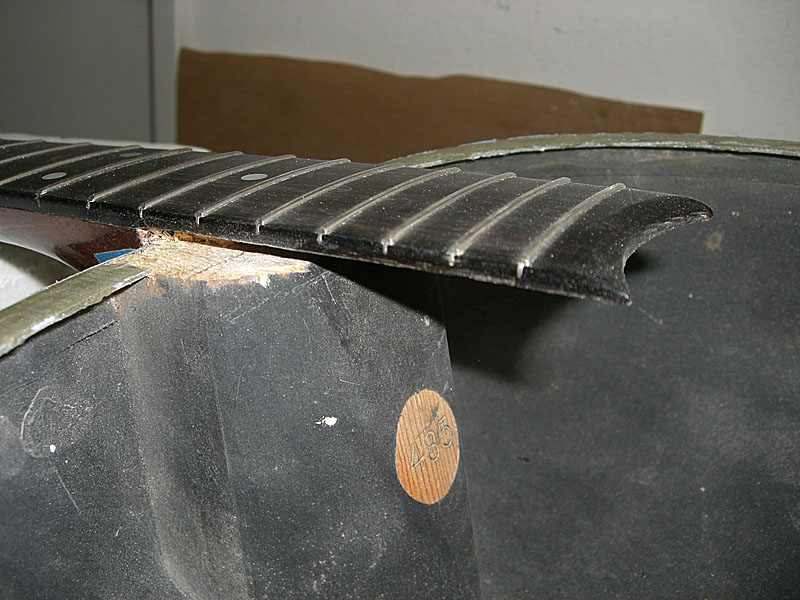
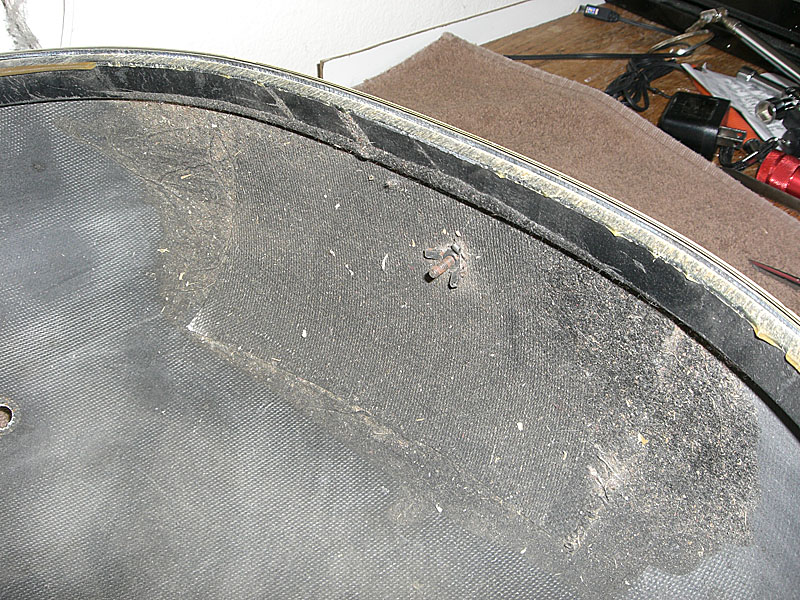
Looking at the guitar from the top to the bottom, the reason for the deformation of the top is that the sides of the bowl in the upper bout area have warped inward. This is most apparent when compared to the lower bout in the next few photos.
I compared this guitar to all my other Ovations and this is the only one with the warping on the upper bout. All my other Os are flat in this area. Here's a close-up that shows the warped upper bout.
It will be interesting to see what happens to the neck position once I get the top off it. Ideally, 'stretching' the sides with piece that's slightly oversize will pull the neck back into proper alignment without having to heat the bowl. If 'stretching' the sides of the upper bout doesn't pull the neck into alignment, then the only other thing to do is a bowl bend, like what MWoody did recently to his 12-string.
More updates soon... | ||
| |||
| jay |
| ||
Joined: January 2009 Posts: 1249 Location: Texas | "found the intonation was sharp on all six strings" No wonder this was the only guitar I could sing in tune with. Dan...holy cow...she was in pretty bad shape. It was evident that there was buzzing on the neck around the lower middle...but no one ever complained. I guess my question is...is it the tension/age that caused the multiple shifts...the lack of hydration on the top... Is it a good bet that the original 5 point was removed (and possibly damaged?) so that the guitar could be playable? This is fascinating to watch. | ||
| |||
| arumako |
| ||
Joined: October 2012 Posts: 1077 Location: Yokohama, Japan | Ooh, ooh, ooh...can't wait to see all the creative stuff you do to this guitar. Your preliminary observations are even fun to read! Thanks! | ||
| |||
| Mark in Boise |
| ||
Joined: March 2005 Posts: 12759 Location: Boise, Idaho | I can imagine that most of the issues with this guitar were caused by the collapse of the neck and top into the sound hole, which is a problem with all guitars over time. It would be interesting to see if other standard box guitars of similar age had the same problems. This was one of the reasons for the Adamas multihole design. It would also be interesting to see what happens to a 1537 or Adamas when they get to be the same age. | ||
| |||
| DanSavage |
| ||
Joined: June 2012 Posts: 2332 Location: Pueblo West, CO | It looks like it's mostly tension/age related. The splits in the lower bout probably contributed, too. My guess is that over time, the tension of the strings caused the top wood to cup inward. The plasticity of the bowl sides allowed them to be warped as the cupping top wood rolled the top of the sides inward. Based on my experience with fiberglass, I'd say the sides have probably taken a set to this new shape. The tricky part is whether the upper bout sides can be warped back into shape. Maybe. It's hard to say why the bridge was replaced. I can say that once this one comes off, it's not going to work on too many other guitars. Thanks! I'm proceeding slowly right now so I can make a list of what needs to be done and map out the course of action so everything gets done in the right order. amosmoses - 2014-10-06 5:26 AM I guess my question is...is it the tension/age that caused the multiple shifts...the lack of hydration on the top... Is it a good bet that the original 5 point was removed (and possibly damaged?) so that the guitar could be playable? This is fascinating to watch.
| ||
| |||
| DanSavage |
| ||
Joined: June 2012 Posts: 2332 Location: Pueblo West, CO | I agree. It looks to me like this is exactly what happened. I've got a 1975 Yamaha FG-260 12 string. It's got a bit of a bellying problem that's caused an increase in the action over the years. I'll take a look at it tonight to see if the sides have warped at all, or if it's just top wood itself that's caving in. I did compare 485's top wood to the other Os I've got and they're all warped to some degree. Interestingly, the least warped is the Book Elite, which has the Adamas quintaid bracing. Mark in Boise - 2014-10-06 9:36 AM I can imagine that most of the issues with this guitar were caused by the collapse of the neck and top into the sound hole, which is a problem with all guitars over time. It would be interesting to see if other standard box guitars of similar age had the same problems. This was one of the reasons for the Adamas multihole design. It would also be interesting to see what happens to a 1537 or Adamas when they get to be the same age. | ||
| |||
| moody, p.i. |
| ||
Joined: March 2002 Posts: 15674 Location: SoCal | Mark in Boise - 2014-10-06 9:36 AM I can imagine that most of the issues with this guitar were caused by the collapse of the neck and top into the sound hole, which is a problem with all guitars over time. It would be interesting to see if other standard box guitars of similar age had the same problems. This was one of the reasons for the Adamas multihole design. It would also be interesting to see what happens to a 1537 or Adamas when they get to be the same age. My 1537 is 31 years old and shows no sign of problems with the top. We'll see what the next 10 years bring. I've seen a lot of the early guitars with the original 5 point rosewood bridges gone and replaced by the walnut rounded bridge. I don't know why that was necessitated except maybe the original glue wasn't good and they came up? | ||
| |||
| FlySig |
| ||
Joined: October 2005 Posts: 4065 Location: Utah | My 1537 is dead flat across the top. It looks like a brand new guitar. My Patriot on the other hand has a bit of bellying behind the bridge. There may be many differences in construction other than multi-hole vs single hole, but there is no question the single hole looks aged. | ||
| |||
| moody, p.i. |
| ||
Joined: March 2002 Posts: 15674 Location: SoCal | That's interesting. Isn't the Patriot A braced? | ||
| |||
| FlySig |
| ||
Joined: October 2005 Posts: 4065 Location: Utah | Yes it is A bracing. | ||
| |||
| DanSavage |
| ||
Joined: June 2012 Posts: 2332 Location: Pueblo West, CO | So, after a bit of thought and research online, I think I have a pretty good idea of how to proceed.
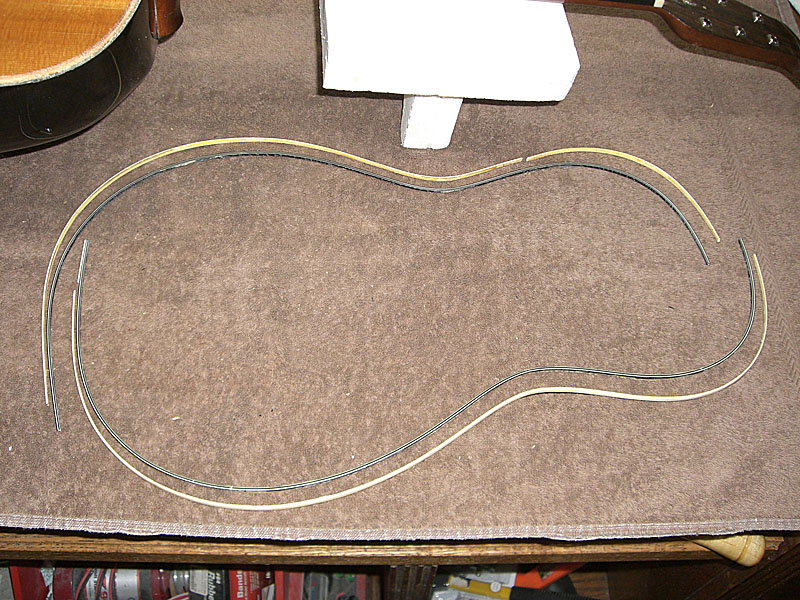
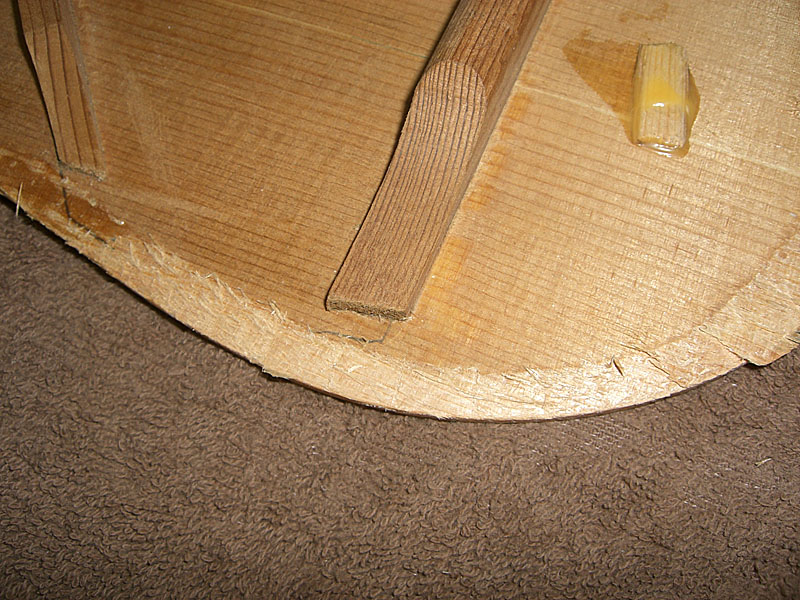
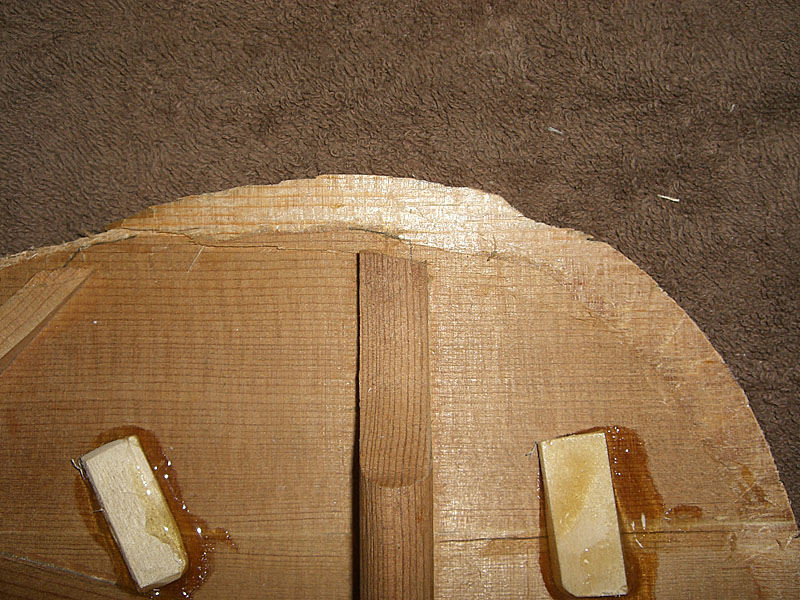
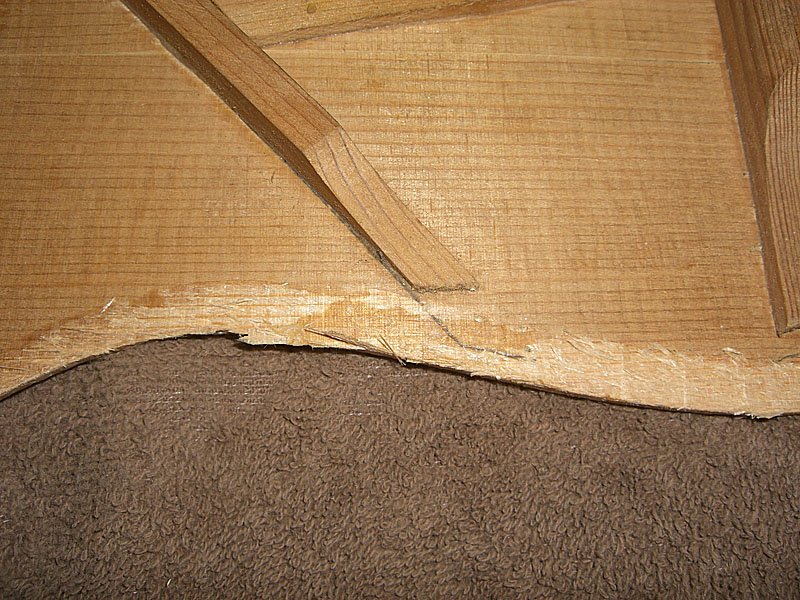
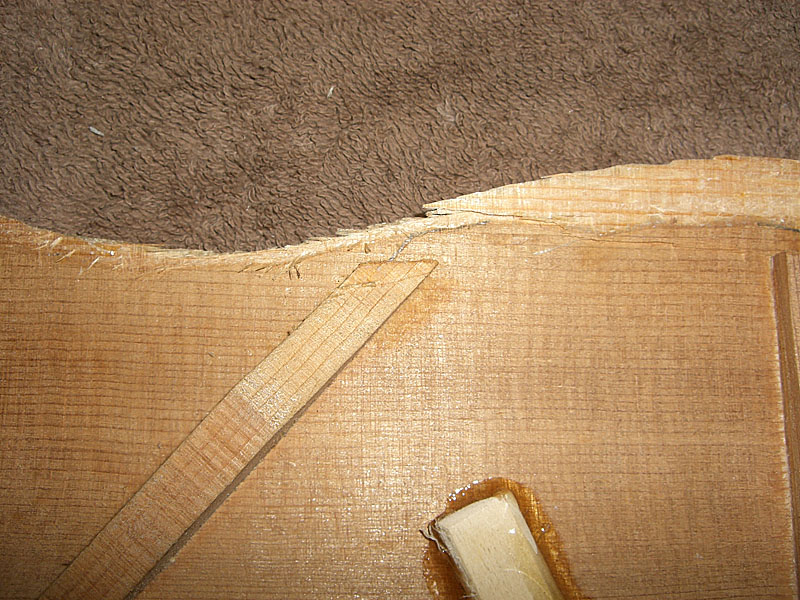
Next, remove the bindings. And, as it turns out, the purfling, too.
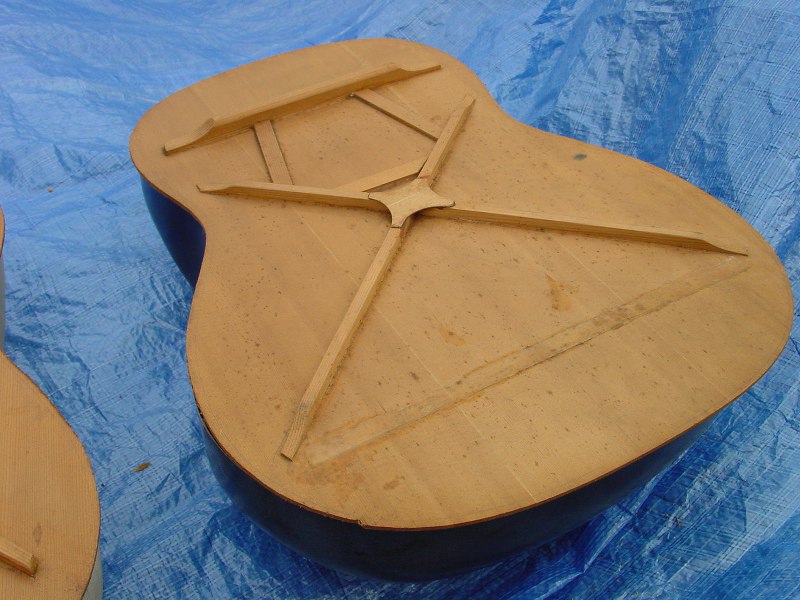
Now the edges of the top are exposed.
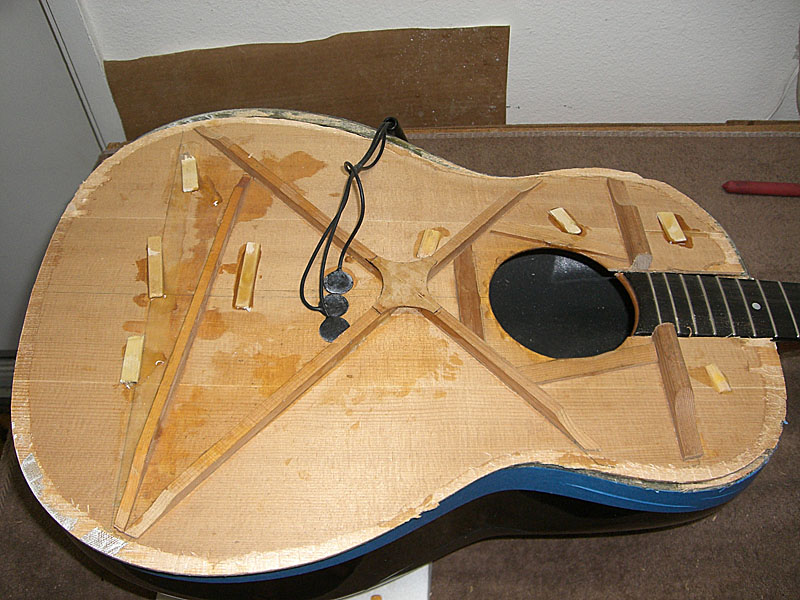
IMO, the molded kerfing is an important factor that makes the the early Os sound so good. This, along with the simple X-bracing allows the top to vibrate really freely. The molded kerfing reminds me of the patented suspension ring used on the Adamas guitars.
Seriously, I used the practice top wood from my 1619 so I could check the neck geometry. (Ewww...)
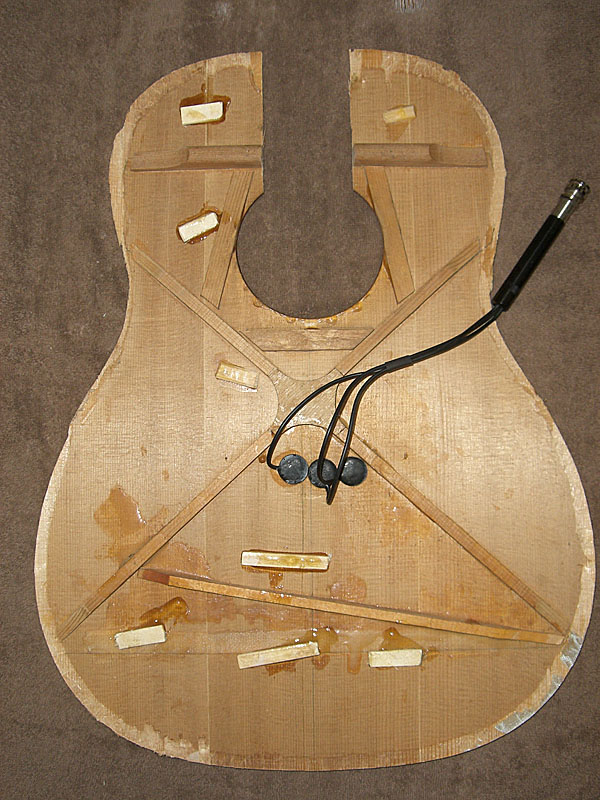
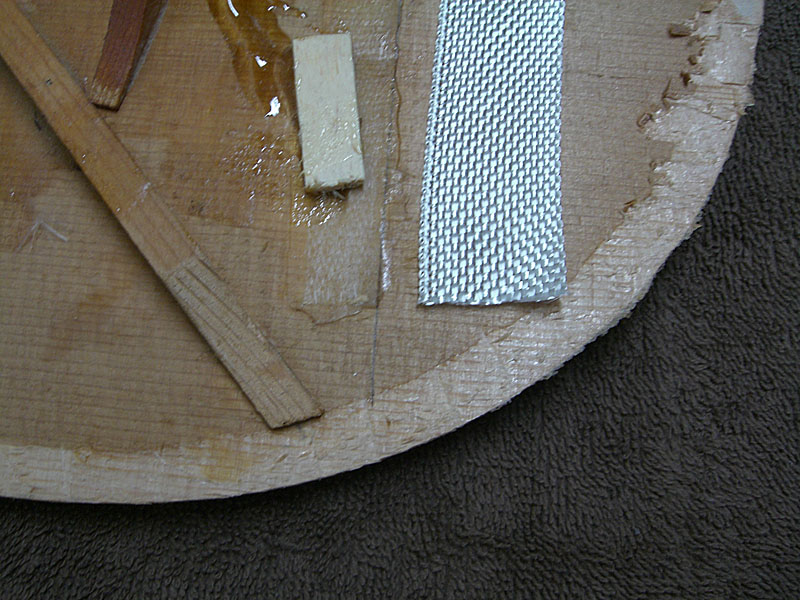
Getting back to the top. It has had a hard life. It's got several cleats used to reinforce crack repairs. These look to me like bass wood. (Think: popcycle sticks) Whomever did the repairs obviously loved epoxy as it was generously slathered on.
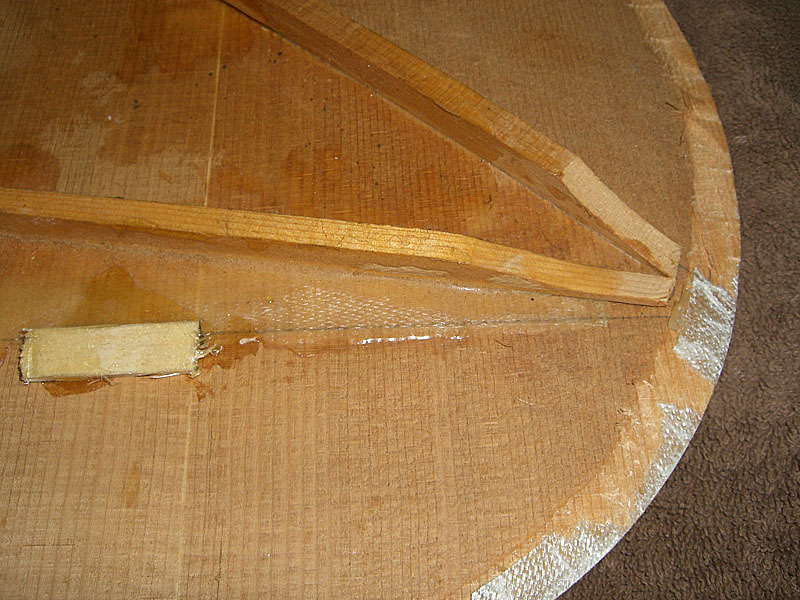
The fiberglass tape reinforcement across the lower bout looks entirely ordinary and should be easy enough to duplicate.
Noteworthy is the extra tone bar across the lower bout between the two lower legs of the X-braces. Obviously, not a part of the original construction. It was probably done as a doubler for the crack repairs.
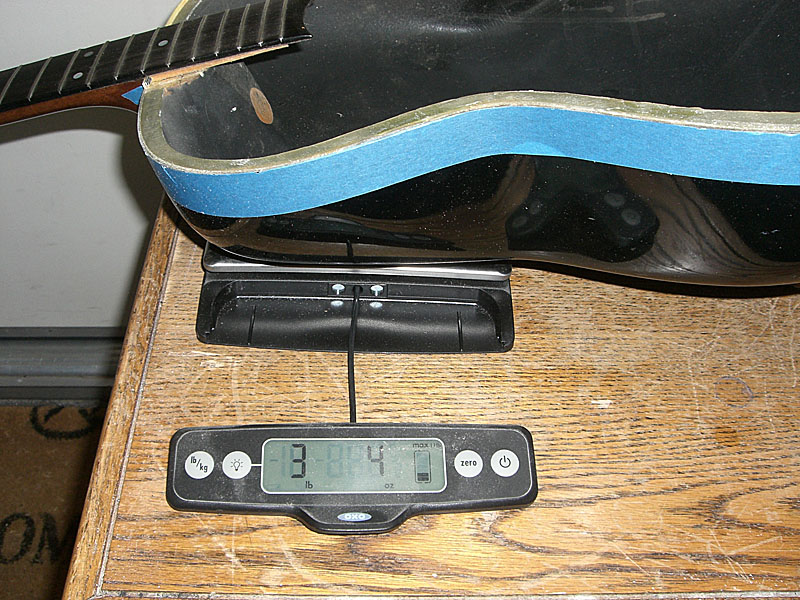
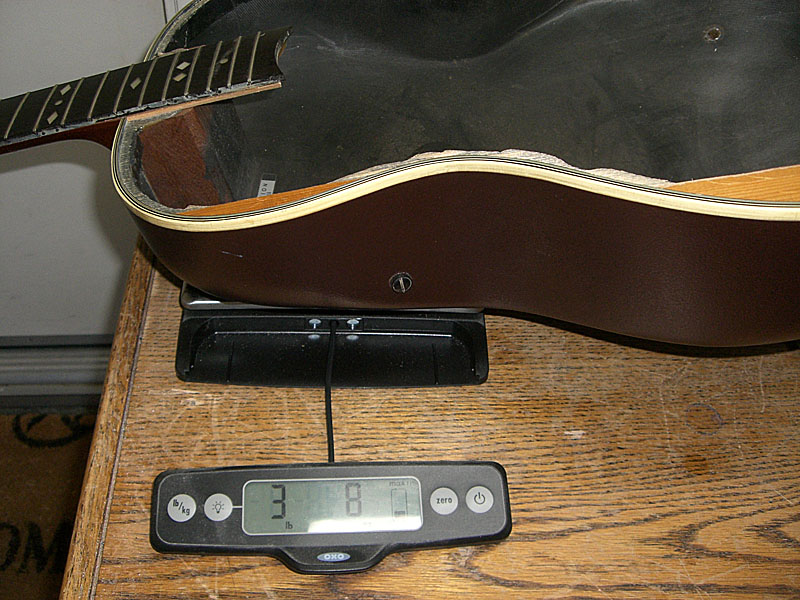
I tried a tap-test of both bowls. What a difference. The 1st Gen. has real tone. The 2nd Gen. sounded dull. It still had tone, but it was being muted. It was about then that a light bulb went off.
IMO, this is just one more thing that gave the early Os the reputation of good sounding guitars. And, any Ovation knock-offs I produce will have thin paint on the bowl. | ||
| |||
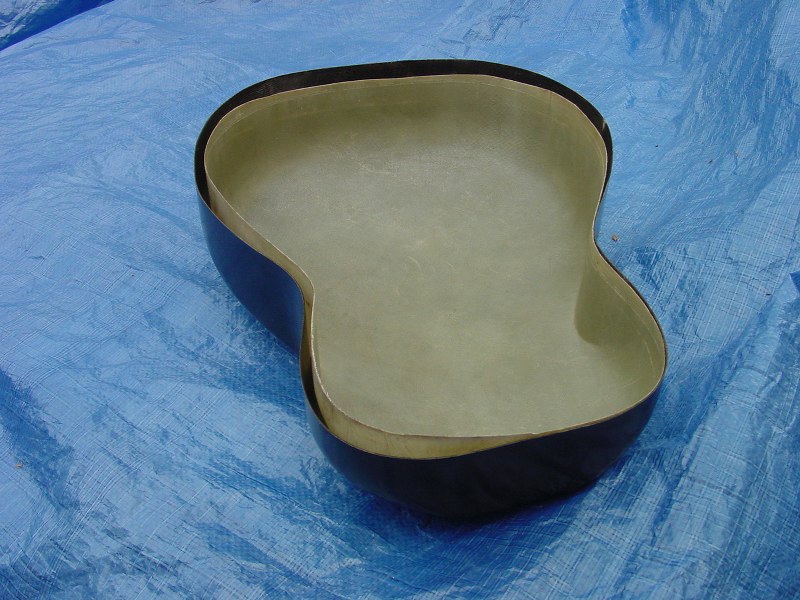
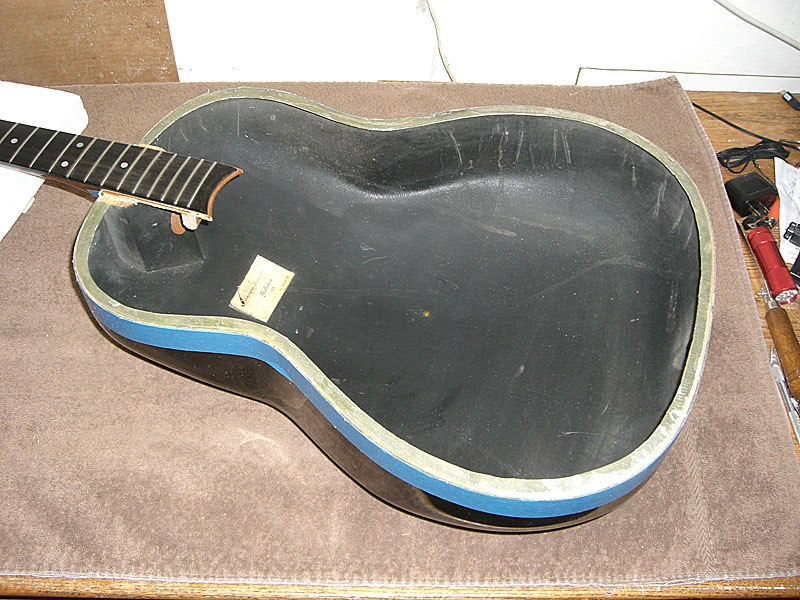
| DanSavage |
| ||
Joined: June 2012 Posts: 2332 Location: Pueblo West, CO | So, getting back to the vertical lines on the inside sides of the bowl. When I first saw these, I assumed they were just drips of epoxy. A closer examination revealed that they're actually wrinkles. And, not just any wrinkles but the type of wrinkles that happen when a molded part is vacuum-bagged. So, what 485 represents is a transitional model between the 1st Gen bowl and the 2nd Gen bowl methods. To wit, 1st Gen bowls were vacuum bagged over male molds. 2nd Gen. bowls were hand-layups inside a female mold. 485 is a vacuum bagged part molded inside a female mold, which is very unusual. Obviously, Charlie was looking for ways to speed up the layup process, but still keep the quality. In the end, it's clear they decided to just lay up parts using the fastest and easiest methods. (2nd Gen.) Edited by DanSavage 2014-10-14 8:45 PM | ||
| |||
| jay |
| ||
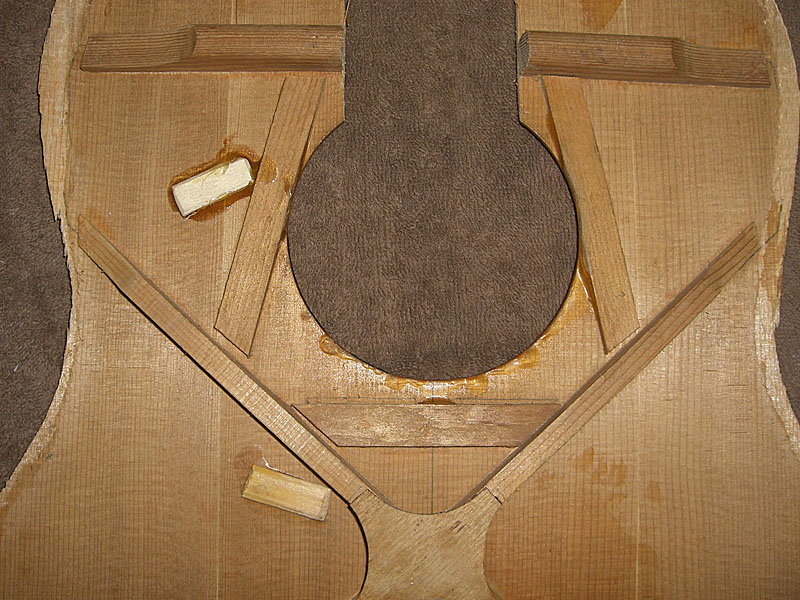
Joined: January 2009 Posts: 1249 Location: Texas | WOW Dan, A couple of questions... I have read where the bracing is supposed to be a little ways away from the soundhole ... and I noticed that the bracing around the soundhole did not come in contact with the cross bracing. Going for optimal soundboard response, do these two things inhibit that? | ||
| |||
| DanSavage |
| ||
Joined: June 2012 Posts: 2332 Location: Pueblo West, CO | My Stewmac Dreadnaught plans show the reinforcement strips spaced at about 1/8" away from the sound hole. That's where I placed them on my 1619. I don't think the placement of these strips is very critical. They only keep the sound board from splitting around the sound hole. When I was getting ready to brace my 1619, I read up on whether to tuck the braces or not. What I mean is making notches in the X-braces for the tone bars and finger braces and making notches in the kerfing for the ends of the X-braces. The Stewmac plans show the braces tucked. They also show the reinforcement strips butted up to the X-braces, but not tucked under. I looked at my 2078TX-5, which has the LX bracing and my Alvarez PD100S, which also has X-braces. None of the braces on these two guitars are tucked. No one really seems to know the true purpose behind why some guitar makers tuck their braces. The general consensus is that manufacturers do this to keep the braces from popping off the sound board if the guitar gets bumped. From what I read, it's best to keep the bracing spacing at about 1/8", which is what I did on my 1619. IMO, yes, tucking the braces would inhibit response because it limits the top vibration. I did not tuck the braces on my 1619. Interestingly, the X-brace is about 2" from the bottom of the hole. The rear-shifted X-brace is usually 1-1/2" and the forward-shifted X-brace is 1". (I used the forward X-brace on my 1619) I haven't measured the angle of the X-brace on the Balladeer, but I will soon. I'm curious what angle it's at. Edited by DanSavage 2014-10-15 10:38 AM | ||
| |||


| Jump to page : < 1 2 3 4 5 6 ... > Now viewing page 1 [25 messages per page] |
| Search this forum Printer friendly version E-mail a link to this thread |
| This message board and website is not sponsored or affiliated with Ovation® Guitars in any way. | |
| (Delete all cookies set by this site) | |