| The Ovation Fan Club | ||
| ||
| Random quote: "Jazz... isn't that just a series of mistakes disguised as musical composition?” - David St. Hubbins of Spinal Tap |
 An Early 1615 Rescue Mission An Early 1615 Rescue Mission
| View previous thread :: View next thread | |
| Member Communities -> Bottom Feeding Luthiery Guild | Message format | |
| MWoody |
| ||
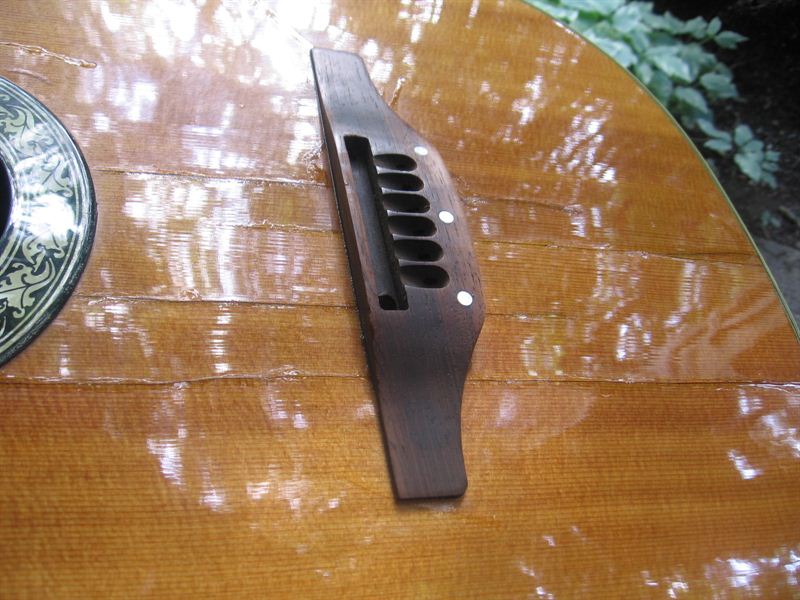
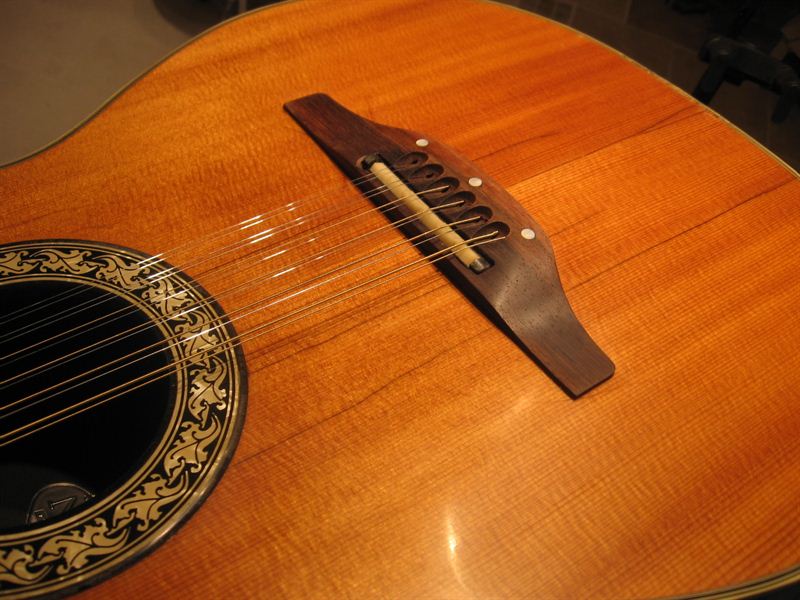
Joined: December 2003 Posts: 13983 Location: Upper Left USA | It has the Klusons and the sweetest grain I've seen in a long time. It also has a broken bottom and a top that will need a lot of gentle guidance back into shape... hopefully. In order to remove the pickup I had to unsolder the wires in the preamp.
http://www.ovationfanclub.com/megabbs/photos/photo-thumbnails.asp?albumid=1157
Edited by MWoody 2014-05-28 7:48 PM | ||
| |||
| DanSavage |
| ||
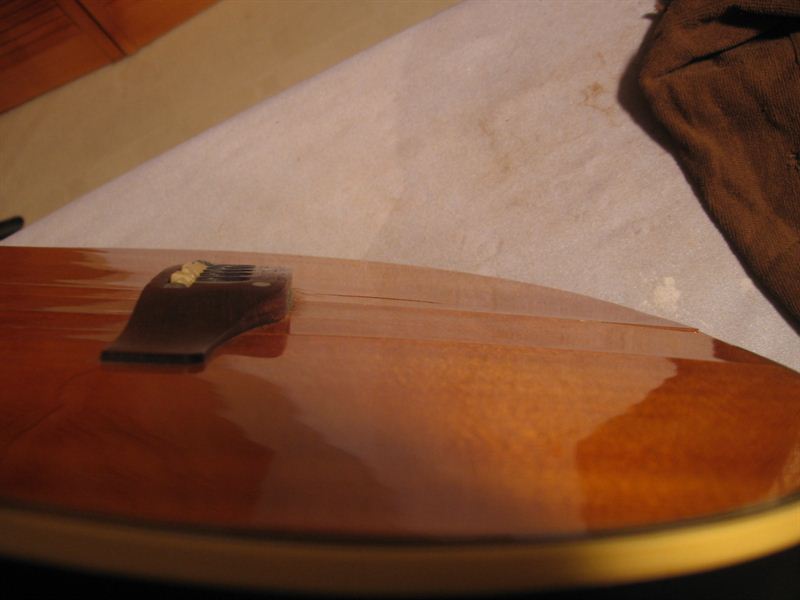
Joined: June 2012 Posts: 2303 Location: Lake Forest, CA | Nice job on the top repair. The belly bulge has pushed the bridge up quite a bit. Are you going to attempt a neck reset or are you trying to reduce the belly bulge with moisture? | ||
| |||
| MWoody |
| ||
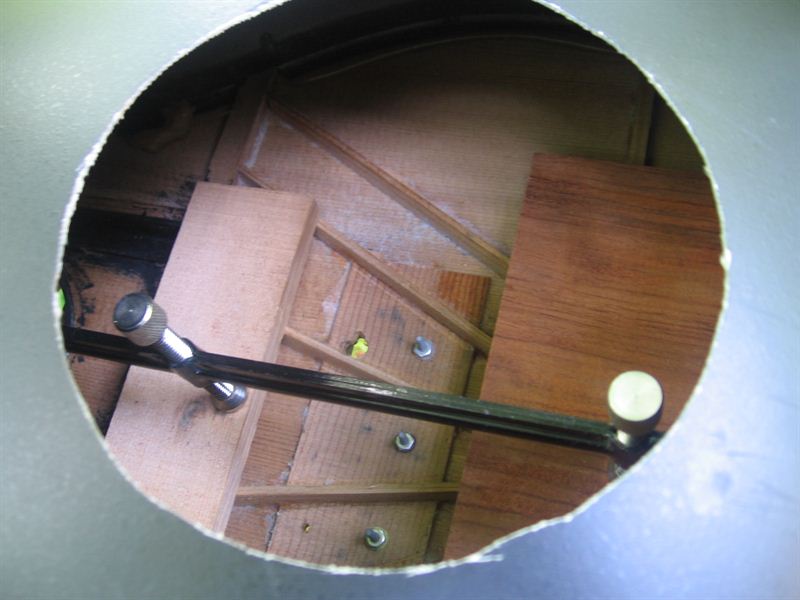
Joined: December 2003 Posts: 13983 Location: Upper Left USA | I currently have clamps on the lower bout and moisture to flatten the area. The top is separated at the bottom and I hope to level out the top. It's hard to say what will really happen. I've cut an access hatch and can see previous regluing of braces, etc. | ||
| |||
| DanSavage |
| ||
Joined: June 2012 Posts: 2303 Location: Lake Forest, CA | Aha! That makes sense. If you need a patch for your access hatch, let me know and I'll lay up an oversize piece similar to what I did for my 1619 and mail it to you. | ||
| |||
| MWoody |
| ||
Joined: December 2003 Posts: 13983 Location: Upper Left USA | Thanks! I have retained the round cut out and should be able to fashion a retainer ring and use the conventional set up. With the length of my forearm I'm a beleiver that ALL Ovations need a back hatch! | ||
| |||
| DanSavage |
| ||
Joined: June 2012 Posts: 2303 Location: Lake Forest, CA | I agree. Having a removable back hatch is a nice feature. I seriously considered doing the same thing to my 1619. If the hole had been symmetrically cut instead of being hacked out willy-nilly, I would have made a removable cover. Edited by DanSavage 2014-05-29 10:08 AM | ||
| |||
| MWoody |
| ||
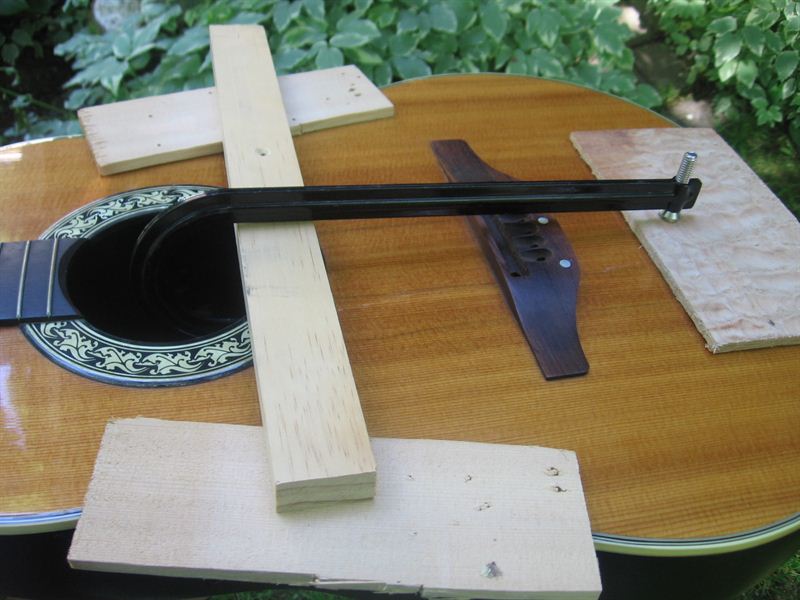
Joined: December 2003 Posts: 13983 Location: Upper Left USA | As it moves forward. Edited by MWoody 2014-06-01 4:24 PM | ||
| |||
| DanSavage |
| ||
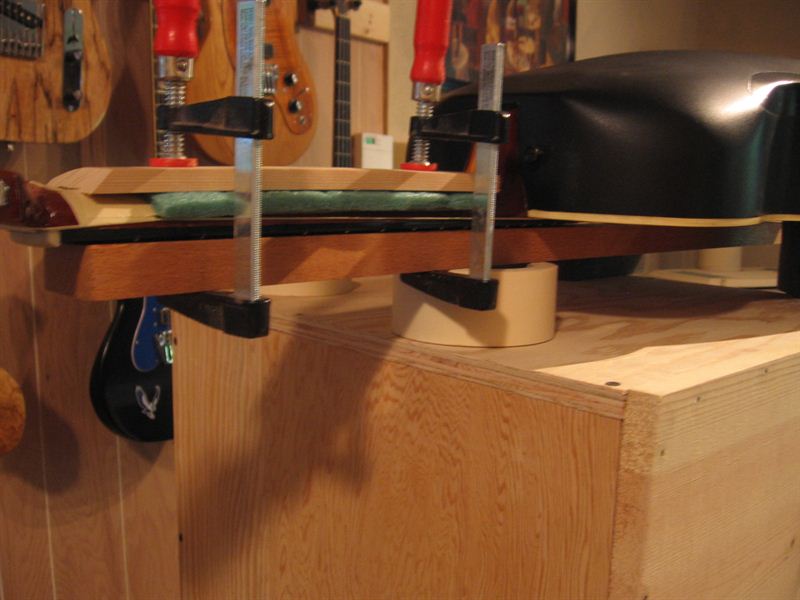
Joined: June 2012 Posts: 2303 Location: Lake Forest, CA | Interesting that you've got the leveling screw for the clamp on the inside. Can you explain what you're doing here? | ||
| |||
| MWoody |
| ||
Joined: December 2003 Posts: 13983 Location: Upper Left USA | I am trying to flatten down the lower bout and press up on the Bridge to Sound hole area. The arm of the clamp is in compression with the leveling screw. If successful I'll re-glue the lower bout to the bowl and then fill the cracks. It appears to be moving in the right direction but time will tell. I get to turn the screw about a 1/16th a day. If it works, awesome! If it doesn't I get to put a new top on it. Edited by MWoody 2014-06-02 8:16 AM | ||
| |||
| DanSavage |
| ||
Joined: June 2012 Posts: 2303 Location: Lake Forest, CA | Gotcha. I thought that's what you were doing, but wasn't sure if it was to clamp the split wood or flatten it. | ||
| |||
| MWoody |
| ||
Joined: December 2003 Posts: 13983 Location: Upper Left USA | Fortunately it really wanted to get back in shape. fill and level, repeat... Edited by MWoody 2014-06-03 9:05 PM | ||
| |||
| MWoody |
| ||
Joined: December 2003 Posts: 13983 Location: Upper Left USA | ...and fill, and level... This will likely require the Bridge to be sanded lower. Probably add an OP Pro preamp. | ||
| |||
| DanSavage |
| ||
Joined: June 2012 Posts: 2303 Location: Lake Forest, CA | It looks like the patient survived the operation, Doctor.  I'm guessing that because you're considering sanding the bridge, the fingerboard is still too low? | ||
| |||
| MWoody |
| ||
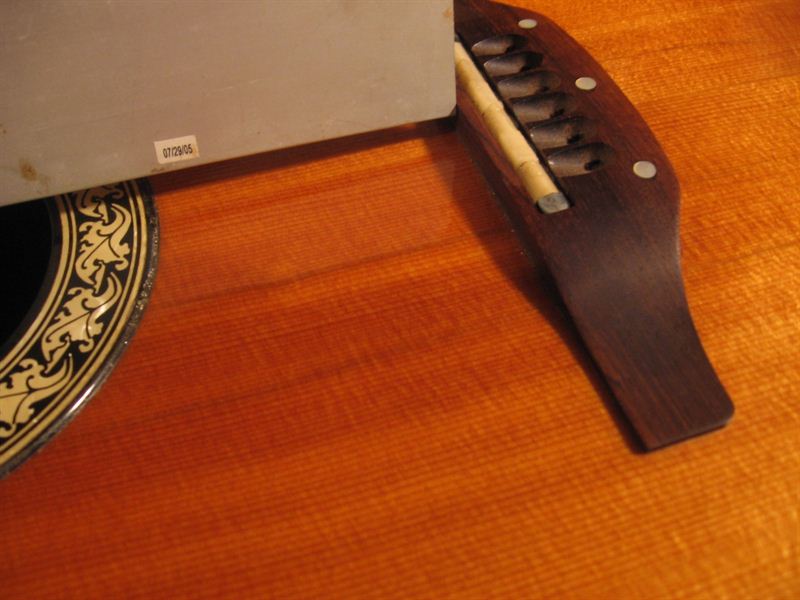
Joined: December 2003 Posts: 13983 Location: Upper Left USA | Right now the Bridge "looks" high. Once I feel everything is glued, braced and steady I'll throw two or three strings on and see what the action is. It does look to have a thicker Bridge, not science, just a feeling. | ||
| |||
| DanSavage |
| ||
Joined: June 2012 Posts: 2303 Location: Lake Forest, CA | Does your straight edge still 'hit' the bridge in about the same location as shown in the pic below? | ||
| |||
| MWoody |
| ||
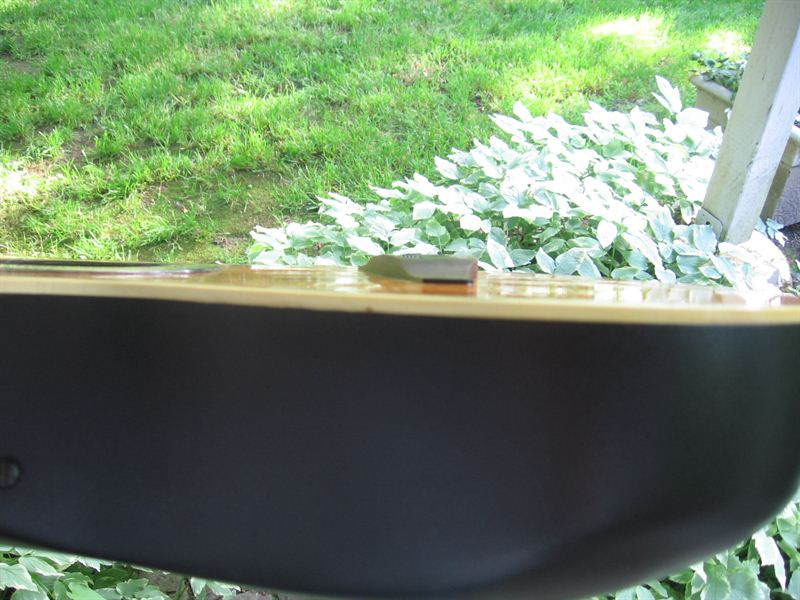
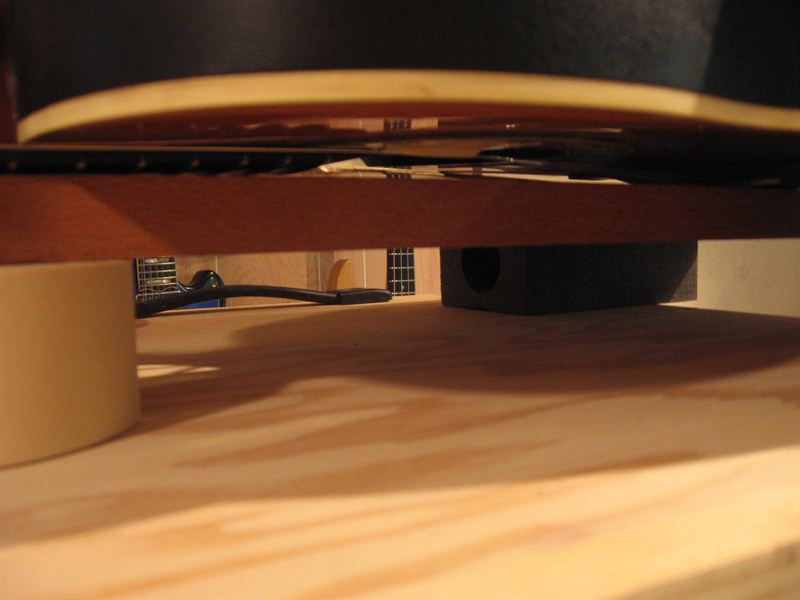
Joined: December 2003 Posts: 13983 Location: Upper Left USA | Performed a successful Bowl Bend on the 12 string! Edited by MWoody 2014-06-09 8:00 PM | ||
| |||
| dvd |
| ||
Joined: December 2003 Posts: 1889 Location: Central Massachusetts | You're gonna need some captions here, Mike, for those of us less mechanically inclined. | ||
| |||
| MWoody |
| ||
Joined: December 2003 Posts: 13983 Location: Upper Left USA | Ya, I'm just worn out from posting pics... The Fretboard was aiming deep below the saddle, close to a half inch. I clamped the neck to provide some push on the bridge area but to make sure that once things started to move they would stop in the right place. Applied the heat in the shoulder of the bowl at first but what worked was hitting the sides. Started low and slow and eventually made it to High setting at 1150 watts. | ||
| |||
| standing |
| ||
Joined: December 2008 Posts: 1453 Location: Texas | I assume you fully loosened the truss rod first? | ||
| |||
| DanSavage |
| ||
Joined: June 2012 Posts: 2303 Location: Lake Forest, CA | MWoody - 2014-06-09 6:12 PM The Fretboard was aiming deep below the saddle, close to a half inch. I clamped the neck to provide some push on the bridge area but to make sure that once things started to move they would stop in the right place. Applied the heat in the shoulder of the bowl at first but what worked was hitting the sides. Started low and slow and eventually made it to High setting at 1150 watts. Very cool. Certainly a lot easier than attempting to pull off the neck to do a reset. How much, if any, did the bowl deform in the process? | ||
| |||
| DanSavage |
| ||
Joined: June 2012 Posts: 2303 Location: Lake Forest, CA | standing - 2014-06-10 7:34 AM I assume you fully loosened the truss rod first? The truss rod only controls relief, so there isn't really any reason to loosen it to change the neck geometry. | ||
| |||
| MWoody |
| ||
Joined: December 2003 Posts: 13983 Location: Upper Left USA | Truss rod was set in the last position of "relatively flat" and the "beam" was set to stop pushing once the top of the saddle was in line with the fretboard. Since the pressure was relieved it ended up just a skosh above - perfect. Since I was in unfamiliar territory as far as "melting" the bowl I was cautious. When it finally yielded the bowl was very flexible on the main surface and I suspect just supple enough on the shoulders were the angles are present. This was done visually, I would love to get a hold of a digital contact thermometer and map out the actual temperatures needed. The original preamp doesn't work so this will end up with an OP Pro and a back hatch. | ||
| |||
| standing |
| ||
Joined: December 2008 Posts: 1453 Location: Texas | DanSavage - 2014-06-10 12:33 PM Very cool. Certainly a lot easier than attempting to pull off the neck to do a reset. How much, if any, did the bowl deform in the process? If it's an early Ovation, it's almost impossible to remove the neck for a neck reset without destroying the top &/or bowl. A "Bowl Bend" is the only solution. I undertand your comment about the truss-rod, but it still seems logical to me that you'd want to back it off before attempting the Bowl-Bend. Most of those old ones I've seen have the truss rod as tight as it will go in an attempt to compensate for the inability to easily reset the neck (along with all the shims removed under the bridge.) I haven't tried a bowl-bend (yet), but wouldn't it make sense to take the tension off of the truss rod first? -standing- | ||
| |||
| DanSavage |
| ||
Joined: June 2012 Posts: 2303 Location: Lake Forest, CA | MWoody - 2014-06-10 2:02 PM Since I was in unfamiliar territory as far as "melting" the bowl I was cautious. When it finally yielded the bowl was very flexible on the main surface and I suspect just supple enough on the shoulders were the angles are present. This was done visually, I would love to get a hold of a digital contact thermometer and map out the actual temperatures needed. Oh, yeah. Once you soften epoxy, it gets real soft. I would be curious about the actual temps, too. What you want is a digital IR thermometer like this: http://www.harborfreight.com/infrared-thermometer-93984.html This is what I use: http://www.harborfreight.com/non-contact-pocket-thermometer-93983.h... | ||
| |||
| DanSavage |
| ||
Joined: June 2012 Posts: 2303 Location: Lake Forest, CA | standing - 2014-06-10 2:31 PM If it's an early Ovation, it's almost impossible to remove the neck for a neck reset without destroying the top &/or bowl. A "Bowl Bend" is the only solution. I understand your comment about the truss-rod, but it still seems logical to me that you'd want to back it off before attempting the Bowl-Bend. Most of those old ones I've seen have the truss rod as tight as it will go in an attempt to compensate for the inability to easily reset the neck (along with all the shims removed under the bridge.) I haven't tried a bowl-bend (yet), but wouldn't it make sense to take the tension off of the truss rod first? Yep, I would agree. This is why I chose to leave the neck in place on my 1619 project and re-top the guitar around the neck. Anyone who tightens the truss rod to compensate for a neck reset doesn't understand what the truss rod does. It doesn't control neck angle. All it controls is the bend in the middle of the fretboard, also known as relief. The truss rod connects and the base of the neck and at the top of the neck. It isn't really connected to the body, or in this case, the bowl at all. All you're doing with a bowl bend is deforming the fiberglass to which the neck block is attached. So, loosening the truss rod or leaving it tight would make no difference at all when doing a bowl bend. Even if the truss rod were attached to the neck block inside the bowl, deforming the bowl would not change the truss rod's relationship with the neck block. The only thing changing is the shape of the bowl, which changes the angle of the neck. Yes, I can see where if you wanted to play it safe you would loosen the truss rod, but like I say, it would really matter one way or the other. Edited by DanSavage 2014-06-10 6:34 PM | ||
| |||


| Jump to page : 1 2 Now viewing page 1 [25 messages per page] |
| Search this forum Printer friendly version E-mail a link to this thread |
| This message board and website is not sponsored or affiliated with Ovation® Guitars in any way. | |
| (Delete all cookies set by this site) | |