| The Ovation Fan Club | ||
| ||
| Random quote: "There are more love songs than anything else. If songs could make you do something we'd all love one another." -Frank Zappa |
 Elite 1768 rehab part 2 Elite 1768 rehab part 2
| View previous thread :: View next thread | |
| Member Communities -> Bottom Feeding Luthiery Guild | Message format | |
| davegardner0 |
| ||
Joined: October 2016 Posts: 15 | Hi all, https://imgur.com/a/ovation-1768-bent-top-2Jszd I tried steaming the top and putting weights on it, which undid the warp just a little bit. But the braces themselves are definitely bent. I put the guitar back together and it surprisingly plays okay with a correct neck angle, but it still looks terrible and doesn't sound very good. I couldn't glue the fretboard extension down since the top is so warped underneath, so the high notes don't ring out at all. The birch ply behind the soundholes is delaminated a bit. I think the top has continued to shrink, too, as the binding is pulling away on the treble side of the lower bout. The fretboard wood is really rough textured too, which I don't like. I wanted to ask the group about the feasibility of a retopping project and see if there's anything I'm overlooking... Here's what I'm envisioning for the project:
I don't have a go-bar deck. Can I use deep-throated clamps to glue on the braces one by one? The fretboard extension has a tiny bit of back bow (visible in one of the photos) but I think this will be fine when it's glued to the top. Do you agree? How do you guys set up clamps to glue on the freboard extension and bridge without a conventional soundhole? I'm thinking maybe use rare earth magnets? How do you recommend removing the top? Heat gun and putty knife, to take the binding off first and then the top? I assume the kerfing (or whatever is in there?) stays attached to the bowl and is reused?
Some photos of the guitar as it sits now:
| ||
| |||
| DanSavage |
| ||
Joined: June 2012 Posts: 2332 Location: Pueblo West, CO | davegardner0 - 2025-07-05 10:06 AM 6. Fabricate and glue on some thin laminate around the soundhole areas on the back When I did my 1778T, I made the cross-grain reinforcement go all the way across the top a la the 1537. This required that I 'notch' the underside of the braces. That was unnecessary. The main purpose of the reinforcement is to ensure the top doesn't split between the sound holes. As such, you only need reinforcement over the sound holes in the same way later Elites are done. The image below is from a 2078 TX.
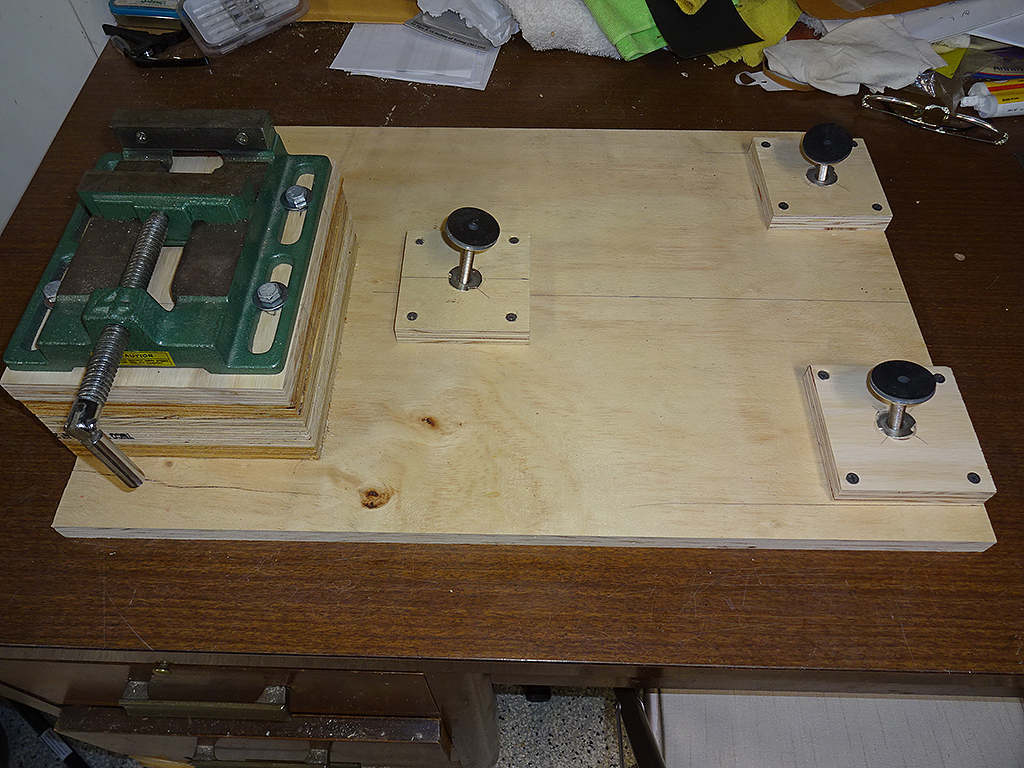
11. (Do I need to do something here with the bowl to make sure the neck is at the correct angle?) I have a jig I made that simulates a tool used by the factory. I use this to set the neck angle when the top is being glued.
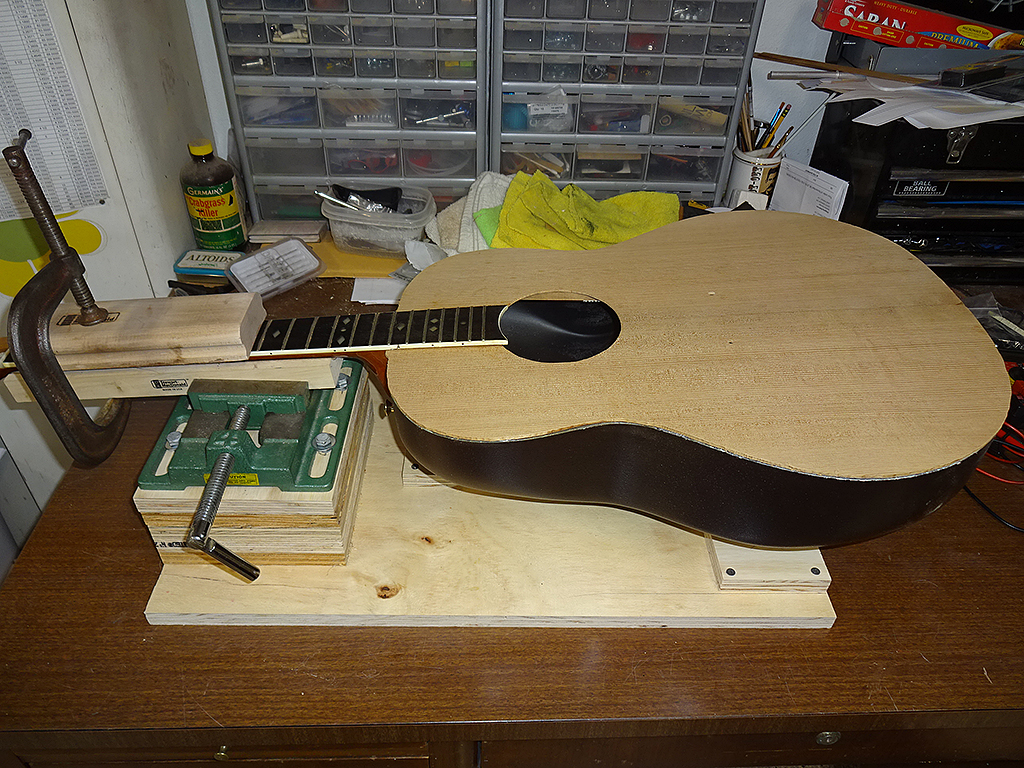
At one time I tried a bowl-bend using heat, but I found when doing Jen Chapin's 1613 that the neck angle can be reset when the top is glued. Once glued, the neck angle will remain the same. 15. Glue on the bridge (or maybe after finishing?) You'll definitely want to glue the bridge on after finishing. To ensure a good glue joint, mask the area of the bridge before applying the finish, then once the finish is done and you've cut and polished the top, remove the masking tape and use naphtha to clean any glue residue. Do Ovations use a radius on the top? I don't have a radiused sanding dish, but could buy one. It would be great if I could use one in a "standard" radius for building more conventional acoustic guitars, which is something I'd like to do in the future. Generally speaking, Ovations are one of the few guitars with no radius to the top. I don't have a go-bar deck. Can I use deep-throated clamps to glue on the braces one by one? I suppose you could use clamps for the braces, but if you're planning to build/re-top guitars in the future you'd probably be better off just spending the money to buy a go-bar deck. I bought mine from Blues Creek Guitars. They sell for $110. (See: Gobar Deck) As it sits now, the guitar has a full-width laminate across the top in the soundhole area. I see in the thread I linked above that Dan suggested in future builds only adding the laminate laminate behind the soundholes, which I'd also like to do. Any pitfalls I should be aware of? If you're going to use torrefied wood for the top and braces, I would also make the doubler from torrefied wood. I have on hand here a StewMac torrefied sitka top and a set of torrefied bracing stock, would those be acceptable to use? What top thickness do you guys recommend? I usually string my acoustics with 12's, by the way, and definitely like a responsive-feeling guitar. I'm not a heavy-handed player. Stewmac torrefied Sitka is fine. Ovation guitars are one of the few to feature tapered tops. IOW, the wood is thicker near the neck and thinner near the bottom. I made myself a custom tool to do this. The top is place in the tool, then it gets tapered when it goes through the belt sander. I usually go for ~.110" at the top and ~.094" at the bottom. I'm sure you would get good results with a top that isn't tapered. Just make the whole top ~.110". The torrefied wood will be much more responsive than a normal top. Keep in mind that torrefied wood has less shear and peel strength and normal wood. Because of this I usually recommend and use Extra Light strings so It doesn't pop the bridge off the top. I've read in some of the retopping threads about heating the bowl to change the neck angle. Is that something I need to do? Is there a way to "measure" the alignment of the neck heel and bowl before I put everything together. Either way, I'm thinking of installing the frets after gluing on the neck, so that I get a chance to sand the fretboard with everything assembled. This is how I've refretted acoustics in the past. Is there any issue with doing things in this order? Only thing I can think of is maybe it'll be really hard to trim the fret ends where the fretboard tapers at the end. If you go to my Harry Chaping 1613 thread, page 3, I explain how I did the neck reset while gluing the top to the bowl. It worked so well, this is my go-to method to reset the neck. I tried a bowl-bend once, but the bowl eventually reverted back to it's previous condition. In the photo below, the top is being glued at the same time the neck is being reset.
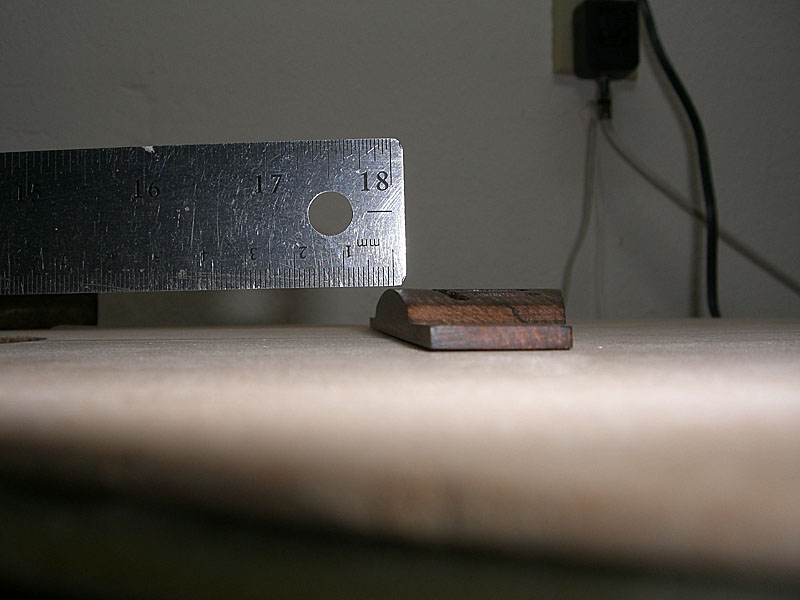
If you adjust the TR so the neck is flat, you can lay a straight edge along the middle so the end of it is near the bridge. On a properly adjusted neck, the straight edge should be just above the top of the bridge, like this:
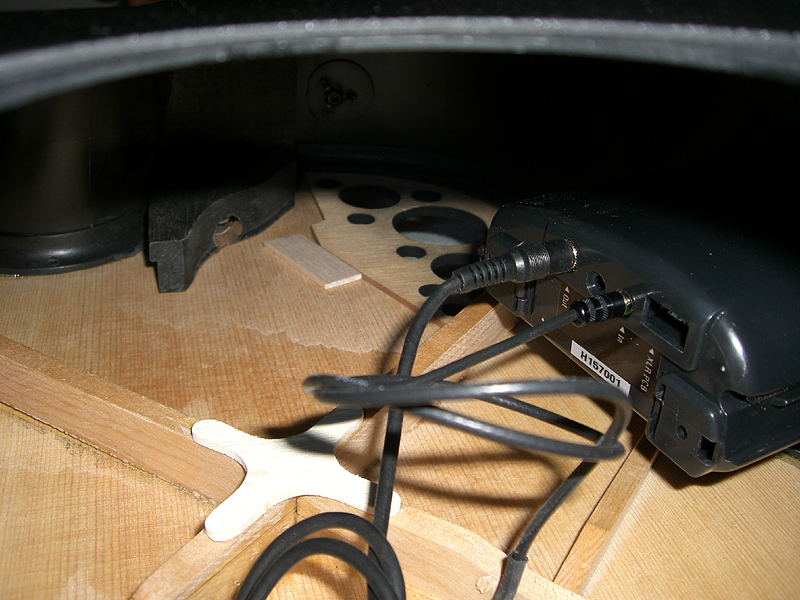
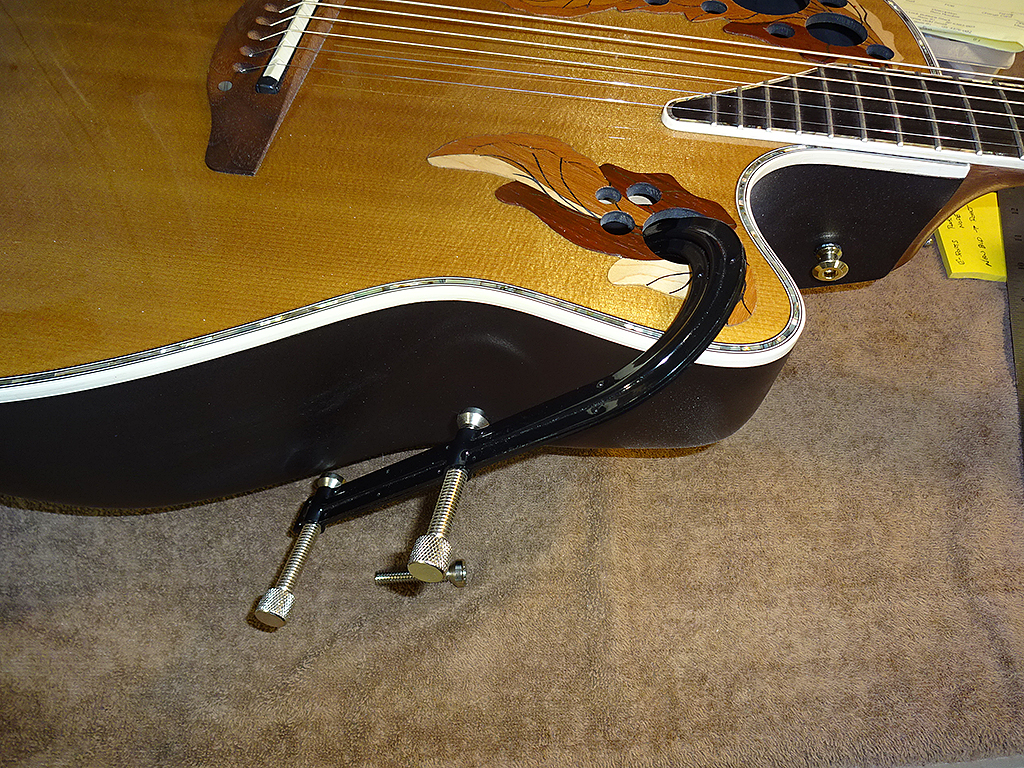
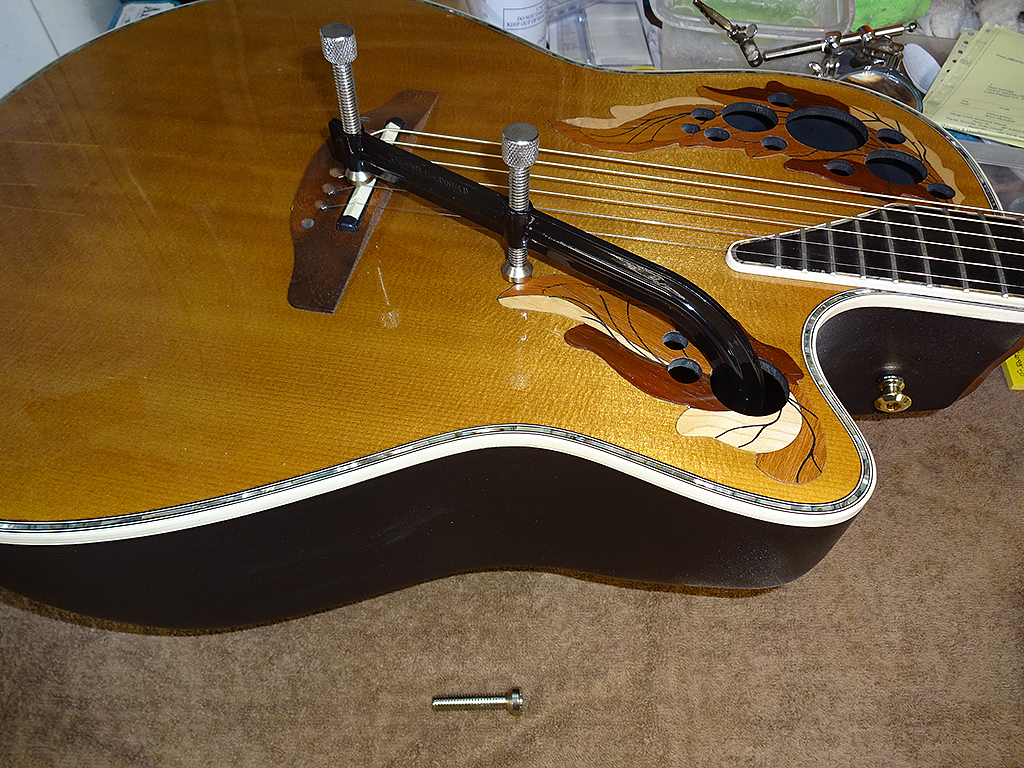
How do you guys set up clamps to glue on the freboard extension and bridge without a conventional soundhole? I'm thinking maybe use rare earth magnets? On my 1778T, I used Stewmac deep throat clamps for the bridge. You'll have to remove the bottom adjuster to get it through the sound hole, then reinstall it once it's inside the guitar.
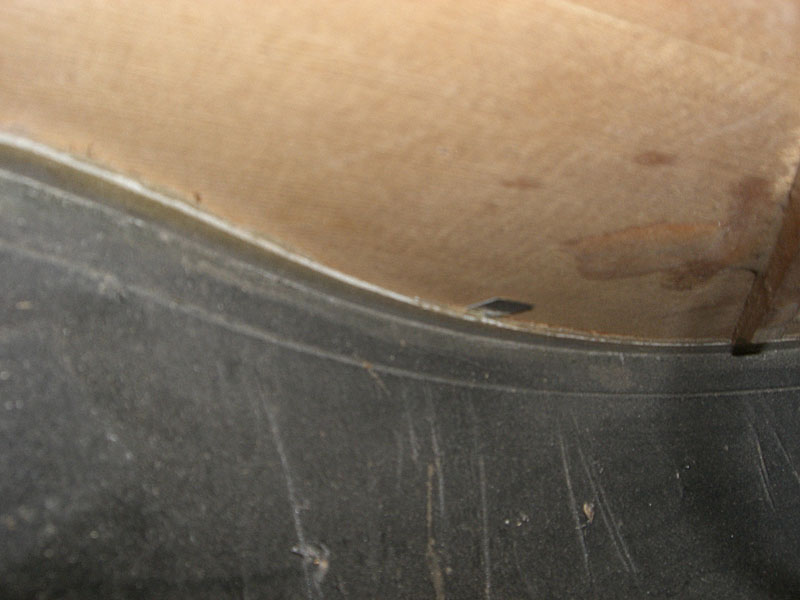
How do you recommend removing the top? Heat gun and putty knife, to take the binding off first and then the top? I assume the kerfing (or whatever is in there?) stays attached to the bowl and is reused? The binding and purfling can just be peeled off without heat. I use an Xacto chisel to remove the top. It gets slid between the lining and the wood of the top. Since you're replacing the top it won't matter if the wood gets a little chewed up. In the photo below you can just see the tip of the chisel.
| ||
| |||
| arumako |
| ||
Joined: October 2012 Posts: 1077 Location: Yokohama, Japan | Hi davegardner0,
The above is on a mid-depth bowl, but the door stop clamp works on deep and super shallow bowls as well. Not exactly the precision Luthiery solution, but it works well with the Os I've worked on. If the neck joint is properly fit, there's no need for an enormous amount of clamping force to keep the fretboard extension in place. If the extension is not designed to be floating I'd definitely recommend against leaving the fretboard floating. If the floating is too bad, I think a shim under the fretboard extension would be advisable. Oh and if you're going to take the top off anyway, you might try flatening it out after removal. My 1868 top looked like this when I first got it
After stripping the paint and removing the top it looked like this...
I was able to salvage, repurpose the top and restore my 1868. Repairing the warped top took a bit of time wetting and drying over several months, but the results were well worth it to me. Having said that, I would probably choose to re-top the 1768 if it were mine. Might be good to get the project under way and share as you go. The BFLG folks are highly experienced and always provide valuable insight. As far as I can tell there is nothing on your 1768 that isn't repairable! Good luck! Edited by arumako 2025-07-06 11:59 PM | ||
| |||
| davegardner0 |
| ||
Joined: October 2016 Posts: 15 | Dan and amurako, thank you both so much for the wealth of info! This is wildly helpful. As I move forward with the project I'll definitely post updates. And I'm sure I'll have more questions as I go along... Dan, do you have a thread for the build of that elite that you showed gluing the fretboard extension on? I hadn't seen that thread if it exists. Regarding the thickness of the top, I'm pretty good with a hand plane and scrapers, so I was thinking of thicknessing the top that way. Therefore I do think I can accomplish the taper as easily as a constant thickness top. I think I just need to buy a deep throated thickness caliper to check the top thickness as I go. The taper on the top is really interesting...any idea who ovation does it that way? And I guess same question on the non-radiused top, seems like an odd choice? Oh and when you say extra light strings, what gauge do you mean? 11's? Do either of you have thoughts on the alternate bridge and bridge bolts I'm thinking of using? How about pulling the preamp and using a soundboard pickup? I can't think of a reason it wouldn't work, but I wouldn't be able to confirm until I'm in pretty deep. | ||
| |||
| DanSavage |
| ||
Joined: June 2012 Posts: 2332 Location: Pueblo West, CO | davegardner0 - 2025-07-07 5:45 PM Dan, do you have a thread for the build of that elite that you showed gluing the fretboard extension on? I hadn't seen that thread if it exists. On the Frankenvation, (1778T) I never glued the fretboard extension to the top. I did that because the 1537 neck I used was made for a deep bowl and I planned to eventually buy a neck for a mid-depth bowl and swap it out. It doesn't really make a difference in tone. Early Adamas guitars didn't have the extension glued, either. The taper on the top is really interesting...any idea who ovation does it that way? And I guess same question on the non-radiused top, seems like an odd choice? According to early documentation tapering the top was done for two reasons. 1) To allow a greater 'excursion' in the belly which enhances tone and timbre. 2) To make the sound board above the sound hole stiffer and more resistant sinking. WRT the lack of radius, it was probably done to speed up production. Oh and when you say extra light strings, what gauge do you mean? 11's? I use Elixir 80/20 Nanoweb Extra Lights. (.010"-.047") Do either of you have thoughts on the alternate bridge and bridge bolts I'm thinking of using? How about pulling the preamp and using a soundboard pickup? I can't think of a reason it wouldn't work, but I wouldn't be able to confirm until I'm in pretty deep. I've only ever used the Ovation bridges/pick-ups/pre-amps, so I wouldn't be able to offer an opinion. For the bridges that are bolted, Ovation used aluminum screws, washers and nuts. They also used glue to secure the nut so it didn't rattle loose. If you're going to use a pinned bridge you'll need to install a bridge plate on the underside of the top as the spruce alone won't prevent the ball ends from pulling through. Most bridge plates use maple, but my Alvarez uses rosewood. I've used rosewood for a bridge plate on one guitar and it worked well. Edited by DanSavage 2025-07-08 10:27 AM | ||
| |||
| arumako |
| ||
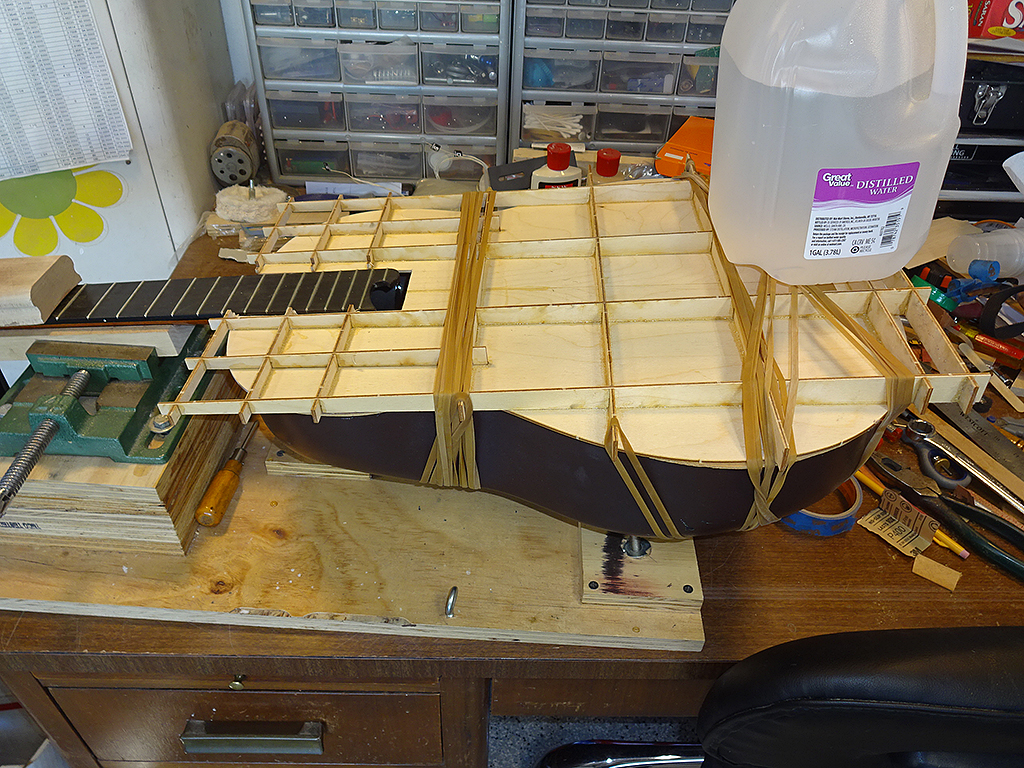
Joined: October 2012 Posts: 1077 Location: Yokohama, Japan | davegardner0 - 2025-07-07 9:45 AM Do either of you have thoughts on the alternate bridge and bridge bolts I'm thinking of using? How about pulling the preamp and using a soundboard pickup? I can't think of a reason it wouldn't work, but I wouldn't be able to confirm until I'm in pretty deep. Hi davegardner0, You're getting great advice from Dan. He's helped me with pretty much all of my BFLG projects. I think there would be overwhelming consensus that he's the "Go to" guy at the BFLG and beyond. As far as using the "All Parts pinless bridge" that will definitely work. Whether you bolt the bridge down or not might depend on the strength of the adhesive you use. I've replaced bridges on some Celebrity models and used the space age epoxy Hysol 9462. As long as the bridge is properly clamped and you're glueing wood to wood (as opposed to wood to poly finish), there is no need for bolts (of course, the bolts are there just to protect players and others in the event the bridge pops off so you might want to add bolts just in case anyway). If you're thinking the bridge might need to come off some time in the future, I'd go with Hysol 0151 with bolts. The adhesives you choose will definitely guide your project in different directions. I also might be able to provide some insight with the bridge and "soundboard pickup" inquiry. I'm assuming you mean round transducer style pickups, right? I've worked with K&K and other brands. They'll definitely work on your 1768; however the configuration will very much depend on how you decide to brace your 1768. If you're going to go with factory specs, I think you'll be using the Quintad bracing; but that will raise some challenges if you decide to go with traditional 3 transducer PUPs (two transducers aren't enough to provide level dynamics across six strings) because the center brace goes right through the middle of the bridge where one of the transducers need to be positioned. I think the pic below might help...
That middle transducer brace blockage will be an issue with A-braced and K-5 braced O's as well. There's several alternatives IMHO. One is to use X-bracing. The other is to keep the Quintad bracing and test for the transducers sweet spot where dynamic balance is achieved. I've put transducer PUPs in some classical guitars with intricate bracing configurations. If you use some masking tape on the guitar top and double-stick (tape) the transducers onto the masking tape, you can test for the sweet spot on the guitar. The masking tape really helped to protect the delicate French polish finish while I stuck and peeled off the transducers to find the perfect position.
This particular classical guitar used a Fleta style bracing pattern modified for a cutaway. There was no way to get the center transducer positioned perfectly under the bridge. Once the ideal position was determined (as shown above) the masking tape was marked at the center and the transducers were glued (very carefully using CA gel) under the sound board using two hands (lots of dry runs!) I was afraid that the proximity of the transducers would detriment the output volume, but my fears were unfounded. Hope this helps! Cheers!
| ||
| |||


| Jump to page : 1 Now viewing page 1 [25 messages per page] |
| Search this forum Printer friendly version E-mail a link to this thread |
| This message board and website is not sponsored or affiliated with Ovation® Guitars in any way. | |
| (Delete all cookies set by this site) | |