|
| ||
| The Ovation Fan Club | ||
| ||
| Random quote: "There are more love songs than anything else. If songs could make you do something we'd all love one another." -Frank Zappa |
 A Rare Elite Style Nylon in Need of TLC A Rare Elite Style Nylon in Need of TLC
| View previous thread :: View next thread | |
| Member Communities -> Bottom Feeding Luthiery Guild | Message format | |
| arumako |
| ||
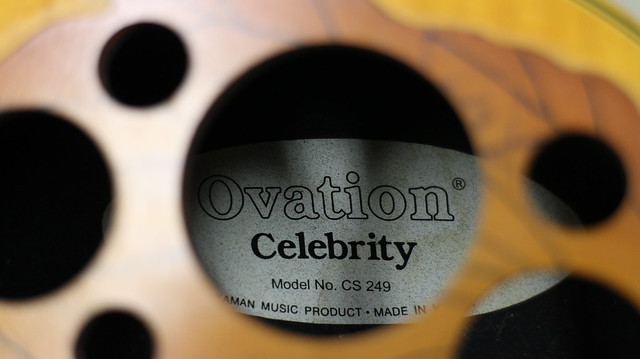
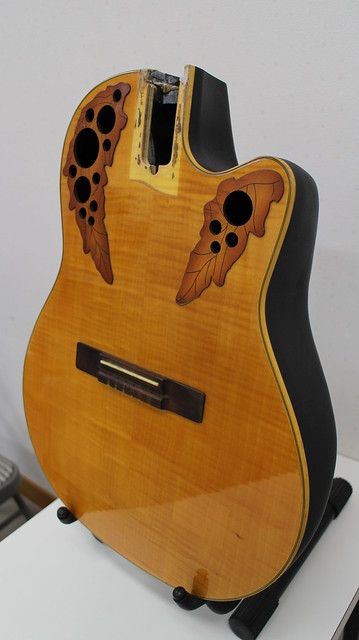
Joined: October 2012 Posts: 1093 Location: Yokohama, Japan | Hello OFC-BFLG! Been a long time since my last post. Still struggling to move forward with most of my personal projects. Brutally busy, with just time enough to glimpse through Dan's mesmerizing Parlor Project for Patch (ooh that's some good consonance!). But I came across this rare and interesting nylon string Celebrity that suffered a failed neck reset attempt. It's called a CS249-4Y, an MIK model made in 2000...
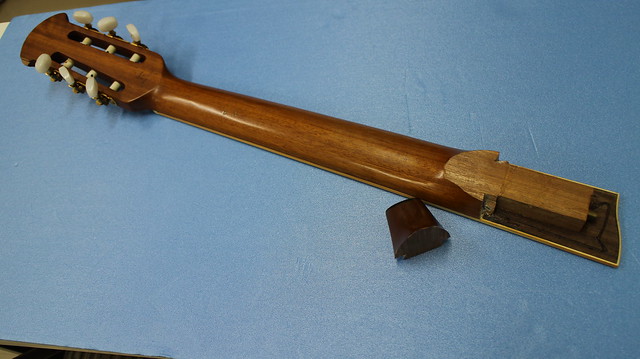
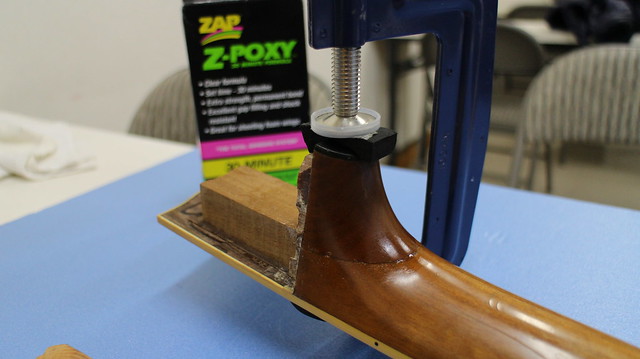
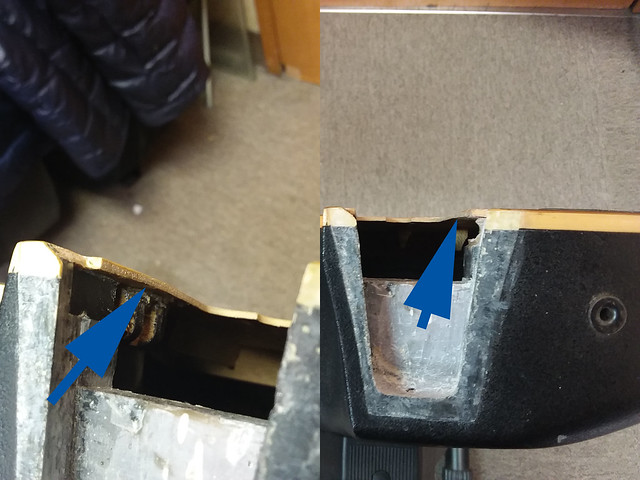
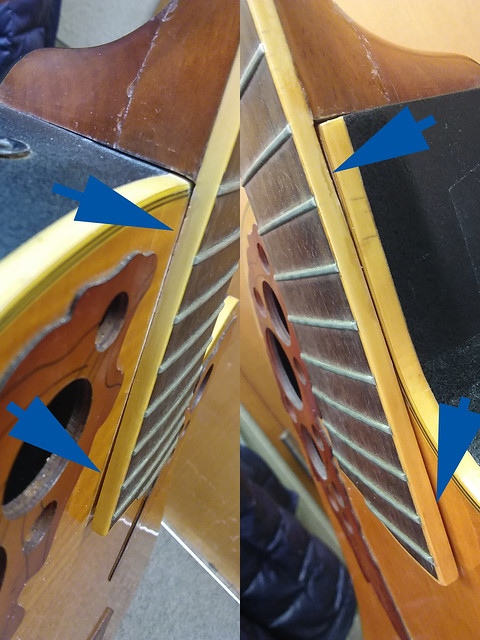
The failed neck reset split the heel from the neck. Not good, but definitely fixable...
The separated top and neck support block will need to be glued back together as well as a lot of cleaning up around the neck/body joint...
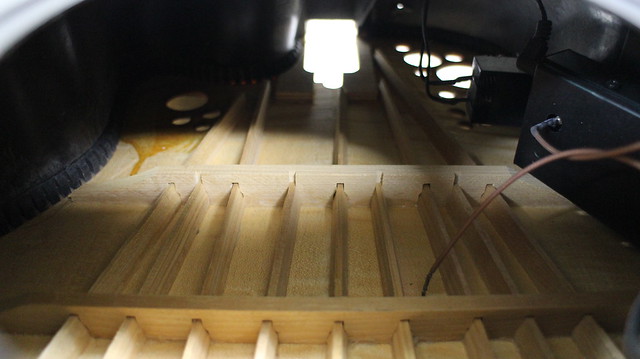
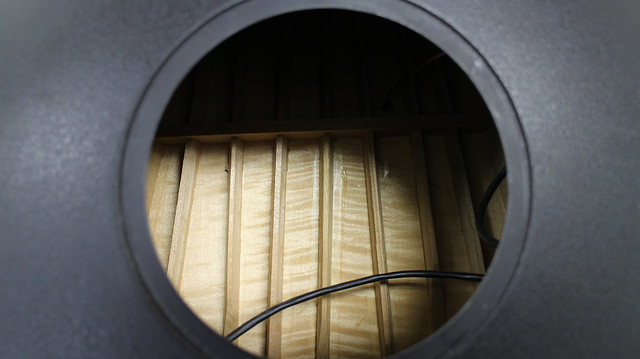
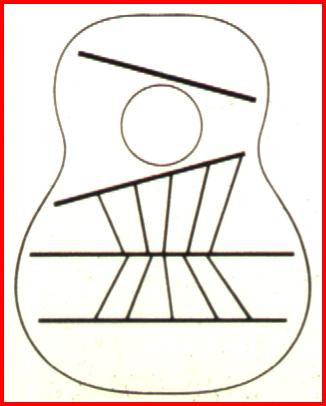
The CS249 features an interesting bracing pattern called the "K-3 Classical" (Thanks to the JP Brochures at Ovation Tribute). Never seen this one before! Still, a very clean layout...
Opened the manhole cover and was suprised to find that this laminated maple top was actually a spruce sandwich with maple on both sides...and with flames at that!
Probably for the Asian market only. Not sure how folks would respond to a nylon string guitar with a 14th fret neck/body joint and a laminated flame maple top in the States...
However, being an O... an Elite with sunburst maple Epis and all... I must say she has a mysterious appeal to her...
Well, first things first...need to get the neck heel repaired. Decided to go with Z-Poxy's 30 Minute Formula. It's not exactly the strongest adhesive, but a well fitted neck heel does not undergo a lot of stress like a bridge/top. So, I'm thinking it will suffice?
If I'm wrong, I'll have to redo the job with some Hysol 9462. Dan's been using Hysol 0151 a lot recently, and I would sure love to give that a try, but Hysol is hard to come by in Japan! Z-Poxy's never let me down before though; so I think it'll be okay... Back in the day in Japan, these guitars retailed for about a $1000 with a street price of $800 (soft case included). They were like the "AX" O models being sold today, and they were pretty popular. You'll find them auctioned off at premium prices over here, but they don't come up very often. Sure hope I can get this thing back to its former glory...come to think of it, a nice nylon stringed O would round out my collection nicely. Wish me luck! Edited by arumako 2018-01-25 11:12 AM | ||
| |||
| DanSavage |
| ||
Joined: June 2012 Posts: 2345 Location: Pueblo West, CO | Yep. That's an unusual guitar, all right. The 14-fret nylon is the same as the 1124/1624 Country Artist series. FWIW, Patch's parlor will also be a 14-fret nylon. Zpoxy 30-minute epoxy should do fine for this application. The two main differences between 9462 and 0151 is that 9462 is white-ish and has a Tg of ~350 degrees. 0151 is clear and has a Tg of ~160 degrees. The clear makes it easier to glue because, well, it's clear. The lower Tg means that the glue can be softened and joints separated without burning the wood or finish. | ||
| |||
| arumako |
| ||
Joined: October 2012 Posts: 1093 Location: Yokohama, Japan | DanSavage - 2018-01-25 2:04 AM Yep. That's an unusual guitar, all right. The 14-fret nylon is the same as the 1124/1624 Country Artist series. FWIW, Patch's parlor will also be a 14-fret nylon. Zpoxy 30-minute epoxy should do fine for this application. The two main differences between 9462 and 0151 is that 9462 is white-ish and has a Tg of ~350 degrees. 0151 is clear and has a Tg of ~160 degrees. The clear makes it easier to glue because, well, it's clear. The lower Tg means that the glue can be softened and joints separated without burning the wood or finish. Yeah, the CS249 is kind of a funky combination, but was really popular over here. Can't wait to hear Patch's parlor. That is one beautiful guitar and you've really perfected your craft! Btw, I meant to ask, and I shoulda asked in your thread, but since your here... did you get that rosette from the Mother Ship? I really appreciate the info about Hysol 0151 too. 9462 is now a regular part of my adhesive arsenal, but it is really intense. I like the lower Tg and clear color of the 0151. Definitely will pick some up the next time I'm out in the States! | ||
| |||
| DanSavage |
| ||
Joined: June 2012 Posts: 2345 Location: Pueblo West, CO | No, Patch supplied the rosette. | ||
| |||
| DetlefMichel |
| ||
Joined: May 2011 Posts: 760 Location: Muenster/Germany | The bracing of this guitar should easily stand the tension of light steelstrings. It has more braces than my old Ovation 12string guitars. I would even say that it is "over-braced". This guitar top will never make any trouble...and probably low feed-back when played loud. The look is phantastic. | ||
| |||
| arumako |
| ||
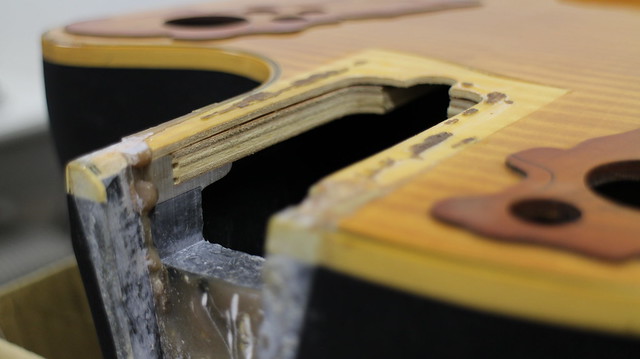
Joined: October 2012 Posts: 1093 Location: Yokohama, Japan | DetlefMichel - 2018-01-26 9:00 PM The bracing of this guitar should easily stand the tension of light steelstrings. It has more braces than my old Ovation 12string guitars. I would even say that it is "over-braced". This guitar top will never make any trouble...and probably low feed-back when played loud. The look is phantastic. Hi DetlefMichel. Your right, those bracings are completely overkill. Not sure what the overall effect on feedback will be, but the top is structurally bullet proof and then some...However, the underside of the neck joint is a bit of a problem... This probably came from the factory with a stressed neck joint area. You can tell there is bowing on both sides of the neck cavity. The laminated support blocks have been removed in the picture below.
Buldging tops like this are not uncommon with Celebrities, but they wreak havoc on the reassembled guitar. Even good adhesives (at least for this kind of application) will give after several years of use. In most cases, the adhesives used on instruments are intended to maintain the structural integrity of components that are built with precision. Good fit enables the adhesives to do their job. Keep things rigid, but when components fit poorly, the adhesives need to work extra hard for a long time to keep things bent or filled eventually leading to failure.
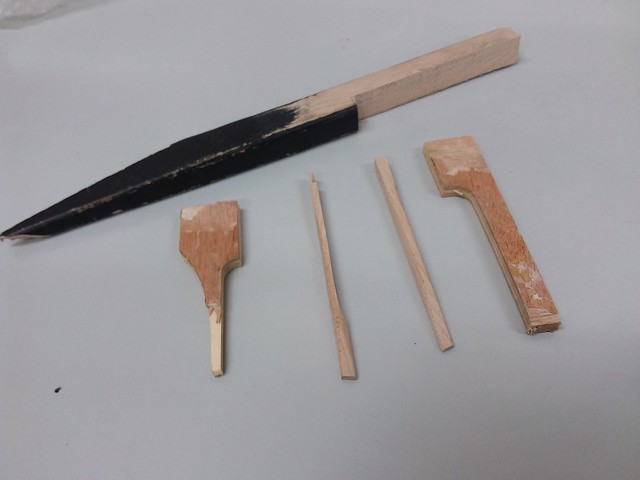
I can glue this back together as is, and the guitar will probably hold together for several years, but eventually the neck will start rocking back and forth and the joint will fail again. Since the laminated support blocks are always problematic when removing the necks from Celebrities (they inevitably split and crack as the neck is removed) I've decided to rebuild this area. After removal of the laminated support blocks, I cut out some new braces to replace the blocks.
Years ago, a friend of mine gave me a bunch of old hockey sticks that he wasn't using. They are made from high quality Birch and they are perfectly suited for high stress bracing areas like this.. The laminated blocks are on the outside and the new Birch braces between them. Birch can be cut with intricate patterns without losing integrity. My Dremmel Moto-Saw comes in handy for jobs like this. The left Birch brace is cut to fit right under the cutaway side of the neck joint. Carefully clamped the right side and waited 24 hours for full-cure of the adhesives.
A good clamping strategy is really important. Dry runs, dry runs, dry runs! Clamped the left side and waited another 24 hours for full-cure.
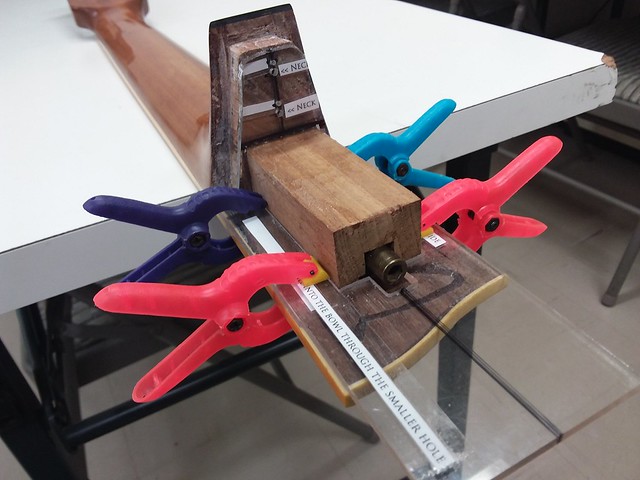
This guitar is going to get a bolt-on neck, and my drilling jig had to be upgraded. The unit is made from acrylic and is used to accurately position the drill for the inserts in the neck heel and the holes in the bowl.
From this position, the bolt inserts can be positioned precisely in the neck heel.
From this position, the holes can be drilled into the bowl with precision. The key is alignment!
The center lines in each component has to be marked with precision. At this point, I'm ready to start drilling the holes and preparing the neck with the inserts. Making progress surely but slowly! More to come in a couple of days!
| ||
| |||
| DanSavage |
| ||
Joined: June 2012 Posts: 2345 Location: Pueblo West, CO | It's coming along nicely, Ken. I like your neck bolt drilling jig. | ||
| |||
| DetlefMichel |
| ||
Joined: May 2011 Posts: 760 Location: Muenster/Germany | All this looks familiar. Your drilling jig is great! And I love your constructions, most of the time better than the original. | ||
| |||
| arumako |
| ||
Joined: October 2012 Posts: 1093 Location: Yokohama, Japan | Thanks Dan and DetlefMichel. Yes, it does look familiar doesn't it. I did similar work on my CC247-GS. For that one, I had to rebuild the neck housing in the bowl because the neck was misaligned by about 3~5mm depending on where the measurement was taken. It seems that I am seeing more and more Celebrities from the mid-nineties to about 2005 needing neck resets like this one. Fortunately over here in Japan, these carry their value pretty well and are, for the most part, worth the trouble. Since my CC247-GS project was based in PhotoBucket the photos are no longer visible. I figured leaving another one of these projects might help somebody, somewhere, someday... So, the bolt hole drilling jig worked out really well. I also made a jig for SSBs, that works great too. These are keepers for sure and will continue to see a lot of use in the future. When the center-line of the jig is aligned to the center-line on the guitar, you can't miss...
The Birch bracing has flattened the top nicely too. Before installing the inserts, the holes are lined with Hysol 9462. The adhesive provides a bit of moisture and lubrication while the inserts are being screwed in, and provides the inserts with enormous holding power when the adhesive dries completely. My CC247 bolt-on conversion used 6mm bolts/inserts, but the joint doesn't need that much support; and so, I opted for double 4mm bolts/inserts this time. When Dan rebuilt Darren's Ultra he stayed with a glue-on construction for fear of insert "tear out", which is a real concern when working with inserts. The tenon joint needs to be clamped to make sure it doesn't crack. Clamping pressure needs to be balanced - too much or too little can increase the chances of cracking the tenon...
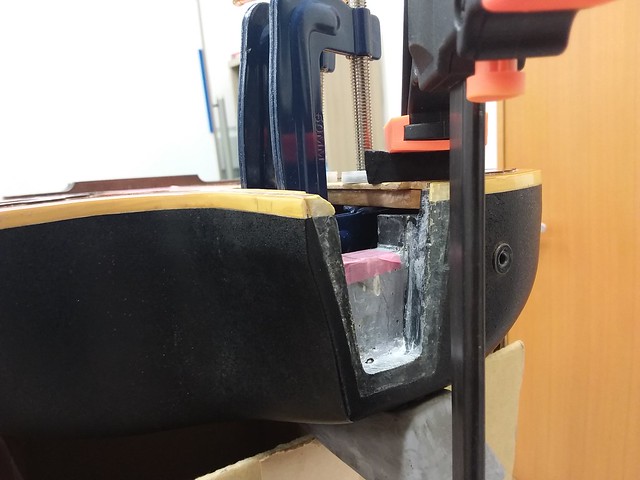
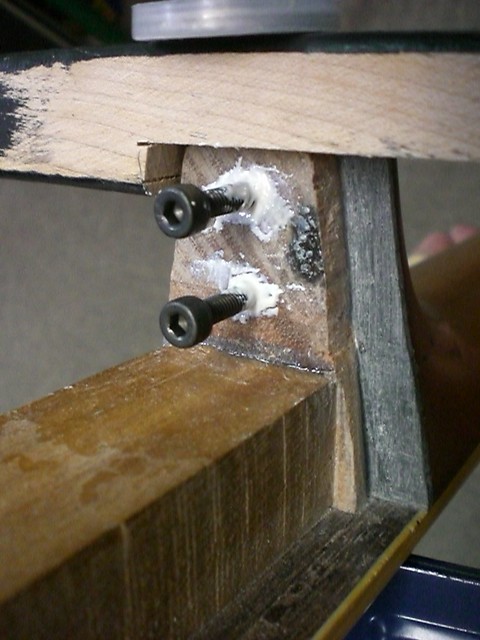
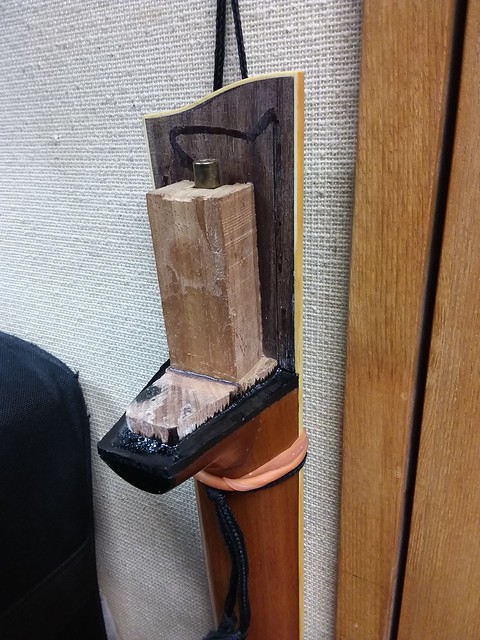
The inserts are seated 3mm into the hole and covered with more Hysol 9462 (this stuff really is amazing) with the bolts screwed in. After 24 hours, the adhesive is basically cured, but will allow the threads to cut-out of the inserts without clogging or compromising the insert's ability to receive the bolts. After 48 hours, Hysol gets really hard, and I don't want to find out that I've got a bolt stuck in the insert with no hope of removal! In addition to the bolt and insert holes, there was a need to rebuild the heel of this neck. The process is the same as when I worked on the CC247, but years of rocking in an unstable neck joint wore down the neck heel/body joint area. it was also probably chiselled a bit as well. The Birch braces that helped to flatten the top really amplified this issue. Again, I filled the neck heel with Smooth-on's Smooth-Cast Onyx black casting resin. Like Hysol, this stuff really works great.
In the photo, the resin is already hardened, and needs to be shaved down to fit final specs. When compared to the previous photo, you can kind of tell that a lot had to be shaved off. To ensure proper intonation and fit (including neck angle and alignment) about 2mm to 2.5mm needed to be shaved off leaving approximately 1mm to 1.5mm of black resin. That is a lot of added material to a neck heel. Now, just wait 48 hours for full cure. Assemble and wait another 48 hours and we're done! And now, a fine quote from the Silver Screen to articulate my thoughts most intimately... Inigo Montoya: I do not suppose you could speed things up? Edited by arumako 2018-02-05 8:48 PM | ||
| |||
| arumako |
| ||
Joined: October 2012 Posts: 1093 Location: Yokohama, Japan | Chiselling and scraping down the neck heel took quite a bit of time, but the adhesive needed to dry anyway...just glad the long wait is over (for now, at least) to make a little bit of progress. It's time to glue the neck back into place. Contemplated just going with CA glue, but there were still some gaps that needed to be filled, and it became apparent that there was going to be some amount of 'load' where the neck extension glues to the body. Decided to go with a Japanese brand epoxy for this step. After administering a thin coat of glue to both the body and the neck (not the heel as that will be secured using the bolts), the neck is positioned in the body and bolted on lightly.
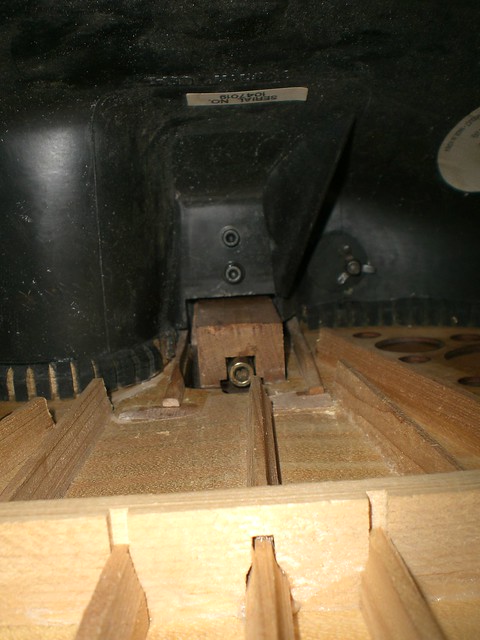
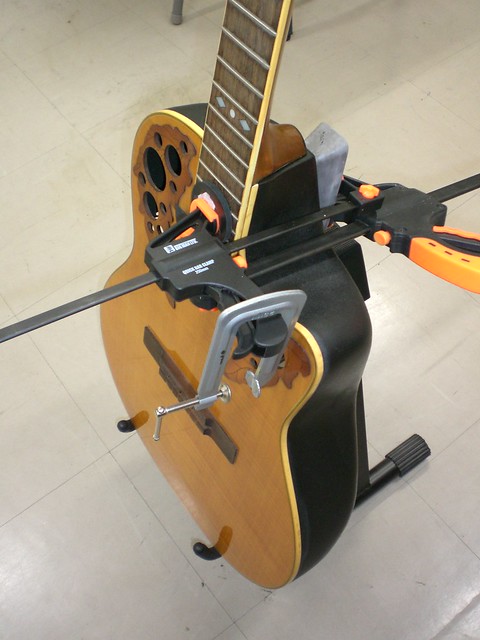
You can see how the neck-joint cut into the body is skewed to the left (more space on the left side than the right). This kind of skewing sometimes results in the neck being misaligned on Celebrity models. The unfortunate risk and reality of mass production. As you work through the construction of the Celebrity models, it's really evident that the 'mass production process' is prioritized in the design of the guitar itself. You can also see how the bracing can interfere with the fit of the truss rod wrench. The 'neck-end' of the center brace needed to be cut a bit (1 cm) to ensure clean fit of the truss-rod wrench. Otherwise, the neck would have had to be removed every time the truss-rod had to be adjusted! Had it not been for the dry runs, I would have missed correcting this flaw! Whew... With the bolts in place, the neck is clamped into position. Elite style guitars are a real challenge when it comes to clamping strategy. I usually use a small clamp through the holes in the Epi's, but this time I needed to apply considerable amount of clamping force to get the top and neck extension to sit flat. There's always the risk of clamping too tightly forcing a brace to pop loose or worse yet the sound board to cave-in. Fortunately, nothing popped, cracked or caved in...for this attempt anyway...
My "door-stop" clamping jig actually works really well. It is hard enough to provide clamping power, but soft enough to "give" without destroyed the clamped components. Once the clamps are in place and position is verified. I go in and tighten the bolts to about 80~90% tightness. THERE! Almost done...Now, let the guitar sit and don't touch the guitar for another 3 days. Let's see - Oh yeah! Gotta fix up the scraggly wire on the piezo...
THERE! Now, let the guitar sit for 3 days Ken...Whew..., ...but then I suddenly hear a voice inside my head, "You can do more Ken. You can do more!" No, no, no, I say to myself, "Don't touch the guitar...just let it sit. Just 3 days! 3 days! You can wait 3 days!" But again, "You can do more Ken." Oh, oh, Oh NOOOOOO! Just one more thing...
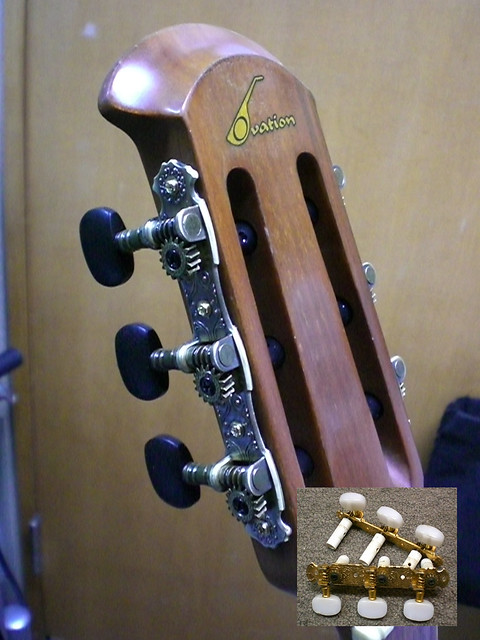
Decided to change out the old and tired white tuning pegs for some new/but inexpensive black ones....HMMMMMMM! I like it! ...and you know, this is how impatience ruins perfectly good projects before they ever reach completion! One dropped tool; one drop of the guitar or bang into a wall or door post and it's over... was fortunate that didn't happen this time! Sheesh...at this rate, I'll never be a real luthier, I hate waiting... oh, but she is coming along nicely...can't wait to string her up and take her for a spin! Edited by arumako 2018-02-09 11:17 PM | ||
| |||
| Jonmark Stone |
| ||
Joined: May 2008 Posts: 1565 Location: Indiana | Thumbs up! | ||
| |||
| DanSavage |
| ||
Joined: June 2012 Posts: 2345 Location: Pueblo West, CO | Really nice write-up Ken. I haven't been commenting too much, but I have been avidly following your progress. The braces on this guitar are complete overkill, especially for a nylon string guitar. Dan | ||
| |||
| Love O Fair |
| ||
Joined: February 2016 Posts: 1882 Location: When?? | You guys are so much more brave than me. If I were to attempt any of this, and post it here, it would be more like watching a wreck happen in slow-photo-motion. | ||
| |||
| DarenSavage |
| ||
Joined: December 2016 Posts: 128 | Love O Fair - 2018-02-11 5:20 PM You guys are so much more brave than me. If I were to attempt any of this, and post it here, it would be more like watching a wreck happen in slow-photo-motion. Who doesn't love a slo-pho-mo wreck? EweToob is full of 'em! arumako: Like Dan, I've enjoyed reading your build. Love the drilling jig! Edited by DarenSavage 2018-02-11 11:03 PM | ||
| |||
| arumako |
| ||
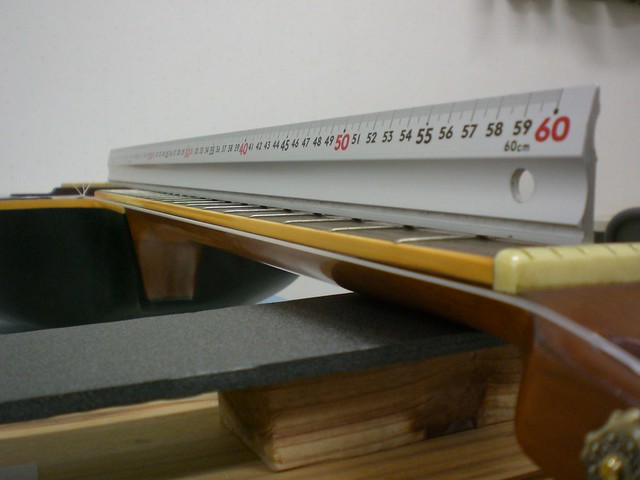
Joined: October 2012 Posts: 1093 Location: Yokohama, Japan | Love O Fair - 2018-02-11 7:20 AM You guys are so much more brave than me. If I were to attempt any of this, and post it here, it would be more like watching a wreck happen in slow-photo-motion. Thanks for the encouragement everybody! Now, I wish "courage" was my source of inspiration; however, my slo-pho-mo projects are the ones that never get posted! Oh, and there are a few of those...just a peek into my make shift tatami mat shop with the caved in tops and peeled off bridges decorating the walls testify of that! May this project not end this way! With that, let's push forward! Strung-up this interesting nylon Celebrity, and some final adjustments were in order. First, a simple re-dressing of the frets. I am indebted to FlySig for his "A beginners guide to re-fretting your guitar" and EVO Gold frets on a Deacon" posts here... http://ovationfanclub.com/megabbs/forums/thread-view.asp?tid=40319&posts=21&start=1 http://ovationfanclub.com/megabbs/forums/thread-view.asp?tid=40376&posts=17&start=1 Thanks to these posts and many of Dan's posts, I now do all my fret work in-house. This is most helpful when you live in a country where full fret jobs are 300 bucks a pop! Here the truss-rod is tightened until the neck is completely flat...
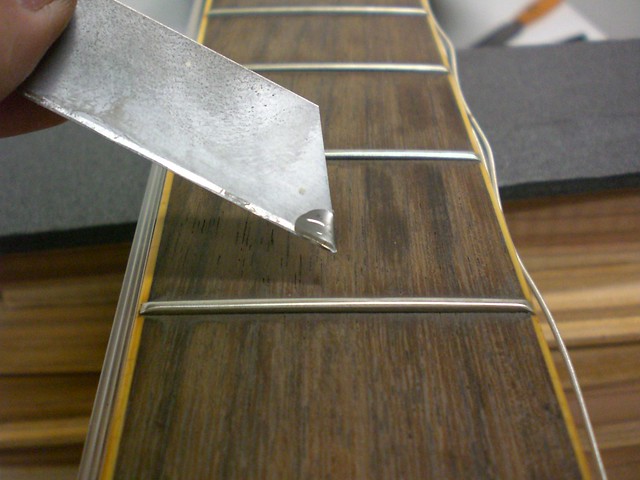
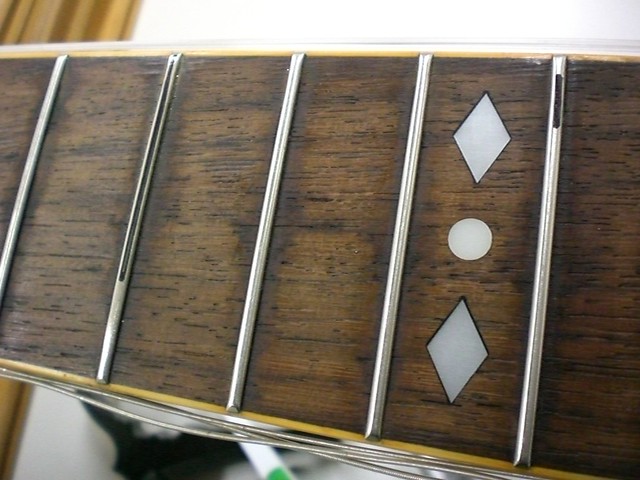
I then used my fret hammer (basically a urethane tip hammer) and lightly tapped the frets to ensure they were seated properly. Many of the frets were floating just a tad. Needed to whip out the CA glue to adhere them into position. A drop of high viscosity CA glue is applied to the tip of an exacto knife...just touch the tip to the joint between the fret and the fretboard; and viola, the adhesive wicks itself into the groove.
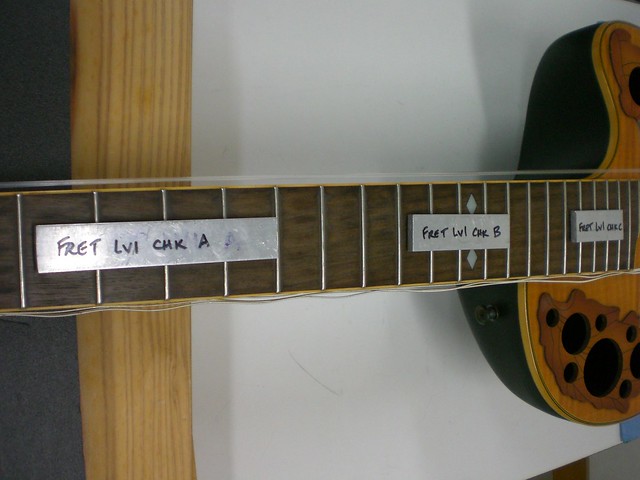
This was performed on every fret from both sides. Once hammered and glued into place the fret level seemed to be in good order. Called my fret level checker into service...
These are perfectly straight aluminum bars that are sold at a nearby hardware store for about two bucks. Took a hack saw, cut them down to size and filed the edges. Tool A is used for the 2nd to 5th frets, tool B for the 6th through 12th frets and so on...works great! The tool is placed over three frets at a time and if the middle fret causes the tool to rock at all (you can tell by the "click" sound), you've got a fret that needs to be leveled (shaved down). Each of these rockin' spots are marked with a black marker...
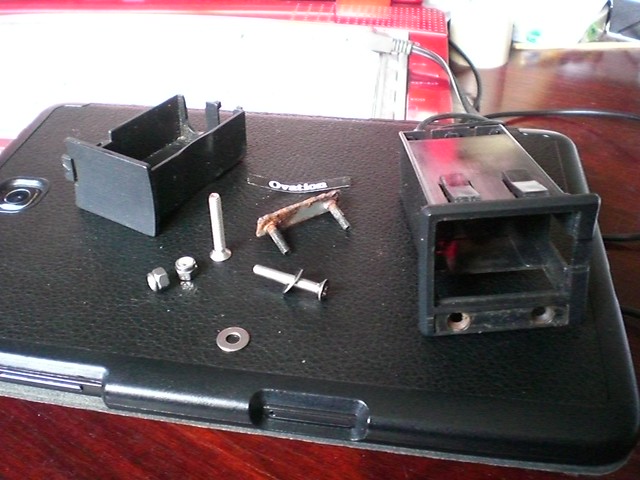
Every fret that is marked is leveled with a fret crowning file (in this case my 2mm file) until the rocking is eliminated. It's a pretty time consuming job, but absolutely necessary to ensure "fret-buzz" freedom. The last thing to do, was to get the battery case installed. The bolts and backing plate were completly rusted together and had to be drilled for removal. No backing plate availability here, and so I opted for some nylon locking nuts.
The "Ovation" screw cover needed some fresh double-stick tape on the back, so that was refreshed and put back together. Now, I think we're ready to take her for a spin!
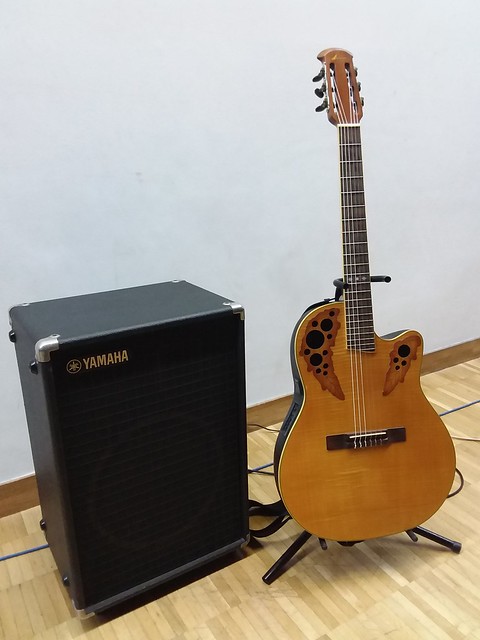
Oh, I should mention this amplifier. It is a Yamaha KS-50, a small (& heavy!) super reliable 40W keyboard amp. I've tried a lot of acoustic amplifiers, but this little baby delivers like no other amp I've tried. It is not designed to make the player 'sound' good. It is designed to amplify and reproduce the source with exacting efficiency. The circuitry is pretty simple, and these are auctioned over here in Japan for anywhere between 25 bucks to 75 bucks. My other fav amp is a Peavey Session 400 steel guitar amp (she's getting maintenanced right now with all new caps throughout), Not exactly "forgiving" amps. These are no frills simple discrete circuit amps, but they are true tone producers. Anyway, this nylon string guitar is easy to play. As is typical of most Os, the action is very low for this sort of configuration. She's currently wearing medium gauge/medium tension strings, but they feel a bit loose, so I ordered high-tension strings for her. The wider classical-ish neck feels really good in my hands too. Now, how does she sound? Electronically she sounds fine, a bit on the bassy side, but relatively balanced - I think; however acoustically? Well, how should I put this? I think...it sounds like, you know, if I put strings on the MDF coffee table I bought from IKEA (they have IKEAs in Japan, meatball lunches and all!)...let's just say, I'm not inspired. So, as you all might have guessed, the K-3 Classical bracing is a kind of resonance killer. I'm no engineer, but as DetlefMichel suggested, it seems the bracing is designed to bring balance to the sound produced by the pre-amp. It definitely is not my mother's classical guitar (well, literally, the classical guitar "standard" in our home is my Mom's '68 Saburo Nogami - Brazilian Rosewood, German Spruce handmade true Luthiery beauty). The laminated flame maple top, the 14th fret neck/body joint, and the bracing suggests that this nylon string was intended to be played through an amp only. That begs the question, "Can a laminated maple table, 14th fret neck/body joined nylon string guitar sound good acoustically?" I think...I want to find out... the real fun begins from here! Oh I hope, I don't demolish this thing and turn this into a slo-pho-mo project! | ||
| |||
| 2wheeldrummer |
| ||
Joined: February 2014 Posts: 715 Location: moline,illinois | Very nice work and an excellent job resurrecting a unique O, I love to watch you guys fix these and someday I may aspire to some minor luthery. So how are you going to try to improve the sound acoustically,shave braces ???? | ||
| |||
| jay |
| ||
Joined: January 2009 Posts: 1249 Location: Texas | I have owned a couple of 1624's and a 1613. Plugged in...great nylon/classical sound...unplugged acoustically...they are just not up to the resonance of an all wood classical....low volume, short on sustain, imo. I wouldn't blame it on the bracing...for some reason, the nylons don't drive the soundboard or maybe the bowl is to blame. Or maybe it is me. | ||
| |||
| arumako |
| ||
Joined: October 2012 Posts: 1093 Location: Yokohama, Japan | 2wheeldrummer - 2018-02-12 10:56 AM So how are you going to try to improve the sound acoustically,shave braces ???? Thanks 2wheeldrummer! Yes, the idea is remove, cut, shave and scallop bracing to change the acoustic voicing of the guitar. Very risky and potentially life threatening (for the guitar, I mean)...however, if the project goes slo-pho-mo, I can revise the top completely, and rebuild her with new bracing, etc... jay - 2018-02-12 11:33 AM I have owned a couple of 1624's and a 1613. Plugged in...great nylon/classical sound...unplugged acoustically...they are just not up to the resonance of an all wood classical....low volume, short on sustain, imo. I wouldn't blame it on the bracing...for some reason, the nylons don't drive the soundboard or maybe the bowl is to blame. Or maybe it is me. Thanks for the timely input/caution jay. Are the 1624 and 1613 X-braced? Fan braced, maybe? Either way, I'll give serious consideration before proceeding. If the 1624 and 1613 aren't acoustically inspiring; then it might be the bowl or some other factor that I'm completely missing. Food for thought! | ||
| |||
| jay |
| ||
Joined: January 2009 Posts: 1249 Location: Texas | The best I could do on short notice was this 1116 - Concert Classic, Nylon strings, Deep bowl, VT 10 bracing, 2" nut width. I would think that the 16 and the 13 were similarly made...but the 13 had cedar and the 16 had spruce You will probably find a consensus that the deep bowl did make a profound difference acoustically between these two nylons. | ||
| |||
| moody, p.i. |
| ||
Joined: March 2002 Posts: 15679 Location: SoCal | The deep bowl most people thing about is the 1113/1613/1763 -- the deep bowl classical. It had fan bracing. | ||
| |||
| DanSavage |
| ||
Joined: June 2012 Posts: 2345 Location: Pueblo West, CO | The 1113/1613 used Ovation's double-fan braces.
But, IMO, there are two things that kill the response of these classical guitars: 1) The top is too thick. Traditionally, steel string guitar tops are ~.100" thick. Nylon string guitars are ~.093" thick. Ovation guitar tops are tapered top-to-bottom from ~.140" to ~.100". Thicker tops means better durability, but lower response, especially with nylon strings. Guitar manufacturers started tucking braces under the lining, not because it sounds better, but because it reduces warranty work due to bracing glue joints that have popped off the top. The problem is that tucked braces also reduce top response. The end result of these two features means that the nylon topped Ovations will be less responsive than their traditionally-built wood brethren. WRT this guitar's braces I'm reminded of an expression we used when describing the construction of model airplanes -- The more you beef it up, the more it'll fly like a cow. Same for guitar construction. Personally, I would leave this guitar alone. No amount of shaving is going to make these braces sound good when played acoustically.
| ||
| |||
| DanSavage |
| ||
Joined: June 2012 Posts: 2345 Location: Pueblo West, CO | FWIW, the top on Patch's parlor is ~.095" with no taper. | ||
| |||
| moody, p.i. |
| ||
Joined: March 2002 Posts: 15679 Location: SoCal | What is the top thickness on my 1113? | ||
| |||
| DanSavage |
| ||
Joined: June 2012 Posts: 2345 Location: Pueblo West, CO | As I recall, tapered from ~.110" - ~.95". But, it's also Adi spruce, with is stiffer than cedar or Sitka spruce. Edited by DanSavage 2018-02-13 1:24 PM | ||
| |||
| moody, p.i. |
| ||
Joined: March 2002 Posts: 15679 Location: SoCal | And it sounds wonderful. Don't forget that...... | ||
| |||
| Jump to page : 1 2 Now viewing page 1 [25 messages per page] |
| Search this forum Printer friendly version E-mail a link to this thread |
| This message board and website is not sponsored or affiliated with Ovation® Guitars in any way. | |
| (Delete all cookies set by this site) | |


