|
| ||
| The Ovation Fan Club | ||
| ||
| Random quote: "Believe me when I say that some of the most amazing music in history was made on equipment that's not as good as what you own right now." - Jol Dantzig |
 Fun Project - Made a Custom Truss Rod Cover For My Dan Savage Parlor Fun Project - Made a Custom Truss Rod Cover For My Dan Savage Parlor
| View previous thread :: View next thread | |
| Members Forums -> General Posting | Message format | |
| Patch |
| ||
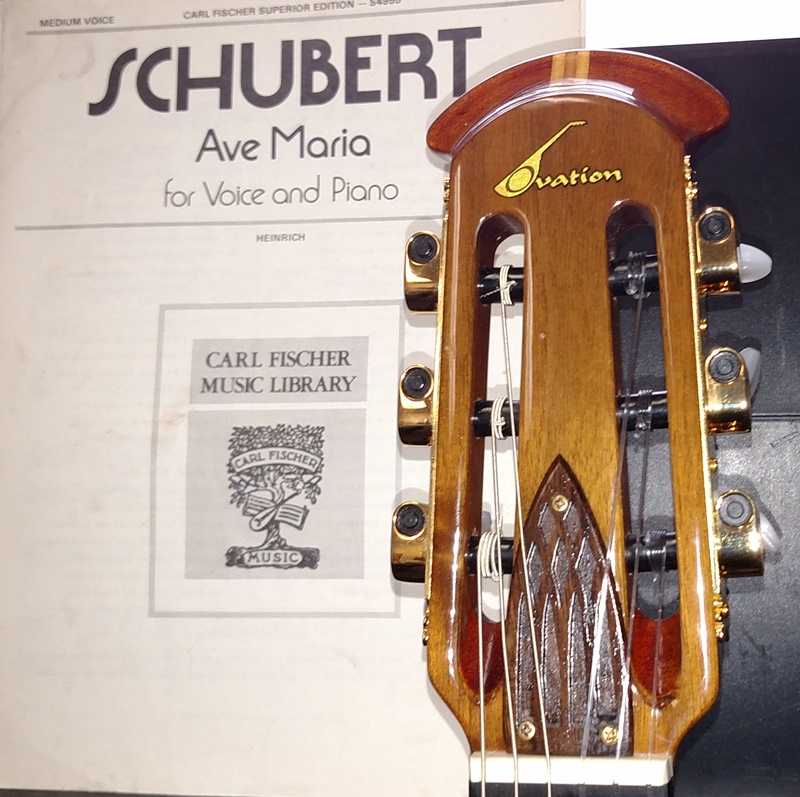
Joined: May 2006 Posts: 4236 Location: Steeler Nation, Hudson Valley Contingent | Many of you remember the custom parlor project Dan put together for me earlier this year. The only thing I really wanted to change was to get rid of the plastic TRC, so I asked Dan to put a carved one I sent on there. But strangely enough, I didn't quite like how it looked. The Walnut was just too stark a contrast to the redwood top and rosewood binding, so I started thinking....I know, I know...."a dangerous pastime." As often happens when one overthinks a hobby, a simple idea develops a life of its own. So here's what happened: I wanted something to pick up the rosewood binding, so I ordered a "not-too-expensive" (aka...cheap) headplate veneer from eBay.
I then drew up a basic template in Microsoft Publisher in a church window motif; nothing too ornate, but I liked it in the end.
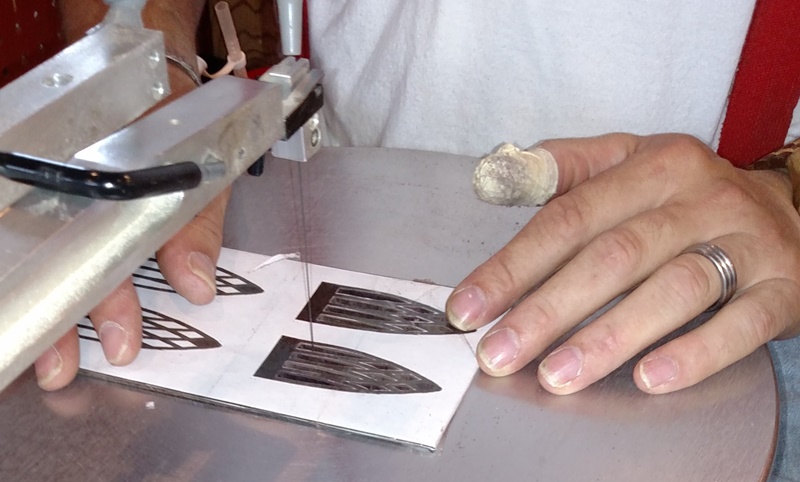
I then printed it out and taped it to the veneer. After failing to find anyone locally willing to cut them out for me, I got the bright idea to take it with my on our annual trip to the Kutztown Folk Festival in PA. There are always lots of "woodsy" type craft stalls there, and sure enough, I found someone willing to help me out...
I had him cut out two windows and two blanks. (BOY did that turn out to be prescient!!!!)
The idea was to place each window on a blank before finishing and trimming. We traveled from PA to visit my father in VA, and I took advantage of his basement workspace to finish trimming out the pieces and sand them to size.
It was during the final filing of one edge that I managed to snap one of the windows. Thank goodness for the second one!!!
I managed not to snap that one, although I misplaced one of the screw holes. However, a little filler and color makes you have to look for it. And after sanding and finishing it with a nice gloss, I knew I had the right idea. I am probably going to do this for some of my other guitars as well, matching woods and aesthetics as I go. (And probably just using a single screw at the top instead of three. Without a drill press, it's kind of hard to perfectly place the holes, so better safe than sorry...know what I mean? After all of that, I can only say: "This looks really cool!!!!"
| ||
| |||
| Love O Fair |
| ||
Joined: February 2016 Posts: 1882 Location: When?? | Very cool idea, Patch. It looks terrific! | ||
| |||
| DanSavage |
| ||
Joined: June 2012 Posts: 2345 Location: Pueblo West, CO | Nice job, Patch. Since you're planning to do this again, let me pass along this little tip. Instead of taping the templates to the wood, get a can of spray glue and put a light coat of glue on the back of the template, then stick it down to the wood. It will keep the template in place while you cut the holes. When you're all done cutting, just use some naphtha (lighter fluid/Coleman camp fuel) to soften the glue and the template will peel right off the wood. Then, use a little more naphtha to clean any remaining glue residue from the wood, if needed. | ||
| |||
| Patch |
| ||
Joined: May 2006 Posts: 4236 Location: Steeler Nation, Hudson Valley Contingent | Yep, I was definitely at the bottom of the learning curve Dan. Although in my defense, I originally figured this attempt would rurn into a bit of an object lesson, so I could do it right next time.But it turned out nice enough ro go ahead and mount it. Of course, now I'm thinking about doing others, along with all the other ideas such thoughts happen to dig up. | ||
| |||
| Nancy |
| ||
Joined: December 2014 Posts: 1713 Location: Frozen Tundra of Minnesota | THAT is COOL!!!! LOVE that Design, Cathedral Windows, and it looks Gorgeous on the Headstock! GREAT Job Patch!!! | ||
| |||
| cholloway |
| ||
Joined: March 2005 Posts: 2791 Location: Atlanta, GA. | Very classic looking. Good job! | ||
| |||
| arumako |
| ||
Joined: October 2012 Posts: 1093 Location: Yokohama, Japan | Beautiful work Patch! Really creative too. Thanks for sharing! | ||
| |||
| ovie26 |
| ||
Joined: June 2012 Posts: 162 Location: Pittsburgh | Very cool, Patch! I love your redwood guitars! | ||
| |||
| hwebster |
| ||
Joined: June 2005 Posts: 496 Location: California | Nice! Good job, | ||
| |||
| Old Man Arthur |
| ||
Joined: September 2006 Posts: 10777 Location: Keepin' It Weird in Portland, OR | That does look Good. And it is always good to get "spares" just in case something untoward happens. | ||
| |||
| DetlefMichel |
| ||
Joined: May 2011 Posts: 760 Location: Muenster/Germany | Great idea! I love special trussrod covers!! Yours is trussrod cover art at it´s best. What a fine work on an extraordinary guitar. You should do more, next time with colored glass windows? I added a metal inlay in the trussrod cover of my Adamas 2008:
or this special trc on the old custom legend 12string:
Edited by DetlefMichel 2018-09-18 12:44 PM | ||
| |||
| DaveKell |
| ||
Joined: November 2011 Posts: 741 Location: Fort Worth, TX | Wow do I EVER have some ideas after this thread! Time to get out my Dremel and StewMac router attachment, my pearl blanks and get after a few of these myself. Thanks! | ||
| |||
| alpep |
| ||
Joined: December 2001 Posts: 10583 Location: NJ | nice | ||
| |||
| ProfessorBB |
| ||
Joined: January 2006 Posts: 5881 Location: Colorado Rocky Mountains | Really beautiful. Nice project. | ||
| |||
| Jump to page : 1 Now viewing page 1 [25 messages per page] |
| Search this forum Printer friendly version E-mail a link to this thread |
| This message board and website is not sponsored or affiliated with Ovation® Guitars in any way. | |
| (Delete all cookies set by this site) | |


