| The Ovation Fan Club | ||
| ||
| Random quote: “Music is a moral law. It gives soul to the universe, wings to the mind, flight to the imagination, and charm and gaiety to life and to everything.” -Plato |
 '74 1115-1 Pacemaker Restoration '74 1115-1 Pacemaker Restoration
| View previous thread :: View next thread | |
| Member Communities -> Bottom Feeding Luthiery Guild | Message format | |
| arumako |
| ||
Joined: October 2012 Posts: 1054 Location: Yokohama, Japan | @ tpa: Thank you tpa. Really glad to be back at the OFC/BFLG. Very much a hack both musically and repairing guitars, but they certainly challenge my creativity! The work bench I'm using now was my late mother-in-laws kitchen prep table. She wanted me to repair it and keep it, but I was so busy and never able to get around to it. It was the first thing I fixed before I got to work on guitars.
Here's how she looks with it... You can see that the mortise side of the tenon cover is a bit off dimension. The cover will be secured with Hysol 9462 and will effectively seal these gaps so not a huge problem but definitely not intentional. The bolt inserts in the neck tenon are secured, but a bit proud (intentional), so a circular piece will need to be cut around the bolt holes in the neck tenon to ensure a clean fit.
On a completely different note: This morning, I went out to walk my dogs at a nearby park, and the Sakura trees were in full bloom - just beautiful. Of course, I thought about my Mom and father-in-law, but I also thought about OMA and Bburg. Hope it's not inappropriate to share these here (some O's were included just-in-case). So, first in memory of OMA (with "Vincent" the '97C he sold to me; even went through the trouble of sending it to Japan):
and In memory of Bburg (with the 1680 he encouraged me to get. It's been everything he said it would be and more):
God rest their beautiful souls. Thanks for letting me share OFC/BFLG. Edited by arumako 2025-04-05 10:14 PM | ||
| |||
| Love O Fair |
| ||
Joined: February 2016 Posts: 1832 Location: When?? | Hi, Ken.. thanks for the PM. Always great to hear from you, and I am sending my condolences on the loss of your mother and your father-in-law. I still have my copy of "If I see Your Face Tomorrow", which I think is an absolutely awesome piece, and I have played it in due honor. I also recall the story of the racoon invasion. They were both very fortunate to have you as a son. Bless you and your family! It is wonderful to see you back here in the BFLG! This 1115 restoration is like finding an old mystery novel I thought I lost and getting back into the story-- and you are the very best of story tellers! Edited by Love O Fair 2025-04-06 9:00 AM | ||
| |||
| arumako |
| ||
Joined: October 2012 Posts: 1054 Location: Yokohama, Japan | Hi Al! Thank you for reaching out to me. I really appreciate your condolences and encouragement. I hope you were not severely affected by the AA Flt 5342 accident back in January. You were the first person I thought about when I saw that news.
Now here's all the pieces I'll need to glue the neck tenon cover into place. The bolt inserts were installed a bit proud so the inside of the tenon cover has been routed by hand to accommodate. For this application, Hysol will be used as a filler as well as an adhesive so controlled squeeze-out is needed to fill the gaps between the tenon and the cover. When bolted into place, the large washers will distribute the clamping force to ensure the glue squeeze out is even.
Applied a thin layer of Hysol 9462 on both the neck tenon and tenon cover. Also added the adhesive in the gaps that needed to be filled. Slowly tightened the bolts with equal force (by counting turns) and wiped away squeeze out. Unscrewed the bolts and cleaned the bolts and the threads in the inserts and repeated this procedure three times until the bolts were tightened sufficiently. In this particular case, I lightly tightened the bolts with a wrench (a bit more force than finger tightening was needed to get the amount of squeeze out that I was looking for. Tomorrow, I'll unthread the clamping bolts, clean-up the squeeze out with an exacto knife, and drill the bowl-side neck block bolt holes from the diameter they're at now (6mm) to 7mm (might go up to 8mm for one of the holes). Whew! That's all the progress I can make for today. Gotta clean up my work station, wash the dishes, clean the bath and enjoy a movie with the wife! I'll never take normalcy for granted again! Good night OFC/BFLG! To be continued tomorrow... Edited by arumako 2025-04-07 7:40 AM | ||
| |||
| arumako |
| ||
Joined: October 2012 Posts: 1054 Location: Yokohama, Japan | Uh Ooh...so it looks like I missed sharing a pic of the clamped-in tenon cover in my last post so here it is! The bolts and large washers (which will be used with the neck bolts come final assembly time) distributes the clamping pressure over a larger area.
As this is a "no load" area as far as gluing and clamping goes, the bolts were removed after 12 hours. Hysol 9462 is pretty easy to work with up to about 36 hours of cure time. Once you pass that point the stuff gets ultra hard. So sooner the better (past 12 hours anyway) for cutting out flashing and excess squeeze out in a no load area like this. After removing the bolts and cleaning out the insert threads, my Japanese carpenter's saw was called into service. You all have probably used one of these too, but these things are amazing. Used the cross-grain side of the blade with no downward pressure. All I need to do is concentrate on the cut angle and straightness of the blade. Pull back lightly and slowly and this thing saws any wood (maybe except African Blackwood) ultra clean.
Notice how the Hysol adhesive fills the gaps in the areas that are not perfectly mated. Hysol will bond with the wood and the bond provided by the adhesive will be stronger than the wood itself. This characteristic of the adhesive enables me to cut, chisel and sand the adhesive as if it is wood (again up to about 36 hours of curing).
Did another dry run without using bolts. The upper area of the neck/bowl joint is still a mess, but the messy looking area does not contribute to the overall structural integrity so I might just leave it as is; however, the fit of the fully restored joint is really good especially for a hack like me! Been practicing cutting better dove and mortise/tenon joints and the practice has definitely paid off! Tempted to just use Hide glue without the bolts to see how the joint holds up! Then again, this is a 12 string and the enormous pull of the string tension with regard to this particular guitar is still etched into my brain... Naw, forget the Hide glue; better stick with the bolts!
Final fitting will need to be done before the fret board is glued on; but the neck looks aweful straight and lining up nicely to the bridge!
COOL! This is so exciting! This 1115 may sing again after all! Wait, wait, wait... a lot can still happen before this babby is done. Better not get too ecstatic and keep my feet on the ground lest my blissful enthusiasm be the demise of this project! Okay, okay...gonna take a breather. Will be back tomorrow! As always, comments and advice are always welcome! Thanks for all the encouragement OFC/BFLG Family! Edited by arumako 2025-04-07 10:08 PM | ||
| |||
| Love O Fair |
| ||
Joined: February 2016 Posts: 1832 Location: When?? | @arumako - >>>Japanese carpenter's saw was called into service. You all have probably used one of these too, but these things are amazing.<<< Actually, no, I have not used one.. but my curiosity was piqued by your own usage, and I went looking to learn. And learn I did, in that I am typically one who grabs just any saw off the wall and moves with it like a defensive lineman on a football scrimmage; and thus the finished product often looking like a sacked quarterback. So now I know. And for those who don't, I recommend this very basic video explanation to complement the reasoning and technique of Ken's fine workmanship. Here is the link -- https://www.youtube.com/watch?v=ZnR_-Lbflgg Edited by Love O Fair 2025-04-08 10:39 PM | ||
| |||
| arumako |
| ||
Joined: October 2012 Posts: 1054 Location: Yokohama, Japan | Love O Fair - 2025-04-08 12:31 PM ...in that I am typically one who grabs just any saw off the wall and moves with it like a defensive lineman on a football scrimmage; and thus the finished product often looking like a sacked quarterback. So would it be safe to say that you saw with enthusiastic athleticism? Lol! An ex-carpenter friend of mine was kind enough to give me his chisels, saws and hand planers among other tools when he retired. He was also kind enough to teach me how to sharpen and store these amazing tools. Recently, folks from all around the globe have been buying Japanese saws and knives (especially sushi knives) so I figured many if not all BFLGers probably knew about these saws! My bad! So thank you for the nice informative video link! Glad to be making consistent progress each day. While waiting for the glued together neck to cure fully, I finished drilling the neck block bolt holes. The holes are currently 6mm and the bolts are 6mm so the fit is tight and alignment is perfect. However, slightly larger bolt holes allow for a bit of flexibility when final assembly time comes around. I might want just enough space under the fret board extension to accommodate a shim. On the other hand, I might want to completely remove the poly-finish where the fret board extension meets the top to lower the overall fretboard height by 0.7mm or so. I started with a 7mm brad point bit using a manual turning handle.
By slowly turning the brad point bit manually, the bit centers itself and makes a clean straight cut. At this point, an electric drill (at least in my hands) is too powerful and can throw the alignment of the bolt hole way-off. Eventually, I settled on an 8mm diameter for the both holes. The necks fit was finalized by sanding (using 360 grit sand paper double-stick taped onto a flat aluminum bar) the bottom and lower sides of the neck's tenon. Proceeded with 10 strokes and dry fit, another 10 strokes and dry fit. After 60 strokes, the neck was ready for a final bolt-on check. Checked the neck's right side fit...
Checked the center...
Ooh...the center is still 0.3mm proud! Just a few strokes with the sand paper... Now, the left side of the neck body joint...
Just a few more strokes and the neck body joint is mated perfectly! Woohoo!
Okay! Now, how does she look with the fret board in place?
WOW! She's looking mighty good! Let's get a measure of the neck angle...
That looks absolutely perfect! Yeah! The last thing I need to do now before assemblng the fret board to the neck is to route two strips down the length of the neck from the nut to about the 5th fret and add a pair of CFRP flat-bars to reinforce the neck. However, try as I might, I can't find my CFRP flat-bars! So I guess that means this is a good time to "call it a day." I'm getting awful sleepy, anyway! So thanks for letting me share OFC/BFLG. Good nighty night! Edited by arumako 2025-04-10 9:51 AM | ||
| |||
| DanSavage |
| ||
Joined: June 2012 Posts: 2325 Location: Pueblo West, CO | That's looking really good, Ken.
| ||
| |||
| arumako |
| ||
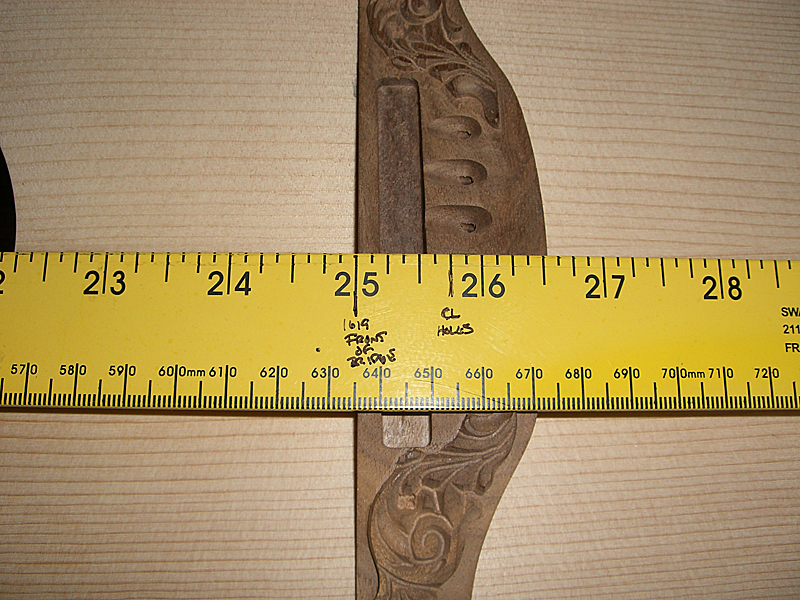
Joined: October 2012 Posts: 1054 Location: Yokohama, Japan | DanSavage - 2025-04-14 12:19 AM Make sure to measure the scale length before gluing the fret board down. It should be 25" from the face of the nut to the front of the bridge. Thanks for the reminder Dan. Since the neck was being restored to its original position I assumed the scale length would be spot on. It's never a good idea to assume anything when all I need is a measurement to verify so...
Thankfully, everything looks to be in order! Now, I just need the CFR strips that I ordered to arrive! Woohoo! Edited by arumako 2025-04-17 5:23 AM | ||
| |||
| arumako |
| ||
Joined: October 2012 Posts: 1054 Location: Yokohama, Japan | The CFRP strips have arrived! Perfect timing as I wait for the 1868 nitro-cellulose finish to dry out before wet sanding. Cool! This 1115 had a slightly twisted neck, but once the fret board was removed, the entire neck has straightened out. These strips aren't going to necessarily make the neck stronger or stiffer; but having had a histrory of bowing and twisting, these strips will definitely provide a significant amount of resistance to protect the neck for a long time to come.
I'm going to treat the groove cutting process like cutting two super long fret grooves, so my fret groove cutting saw and other fretting tools will be used. But before the cutting begins, I need to pencil in the exact location of the groove and use some straight aluminum strips as cutting guides. Light duty double stick tape will be enough to keep the guides in place. Here again, my dremel will be over-powering in my unsteady hands so we'll proceed manually!
This fret cutting saw is the ideal tool to make the initial cut for the grooves. Masking tape serves as a depth guide so that I don't cut right through the neck!
Once the ideal depth is achieved, it's time to call my stewmac re-fret saw to action. This will widen the groove just a bit. At this point the aluminum guides are removed; however, the process becomes ultra delicate. If the grooves aren't cleaned often, saw dust will buildup in the narrow groove. Forcing the saw without cleaning or sawing out of line could split the entire neck right at the groove. Straight strokes and brush/vacuum often!
The fret slot cleaning tool helps to clear out the groove right up to the square edge. Again, digging in too hard, too deep or too crooked can be disastrous!
The grooves are cut from the area under the nut all the way to the neck joint. They need to be just the right width for a snug fit. Too snug risks a cracked neck. Too loose will put strain on the adhesive instead of the CFRP strip causing neck instability! Just right and this neck will never over-bow or twist. After about two-hours, both grooves are done without damaging the neck in any way. Yes!
Now it's time to glue the CFRP strips into the grooves. The CFRP strips are a permanent installation so I'm going with Hysol 9462 again. Need to get plenty of glue in the groove to make sure there are no air pockets that might hinder structural integrity. The adhesive is applied in the groove and on the strips. The strips are pushed in and pulled out several times to ensure glue is in the groove from end-to-end. Wipe the initial squeeze-out, lightly hammer the strip (I hammered on an aluminum strip with the same width as the CFRP strip) down into the groove so that the strip is slightly lower than the top of the neck. Wipe the rest of the squeeze out, and voila!
It's really important to make sure the neck is absolutely straight, once the strips are glued into position; and because of the thixotropic (a word I learned here at the BFLG!) nature of Hysol 9462, the assembly need not be clamped down as there is no load being placed on this glue-up. Also decided to fill the two non-sensical holes drilled on the left side of the neck with 9462 - just don't like invisible air pockets.
Cool! The fret board will be glued in another 48 hours! Not sure if I'll use Hide glue or Hysol 0151 for that application, but we'll cross that bridge when we get there! Getting closer and closer! Thanks for letting me share OFC/BFLG! Will be back in a coulple of days! Edited by arumako 2025-04-18 10:28 AM | ||
| |||
| Love O Fair |
| ||
Joined: February 2016 Posts: 1832 Location: When?? | I have never heard of CFRP strips. But, then again, I am not a luthier or otherwise woodworker. However, it is clear to see their purpose (nice installation, btw). So do tell.. what does "CFRP" stand for.. and.. are they used in other forms of woodworking? Oh, and PS-- what are they made of? Edited by Love O Fair 2025-04-19 12:37 AM | ||
| |||
| DanSavage |
| ||
Joined: June 2012 Posts: 2325 Location: Pueblo West, CO | Nice job, Ken. Al, CFRP = Carbon Fiber Reinforced Polymer, with the polymer being catalyzed resin. Fiberglass is also called, FRP, or Fiber Reinforced Polymer. | ||
| |||
| seesquare |
| ||
Joined: November 2002 Posts: 3635 Location: Pacific Northwest Inland Empire | Thanks for the basic education, Dan. I was wondering the same thing, Al. | ||
| |||
| Love O Fair |
| ||
Joined: February 2016 Posts: 1832 Location: When?? | Thank you, Dan. Looking at Ken's photo of them laying across the guitar top, it was difficult to tell their composition.. like they were perhaps metal. Chris.. dang, man.. I will take that as a complimentary ego booster since I don't recall you ever residing at my level of knowledge on this stuff! | ||
| |||
| seesquare |
| ||
Joined: November 2002 Posts: 3635 Location: Pacific Northwest Inland Empire | Abbreviations are pretty customary within subject genre. After Dan's expansion, I understand & appreciate the reference now. As I recall in Uncle Sam's Flying Club, you seldom heard a complete sentence that didn't have some abbreviated moniker in it- SOP & OJT if you're TDY. | ||
| |||
| arumako |
| ||
Joined: October 2012 Posts: 1054 Location: Yokohama, Japan | Love O Fair - 2025-04-18 2:28 PM ...are they used in other forms of woodworking? Hey Al, thanks for the interest! Dan's right (you know you can trust his information)! I suspect it would not be all together inaccurate to say Lyrachord is an FRP. CFRP is used all over the place for cosmetic enhancement in wood working or high stress parts for motor racing chassis'. CFRP is lighter and stronger than wood or (most) metal. A strip of mahogany with the same dimensions as the carbon fiber strips that I used would be multiple times heavier and weaker (assuming a precise installation). Classical guitar builders use CFRP, titanium or aluminum strips to reinforce their necks since a truss rod is a heavy piece of hardware that can throw off the weight balance of the lighter construction of their instrument. Electrical guitars and bass necks often benefit from CFRP for the same reason, only the strips are installed more conspicuously for cosmetic enhancement. They even have CFRP sheets with glow in the dark material weaved in nowadays. seesquare - 2025-04-19 9:51 AM As I recall in Uncle Sam's Flying Club, you seldom heard a complete sentence that didn't have some abbreviated moniker in it- SOP & OJT if you're TDY. LOL! When you talk about the USFC are you referring to the USAF? Thanks for all the encouraging comments OFC/BFLG! The adhesive has cured and the CFRP strips are firmly in place so it's time to glue the fret board on to this neck! Exciting! The first order of business is to drill the fret board positioning hole into the truss rod cover strip to ensure the assembly doesn't move around after clamping. Working manually again.
In this particular case, one positioning dowel is enough, and it will be shaved down for a shallow fit. To ensure the hole is drilled in the right place, the position dowel was super-glued into the fret board and some black paint was dabbed onto the position dowel and dropped onto the neck. Imprecise positioning will = poor intonation.
Fret board position and fit is verified over and over to ensure a perfect match. The pic below is one of many dry-runs that were performed before applying the glue...
Clamp position and caul position (for clamping the fret board extension) needs to be verified. These dry runs also helped to identify some fitting problems that need to be corrected before glueing begins. It's pretty clear that the edges of the fret board are not flush to the neck. Some of this comes from a previous poor fret board removal job. In a few areas, the fret board edges appear to have curled upwards ever so slightly. This fret board was removed 10 months ago so there's a good chance that she's dried out. Thought introducing lemon oil to the center of the exposed side of the fret board might help, but couldn't risk any potential for poor adhesion either! A one inch strip down the middle of the underside of the fret board was sanded down to improve the fit. For this application, Hysol 0151 was called into action and copious amounts of the adhesive was applied to the top of the neck, bottom of the fret board and the neck extension area.
Spent quite a bit of time wiping off the squeeze out; and now, the 72 hour wait for full cure begins! Thank you for all the kind comments and encouragement OFC/BFLG! Hoping I'm just a refret away from resurrecting this 1115! Edited by arumako 2025-04-20 3:26 AM | ||
| |||


| Jump to page : 1 2 3 4 5 Now viewing page 5 [25 messages per page] |
| Search this forum Printer friendly version E-mail a link to this thread |
| This message board and website is not sponsored or affiliated with Ovation® Guitars in any way. | |
| (Delete all cookies set by this site) | |