
| ||
| The Ovation Fan Club | ||
| ||
| Random quote: "Ovation Guitars really don't get the respect they deserve!" - Alex Pepiak |
 Elite 1768 rehab part 2 Elite 1768 rehab part 2
| View previous thread :: View next thread | |
| Member Communities -> Bottom Feeding Luthiery Guild | Message format | |
seesquare |
| ||
Joined: November 2002 Posts: 3666 Location: Pacific Northwest Inland Empire | Dazzling! Nice work, Dave. Keep the photos coming. | ||
| |||
| DanSavage |
| ||
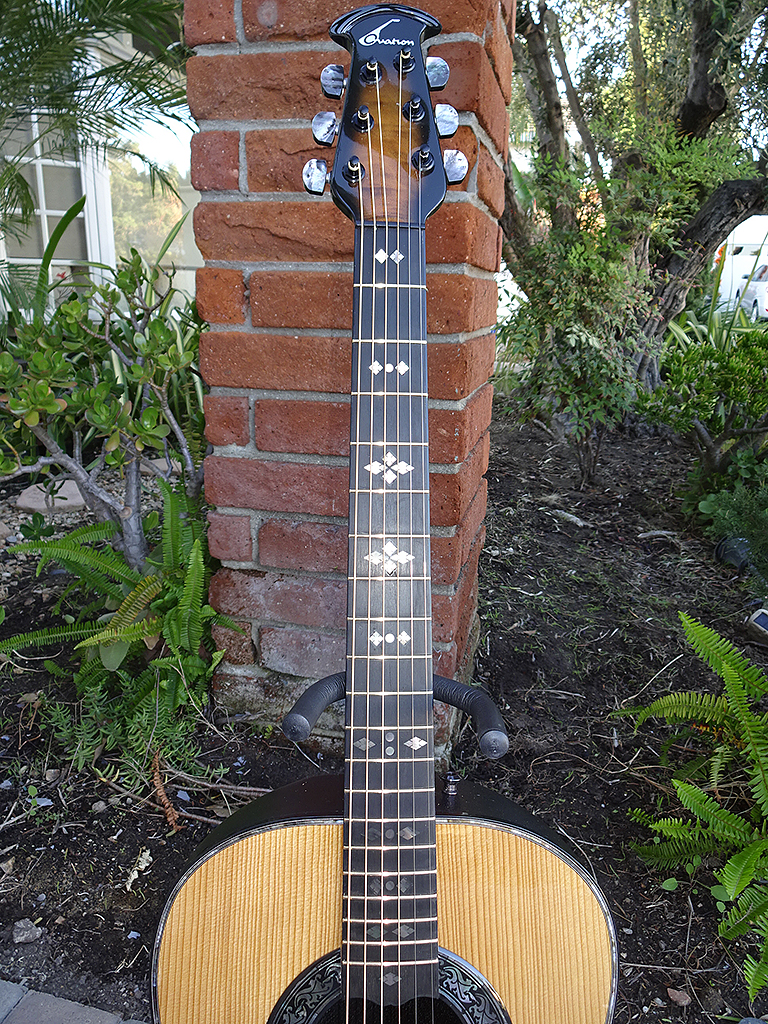
Joined: June 2012 Posts: 2353 Location: Pueblo West, CO | davegardner0 - 2026-04-12 12:24 PM I haven't posted in a while, but I have some good progress to report on this project... Right now I think the straightedge on the neck is just a little too low at the bridge? Yes, the neck angle is a little too shallow. It should be at the top of the bridge, or slightly higher. (~1/16" - 3/32") Neck I turned my attention to the rosette. I don't have the epaulets, and I wanted to do something a bit creative. I spent a LONG time thinking about and sketching out designs. I settled on a concept that would sort of "copy" a traditional Martin black and white rosette, but in a creative way. ...
2 days later, all of the acetone had offgassed and the plastic was hard again. I chiseled off the bulk of the plastic, then scraped it smooth with a scraper.
I think it looks really cool. It reminds me of the original design for the prototype nylon-string Adamas that features miniature oak leaf rosettes surrounding the sound holes.
I do like it. Keep up the good work! | ||
| |||
| Jonmark Stone |
| ||
Joined: May 2008 Posts: 1569 Location: Indiana | Beautiful work. | ||
| |||
| davegardner0 |
| ||
Joined: October 2016 Posts: 28 Location: NJ, USA | I've been making slow but steady progress. I didn't end up buying a go-bar deck. I just used a bunch of clamps, with either a board or my workbench as a flat backing surface. It was slow-going, but it worked.    I don't know that this was entirely necessary, but I sanded the plastic kerfing on the body with 120 grit sandpaper to roughen the surface and remove any residual epoxy that might not be bonded super well.  Next, I spent some time on the neck. The back of the fretboard extension had a bunch of glue residue, so I removed that with some scrapers.  I pulled out the old frets.  The fretboard is very rough texture. But, I think I'll leave it alone for now, and only level the board and refret once the neck is on the guitar. That way I can make sure i get the fretboard extension flat.  Speaking of the fretboard extension, it's currently bowed down a bit. I'm thinking this would be pushed back into a flat position when the top and neck are both installed onto the body. Does that seem right? Or should I make the backside flat with the scrapers? It's a slight curve, hopefully it's visible in this photo.  One more thing about the neck.... I'm planning on leaving the top as a natural finish as I like that look. However, the neck has a sunburst finish both on the back and the headplate area. I'm not sure it's gonna look great with a natural finish body. So I'm considering refinishing the neck. The finish on the neck is in good shape so this isn't necessary, but I'm tempted. Has anyone tried removing the finish from a neck? And if so, what's the best method? I would think both a chemical paint stripper and a heat gun would run the risk of softening the epoxy that the neck is likely built with. What do you think?   I think next I'm going to get ready to glue to the top to the bowl. I've already started working on a neck set jig like Dan suggested. A few more questions: 1. I'll need to have the neck mounted to the body to glue the top. How do I get epoxy onto the bowl's kerfing under the fretboard extension? 2. Similarly, how do I avoid gluing the neck to the bowl, assuming there will be some epoxy squeeze-out from the kerfing near the neck joint area. 3. What's the best way to clamp the top to the bowl during gluing? Perhaps some sort of frame or board that goes over the body, with a weight on top of it? 4. I also want to move the strap button near the neck joint to the underside, inside the cutaway as I think that'll make the guitar hang better when played standing up. (I have another non-cutaway ovation with the strap button under the neck and it's great). I see that the existing strap buttons are attached to the body with a drywall anchor-looking thing. Does anyone have a source for them? I'm thinking of leaving the existing strap button in place and just adding a 3rd, so that I don't need to plug the hole. | ||
| |||
| DanSavage |
| ||
Joined: June 2012 Posts: 2353 Location: Pueblo West, CO | davegardner0 - 2026-06-27 12:56 PM I've been making slow but steady progress. I don't know that this was entirely necessary, but I sanded the plastic kerfing on the body with 120 grit sandpaper to roughen the surface and remove any residual epoxy that might not be bonded super well. No, that's good that you did that as the epoxy needs somthing to grab onto to get a good glue joint. Speaking of the fretboard extension, it's currently bowed down a bit. I'm thinking this would be pushed back into a flat position when the top and neck are both installed onto the body. Does that seem right? Or should I make the backside flat with the scrapers? It's a slight curve, hopefully it's visible in this photo. Correct. I used a sunburst neck on my Black Pearl. It was acceptable on that guitar because of the all-black trim. I don't think it would look too bad on this guitar. Perhaps change out the gold tuner buttons for ebony.
Do not use heat or solvent to remove the finish from the neck/headstock. You'll ruin it. The only thing that would work is to mechanically remove it. Yes, I've removed the finish from a couple of necks. For the back of the neck, start with 80-100 grit sandpaper. Once the finish is removed, smooth it with 200-grit. Keep in mind, by removing the finish from the front of the head stock, you'll also be removing the Ovation decal, which are not readily available. I used a Dremel hi-speed rotary with Dremel Max Life EZ511HP 180 & 280 Grit Finishing Abrasive Buffs. I used these because they're rounded and don't dig into the wood. Here's a short video I made for this process. After sanding. 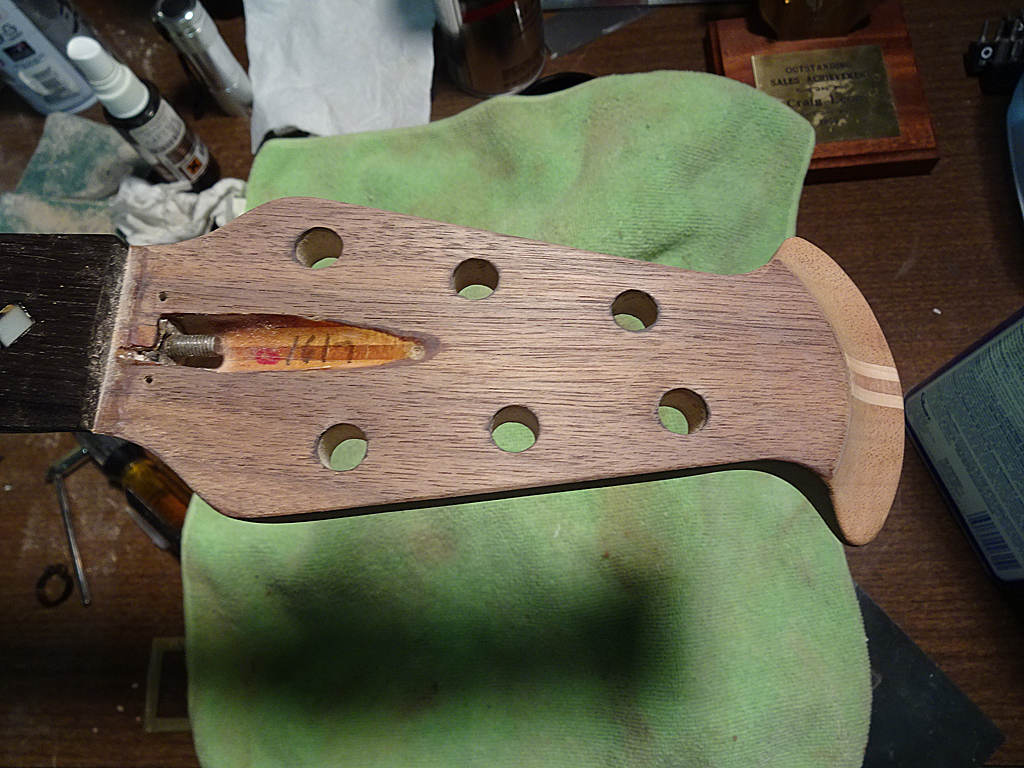 Wetted with naptha. 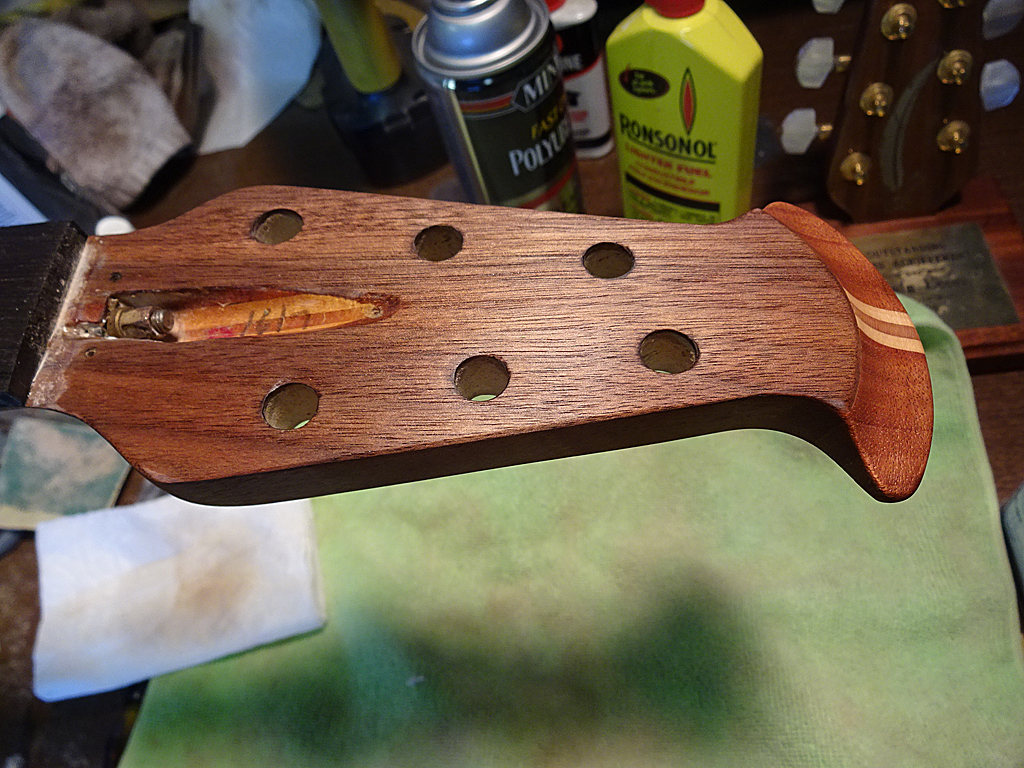 Finished with decal applied. The decal was applied after a few coats. The first coats were sanded smooth with 600-grit, decal applied. Finish coats were applied, then cut and polished. 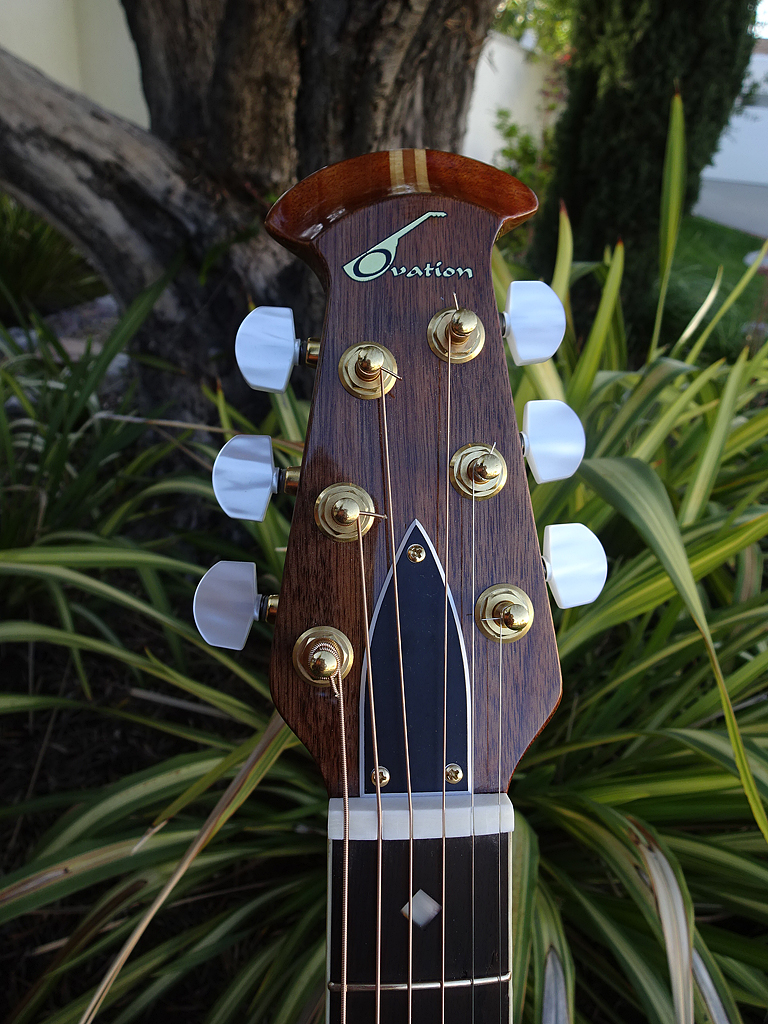
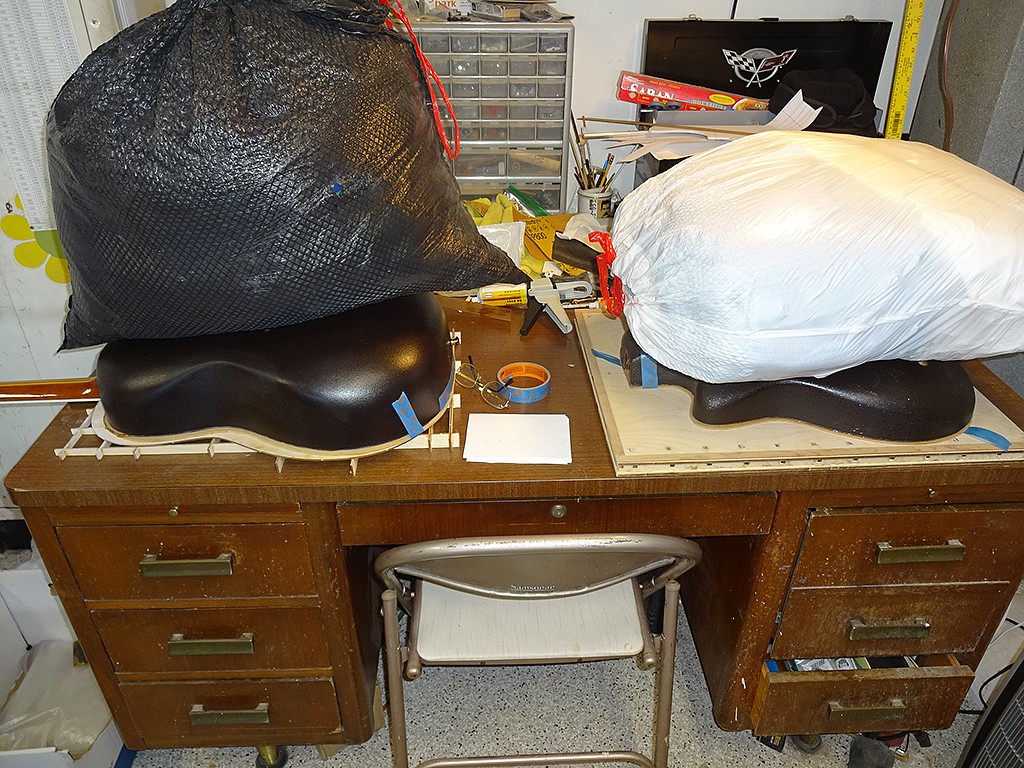
It looks like your neck is a Kaman-bar neck. (bolt-on) If so, you won't need a jig. If yours is a bolt-on neck, I'd glue and finish the top before mounting the neck and and gluing the extension. If you go this way, you just need to make sure the top is aligned to the neck, then put the body face-down and weight the bowl. In the pic below, I used a garbage bag full of old clothes. The guitar on the left has a glued neck. (More below) The guitar on the right doesn't have the neck mounted, yet.
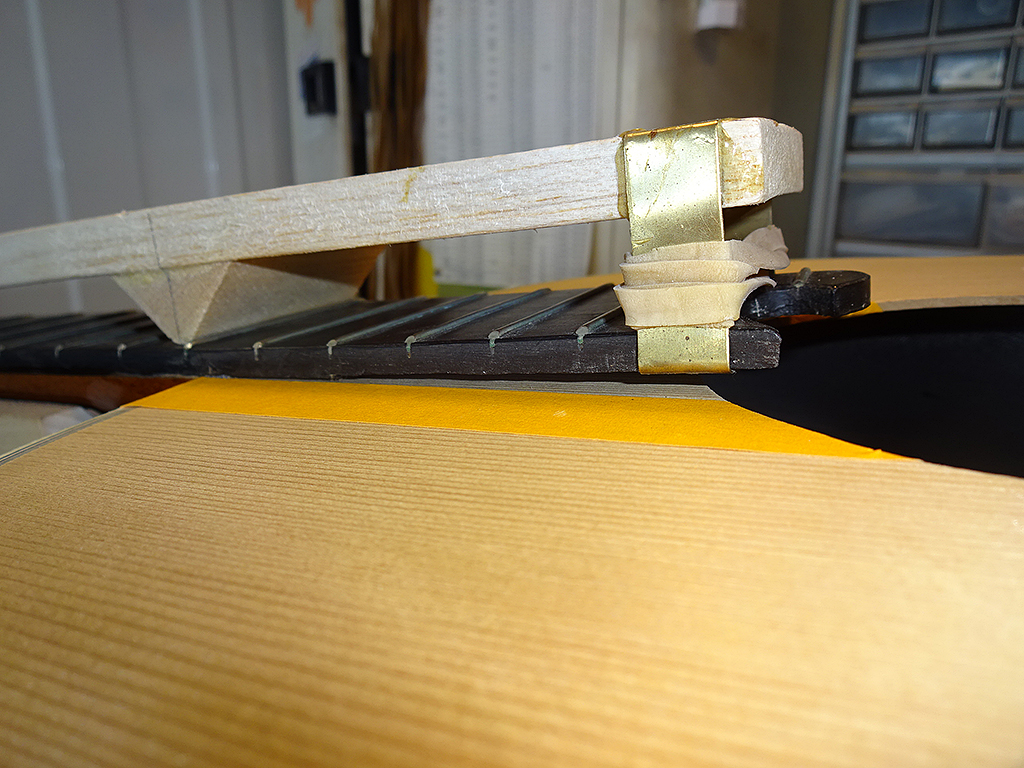
I made myself a specialzed tool from balsa and strip brass, to raise the extension so I could apply epoxy using a thin stick. The other end of the tool reaches to the first fret and it gets taped down to raise the extension. Tape a strip of masking tape along the edges of the extension to catch the squeeze out. If you're going to bolt the neck on, mask the area under the extension, finish the guitar, then remove the tape to glue the extension. It doesn't take that much glue to hold the extension down. Test the glue beforehand. I've used hardware-store epoxy that never fully hardened and stayed rubbery and allowed the extension to pull up. If you've got a glued neck, then you'll want to glue the neck and extension before finishing.
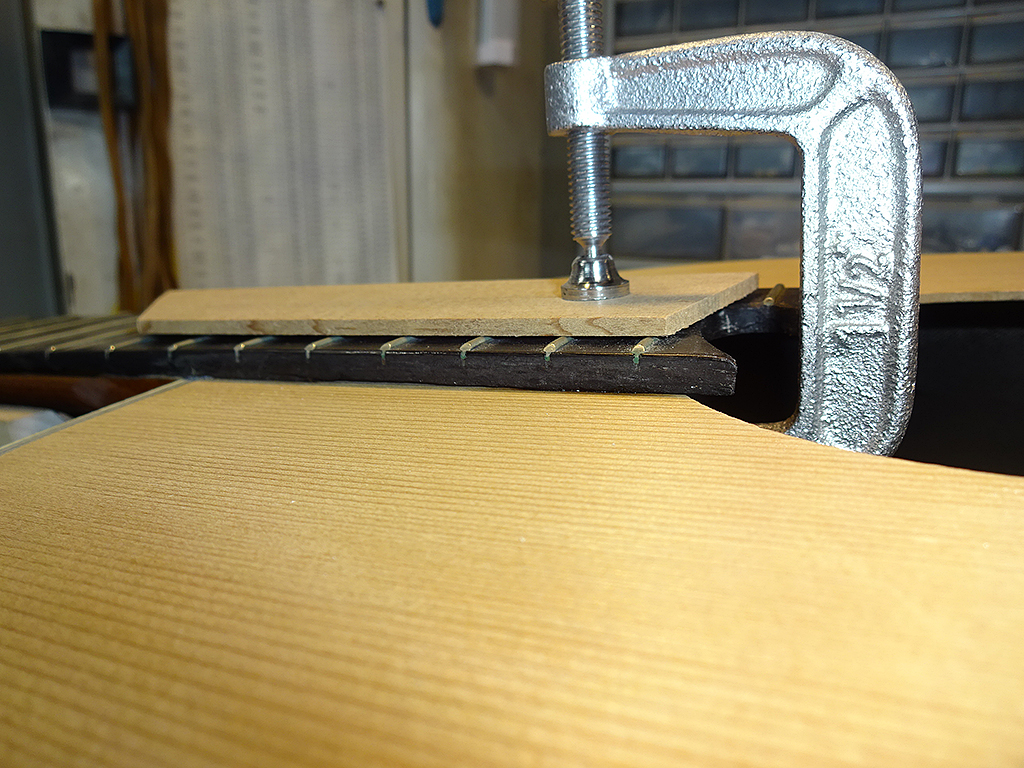
Extension being clamped. The squeeze-out is cleaned up using a drinking straw with the end cut to 45°, then with a paper towel wetted with rubbing alcohol. (91%, not 78%)
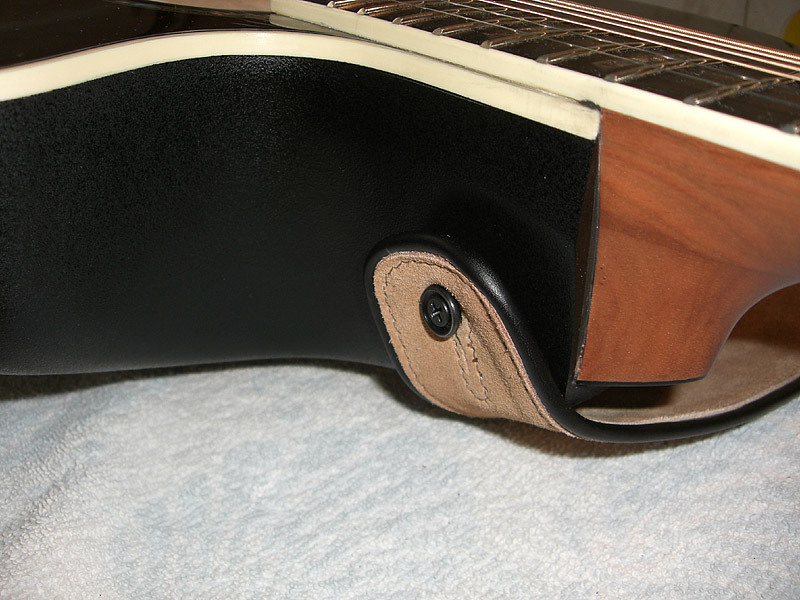
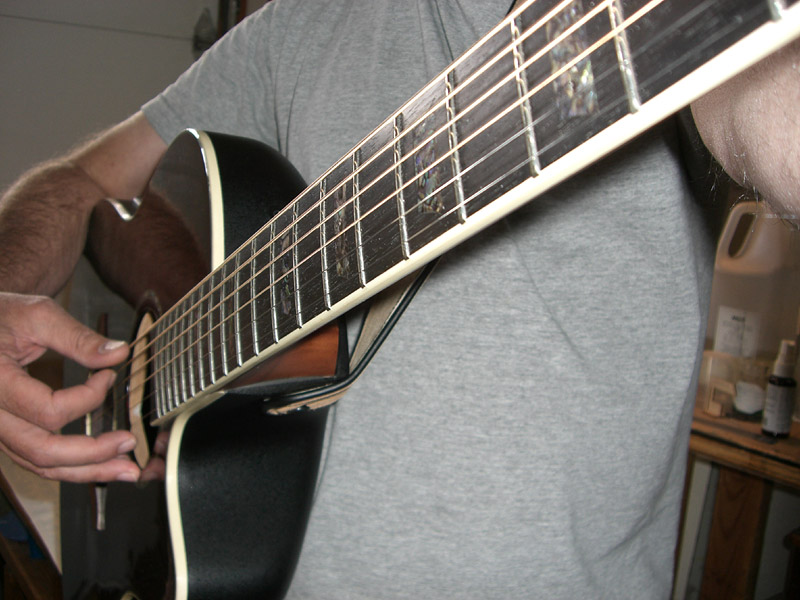
Here's a method I used for bodies with a glued neck and one with a bolt-on neck. Pretty self-explanatory. The glued neck requires a special plate with an opening to allow the body to lie flat on the plate. 4. I also want to move the strap button near the neck joint to the underside, inside the cutaway as I think that'll make the guitar hang better when played standing up. (I have another non-cutaway ovation with the strap button under the neck and it's great). I see that the existing strap buttons are attached to the body with a drywall anchor-looking thing. Does anyone have a source for them? I'm thinking of leaving the existing strap button in place and just adding a 3rd, so that I don't need to plug the hole. Here's what I do. I mount the strap button on the cut-away. The nice thing about this is that the guitar will never tuck under.
Edited by DanSavage 2026-07-01 4:13 PM | ||
| |||
| davegardner0 |
| ||
Joined: October 2016 Posts: 28 Location: NJ, USA | DanSavage - 2026-07-01 4:58 PM It looks like your neck is a Kaman-bar neck. (bolt-on) If so, you won't need a jig. If yours is a bolt-on neck, I'd glue and finish the top before mounting the neck and and gluing the extension. If you go this way, you just need to make sure the top is aligned to the neck, then put the body face-down and weight the bowl. In the pic below, I used a garbage bag full of old clothes. The guitar on the left has a glued neck. (More below) The guitar on the right doesn't have the neck mounted, yet.
Hey Dan, thanks so much for all of this helpful info!! Huh, I thought I did need the neck set jig to make sure the floppy bowl back is in the exact right shape for gluing the top? In the gluing setup in the photo above, how do you ensure the neck angle is correct? I've actually measured the neck angle twice now. The first time the straightedge hit the front of the bridge, implying that the neck angle was too shallow. But, I've since realized that I had the guitar resting on its headstock during this test, which could have pushed the neck up some:  I measured the neck angle w/straightedge again today, this time making sure I supported the guitar by the body only. In this state, the weight of the neck is basically hanging off of the body. And the angle is perfect, the straightedge just hits the top of the bridge. So it seems like the neck angle is a bit flexible till the top is glued on (not surprising). Do you think the neck angle from my 2nd test today is what I'd get if I glue the top on with no neck attached? That would be MUCH easier for applying the epoxy, clamping it, not accidentally epoxying the neck on, etc. So I'd like to do it this way if I can!! But I also don't want to get the neck angle wrong. What do you think? And this is EXACTLY where I was thinking of putting the strap button, and for the exact reason I had in mind. What do you use to anchor the strap button into the bowl? Do you need a drywall anchor-like device. 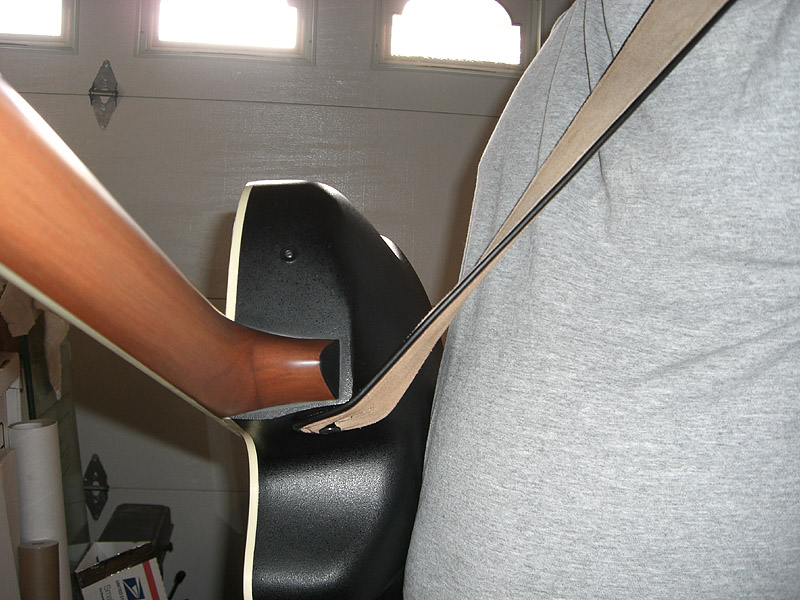 Edited by davegardner0 2026-07-01 4:34 PM | ||
| |||
| DanSavage |
| ||
Joined: June 2012 Posts: 2353 Location: Pueblo West, CO | davegardner0 - 2026-07-01 2:31 PM Hey Dan, thanks so much for all of this helpful info!! YVW. With those two guitars, it was pure dumb luck. These were done before I discovered the need for the neck jig. The neck jig is only really needed for glued necks. Once the top is glued into place, there's no adjustments to be made. With a bolt-on neck, the angle can be adjusted after the fact through shimming of the neck heel. Makes sense. I measured the neck angle w/straightedge again today, this time making sure I supported the guitar by the body only. In this state, the weight of the neck is basically hanging off of the body. And the angle is perfect, the straightedge just hits the top of the bridge. Personally, I like the straight-edge to be slightly above the top of the bridge to account for the top "growth" later on. Usually ~1/16" or so. It's always easier to remove a shim to lower the saddle, then to deal with the opposite. With a bolt-on neck, it's much easier to glue the top, route the purfling/binding channels, finish the top, then mount the neck and glue the extension. I don't have that guitar any more, so I can't check. It's a late-model Chi-com Celebrity with an SMC bowl and glued neck. It might have a wood neck block, in which case I simply used a wood screw. If yours just has the bare SMC inside with no wood neck block, scuff the area and epoxy a small piece of plywood to accept a wood screw. | ||
| |||
| DanSavage |
| ||
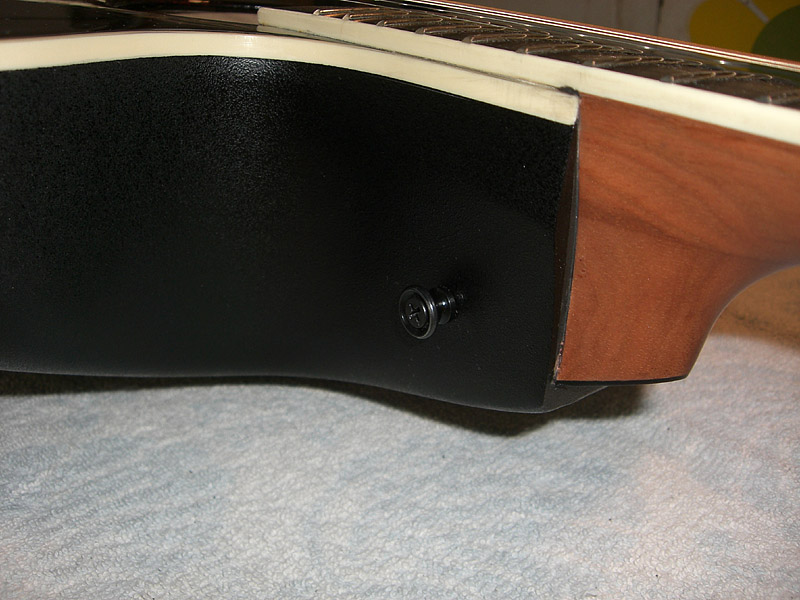
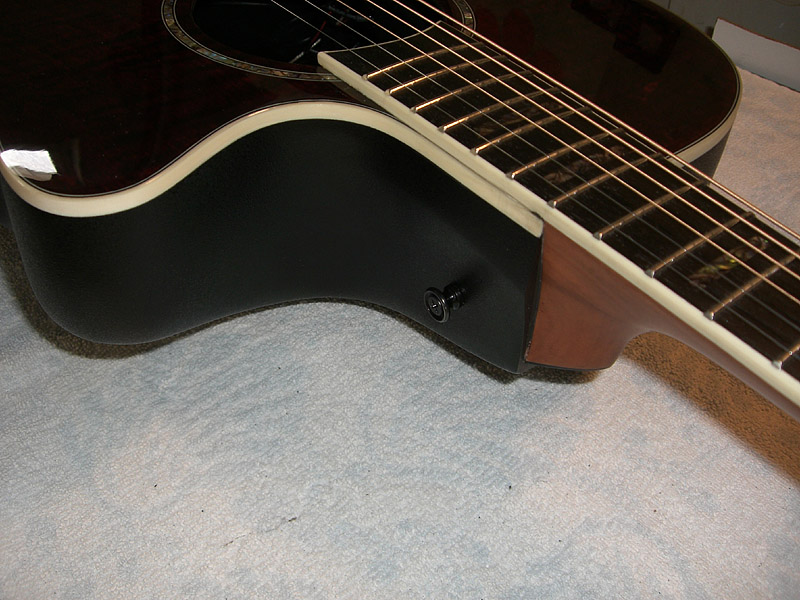
Joined: June 2012 Posts: 2353 Location: Pueblo West, CO | davegardner0 - 2026-06-27 12:56 PM I see that the existing strap buttons are attached to the body with a drywall anchor-looking thing. Does anyone have a source for them? I looked again at this photo you posted.
You can simply use a wood screw to attach the strap button near the neck heel. The SMC is really thick there and should hold the weight of the guitar with no problems. Edited by DanSavage 2026-07-01 5:23 PM | ||
| |||
| davegardner0 |
| ||
Joined: October 2016 Posts: 28 Location: NJ, USA | Dan, somehow shimming the neck had never occurred to me! That's definitely the way to go, since I can avoid the neck setting jig and the tricky glue-up with the neck already attached. Thanks for reminding me of that option. Let me circle back and ask you a follow up question about neck refinishing. That neck you refinished looks great! Understood that sanding is the only way to take off the old finish without damaging the neck. How bad is the finish to sand? Does it gum up the sandpaper badly like some finishes can do, or does it behave ok? Does it take forever to get through with the 80 or 100 grit? Also thanks for the recommendation of those dremel buffs. They look like they're made of scotchbrite? If so, do they cut through the finish without abrading the wood too badly? Anyway, I'm on the fence about the neck. I may finish up the body and see how the neck/body look together before deciding. The back of the neck does have a nice satin finish that I like the feel of, and I do like the idea of keeping the decal. To be continued... | ||
| |||
| DanSavage |
| ||
Joined: June 2012 Posts: 2353 Location: Pueblo West, CO | davegardner0 - 2026-07-02 7:10 AM Dan, somehow shimming the neck had never occurred to me! That's definitely the way to go, since I can avoid the neck setting jig and the tricky glue-up with the neck already attached. Thanks for reminding me of that option. YVW. The polyester resin Ovation used is very hard. Imagine a surfboard. It doesn't gum up the sandpaper. It takes a while, as it is pretty thick. The real problem is that the underlying wood is mahogany, which is, realtively, very soft. This means you must be careful on the areas when you finally cut through the finish so you don't badly gouge the wood. The dremel wheels are akin to ScotchBrite. They do a pretty good job of cutting through the finish. As noted above, you have to be careful to watch for when you finally break through the finish and into the wood. In the video I posted, the process of removing the head stock finish took about 30 minutes. I did not bear down at all on the Dremel. I let the tool do the work, applying very light pressure. I grinded a little, wiped off the sanding dust to check how much was removed, then continued. I also used these wheels for the cove on the head stock, again being very careful. That's the route I would take. | ||
| |||
| davegardner0 |
| ||
Joined: October 2016 Posts: 28 Location: NJ, USA | I got the top glued onto the bowl successfully! I'll post pics soon. One question for what comes next...what's a good way to hold the body onto the workbench for binding channel routing and binding gluing? I think I'll need two hands to pilot the Dremel, so I'm thinking some way to hold the body securely would be super helpful. I'm thinking of using this Dremel jig with this guide to route the channels. Dan, I looked at your old topics and saw your cardboard box jig as well as your neck set jig being used to hold bodies for binding. I did partially complete my own neck set jig before realizing I didn't need it, so I could always work on it more. Or maybe there's a more simple body holder idea? Edited by davegardner0 2026-07-04 9:16 PM | ||
| |||
| DanSavage |
| ||
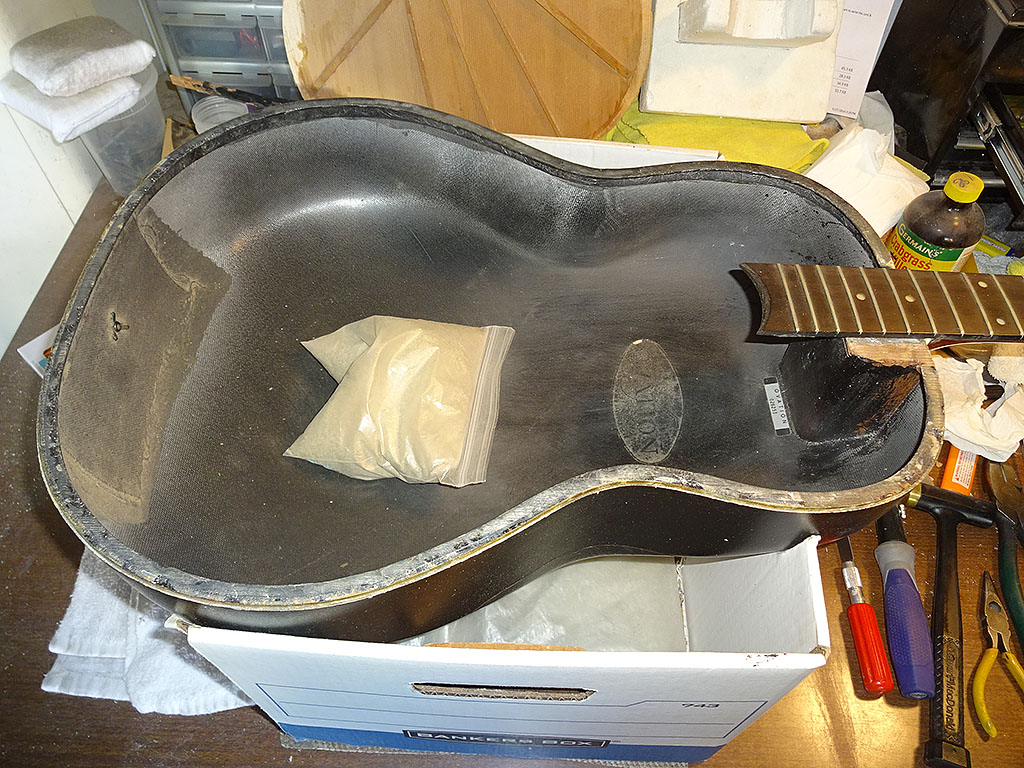
Joined: June 2012 Posts: 2353 Location: Pueblo West, CO | davegardner0 - 2026-07-04 6:54 PM One question for what comes next...what's a good way to hold the body onto the workbench for binding channel routing and binding gluing? I think I'll need two hands to pilot the Dremel, so I'm thinking some way to hold the body securely would be super helpful. There's two ways. When I first started re-topping Ovations, I used a Banker Box. I cut the sides so a body could rest in there. Overall, it worked pretty good.
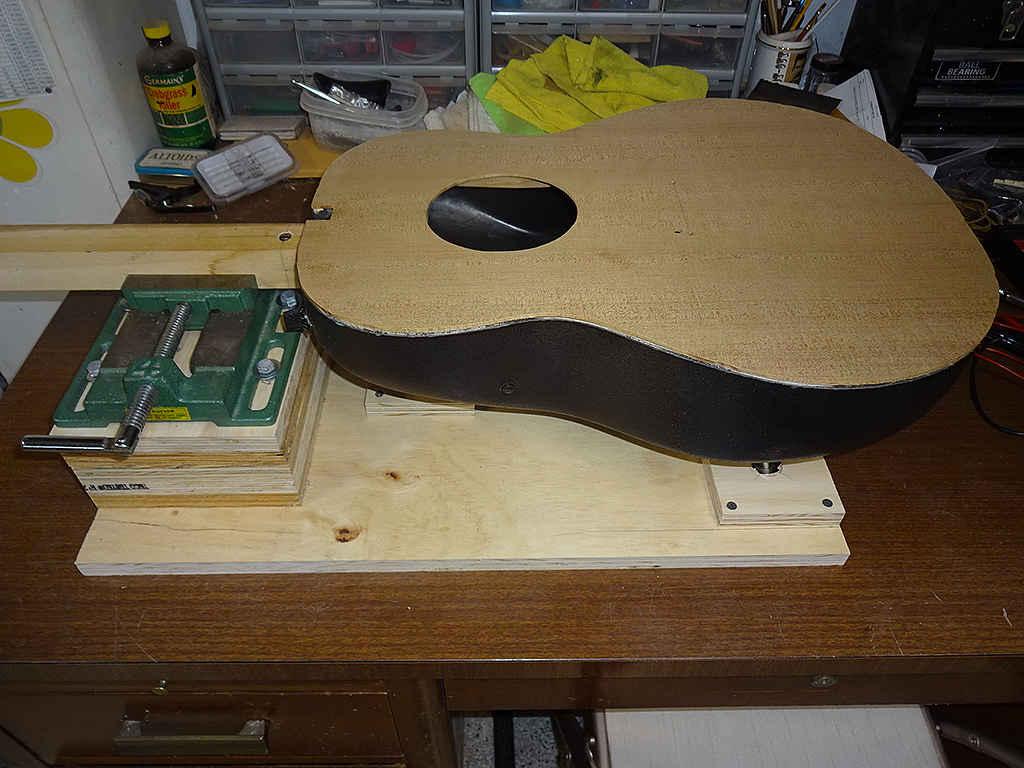
After a while, I made my jig.
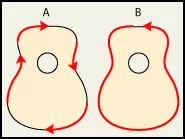
These were what I used at first. Then I decided to upgrade to a Bosch Colt router and the LMI routing bit and bearing set. Dan, I looked at your old topics and saw your cardboard box jig as well as your neck set jig being used to hold bodies for binding. I did partially complete my own neck set jig before realizing I didn't need it, so I could always work on it more. Or maybe there's a more simple body holder idea? If you're going to do just this one guitar, the simpler set-up with the Banker Box and Dremel jig and guide work fine. If you think you're going to do more guitars in the future, the more expensive router stuff and jig are the way to go. Both ways will end up being pricey, with the Bosch router set-up being slightly more expensive. The Bosch router set-up will be easier to work with because you install the bearing you need for the proper depth, then just go after it. With either set up, you'll want to make climbing cuts so you don't tear out the wood.
| ||
| |||


| Jump to page : 1 2 Now viewing page 2 [25 messages per page] |
| Search this forum Printer friendly version E-mail a link to this thread |
| This message board and website is not sponsored or affiliated with Ovation® Guitars in any way. | |
| (Delete all cookies set by this site) | |