|
| ||
| The Ovation Fan Club | ||
| ||
| Random quote: "Believe me when I say that some of the most amazing music in history was made on equipment that's not as good as what you own right now." - Jol Dantzig |
 X Braced Balladeer Repair X Braced Balladeer Repair
| View previous thread :: View next thread | |
| Member Communities -> Bottom Feeding Luthiery Guild | Message format | |
| ChuckSurette |
| ||
Joined: April 2017 Posts: 22 |
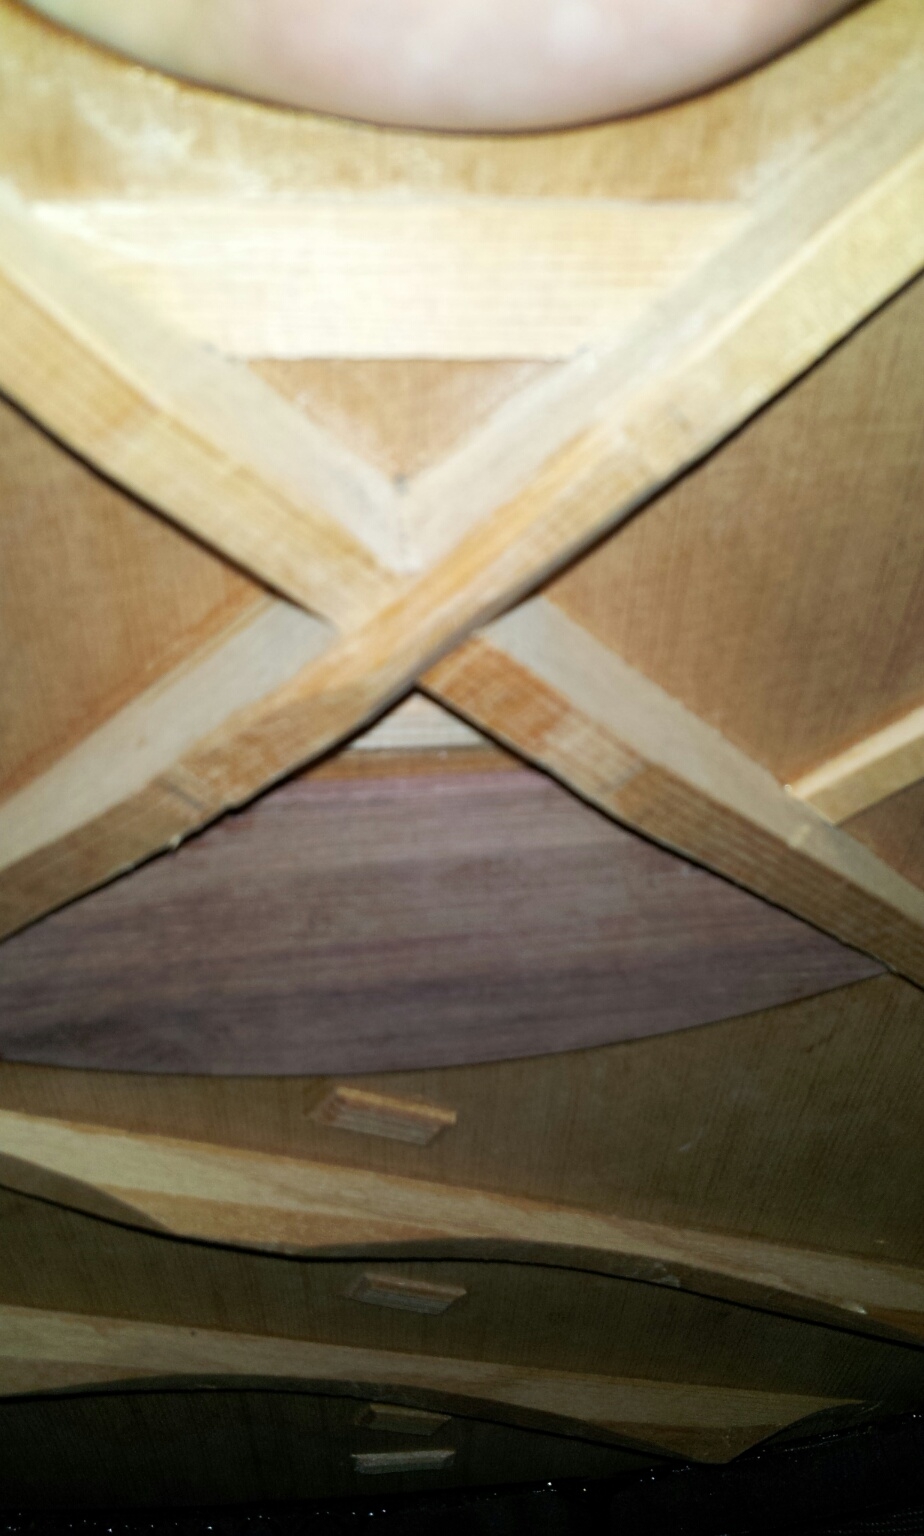
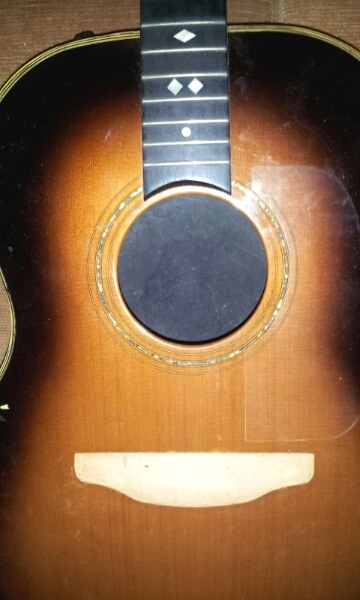
I picked up my first Ovation - this 1977 Balladeer recently, not sure of the model # as the sticker is gone. I've discovered a few things about it, in the short time we've been together. It looks to have had the top swapped - purfling by the waist is off & rosette doesn't look right. Inside - it's X-braced with what looks like a rosewood bridge pad. The bridge, as shown - has had the original pickup removed and a new insert installed with a piezo. Saddle slot is straight across...oops! I've taken the bridge off (it was loose) and added a humidifier inside before I tackle a top crack. My plan is to let it acclimate for a bit, then I'll have another look at the neck angle. I don't like what I see now, so a Bowl Bend may be in this Balladeers future. Without the model # - can you tell what model it might be by the inlays? More pictures & carnage to follow.
Chuck | ||
| |||
| DanSavage |
| ||
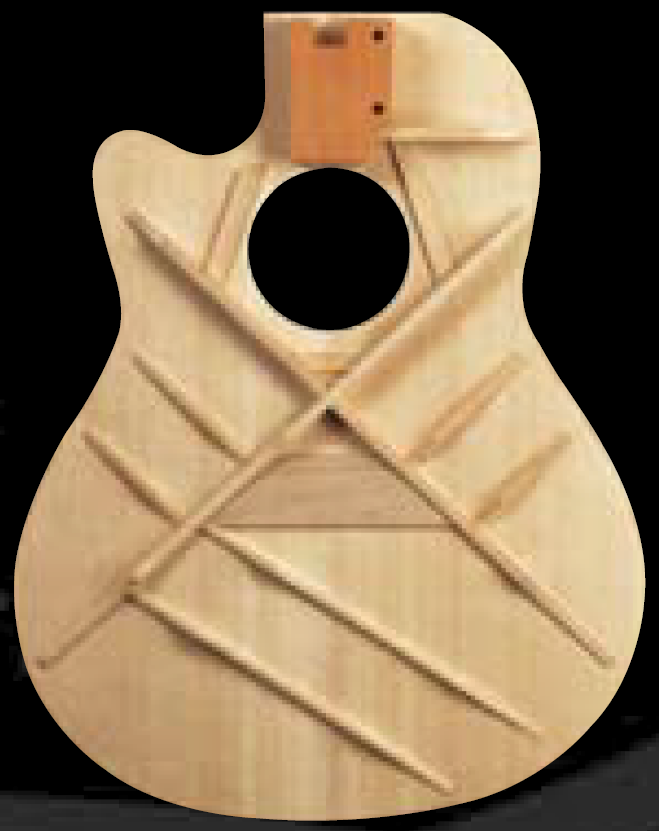
Joined: June 2012 Posts: 2315 Location: Pueblo West, CO | Yes, this guitar has been re-topped. That rosette is definitely non-standard. The early Balladeers were X-braced, but the x-braces were quite a bit simpler than what you'd find on a Martin or Taylor, though to my knowledge Ovation never put rosewood bridge plates. The LX braces used maple bridge plates, but not rosewood. This is what the typical Martin X-brace pattern looks like. From the inlays, and the fact that it's a 1977 and AE, I'd hazard a guess and say it's a 1612 Custom Balladeer. Here's a page that you use to determine what model it might be. (See: Ovation Decoder)
Edited by DanSavage 2017-04-13 7:31 PM | ||
| |||
| ChuckSurette |
| ||
Joined: April 2017 Posts: 22 | Thanks Dan - now I'm really scratching my head. The x brace looks like your 1111-4, it has a nice patch over the union of the X, but the tone bars positioned more like a Martin. I think the rear of the bridge pad is curved. I'll post some pics tomorrow. Thanks for the model info. Does the rosette look at all like a Celebrity? It appears to be a foil stick on, under the finish. No trace of the original large rosette. Color matches the headstock. No locating pins on the bridge. Hole for the piezo is neat. | ||
| |||
| ChuckSurette |
| ||
Joined: April 2017 Posts: 22 |
Martinized scalloped bracing
Better shot of 3 ring rosette. Bridge came of clean. Tiny hole for transducer. | ||
| |||
| DanSavage |
| ||
Joined: June 2012 Posts: 2315 Location: Pueblo West, CO | Yep. Those braces look like standard Martin X-brace pattern. It's nice that your bridge came off cleanly. To glue the bridge down I use Hysol 0151. I used to use Hysol 9462, but I like the 0151 better because it's clear instead of white, like the 9462. It has about the same strength as 9462. It also has a lower Tg temp, which will make it easier to remove in the future, should the need arise. I wouldn't use any sort of carpenter's glue as it doesn't have the right properties for a high-stress part like the bridge. Edited by DanSavage 2017-04-14 8:36 AM | ||
| |||
| ChuckSurette |
| ||
Joined: April 2017 Posts: 22 | Thanks, I'll check out the Hysol. | ||
| |||
| ChuckSurette |
| ||
Joined: April 2017 Posts: 22 | 4 years went by quickly...I'm finally getting back to my Balladeer. I have the top removed - it definitely WAS retopped - as the fretboard end was cut... I've got a new Martin top from their Guitar Makers Connection, that was purchased back in 1995, with the original braces from the Balladeer. Now I need to figure out how to strap the bowl to clamp the top in place. ? | ||
| |||
| DanSavage |
| ||
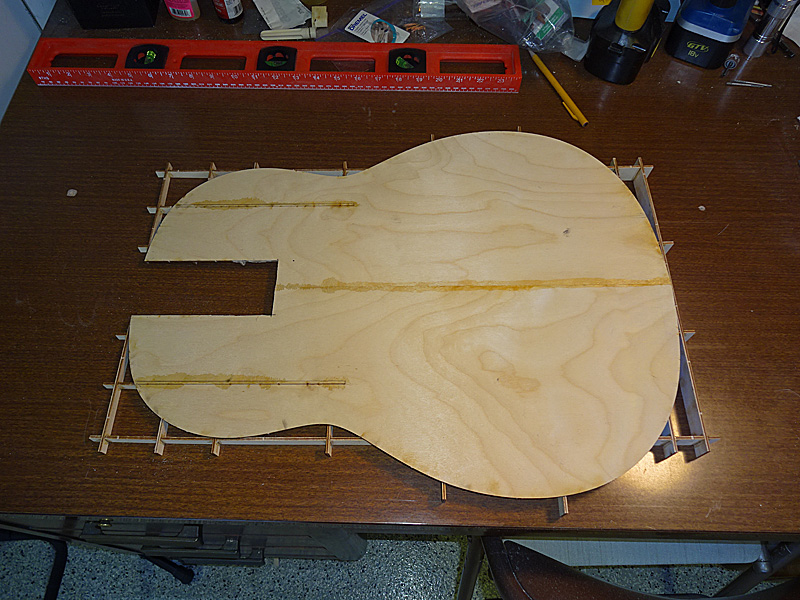
Joined: June 2012 Posts: 2315 Location: Pueblo West, CO | The easiest way to clamp the top to the bowl is to cut a slot into a piece of plywood so the fret board extension doesn't interfere.
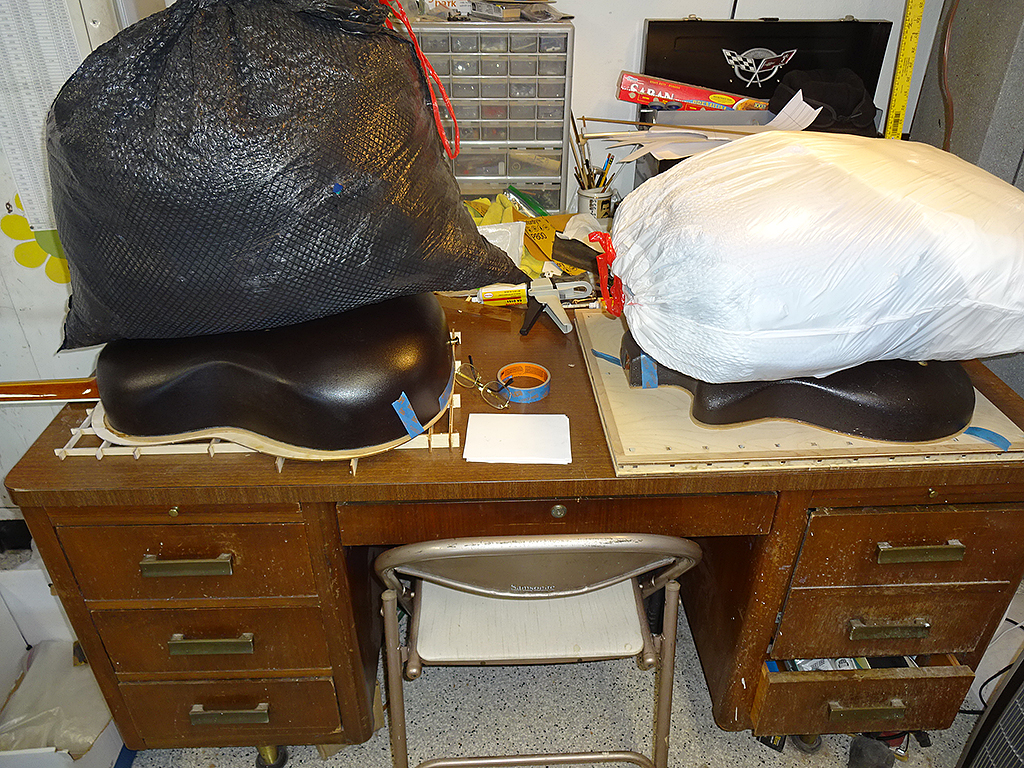
The one on the left is using the fixture above because the neck is still attached. If your neck is removable, you can use any old surface to clamp the top to the body, like the one on the right.
Edited by DanSavage 2021-04-26 7:14 PM | ||
| |||
| ChuckSurette |
| ||
Joined: April 2017 Posts: 22 | Thanks Dan! That's kinda what I was thinking - I was going to cut out a ring about 2" wide - the shape of the body, so that I don't compress the center of the top. Here's the issue as I see it today - I found a small, flat table to check the rim for flatness, but lying flat the rim has a dip on either side at the waist. It measures about 1/8. Is this normal? | ||
| |||
| ChuckSurette |
| ||
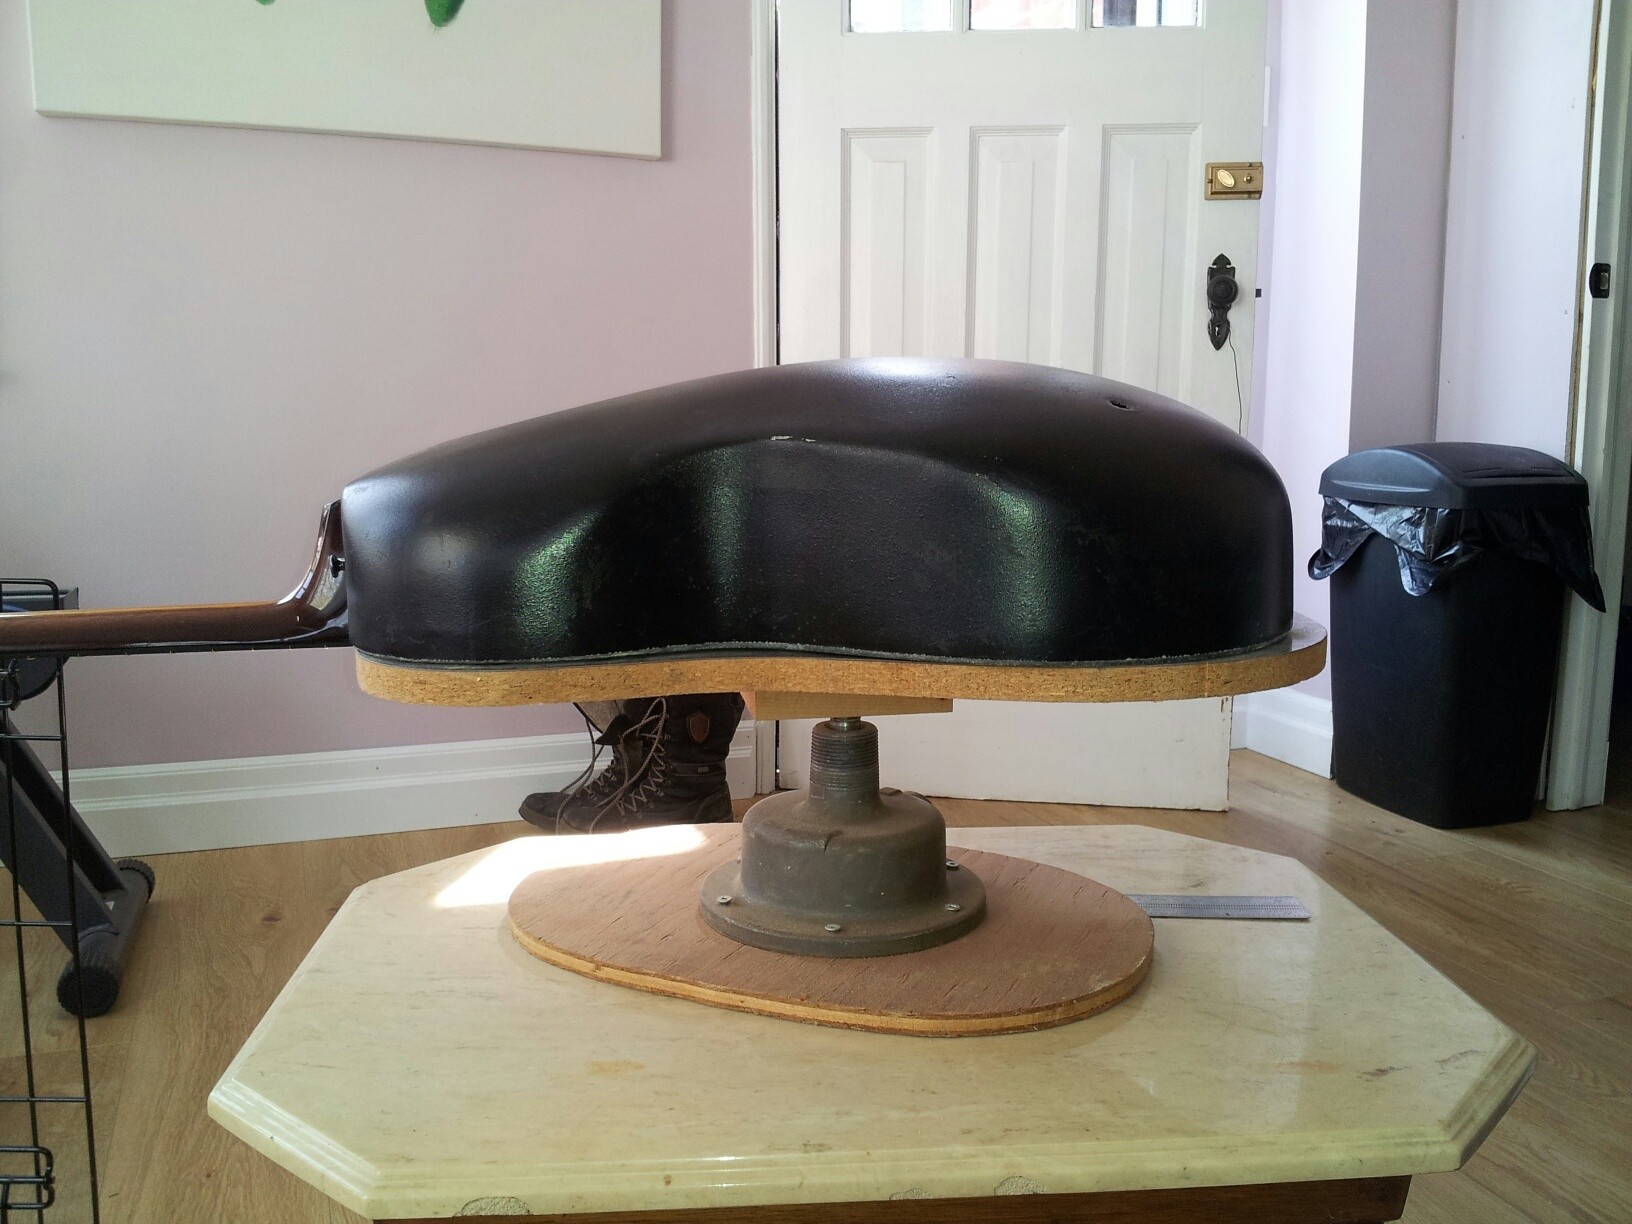
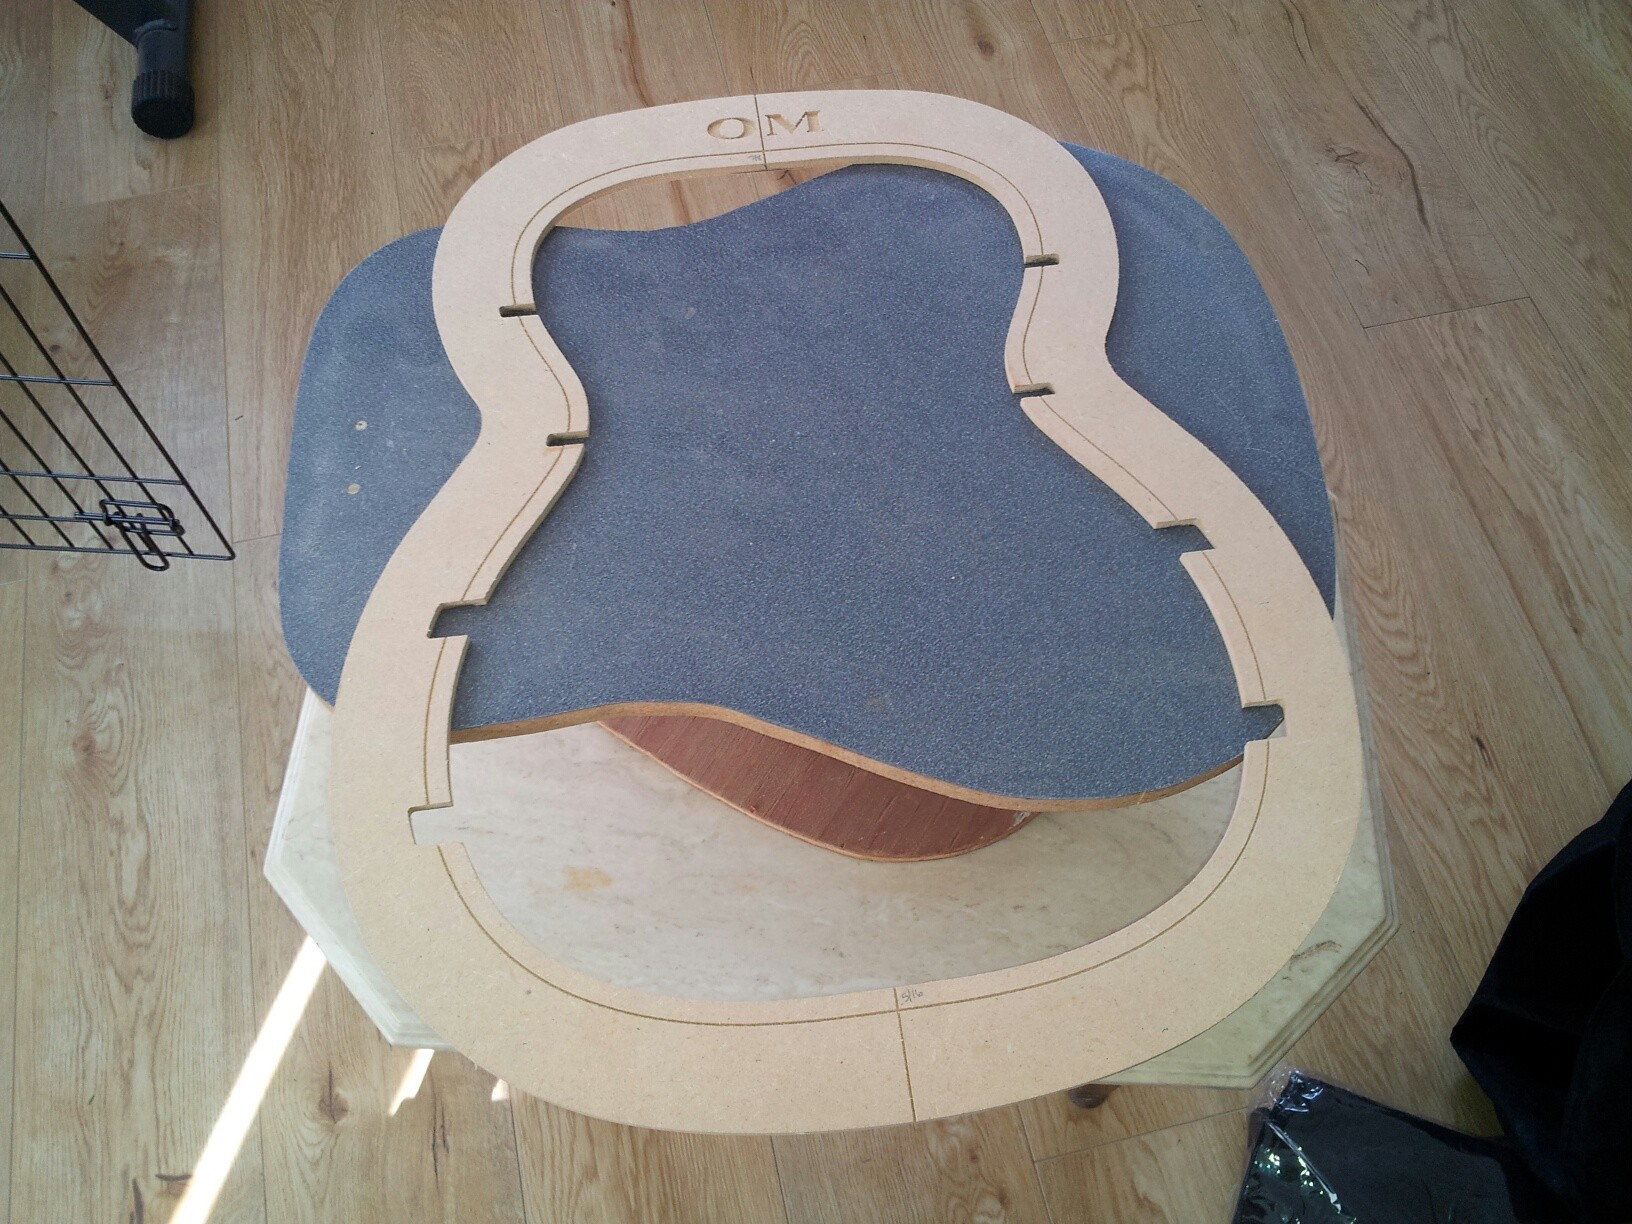
Joined: April 2017 Posts: 22 | OK - I had a look around and found some jigs that may get me home, at least started. The first one is a rotating form that's shaped like a drednaught. The other is a bracing template from Blues Creek. I won't cut up the bracing form for this - but will make something similar - Balladeer shaped. I'm not having luck posting pics, but they are located here. https://chucksguitarstache.wordpress.com | ||
| |||
| DanSavage |
| ||
Joined: June 2012 Posts: 2315 Location: Pueblo West, CO | ChuckSurette - 2021-04-27 6:58 AM Thanks Dan! That's kinda what I was thinking - I was going to cut out a ring about 2" wide - the shape of the body, so that I don't compress the center of the top. Here's the issue as I see it today - I found a small, flat table to check the rim for flatness, but lying flat the rim has a dip on either side at the waist. It measures about 1/8. Is this normal? Unlike most 'flat-top' guitars, Ovations have true flat-tops. Most guitar tops like Martin and Taylor feature tops that were built on radius dishes so the top is domed slightly. So, you don't really need to worry about not compressing the center of the top. In fact, if you tried to build a domed top for an Ovation on a radius dish, the neck geometry would probably be wrong. The gap ('dip') at the waist area is a sure sign to me that the guitar's top was collapsing causing the neck angle to flatten. Because the bowl is somewhat flexible at this point, you should be able to lay the body, top-side down and apply pressure to the center of the bowl and flatten it out to remove the 'dip.' | ||
| |||
| DanSavage |
| ||
Joined: June 2012 Posts: 2315 Location: Pueblo West, CO | ChuckSurette - 2021-04-27 8:00 AM OK - I had a look around and found some jigs that may get me home, at least started. The first one is a rotating form that's shaped like a drednaught. The other is a bracing template from Blues Creek. I won't cut up the bracing form for this - but will make something similar - Balladeer shaped. I'm not having luck posting pics, but they are located here. https://chucksguitarstache.wordpress.com Either one should work fine for what you're doing. As I say, you'll want to notch whatever you use so the top can rest flat without interference from the fret board extension. Here's the pics.
Edited by DanSavage 2021-04-27 11:30 AM | ||
| |||
| ChuckSurette |
| ||
Joined: April 2017 Posts: 22 | The issue that's happening with the bow is that when enough downward force is applied to the bowl to flatten it out, the force applied distorts the bowl. It takes a lot of force. I will try some different weighty items and see how they work out. I think there may be a big vacuum bag in my shop... Thanks for listening my rant Dan - stay tuned. | ||
| |||
| DanSavage |
| ||
Joined: June 2012 Posts: 2315 Location: Pueblo West, CO | I would expect some distortion of the back of the bowl (flattening) when force is applied to warp the bowl so the kerfed lining is flat. Edited by DanSavage 2021-04-27 4:14 PM | ||
| |||
| ChuckSurette |
| ||
Joined: April 2017 Posts: 22 | Oh Dan, I've reset my share of necks...and you make a good point on the resulting neck angle - it is my second biggest concern. Getting the top on and flat is #1. I did check the angle with this top kinda held in place, which looked ok. It wasn't way out in space, or pointing back at the top. The conundrum is how to calculate for all the distortion and the resulting springing back. The good news is that I have lots of rosewood bits and a bag full of bridges - so I'm sure that something will work out. I did have some success today - I successfully discovered that this current top is a failure. The success was that I found a way to load the bowl - with some heavy elastic strap. The dread top that I had on hand is not quite wide enough for the new distorted lower bout though. So, success in failure, failure in success - who knows. I think I may have one last uncut top-set, from the batch of '95 Martin stuff I picked up eons ago. Time will tell - I'll post some pics of tomorrow's events. Thanks, Chuck Surette | ||
| |||
| ChuckSurette |
| ||
Joined: April 2017 Posts: 22 | Oh - you mentioned neck removal. This neck seems like it's epoxied into a mahog neck block? Have you managed to get one of these out before? This one is a 1977 and it looks like 2 steel bars extend into the block & a pile of (epoxy) goop. I should take a pic of this. The neck joint looks like it has RTV (silicone) where the neck meets the bowl. I can't even see if there is a tenon on the neck. My plan is just to leave it. | ||
| |||
| DanSavage |
| ||
Joined: June 2012 Posts: 2315 Location: Pueblo West, CO | ChuckSurette - 2021-04-27 3:50 PM Oh Dan, I've reset my share of necks...and you make a good point on the resulting neck angle - it is my second biggest concern. Getting the top on and flat is #1. I did check the angle with this top kinda held in place, which looked ok. It wasn't way out in space, or pointing back at the top. The conundrum is how to calculate for all the distortion and the resulting springing back. The good news is that I have lots of rosewood bits and a bag full of bridges - so I'm sure that something will work out. I did have some success today - I successfully discovered that this current top is a failure. The success was that I found a way to load the bowl - with some heavy elastic strap. The dread top that I had on hand is not quite wide enough for the new distorted lower bout though. So, success in failure, failure in success - who knows. I think I may have one last uncut top-set, from the batch of '95 Martin stuff I picked up eons ago. Time will tell - I'll post some pics of tomorrow's events. Thanks, Chuck Surette Hi Chuck, By gluing the top, then placing it upside-down on a flat surface will assure the top will be flat. As long as the neck angle is okay beforehand, you should be okay after gluing and clamping. I wouldn't worry too much about trying to account for distortion or spring-back. Once the top is glued to the bowl, it will become very rigid. I thought there might be some spring-back the first time I changed the neck angle while re-topping, but there was none. Too bad about the failed top. If you haven't built anything to replace it I would highly recommend you consider using torrefied tone wood and braces instead of plain. If you decide to go with the torrefied tone wood, I strongly suggest using torrefied braces. I've played guitars with torrefied top and plain braces and the results were underwhelming. I've done several torredifed top Ovations and they all sound spectacular. It still sounds like the original brace pattern, but like it's on steroids. There is an alternative way to glue the top and assure that the neck angle will be correct, but it involves building a jig. I built the one below using a drill-press vise and three chair adjusters. The neck is clamped and the adjusters level the bowl. To alter the neck angle, I put sand bags inside the bowl before gluing the top and using binding rubber bands to strap the top in place. Here's some pics. First, the jig. This is the neck clamped, but the body is resting in the jig. This is how I route the purfling/binding slots. Here the top is being clamped to the bowl. Neck angle was verified, then sand baggies placed into the bowl to weight it into place. Last, the framed plate is put onto the top and clamped with rubber bands. | ||
| |||
| DanSavage |
| ||
Joined: June 2012 Posts: 2315 Location: Pueblo West, CO | ChuckSurette - 2021-04-27 3:56 PM Oh - you mentioned neck removal. This neck seems like it's epoxied into a mahog neck block? Have you managed to get one of these out before? This one is a 1977 and it looks like 2 steel bars extend into the block & a pile of (epoxy) goop. I should take a pic of this. The neck joint looks like it has RTV (silicone) where the neck meets the bowl. I can't even see if there is a tenon on the neck. My plan is just to leave it. Yep. It's epoxied into the neck block. Yes, I have. It's not for the faint of heart. The epoxy will soften at around 170 degrees or so. This means that you need to heat the neck heel and neck block to that temperature, then start wiggling it around to break the epoxy bond loose. The tricking part is that the entire guitar is glued together with this same epoxy, so you have to be careful to focus the heat on the heel and block so you don't separate the neck block from the bowl. I borrowed a technique from a fellow-BFLGer that used boiling water poured into a Ziploc baggie and placed on the neck heel. In 1977, they had only a single-action truss rod. Unless someone changed this, you should not be able to see the truss rod from the inside. There should be a tenon. It is a dovetail, but not in the sense of a Martin-style. Yes, unless there's a problem with the neck/bowl glue joint I would leave it alone. It's much easier to adjust neck angle by warping the bowl when replacing the top. The neck/bowl glue joint is black epoxy. Neck block with globs of epoxy. Neck heel and tenon. More globs of epoxy.
Neck placed back into neck block. | ||
| |||
| DanSavage |
| ||
Joined: June 2012 Posts: 2315 Location: Pueblo West, CO | I'm not sure what brace pattern you're planning to use, but if you're thinking of an X-brace I'd like to suggest my custom X-braces I developed. I've done three of these. One of the guys liked his first one so much he commissioned me to build him another. I've re-topped three guitars with these braces, one in plain bearclaw Sitka spruce, one in torrefied Sitka spruce and one in torrefied Adirondack spruce. It sounds equally good in all three, though my personal preference is the torrefied Sitka. Here's a pic of the standard Ovation LX brace pattern, which is similar to the standard Martin pattern.
Here's a pic of the pattern. Like your guitar, I used a rosewood bridge plate. First, the mock-up. This is the torrefied Adi top being glued.
Edited by DanSavage 2021-04-28 1:33 AM | ||
| |||
| ChuckSurette |
| ||
Joined: April 2017 Posts: 22 | Thanks Dan - I heated the bowl while it was clamped to a flat surface (plywood ring). I heated from the inside and avoided the neck block and got the temp up to 200* Letting it cool down now, but I hope this will take out some of the flexing/distortion when gluing on the top. Early results look good, but it stinks in my shop now... I'll take a look at it again, once the smell clears. I'm going to stick with this top. The original braces are glued on and I don't want to remove them. They were super dry and probably 50 years old. I guess the time to evaluate neck angle, like you said - is once the top is attached. I'll post a pic of the neck block - but here's a shot of the top/braces. It's pretty close to an early Martin - shown in pencil. https://chucksguitarstache.wordpress.com/2021/04/28/new-top-for-an-o... | ||
| |||
| DanSavage |
| ||
Joined: June 2012 Posts: 2315 Location: Pueblo West, CO | Probably should have mentioned this, but heating the bowl only works if it's a hand-laid cloth bowl. SMC bowls cannot be reshaped. WRT the stink, I guess that's one of the things I like about being anosmic. For the most part, my nose is blind. That top bracing looks like a hybrid of old and new. X-braces are new while tone bars are at the old angle. | ||
| |||
| ChuckSurette |
| ||
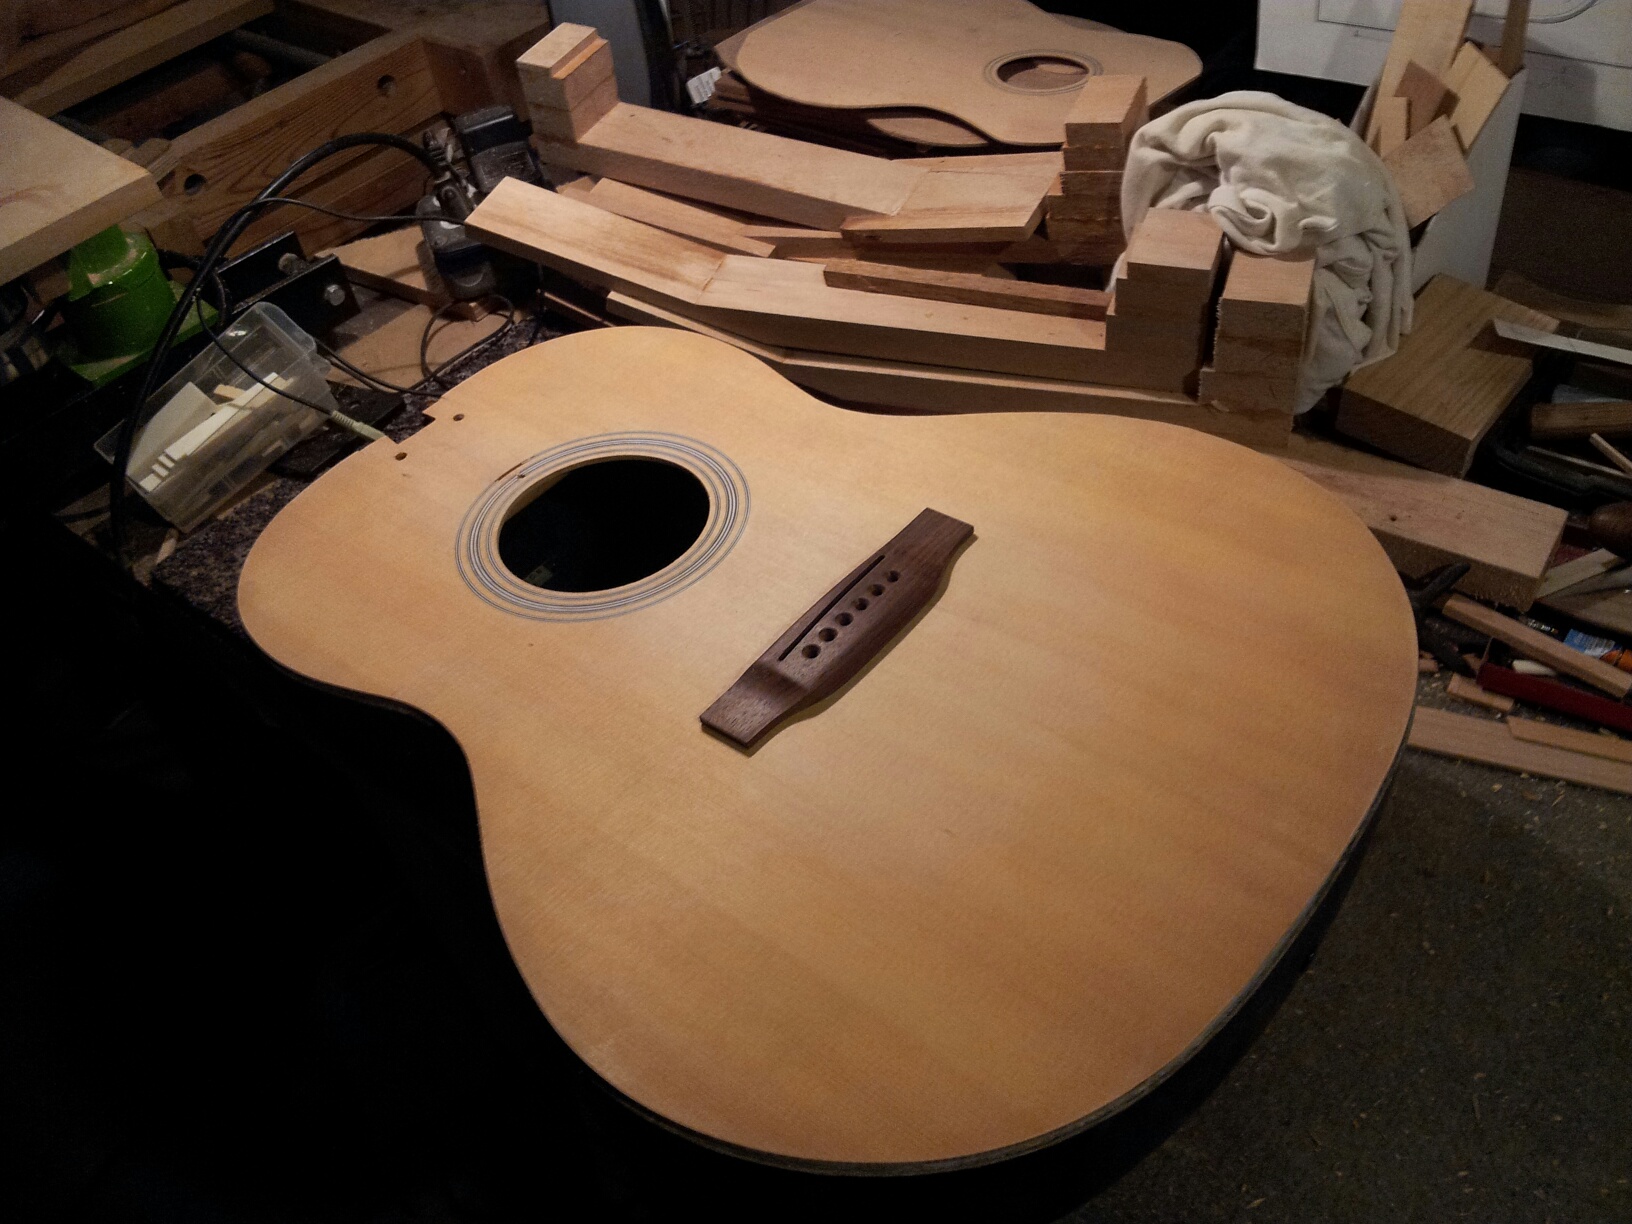
Joined: April 2017 Posts: 22 | Well I got the neck off and the new top on. It's starting to look like a guitar again.
| ||
| |||
| tpa |
| ||
Joined: December 2004 Posts: 565 Location: Denmark | Will the epoxy not regain its properties when cooled or does it degenerate? Meaning that small corrections can be done while the glue is heated and mechanical stability is recovered after cool down. | ||
| |||
| DanSavage |
| ||
Joined: June 2012 Posts: 2315 Location: Pueblo West, CO | ChuckSurette - 2021-05-04 5:04 PM Well I got the neck off and the new top on. It's starting to look like a guitar again.
Nice job, Chuck. Thanks for the update. Were you able to fix the dip in the waist area? Edited by DanSavage 2021-05-05 9:56 AM | ||
| |||
| DanSavage |
| ||
Joined: June 2012 Posts: 2315 Location: Pueblo West, CO | tpa - 2021-05-04 11:09 PM Will the epoxy not regain its properties when cooled or does it degenerate? Meaning that small corrections can be done while the glue is heated and mechanical stability is recovered after cool down. Yes. Generally speaking, the epoxy will recover its mechanical properties after cooling. The trick is to not get it too hot. It's sort of like steaming wood to bend for stuff like bindings. | ||
| |||
| Jump to page : 1 2 Now viewing page 1 [25 messages per page] |
| Search this forum Printer friendly version E-mail a link to this thread |
| This message board and website is not sponsored or affiliated with Ovation® Guitars in any way. | |
| (Delete all cookies set by this site) | |


