|
|
Joined:
February 2022
Posts: 11
| Link to the imgur gallery:
https://imgur.com/a/HxqxIe2
I inherited this instrument from a family member, so there's a bit of sentimental value to it. I'd like to get it fixed back up into playing shape, and would love to get some opinions on what's needed. I'm not sure if the top can be saved; I found this thread on Warped & Cracked Tops which shows some instrument with similar issues, and it seems the solution is replacing the top: http://www.ovationfanclub.com/megabbs/forums/thread-view.asp?tid=47...
Anyone want to comment on the difficulty of the repairs? Presumably the neck has to be removed to remove and reinstall the top? I've got some woodworking experience and think it would ultimately be within my reach, but it's a project I don't think I'd have time for anytime soon.
If anyone can suggest a luthier who could do this repair (bonus if they're in the Baltimore / DC area) I'd love to have a recommendation. |
|
| |
|
Joined:
February 2022
Posts: 11
| Looks like I made an error on that link to the Warped thread, http://www.ovationfanclub.com/megabbs/forums/thread-view.asp?tid=47... should work. |
|
| |
|
Joined:
July 2019
Posts: 109
Location: northern Georgia | While some photos sometimes don't reveal the extent of the problems, looking at yours, I would not rush to assume that a top replacement was needed. The cracks look to have good repair possibilities. On the side where the top separated from the bowl, it might help to take off the binding in order to clean out the joint so the glue could be put in with a thin spatula between the top and bowl. Ovation used an epoxy for the bowl-top joint, Dan Savage would be the expert on the best type to use. Dan and others have retopped Ovations many times, and I am in the process of doing that to an old 1617 that was in much worse shape, but your original top has decades of age, and repaired correctly could sound as good or better that a new top. The amount of work needed would also be considerably less. My opinion is that if the braces under the top are still properly glued to the top, then you are better off keeping the existing one. Of course, if you want to make this an educational project, then retopping could be fun.
For my approach, I would first make sure the top was properly humidified - it is amazing how much effect humidity can have on wood. 50% would be good. For top cracks that go through the wood, my preference would be hide glue. If you are not used to that, Titebond could work. I would also add 2 or three small 'cleats' to reinforce the top under the crack. For cracks just in the finish, thin super glue works well. Go to the Stewart-MacDonald site for videos on crack repairs, Dan Erlewine has several on that. |
|
| |
|
Joined:
November 2002
Posts: 3664
Location: Pacific Northwest Inland Empire | Yep, Ray, you may have a similar challenge & process as I did with the ongoing Pandora II project. There were a couple of significant top repairs required, and I really wanted to save the 55-year-old top on the critter. Admittedly, my documentation of the process & progress is probably overkill, but it will give you an indication of how the task was approached & organized. There are some repairs that have to be made before others. Look carefully at the other BFLG projects, too. Dan Savage is the resident maestro. Exemplary work done by other members, too. "The only stupid question is the one you didn't ask." |
|
| |
|
Joined:
February 2022
Posts: 11
| My basement music room is currently 70F and 40% humidity. It's a little warmer the past week or so, but humidity has been at or above 40% all winter, and it's reasonably stable year-round though I haven't always closely tracked it.
I spent some time looking under the hood, snapped some photos:
https://imgur.com/a/LdJ6dzR
Overall, the top seems to be in better shape than I realized. Doesn't look split at all from the bottom, and I'm speculating that most of those cracks visible on the top are just in the finish or relatively shallow. Only the longest crack, from the bridge near the B string down to the edge, really telegraphs. That's also the primary spot where the top isn't flat.
Furthermore, all the braces are firmly glued down. But I'm rather surprised there isn't more bracing below the bridge. That bottommost "brace" is only like 1/8" thick, maybe less. Realistically there's no bracing that could prevent that big crack in the top below the bridge. Seems like I'd need to add bracing across this area in order to stabilize it and flatten it out. |
|
| |
|

Joined:
February 2016
Posts: 1882
Location: When?? | Hi, Ray. Welcome to the OFC. What an awesome inheritance. Anything with a chain-link rosette is deep into Ovationlore and it looks like it could have some promise without replacing the top. It would be a shame to lose that part of it. And I agree with Seesquare. You've probably already looked at his Pandora II rebuild. Man, talk about starting with something that had been through a blue ringer and turning it into a pleasing instrument without going to the lengths of a full gutting, that one is a great example (and it still has more to go). I have a 1968 Deluxe Balladeer shiny that has the same sinking around the sound hole as yours does, and looks to have essentially the same bracing as well. I think my sinkage is a combination of things. Namely humidity fluctuation over several owner locations and possibly a bracing issue on the upper treble tip. But the sound.. oh my.. just wonderful all around. Has yours lived in the Baltimore / D.C. area its whole life? Curious to know what the serial number and year is.
Edited by Love O Fair 2022-03-12 1:38 AM
|
|
| |
|
Joined:
February 2022
Posts: 11
| Off the top of my head I do recall it's a B plus 3 serial, and thus dates to Nov 68 -- Feb 69, per this: http://ovationtribute.com/Date%20your%20Ovation.html
It's lived in New York and South Florida as well, and I think it's had the large crack for over 20 years. But I don't think it was particularly well monitored for impacts of temperature and humidity. The action is certainly a little high, but not unplayable, and it does sound good - even with the top partially detached, lol.
I'll start cleaning it up a little, get that packing tape off the edge and see how easily I can flatten the top out and how well everything fits together.
I wonder if I should start sanding back the finish on the top. Knowing about the shrinkage issues, it seems like I should get the old finish off and let the top relax?
I've read through see's Pandora II thread, plus a few others that I've come across. If there are any other memorable threads feel free to point them out, and I'll take a read. I'm in no rush here.
Edited by electric__ray 2022-03-12 11:08 AM
|
|
| |
|

Joined:
June 2012
Posts: 2345
Location: Pueblo West, CO | electric__ray - 2022-03-11 2:13 PM
I spent some time looking under the hood, snapped some photos:
https://imgur.com/a/LdJ6dzR
Overall, the top seems to be in better shape than I realized. Doesn't look split at all from the bottom, and I'm speculating that most of those cracks visible on the top are just in the finish or relatively shallow. Only the longest crack, from the bridge near the B string down to the edge, really telegraphs. That's also the primary spot where the top isn't flat.
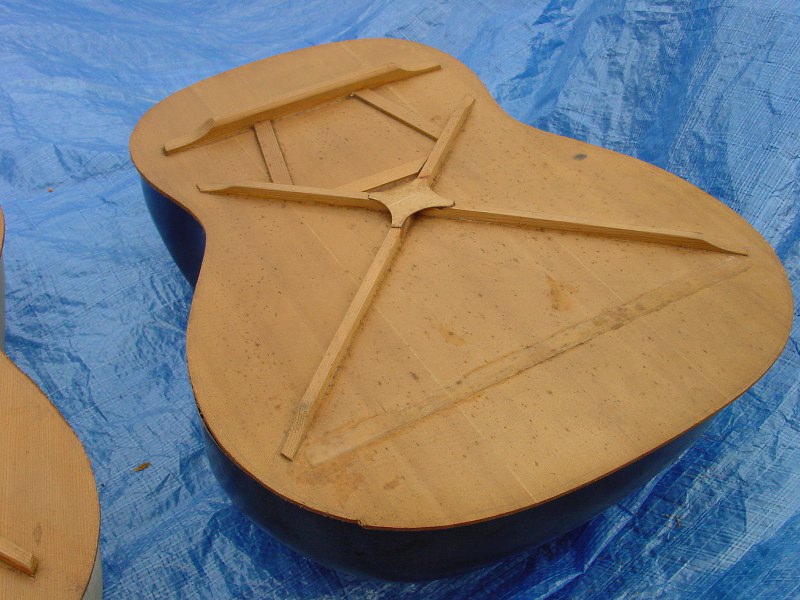
Furthermore, all the braces are firmly glued down. But I'm rather surprised there isn't more bracing below the bridge. That bottommost "brace" is only like 1/8" thick, maybe less. Realistically there's no bracing that could prevent that big crack in the top below the bridge. Seems like I'd need to add bracing across this area in order to stabilize it and flatten it out. Yep. Looks like the original Ovation X-braces. It looks to me like they stopped using the fiberglass strip between the lower legs of the Xs and used a thin spruce strip instead. They also simplified the X-brace reinforcement from an octagon to a simple rectangle. Here's what the 66-67 X-braces looked like. 
In looking at the DUBOB pics you posted, the finish crack looks like it might be all the way through the wood. You can test this by dribbling some naptha (lighter fluid/white gas) along the crack, then look inside. If the crack is all the way through the wood, the naptha should wick through the crack and wet the wood inside. 
|
|
| |
|
Joined:
March 2002
Posts: 15680
Location: SoCal | Looking at this makes me wonder what the bracing on a K1111 reissue looked like..... |
|
| |
|
Joined:
February 2022
Posts: 11
| The naptha trick is pretty smart stuff. The one large crack is indeed open, but all the small ones are not. Frankly, they just look like they're in the finish.
I actually found that the crack is visible with bright light shining on top of the guitar if I take a photo without a flash:

Closeup of the separation on the side. The total separation is about 12" long. There's about 3" or so with rougher tearout.

Did Ovation use epoxy everywhere on these guitars, or just where wood and fiberglass meet? |
|
| |
|

Joined:
June 2012
Posts: 2345
Location: Pueblo West, CO | Ovation pretty much used epoxy everywhere except the finish, which is polyester resin.
Polyester resin never stops shrinking. It shrinks even more when exposed to sunlight & heat, hence the reason for the top cracks.
WRT the top separation, if you can squeeze it back together by hand, you should be able re-glue it using epoxy.
Smear epoxy into the open area, then use strips of masking tape to pull the top back down to the bowl while the glue cures.
|
|
| |
|
Joined:
February 2022
Posts: 11
| I added a couple more photos to the bottom of the first gallery showing the rosette up close: https://imgur.com/a/HxqxIe2
It's half unglued and lifting out of its slot, and kind of curled as well. It sort of looks like there are cracks in it, but that may be the glue underneath it, which seems kind of stringy and sticky. Some of the poly topcoat is chipped and flaking off, but not everywhere. Would the gameplan be to try to remove it, clean it up, and reinstall? Or try to replace it? I love the look of that chainlink rosette, certainly want to keep it if possible.
WRT the top separation, Dan, I can sort-of squeeze it together. it takes a pretty firm press to get it to where it seems properly flush with the height of the binding. I'm not sure that tape alone would provide enough clamping force. I'm not sure if it's because closing the gap means fighting the pull of the shrunken polyester, or just because I need to smooth and level the surfaces in the gap with some sandpaper. Or a little of both.
Edited by electric__ray 2022-03-19 12:51 PM
|
|
| |
|

Joined:
June 2012
Posts: 2345
Location: Pueblo West, CO | Everything I'm seeing in the new photos looks to me like it was caused by the finish shrinking, from the top cracks, the top pulling away from the bowl and rosette being pulled out of its groove.
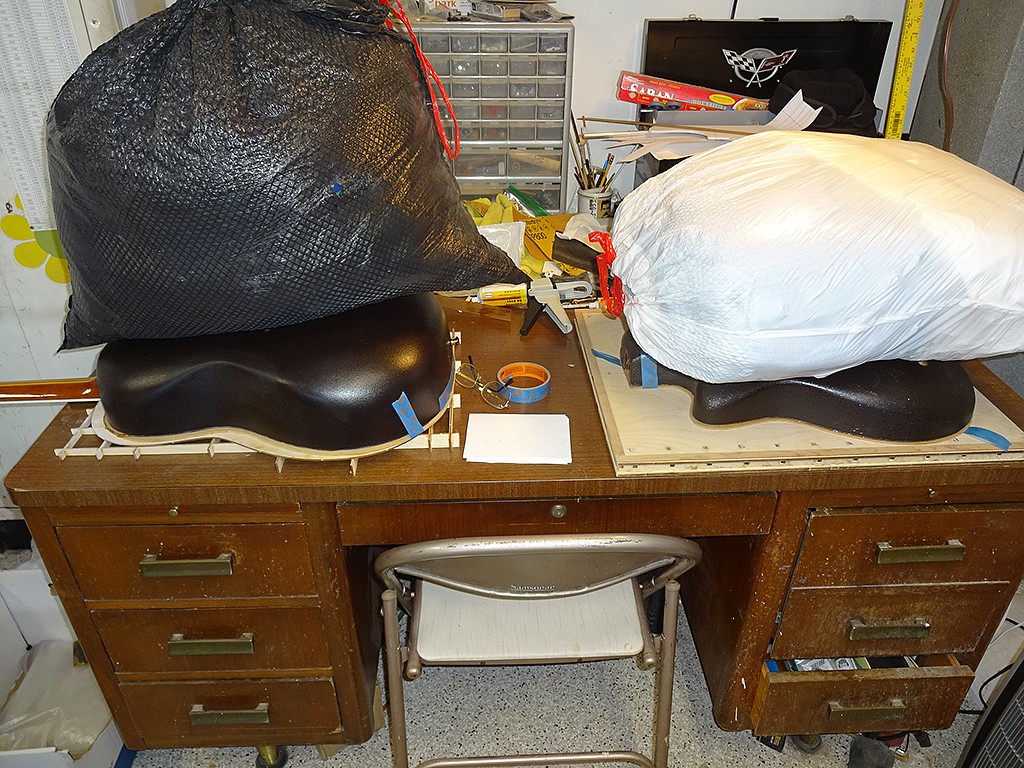
Another way to see if you can close the top gap is to put the bowl upside-down on a flat surface (with a hole for the bridge & neck fretboard extension) then, add weight to the bowl. Here's a couple of tops being glued to bowls. 
|
|
| |
|
Joined:
February 2022
Posts: 11
| Dan, that makes perfect sense to me. If the old finish is that much of the problem, should I remove it first, before regluing the side? And what is the best way to remove this old polyester? Sanding? |
|
| |
|

Joined:
June 2012
Posts: 2345
Location: Pueblo West, CO | The top wood should not require much force to push it back down. If it does require a fair amount of force, as you say, then it sounds like you're fighting the finish.
So, removing the finish sounds like the best option.
Yes, sanding is the only way to remove polyester finish. |
|
| |
 Shiny bowl Balladeer photos and repair questions
 Shiny bowl Balladeer photos and repair questions