|
|
Joined:
May 2011
Posts: 82
Location: Ozark, Arkansa | I decided to start a separate thread for another repair on the 1113 restore project.
One of the defects I sort of knew about with the 1113 was that the sound ring was deteriorating. There was a sort of celluloid layer, back printed with the pattern of the rosette. That was on top of a white layer that had basically dissolved into goo. I should mention, the 1967 sound ring pattern is not like later versions.
I say, "sort of knew about" because I really had no idea what I was in for.
I expected that the printed top layer was like the hard sound rings of more modern Ovations, but not so. I carefully cut through the finish which overlapped the celluloid so I could remove it intact, but the goo was all over the underside of the top layer, which was also covered in nitro finish. No lacquer as I had been told.
I peeled the nitro off the top of the ring, and then started removing the goo with alcohol. That worked fine for the most part to get the majority off. But when I went back over it to clean up the residue, I noticed that the black pattern was being damaged.
To make matters worse, I notice that the celluloid was starting to curl up like an old apple peel. I had to work fast if I was going to save anything.
I decided in order to preserve the pattern I had to mount the celluloid on white paper and scanned it on a Canon flat bed scanner at 600x600dpi into my computer. I reached out to Al P. in hopes of finding an original, but no such luck. I would have to go it on my own to restore the 1113 as original.
I brought the scanned image up in PhotoShop, converted it to TIFF format so as to not loose any detail, and repaired the damaged areas of the pattern. I converted it to monochrome to get pure black and white, and last night I ran a little experiment.
I printed off a copy on a plain sheet of paper on my Xerox laser printer, and then sprayed it with a good thick coat of MinWax Polycrylic clear gloss finish to act as a clear adhesive. Then I covered that with a thin sheet of hard plastic and squeezed out the bubbles. This morning I had a sample of a hard sound ring with a totally original rosette pattern.
Yay!
Edited by Oldvation Guy 2020-07-09 1:21 PM
| |
| | |
Joined:
May 2011
Posts: 82
Location: Ozark, Arkansa | I know, I know, pics. Here you go.
 (IMG_1670.jpg) (IMG_1670.jpg)
 (IMG_1675.jpg) (IMG_1675.jpg)
 (IMG_1676.jpg) (IMG_1676.jpg)
 (IMG_1678.jpg) (IMG_1678.jpg)
 (IMG_1680.jpg) (IMG_1680.jpg)
 (IMG_1687.jpg) (IMG_1687.jpg)
 (IMG_1688.jpg) (IMG_1688.jpg)
Attachments
----------------
 IMG_1670.jpg (94KB - 2 downloads) IMG_1670.jpg (94KB - 2 downloads)
 IMG_1675.jpg (86KB - 1 downloads) IMG_1675.jpg (86KB - 1 downloads)
 IMG_1676.jpg (76KB - 1 downloads) IMG_1676.jpg (76KB - 1 downloads)
 IMG_1678.jpg (88KB - 0 downloads) IMG_1678.jpg (88KB - 0 downloads)
 IMG_1680.jpg (40KB - 0 downloads) IMG_1680.jpg (40KB - 0 downloads)
 IMG_1687.jpg (73KB - 1 downloads) IMG_1687.jpg (73KB - 1 downloads)
 IMG_1688.jpg (91KB - 2 downloads) IMG_1688.jpg (91KB - 2 downloads)
| |
| | |
Joined:
March 2002
Posts: 15678
Location: SoCal | Interesting pictures and work. I believe that the correct name for that part is "rosette", not sound ring. Regardless of the name, I'm enjoying watching the work. Please continue...... | |
| | |
Joined:
May 2011
Posts: 82
Location: Ozark, Arkansa | Thanks for the clarification, and I believe you are correct, Paul. I shall henceforth refer to it as a rosette.
So, here is a nearly finished version of the paper rosette, before adding it to a plastic ring (lol, thus turning it into a sound hole ring).
After repairing the significant damage to the pattern at about the 1:00-2:00 o'clock position, it looks amazing IMHO, and is a huge step toward restoring the 1113 back to original appearance.
But now the question becomes, do I want to add some color to the original pattern?
Choices, choices...
Edited by Oldvation Guy 2020-07-11 4:22 PM
 (IMG_1689.jpg) (IMG_1689.jpg)
Attachments
----------------
 IMG_1689.jpg (75KB - 0 downloads) IMG_1689.jpg (75KB - 0 downloads)
| |
| | |

Joined:
June 2012
Posts: 2340
Location: Pueblo West, CO | Oldvation Guy - 2020-07-11 2:11 PM
So, here is a nearly finished version of the paper rosette, before adding it to a plastic ring (lol, thus turning it into a sound hole ring).
After repairing the significant damage to the pattern at about the 1:00-2:00 o'clock position, it looks amazing IMHO, and is a huge step toward restoring the 1113 back to original appearance.
But now the question becomes, do I want to add some color to the original pattern?
Choices, choices...
Steve,
If I may, I'd like to offer a suggestion.
If this rosette has been printed on plain paper, you will not want to apply any solvents, a.k.a. glue, to it as the paper will absorb the solvent and discolor to the point of becoming semi-translucent.
Instead, I would use a waterproof paper. Waterproof paper is a thin, printable plastic sheet. I've had really good luck with PuffinPaper. It works well with laser and inkjet printers as well as plain-paper copiers.
I used PuffinPaper for all my Ovation body labels. It comes in two thicknesses, 8-mil and 10-mil. I use the 10-mil.
There are many different brands of waterproof paper. Since PuffinPaper is the the only one I've used, and I've had good results with it, it's the only one I can recommend.
Dan | |
| | |

Joined:
June 2012
Posts: 2340
Location: Pueblo West, CO | Sorry. I should add that PuffinPaper is completely opaque. | |
| | |
Joined:
May 2011
Posts: 82
Location: Ozark, Arkansa | Thanks, Dan! I have never heard of Puffin Paper. I should say that the the Polycrylic did not make the regular translucent at all.
I wonder if printing on an overhead transparency sheet would accomplish the the same thing, except I would have to come up with a background. I even wondered about getting abalone to go behind a transparent pattern, like a regular Ovation sound ring would have an insert.
Here is a version of the rosette, playing with color.
Edited by Oldvation Guy 2020-07-11 7:54 PM
 (Colored rosette.jpg) (Colored rosette.jpg)
Attachments
----------------
 Colored rosette.jpg (93KB - 0 downloads) Colored rosette.jpg (93KB - 0 downloads)
| |
| | |

Joined:
June 2012
Posts: 2340
Location: Pueblo West, CO | Oldvation Guy - 2020-07-11 5:46 PM
I wonder if printing on an overhead transparency sheet would accomplish the the same thing, except I would have to come up with a background. I even wondered about getting abalone to go behind a transparent pattern, like a regular Ovation sound ring would have an insert.
Here is a version of the rosette, playing with color.
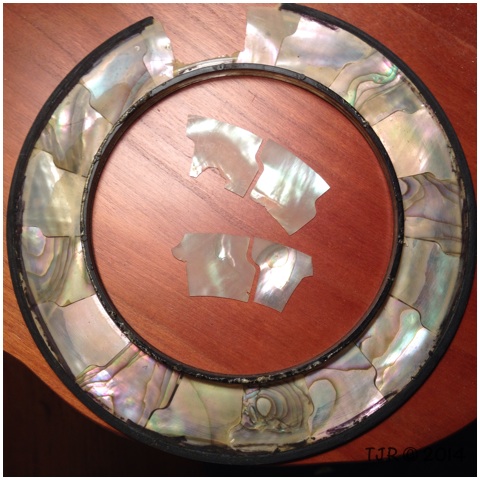
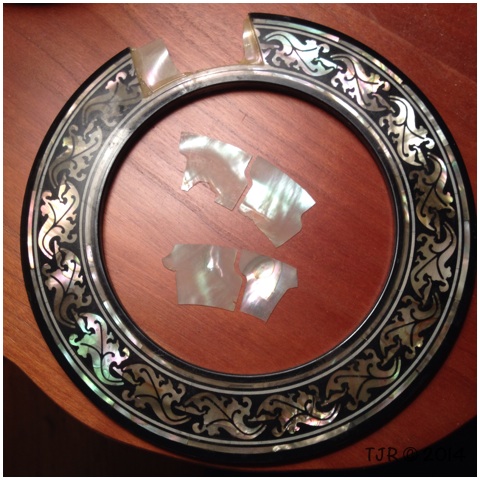
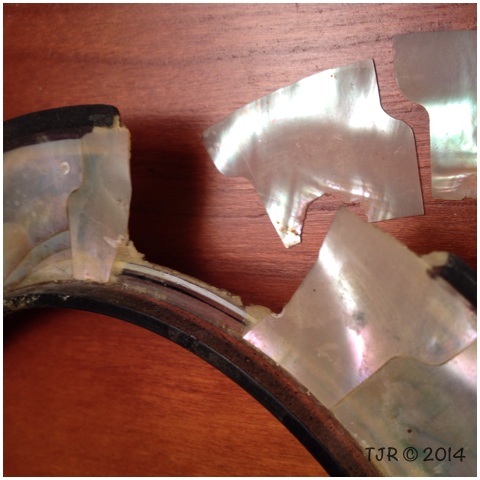
Overhead transparency would work except that inkjet ink is translucent. Abalone would work, too. The original abalone was diced into separate sections which were cut so as to align the seams with the printed shell so the sections would mostly disappear.Here's what the sections look like from the back. 
Here's what they look like from the front. 

| |
| | |
Joined:
May 2011
Posts: 82
Location: Ozark, Arkansa | Yes, I think I saw this on your Black Pearl build. Am I correct. What did you use for adhesive to bind the abalone to the ring?
If I used a transparency sheet, it would be printed on my Xerox color laser, so no issue with dissolving the pattern.
Here is a pic with just a paper ring temporarily attached.
 (IMG_1693_01.jpg) (IMG_1693_01.jpg)
Attachments
----------------
 IMG_1693_01.jpg (92KB - 0 downloads) IMG_1693_01.jpg (92KB - 0 downloads)
| |
| | |
Joined:
May 2011
Posts: 82
Location: Ozark, Arkansa | First attempt at a rosette. This will do for a while. I will make another later when I have more time. I need to get other things done right now.
 (IMG_1694.jpg) (IMG_1694.jpg)
Attachments
----------------
 IMG_1694.jpg (94KB - 0 downloads) IMG_1694.jpg (94KB - 0 downloads)
| |
| | |

Joined:
June 2012
Posts: 2340
Location: Pueblo West, CO | Looks pretty good to me. | |
| | |
Joined:
May 2008
Posts: 1562
Location: Indiana | Nice job.
How's the Adamas coming along? | |
| | |
Joined:
May 2011
Posts: 82
Location: Ozark, Arkansa | Thanks, Dan. I want to make another, but not now. The Polycrylic finish does a great job of securing the paper to the plastic, with almost no translucency issue. The black and white in the rosette pattern are both slightly muted, but the plain black and white paper rosette seemed almost too contrasty. I like it the way it is, but I need to work on the fit a little more. I really do like having been able to keep it as close to original as possible. And it sounds amazing. The resonance of that 53 year old top is outstanding.
Thanks, Jonmark. I kind of put the Adamas on hold again. I quit my job, so I am reprioritizing right now. To be honest, I got some pretty strong negative pushback about my customizing ideas for the Adamas, so I am working through whether I want to press on with the way I was going to finish it.
I am actually busy right now with the Ultra I bought in Dallas a couple of years ago for experimenting. The neck and bowl were in great shape, but the top was trash. So I am working on an experimental top, bridge, and tailpiece. It won't be a an archtop, but will have some resemblance to one. | |
| | |
Joined:
May 2011
Posts: 82
Location: Ozark, Arkansa | One thing I should mention regarding my effort to keep the 1113 as original as possible is another experiment.
I chose to create a carved ebony saddle for it. I had read that some famous players highly regard them. The original was some kind of plastic. I don't know a lot about intonation on classical guitars yet, but I went by what I saw others had done for compensation. I also split off the high E and B strings on their own section. So far, I like what I hear. | |
| | |

Joined:
February 2016
Posts: 1879
Location: When?? | Nice job, Oldvation Guy. That looks terrific. | |
| | |
Joined:
July 2019
Posts: 109
Location: northern Georgia | Again, nice work on the rosette for this early Ovation classical. The idea of an ebony saddle is interesting. I have seen some comments on line that ebony is not as hard as bone, and will wear more rapidly. However, there isn't much continuous string motion at the bridge that would generate a lot of friction to cause wear.
I recently refreshed a mandolin that I had put together from a kit from Martin in 1989, and they suggested ebony as a material for the nut, which is what I did then. I recently replaced it, the only reason being that when I replaced the fingerboard, the new board was a bit more than 1/32" thicker and I decided not to shim the old nut. I had a bone nut blank meant for Martin-style guitars that I did not have other plans for so I used that instead. The original ebony nut would have been usable, and nuts get much more string movement across them than saddles, so they should wear much more. As for ebony saddles/bridges on string instruments, they are common on arch top mandolins and guitars.
There is a history of experiments with saddle composition, especially by luthiers specializing in classical guitars - I recall an old String Instrument Craftsman newsletter with a article on experiments with several different materials, including some metals. A bit off topic, but in the early 2000s Red Henry started a study involving use of a single piece maple bridge instead of a multi-piece adjustable ebony bridge on mandolins. This was inspired by the use of single piece maple bridges on violins. He claimed that in practice, wear across the top on the maple was not enough to worry about, and he did not advocate using an overlay of a harder material, like bone or ebony, to prevent wear. If interested, see the articles in this link:
http://murphymethod.com/index.cfm?event=pages.content&contentid=87
I just made one of his maple bridge designs for my old Martin kit mandolin, and it made it much louder than the single piece rosewood bridge that it had. A worthwhile change. It might be interesting to try maple or some other hardwood on a classical saddle, and your experiment with ebony is intriguing.
Did I read correctly that you make the saddle from 2 pieces, one for the lower 4 strings and the other for the B and high E? I did something like that on an acoustic electric guitar (Gibson Chet Atkins CE 1987, a version Gibson sold using a thin line Fishman pickup). There, my motive was to even the electrical output between the strings, which I did by splitting the saddle into 3 equal length pieces, so each piece was in contact with 2 piezo elements. In your case, I suspect that using 2 pieces might change the acoustic output by increasing the flexibility of the bridge across the top a bit, since the bridge could flex more easily between the two pieces of your ebony. Interesting.
| |
| | |
Joined:
May 2011
Posts: 82
Location: Ozark, Arkansa | Thanks for your interest and comments, Keldon85. Yes, the saddle is in two pieces. I made one complete saddle to get the height right across both sections. I have a small Delta band saw with an extremely thin blade, so after I had compensated the saddle I cut the section loose for the E and B strings.
I agree that there is very little string motion across the saddle, so there is very little wear on either the saddle or the strings. I am impressed enough with the tone, that I doubt I would bother buying a Tusq, or bone to replace it. But maybe some day for comparison to the ebony, I will. I am also considering trying hardened aluminum because of the density and weight advantages. | |
| |
|
 Ovation 1113 Sound Ring replacement
 Ovation 1113 Sound Ring replacement