|
|

Joined:
June 2012
Posts: 2340
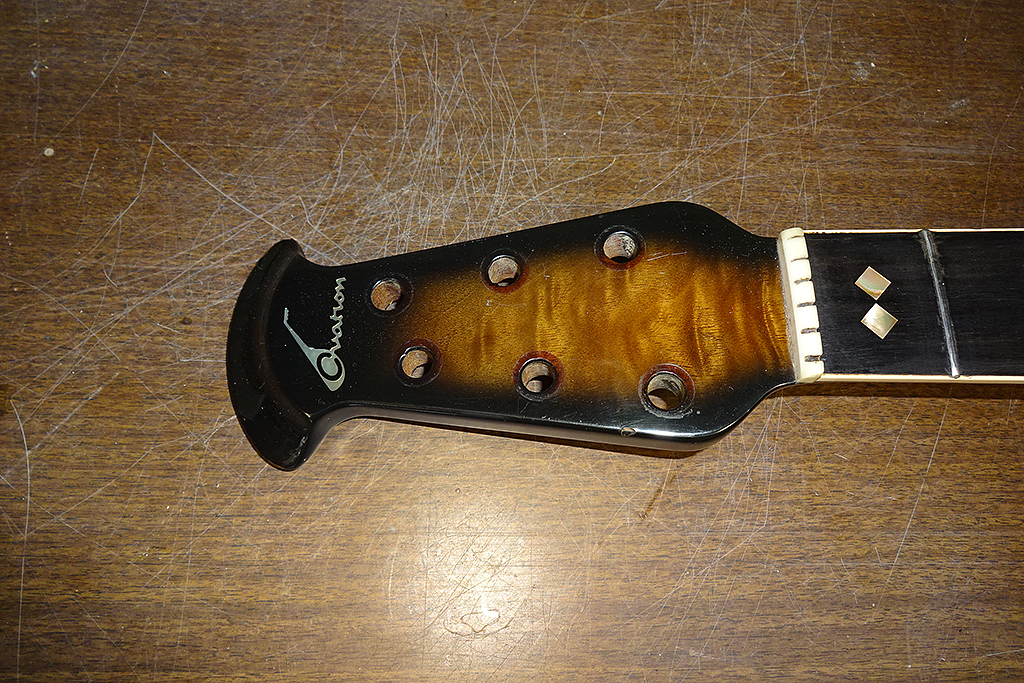
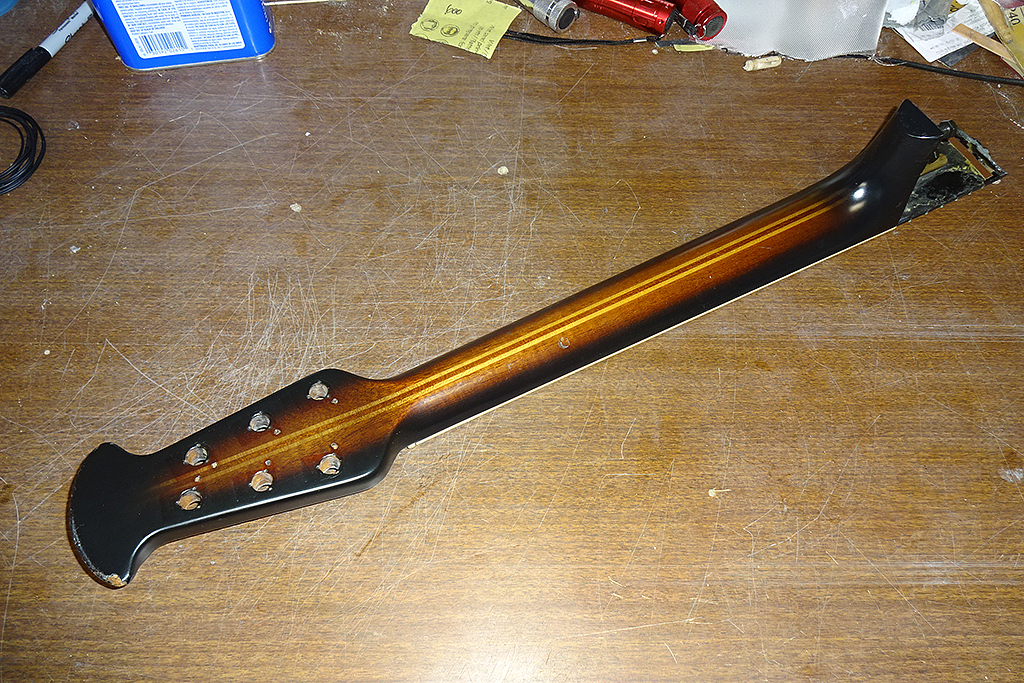
Location: Pueblo West, CO | I've had this project waiting. It won't have a model number. Just a name; The Black Pearl. I really like how my parlor looks with the black MOP purfling and tuner knobs, so this guitar will get the same treatment. Plus a whole lot more. I bought this CL neck a while ago. I will build the rest of the guitar around this. I'm going to replace the white neck binding with black. It'll also get a black TUSQ nut. I'm also going to remove the abalone fret board inlays and replace them with black MOP. I'll also be re-fretting the neck with gold EVOs. 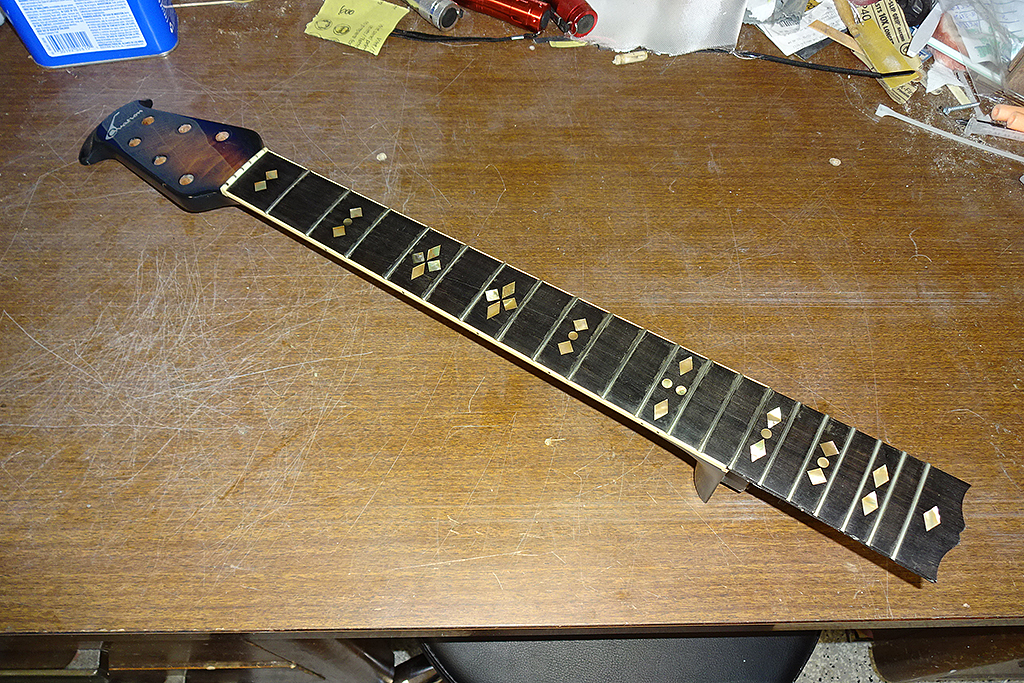
You may remember this bowl. It came with my original 1619. I also splashed a mold off it. This is the lightest, thinnest bowl I've ever seen. As near as I can tell this was molded using vacuum infusion. This should make for a really light, nice sounding guitar. 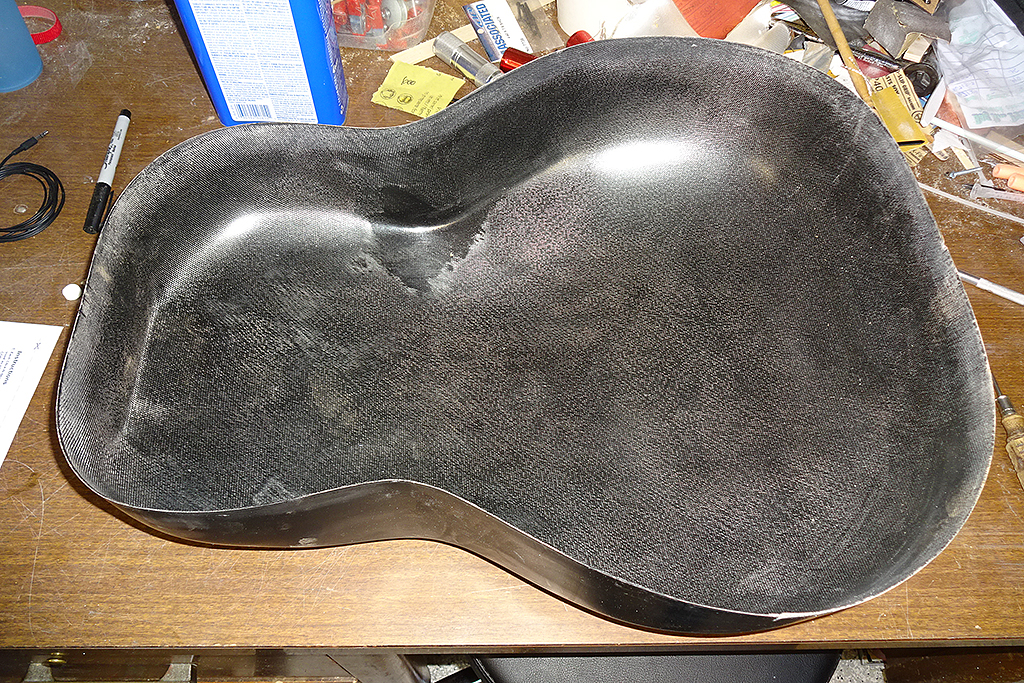
I'll top the guitar with torrefied Adirondack and torrefied Adi A-braces. I realized that I've built a few torrefied Adi A-brace Os, but that I don't own one myself. I like my parlor, but I can't play it standing up.
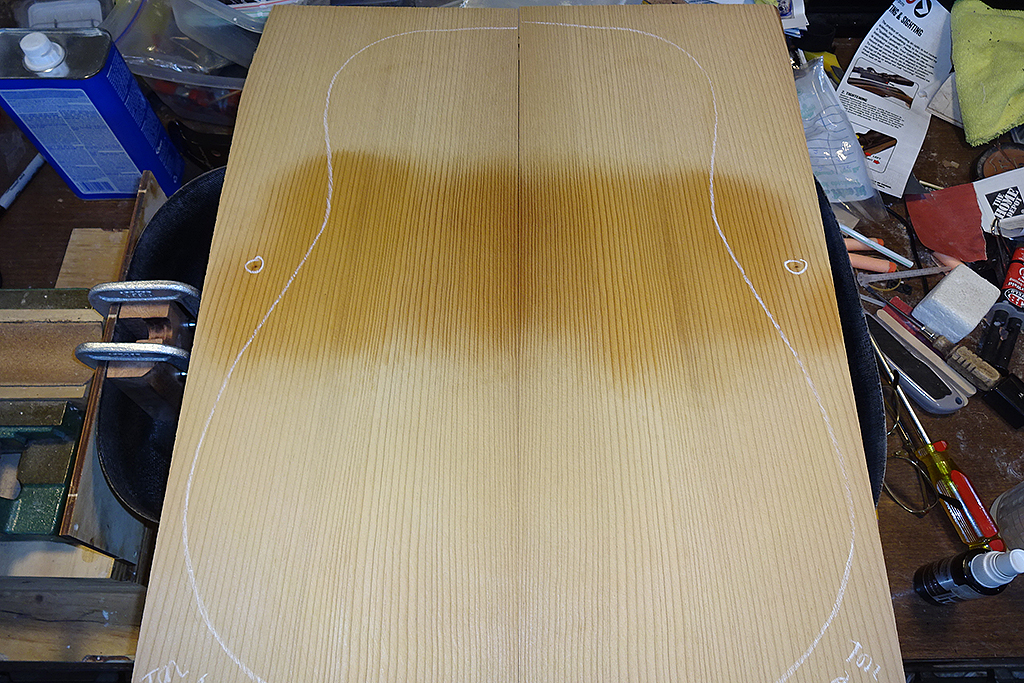
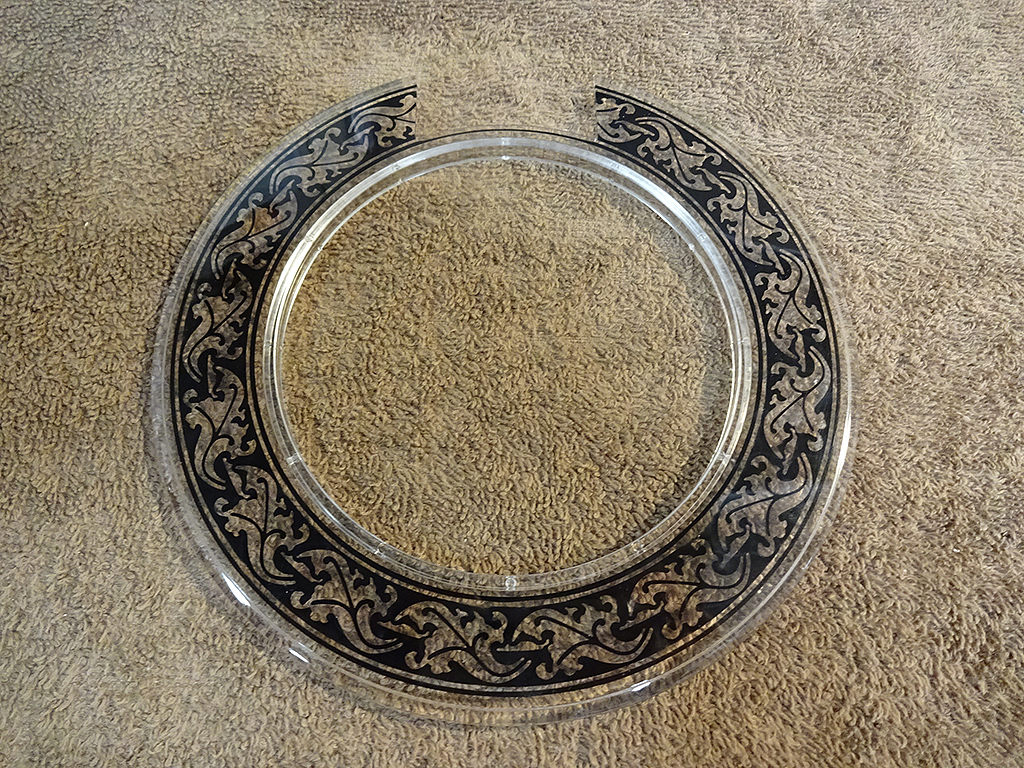
I never did use the unfinished rosette I got from the MS. As you may recall I was originally going to use that on Daren's 1528, even going so far as to cut out the abalone inlay pieces from feathers I bought online. So, I'm going to use it on this one, but it'll get black MOP.
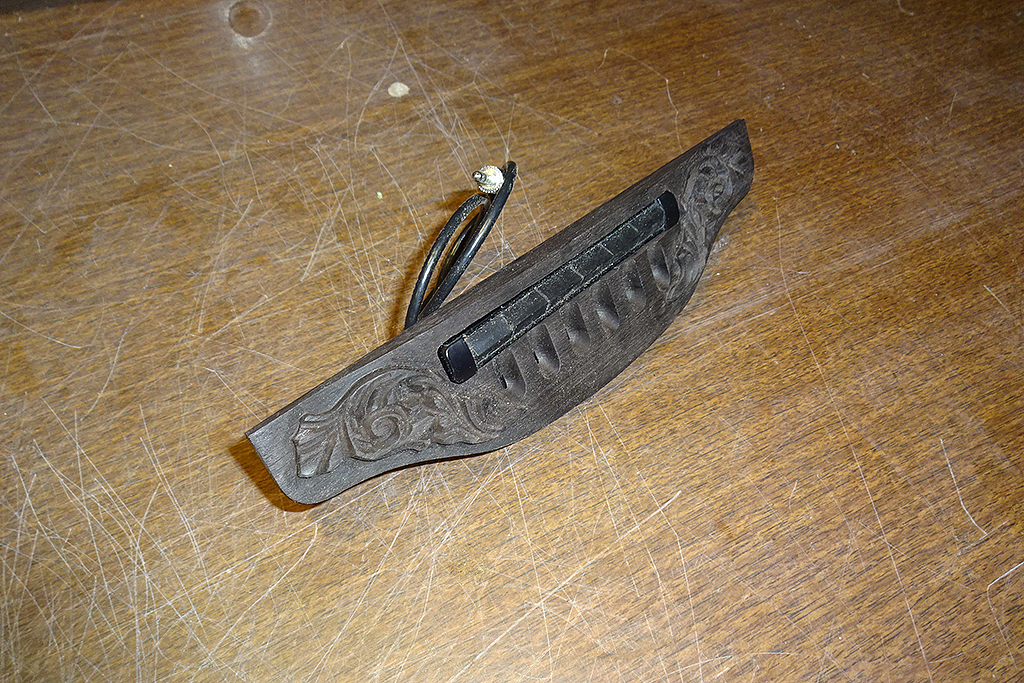
I'm also going to use an carved ebony CL bridge and compensated black saddle.
I probably won't cover all the phases of the build, like bracing the top. Just the new stuff, like removing and replacing the fret board inlays.
Edited by DanSavage 2019-08-16 3:08 PM
|
|
| |
|

Joined:
June 2012
Posts: 2340
Location: Pueblo West, CO | Before the neck can be mounted to the bowl, the bowl needs a neck block.
I'm using a Stewmac bolt-on neck block. It's really made for a Martin-style guitar, but with a few mods it'll work here. 
The top hole is fine. The bottom hole too far down and the angle at the bottom needs to be adjusted. It also needs to be notched at the top for the K-bar truss rod.
I've already modified the neck block to work here. I notched the top and drillled a new hole. I'll fill or cover the old hole before I glue the neck block into the bowl. 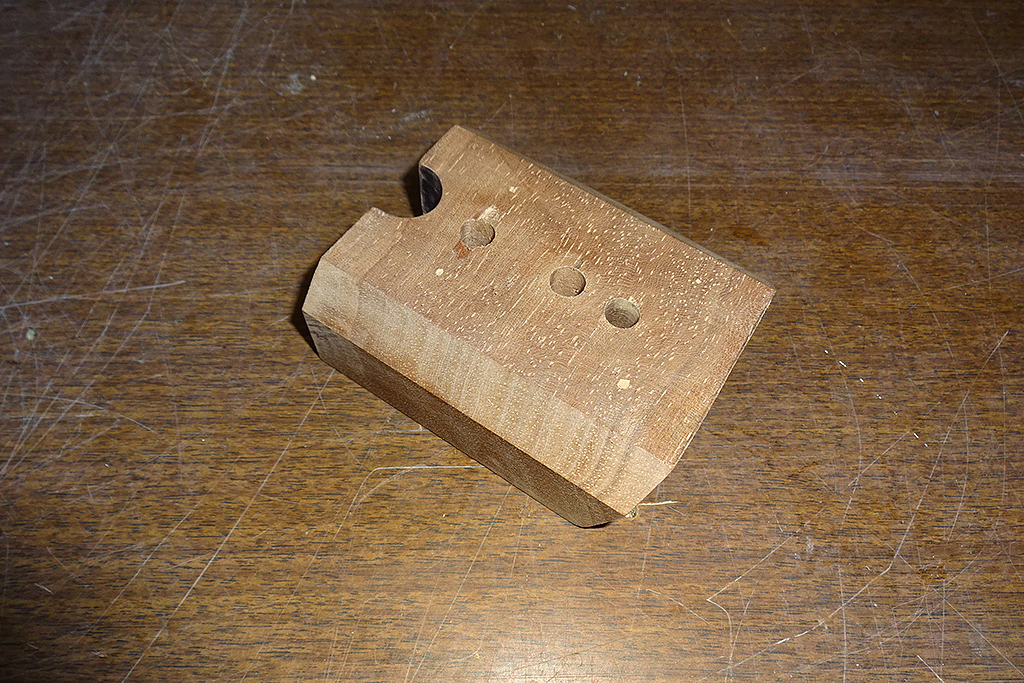
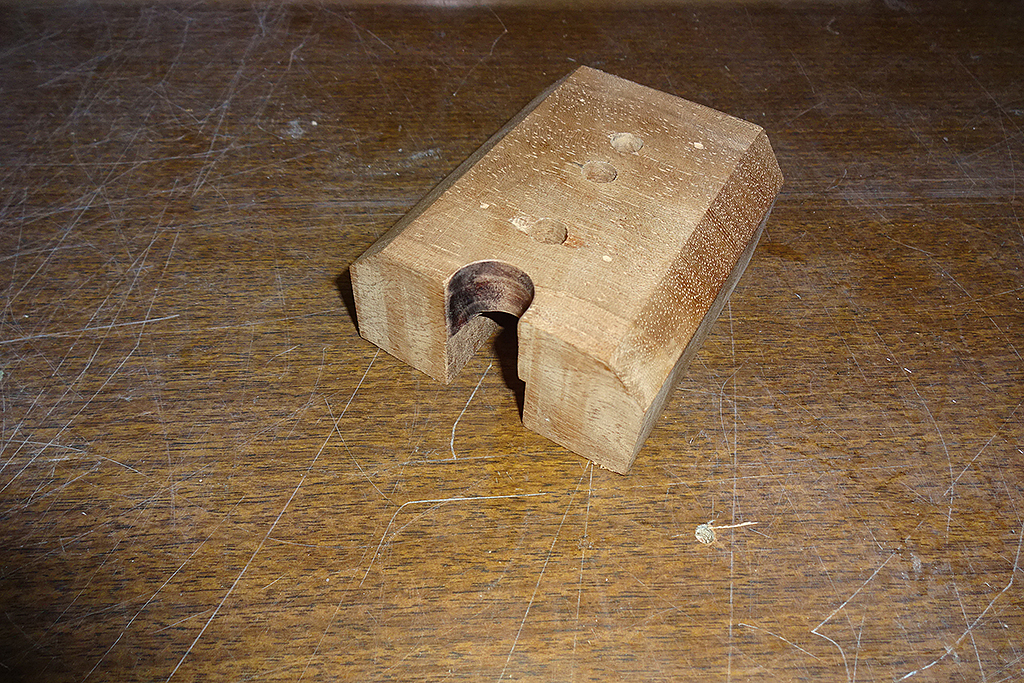
Neck bolted to block. 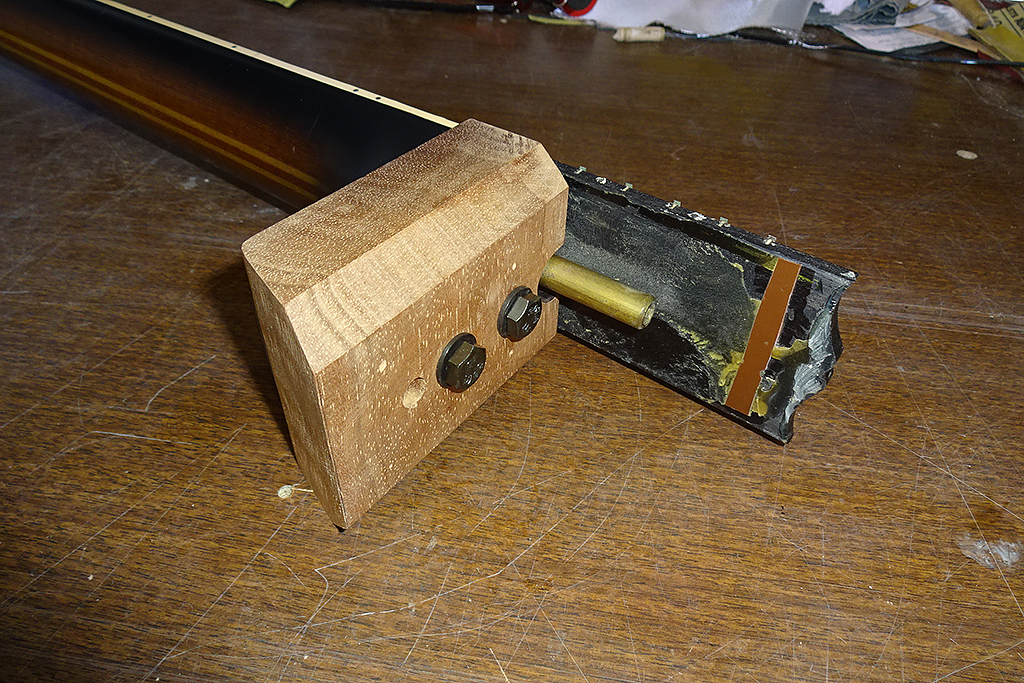
Neck block clamped into bowl for test fitting. After the block is glued to the bowl, I'll glue in the same reverse kerfed mahogany that I used on Patch's parlor. 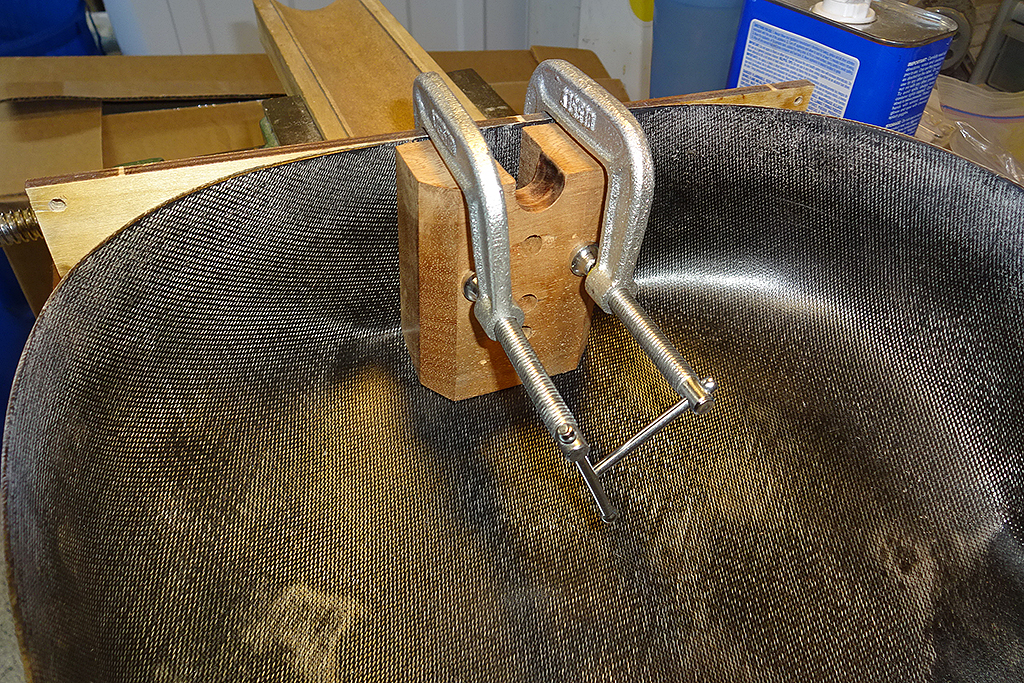
|
|
| |
|
Joined:
May 2008
Posts: 1564
Location: Indiana | This will be interesting. |
|
| |
|
Joined:
February 2014
Posts: 715
Location: moline,illinois | Great to see you back in action with a New Project I love following your work and this one sounds like it will be superb  |
|
| |
|
Joined:
October 2012
Posts: 1093
Location: Yokohama, Japan | 2wheeldrummer - 2019-08-16 6:53 AM
Great to see you back in action with a New Project I love following your work and this one sounds like it will be superb 
+1! |
|
| |
|
Joined:
December 2003
Posts: 855
Location: Canada | Holy black fankenvation - looking forward to following this build. |
|
| |
|
Joined:
February 2016
Posts: 1881
Location: When?? | Dan.. I've been worried not seeing you around. Bad dreams. Can't focus on life. Missing work. My shrink even gave up on me. So now it's great to see you back on the BFLG! I'm cured!! This one looks like it's gonna be lots of fun.
PS: I assume the neck refinish is NOT going to be back to the original burst colors, or the top a burst either. I don't recall ever seeing you do any burst work.
Edited by Love O Fair 2019-08-16 11:14 PM
|
|
| |
|

Joined:
August 2007
Posts: 1008
Location: Tuscany, Italy | arumako - 2019-08-16 12:25 AM
2wheeldrummer - 2019-08-16 6:53 AM
Great to see you back in action with a New Project I love following your work and this one sounds like it will be superb 
+1!
+2  |
|
| |
|

Joined:
June 2012
Posts: 2340
Location: Pueblo West, CO | Love O Fair - 2019-08-16 8:57 PM
PS: I assume the neck refinish is NOT going to be back to the original burst colors, or the top a burst either. I don't recall ever seeing you do any burst work.
Hi Al,
Other than touching up the parts of the neck with finish damage and the updates to the fretboard, the neck will remain largely unchanged. I think the style of burst on it fits in with the theme of the guitar.
You're right. Generally speaking, I'm not a fan of bursts on guitar bodies. I had a 1719 with a burst, but I sold it because I like plain-top guitars. |
|
| |
|
Joined:
October 2014
Posts: 270
| This is going to be a great project to follow! |
|
| |
|

Joined:
June 2012
Posts: 2340
Location: Pueblo West, CO | First order of business is to mask off the neck block area, then scuff it up in preparation for gluing. 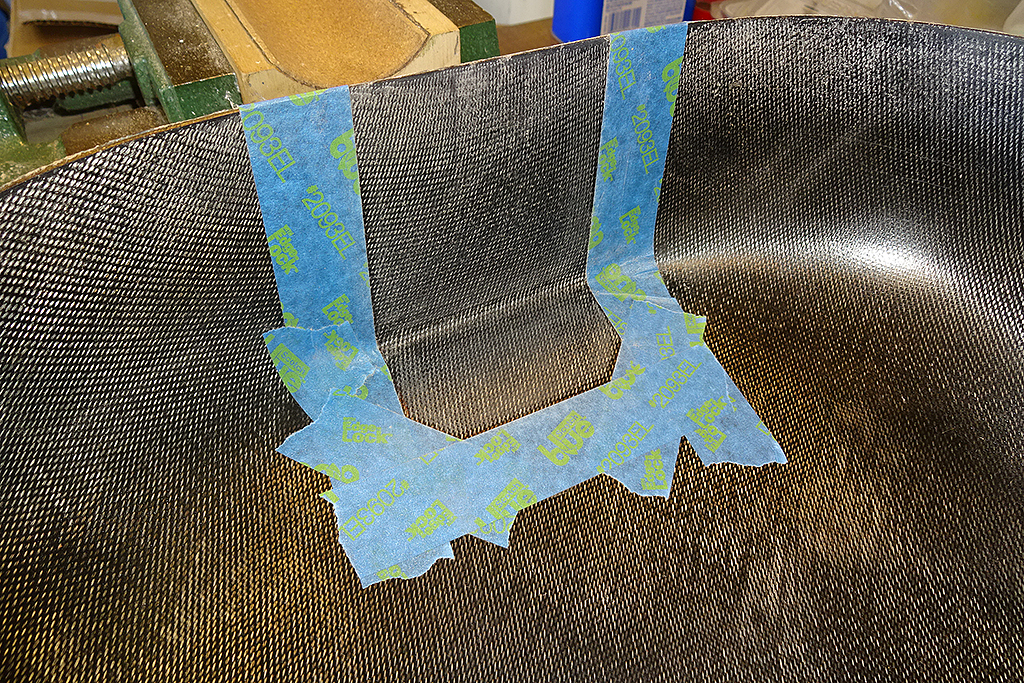
Third hole in the neck block is sealed with a mahogany plug I made.
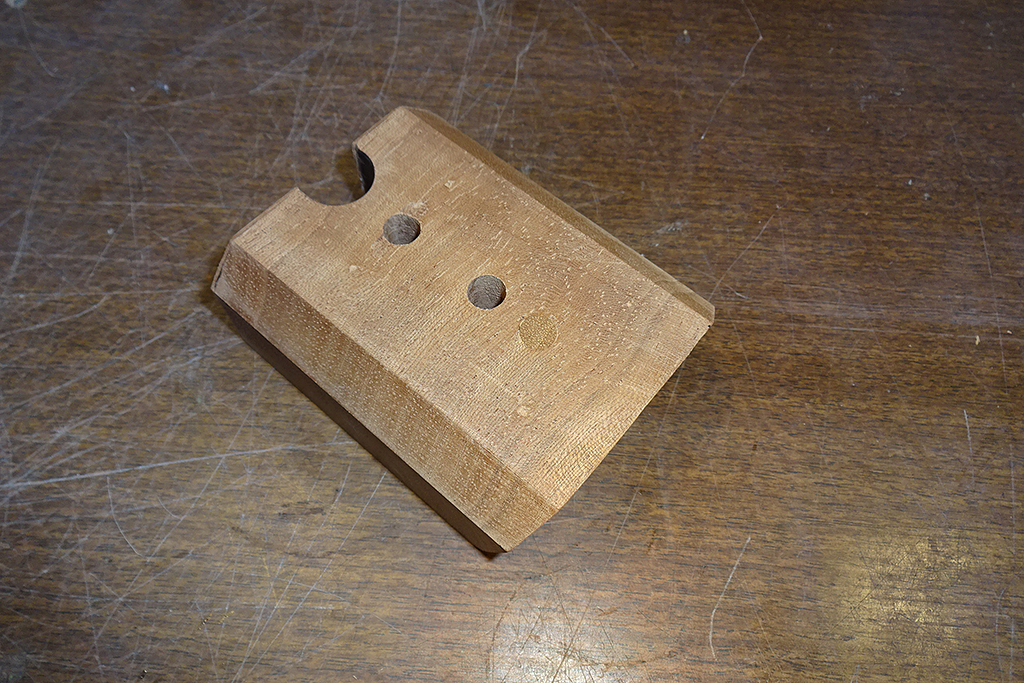
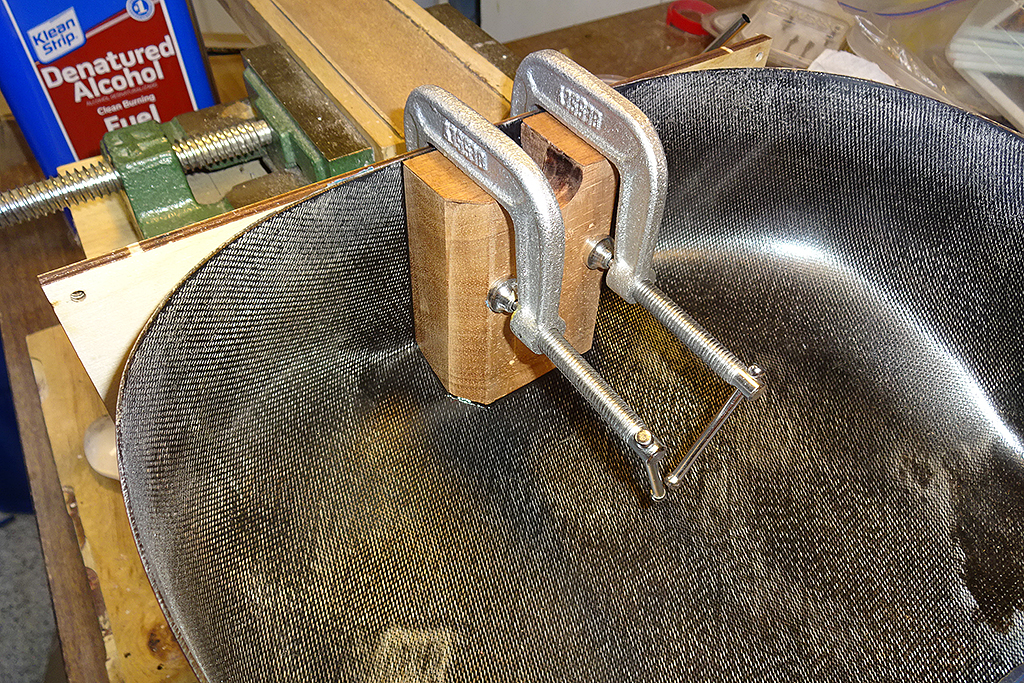
Neck block is masked and being glued into place. (sorry for the blurry pic)
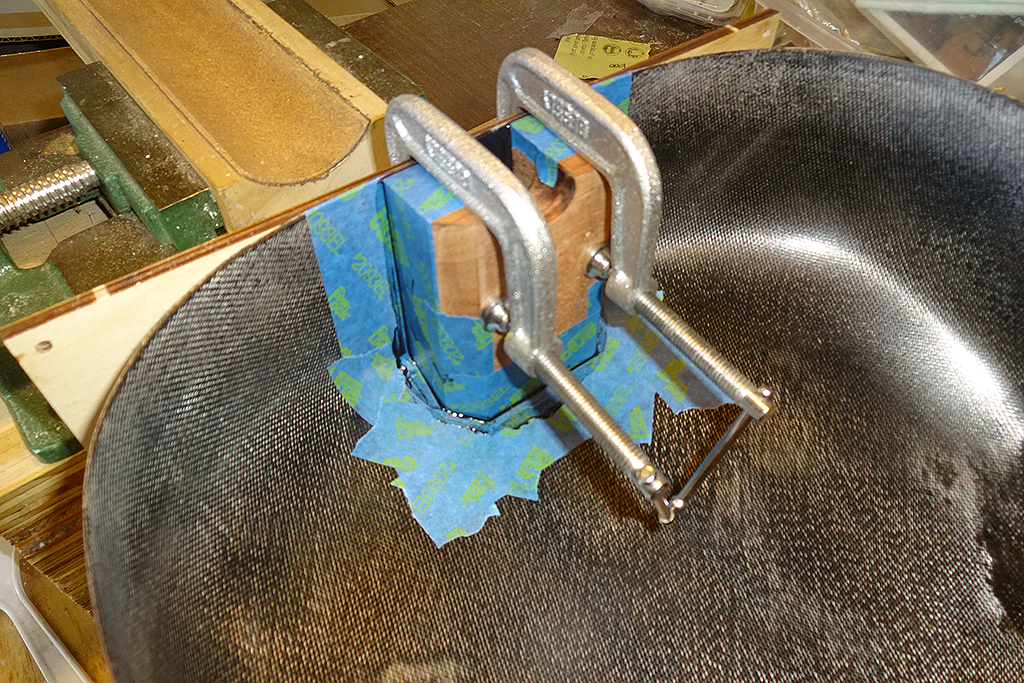
Masking is peeled off. I'll let this cure for 24 hours, then start in on the kerfed lining.
|
|
| |
|

Joined:
June 2012
Posts: 2340
Location: Pueblo West, CO | Neck block is glued. Kerfed lining is being glued. The photo below shows the wetted lining being clamped to pre-shape the lining.
I did that this morning. The wood was dry this afternoon, so I moved forward with gluing them into place. 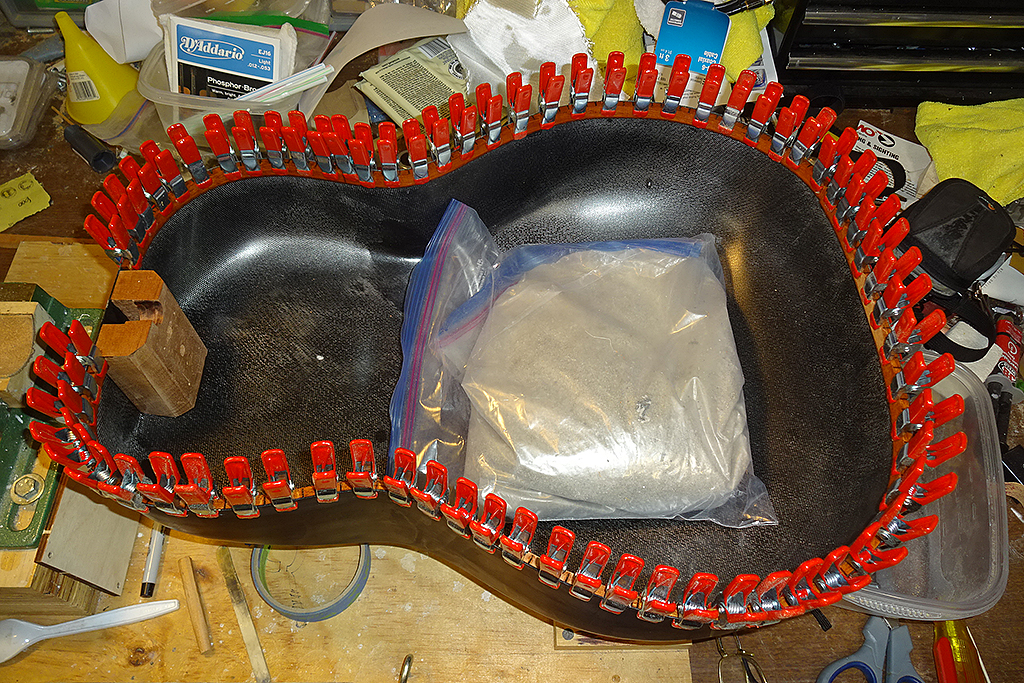
|
|
| |
|

Joined:
October 2012
Posts: 1093
Location: Yokohama, Japan | DanSavage - 2019-08-18 7:58 AM
Neck block is glued. Kerfed lining is being glued. The photo below shows the wetted lining being clamped to pre-shape the lining.
I did that this morning. The wood was dry this afternoon, so I moved forward with gluing them into place.
Hi Dan! Great to see you back in action @BFLG. I know you prefer not to repeat stuff covered in previous posts, but I could read and re-read your threads all day long. This project seems to be a conglomeration of previous threads with the bowls and rosettes we've seen before. Very exciting stuff!
Hope you don't mind my asking about the specific adhesives you're using for this project. Previous threads seem to indicate that you've settled on Hysol 0151 and brown hide glue; so I'm thinking neck block and kerfing - 0151?
|
|
| |
|
Joined:
September 2006
Posts: 10777
Location: Keepin' It Weird in Portland, OR | Educational, as always.
Thanks for the show.
|
|
| |
|
Joined:
May 2011
Posts: 760
Location: Muenster/Germany | Just like the other addicts I`m so curious to watch your new project.
Schaller grand tune black? Or F6 black chrome? I put black M6 mini with dark rosewood knobs on my Adamas 1688... |
|
| |
|

Joined:
June 2012
Posts: 2340
Location: Pueblo West, CO | arumako - 2019-08-19 7:37 PM
Hope you don't mind my asking about the specific adhesives you're using for this project. Previous threads seem to indicate that you've settled on Hysol 0151 and brown hide glue; so I'm thinking neck block and kerfing - 0151?
Don't mind at all.
Yep. Neck block and kerfed lining are glued with 0151. The top will be assembled with Old Brown Glue.
Sadly, my local Rockler's stopped selling it so I have to order a bottle online. |
|
| |
|

Joined:
June 2012
Posts: 2340
Location: Pueblo West, CO | Old Man Arthur - 2019-08-19 11:05 PM
Educational, as always.
Thanks for the show.
Thanks, Art. And, you're welcome. |
|
| |
|

Joined:
June 2012
Posts: 2340
Location: Pueblo West, CO | DetlefMichel - 2019-08-20 4:02 AM
Just like the other addicts I`m so curious to watch your new project.
Schaller grand tune black? Or F6 black chrome? I put black M6 mini with dark rosewood knobs on my Adamas 1688...
Thanks, Detlef.
Probably will stick with M6. I haven't decided whether to use black or gold.
|
|
| |
|

Joined:
June 2012
Posts: 2340
Location: Pueblo West, CO | The lining is glued. 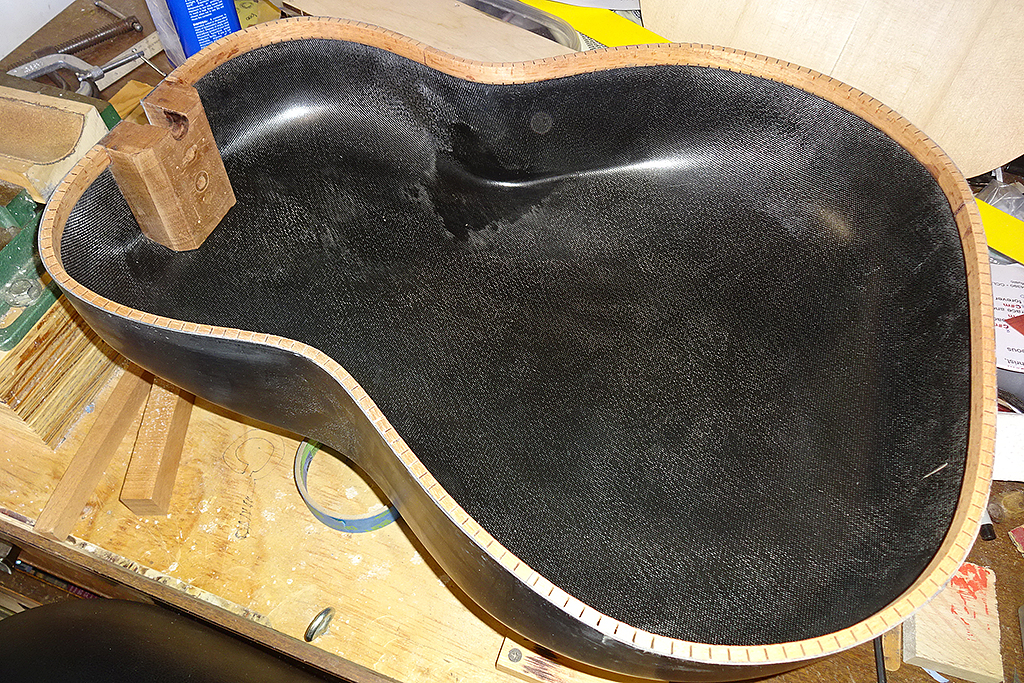
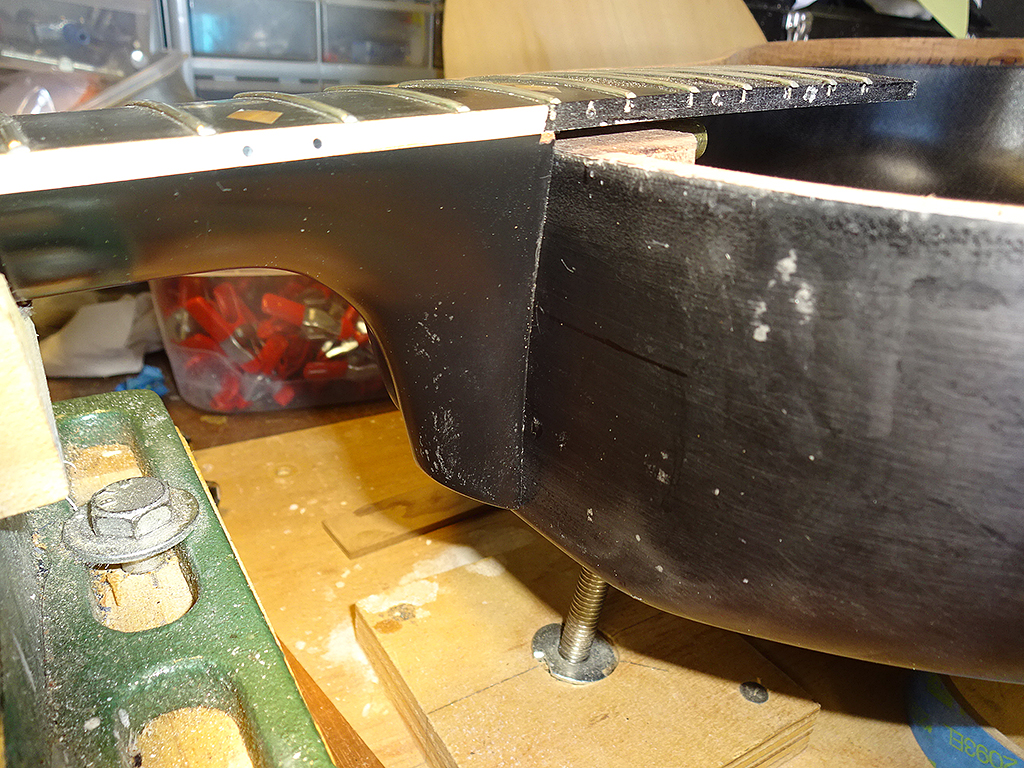
I opened up the slot in the top of the bowl. Neck heel fits top of guitar well.
|
|
| |
|
Joined:
December 2016
Posts: 128
| DanSavage - 2019-08-21 5:56 PM
I opened up the slot in the top of the bowl. Neck heel fits top of guitar well.

The fit is amazing. Not to take away from the work you've done, but I think the changes we're going to see to the neck will be breathtaking. Can't wait to see/play The Black Pearl this coming winter. Carry on Brah!
Edited by DarenSavage 2019-08-24 10:08 PM
|
|
| |
|

Joined:
June 2012
Posts: 2340
Location: Pueblo West, CO | Thanks, Daren.
I'm waiting for the pearl parts to arrive on a slow boat from down under. In the meantime, I'm working on the bowl.
I also ran out of OBG, so I'm waiting for that to come in so I can start on the top. The only thing I can really do until then is to keep working on the bowl.
|
|
| |
|
Joined:
May 2008
Posts: 1564
Location: Indiana | Maybe a shiny bowl? |
|
| |
|
Joined:
December 2016
Posts: 128
| Jonmark Stone - 2019-08-27 1:21 PM
Maybe a shiny bowl?
Hmm. An interesting idea. Is a black pearl smooth and shiny, or textured? My Os have the remounted neck strap mounts, so slipperiness isn't an issue. Thoughts, Dan?
Edited by DarenSavage 2019-08-27 9:31 PM
|
|
| |
|

Joined:
June 2012
Posts: 2340
Location: Pueblo West, CO | Yes, the thought of doing a shiny bowl has crossed my mind. I still haven't decided.
Speaking of bowls, here's the latest progress.
I added a reinforcement layer to the bottom of the bowl where the lower strap button molly will be mounted. After the resin cured, I drilled a hole for the molly and the jack. 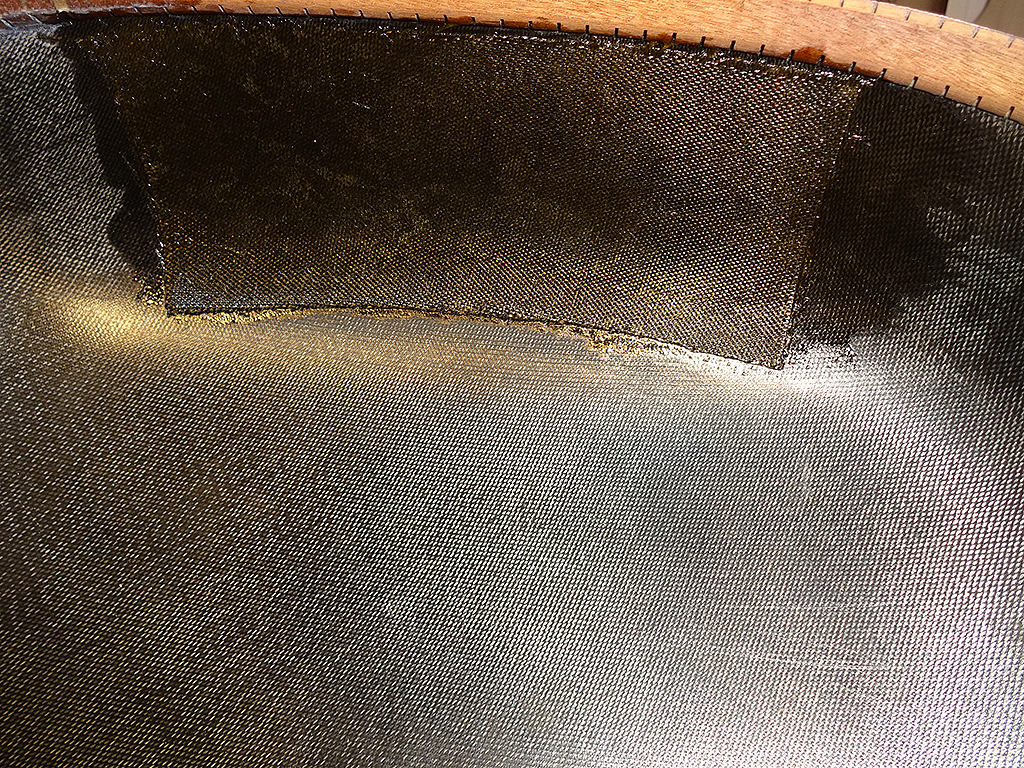
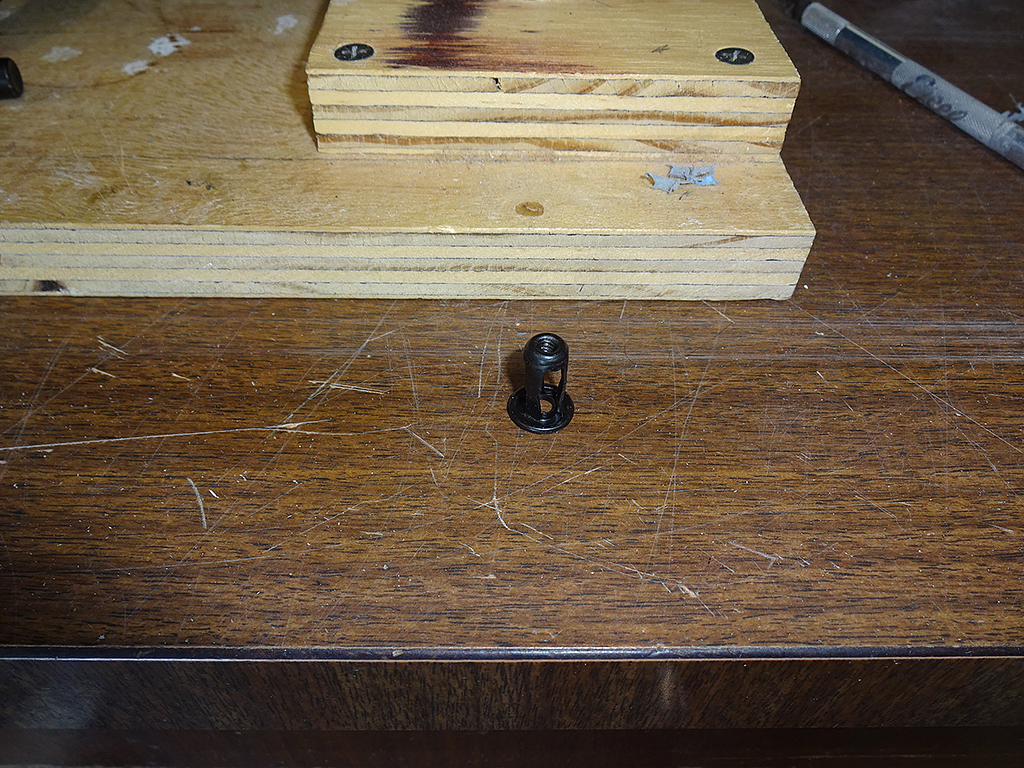
I had originally planned to use a molly on the upper bout, but after a few quick measurements I realized that there might be some interference with the neck block. Instead I glued a mahogany block to the neck block and bowl. It's not too pretty, but it'll get the job done. 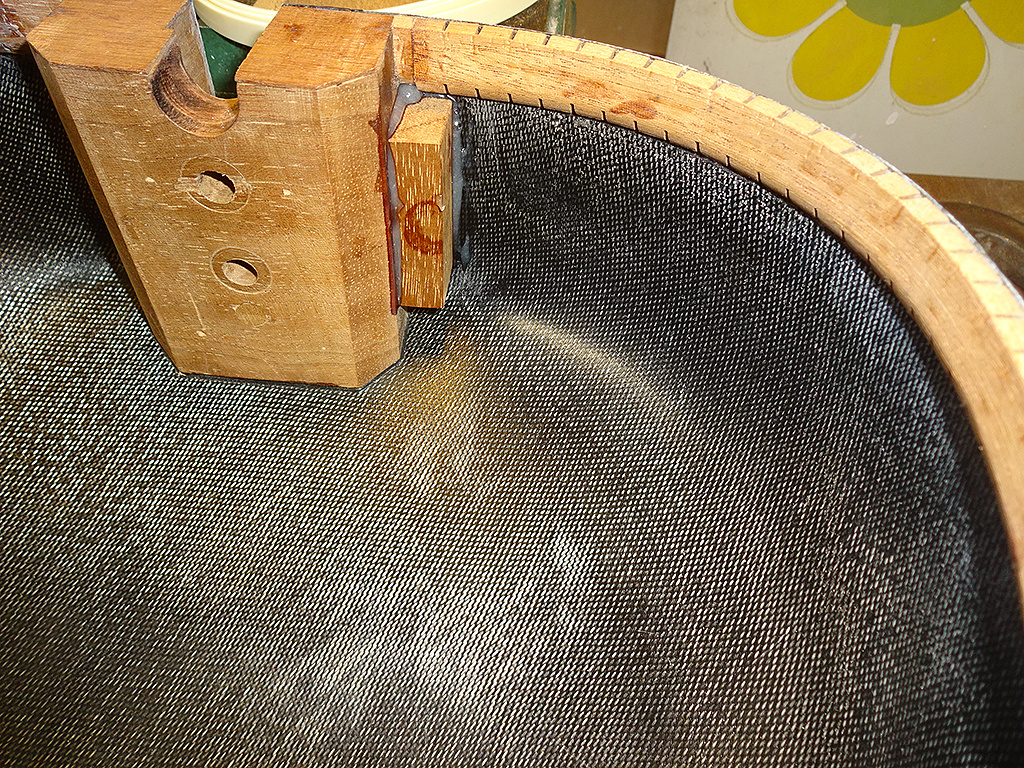
I also marked and cut out the hole in the side for the OP-Pro pre-amp.
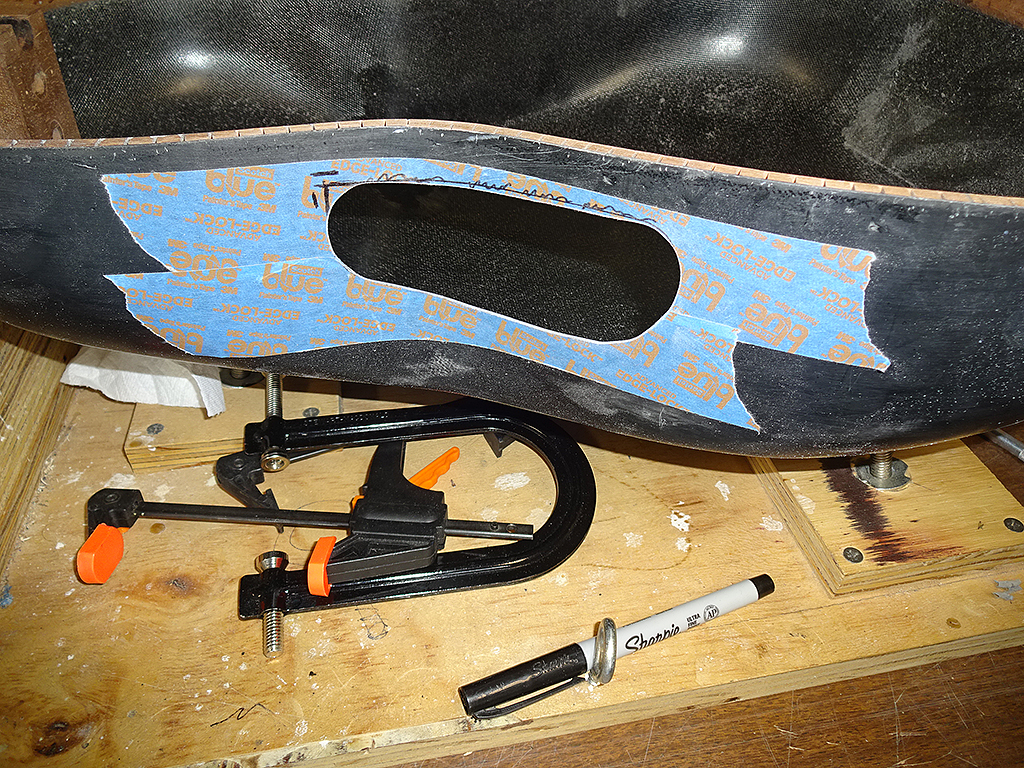
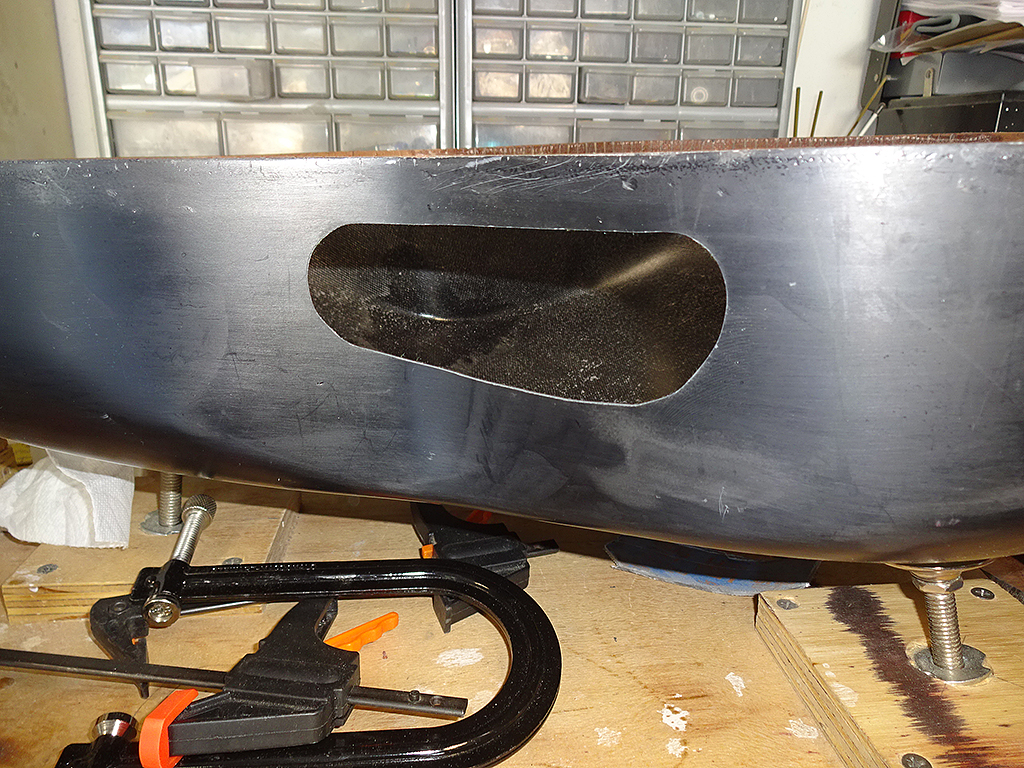
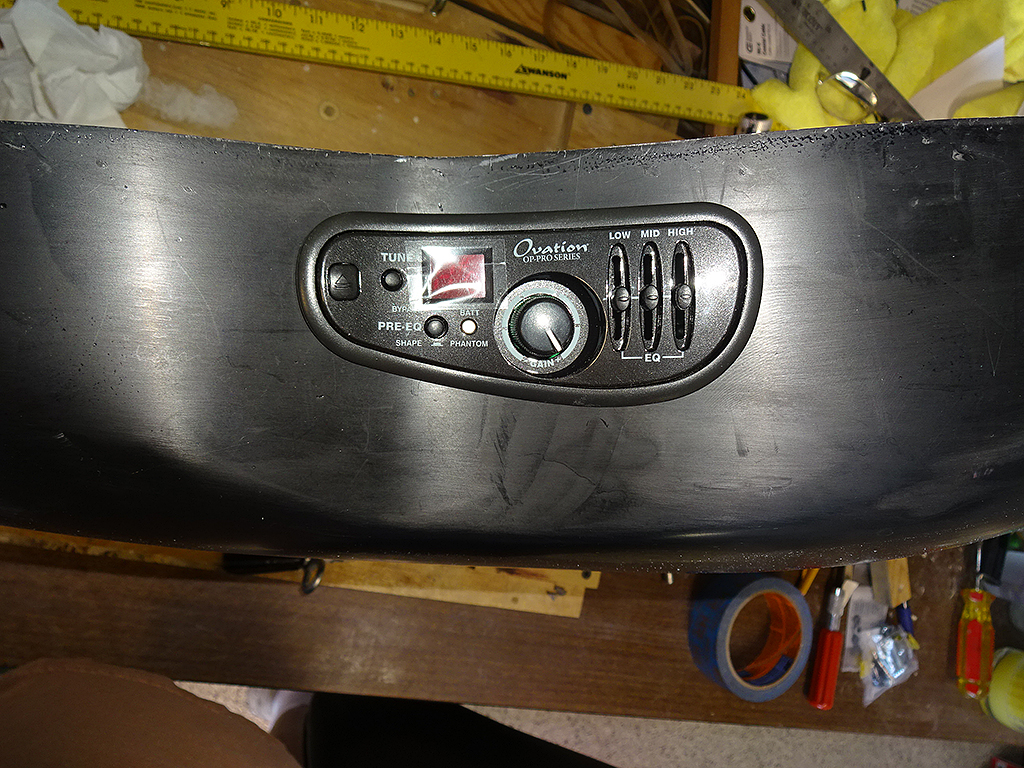
With this, the bowl is pretty much done and ready to have a top mounted and purfling/binding installed. |
|
| |
|
Joined:
October 2014
Posts: 270
| I'm curious as to what tool you used to make the cut-out. |
|
| |
|

Joined:
June 2012
Posts: 2340
Location: Pueblo West, CO | It was a two-step process.
I used a Dremel fiberglass cut-off wheel to cut out the majority, then a Dremel drum sander to open it up to the final shape. |
|
| |
|
Joined:
December 2016
Posts: 128
| DanSavage - 2019-08-28 11:47 AM

With this, the bowl is pretty much done and ready to have a top mounted and purfling/binding installed. 
Edited by DarenSavage 2019-09-01 12:00 AM
|
|
| |
|

Joined:
June 2012
Posts: 2340
Location: Pueblo West, CO | DarenSavage - 2019-08-31 9:59 PM
This looks to be about 90% ready for a shiny bowl. As we know, the last 10% takes 90% of the time to complete. 
Yep. I had prepped it for splashing the mold, so most of the priming is already done. There are a few nicks here and there, but other than that the fabric print-through is already mitigated.
I'm even thinking of a satin bowl. It would look pretty cool with polished black body binding. |
|
| |
|

Joined:
June 2012
Posts: 2340
Location: Pueblo West, CO | There was one last job that I needed to do to the bowl before it's ready to close -- labels.
I decided to give it a model number after all. It's the 1619-X. Natch, I used the classic Custom Legend gold foil label.
As I wrote previously I needed a label to hide the third bolt hole in the neck block, so I added a variant of my 'Rebuilt by" label. 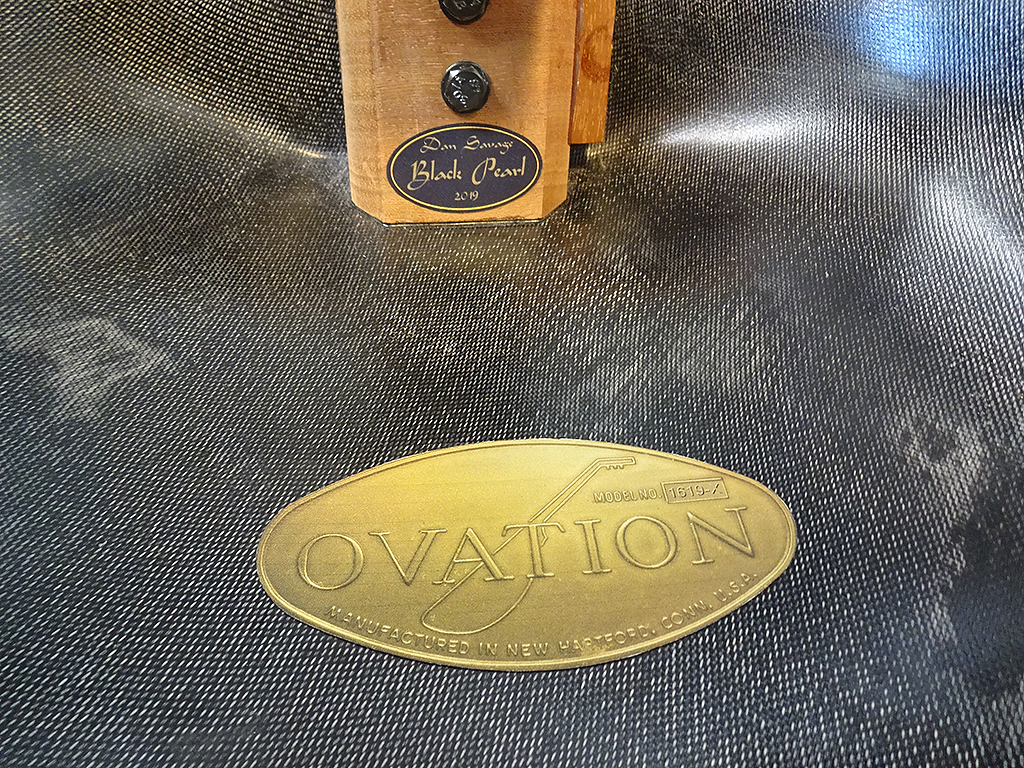
The top is built and ready to be joined with the bowl. I'll be setting up for that job tomorrow. After that, it's time to route the grooves for the binding/purfling, and then the bowl is mostly done except for masking the bridge and finishing. Now, if only my pearl order from the land down under would arrive. Until then, I'm in a holding pattern.
Edited by DanSavage 2019-09-01 6:37 PM
|
|
| |
|
Joined:
December 2016
Posts: 128
| Very cool! I like the 1619-X and Black Pearl labels. This will definitely be a one-of-a-kind O, and dare I say, calendar worthy? 
Edited by DarenSavage 2019-09-02 6:27 PM
|
|
| |
|

Joined:
June 2012
Posts: 2340
Location: Pueblo West, CO | DarenSavage - 2019-09-02 4:09 PM
Very cool! I like the 1619-X and Black Pearl labels. This will definitely be a one-of-a-kind O, and dare I say, calendar worthy? 
Thanks!
I got the top glued to the bowl today. I'll take it out of the fixture tomorrow morning and see how it went.
|
|
| |
|
Joined:
December 2016
Posts: 128
| Kewl! Can't wait to see.
|
|
| |
|

Joined:
June 2012
Posts: 2340
Location: Pueblo West, CO | Here's the obligatory top-being-glued-photo. :D JK. Actually, what this photo shows is setting the neck angle while gluing on the top.
Unlike re-topping an OEM guitar, I needed to establish the correct neck angle. I used the same technique as I used on Jen Chapin's 1613.
I clamped the neck, then weighted the bowl with a sand bag. I adjusted the legs to set the neck angle. Once the top was glued, I used my original bowl bend jig and rubber bands to clamp the top to the bowl. 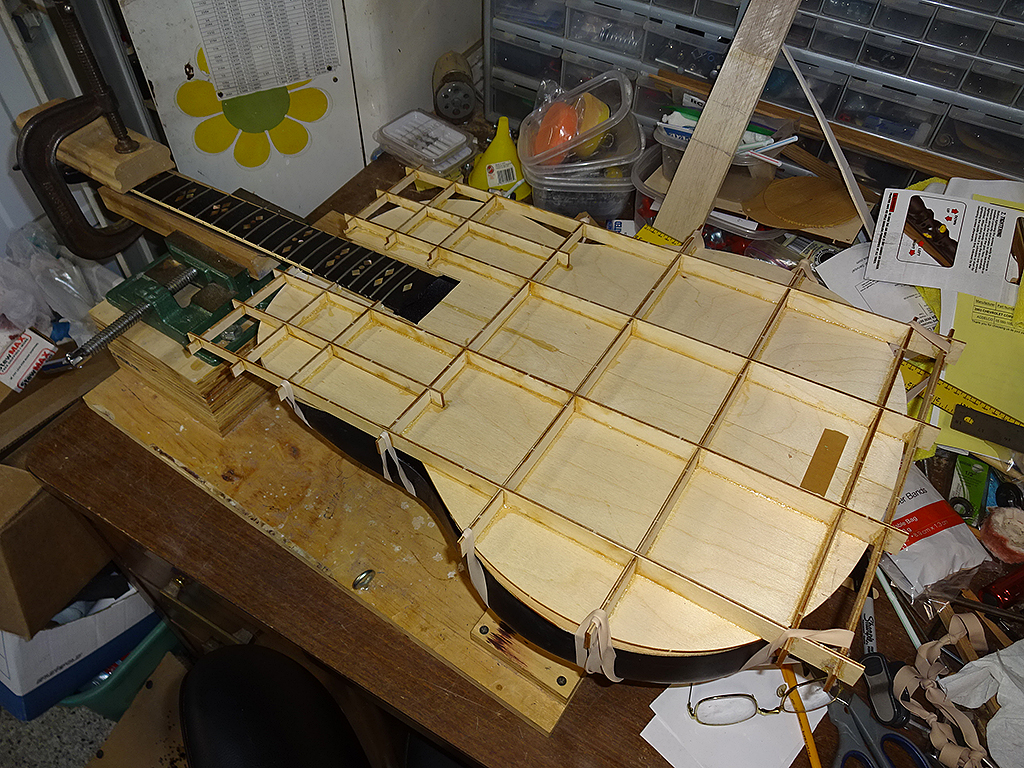
Edited by DanSavage 2019-09-02 7:23 PM
|
|
| |
|

Joined:
February 2014
Posts: 715
Location: moline,illinois | Very cool,awesome work as always Dan and love seeing things come together 
|
|
| |
|
Joined:
May 2008
Posts: 1564
Location: Indiana | This is really a picture of quality and detail. Carry on. DanSavage - 2019-09-01 6:32 PM There was one last job that I needed to do to the bowl before it's ready to close -- labels.
I decided to give it a model number after all. It's the 1619-X. Natch, I used the classic Custom Legend gold foil label.
As I wrote previously I needed a label to hide the third bolt hole in the neck block, so I added a variant of my 'Rebuilt by" label. 
The top is built and ready to be joined with the bowl. I'll be setting up for that job tomorrow. After that, it's time to route the grooves for the binding/purfling, and then the bowl is mostly done except for masking the bridge and finishing. Now, if only my pearl order from the land down under would arrive. Until then, I'm in a holding pattern. |
|
| |
|

Joined:
June 2012
Posts: 2340
Location: Pueblo West, CO | First coat of clear is on the top. 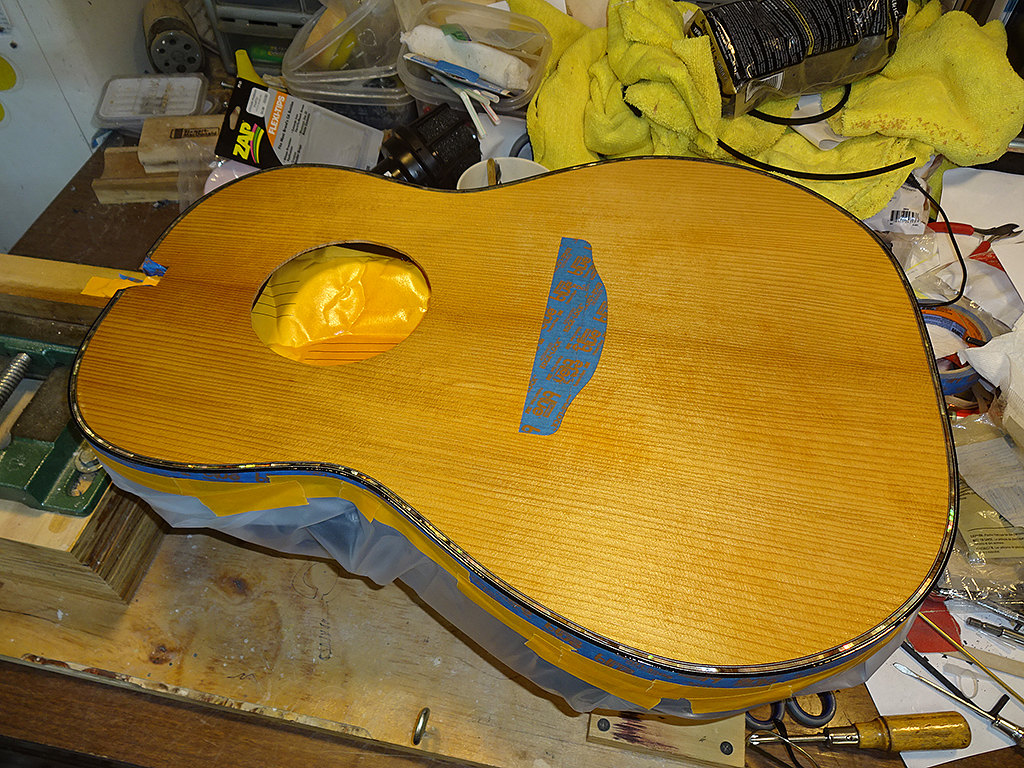
|
|
| |
|

Joined:
October 2012
Posts: 1093
Location: Yokohama, Japan | Beautiful Dan! The purfling really accents the color and grain of the Adirondack top. Wow! Trying to imagine how much sparkle the abalone rosette will provide...very classy. Btw, the inside of that bowl looks like it's sparkling too. Did you add a touch of resin to clean her up?
Edited by arumako 2019-09-14 11:25 AM
|
|
| |
|

Joined:
February 2016
Posts: 1881
Location: When?? | Dig that wide grain. If guitars were women, I think this is going to be one I would want to marry. But you can put the shotgun down, Dan, since I don't have the cash to ask for her hand anyway.
Edited by Love O Fair 2019-09-14 12:06 PM
|
|
| |
|

Joined:
June 2012
Posts: 2340
Location: Pueblo West, CO | arumako - 2019-09-14 9:23 AM
Beautiful Dan! The purfling really accents the color and grain of the Adirondack top. Wow! Trying to imagine how much sparkle the abalone rosette will provide...very classy. Btw, the inside of that bowl looks like it's sparkling too. Did you add a touch of resin to clean her up?
Thanks, Ken.
Actually, my initial plan is to attempt to make a rosette with black MOP instead of pearloid or abalone.
WRT the inside of the bowl, that's the natural fiberglass. Normally Ovation would paint the inside of the bowl to hide the weave of the cloth.
This bowl is a little different from the OEM hand-laid bowls. This one looks to me like it was molded using vacuum infusion. I suspect this was an engineering sample supplied by an outside firm attempting to get the contract for molding bowl. I've never seen a molded bowl like this. It is very thin with absolutely no evidence of the mold release film usually used for molding O bowls.
IMO, whomever made it was a little stingy with the resin, which is why it you can see the weave. When enough resin is infused, as a section of the bowl has, the weave completely disappears (as it should) and you're left with a smooth molded part.
Al,
You're funny. LOL! (Honey! Paint the shotgun white! It's gonna be a formal wedding!) |
|
| |
|

Joined:
February 2016
Posts: 1881
Location: When?? | @Dan - >>>You may remember this bowl. It came with my original 1619. I also splashed a mold off it.<<<
As usual, I'm lost. You said "as near as you can tell" that this bowl was vacuum infused resin, so I assume you meant it is a factory original bowl from your 1619, and not a bowl that you "splashed" from a mold of the original. If it is a factory original, was it a shiny bowl? I ask that not expecting they made a shiny (or smooth) bowl in the 1974-1984 manufacture range of the 1619. Or did they??? Looking at the page 1 photos is just looks so smooth. Unlike typical Lyrachord texture I remember from that era. Did I miss something? I hope these questions make sense. Sorry so lost on this end.. but inquiring minds (at least this one) want to know.
Edited by Love O Fair 2019-09-15 12:21 AM
|
|
| |
|
Joined:
July 2002
Posts: 288
Location: Maine | Dan, the project looks amazing! I can't wait to see the final stages.
LOF, I can fill in a few of the blanks. The 1619 Dan is referring to was a project guitar I once owned. For some reason it had part of the bowl back cut out, a large ugly trapezoid cutout. The top was trashed, but the 5 piece neck was complete and in pretty decent shape. The neck assembly was the only thing on the guitar I considered useable. Dan was interested in the neck but asked if I had any other pieces. I showed him a pic of the thin resin bowl and he was interested in that too. A deal was made. At some point, Dan had the clever idea to use the complete bowl (the "Black Peral" one) as a form to mold a fiberglass patch for the 1619 project guitar. While I thought the 1619 bowl was a loss, Dan saw it as a challenge. Now, to know ones surprise , Dan is creating/saving another USA ovation!
-TJR
|
|
| |
|

Joined:
July 2002
Posts: 288
Location: Maine | * (the "Black Pearl" one) ...
* Now, to no ones surprise ...
|
|
| |
|

Joined:
June 2012
Posts: 2340
Location: Pueblo West, CO | Love O Fair - 2019-09-14 9:52 PM
As usual, I'm lost. You said "as near as you can tell" that this bowl was vacuum infused resin, so I assume you meant it is a factory original bowl from your 1619, and not a bowl that you "splashed" from a mold of the original. If it is a factory original, was it a shiny bowl? I ask that not expecting they made a shiny (or smooth) bowl in the 1974-1984 manufacture range of the 1619. Or did they??? Looking at the page 1 photos is just looks so smooth. Unlike typical Lyrachord texture I remember from that era. Did I miss something? I hope these questions make sense. Sorry so lost on this end.. but inquiring minds (at least this one) want to know.
Yes. The bowl looks like it's an unfinished factory bowl. As TJ writes, it came as part of a deal I made when I bought his 1967 1619-4. That was my first Ovation rebuild. (See: 1619-4 Rebuild...)I initially thought it was a sample supplied by some third party. But after looking at my 1619 pics I saw that the unpainted sections of the bowl look the same as the bare bowl. There were several generations of hand-laid cloth bowls. I detailed these in The History of the Bowl thread. 1965-1967-ish, 2-ply cloth bowl hand-laid over male mold. Covered with clear plastic, apply vacuum and scrape excess resin. High-quality, but time-consuming to produce, thus very high cost.
1968-1981, 2-ply cloth bowl hand-laid in a female mold. Early models used no vacuum. These are the cloth bowls you're used to seeing. The weave of the cloth is very visible when looking inside the bowl. Later models used, either vacuum or vacuum-infused inside the female mold. This is what the inside of the 1619 bowl looks like. As far as I know, they're still making cloth bowls this way. This is style of bowl I'm using on the Black Pearl. 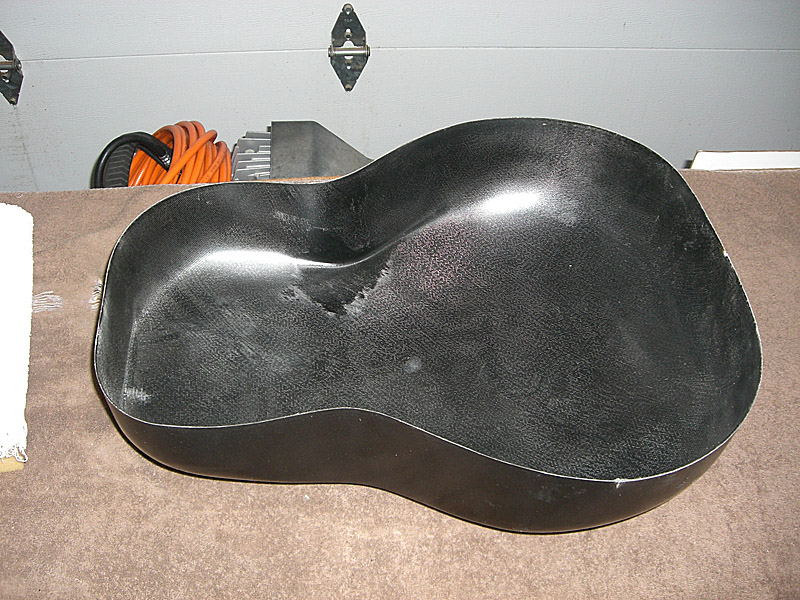
The 1619 was a factory engineering model. It had a hole cut into the bowl that allowed access to the inside of the guitar without loosening the strings.
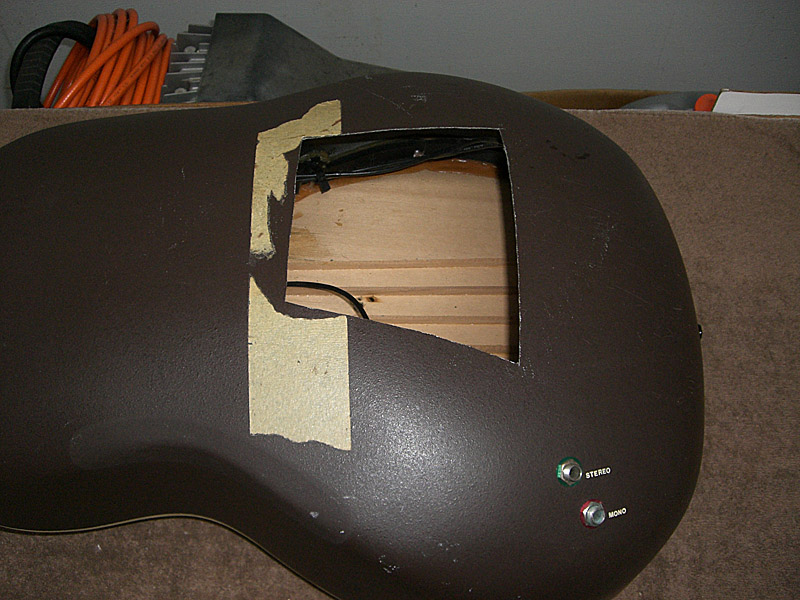
Interestingly, the braces on that guitar look like they were prototypical. The main transverse brace isn't notched and the fan braces are plain 1/8" stock that hasn't been milled. Also, there is only a piece of 1/8" stock reinforcing the joint between the upper part of the A-braces and the lower fan braces.
In the pic below you can see the 1619 A-braces on the left and a production 1985 1717 A-braces. I've done a 1978 1617 which had the same style seen on the 1985. On later models, the fiberglass joint reinforcement was superceded by a perforated aluminumm piece. 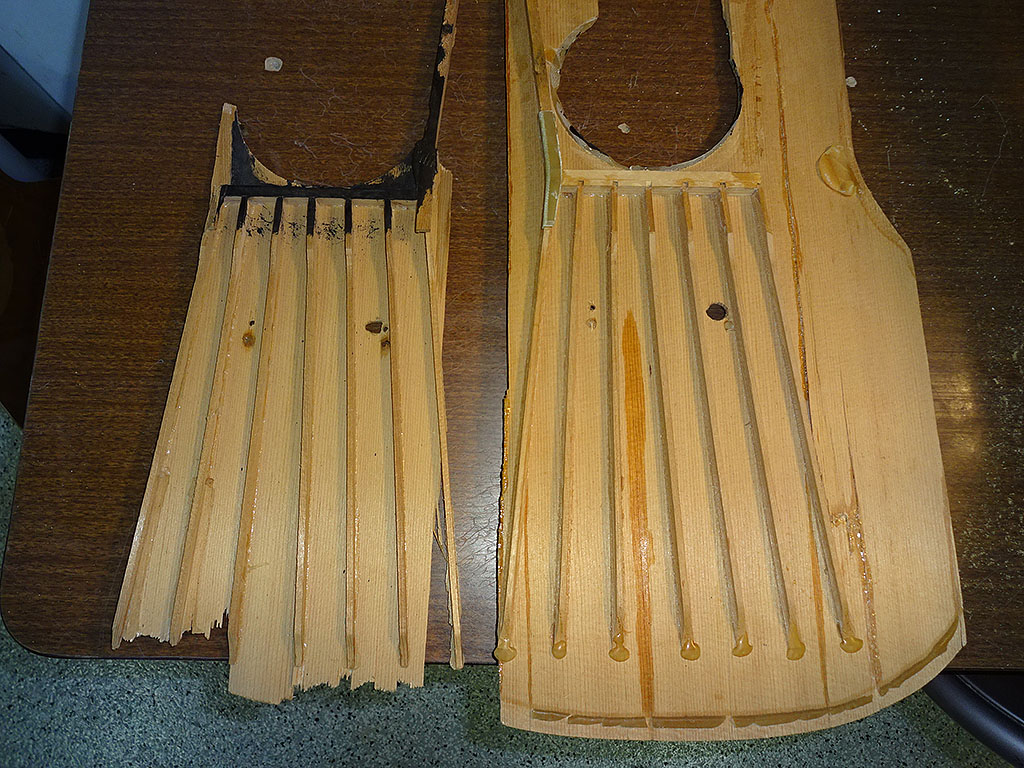
Edited by DanSavage 2019-09-15 1:25 PM
|
|
| |
|

Joined:
June 2012
Posts: 2340
Location: Pueblo West, CO | TJR - 2019-09-15 6:30 AM
Dan, the project looks amazing! I can't wait to see the final stages.
LOF, I can fill in a few of the blanks. The 1619 Dan is referring to was a project guitar I once owned. For some reason it had part of the bowl back cut out, a large ugly trapezoid cutout. The top was trashed, but the 5 piece neck was complete and in pretty decent shape. The neck assembly was the only thing on the guitar I considered useable. Dan was interested in the neck but asked if I had any other pieces. I showed him a pic of the thin resin bowl and he was interested in that too. A deal was made. At some point, Dan had the clever idea to use the complete bowl (the "Black Peral" one) as a form to mold a fiberglass patch for the 1619 project guitar. While I thought the 1619 bowl was a loss, Dan saw it as a challenge. Now, to know ones surprise , Dan is creating/saving another USA ovation!
-TJR
Thanks, TJ.
Yes, the molding part was during Patch's Parlor Build... thread. I guess right now, I'm the only one in the world right now that can mold an Ovation Parlor bowl. |
|
| |
|

Joined:
February 2016
Posts: 1881
Location: When?? | Thank you Dan and TJ for the fine and detailed explanations to my questions! I had forgotten about your The History of the Bowl thread, so I crawled back through it for a nice refresher (my aging memory is turning to mush). I highly recommend it to all newer members and lurkers who may be reading this post and may have never seen that thread. Man, just when I thought I knew something about Ovations I find myself still hoping to someday graduate from kindergarten. You guys continue to blow my mind. |
|
| |
|

Joined:
July 2002
Posts: 288
Location: Maine | Dan, I had to look back to see, but it was your 05/15/2014 post in the original rebuild I had remembered as you molding the patch off the smaller bowl, not a mold for Patch at that time ... lol |
|
| |
|

Joined:
June 2012
Posts: 2340
Location: Pueblo West, CO | Ha ha!
You're right, TJ. I mis-read your comments. When you wrote 'mold' my immediate thought was the full bowl molds, not the patch I made for the 1619. |
|
| |
|
Joined:
December 2003
Posts: 855
Location: Canada | The bowl history is very interesting. I wonder how this has continued into the more recent times. For example, I have an 1687 RI but assume that it has a SMC bowl and not the period-correct second generation cloth, the paint has come off in places and it is bright white below. Also, I assume that with the overseas AX models their bowls are made right there in China or Korea. Then with the most recent New Hartford/new small shop Adamas they state hand-laid bowl as a feature, and it would be good to know more details about the process they are using now. |
|
| |
|
Joined:
December 2003
Posts: 13996
Location: Upper Left USA | I believe that all bowls (except hand laid) come from the US, Indiana I think.
Yes? |
|
| |
|

Joined:
September 2006
Posts: 10777
Location: Keepin' It Weird in Portland, OR | MWoody - 2019-09-16 10:50 AM
I believe that all bowls (except hand laid) come from the US, Indiana I think.
Yes?
I am not sure about NOW...
But they Used-to be made in Ashtabula, Ohio.
https://www.zehrco-giancola.com/gallery.html
In this gallery photo, there WAS a bowl back guitar...
Notice the empty space in the photo layout?
|
|
| |
|
Joined:
December 2016
Posts: 128
| First coat of clear is on the top. 
Beautiful! I can't wait to see the rest.  |
|
| |
|

Joined:
June 2012
Posts: 2340
Location: Pueblo West, CO | d'ovation - 2019-09-16 8:42 AM
The bowl history is very interesting. I wonder how this has continued into the more recent times. For example, I have an 1687 RI but assume that it has a SMC bowl and not the period-correct second generation cloth, the paint has come off in places and it is bright white below. Also, I assume that with the overseas AX models their bowls are made right there in China or Korea. Then with the most recent New Hartford/new small shop Adamas they state hand-laid bowl as a feature, and it would be good to know more details about the process they are using now.
The difference between a cloth bowl and an SMC bow is easy to spot. The SMC bowls have the characteristic molded webbing around the neck/body joint. Hand-laid cloth bowls will have a wood neck block.
My 50th Anniversary CL has a cloth bowl and wood neck block. The neck is a bolt-on joint. |
|
| |
|

Joined:
June 2012
Posts: 2340
Location: Pueblo West, CO | DarenSavage - 2019-09-16 7:45 PM
Beautiful! I can't wait to see the rest. 
Thanks, bra.
Me, too.  |
|
| |
|
Joined:
September 2005
Posts: 138
Location: Birmingham, AL | Dan, are you still using the same lacquer/finish on this top as the other ones? BTW really looks nice. I appreciate the efforts of rebuilding Ovations. I have always played O's and have for 43 years. |
|
| |
|

Joined:
June 2012
Posts: 2340
Location: Pueblo West, CO | I've gone back and forth on the finish between Minwax Polyurethane rattle can and Eastwood 2K Urethane rattle can.
I experimented on different rebuilds. Some, like my Frankenvation, I used only Minwax.
On others, such as Jen's 1613, I used the Minwax poly as a primer/grain filler, then topped it off with Eastwood 2K.
Lately, I've found I like using the Eastwood 2K as the sole finish, mainly because of how quickly the finish 'builds.'
One thing I do like about the Minwax is that it will harden up and shrink over a few months time and is a lot like a thin lacquer finish.
Edited by DanSavage 2019-09-18 9:36 AM
|
|
| |
|

Joined:
June 2012
Posts: 2340
Location: Pueblo West, CO | Clear coats are done. I'll set the bowl aside for a couple of weeks and concentrate on the neck. 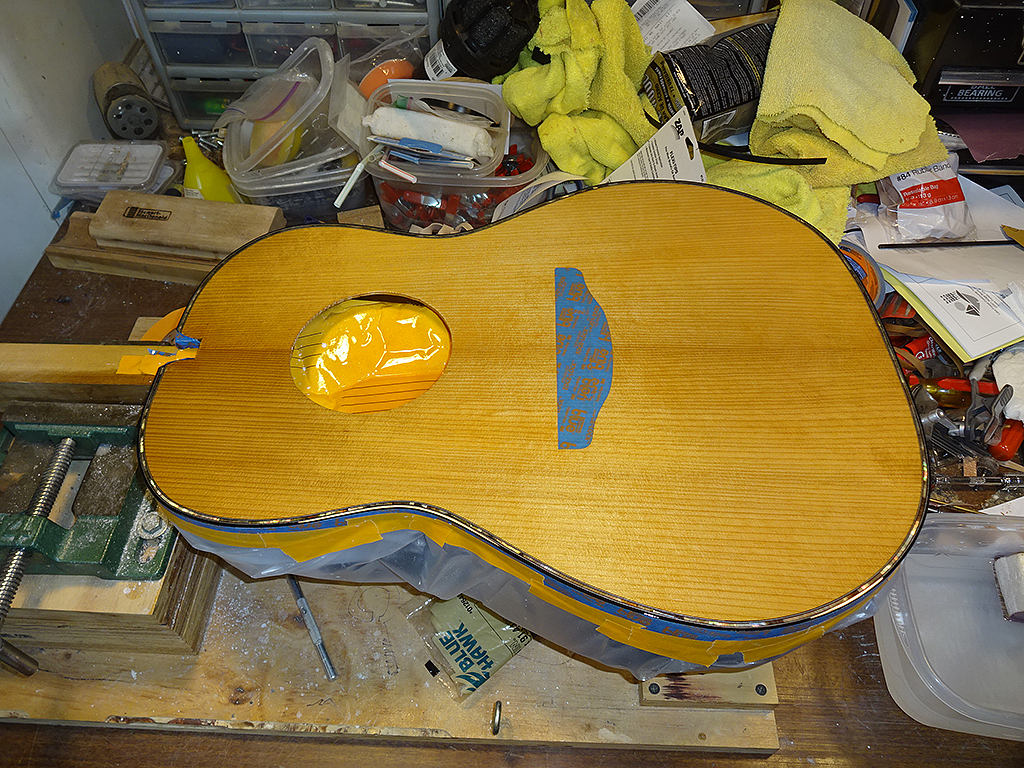
|
|
| |
|

Joined:
June 2012
Posts: 2340
Location: Pueblo West, CO | First job is to remove the frets. Plenty of heat ensured easy removal with no chip-out. Next, remove the white binding. I did damage the finish slightly during the process, but it will be invisible once it's done. 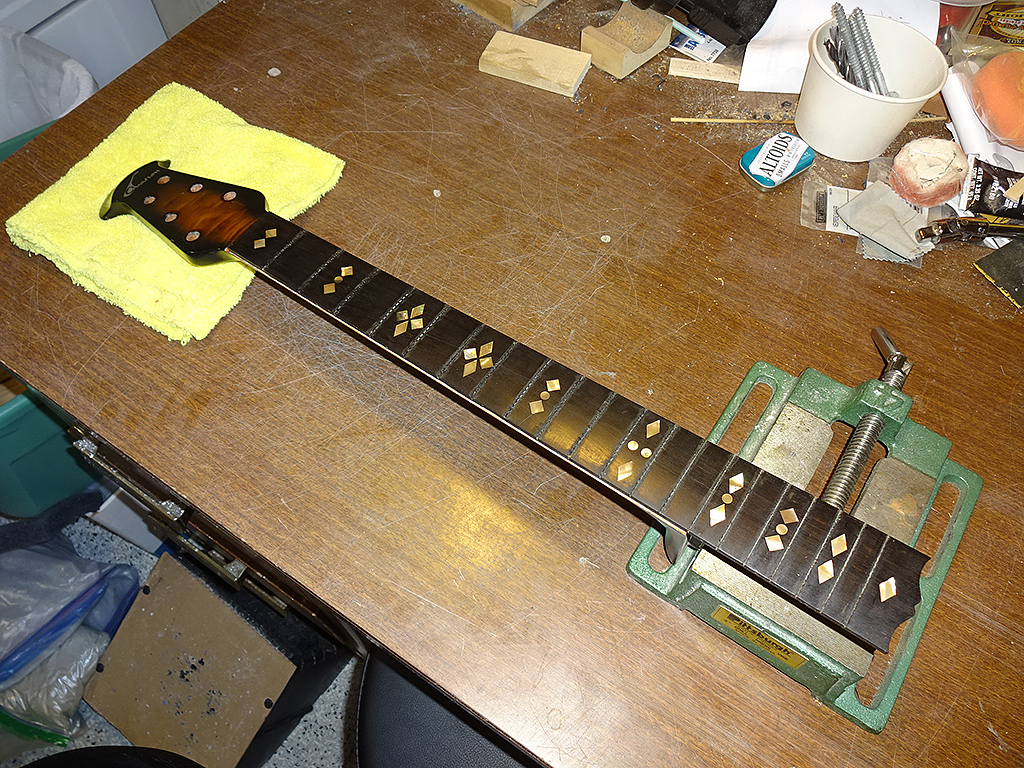
|
|
| |
|
Joined:
December 2016
Posts: 128
| DanSavage - 2019-09-19 9:17 PM
First job is to remove the frets. Plenty of heat ensured easy removal with no chip-out. Next, remove the white binding. I did damage the finish slightly during the process, but it will be invisible once it's done. 
Kewl. This is the part of the build I've been looking forward to. Buckle your seatbelts everyone!  |
|
| |
|

Joined:
June 2012
Posts: 2340
Location: Pueblo West, CO | DarenSavage - 2019-09-19 11:00 PM
Kewl. This is the part of the build I've been looking forward to. Buckle your seatbelts everyone! 
Yes, this job is definitely the interesting part of this build.
I finally received my shell order from down under. The dots and diamonds will probably work okay. The squares are a little small for the job. I may have to make my own.
I'll post some pics a little later today. |
|
| |
|

Joined:
June 2012
Posts: 2340
Location: Pueblo West, CO |
I decided to conduct some tests on removing the fret board inlays. I have a junky Balladeer of very early vintage, whose neck is thoroughly thrashed -- IOW, a perfect medium for testing.
Knowing that Ovation highly favors the use of epoxy, it occurred to me that the fret board inlays were probably glued using epoxy. The normal process for removing an inlay is to route out the center, then use a chisel, etc., to separate the shell from the fret board. I've seen a Stewmac demonstrating this on a Martin D-45. I thought that would be pretty difficult on these inlays.
Instead, I thought I'd drill out the center of the inlay using a Forstner bit, then heat up area using one of my small modeling irons to soften the epoxy, then gently pry out the inlay using an Xacto knife.
In this photo I've already removed one of the inlays at the 12th fret.
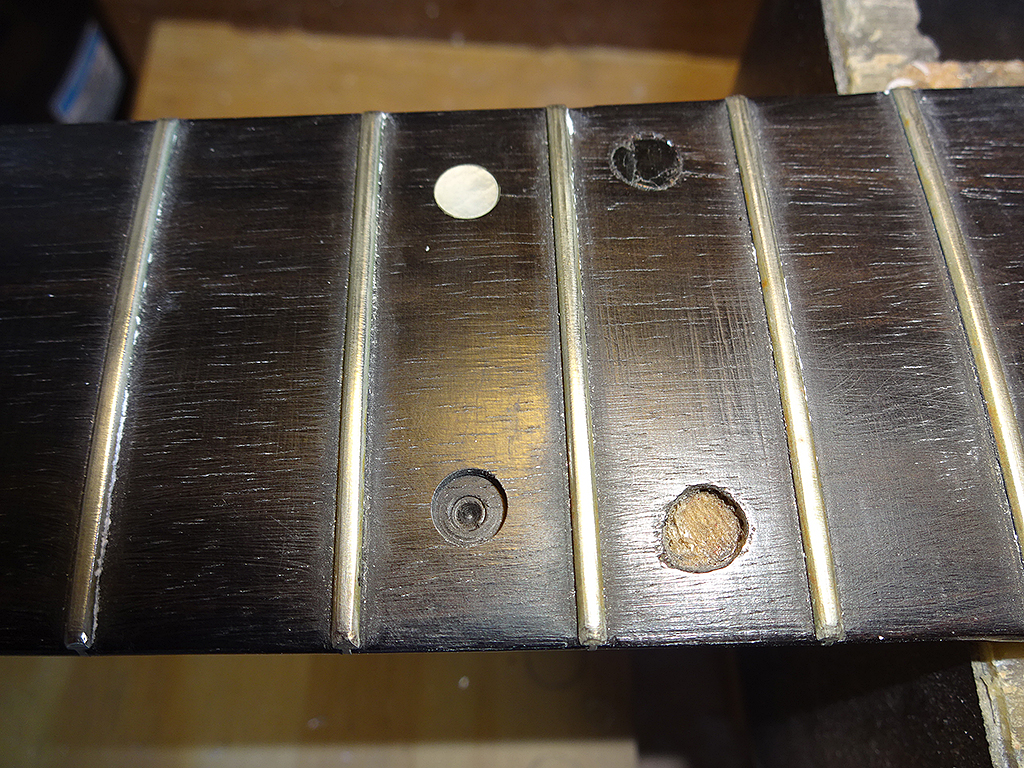
Hole is being drilled in the other 12th fret inlay. Sorry about the lighting. MOP is really difficult to photograph.
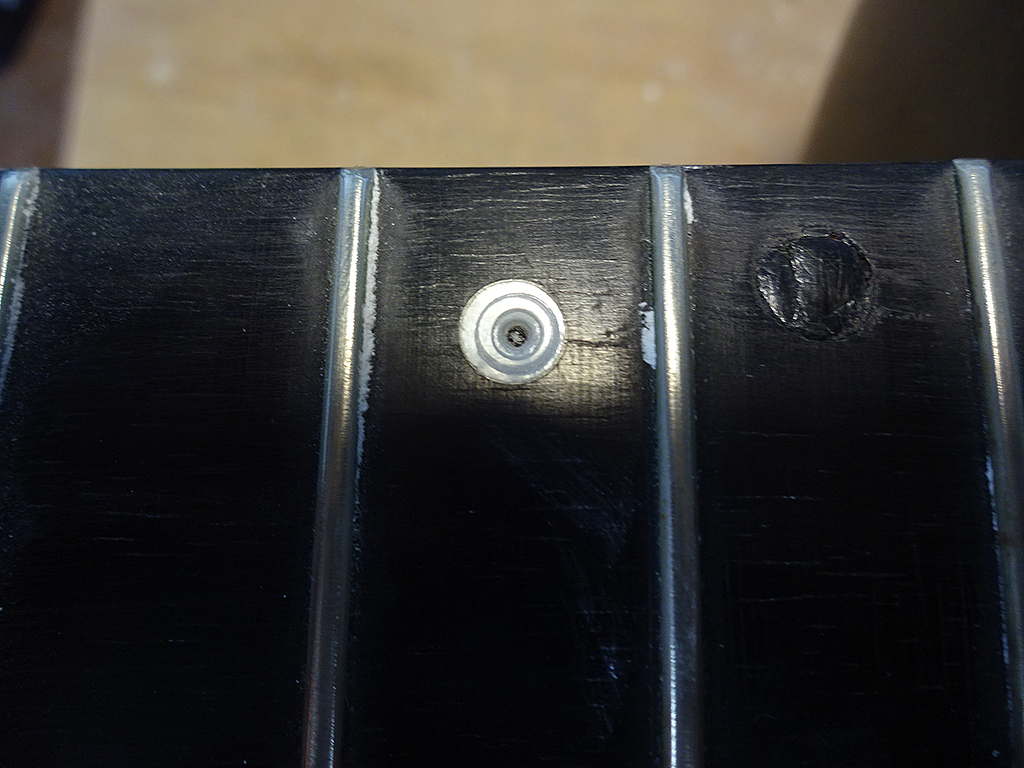
Hole is drilled until I just touch the ebony.
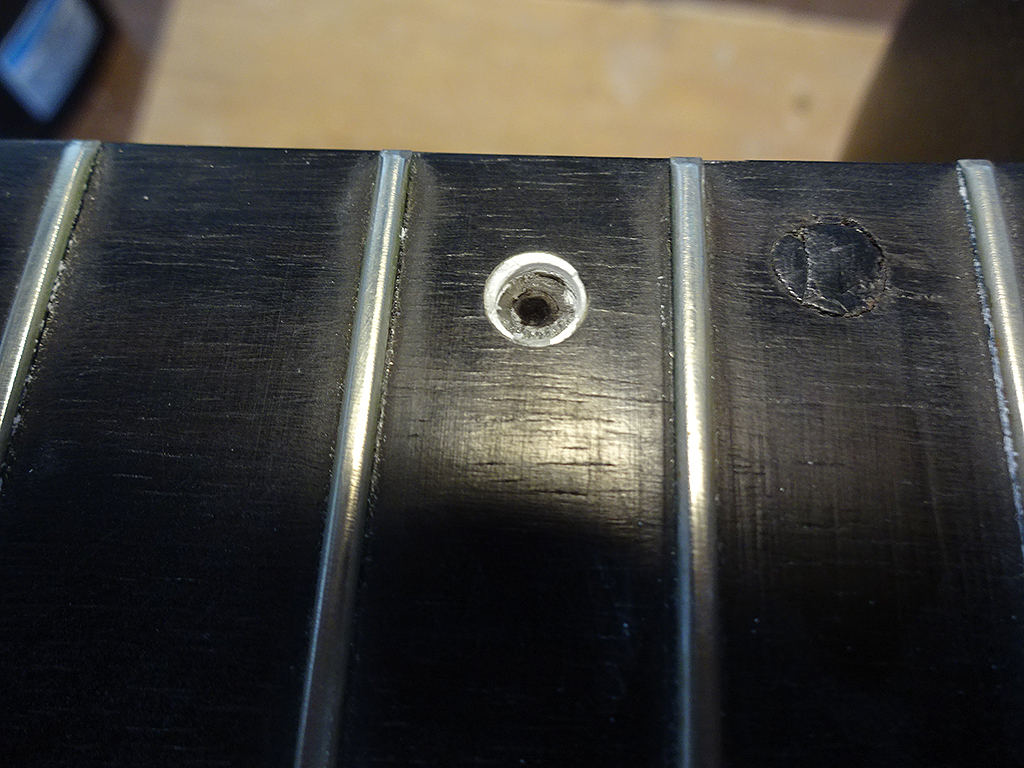
Heat being applied. This is the smaller of the two irons. I found that the larger one works better as it doesn't lose heat as fast as the smaller one.
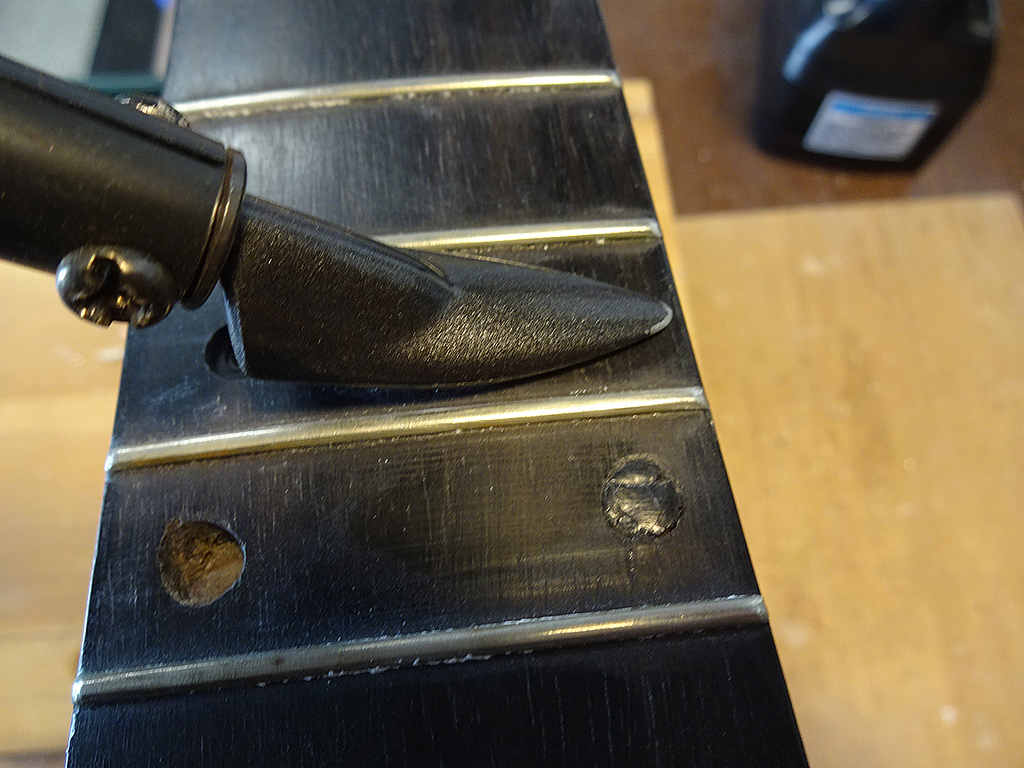
Inlay being pried out.
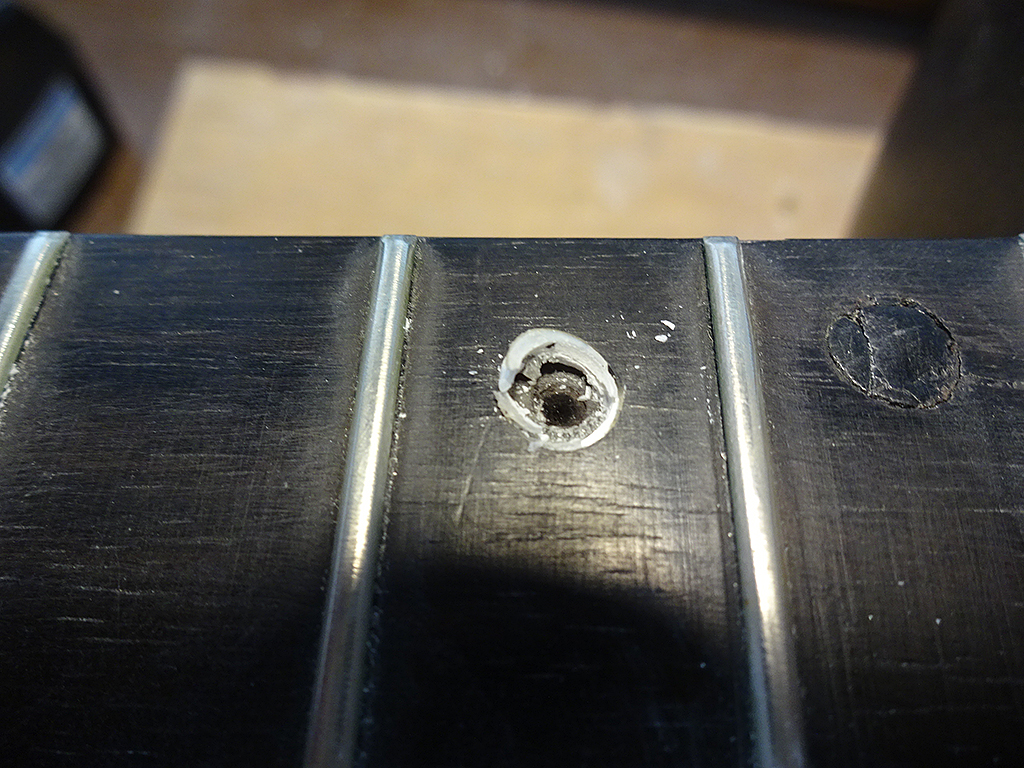
Part of the inlay broke. You can see the thin layer of glue holding the inlay into place.
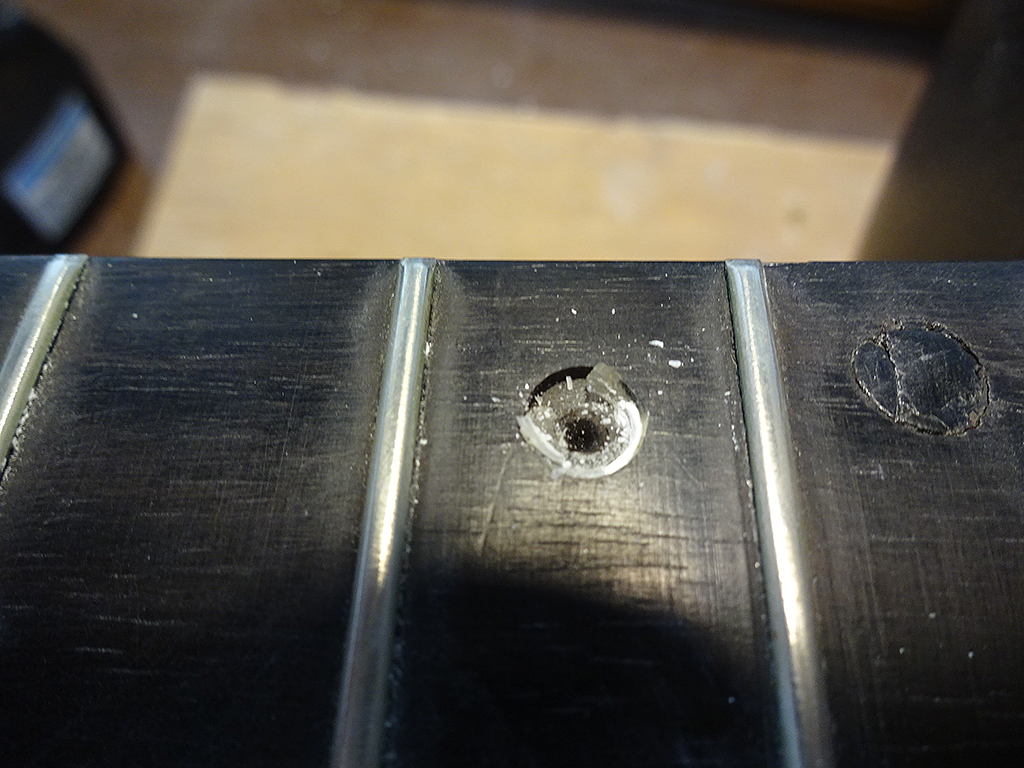
Final result: a nice clean hole ready to receive a new inlay. I had done four of the inlays on this fret board. By this time, I was comfortable enough to move onto the CL neck.
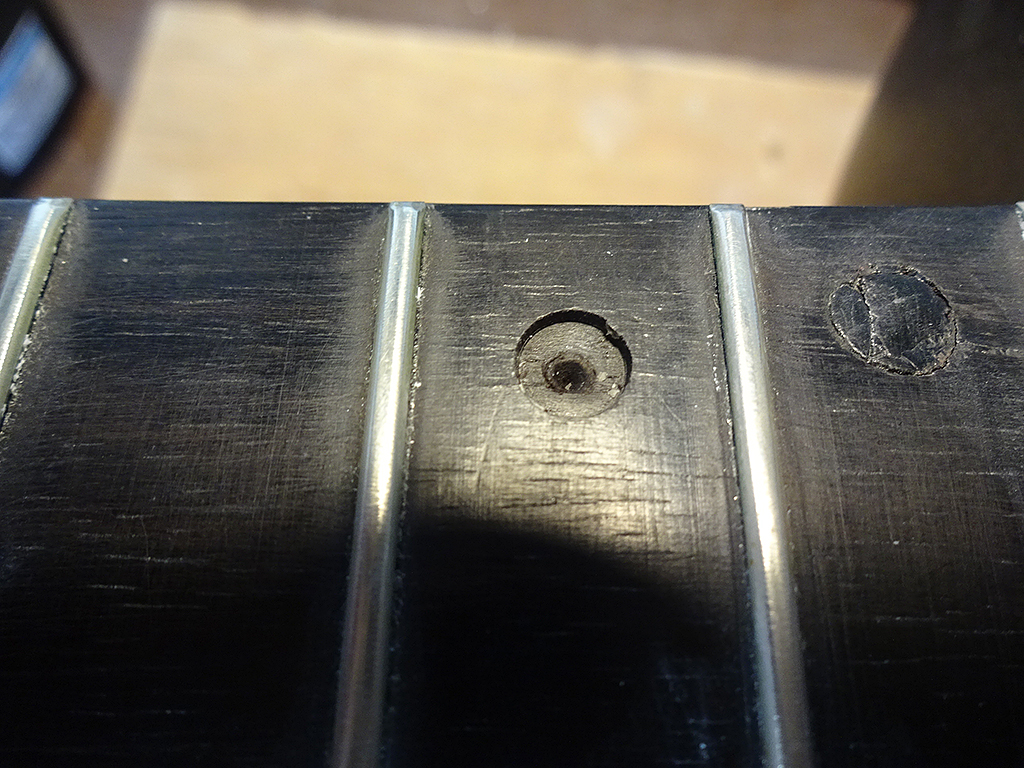
First job was to remove the dots. The CL dots are smaller than the Balladeer dots, so I had to be extra careful to drill them as close to center as I could. Abalone is softer than white MOP, so when the drill broke through to the ebony most of the dot crumbled leaving behind a clean hole.
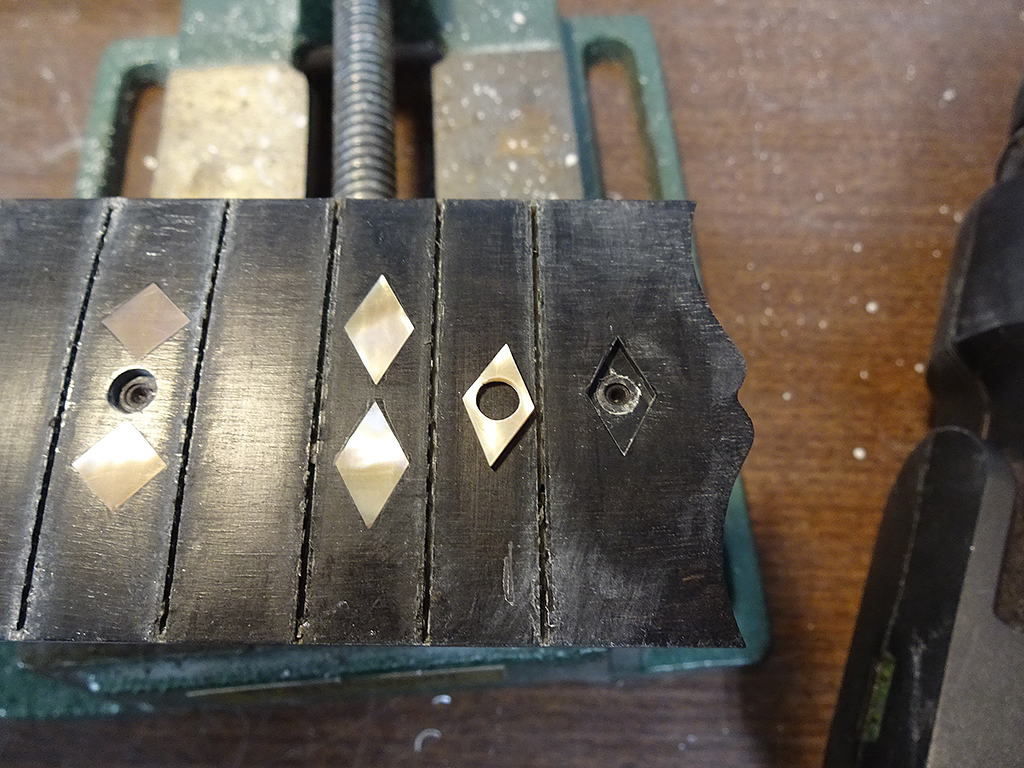
First diamond. It, too, came out cleanly.
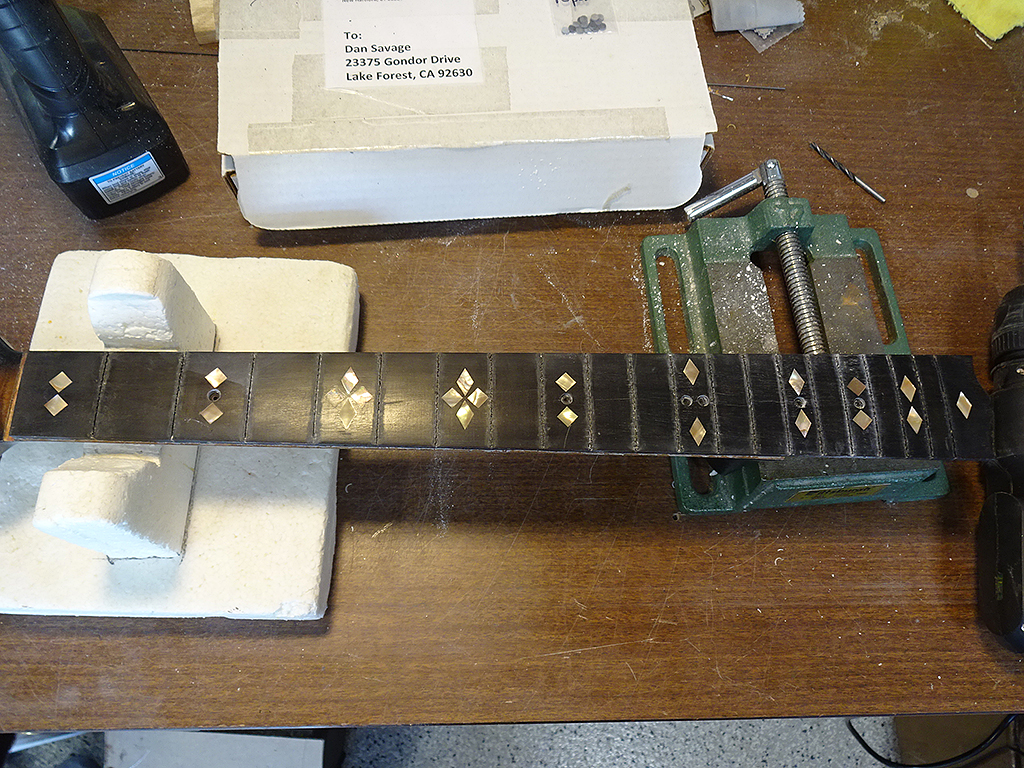
Holes drilled in all the diamonds and squares.
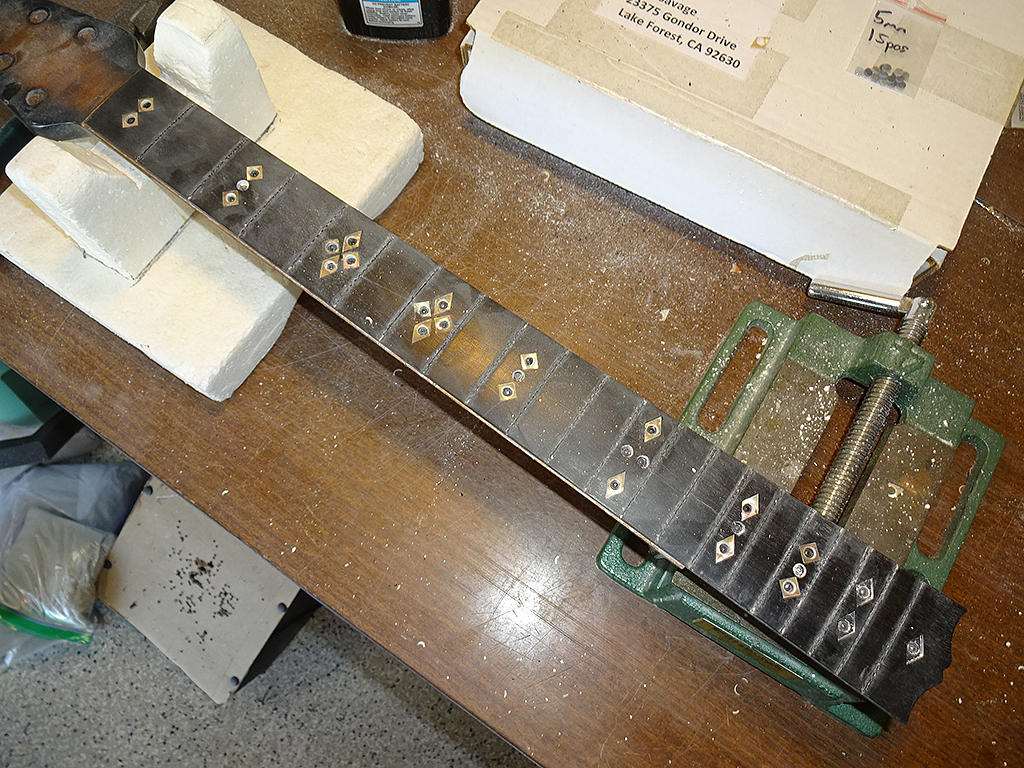
And, all the inlays are out. To be honest, I was more than a little nervous about this step, but it wasn't too bad. It only took me about 90 minutes to get all the inlays out cleanly.
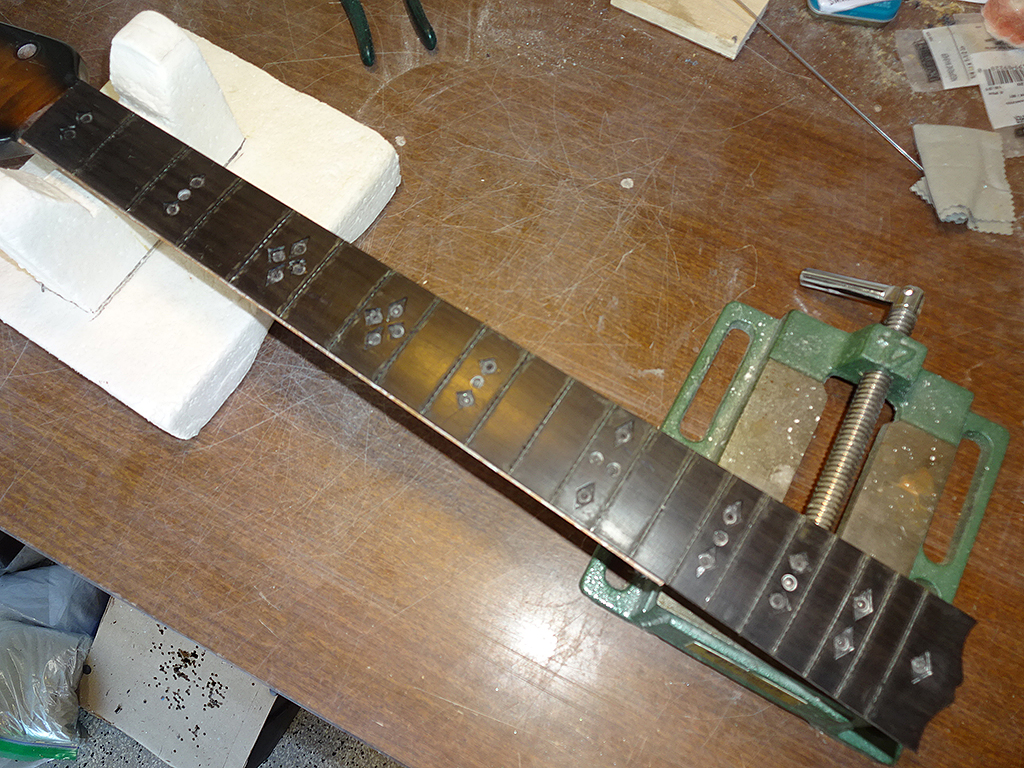
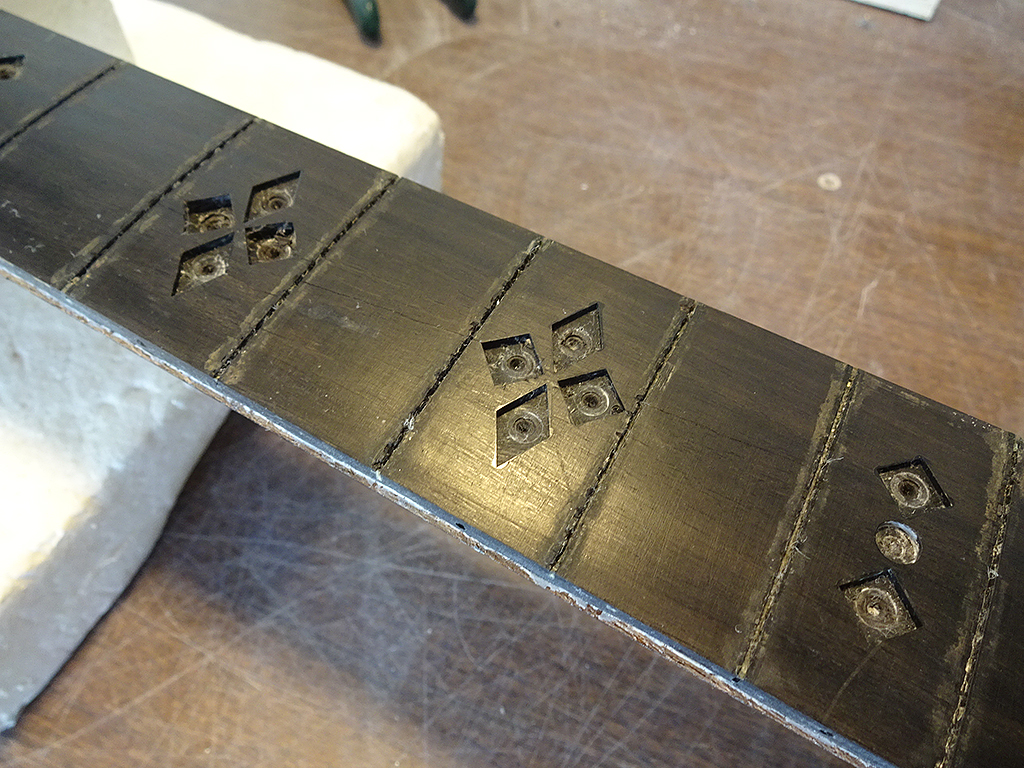
Nice clean holes with no chip-out of the ebony. Ready for the new inlays. One thing I noticed was that some of the inlay holes are deeper than the back MOP replacements. The inlays will need to stand slightly proud of the fret board so they can be sanded level. I'll buy some ebony veneer from Rockler's to make spacers under the inlays.
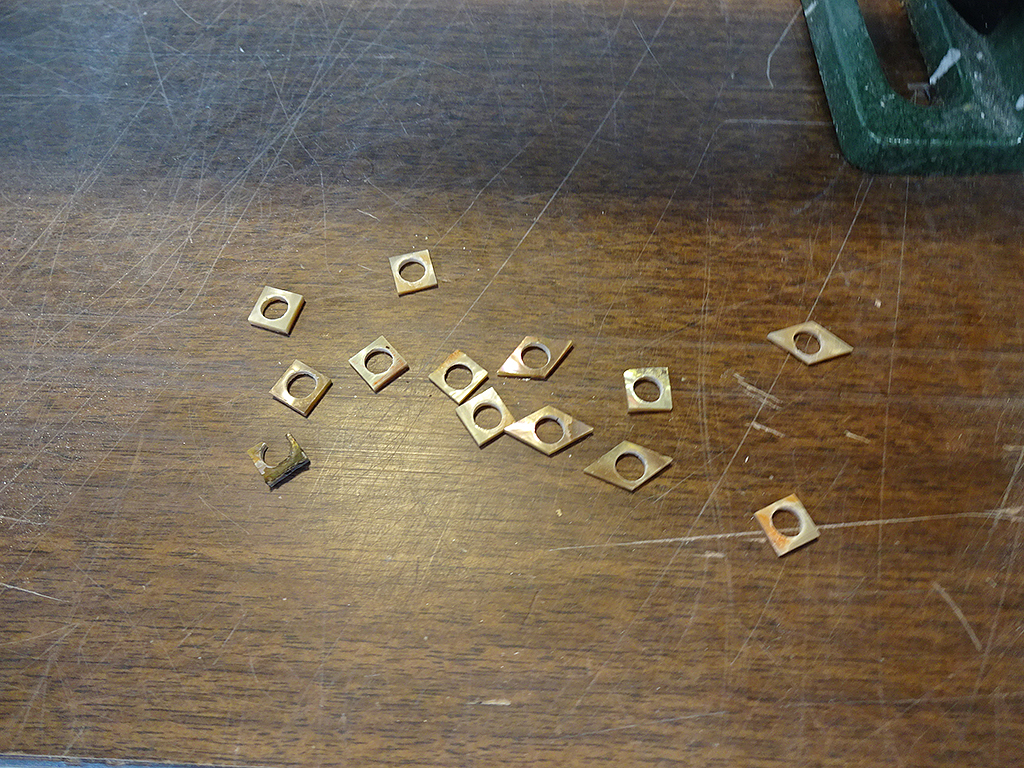
Most of the old inlays came out in one piece.
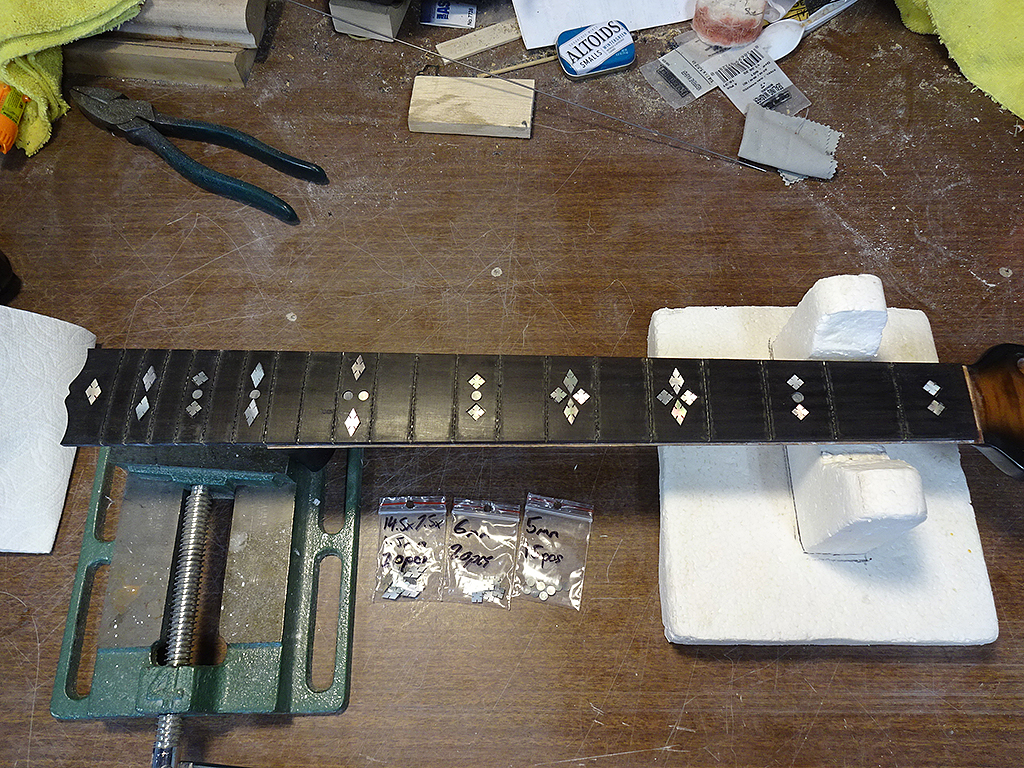
New inlays are set into place so I can decide which one goes where. I'm really digging the look of the new inlay pieces. These are only available with the notches cut into them. I wasn't sure whether I would like them, but after seeing them all together in the fret board, I've decided that I do like them.
The black MOP pieces seem to have a darker side and a brighter side. I'm kind of leaning toward the brighter side. The diamonds are a little bit different shape than the old diamonds, so I'll need to sand them a little bit so they fit into the holes.
|
|
| |
|
Joined:
March 2002
Posts: 15679
Location: SoCal | Cool. Never seen this done before.....
|
|
| |
|

Joined:
June 2012
Posts: 2340
Location: Pueblo West, CO | After looking at the inlays with the light side out I decided to flip them all over to see what the fret board would look like with the dark side out. I also sanded the diamonds to fit into the holes and spaced out under the inlays where necessary so they all stand slightly proud of the surface. I was going to buy some ebony veneer, but at $32 a pop, it's a little too rich for my blood. I only needed about 2 square inches. So, I used 1/64" plywood that I dyed black using a sharpie. 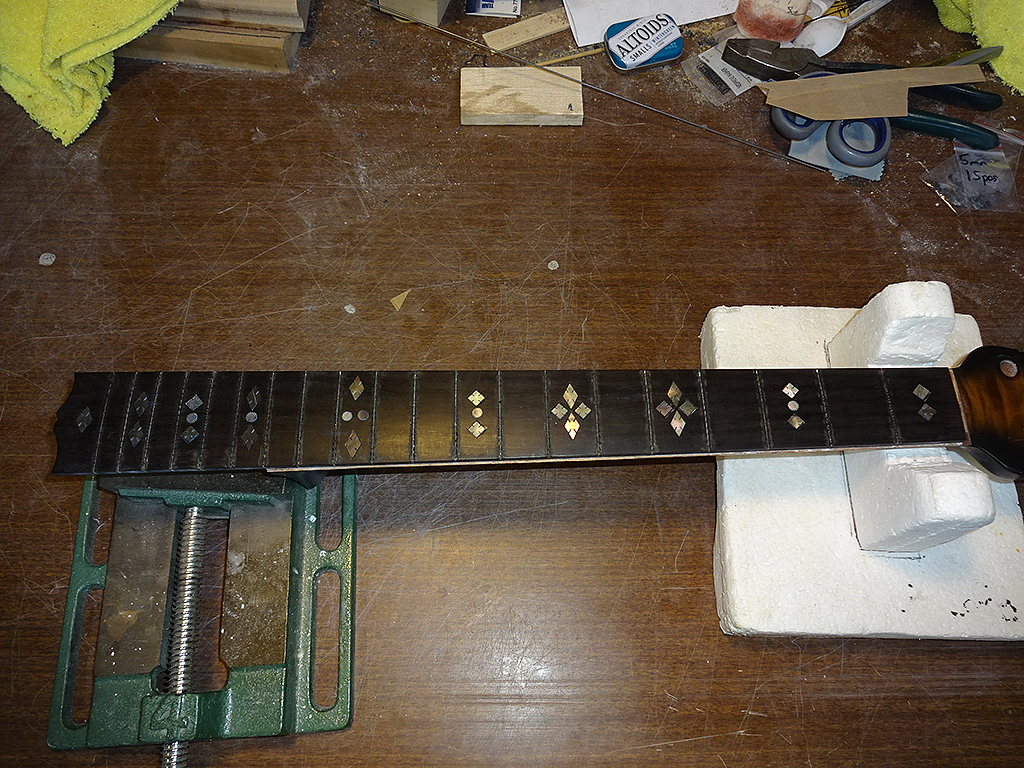
One of the things I like about the light side out is that the inlays really stand out against the ebony. What I didn't like was they really stand out against the ebony. They reminded me of white MOP, not black MOP. Plus it had a blue tint that clashed with the color of the walnut on the head stock.
The dark side out is a lot more muted, which is what I liked about the black MOP purfling in the first place. You can still see the iridescence of the inlays, but you have to be at the right angle.
There are a couple of dots, such as the two at the 12th and 15th frets that are slightly mis-matched in color, so I'll see if I can find something a little closer. Once that's done, it'll be time to glue the inlays.
Edited by DanSavage 2019-09-21 6:06 PM
|
|
| |
|
Joined:
March 2002
Posts: 15679
Location: SoCal | I would vote for lighter side out. YMMV..... |
|
| |
|

Joined:
February 2014
Posts: 715
Location: moline,illinois | Very Very cool work Dan!!!
The lighting in the first picture looks brighter so to me in the second pic the inlays don't really show up well,personally I agree with Moody the lighter side really pops but if you want understated then the dark side will accomplish that,Has Dr. Savage gone over to the Dark Side 
Was the ebony Veneer to fill the holes so the inlays stood higher??
|
|
| |
|

Joined:
October 2012
Posts: 1093
Location: Yokohama, Japan | SWEET! |
|
| |
|
Joined:
December 2016
Posts: 128
| My vote is dark side out. I think it will work very well with the perfling and the Black Pearl theme. Honestly, either way it will be a beautiful guitar.
Edited by DarenSavage 2019-09-21 11:51 PM
|
|
| |
|

Joined:
June 2012
Posts: 2340
Location: Pueblo West, CO | 2wheeldrummer - 2019-09-21 6:13 PM
Was the ebony Veneer to fill the holes so the inlays stood higher??
Yes. Some of the original inlays were quite a bit thicker than others, such as the squares at the 5th and 7th frets. All of the round inlays also needed quite a few spacers. |
|
| |
|

Joined:
June 2012
Posts: 2340
Location: Pueblo West, CO | DarenSavage - 2019-09-21 9:50 PM
My vote is dark side out. I think it will work very well with the perfling and the Black Pearl theme. Honestly, either way it will be a beautiful guitar.
I'm also leaning toward the dark side out. Like I say, the light side looks too much like white MOP. It really pops, but doesn't fit with the theme of the guitar.
I came to within a hair's breadth of leaving the old abalone inlays in place because I really didn't want to try to route and chisel them out. Now, of course, I'm really happy I removed them. I was relieved to find that the combination of drilling the center, then heating the epoxy made the removal quick and easy.
I ordered more inlay pieces than I needed because I figured there would be a fair amount of variation in the coloring. And, I was right. Now I wish I'd ordered even more because some of the pieces had absolutely no iridescence at all on the darker side.
I've got the best combination I can make with the inlays I bought, so I'll be gluing the inlays down today.
After that, I'll glue the new binding in place and sand/level the fret board, inlays and binding. Then, it'll be time for new frets. Yay!
Edited by DanSavage 2019-09-22 11:33 AM
|
|
| |
|

Joined:
May 2011
Posts: 760
Location: Muenster/Germany | Wonderful! I can feel with you, I´ve just added some MOP inlays on the bridge of my Martin D 45...I was always offended that some of the lesser models had this ornaments there and mine did not.
Unbelievable that this piece of mistreated wood shall become a shiny guitar neck again.
I thought that you might make some 45-style purflings on the top this time, around the neck extension? I love this abalone wars;-)
|
|
| |
|
Joined:
May 2008
Posts: 1564
Location: Indiana | Love the new inlays. Going to be beautiful and unique instrument.
Off topic... but, I just moved into a new property. Out of all my guitars, my Savage parlor is the first only one out of it's case so far. So much fun to play.
Carry on. |
|
| |
|

Joined:
June 2012
Posts: 2340
Location: Pueblo West, CO | DetlefMichel,
I do like how the purfling next to the neck looks. This one won't be getting this treatment.
Jonmark,
I was wondering how you and your Parlor were getting on together. I love my Parlor, too. |
|
| |
|
Joined:
May 2011
Posts: 82
Location: Ozark, Arkansa | Almost sounds like a guy would have to buy two sets and make the best set out of them to get the closest matchup. I have never seen this done. Good to know.
I never told you, Dan, but the 1979 1112 Balladeer I got and did the major work on a while back I only took home because of the neck repair you did on Chapin's 1613. I figured, if he can do it, so can I. Neck on the 1112 was almost broken in two just below the headstock. Might have been better to go ahead and break it all the way to fully reglue. But it fit pretty cleanly, and I was able to wick Titebond all the way back into the cracks before I clamped it and set it aside for a few days.
I was amazed by how solid it was in the end, and the tone of the guitar is wonderful. Thanks for the encouragement! Looking forward to seeing what your neck/fretboard job ends up looking like for the Pearl. You have never done the inlays before?
Edited by Oldvation Guy 2019-09-27 12:11 PM
|
|
| |
|

Joined:
June 2012
Posts: 2340
Location: Pueblo West, CO | Oldvation Guy - 2019-09-27 10:09 AM
Almost sounds like a guy would have to buy two sets and make the best set out of them to get the closest matchup. I have never seen this done. Good to know.
I never told you, Dan, but the 1979 1112 Balladeer I got and did the major work on a while back I only took home because of the neck repair you did on Chapin's 1613. I figured, if he can do it, so can I. Neck on the 1112 was almost broken in two just below the headstock. Might have been better to go ahead and break it all the way to fully reglue. But it fit pretty cleanly, and I was able to wick Titebond all the way back into the cracks before I clamped it and set it aside for a few days.
I was amazed by how solid it was in the end, and the tone of the guitar is wonderful. Thanks for the encouragement! Looking forward to seeing what your neck/fretboard job ends up looking like for the Pearl. You have never done the inlays before?
I did buy enough pieces for two sets. I should have bought three sets. LOL!
Good for you on the neck repair. A lot of people are scared to work on their own guitars. I've been working on mine since before I knew better.
You're welcome. Nope. Never done any inlay work before. I've read a lot on the internet, but this is the first time I got my hands dirty, so to speak. Probably the last time, too. LOL! |
|
| |
|

Joined:
June 2012
Posts: 2340
Location: Pueblo West, CO | I sanded down the inlays. They're not perfect. I made a few mistakes. But, on the whole I'm happy. So, I'm pressing forward. 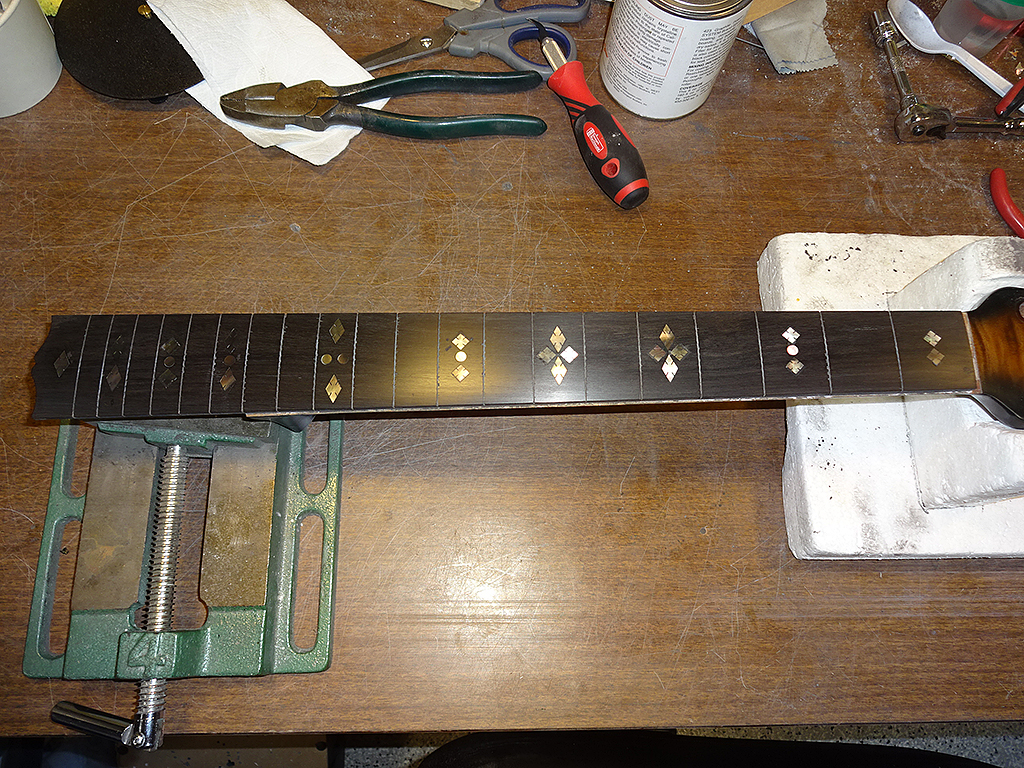
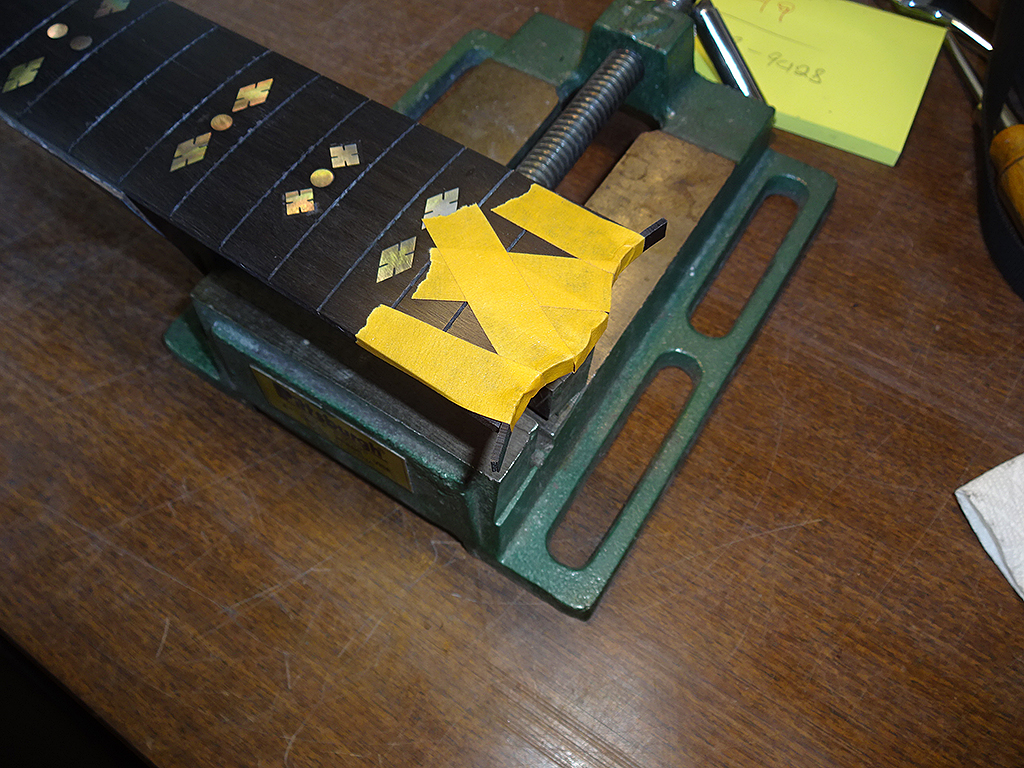
Moustache binding made and being glued into place.
|
|
| |
|
Joined:
December 2016
Posts: 128
| Wow! I love the inlays. The dark side out with the gold EVO frets will be a smashing combination. |
|
| |
|

Joined:
June 2012
Posts: 2340
Location: Pueblo West, CO | Thanks, brah!
All in all, I'm pretty happy with the progress so far.
Edited by DanSavage 2019-09-27 11:50 PM
|
|
| |
|
Joined:
September 2005
Posts: 138
Location: Birmingham, AL | The slotted diamonds really add a nice visual touch.
I also tried to flip through the whole post trying to find what bracing pattern you are using. I didn't see it but then nowadays I have trouble seeing anything (!). Are you sticking with A type?
Edited by clrules 2019-09-28 9:47 AM
|
|
| |
|

Joined:
June 2012
Posts: 2340
Location: Pueblo West, CO | Thanks. I agree. They add some flourish.
Yes, A-braced with torrefied Adi. I don't really post pics of the gluing of the braces, etc. any more because everyone's seen it a million times by now.
I'm only posting pics of stuff that hasn't been seen before. |
|
| |
|

Joined:
June 2012
Posts: 2340
Location: Pueblo West, CO | Moustache binding is scraped. Side binding with side-marker dots is glued and scraped.
Next job is to fix the dings in the neck, then polish it. I'm polishing the neck before I install the frets because it'll be easier to mask the fret board before the frets are installed. 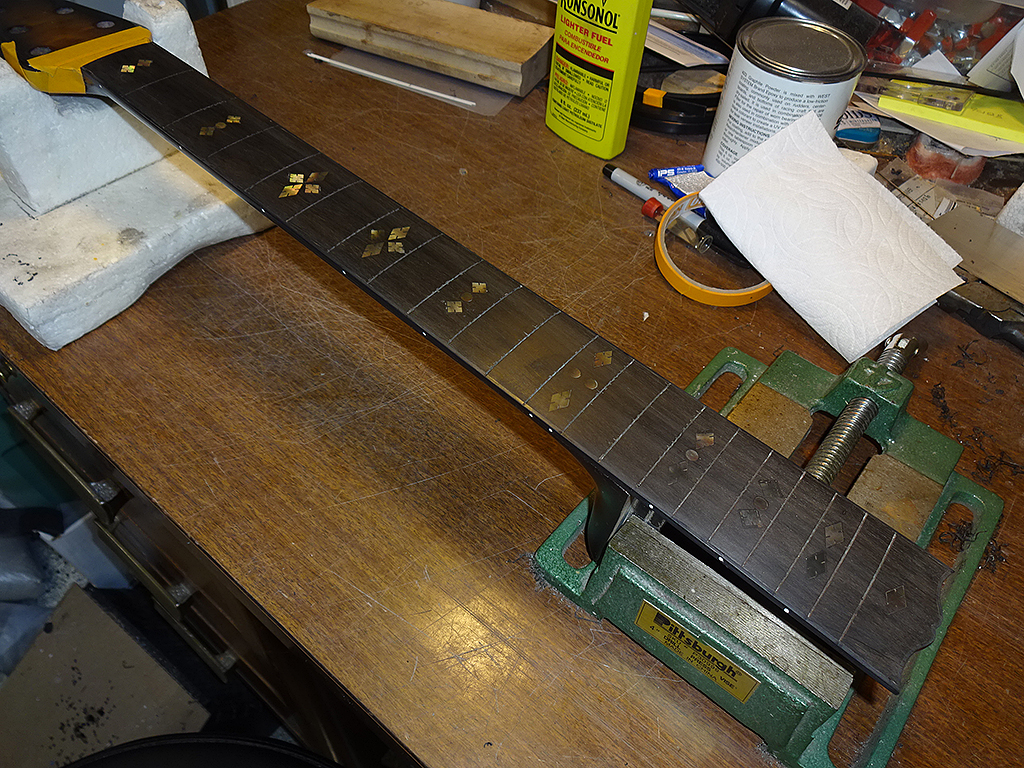
|
|
| |
|
Joined:
December 2016
Posts: 128
| I love the black on black. The gold frets will really bring out the gold in the inlays. |
|
| |
|

Joined:
June 2012
Posts: 2340
Location: Pueblo West, CO | Thanks! I'm really digging it, too. |
|
| |
|

Joined:
June 2012
Posts: 2340
Location: Pueblo West, CO | Fixing the dings on the neck required that I fill a ding with epoxy, then set the neck aside for 24 hours while the glue cures. That left a lot of down time.
So, I decided to start cutting out the pieces of shell needed for the rosette. Unfortunately, I wasn't able to buy any black MOP shell feathers. White MOP? Sure. Abalone? Yep. But no one sells black MOP shell feathers.
So, I had to make do with shell veneer, or shell paper. (See: Black MOP Veneer)
First three pieces cut. 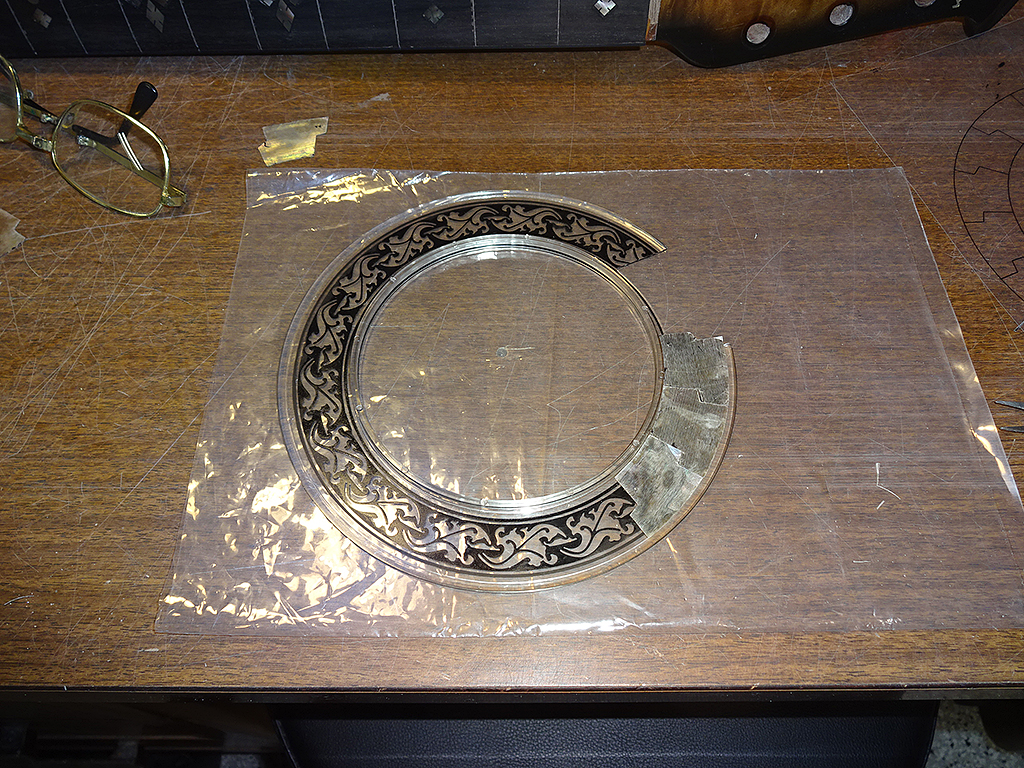
Half way done.
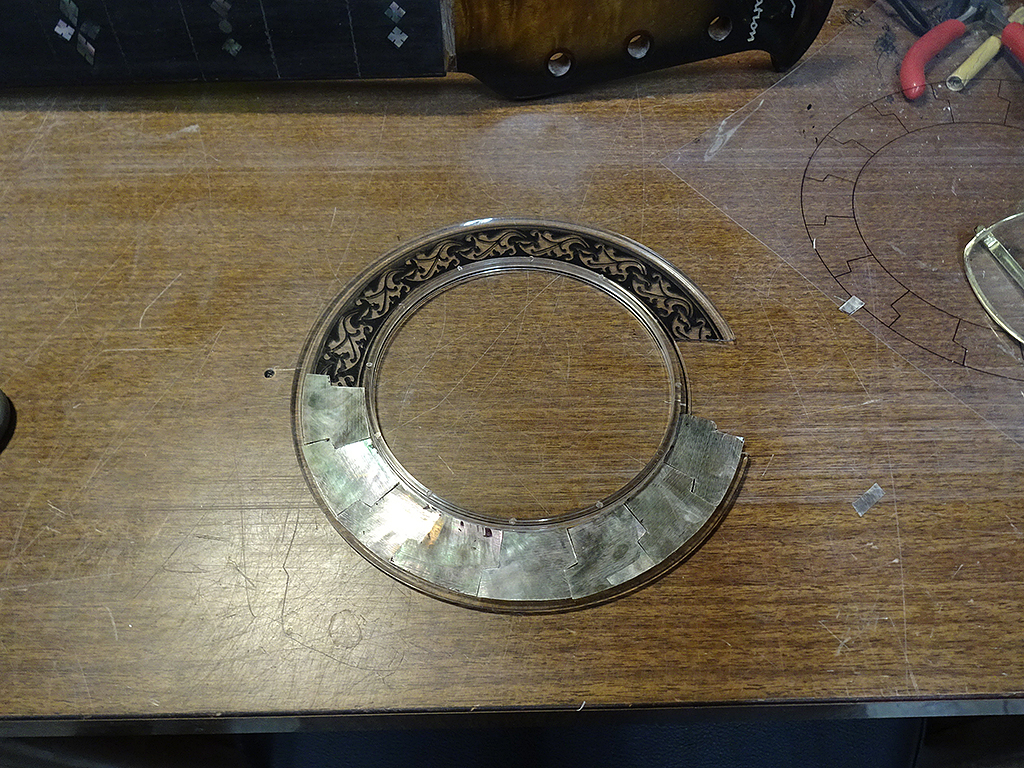
This shot reveals a little of the shell iridescence.
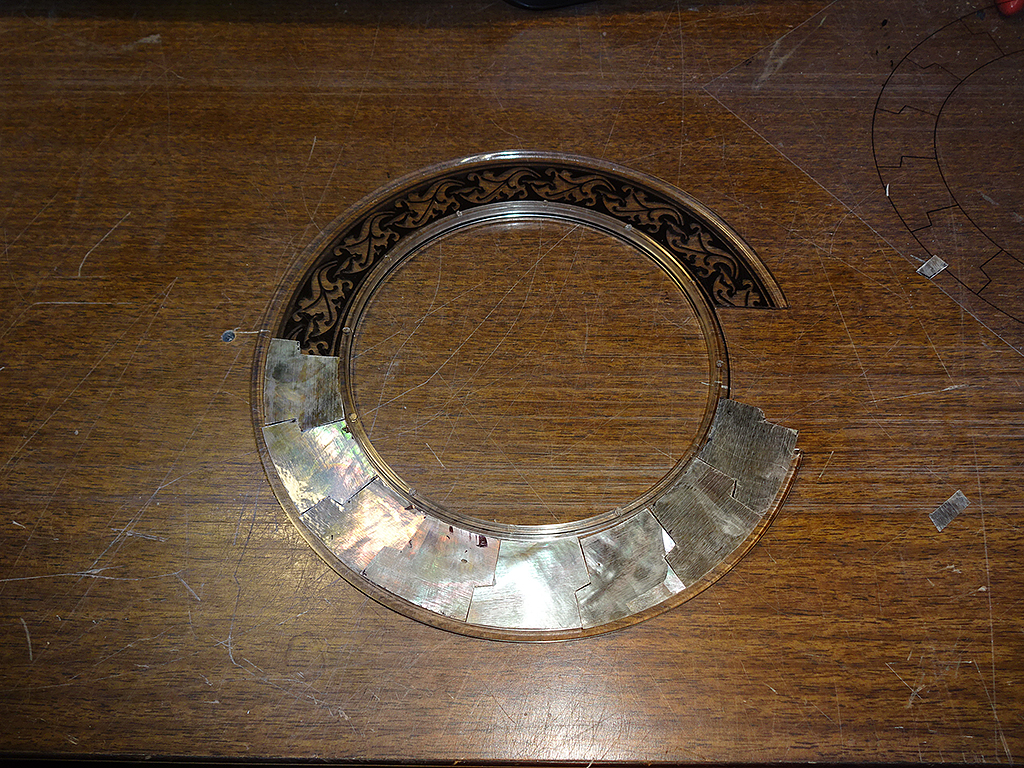
All the pieces are cut. You're seeing gaps because the loose pieces are just sitting in the groove in the back of the rosette.
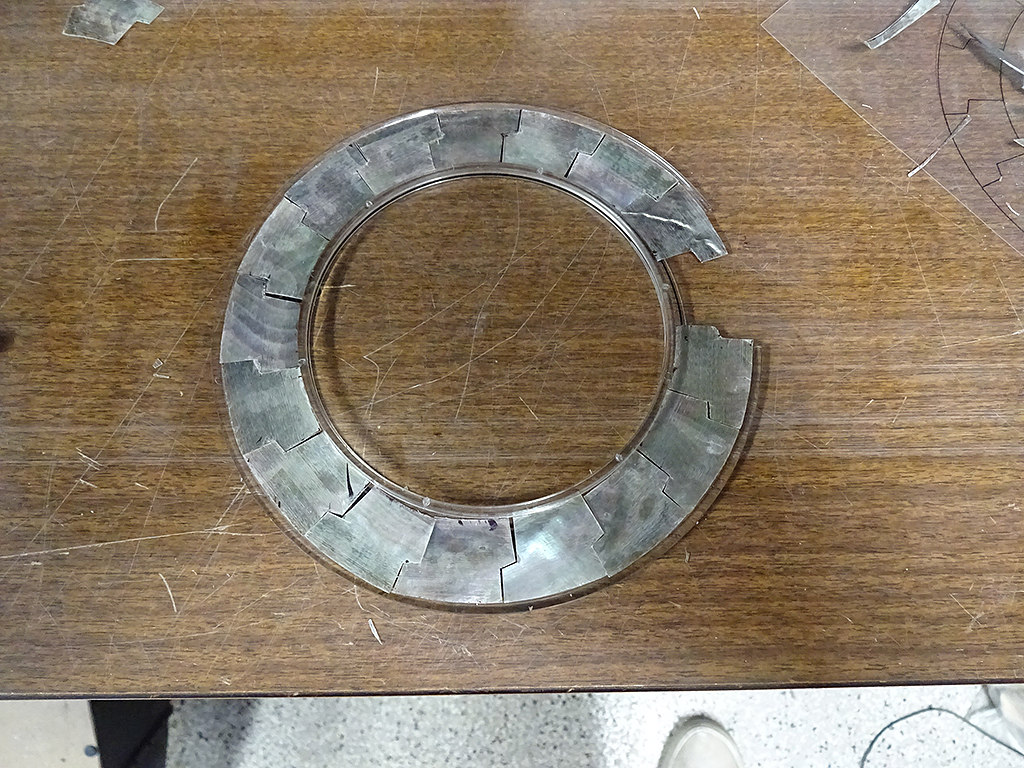
More iridescence. 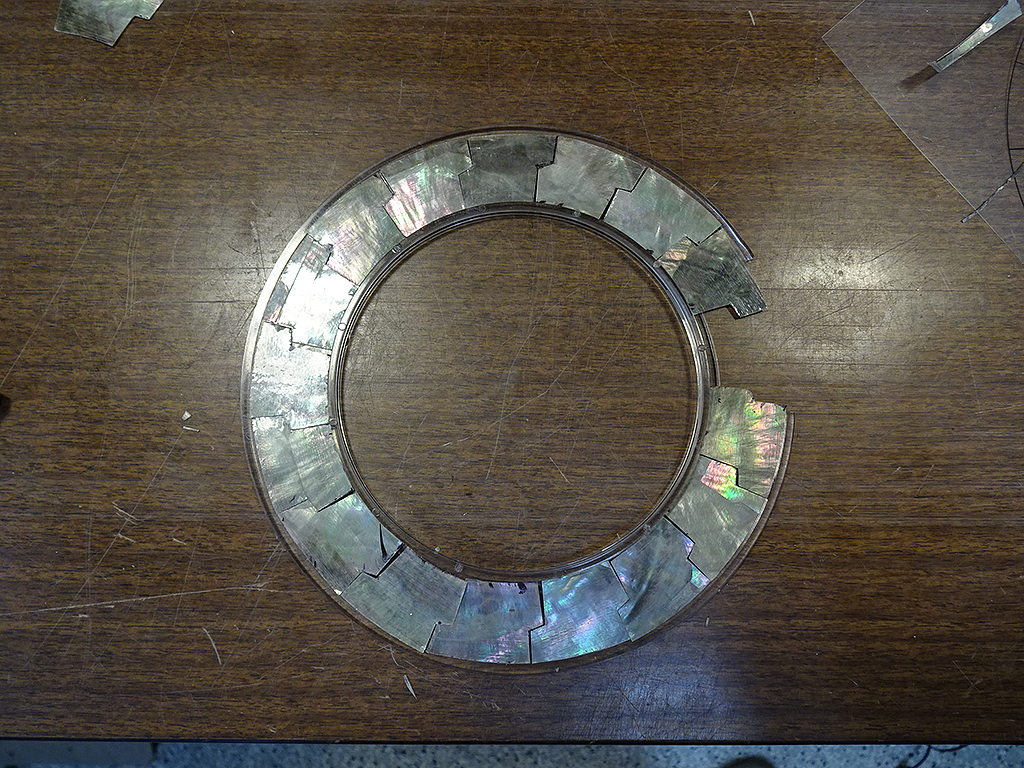
While I was working on these, I was also sanding the dings on the neck. At this point, all of the dings are fixed and I've polished the neck. It's ready for frets, which I'll be doing next.
After that, it's time to get back to the body and sand/polish the top.
|
|
| |
|
Joined:
May 2011
Posts: 82
Location: Ozark, Arkansa | So, how do you attach the pieces to the ring without making it visible? |
|
| |
|

Joined:
June 2012
Posts: 2340
Location: Pueblo West, CO | Oldvation Guy - 2019-10-07 6:50 PM
So, how do you attach the pieces to the ring without making it visible?
That, is the right question... |
|
| |
|
Joined:
May 2011
Posts: 82
Location: Ozark, Arkansa | Ah, but the more important question, is where are you going to incorporate the skull and crossbones, or pirate symbol into the Black Pearl?
Arrrrgh! Shiver me timbers, matey...
Edited by Oldvation Guy 2019-10-08 11:37 AM
|
|
| |
|

Joined:
June 2012
Posts: 2340
Location: Pueblo West, CO | Neck is done. The photo below is missing the nut, but I added it after the photo was taken.
It's time to get back to the body. First job there is to level and polish the top. 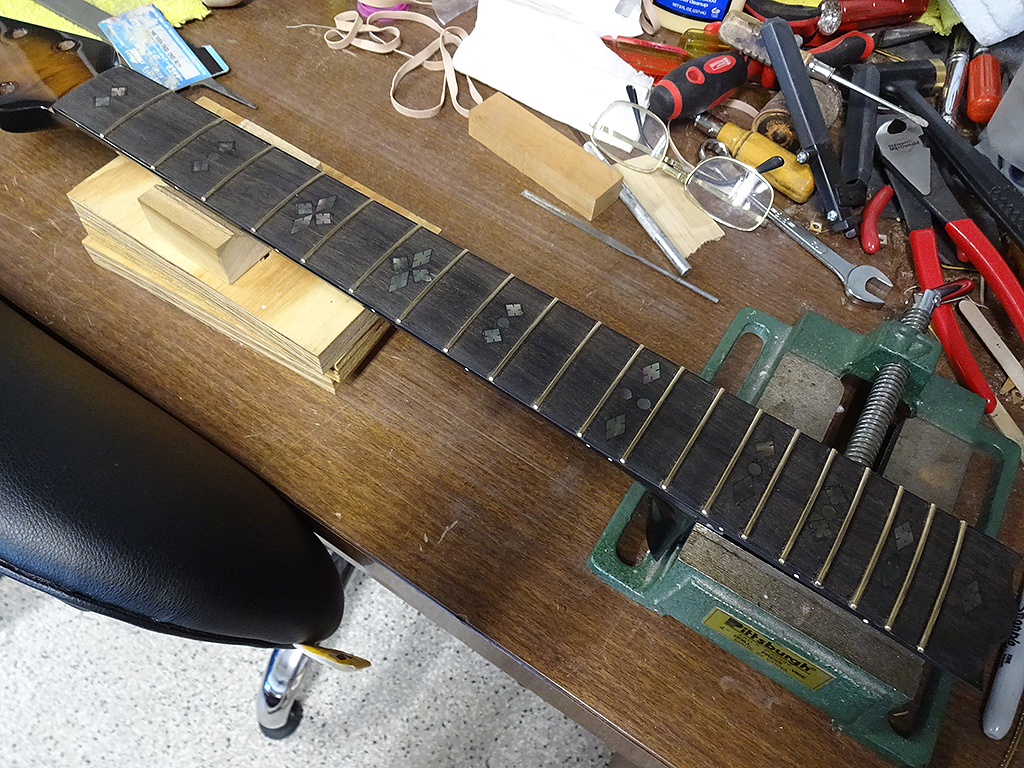
|
|
| |
|
Joined:
December 2016
Posts: 128
| Nice! |
|
| |
|
Joined:
May 2011
Posts: 82
Location: Ozark, Arkansa | What do you use to press your frets in? |
|
| |
|

Joined:
June 2012
Posts: 2340
Location: Pueblo West, CO | Mostly I use Stewmac's Deadblow Fretting Hammer. I also run a bead of Titebond carpenter's glue in the slot before hammering the frets down. |
|
| |
|

Joined:
June 2012
Posts: 2340
Location: Pueblo West, CO | DarenSavage - 2019-10-09 8:50 AM
Nice!
Thanks! It's really nice to have this big job out of the way. |
|
| |
|
Joined:
March 2002
Posts: 15679
Location: SoCal | Looking good! |
|
| |
|

Joined:
June 2012
Posts: 2340
Location: Pueblo West, CO | Top and binding are polished. 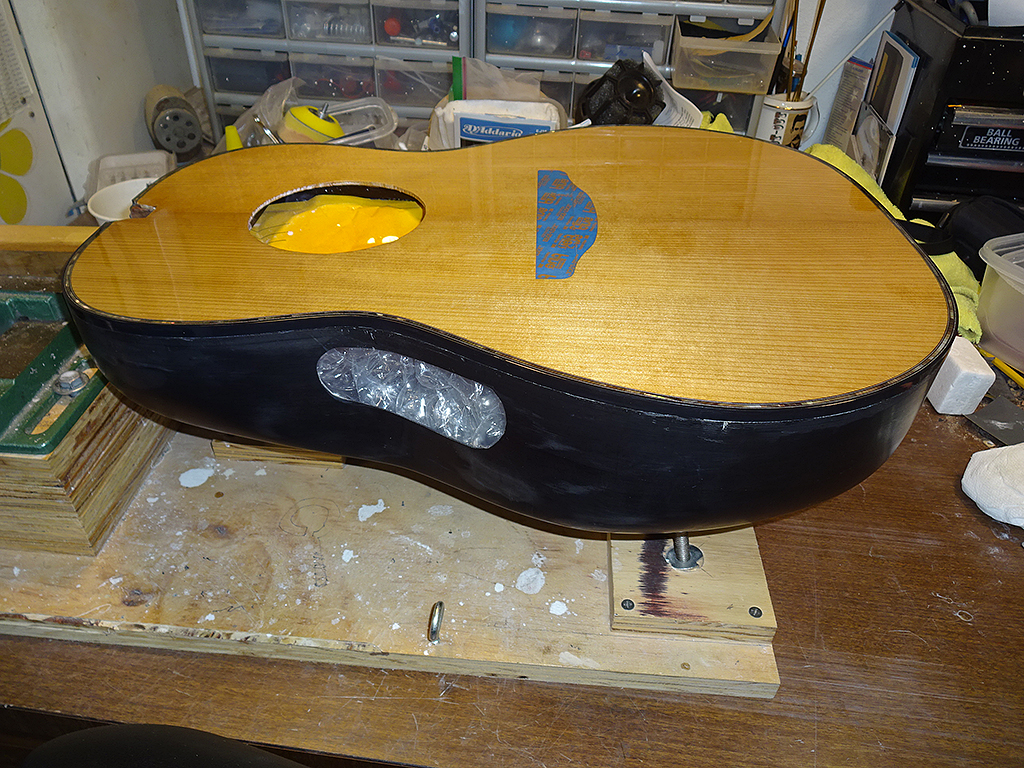
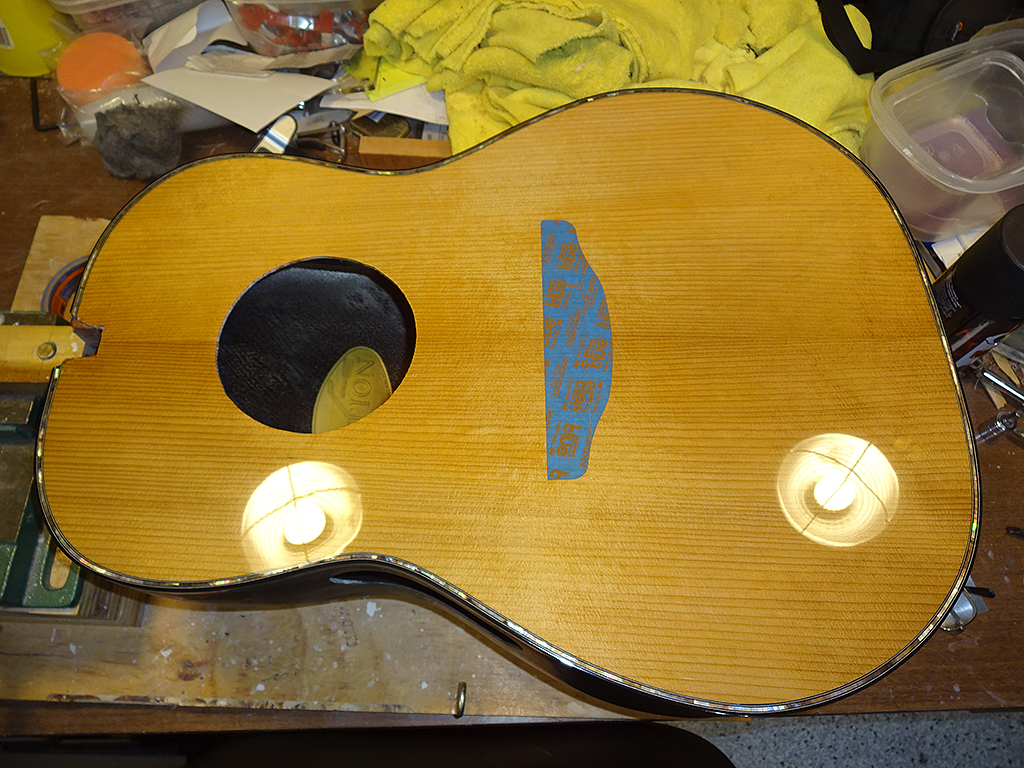
Bowl is textured. It's not done using the same technique as the factory, but it is a reasonable facsimile. 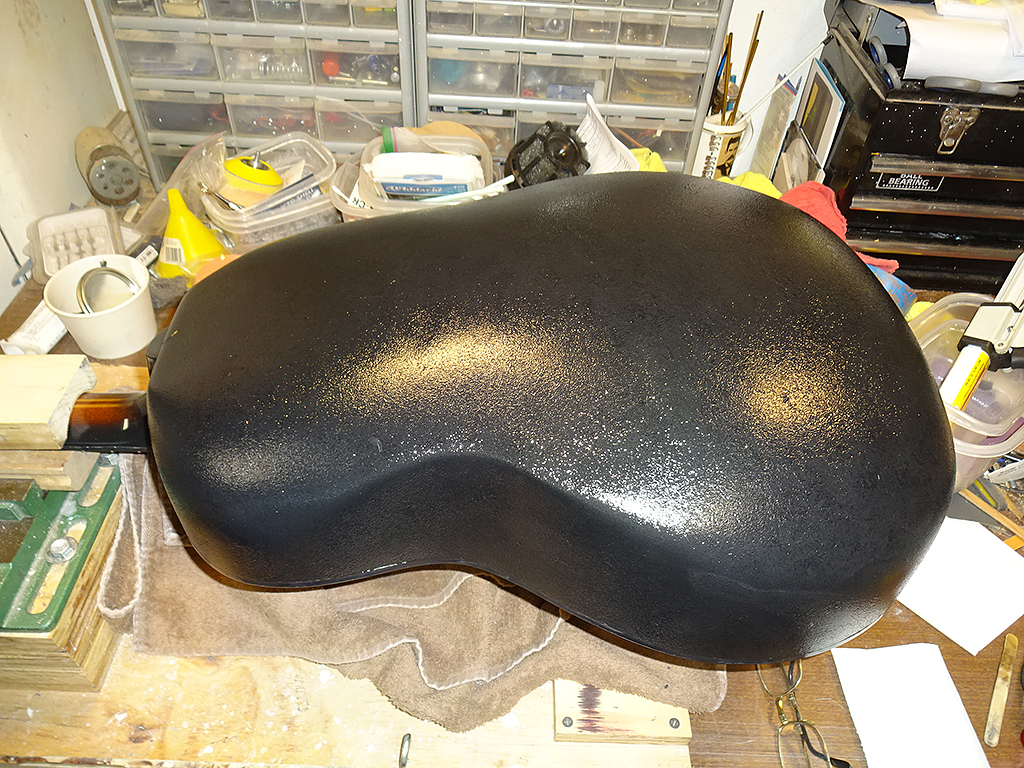
|
|
| |
|

Joined:
October 2012
Posts: 1093
Location: Yokohama, Japan | Hi Dan! That looks so classy! As good as the 2077AV50-4 50th Anniversary Legend IMHO. Can't wait to see what she looks like with your custom made rosette! Thanks for sharing! |
|
| |
|

Joined:
September 2006
Posts: 10777
Location: Keepin' It Weird in Portland, OR | Nice. 
|
|
| |
|
Joined:
May 2011
Posts: 82
Location: Ozark, Arkansa | Lookin' good!
|
|
| |
|
Joined:
March 2002
Posts: 15679
Location: SoCal | It's looking wonder Dan. When you get it done, I'll bring over the Legend and we can compare the two.... |
|
| |
|
Joined:
December 2016
Posts: 128
| This is going to be one of those sublime guitars that needs to be seen in person to truly appreciate it's beauty.
Edited by DarenSavage 2019-10-12 9:41 PM
|
|
| |
|

Joined:
June 2012
Posts: 2340
Location: Pueblo West, CO | moody, p.i. - 2019-10-12 7:24 PM
It's looking wonder Dan. When you get it done, I'll bring over the Legend and we can compare the two....
Thanks, Paul. Yes, I do want to compare it to your 1117. |
|
| |
|

Joined:
June 2012
Posts: 2340
Location: Pueblo West, CO | DarenSavage - 2019-10-12 7:39 PM
This is going to be one of those sublime guitars that needs to be seen in person to truly appreciate it's beauty.
Yep. Just for the fun of it I put a blank rosette into the sound hole, then placed the bridge in place to get an idea of how it's going to look.
As it turns out, I really like the look of the wood behind the rosette. As you say, it's got a sublime look to it.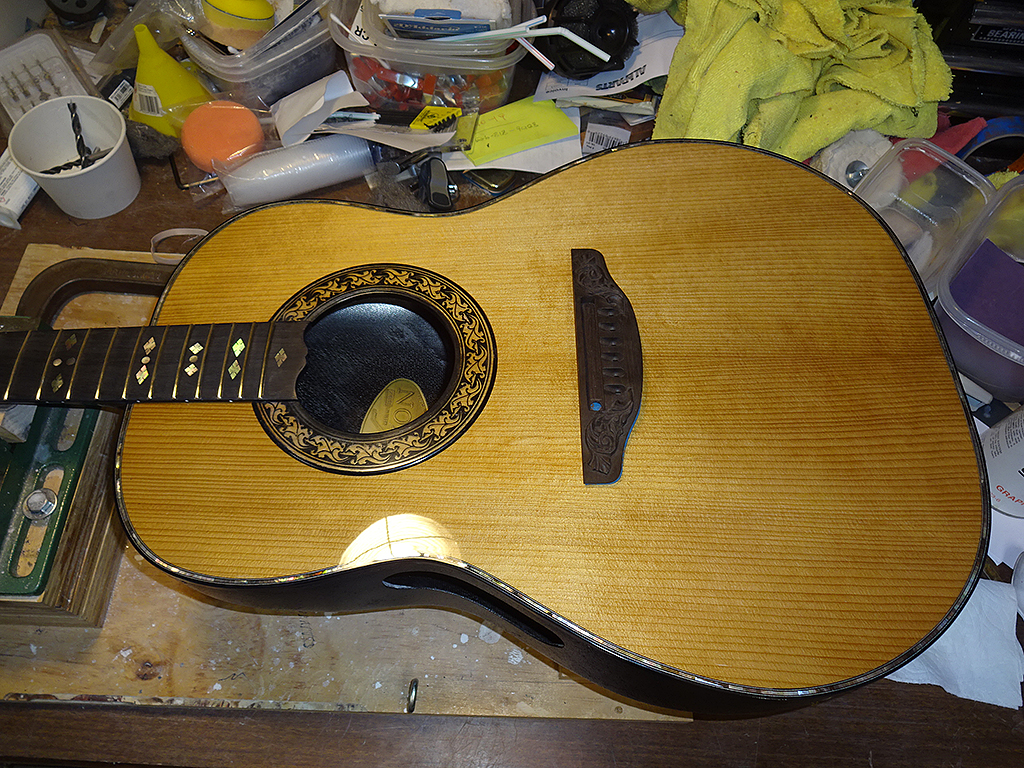
|
|
| |
|

Joined:
September 2006
Posts: 10777
Location: Keepin' It Weird in Portland, OR | That's just beautiful.
|
|
| |
|
Joined:
May 2008
Posts: 1564
Location: Indiana | The blank rosette looks fantastic... neck as well. Great job Dan. |
|
| |
|

Joined:
June 2012
Posts: 2340
Location: Pueblo West, CO | Thanks, Art & Jonmark. |
|
| |
|
Joined:
May 2011
Posts: 82
Location: Ozark, Arkansa | Looks outstanding, even without the pieces of shell. I like the heavy grain in the top, and the abalone really pops. |
|
| |
|

Joined:
June 2012
Posts: 2340
Location: Pueblo West, CO | Oldvation Guy - 2019-10-13 7:03 PM
Looks outstanding, even without the pieces of shell. I like the heavy grain in the top, and the abalone really pops.
Thanks!
There's no abalone on this guitar. Except for the head stock logo, it's all black MOP, hence the name, Black Pearl.
One of the things I really like about black MOP is the color of the iridescence is different depending on the lighting angle. In those photos, the inlays have a golden look. At other angles it's got a blue, or green, or red tinge or will even disappear into the ebony if the angle of the lighting is correct. |
|
| |
|
Joined:
May 2011
Posts: 82
Location: Ozark, Arkansa | So the perfling is MOP, and not abalone? |
|
| |
|

Joined:
June 2012
Posts: 2340
Location: Pueblo West, CO | Yep. Purfling, fret board inlay and soon, the rosette are all black MOP, not abalone.
I used black MOP for the purfling on my Parlor and really liked the look of it. So, I decided to expand use of it on this CL. |
|
| |
|

Joined:
February 2016
Posts: 1881
Location: When?? | The stealth properties of the inlays is great! Various lighting conditions and directions of sight will probably produce a lot of different views of them in terms of individual reflection. Probably never all of them at the same time. Cool concept. |
|
| |
|
Joined:
December 2016
Posts: 128
| DanSavage - 2019-10-12 11:57 PM
As it turns out, I really like the look of the wood behind the rosette. As you say, it's got a sublime look to it. 
Wowee! I love the unfinished rosette. It really brings out the color of the top and accentuates the pattern of the rosette.
The black pearl inlays really shine as the perspective changes, then slide off into stealthiness. What a beauty!
Edited by DarenSavage 2019-10-14 8:46 PM
|
|
| |
|

Joined:
June 2012
Posts: 2340
Location: Pueblo West, CO | Love O Fair - 2019-10-14 2:15 PM
The stealth properties of the inlays is great! Various lighting conditions and directions of sight will probably produce a lot of different views of them in terms of individual reflection. Probably never all of them at the same time. Cool concept.
THanks, Al. Yep. That's what I really like about the black MOP. Very different from abalone which is all flash, all the time. |
|
| |
|

Joined:
June 2012
Posts: 2340
Location: Pueblo West, CO | DarenSavage - 2019-10-14 6:43 PM
Wowee! I love the unfinished rosette. It really brings out the color of the top and accentuates the pattern of the rosette.
The black pearl inlays really shine as the perspective changes, then slide off into stealthiness. What a beauty!
Me,, too!
I love the look of the bare rosette exposing the wood underneath. Unfortunately, the sound hole location in the top and the rosette location don't match, so there's no way I could use this on this guitar, as much as I like how it looks.
Yeah, that's what I really liked when I finished my parlor. The iridescence is there, but extremely understated and totally controlled by the lighting angle. It's really evident on the fret board, to the point of invisibility. |
|
| |
|

Joined:
June 2012
Posts: 2340
Location: Pueblo West, CO | The bridge is glued down.
Except for the rosette, the basic construction is done.
Please stand by... 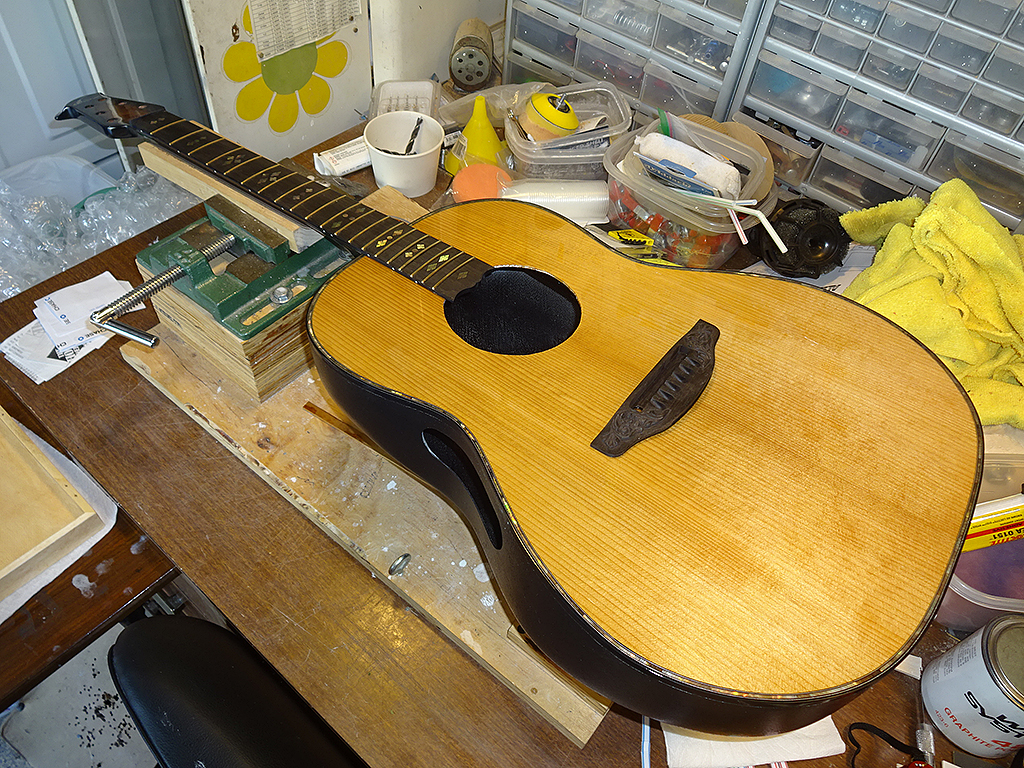
|
|
| |
|

Joined:
October 2012
Posts: 1093
Location: Yokohama, Japan | Stunning! Just the rosette and the pre-amp to go. That is going to be one impressive guitar with the phantom power capable OP-Pro pre-amp! I'm right in the middle of several non-O re-builds; and your projects always give me incentive to push forward! Thanks for another one of your inspiring threads! Can't wait for the finish! |
|
| |
|
Joined:
December 2016
Posts: 128
| DanSavage - 2019-10-14 9:12 PM
Unfortunately, the sound hole location in the top and the rosette location don't match, so there's no way I could use this on this guitar, as much as I like how it looks.
That's a bummer. I guess it means you have to build another Ovation to use that rosette. 
Yeah, that's what I really liked when I finished my parlor. The iridescence is there, but extremely understated and totally controlled by the lighting angle. It's really evident on the fret board, to the point of invisibility.
I can't wait to see it in person!  |
|
| |
|

Joined:
June 2012
Posts: 2340
Location: Pueblo West, CO | DarenSavage - 2019-10-17 6:08 PM
That's a bummer. I guess it means you have to build another Ovation to use that rosette. 
I can't wait to see it in person! 
I would except that's the rosette I'm using for this guitar.
Yeah, I don't think you've seen my parlor, either. |
|
| |
|

Joined:
June 2012
Posts: 2340
Location: Pueblo West, CO | It's been a week since my last update, but I've been busy.
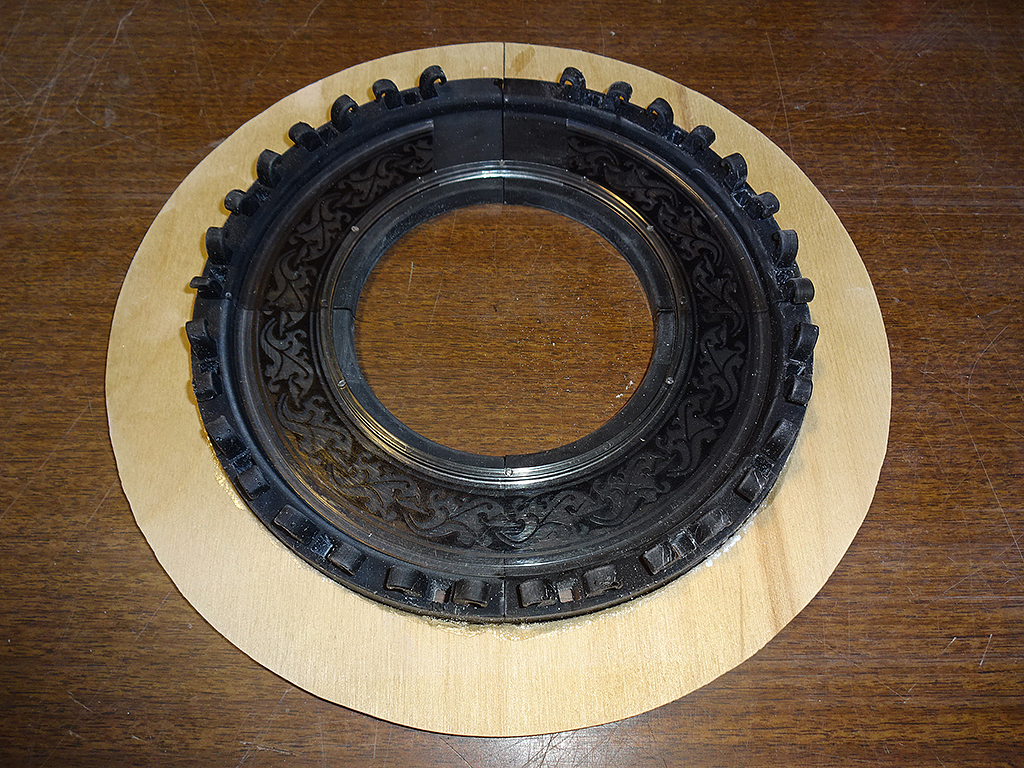
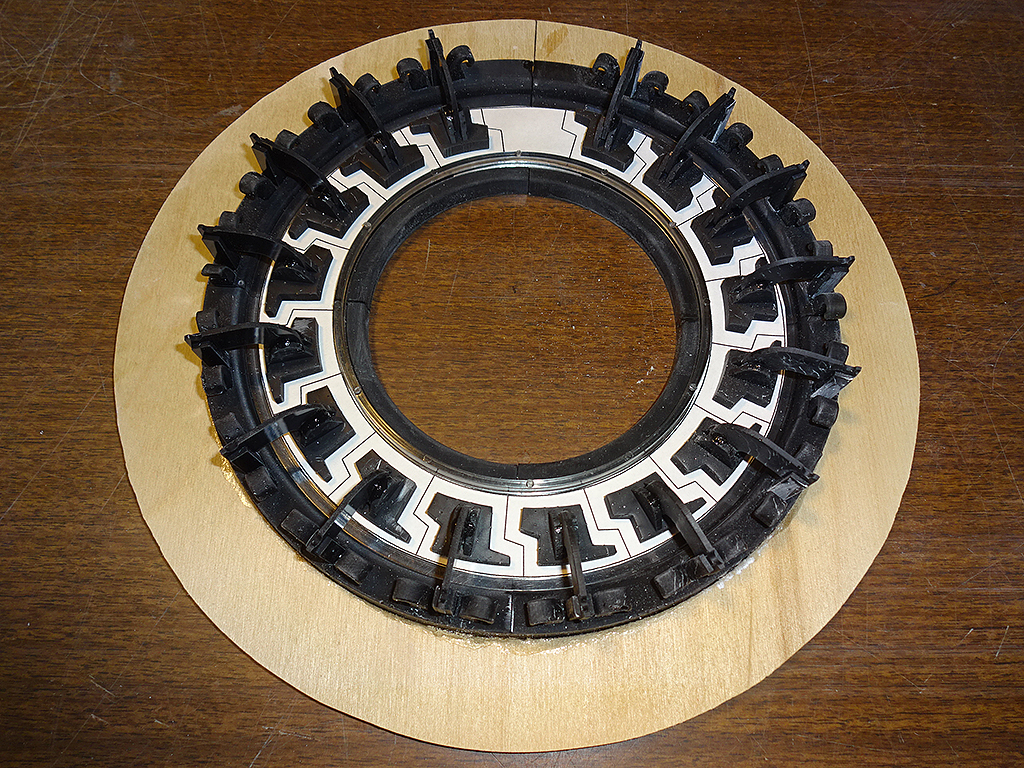
The factory uses specialized equipment to assemble the old style CL rosettes. The problem is to securely clamp each of the 16 shell segments so they remain in alignment to each other and to the oak leaf pattern in the rosette casing.
I designed a 3D printed caul to clamp each piece of shell into place. Here is the base. Because of the size limitation of the AnyCubic Photon printer, I had to break the bed into four sections. 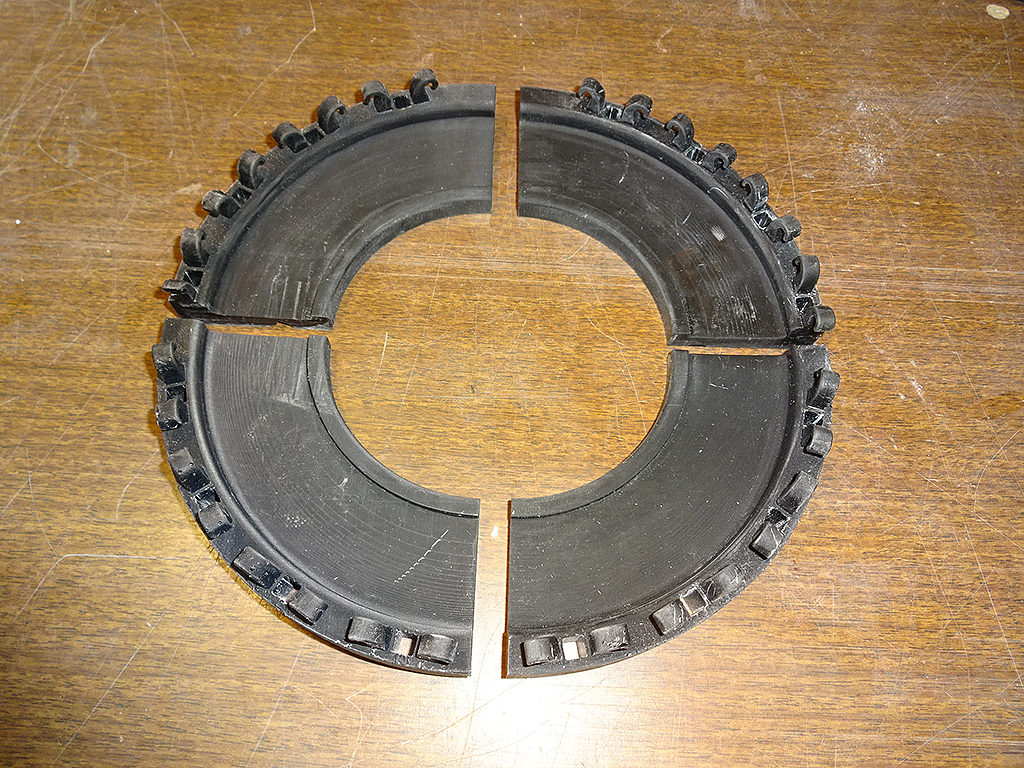
Here are the clamping arms.
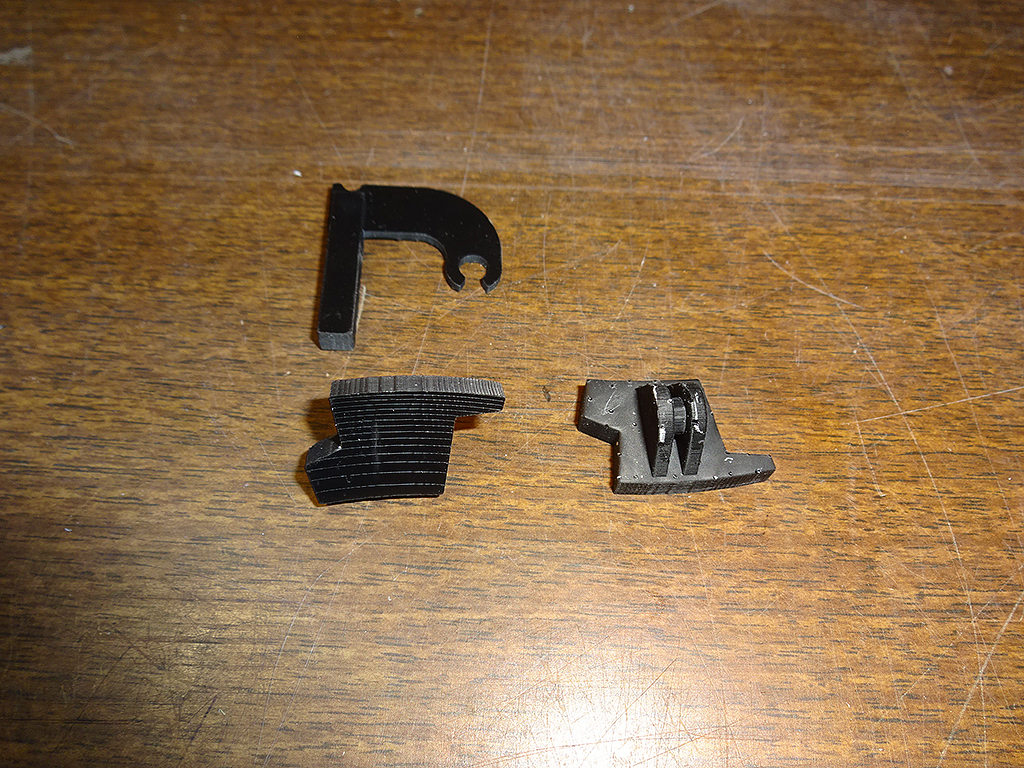
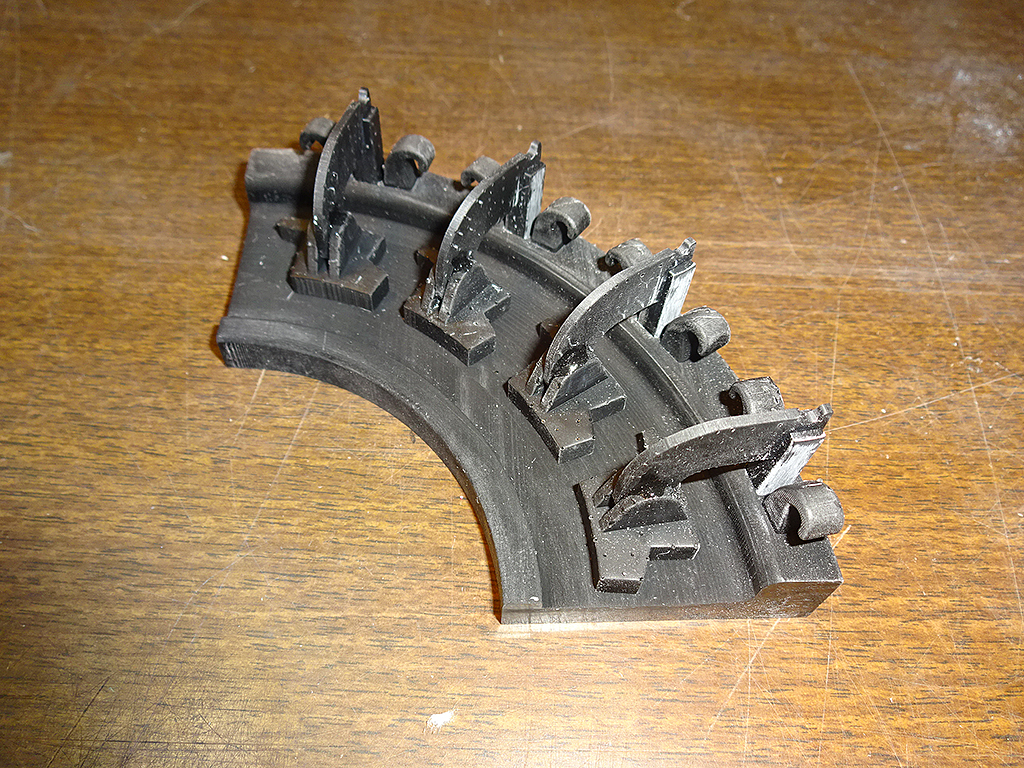
Clamping arms assembled and inserted into the base. I'll stretch small rubber bands from the hooks in the base over the notch in the arms to provide the clamping force. At least, that's the idea.
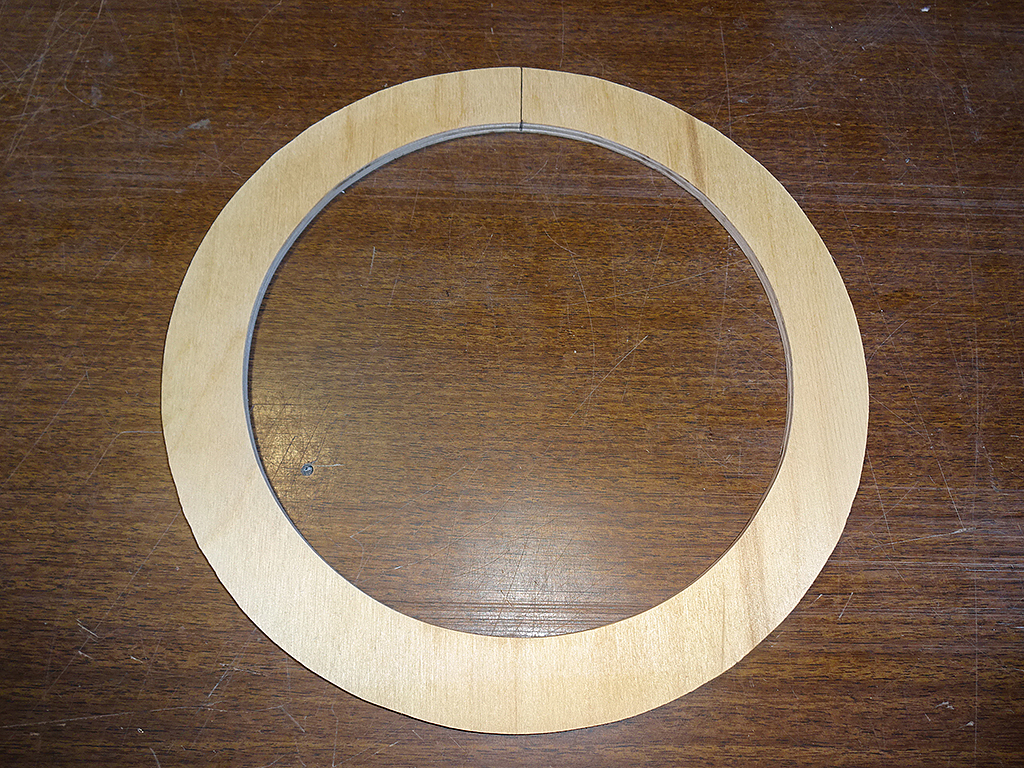
This is the 1/4" birch plywood ring that will hold the four base sections together.
Base sections glued to plywood ring. 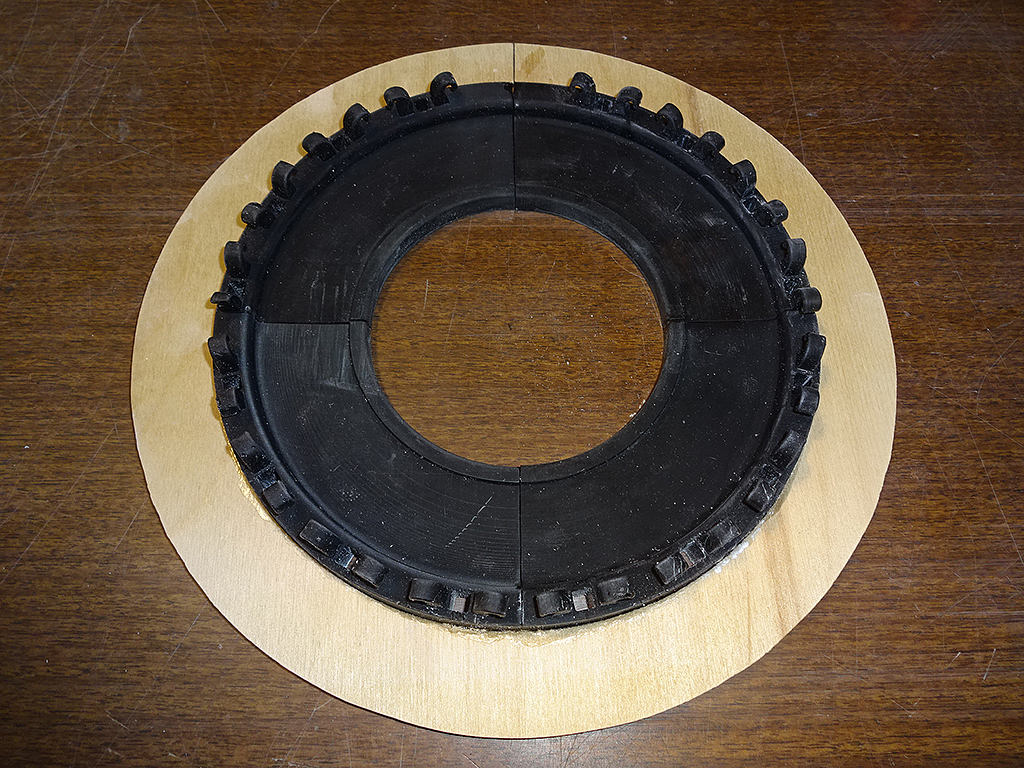
Rosette placed into base.
Paper mock-up of shell sections and clamping arms placed into base.
Next job is to see how it works. I've got a couple of rosettes I pulled off project guitars and some spare shell sections. I'll use these to practice.
Edited by DanSavage 2019-10-23 11:24 PM
|
|
| |
|
Joined:
March 2002
Posts: 15679
Location: SoCal | Amazing.... |
|
| |
|
Joined:
December 2016
Posts: 128
| Cool stuff. I was wondering how the 3D printing has been going. Now I know! |
|
| |
|
Joined:
May 2008
Posts: 1564
Location: Indiana |  |
|
| |
|

Joined:
February 2016
Posts: 1881
Location: When?? | Such a very cool jig system you designed there, Dan! For some reason I am picturing a diploma from MIT hanging on your wall. |
|
| |
|

Joined:
June 2012
Posts: 2340
Location: Pueblo West, CO | Thanks, everyone.
DarenSavage - 2019-10-24 9:26 AM
Cool stuff. I was wondering how the 3D printing has been going. Now I know!
Well, it was going pretty cool until I actually tried to start clamping test pieces into one of the practice rosette casings.
It was then that I discovered that I'd made the feet a mirror image of how they're actually supposed to be. The paper template was printed for cutting out the shell pieces, not for clamping. IOW, it was backwards.
Oopsie!
It was easy enough to fix the problem in the models. I just mirrored the pieces and created a new print file.
I'm printing out another set of 16 clamps. I can only print 4 arms and 4 feet at a time (a 'set') and each set takes 4 hours to print.
So, I should be able to practice clamping test pieces tomorrow night.
Edited by DanSavage 2019-10-24 5:37 PM
|
|
| |
|

Joined:
June 2012
Posts: 2340
Location: Pueblo West, CO | Houston, we've got a problem... 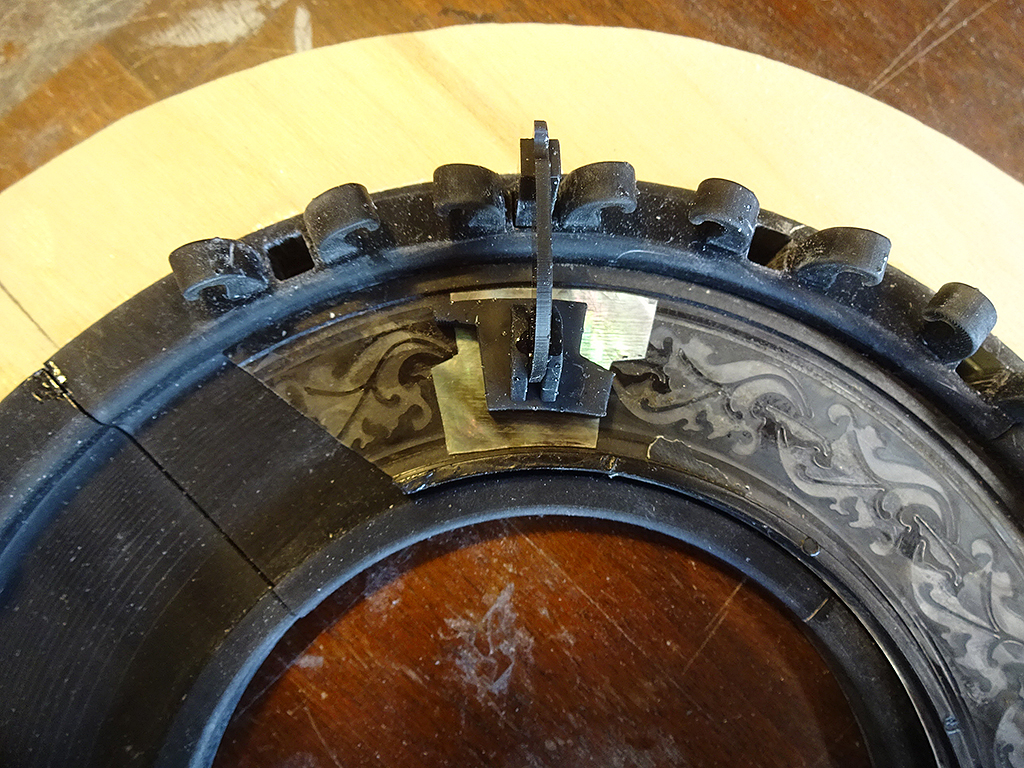
|
|
| |
|

Joined:
October 2012
Posts: 1093
Location: Yokohama, Japan | DanSavage - 2019-10-24 7:44 AM
Houston, we've got a problem...
WOW Dan! Just inspiring work there, backwards and all! What kind of adhesives are you planning on using to secure the shell into the rosette? |
|
| |
|

Joined:
June 2012
Posts: 2340
Location: Pueblo West, CO | arumako - 2019-10-24 5:41 PM
WOW Dan! Just inspiring work there, backwards and all! What kind of adhesives are you planning on using to secure the shell into the rosette?
Hysol 0151. I want a long working time. |
|
| |
|

Joined:
June 2012
Posts: 2340
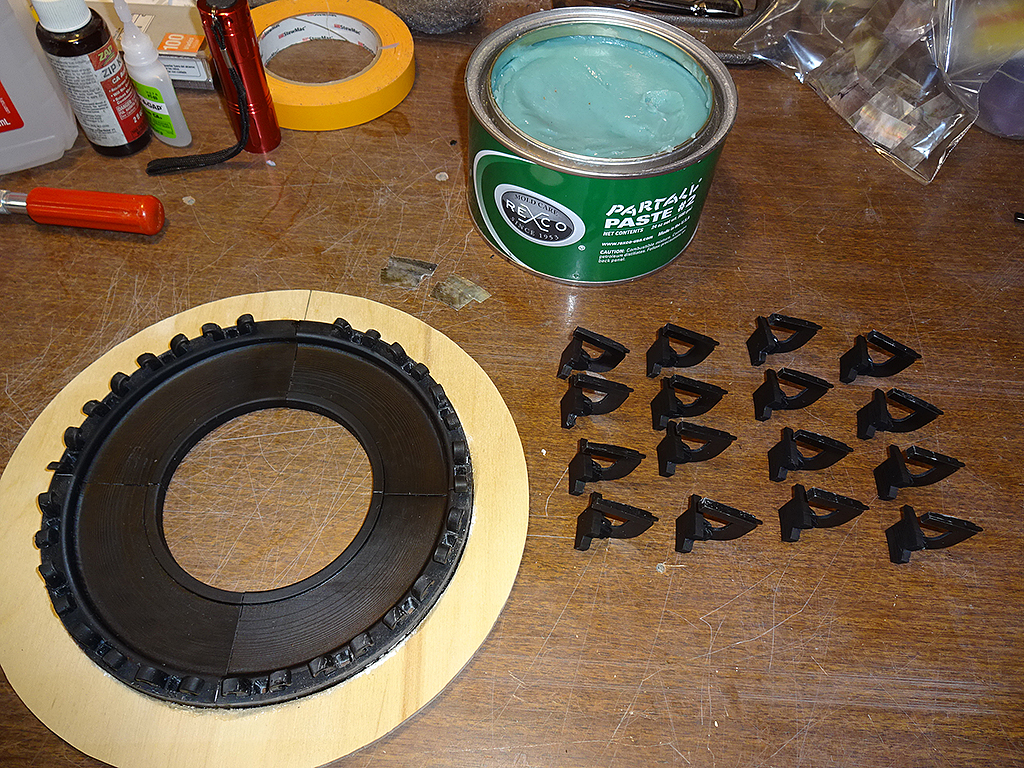
Location: Pueblo West, CO | I finished printing the replacement feet. Here's the general idea of how it should work. 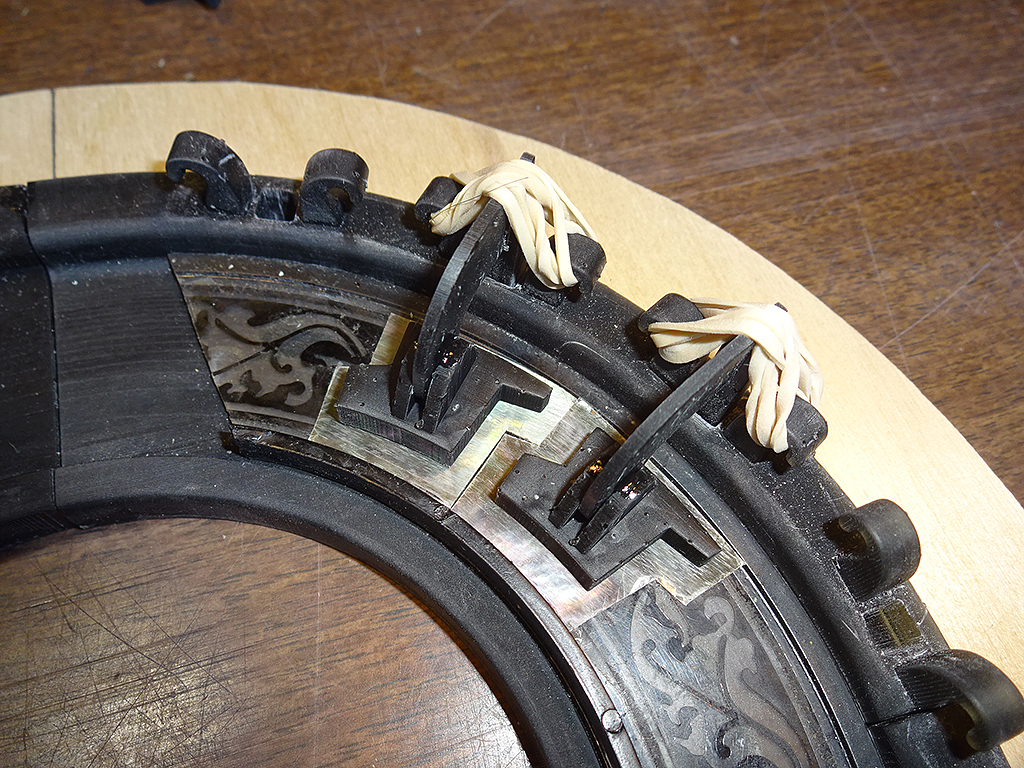
Since I'm working with epoxy, I thought it might be a good idea to apply a generous coat of parting wax to the base and to the feet. I'll let these parts harden overnight, then glue the two pieces above.
|
|
| |
|
Joined:
May 2008
Posts: 1564
Location: Indiana | Sorry if I missed it... you must have acquired your own printer to turn these parts around so quickly. What 3D design program are you using?
This is pure art.
Carry on. |
|
| |
|

Joined:
June 2012
Posts: 2340
Location: Pueblo West, CO | Hi Jonmark,
Yes. A while ago I bought an AnyCubic Photon DLP resin printer.
I bought this printer specifically so I could prototype parts or for producing one-off parts, such as this rosette caul. This was the printer I used when developing my compensated saddle for the OCP-1K pick-up.
I like Shapeways, but it takes too long for prototyping.
I'm using Rhino 3D V.4
Thanks!
Dan
Jonmark Stone - 2019-10-26 2:44 PM
Sorry if I missed it... you must have acquired your own printer to turn these parts around so quickly. What 3D design program are you using?
This is pure art.
Carry on.
|
|
| |
|

Joined:
June 2012
Posts: 2340
Location: Pueblo West, CO | I got the first two test pieces glued. All in all I'm happy with the results. One of the pieces got a tiny little air bubble. I figure that happened because I was too stingy with the glue.
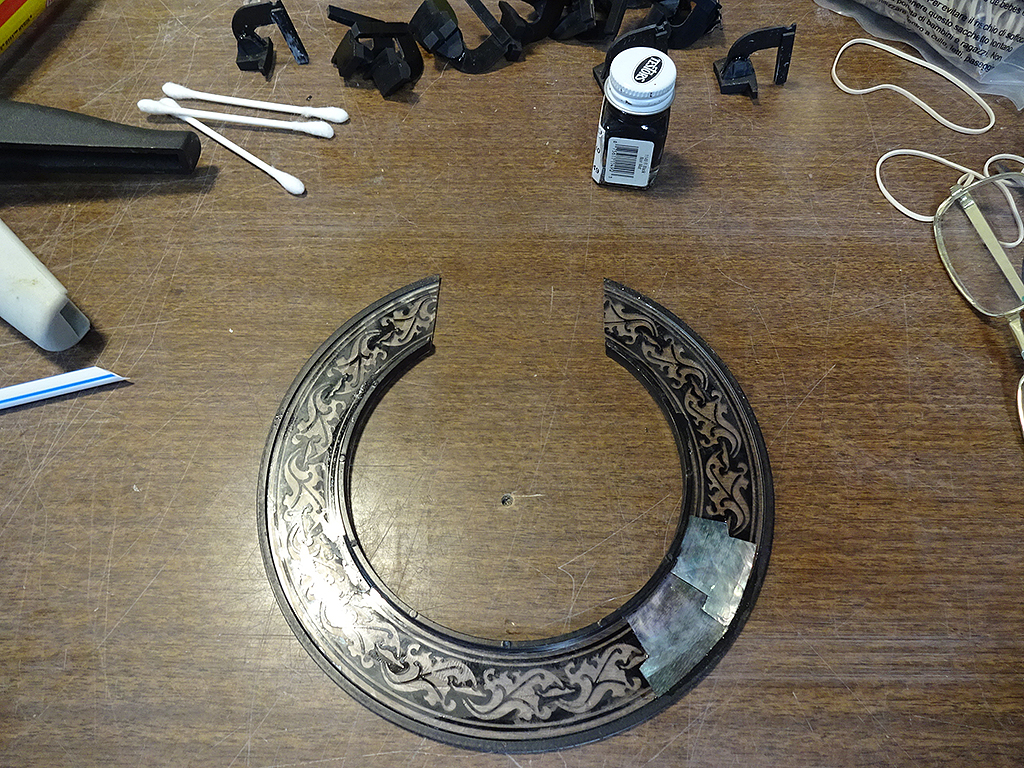
To add depth and kick up the color on any shell, it's best to paint the back with black. I did this using Testor's flat black. The paint wasn't quite dry when I took this pic. 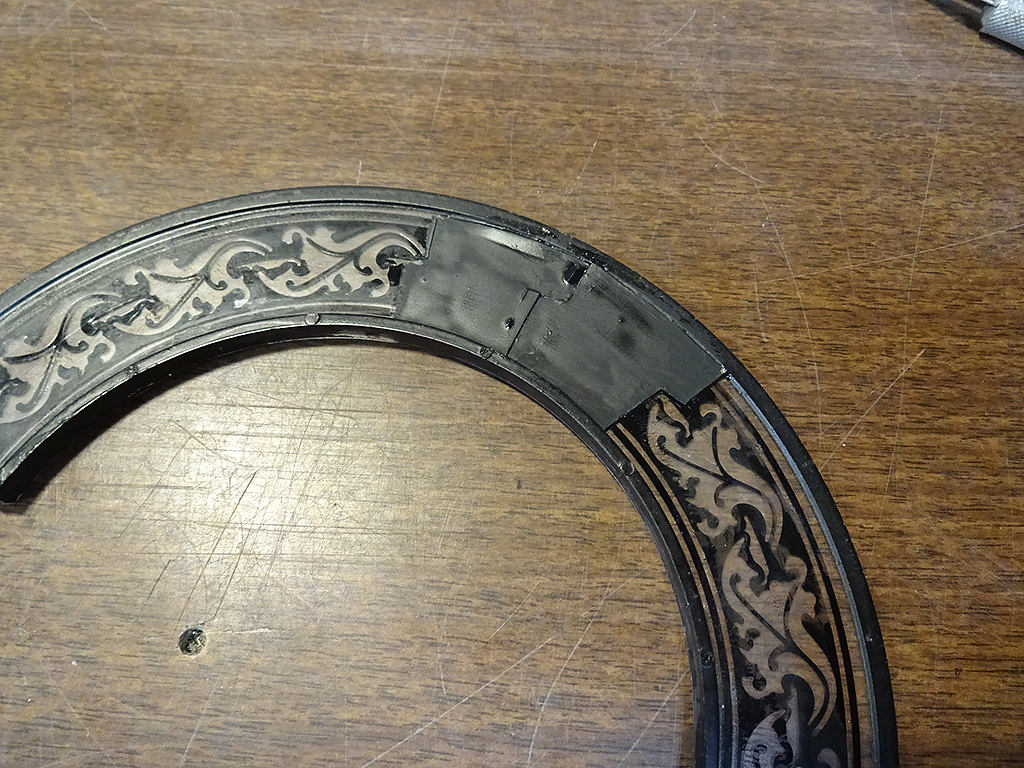
There was a little bleed-through of the paint under the seam of the shell that had the air bubble, which is another indication of glue starvation.
A good trick to prevent bleeding is to use the base color, clear, in this case, over the joint before painting the backing color. I'll use that on the next test.
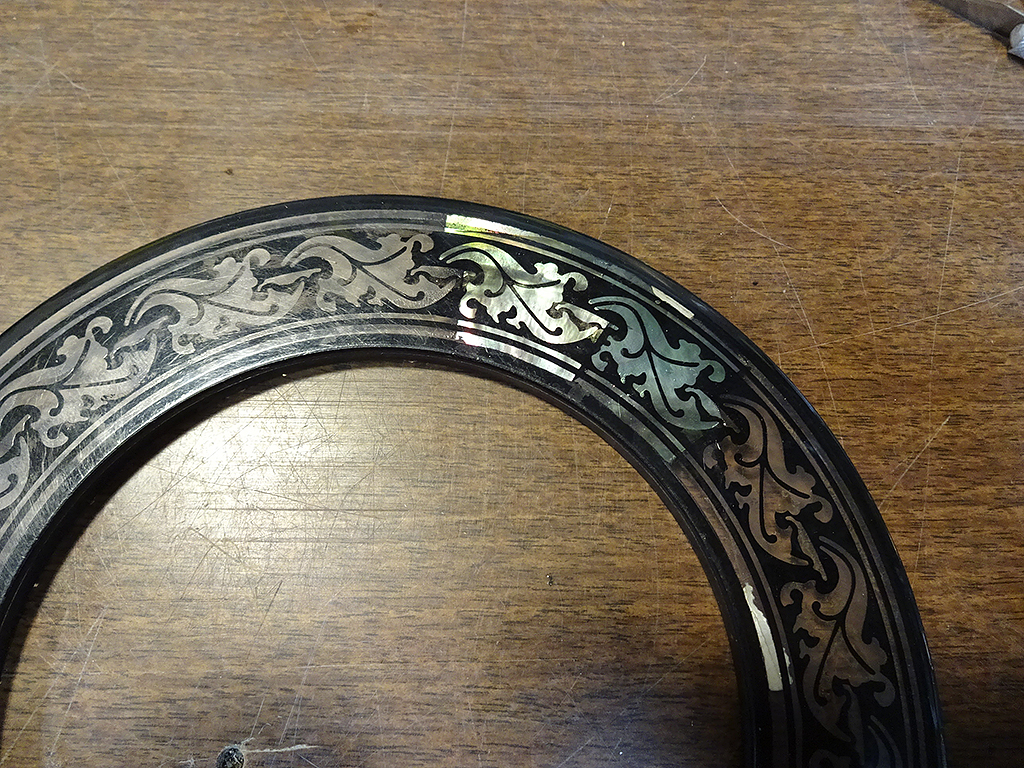
|
|
| |
|

Joined:
February 2016
Posts: 1881
Location: When?? | I've never worked with this stuff, so I am curious to know how much effect the backing paint contributes to the display side? What would the display colors be like if the backing paint was white? Would it cause a brighter look? Or what about gold, or another color? Does the backing color show through very much as its actual color? |
|
| |
|
Joined:
May 2011
Posts: 82
Location: Ozark, Arkansa | Cool! Back to the mad scientist lab... |
|
| |
|
Joined:
December 2016
Posts: 128
| Looks like the gluing jig will work great. Is this the final rosette, or a test piece?
Edited by DarenSavage 2019-10-27 3:52 PM
|
|
| |
|

Joined:
June 2012
Posts: 2340
Location: Pueblo West, CO | DarenSavage - 2019-10-27 1:51 PM
Looks like the gluing jig will work great. Is this the final rosette, or a test piece?
Yes, it is working great. There is no way I'd be able to do this type of precision gluing without it.
This is the test piece, and I'm learning a lot from it.
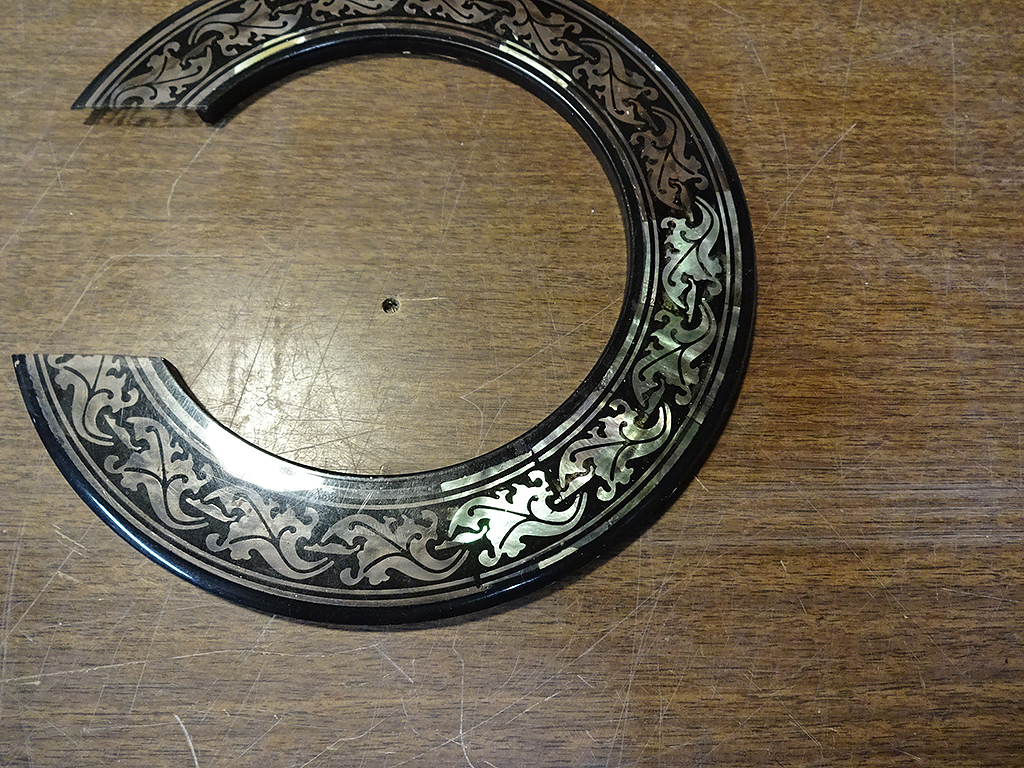
I glued another pair of shell to the casing today. I wanted to test sealing the joints with clear before the black.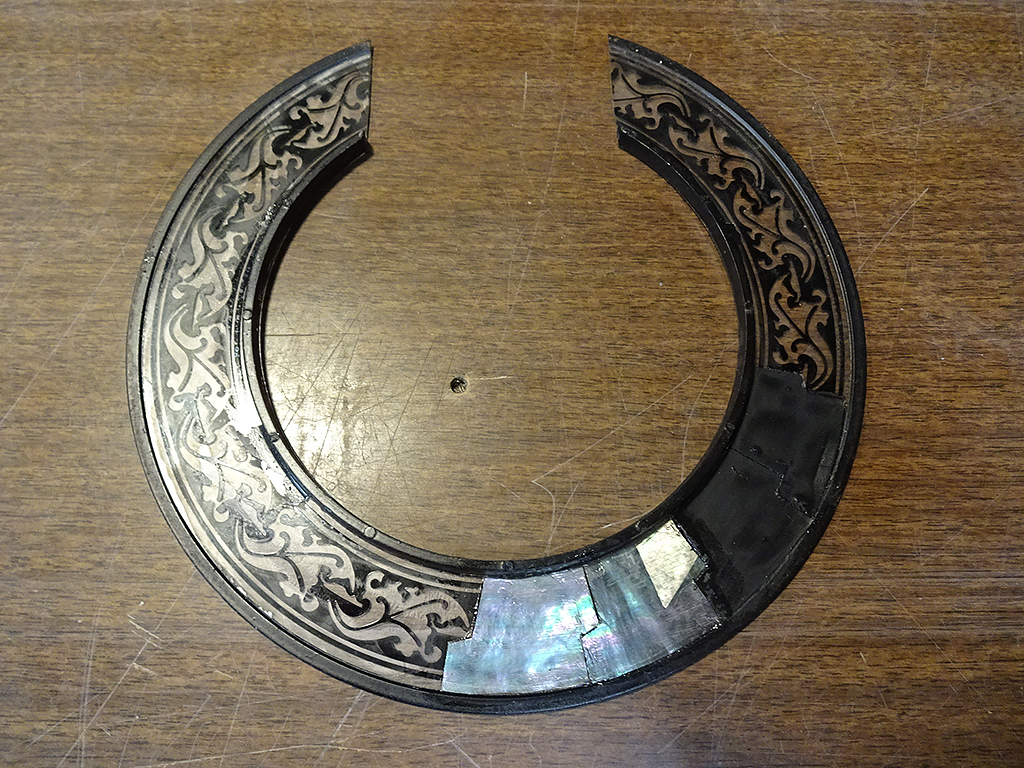
Here's what it looks like after the clear and black backing coat. The joint ends up being much cleaner.
|
|
| |
|
Joined:
December 2016
Posts: 128
| That is a lot cleaner. When you glue the final rosette, are you going to glue all of the pieces at the same time to eliminate possible glue fillets which might cause gaps between the pieces? |
|
| |
|

Joined:
June 2012
Posts: 2340
Location: Pueblo West, CO | DarenSavage - 2019-10-27 8:04 PM
That is a lot cleaner. When you glue the final rosette, are you going to glue all of the pieces at the same time to eliminate possible glue fillets which might cause gaps between the pieces?
Yes. As you say to get the best possible fit between all the pieces. |
|
| |
|

Joined:
June 2012
Posts: 2340
Location: Pueblo West, CO | Love O Fair - 2019-10-26 4:57 PM
I've never worked with this stuff, so I am curious to know how much effect the backing paint contributes to the display side? What would the display colors be like if the backing paint was white? Would it cause a brighter look? Or what about gold, or another color? Does the backing color show through very much as its actual color?
The shell pieces are pretty translucent. Here's a shot of the two pieces I glued yesterday. This is before I painted the background black.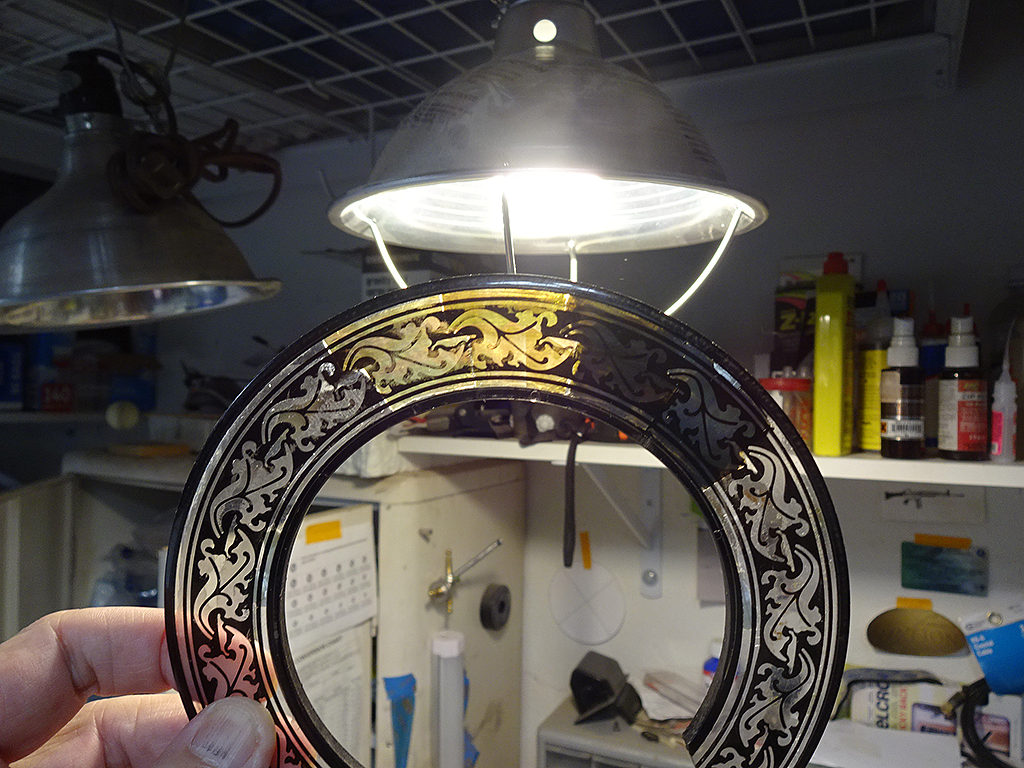
Yes, the backing color will affect the final look of the shell. Most of the time, black is used to increase the depth of the shell.
|
|
| |
|

Joined:
June 2012
Posts: 2340
Location: Pueblo West, CO | The rosette pieces have been finalized and are being glued into place.
We'll see tomorrow what it looks like. 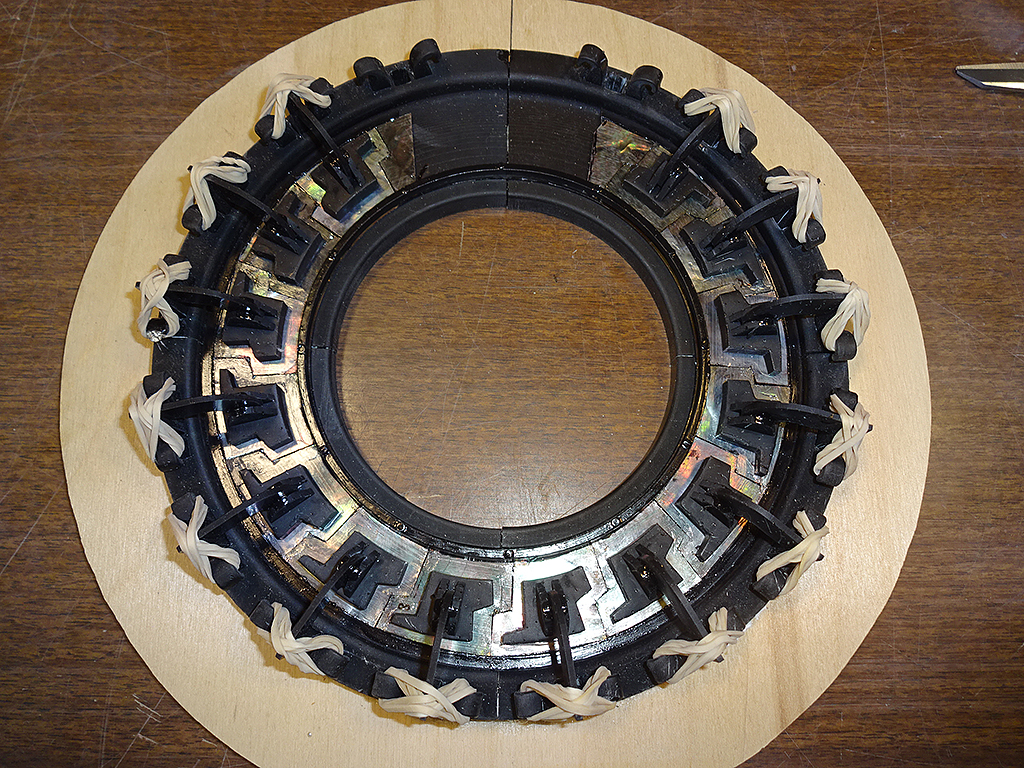
|
|
| |
|
Joined:
December 2016
Posts: 128
| Cooleo! I can't wait to see it. What a great rosette tool! |
|
| |
|

Joined:
February 2016
Posts: 1881
Location: When?? | Waiting for the angels to sing when you flip that baby over.. and sing they will, I'm sure. |
|
| |
|

Joined:
October 2012
Posts: 1093
Location: Yokohama, Japan | SWEET! |
|
| |
|

Joined:
June 2012
Posts: 2340
Location: Pueblo West, CO | DarenSavage - 2019-10-30 7:49 PM
Cooleo! I can't wait to see it. What a great rosette tool!
The garage was warm which caused the epoxy to cure fast enough for me to pop the rosette out of the caul.
I trimmed the excess shell and put it into place on the guitar for a quick peek.I'll let the epoxy finish curing overnight, then tomorrow I'll seal the joints with clear and apply the black.
While that's drying I might as well install all the hardware. :D
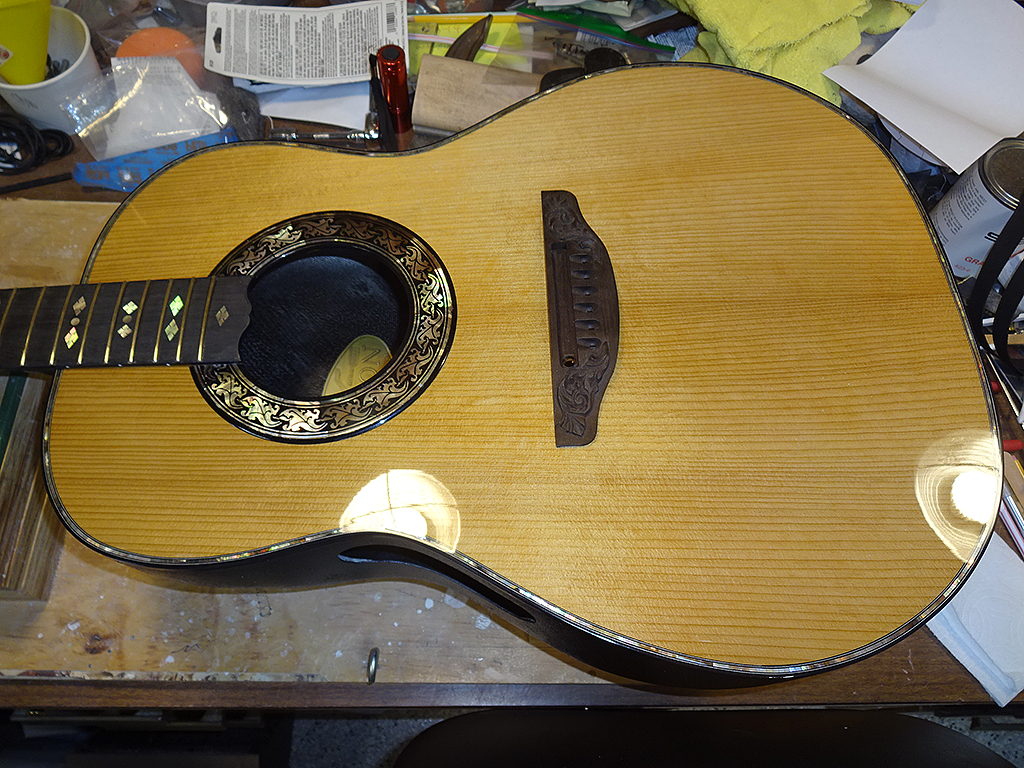 Yes, this caul works really well for both cutting/fitting the shell pieces and later for gluing them to the rosette casing. As you probably recall one of the problems we had cutting out the shell pieces was not disturbing the relationship between the shells we'd cut before. Being able to clamp each piece as you go makes the joints more precise. When it came time to glue, it was really nice to be able to manuever the new piece into place and not have to worrry about disturbing the previous pieces. I'm really glad I spent the time and effort to make this tool. I can't imagine how I'd have done this without it.
Edited by DanSavage 2019-10-31 1:06 AM
|
|
| |
|

Joined:
September 2006
Posts: 10777
Location: Keepin' It Weird in Portland, OR | That's just beautiful, man.
|
|
| |
|

Joined:
October 2012
Posts: 1093
Location: Yokohama, Japan | Old Man Arthur - 2019-10-30 6:18 PM
That's just beautiful, man.
+1 |
|
| |
|
Joined:
September 2005
Posts: 138
Location: Birmingham, AL | Yes it is. |
|
| |
|
Joined:
May 2008
Posts: 1564
Location: Indiana | Beautiful work, Dan. |
|
| |
|
Joined:
March 2002
Posts: 15679
Location: SoCal | Wow! Can't wait to see and play it...... |
|
| |
|

Joined:
February 2016
Posts: 1881
Location: When?? | Fitting for it to be coming together on Halloween week since the color and shade combo has such a mysterious, dark and haunting look. Just beautiful, Dan! |
|
| |
|
Joined:
December 2016
Posts: 128
| moody, p.i. - 2019-10-31 10:08 AM
Wow! Can't wait to see and play it......
Me too! |
|
| |
|
Joined:
December 2016
Posts: 128
| DanSavage - 2019-10-31 12:55 AM
Yes, this caul works really well for both cutting/fitting the shell pieces and later for gluing them to the rosette casing. As you probably recall one of the problems we had cutting out the shell pieces was not disturbing the relationship between the shells we'd cut before. Being able to clamp each piece as you go makes the joints more precise. When it came time to glue, it was really nice to be able to maneuver the new piece into place and not have to worry about disturbing the previous pieces. I'm really glad I spent the time and effort to make this tool. I can't imagine how I'd have done this without it.
Yes, and I remember the results. 
Are you able to fine tune the shell pieces' placement while they're clamped?
|
|
| |
|

Joined:
June 2012
Posts: 2340
Location: Pueblo West, CO | DarenSavage - 2019-10-31 6:51 PM
moody, p.i. - 2019-10-31 10:08 AM
Wow! Can't wait to see and play it......
Me too!
Me, three! |
|
| |
|

Joined:
June 2012
Posts: 2340
Location: Pueblo West, CO | DarenSavage - 2019-10-31 7:05 PM
Yes, and I remember the results. 
Are you able to fine tune the shell pieces' placement while they're clamped?
Yes. As long as I don't wrap the rubber bands too tightly around the hooks, I'm able to slide the shell around for a good fit. |
|
| |
|
Joined:
May 2011
Posts: 82
Location: Ozark, Arkansa | Wow! Really eye popping work. I have been busy every weekend, so little to no progress on my project. This one will be just like the rest I fear.
|
|
| |
|

Joined:
June 2012
Posts: 2340
Location: Pueblo West, CO | All done. I'll let the pics speak for themselves. 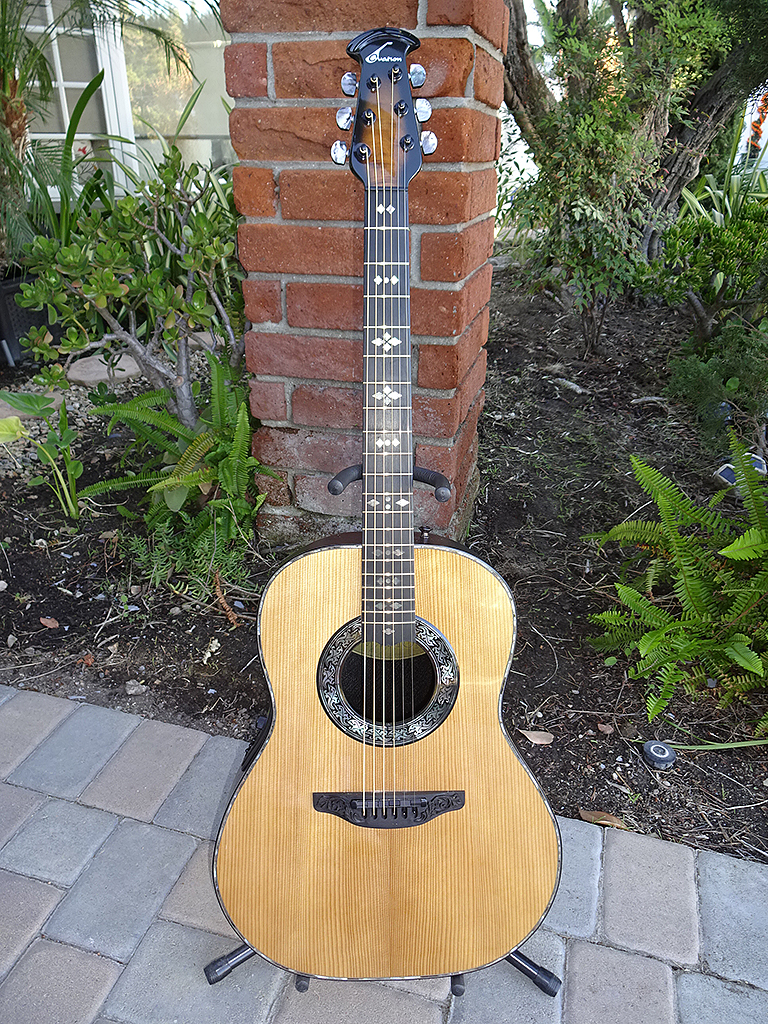
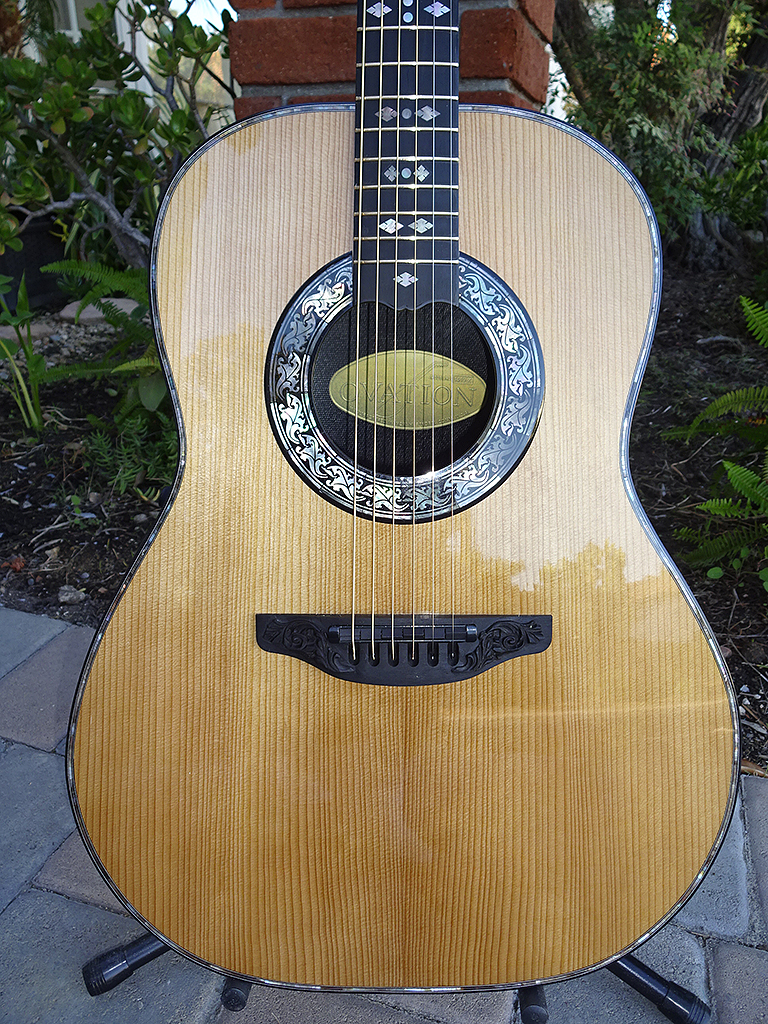
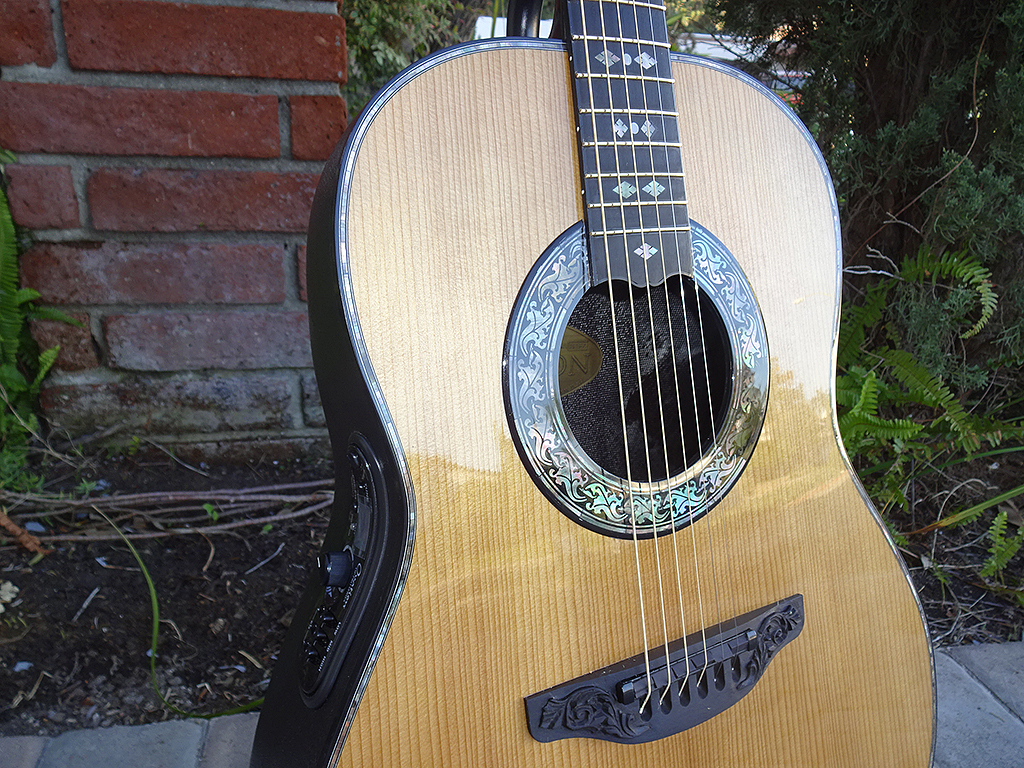
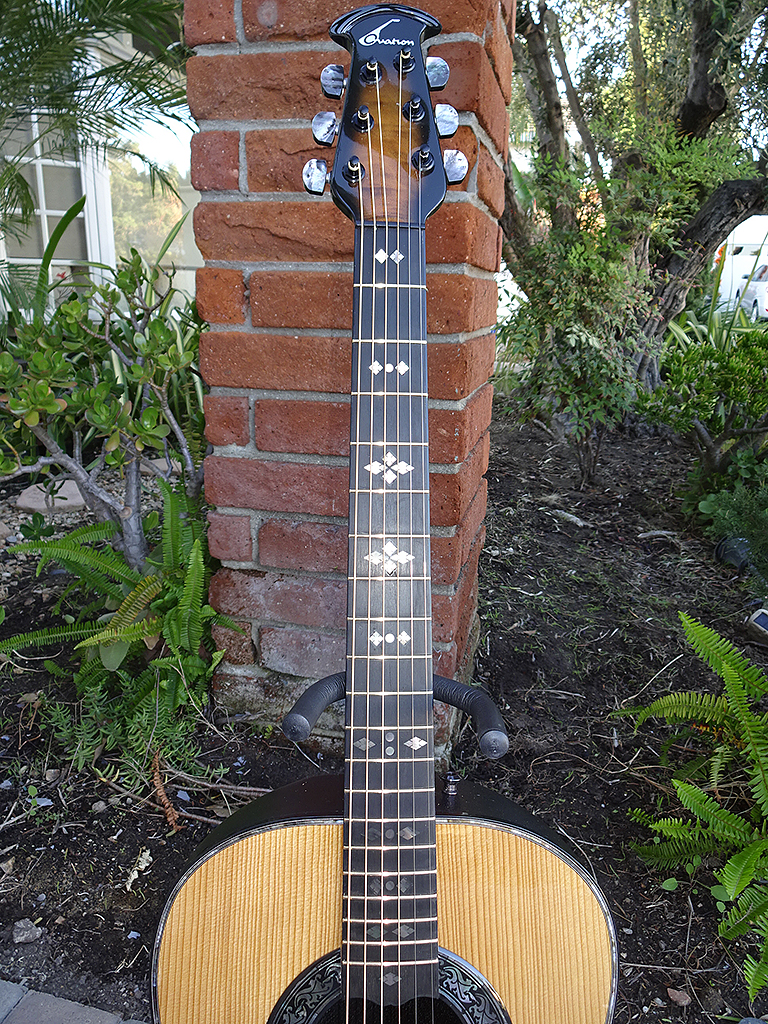
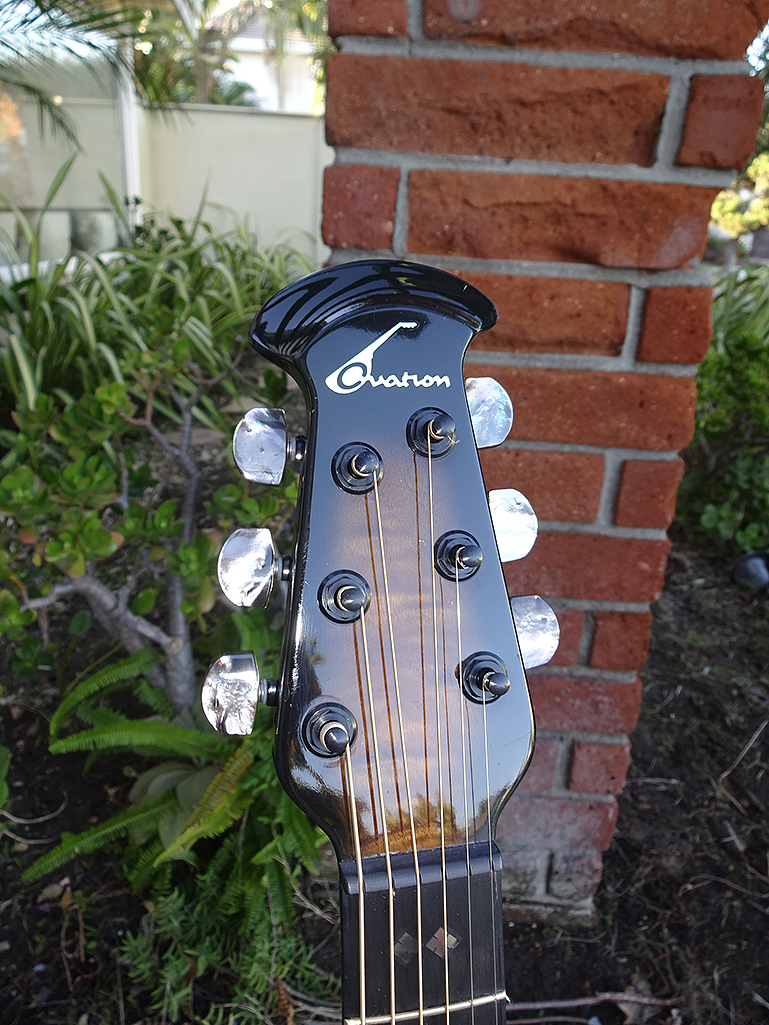
|
|
| |
|

Joined:
June 2012
Posts: 2340
Location: Pueblo West, CO | So...
How does it sound? Deeply resonant bass, vibrant mid-range and sparkling highs.
In a lot of ways it reminds me of Darth Ovation. |
|
| |
|

Joined:
February 2014
Posts: 715
Location: moline,illinois | Dan let me be the first to say...The Black Pearl is Stunning!!!!!!!!!
Beautiful job as we all knew you would do a definite work of musical art 
|
|
| |
|

Joined:
October 2012
Posts: 1093
Location: Yokohama, Japan | And may I be the 2nd to say, "The Black Pearl is Stunning!!!!!" By the way, the color of the top looks lighter than your previous torrefied tops. Is that just me? Like, maybe the darker binding, headstock, and rosette are making the color of the top standout with a lighter look? Really beautiful! |
|
| |
|

Joined:
August 2007
Posts: 1008
Location: Tuscany, Italy | Dan......beautiful guitar !! ...... stunning artwork ........ I want one  |
|
| |
|
Joined:
March 2005
Posts: 12761
Location: Boise, Idaho | Wow! Beautiful! |
|
| |
|

Joined:
May 2011
Posts: 760
Location: Muenster/Germany | This guitar looks unbelievable.
Some people may use efforts like this for building an aircraft carrier...
When I look at your projects I feel like having 5 left thumbs on each hand. |
|
| |
|

Joined:
June 2012
Posts: 2340
Location: Pueblo West, CO | Thanks for the kind words, everyone.
Ken,
WRT the color of the top, you're right. It is a little lighter than the torrefied Englemann I used on the Parlor and the torrefied Sitka I used on the Frankenvation. |
|
| |
|
Joined:
March 2005
Posts: 5567
Location: Blue Ridge Mountains | Dan, in the nearly 14 years as a member of this group, I've seen some pretty amazing things and some incredible guitars. That said, your Black Pearl build is IMHO the finest I have seen. CONGRATULATIONS! Thanks for showing us the step by step creation of this outstanding example of custom Ovation art: Charlie would be very proud! |
|
| |
|

Joined:
January 2009
Posts: 1249
Location: Texas | Tremendous work Dan. So impressive. You should be extremely proud...Hey...what about a rear shot (of the guitar)? |
|
| |
|

Joined:
June 2012
Posts: 2340
Location: Pueblo West, CO | Thanks, Mike & Jay.
I'll post a rear photo a little later today. |
|
| |
|

Joined:
June 2012
Posts: 2340
Location: Pueblo West, CO | There's a free OCP-1K saddle for the first one to point out the obvious mistake seen in this photo.
Not a flaw in workmanship or imperfection in material. An actual mistake I made in both planning and execution. It might help to view the actual image instead of the reduced size shown in this web page.

Edited by DanSavage 2019-11-02 3:00 PM
|
|
| |
|

Joined:
February 2014
Posts: 715
Location: moline,illinois | Dan are you talking about the side marker dot between the nut and first fret??
I thought that was just to make it easier to count to the 3rd fret LOL |
|
| |
|

Joined:
June 2012
Posts: 2340
Location: Pueblo West, CO | 2wheeldrummer - 2019-11-02 2:41 PM
Dan are you talking about the side marker dot between the nut and first fret??
I thought that was just to make it easier to count to the 3rd fret LOL
Bingo and DOH! |
|
| |
|

Joined:
February 2014
Posts: 715
Location: moline,illinois | DanSavage - 2019-11-02 5:51 PM
2wheeldrummer - 2019-11-02 2:41 PM
Dan are you talking about the side marker dot between the nut and first fret??
I thought that was just to make it easier to count to the 3rd fret LOL
Bingo and DOH!
Dan I don't think anyone would have noticed if you hadn't brought it up 
If someone asks tell them it adds symmetry to side markers 
She's a beauty no matter what and this adds a unique mistake that adds to the originality of the creation
Now we want sound clips so we can hear the voice that goes with the image in our heads .
|
|
| |
|

Joined:
February 2016
Posts: 1881
Location: When?? | A MASTERFUL piece, Dan. IMO, it's the zenith of your work to date, and I'm proud to say I know the guy who did that. For the first three seconds the eye bounces between the natural top and the burst headstock, and by the fourth second the visual becomes akin to how the caramel mixes into that little melted ring of ice cream on the edge of a sundae you can't wait to dive into. But something that we don't get to see actually take place in static photos is how that same visual must also continue to mix with illumination on the inlays and rosette as it dances around in random reflection when the guitar is moving while being played. Much more than standard ones I'm' guessing. These photos are guitar porn at its finest.. and for those who actually get to meet the actress.. well... you know. |
|
| |
|
Joined:
December 2016
Posts: 128
| DanSavage - 2019-11-01 11:19 PM
All done. I'll let the pics speak for themselves. 
Bra. This is a seriously cool guitar. I love how the black binding showcases the top. Bravissimo! |
|
| |
|
Joined:
December 2003
Posts: 855
Location: Canada | Wow it looks stunning. Love the red spruce top. |
|
| |
|
Joined:
September 2005
Posts: 138
Location: Birmingham, AL | Just freakin' awesome! |
|
| |
|

Joined:
September 2012
Posts: 815
Location: Thredbo, NSW, Australia | DanSavage - 2019-11-01 11:19 PM
All done. I'll let the pics speak for themselves. 
Another brilliant job Dan. Just stunning! |
|
| |
|
Joined:
May 2011
Posts: 82
Location: Ozark, Arkansa | Has anyone used the word stunning? Drop dead gorgeous. Even wow doesn't do it justice. Your work inspires me to be diligent in my own rebuilding efforts, even though it won't look quite that spectacular.
Edited by Oldvation Guy 2019-11-03 6:28 AM
|
|
| |
|

Joined:
January 2009
Posts: 1249
Location: Texas | Dan...can you tell if the grain makes a significant difference acoustically compared to...say...485? I have read...it makes a difference, it doesn't make a difference, it is the sum of the parts...etc etc etc. Your top is visually stunning in its definition of its grain. Again, congrats.
Edited by jay 2019-11-03 8:45 AM
|
|
| |
|

Joined:
June 2012
Posts: 2340
Location: Pueblo West, CO | 2wheeldrummer - 2019-11-02 4:17 PM
Dan I don't think anyone would have noticed if you hadn't brought it up 
If someone asks tell them it adds symmetry to side markers 
She's a beauty no matter what and this adds a unique mistake that adds to the originality of the creation
Now we want sound clips so we can hear the voice that goes with the image in our heads .
I didn't even notice it until I looked at one of my other guitars.
I'll see what I can do about a clip. |
|
| |
|

Joined:
June 2012
Posts: 2340
Location: Pueblo West, CO | Love O Fair - 2019-11-02 5:06 PM
A MASTERFUL piece, Dan. IMO, it's the zenith of your work to date, and I'm proud to say I know the guy who did that. For the first three seconds the eye bounces between the natural top and the burst headstock, and by the fourth second the visual becomes akin to how the caramel mixes into that little melted ring of ice cream on the edge of a sundae you can't wait to dive into. But something that we don't get to see actually take place in static photos is how that same visual must also continue to mix with illumination on the inlays and rosette as it dances around in random reflection when the guitar is moving while being played. Much more than standard ones I'm' guessing. These photos are guitar porn at its finest.. and for those who actually get to meet the actress.. well... you know.
Thanks, Al.
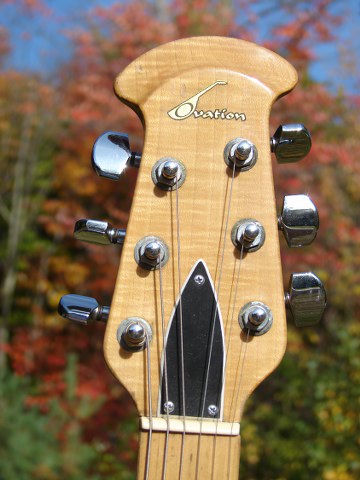
As I looked at it more I liked the idea of an all-black head stock, but I couldn't figure out a way to mask the Ovation logo. In the end, I left it as is. |
|
| |
|

Joined:
June 2012
Posts: 2340
Location: Pueblo West, CO | DarenSavage - 2019-11-02 8:09 PM
Bra. This is a seriously cool guitar. I love how the black binding showcases the top. Bravissimo!
Thanks, Daren!
It's hard to see in the pics but I polished all the binding. The shiny black binding really stands out against the textured black back.
I also polished the back of the neck, which was satin. This also really stands out against the black textured back.
I'll post some pics a little later this morning. |
|
| |
|

Joined:
June 2012
Posts: 2340
Location: Pueblo West, CO | Thanks, Jay.
I've read that the top's stiffness comes from the light grain, not the dark. Using that theory, the wider the grain, the stiffer the top.
Some luthiers actually measure stiffness by suspending the bare wood top between two supports and adding weights to the middle and then measure the deflection. Those who do this record the deflection. Then, once the guitar is finished they have a yardstick by which they can judge future top wood will sound once finished.
I just tap the wood and listen to the resonance. So far, so good. 
jay - 2019-11-03 6:40 AM
Dan...can you tell if the grain makes a significant difference acoustically compared to...say...485? I have read...it makes a difference, it doesn't make a difference, it is the sum of the parts...etc etc etc. Your top is visually stunning in its definition of its grain. Again, congrats. |
|
| |
|

Joined:
June 2012
Posts: 2340
Location: Pueblo West, CO | Here's the back shots. 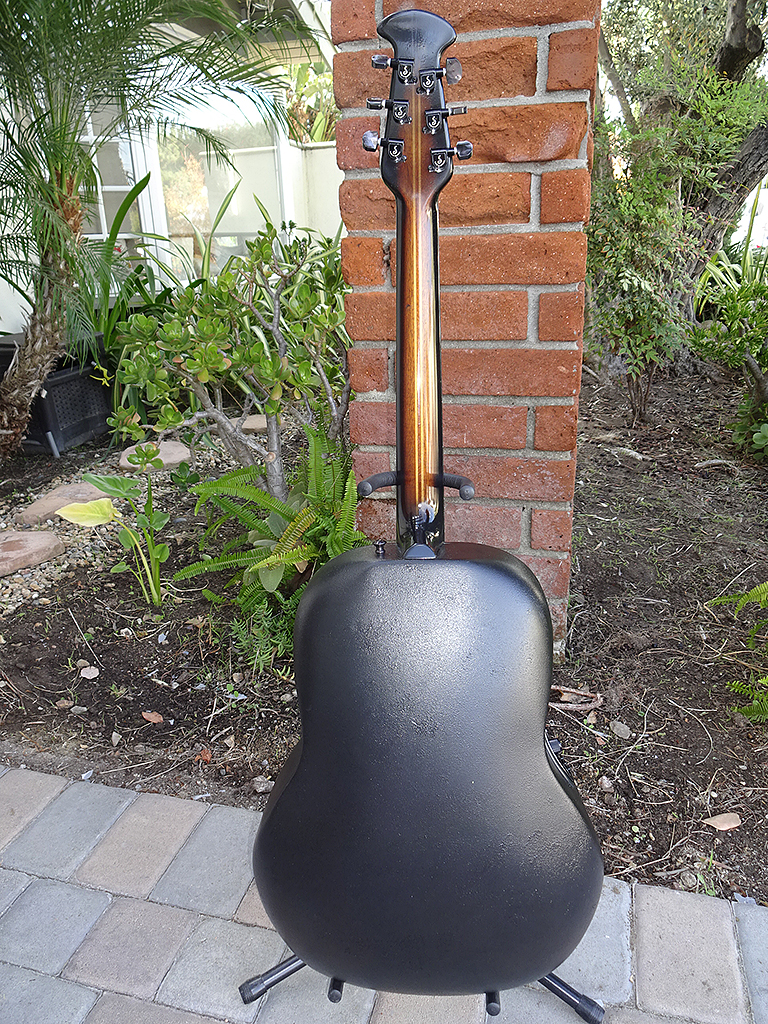
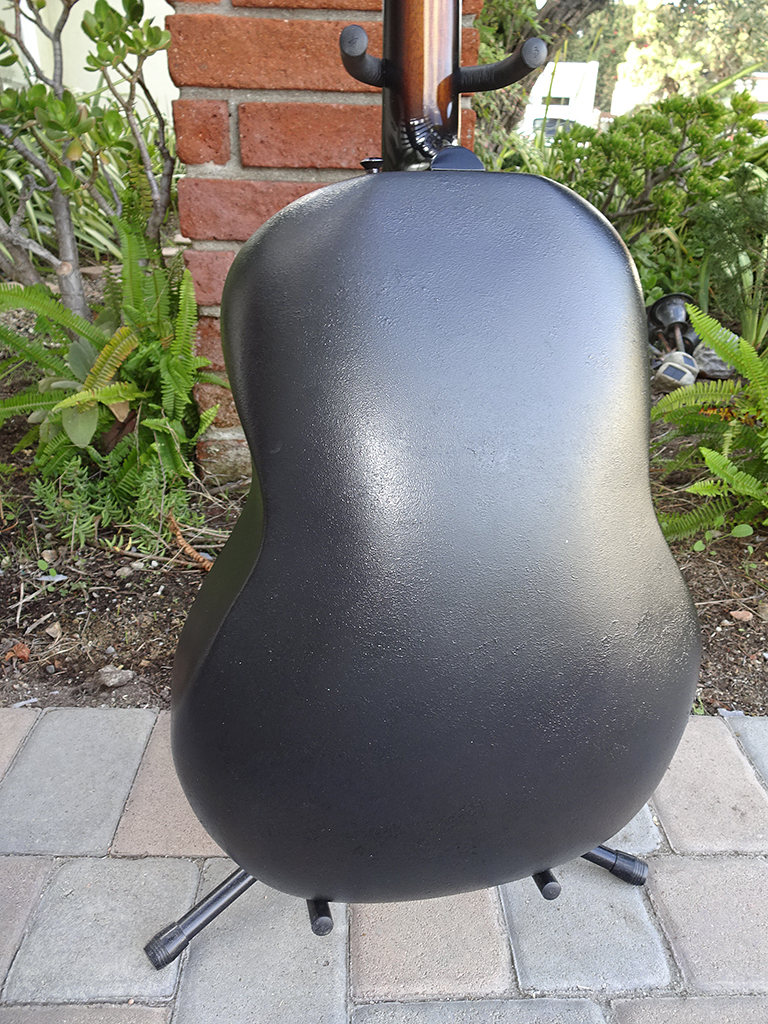
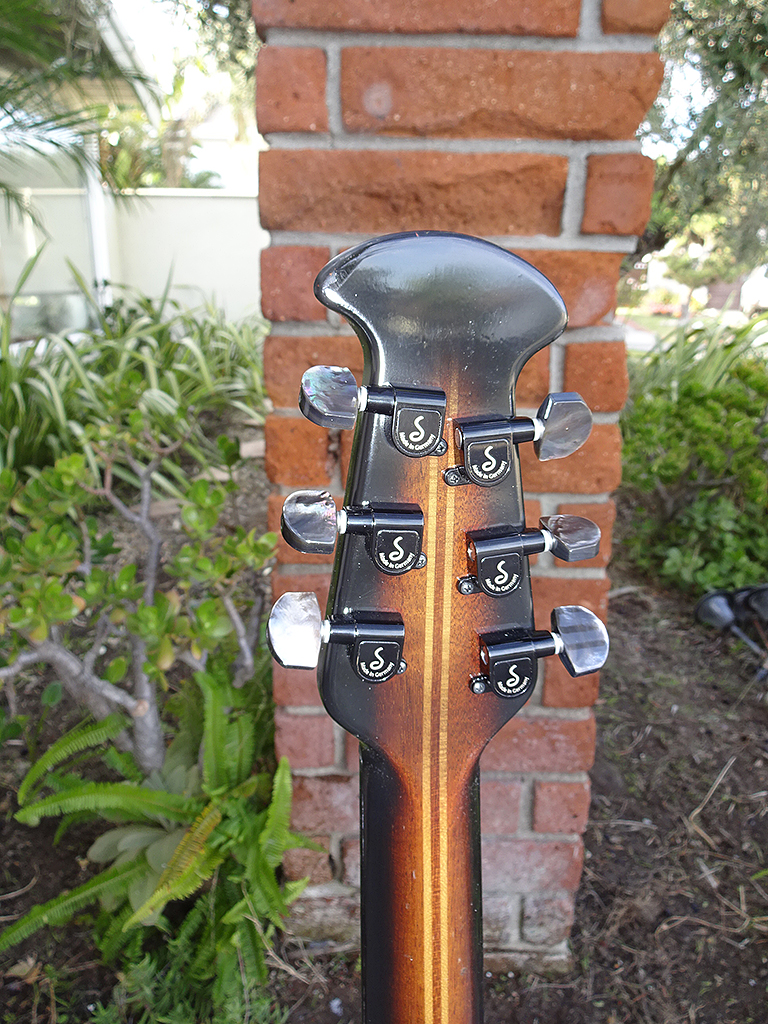
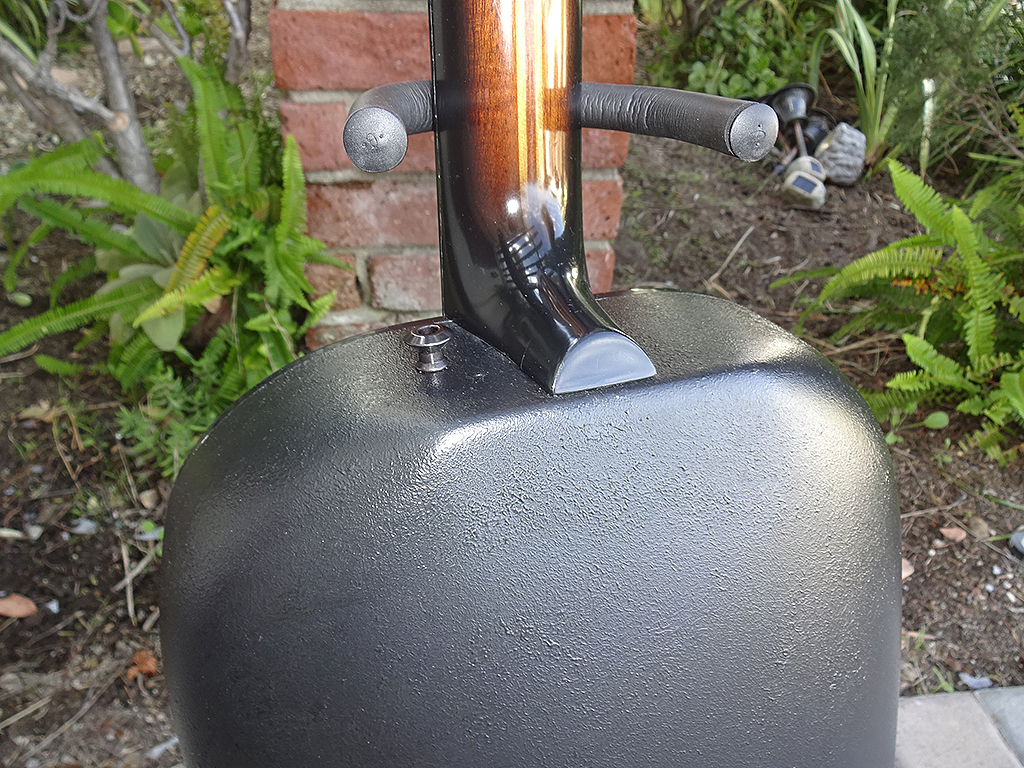
|
|
| |
|

Joined:
February 2014
Posts: 715
Location: moline,illinois | Sweet..More guitar porn..But then I think we all like a nice round bottom !!!!  |
|
| |
|

Joined:
June 2012
Posts: 2340
Location: Pueblo West, CO | 2wheeldrummer - 2019-11-03 9:51 AM Sweet..More guitar porn..But then I think we all like a nice round bottom !!!!  
|
|
| |
|

Joined:
February 2014
Posts: 715
Location: moline,illinois |    |
|
| |
|

Joined:
February 2016
Posts: 1881
Location: When?? | @Dan - >>> It's not every day you see a dog driving a car<<<
And, collecting cab fares to earn his own booty. Enterprising little mutt, I'll give him that.
Wait.. did I say "booty"?
Oh.. PS.. nice bowl on the guitar, too :-)
Edited by Love O Fair 2019-11-03 4:55 PM
|
|
| |
|

Joined:
June 2012
Posts: 2340
Location: Pueblo West, CO | Love O Fair - 2019-11-03 2:38 PM
Oh.. PS.. nice bowl on the guitar, too :-)
Thanks!
It's not done using the same technique as the factory uses, but it is a reasonable facsimile. |
|
| |
|

Joined:
February 2016
Posts: 1881
Location: When?? | @Dan - >>>It's not done using the same technique as the factory uses, but it is a reasonable facsimile.<<<
I like it. It definitely has its own character, and appears maybe a bit more slick to the pant leg than factory, and not quite as uniform in texture inch-to-inch across the surface, though I am in the dark as to exactly how you arrived at that texture/finish and materials used. |
|
| |
|
Joined:
July 2019
Posts: 109
Location: northern Georgia | A beautiful instrument, with painstaking details in construction and appearance. Now, how does it sound in comparison to the factory instruments with that type of bowl? |
|
| |
|

Joined:
June 2012
Posts: 2340
Location: Pueblo West, CO | keldon85 - 2019-11-04 8:17 AM
A beautiful instrument, with painstaking details in construction and appearance. Now, how does it sound in comparison to the factory instruments with that type of bowl?
Thanks.
There's no comparison between a normal guitar and one with a torrefied top, like this one.
It sounds like an Ovation guitar, but like it's on steroids.
It has deep, rich bass with lots of sustain, ringing mid-tones and sparkling highs.
When you dig in during strumming, it just gets louder without losing any clarity.
I'll shoot some video today and post it to youtube.
Edited by DanSavage 2019-11-04 11:18 AM
|
|
| |
|

Joined:
February 2014
Posts: 715
Location: moline,illinois | marenostrum - 2019-11-02 2:33 AM
Dan......beautiful guitar !! ...... stunning artwork ........ I want one 
+1
An Ovation on steroids that looks this beautiful your going to have people lining up for you to build one for them!!!
The more I look at the pictures the greater my appreciation for the skilled artistry behind the build.
Congrats on a magnificent instrument may she bring you joy for years to come.
|
|
| |
|

Joined:
June 2012
Posts: 2340
Location: Pueblo West, CO | Thanks, Kevin. |
|
| |
|
Joined:
May 2008
Posts: 1564
Location: Indiana | "There's no comparison between a normal guitar and one with a torrefied top, like this one. It sounds like an Ovation guitar, but like it's on steroids." Gotta agree with Dan on this. Aptly describes the difference between the parlor I sent him... and the one he sent back. The difference is more than striking.
Edited by Jonmark Stone 2019-11-04 5:03 PM
|
|
| |
|
Joined:
March 2002
Posts: 15679
Location: SoCal | Yup.... About 10 years ago Ovation built a very limited edition Legend with a torrefied Addy spruce top. Wonder what it sounded like? Anybody buy one of those? |
|
| |
|

Joined:
May 2011
Posts: 760
Location: Muenster/Germany | DanSavage - 2019-11-02 9:58 PM
There's a free OCP-1K saddle for the first one to point out the obvious mistake seen in this photo.
Not a flaw in workmanship or imperfection in material. An actual mistake I made in both planning and execution. It might help to view the actual image instead of the reduced size shown in this web page.

So with that mistake you can only throw it away. I will gladly take it . |
|
| |
|

Joined:
June 2012
Posts: 2340
Location: Pueblo West, CO | moody, p.i. - 2019-11-04 4:16 PM
Yup.... About 10 years ago Ovation built a very limited edition Legend with a torrefied Addy spruce top. Wonder what it sounded like? Anybody buy one of those?
There was the 2011 1617ALE-1, but it wasn't torrefied. Just a normal Adi top.I haven't played one, nor even held one in my hands. I'd be curious to check one out. |
|
| |
|
Joined:
December 2016
Posts: 128
| I'm in Cali for the holidays. I got to play the Black Pearl last night. What a sweet playing and sounding guitar. Bravisimo! |
|
| |
|
Joined:
March 2005
Posts: 12761
Location: Boise, Idaho | DanSavage - 2019-11-05 8:16 PM
moody, p.i. - 2019-11-04 4:16 PM
Yup.... About 10 years ago Ovation built a very limited edition Legend with a torrefied Addy spruce top. Wonder what it sounded like? Anybody buy one of those? There was the 2011 1617ALE-1, but it wasn't torrefied. Just a normal Adi top. I haven't played one, nor even held one in my hands. I'd be curious to check one out.
Come up to Boise and play mine. It needs it. I could also use your help with a bump at the 14th fret, which is my excuse for the lack of playing time. The 2011 and the 2010 are both great guitars. The 2010 hangs next to my 1537, since it bears some similarities. The 2011 hangs next to it and the 2004 Commemorative CL, maybe the best of the Legends. |
|
| |
|
Joined:
March 2002
Posts: 15679
Location: SoCal | I played the Black Pearl tonight. A rather remarkable guitar!
First, it's a striking guitar to look at and hold. The inlays are like a custom legend but a bit beyond and they are beautiful. The top is a torrified addy piece of wood. Wide grain (as addy tops tend to be) but it adds to the striking look. All that Dan has done has made a beautiful guitar. He believes that it is his piece de resistance and I tend to agree with him.
Sound wise, it's the deepest most resonant wood topped Ovation I've ever played. Even more than my Dan Savage Legend. Dan attributes that to the heavy ebony CL bridge. Could be. Mine has a rosewood 5 pointer. Whatever, it's really something to play and hear. Very dreadnaught-ish. And this is with the extra light strings that he loves! I wonder what it would sound like with lights or mediums (I would go with mediums and then take it to a bluegrass jam - the Martin players' heads would explode!).
All in all, very very impressive..... |
|
| |
|

Joined:
June 2012
Posts: 2340
Location: Pueblo West, CO | Thanks, Paul. It was good to see you again.
It's funny. When Daren and I were playing together over the holidays (him on the Black Parlor and me on the Black Pearl) we noticed that when I would play the Parlor fingerstyle, it was noticeably louder than the Pearl. But, when we played rhythm with picks, the Pearl was louder.
We attributed this to the different woods. The Parlor uses torrefied Englemann and the Pearl, torrefied Adi. Since Englemann isn't as stiff as Adi, this makes perfect sense.
Mostly, what we noticed was how good the two guitars sounded when played together. They really compliment each other. |
|
| |
|

Joined:
February 2014
Posts: 715
Location: moline,illinois | DanSavage - 2020-01-24 12:38 PM
Mostly, what we noticed was how good the two guitars sounded when played together. They really compliment each other.
Great to hear a review of what we all knew would be a spectacular guitar!!!!
So are we still going to get the long awaited sound clips so we can drool on our computer screens to angelic voice of the "Black Pearl" 
|
|
| |
 The Black Pearl...
 The Black Pearl...