Since the Frankenvation is done, I'm moving onto my next project.
Patch approached me about using some components he has to build a custom Ovation Parlor guitar.
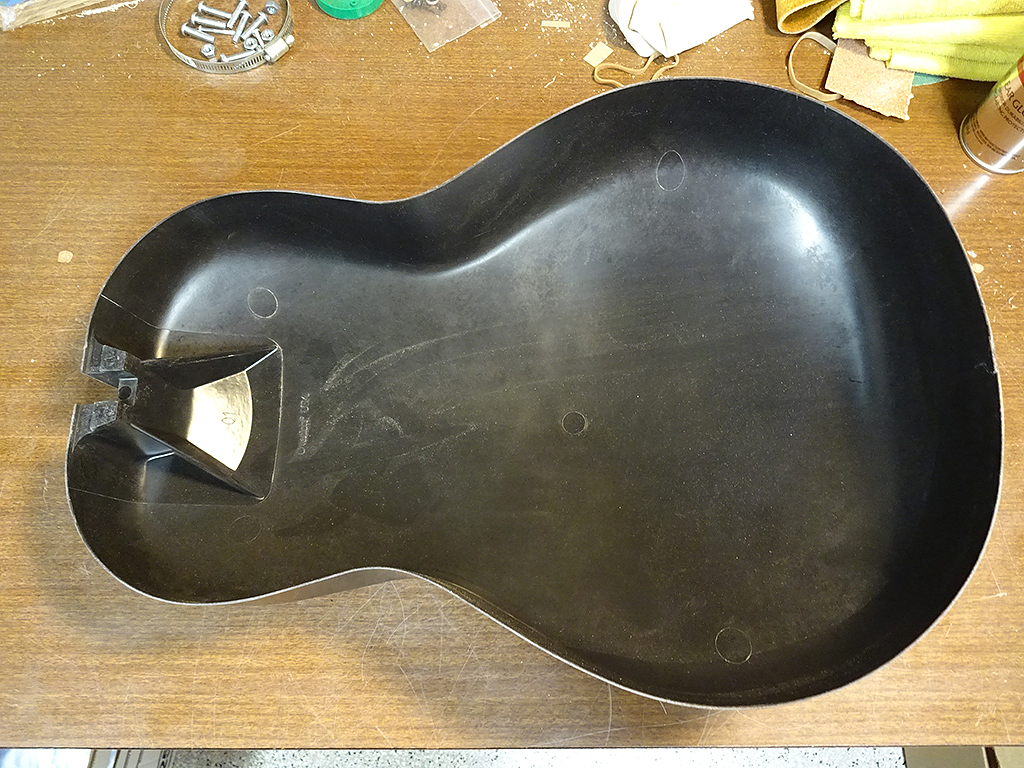
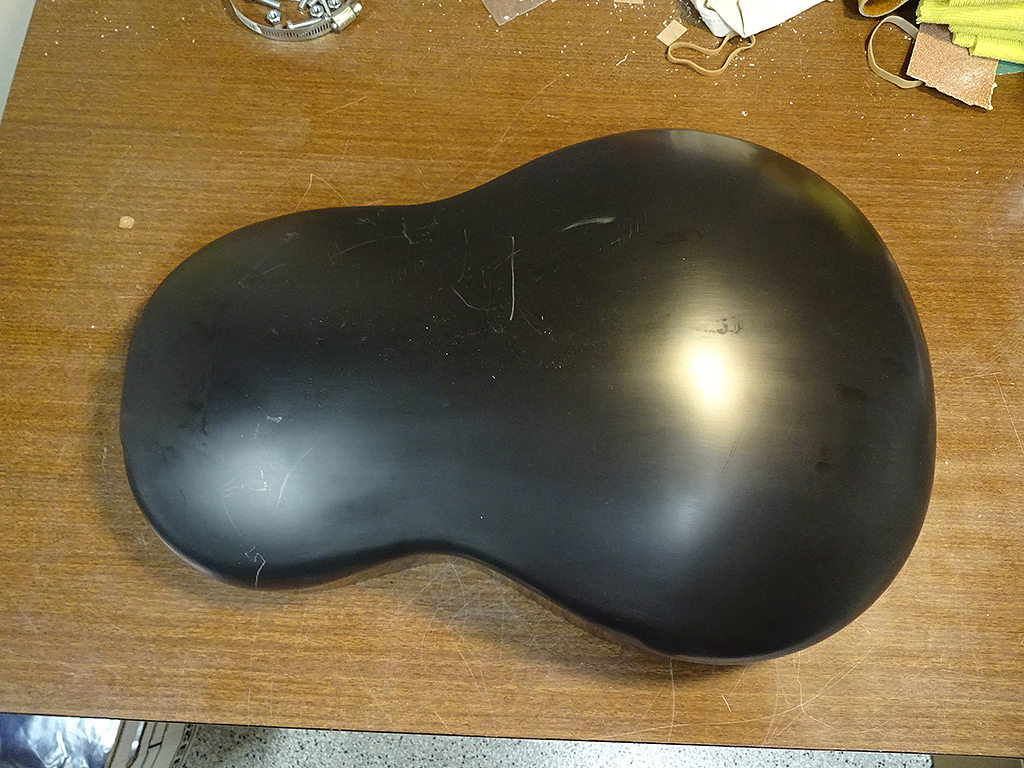
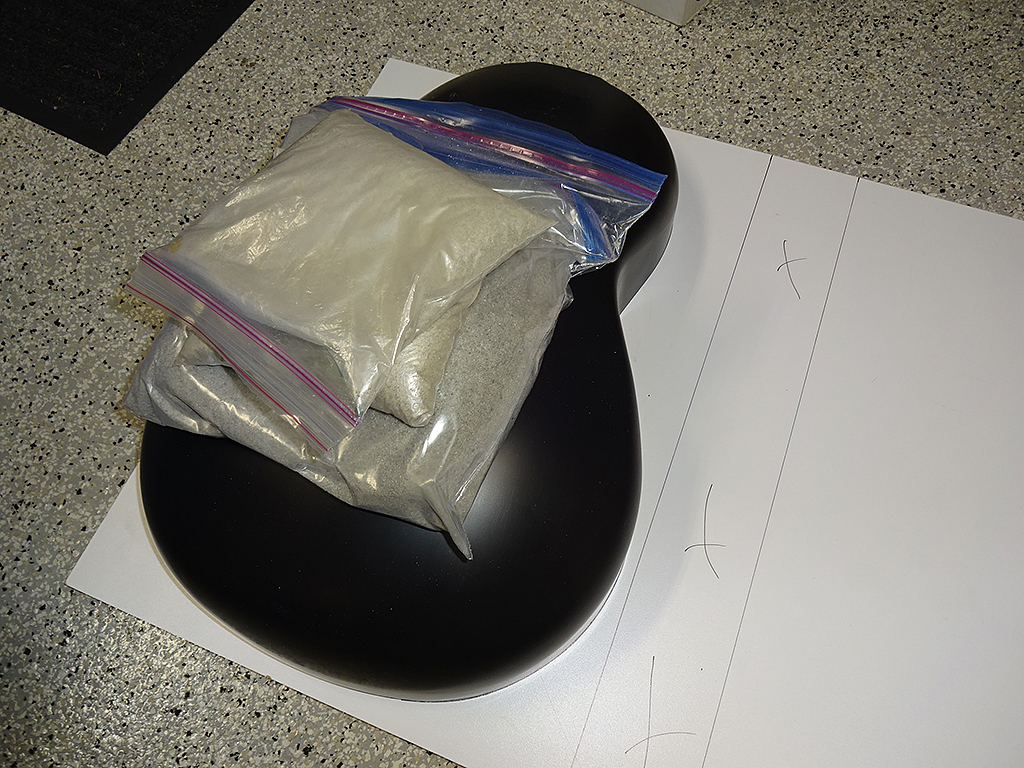
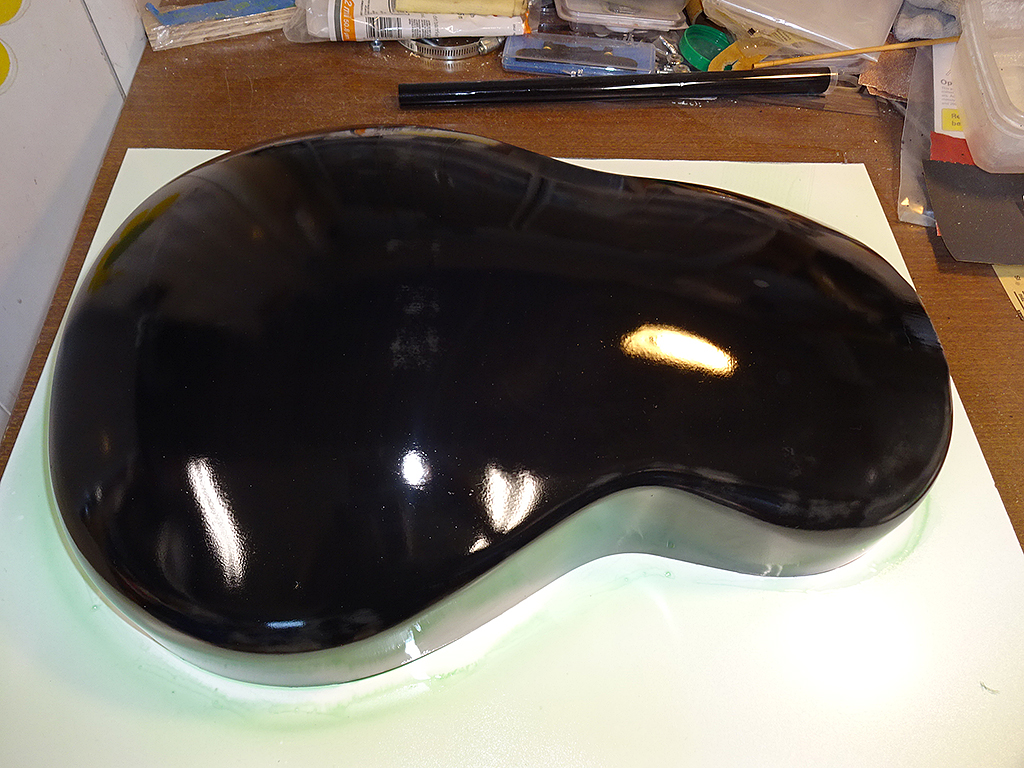
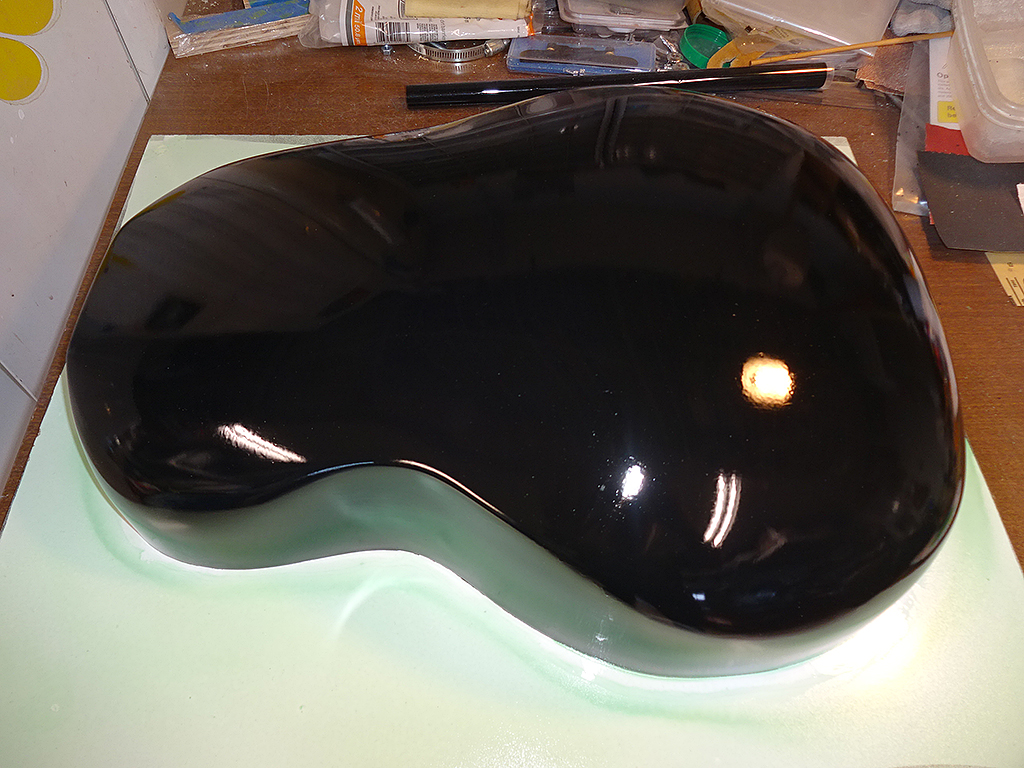
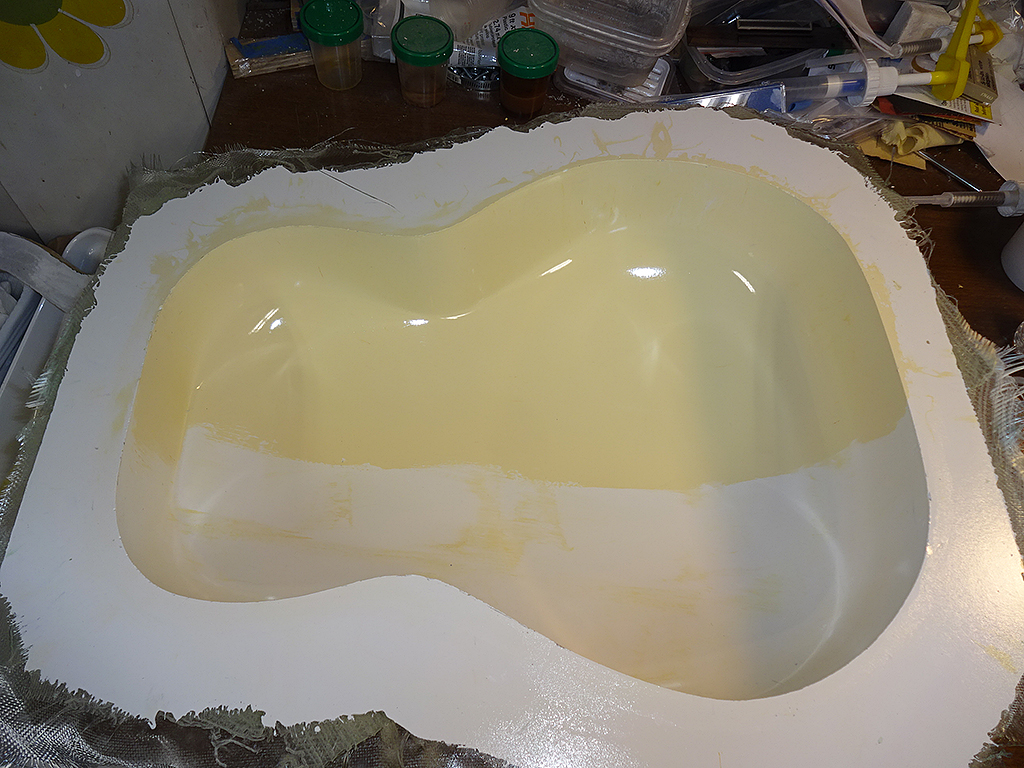
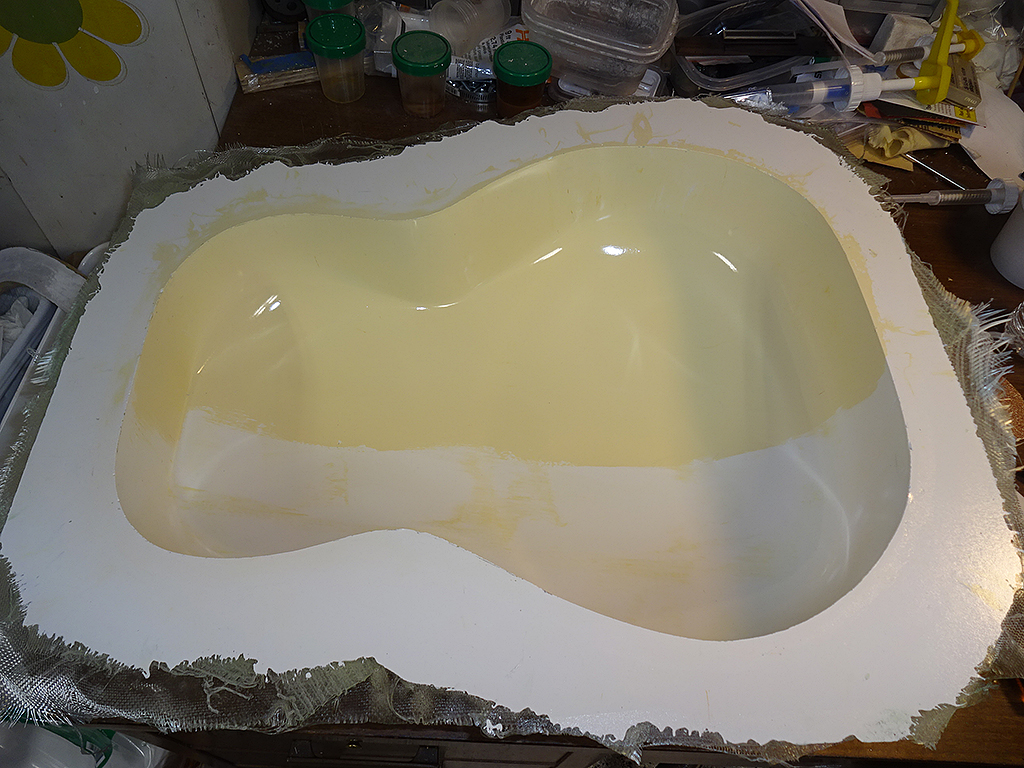
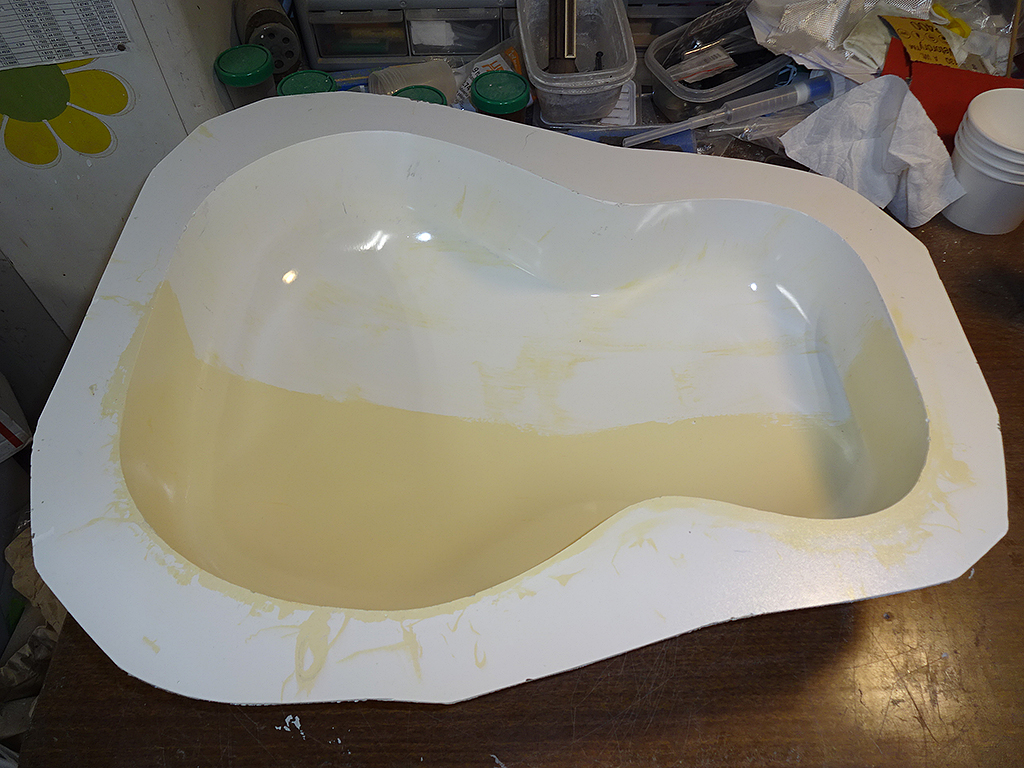
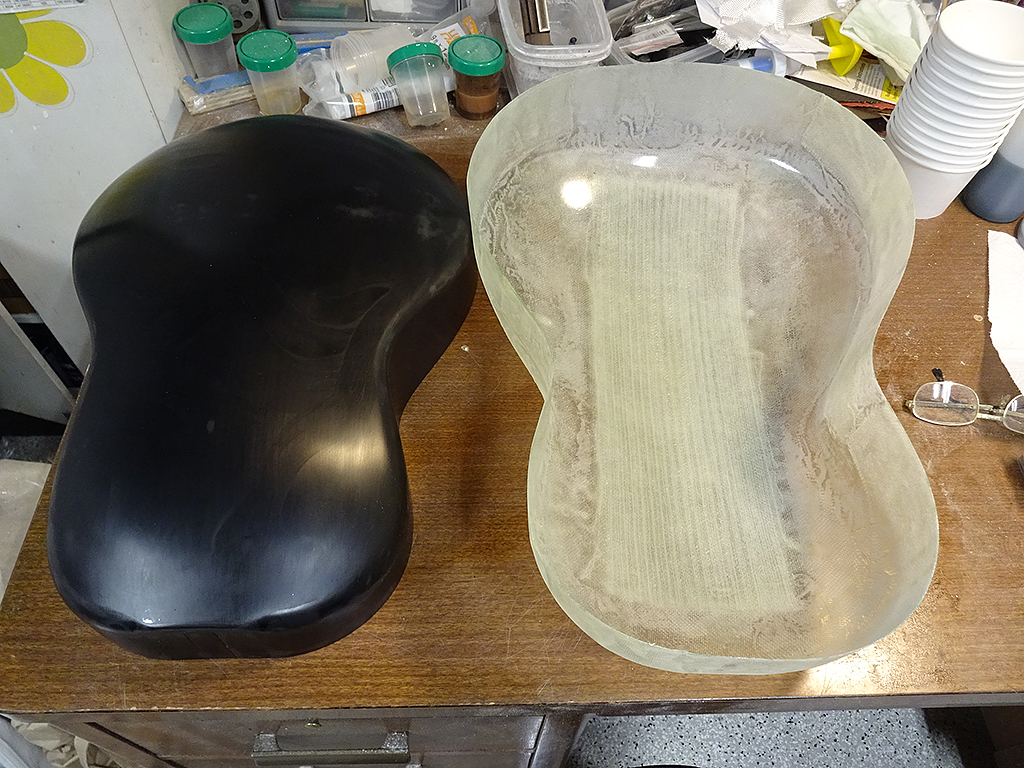
First, there's the bare bowl. More on this later.
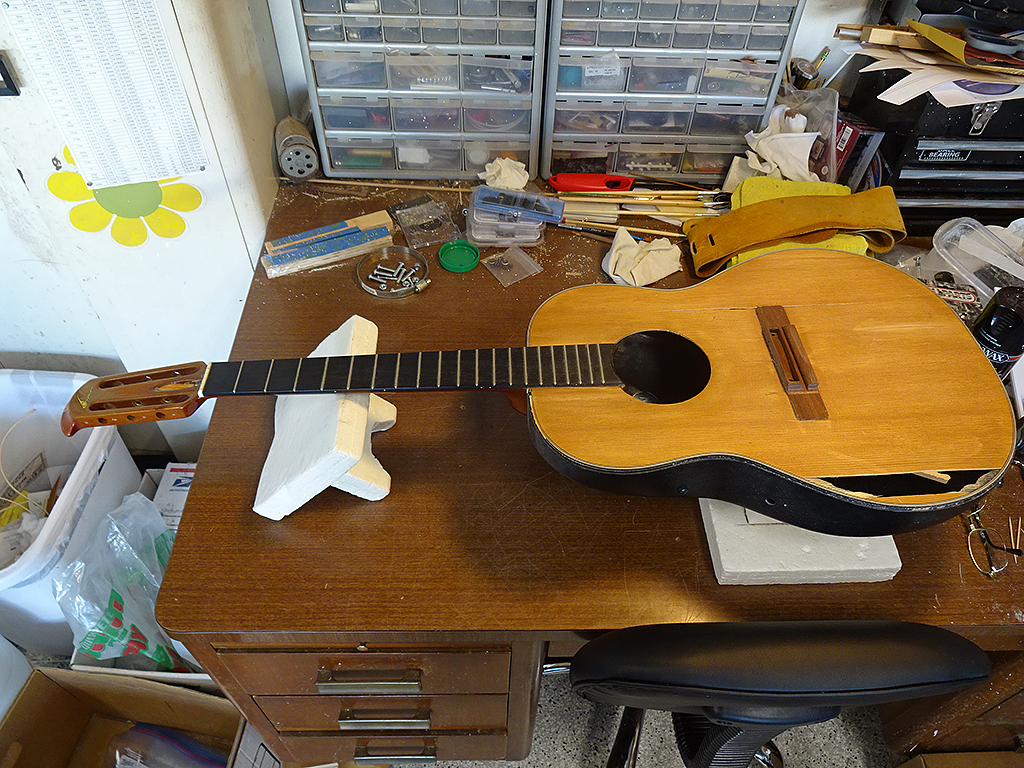
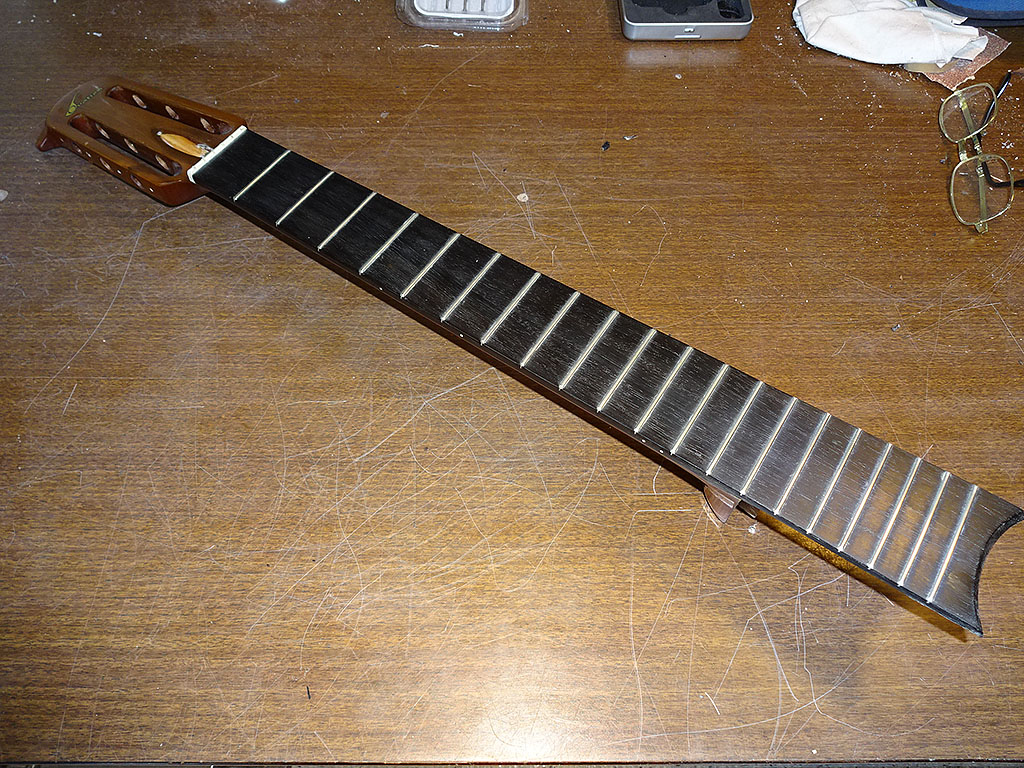
Then, I'm going to remove the neck from this junked 1624 and convert it to a bolt-on neck.
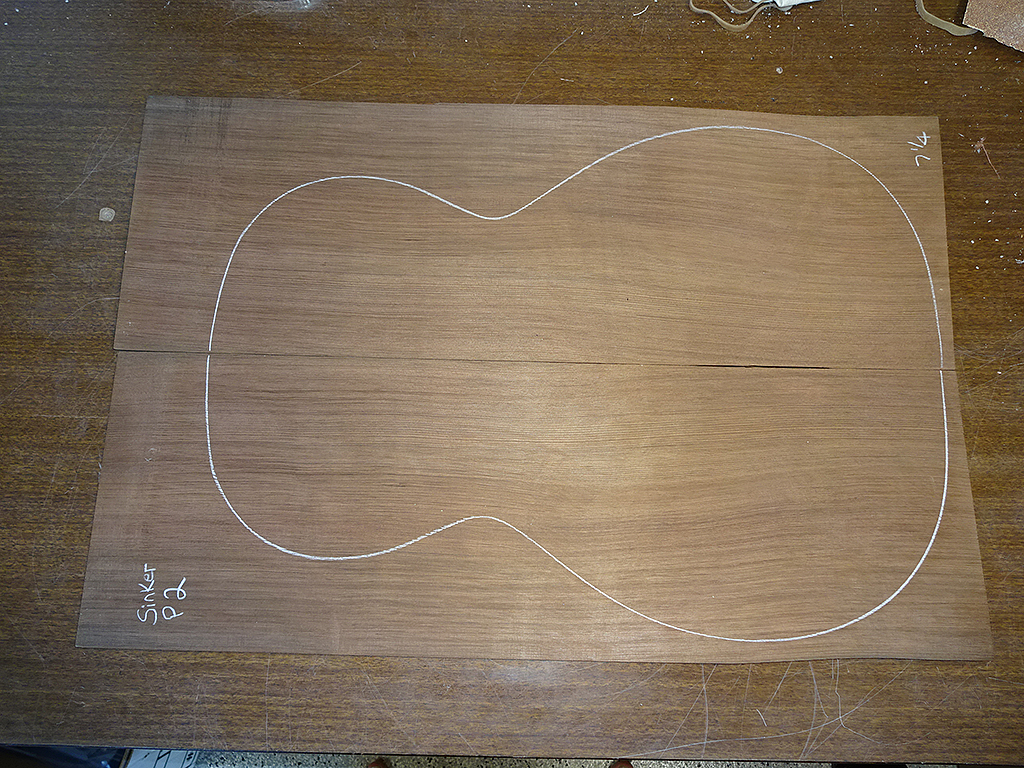
It'll get a sinker redwood top. I strongly encouraged Patch to go with torrefied spruce, but he strongly resisted because he's a real fan of sinker redwood. Since it's his guitar I let him have his way.
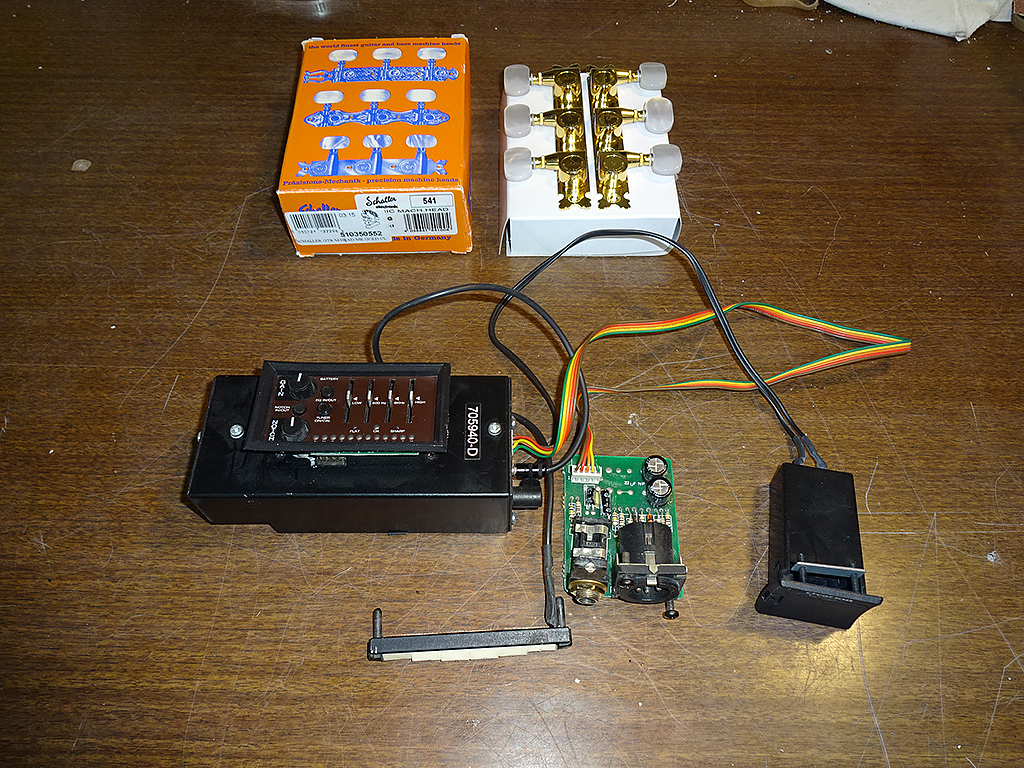
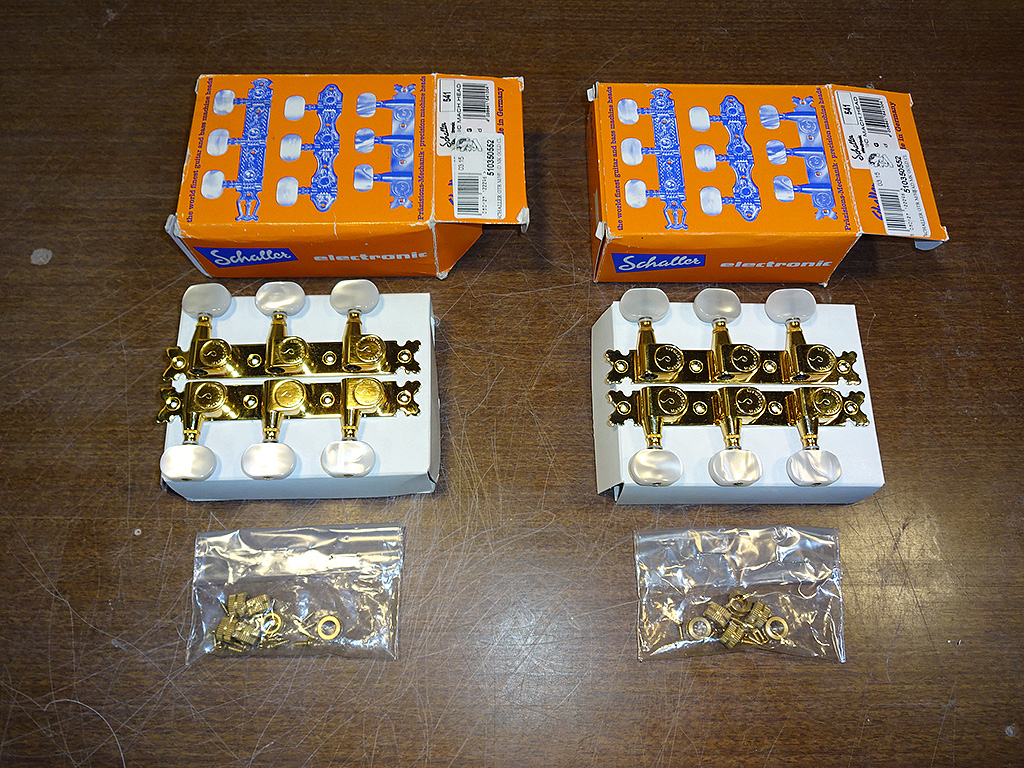
I managed to find some honest-to-goodness hen's teeth. A NIB set of Schaller 541 gold tuners. These must be the last NIB set of these tuners in the world.
Posted 2017-09-16 12:24 PM (#537423 - in reply to #537422) Subject: Re: Patch's Parlor Build...
Joined: June 2012 Posts: 2303
Location: Lake Forest, CA
Back to the bowl.
Parlor bowls are all but unobtainable. Since this one is currently in perfect, unused condition, I'm going to splash a mold from the outside before I use it for Patch's guitar.
Because I'm sure everyone will find that process interesting, I'll document it here.
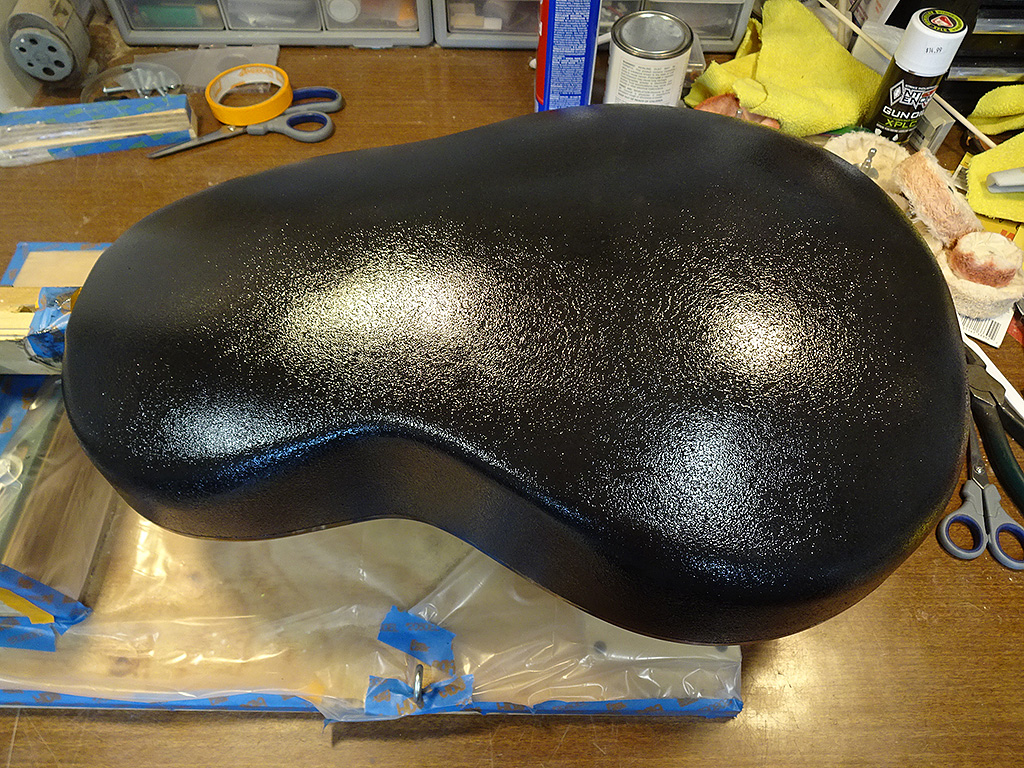
Also, it's going to be a shiny bowl. Probably the only shiny bowl Parlor in the world.
Posted 2017-09-16 7:33 PM (#537427 - in reply to #537422) Subject: RE: Patch's Parlor Build...
Joined: May 2006 Posts: 4221
Location: Steeler Nation, Hudson Valley Contingent
I can't thank Dan enough. When the market crash finally caught up with my, some would say out of control, guitar trading habit, I thought my custom build days were over. I wasn't all that bummed out as I had amassed a very satisfying collection of O's, but I did regret that I never got to move on to the next project I had in line at the time. I had discussed it with John Budny for years, but I wanted a Redwood parlor BAD!
Now, not only do I get the parlor, but it will be a nylon string, shiny bowl, wide-neck, SINKER redwood one as well! I have nothing against torrified spruce at all, and I may let Dan scratch his itch to get some in my hands down the road. But for now, I'm looking forward to following this build almost as much as I am to playing the final result!
Posted 2017-09-16 11:08 PM (#537434 - in reply to #537422) Subject: Re: Patch's Parlor Build...
Joined: March 2002 Posts: 15654
Location: SoCal
Patch, if it means anything to you, I had Dan put a torrefied Adirondack spruce top and braces on my 1113. Best sounding Ovation O I've ever heard.....
Posted 2017-09-17 5:25 PM (#537438 - in reply to #537422) Subject: RE: Patch's Parlor Build...
Joined: June 2012 Posts: 2303
Location: Lake Forest, CA
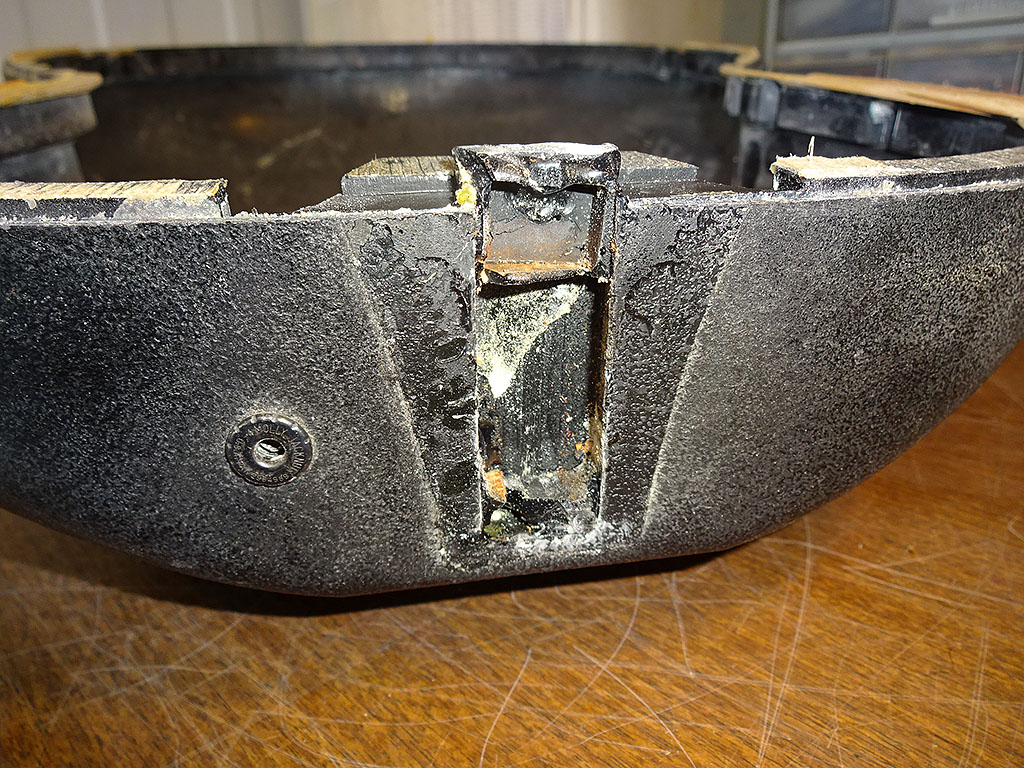
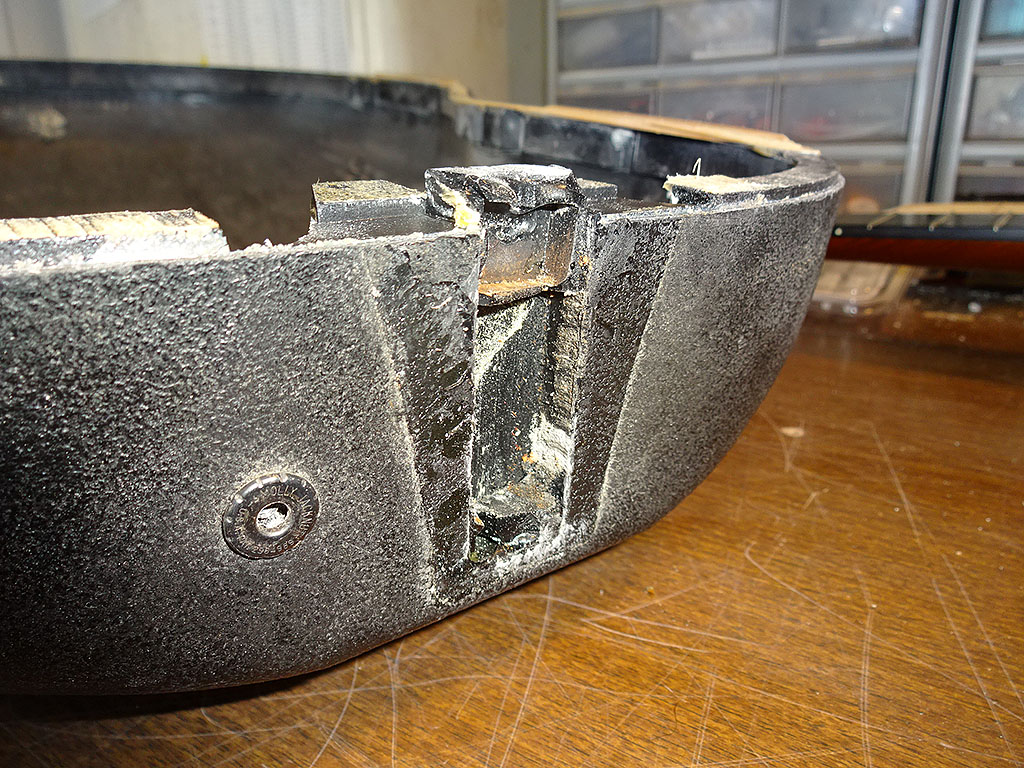
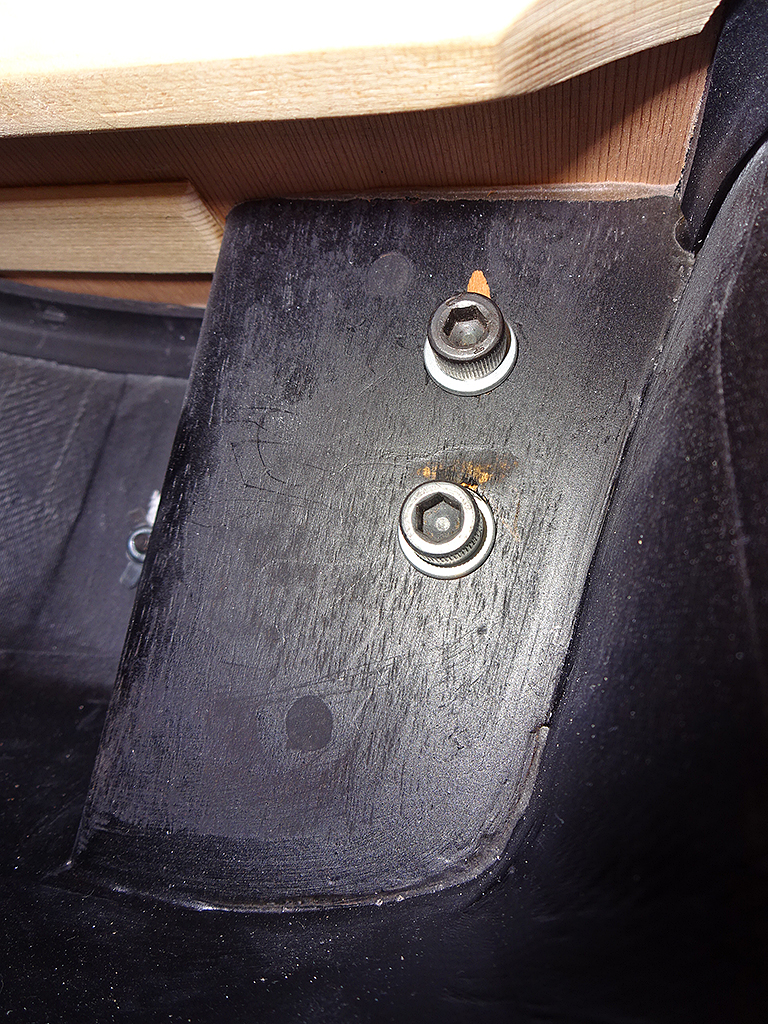
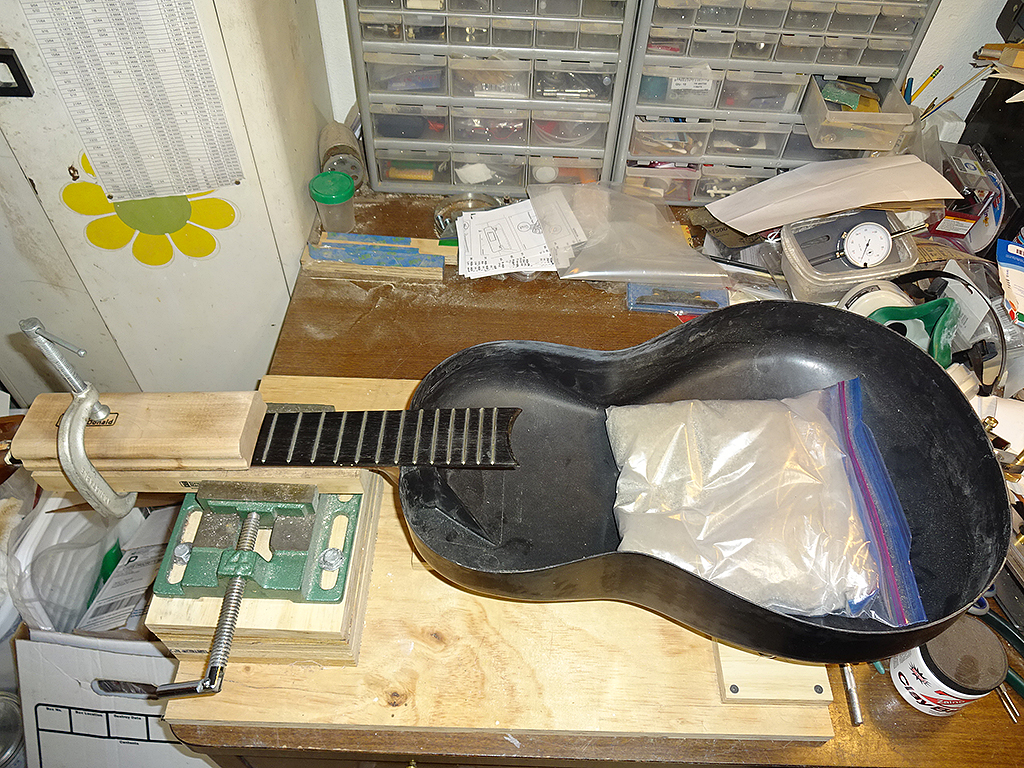
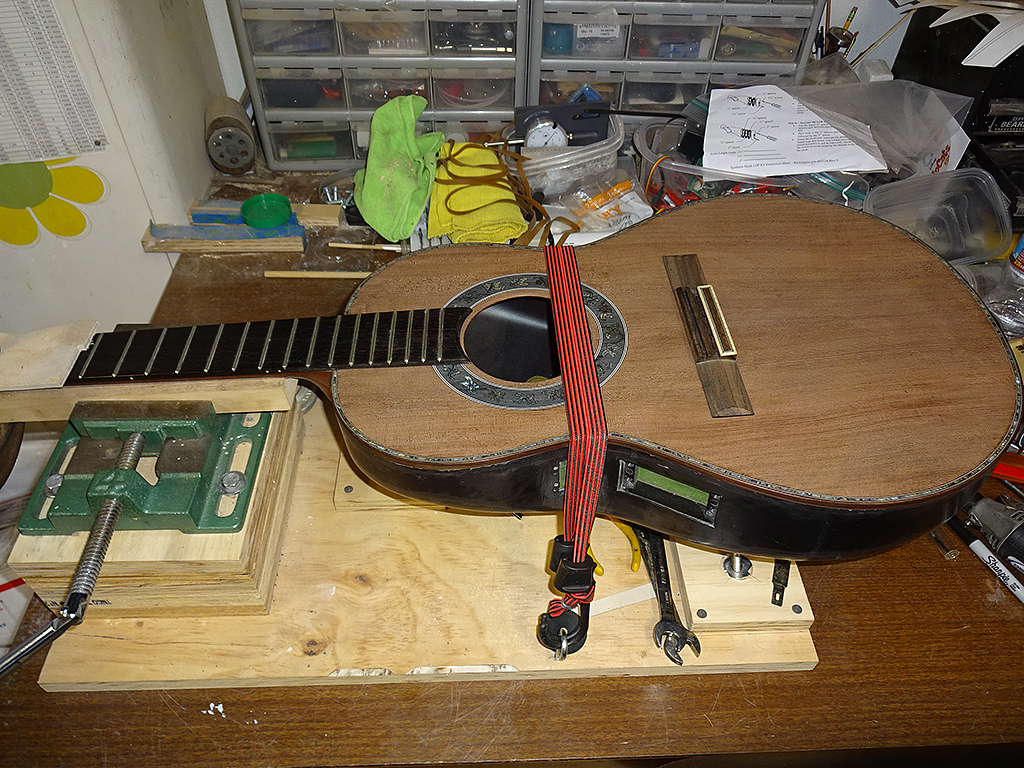
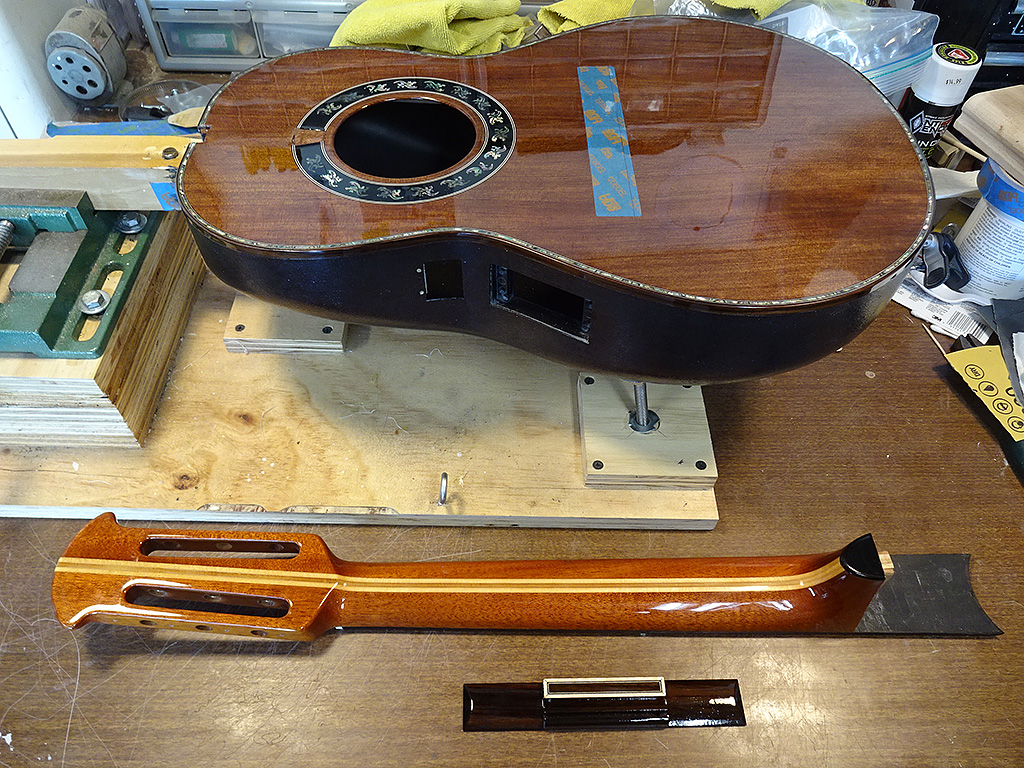
Removed the neck from the 1624 yesterday.
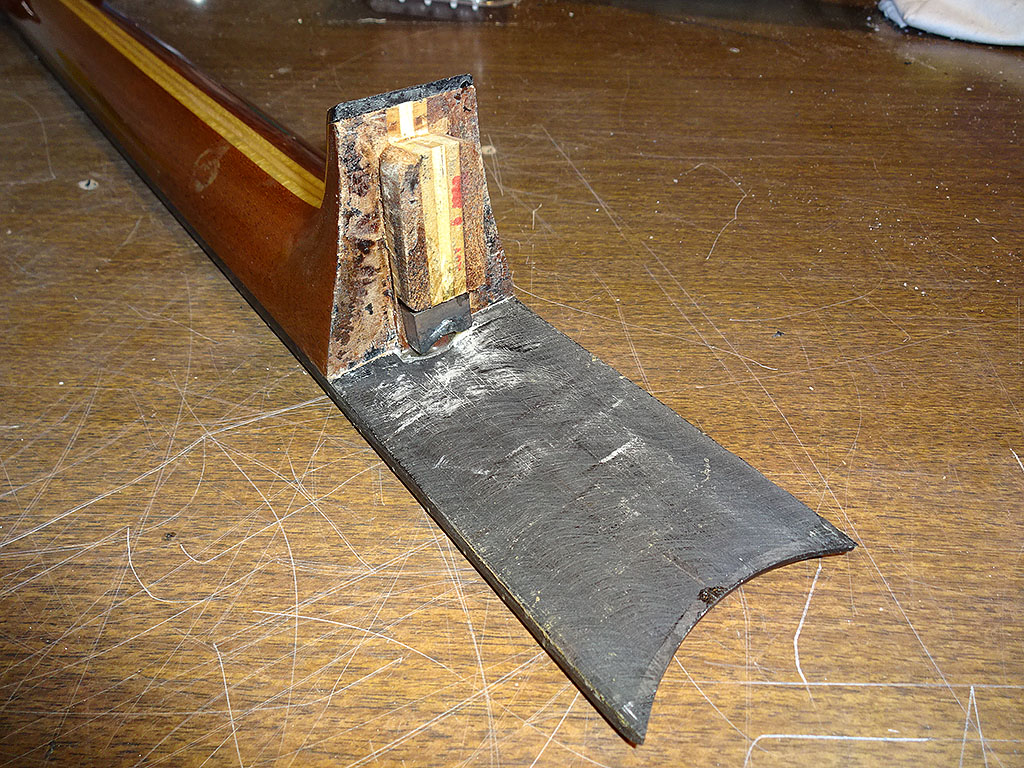
I cleaned off the excess epoxy from the dovetail area. The square piece of metal between the fretboard extension and the dovetail is the truss rod anchor.
Interestingly, this is a dovetail (glue-on) neck on an SMC bowl meant for a K-Bar neck. The serial number dates the guitar to 1985/86. The neck looks to me like it was glued to the bowl at the factory.
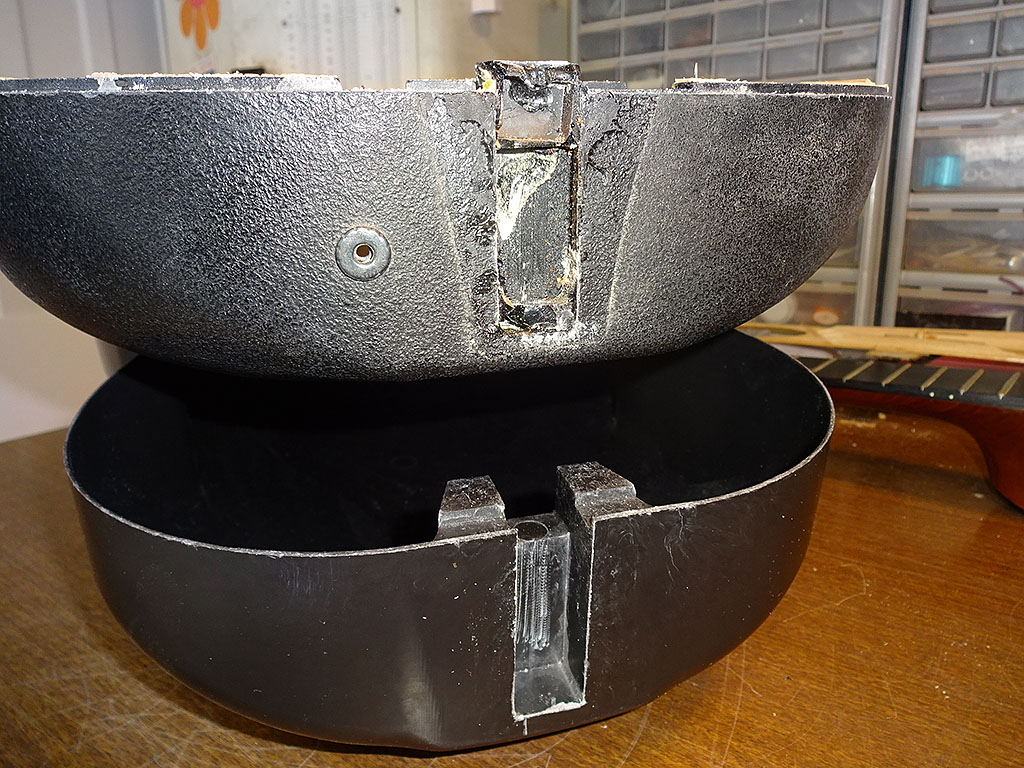
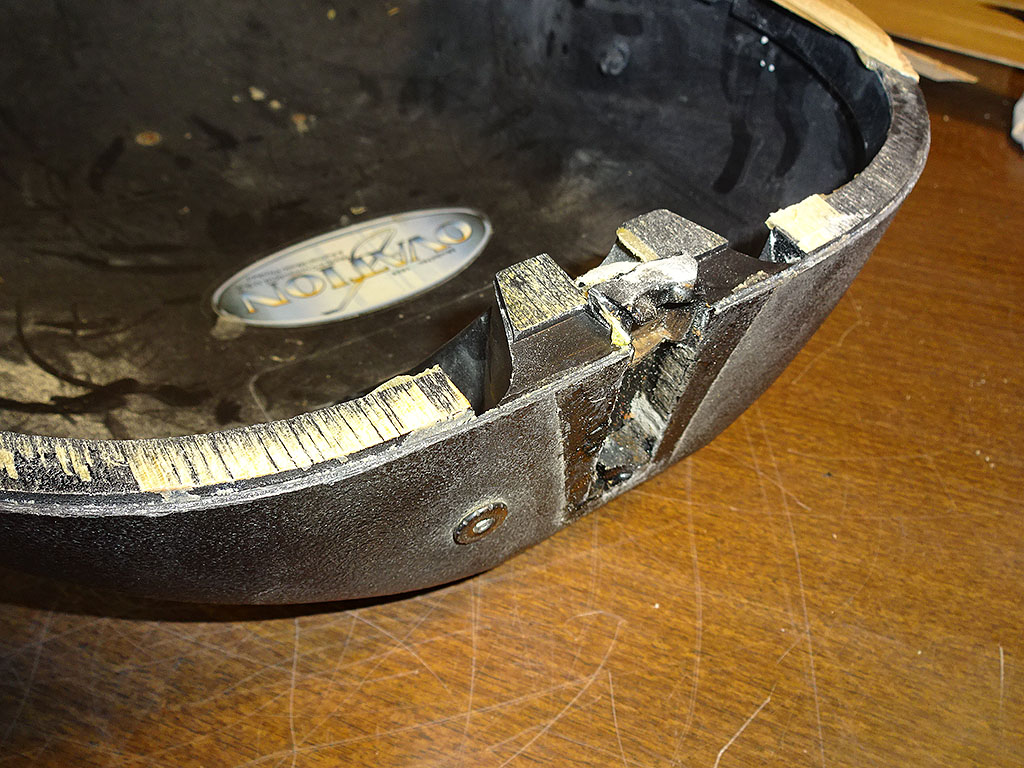
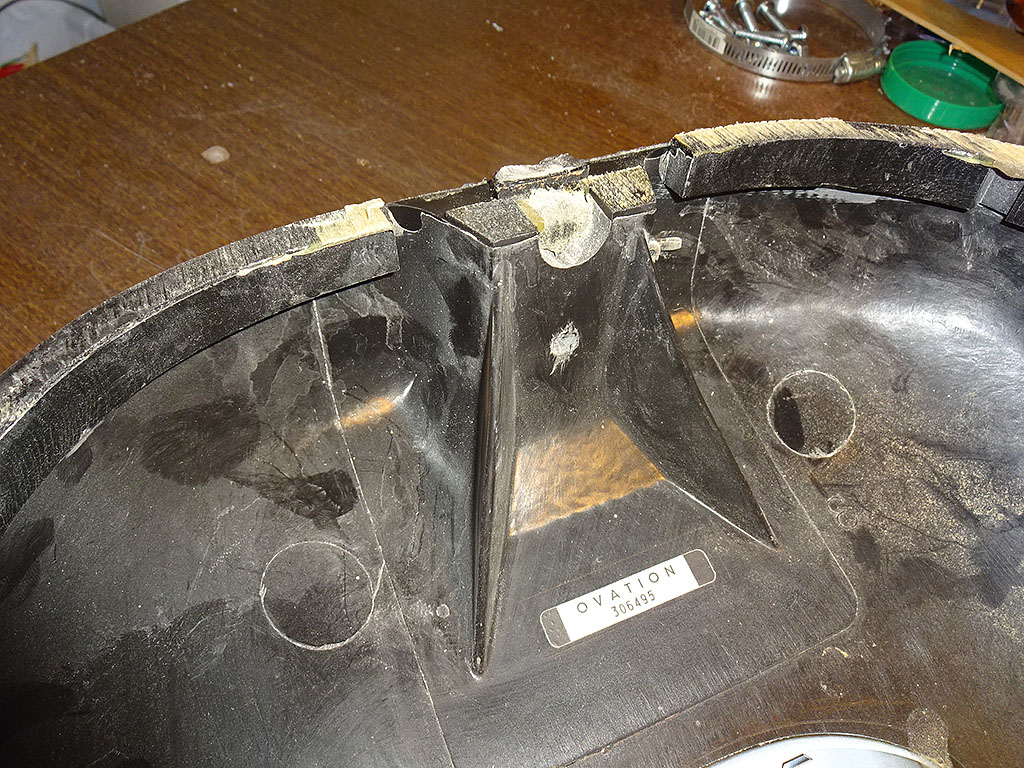
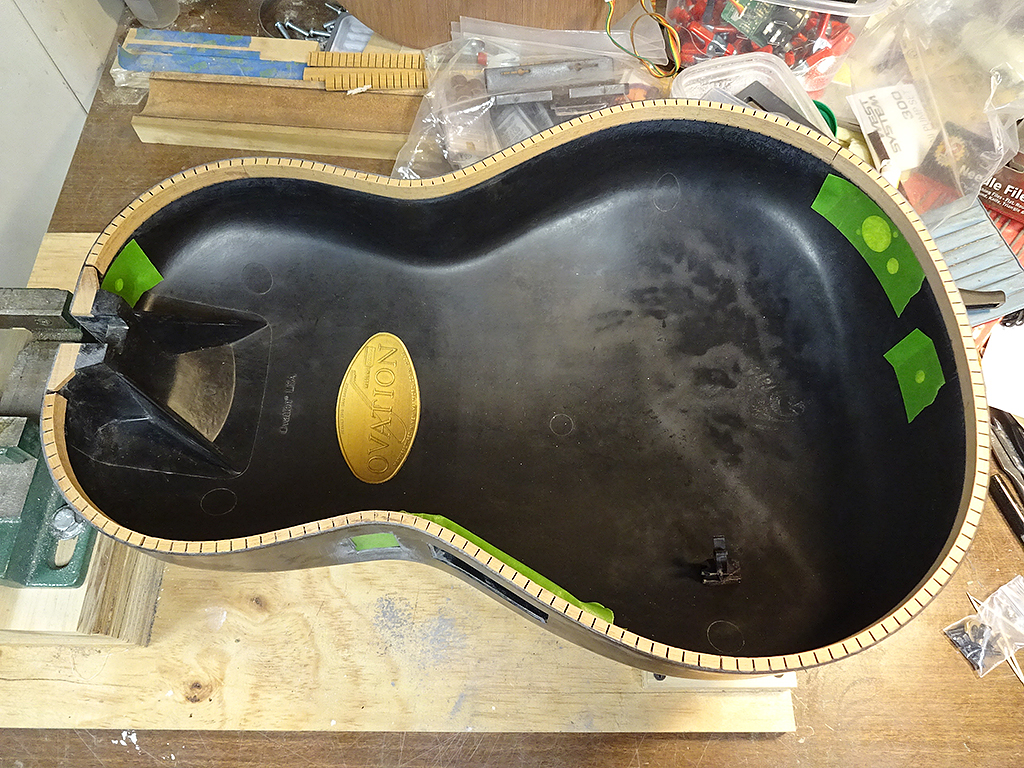
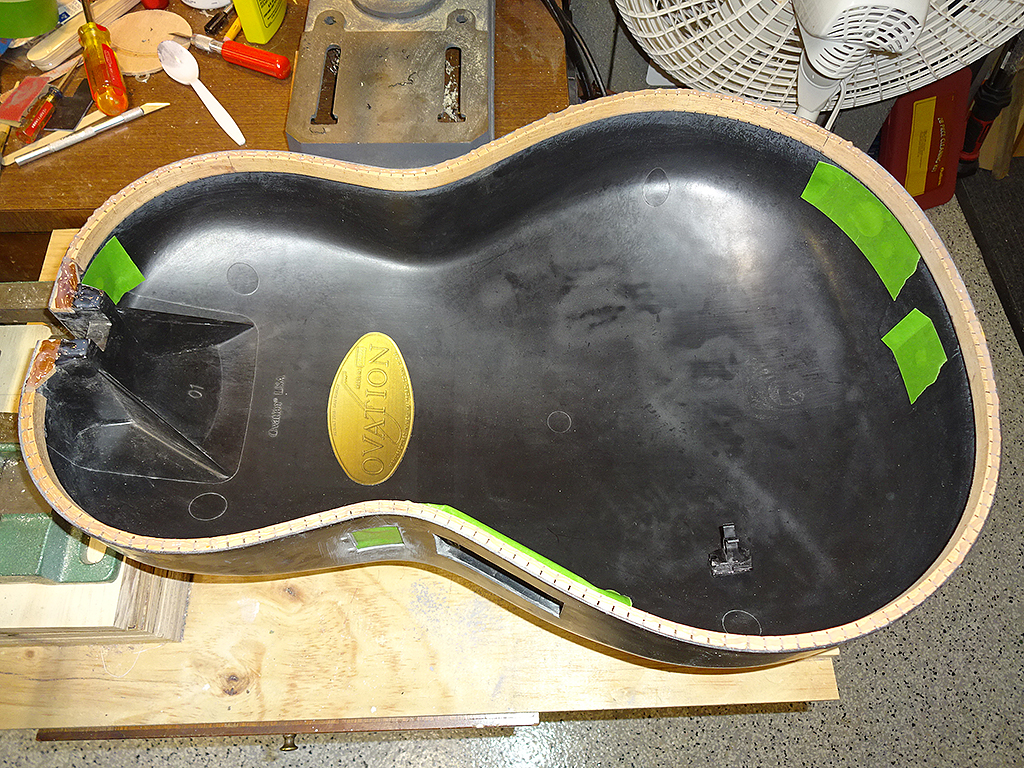
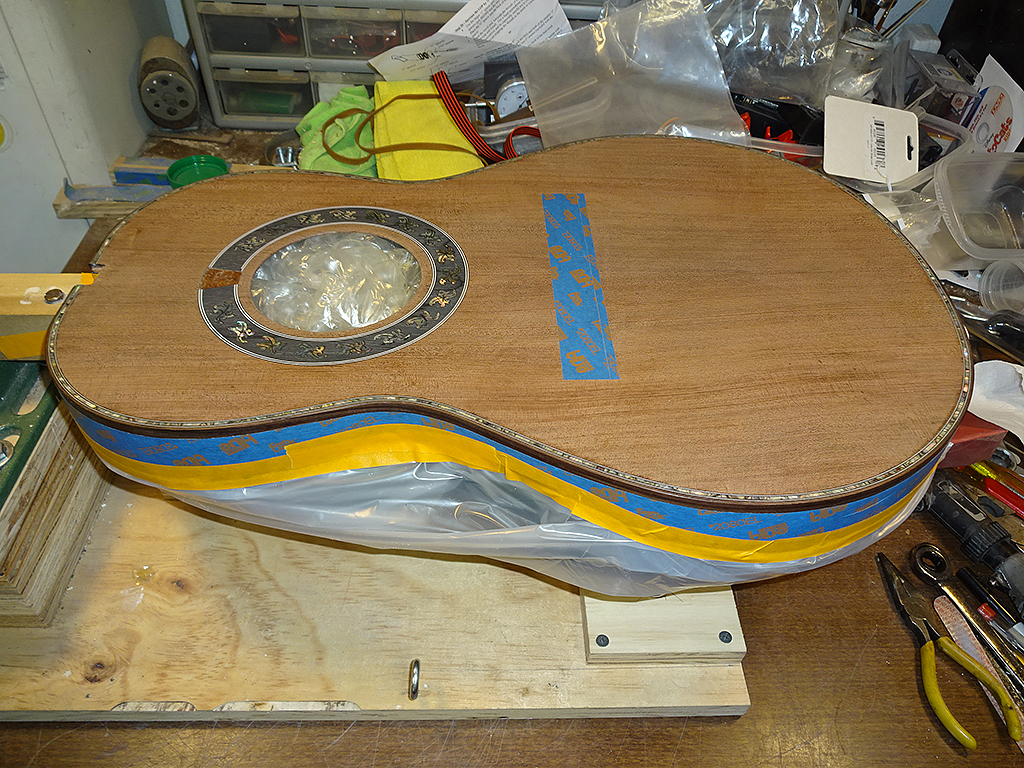
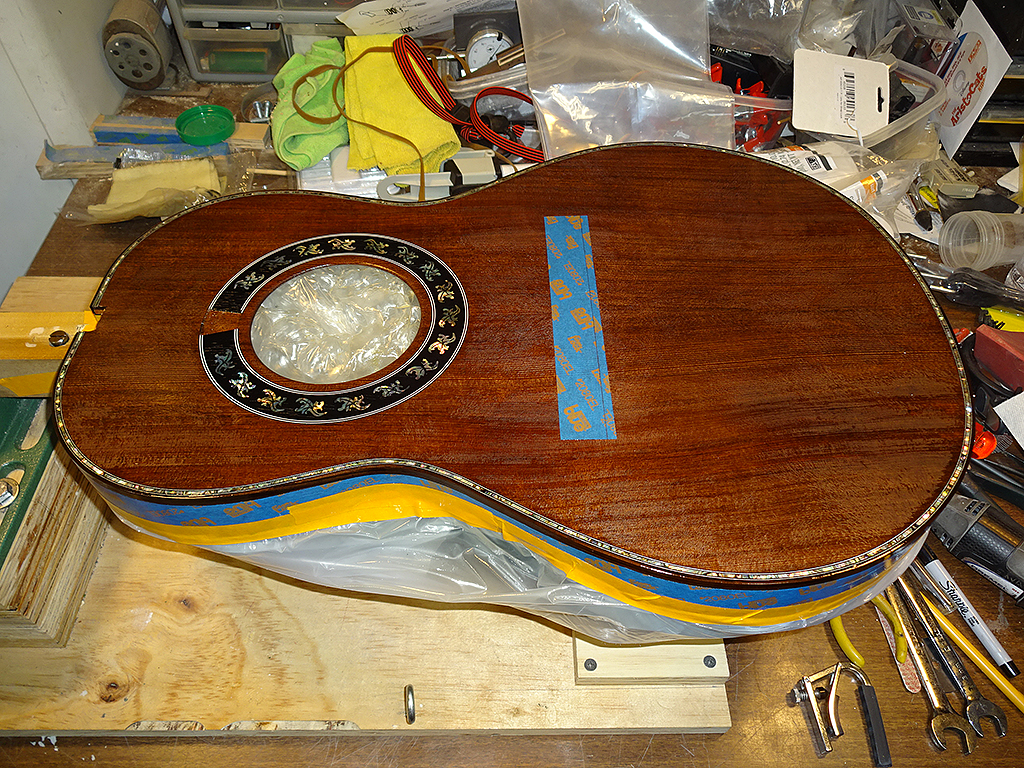
Here's the 1624 bowl on top of the parlor bowl. From this shot you can get a good idea of how much black epoxy it took to set the dovetail neck into the bolt-on pcoket. As has been said before Ovation used whatever they had at hand to keep building guitars.
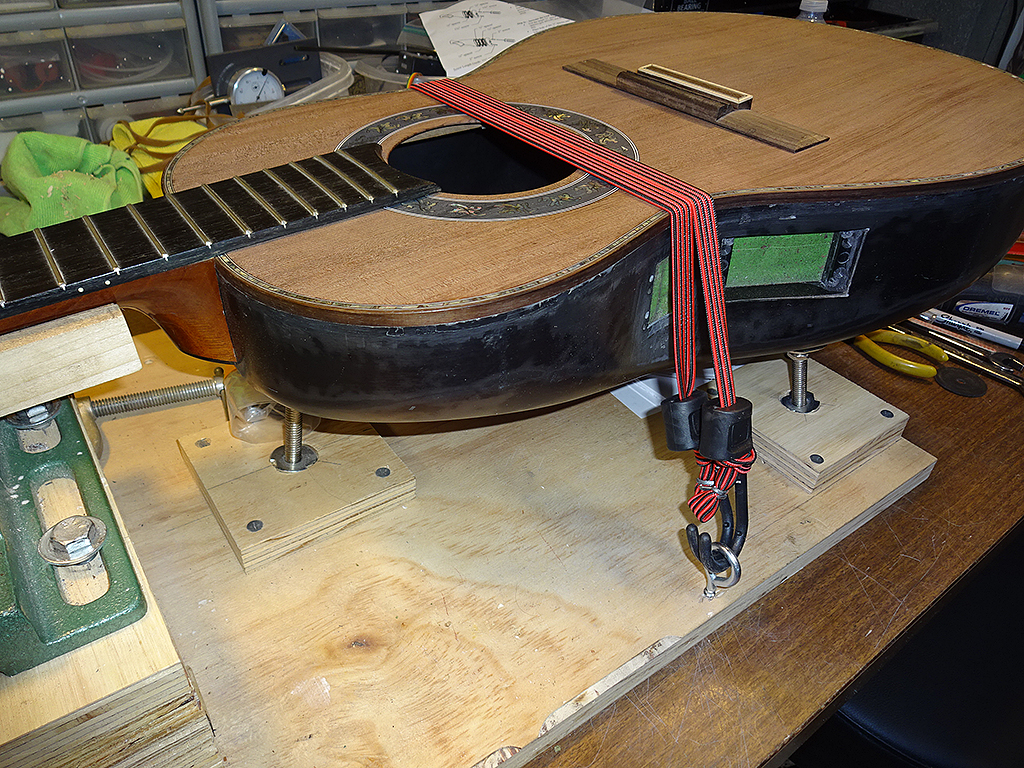
Here's a close-up of the neck pocket in the body.
Taking the neck off this guitar was interesting. I knew it was an SMC bowl and there was a single bolt hole on the inside. I figured the neck was a dovetail neck, but I wasn't sure what was lurking inside the pocket. And, to top it all off, the molded-in neck block is quite thick, so I wasn't really enamored with trying to cut the neck off the bowl.
When I did the bowl bend on Jay's 485 I used my trusty heat gun. It worked, but didn't keep every part of the bowl an even temperature. For this, I decided to try IR lamps like the kind you buy in the hardware store to warm up the bathroom when taking a shower. They did work, but because they are only 125W each, it takes a while to heat the wood. These would work well to do a bowl bend because they do heat up large areas. In the end, I used my trusty heat gun.
The trick to removing the necks, or any part on an Ovation is you've got get the epoxy up to a temperature where it'll soften and turn rubbery. For the most part, room-temperature cure epoxy will start to soften at around 170-180 degrees.
For a glue joint like the bridge, you can heat up the part pretty quickly. But, with a deep joint like the neck, you need to heat soak the external areas and let the heat sink down deep enough so it'll soften the glue.
Once the glue gets soft enough, you just need to start moving the neck back and forth to break loose the glue.
Posted 2017-11-18 3:42 PM (#538071 - in reply to #537422) Subject: RE: Patch's Parlor Build...
Joined: June 2012 Posts: 2303
Location: Lake Forest, CA
It's been a while since my last update, hasn't it? Two months to be exact.
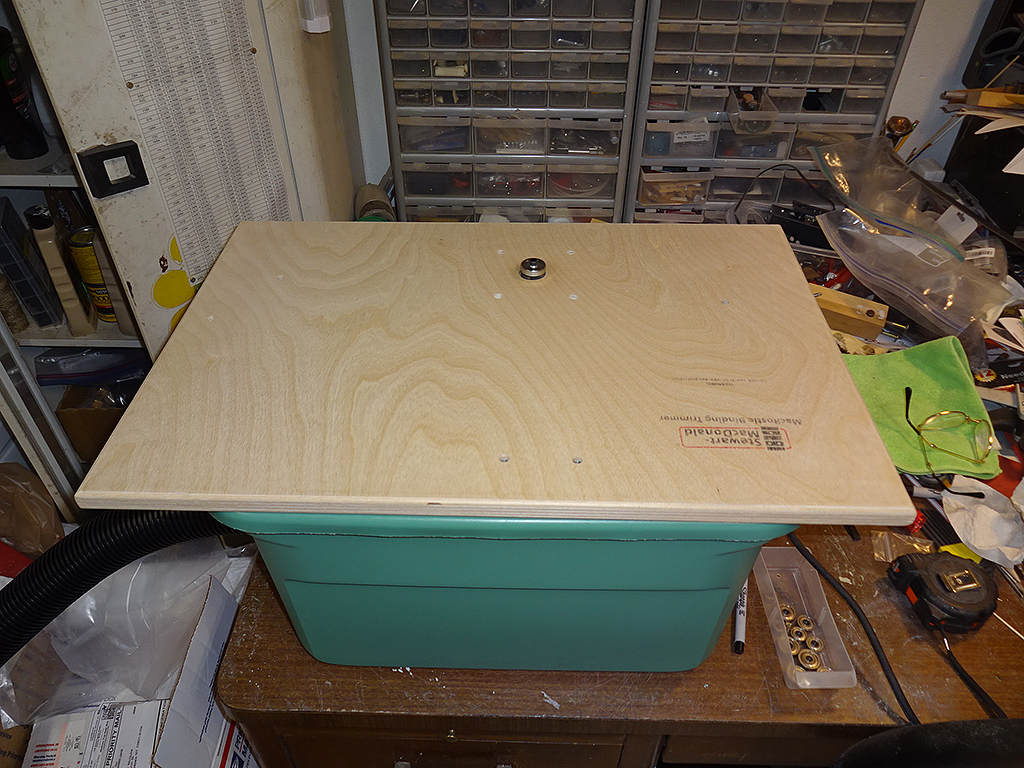
The time has come to prepare the bowl for splashing a mold from it. Normally, a male plug would be made from wood, or some other material which could be attached to a parting plate. Since this is a finished piece there's no way to attach the bowl to the parting plate.
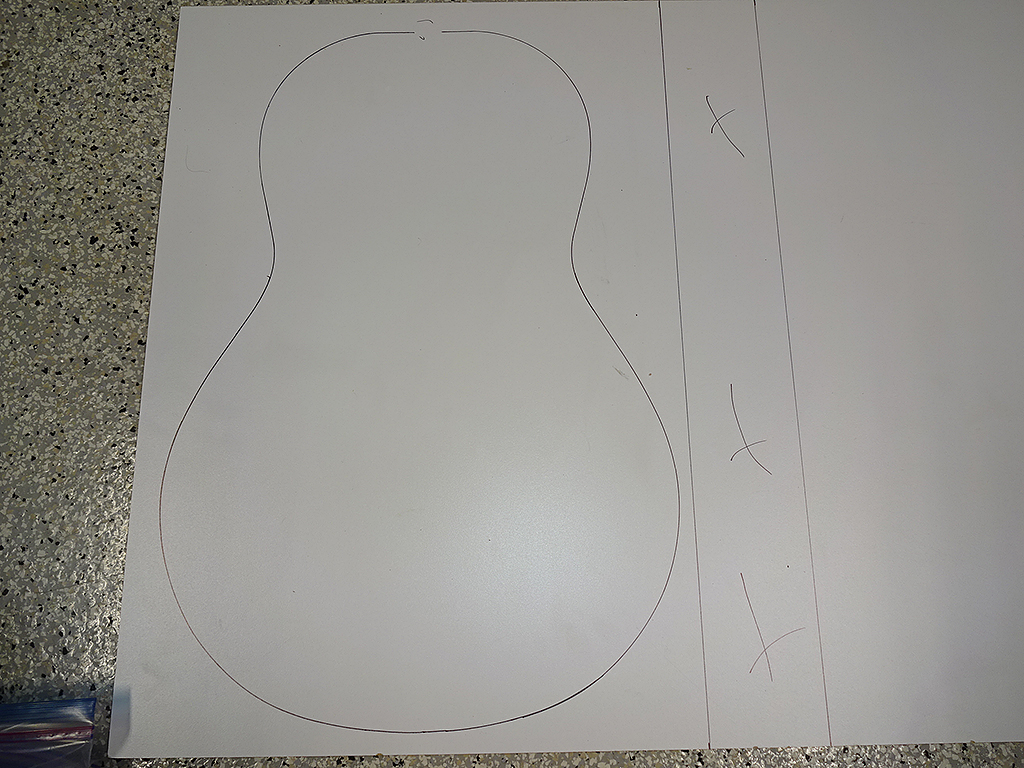
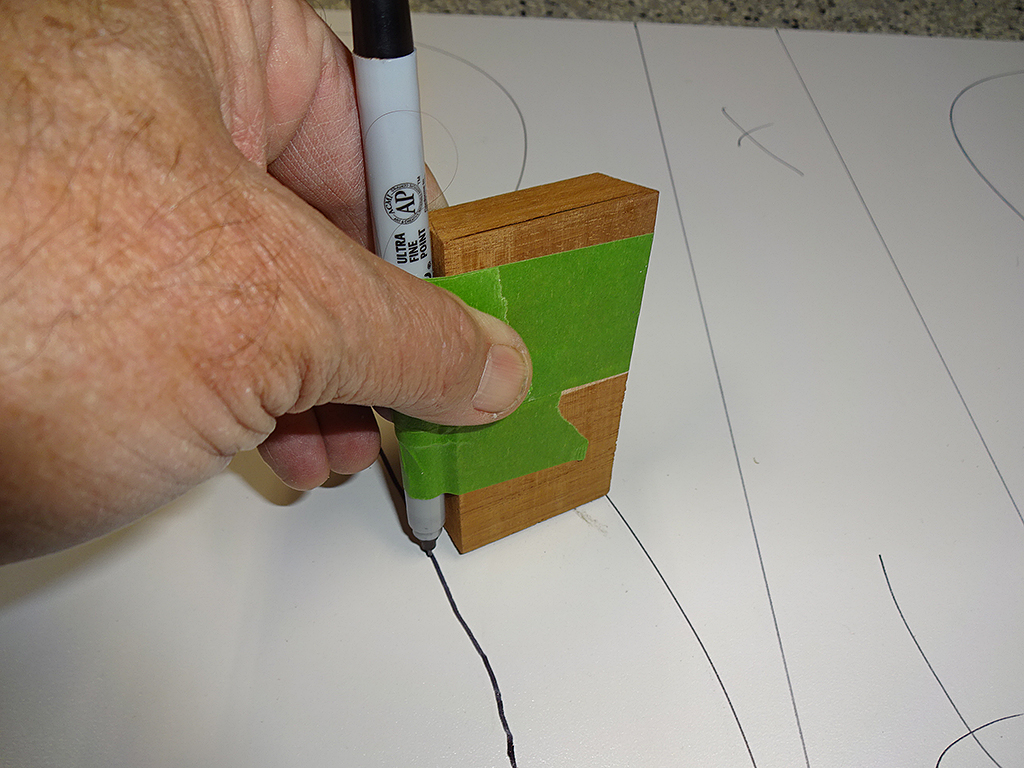
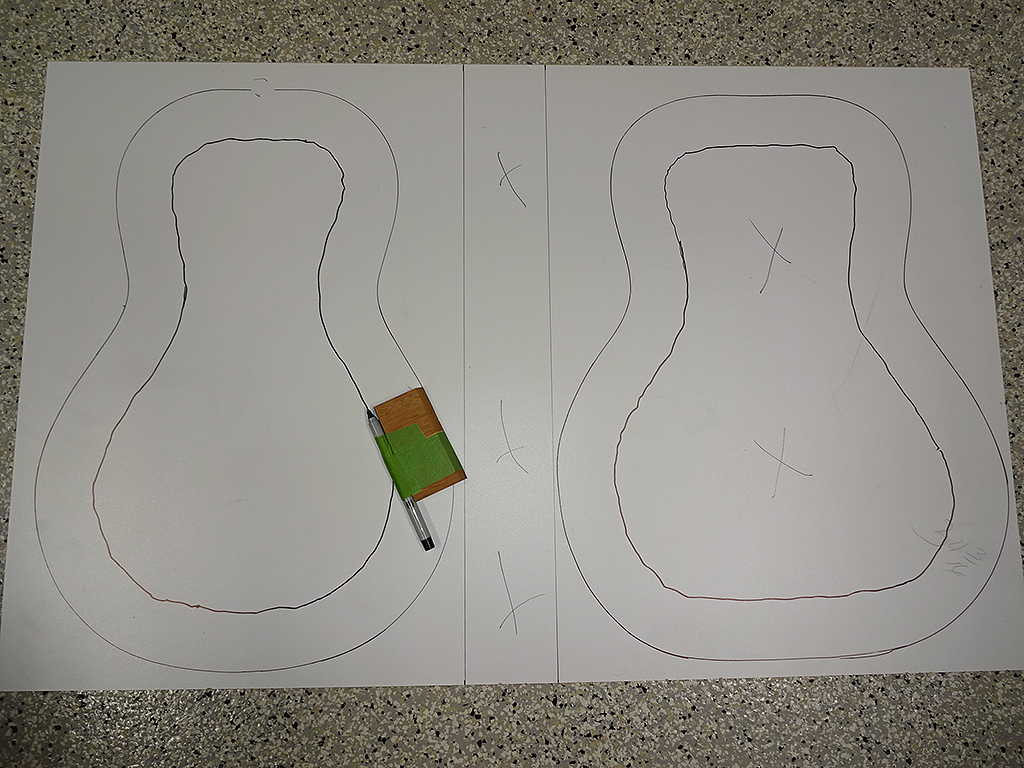
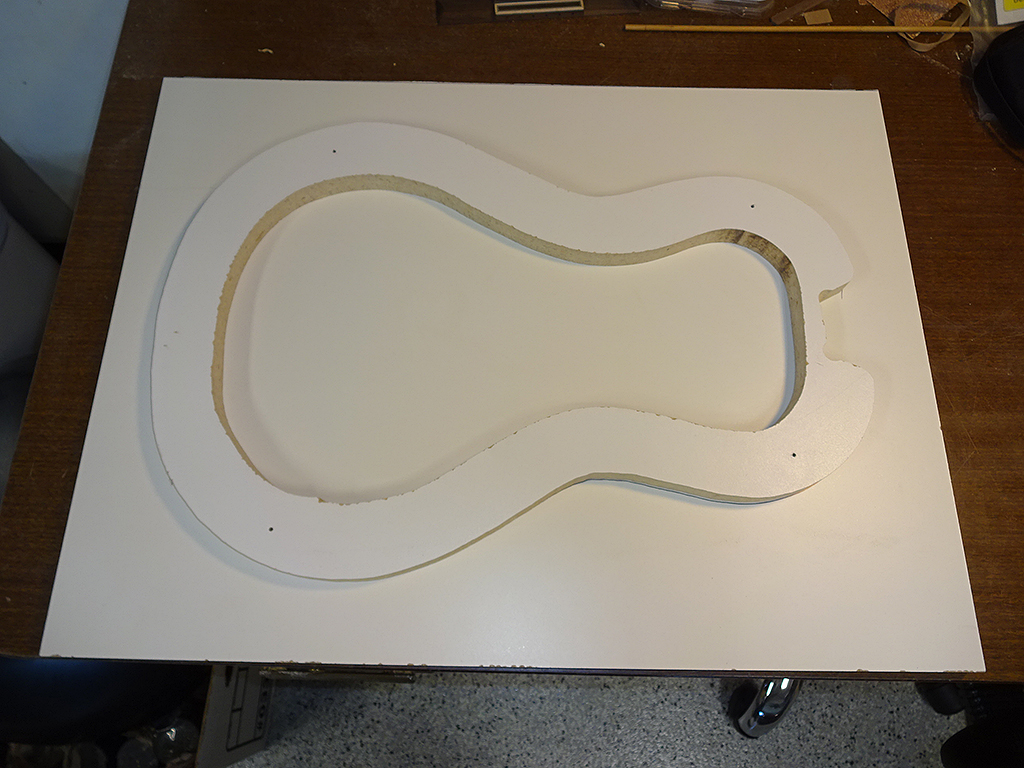
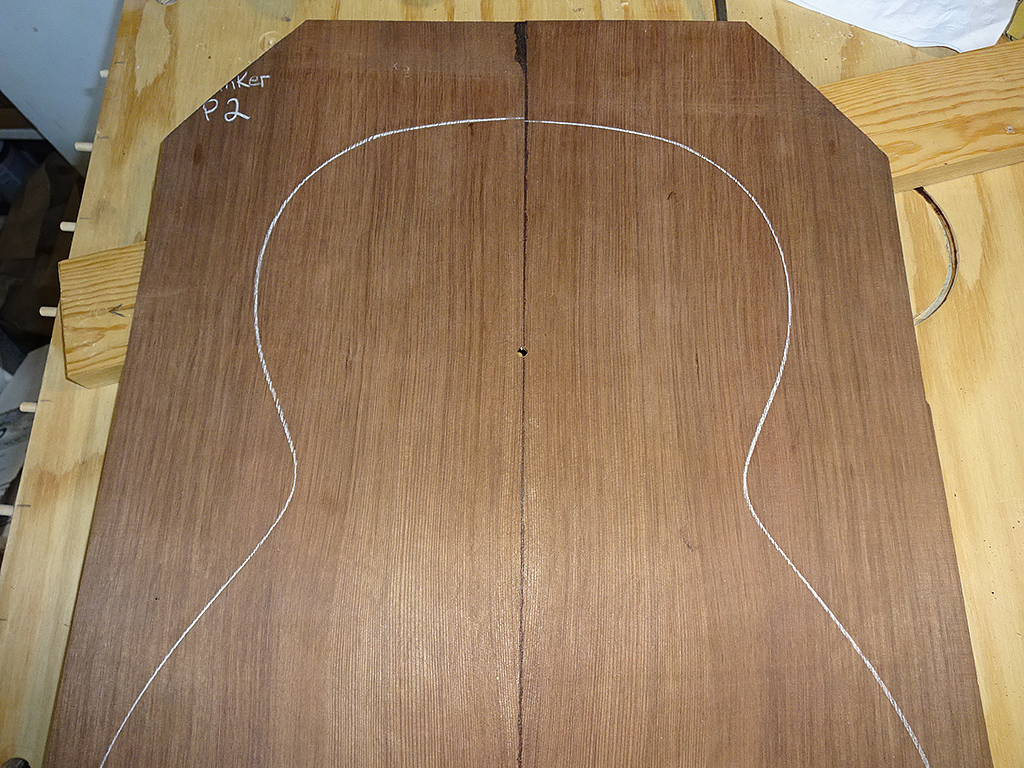
So, I'm going to cut an insert that can be temporarily attached to the inside of the bowl. The first step is to trace the outline of the bowl onto 3/4" MDF. I'm using MDF that has a plastic laminated surface which is smoother than bare wood.
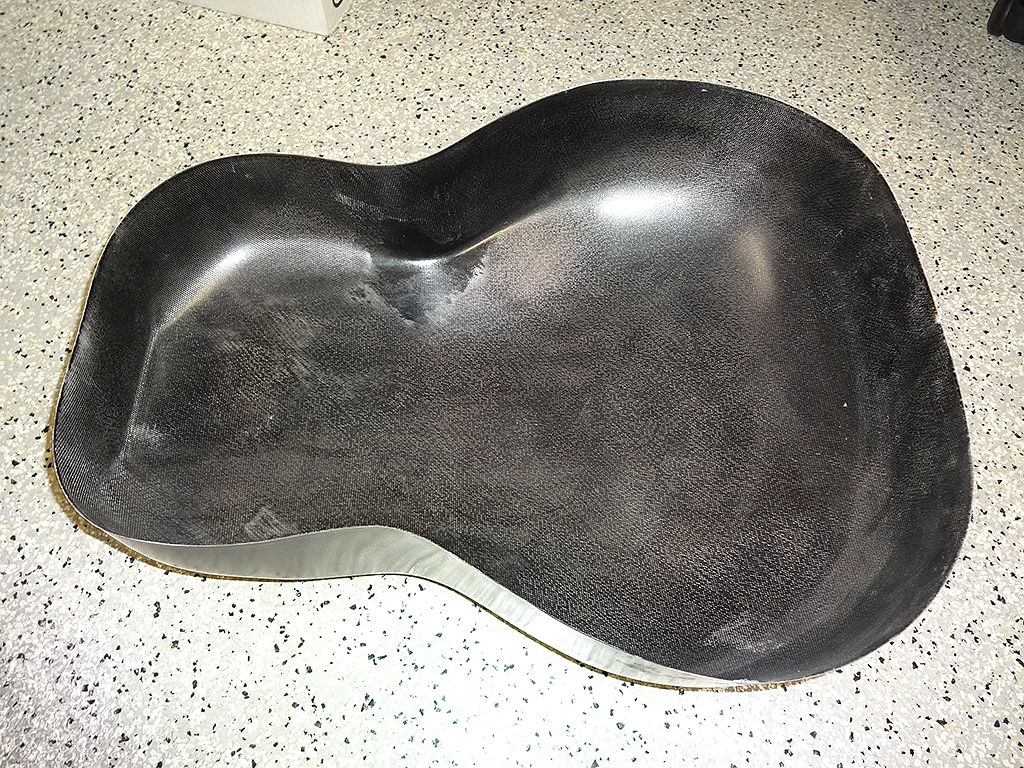
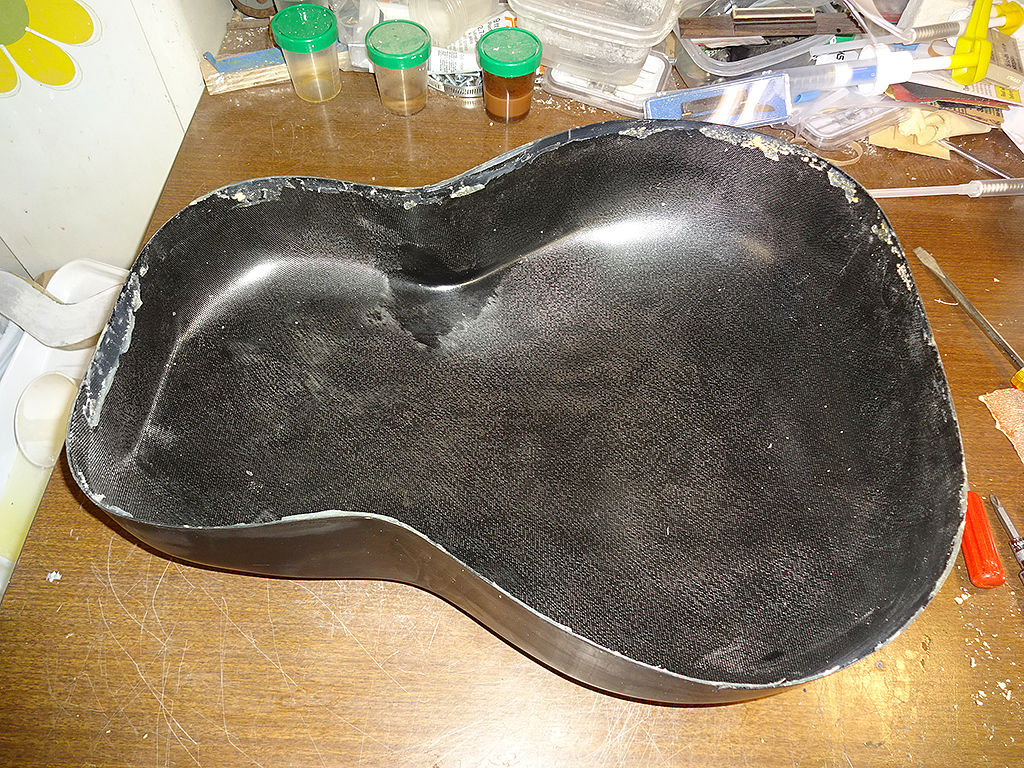
Way back when I bought my 1619, TJR included a bare bowl in the deal. I figured that as long as I was going through the process to splash parlor bowl, it wouldn't be too much work to splash a mold off this bowl, as well.
Tracing the outline of the deep bowl.
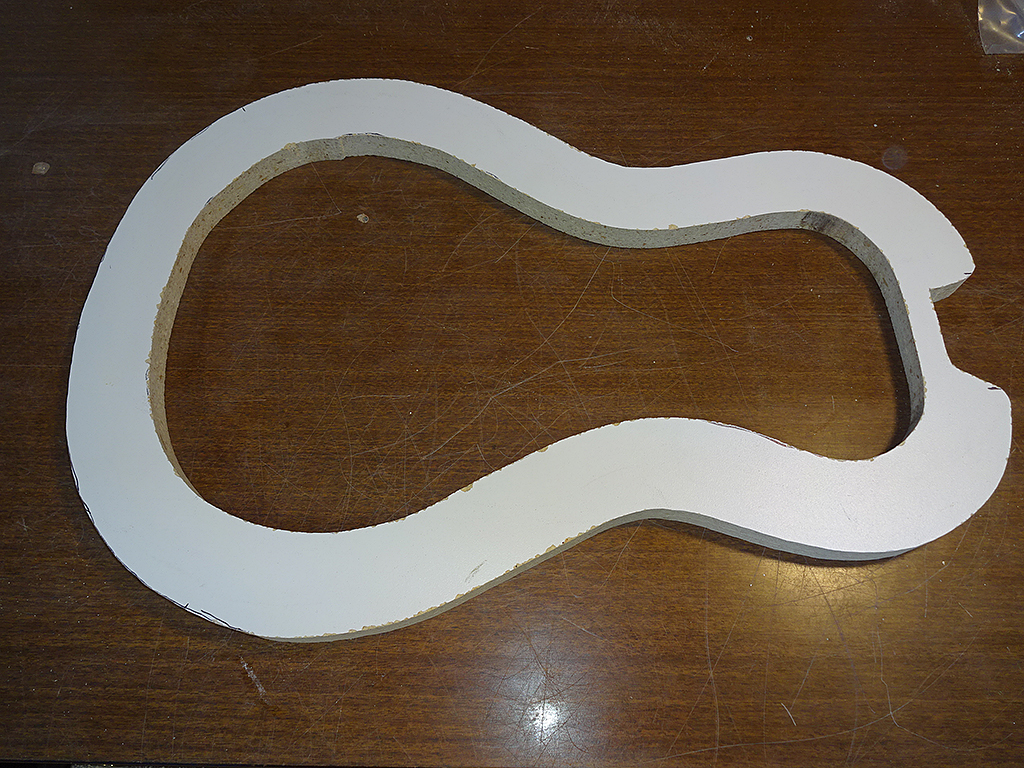
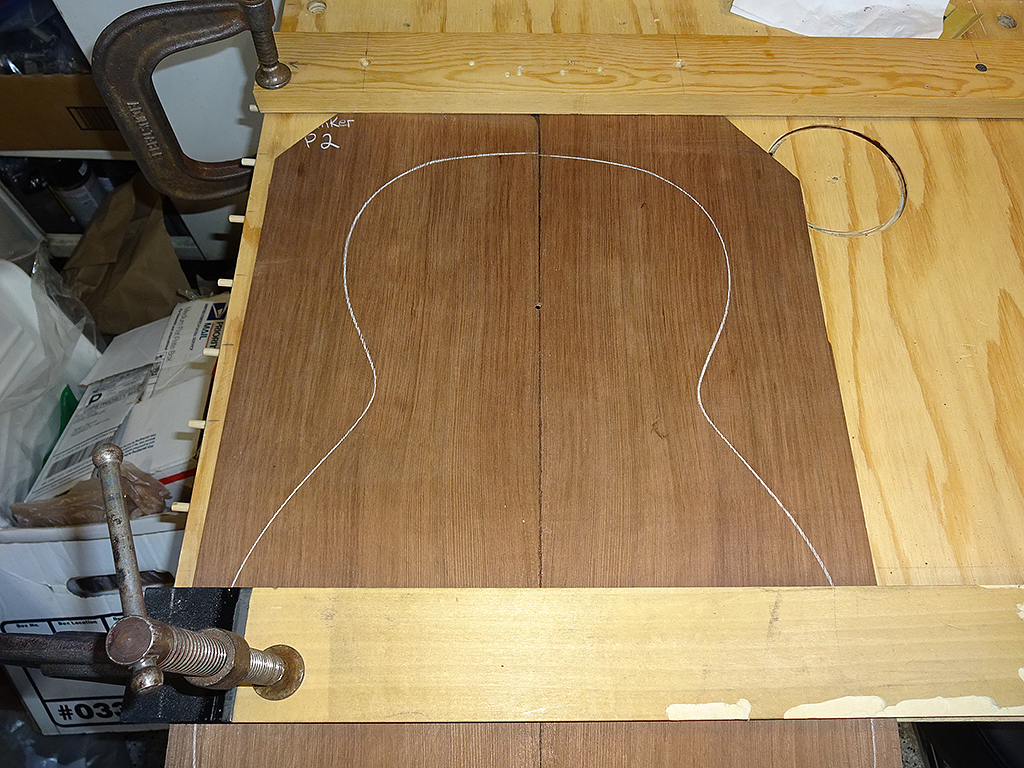
The 3/4" MDF is really heavy, which would make the finished mold too cumbersome to work with. So, I decided to cut out the inside. The side benefit is that the bowls will eventually need to be separated from the inserts and the parting plates, so cutting out the center will give me something to grab onto when the time comes.
I taped a marker to a piece of scrap wood so I could draw parallel lines to the outline.
Both inserts are ready to cut.
Parlor insert is cut out and ready to attach to the bowl.
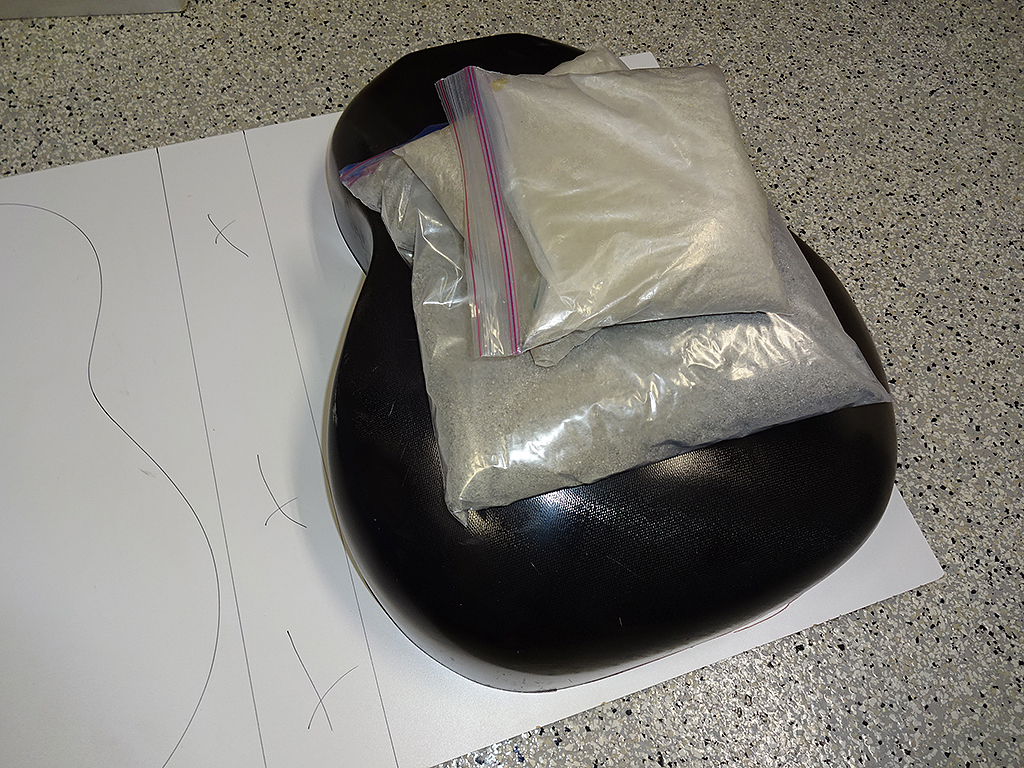
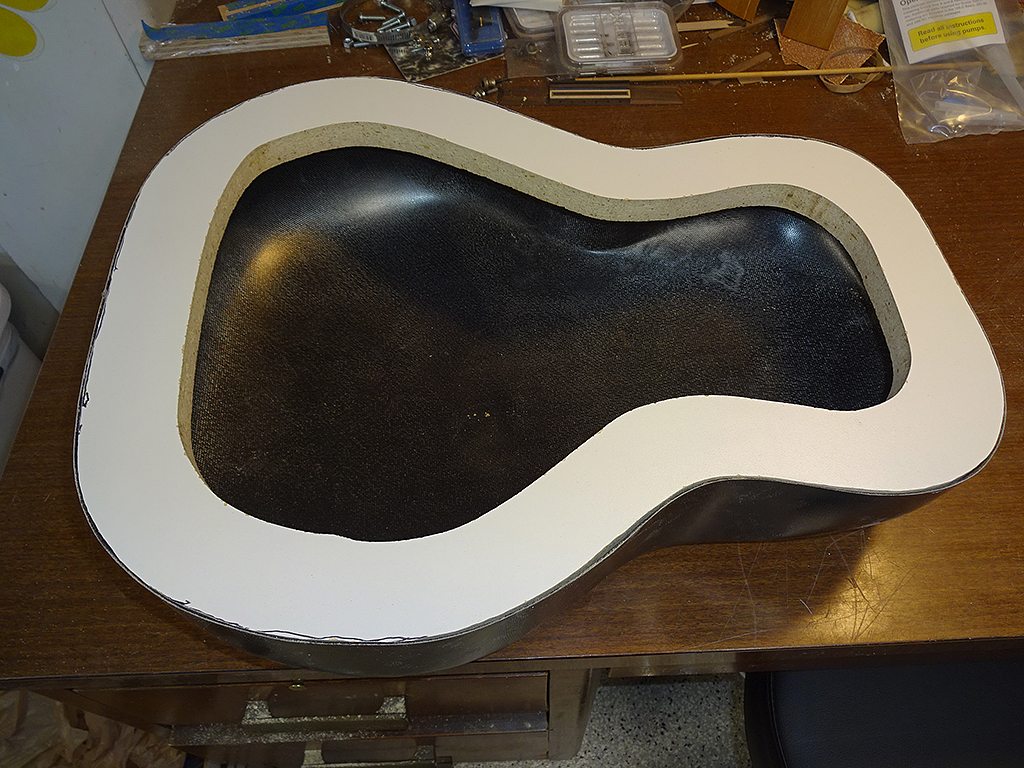
Insert is fitted to to the parlor bowl.
Insert is fitted to the deep bowl.
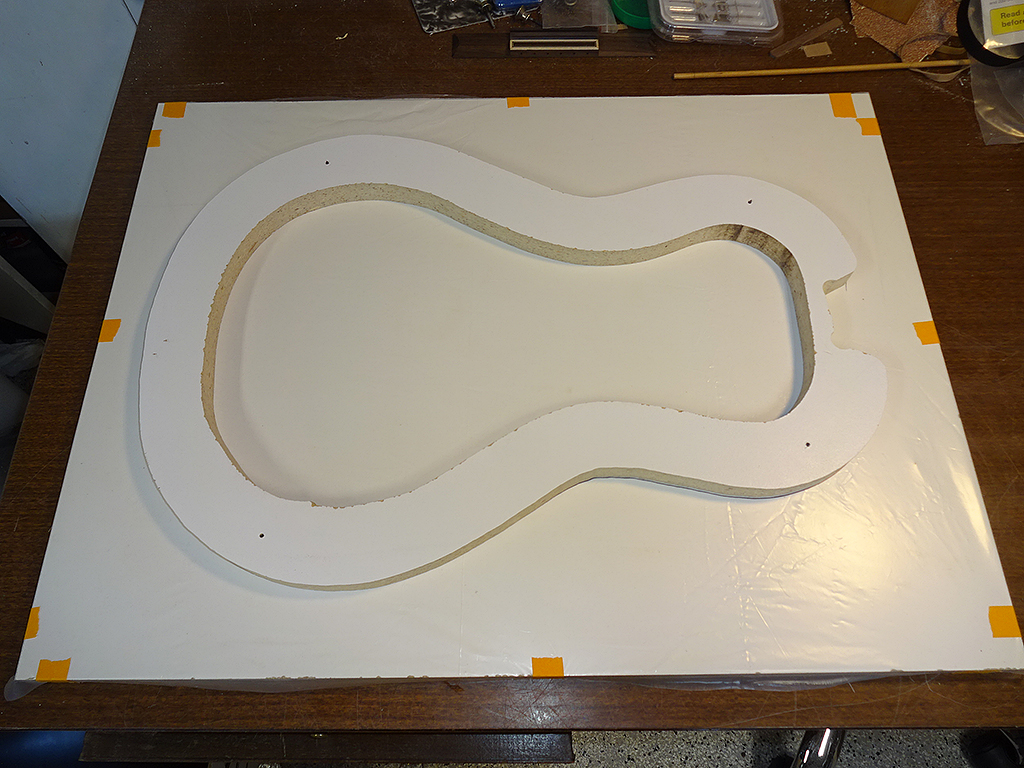
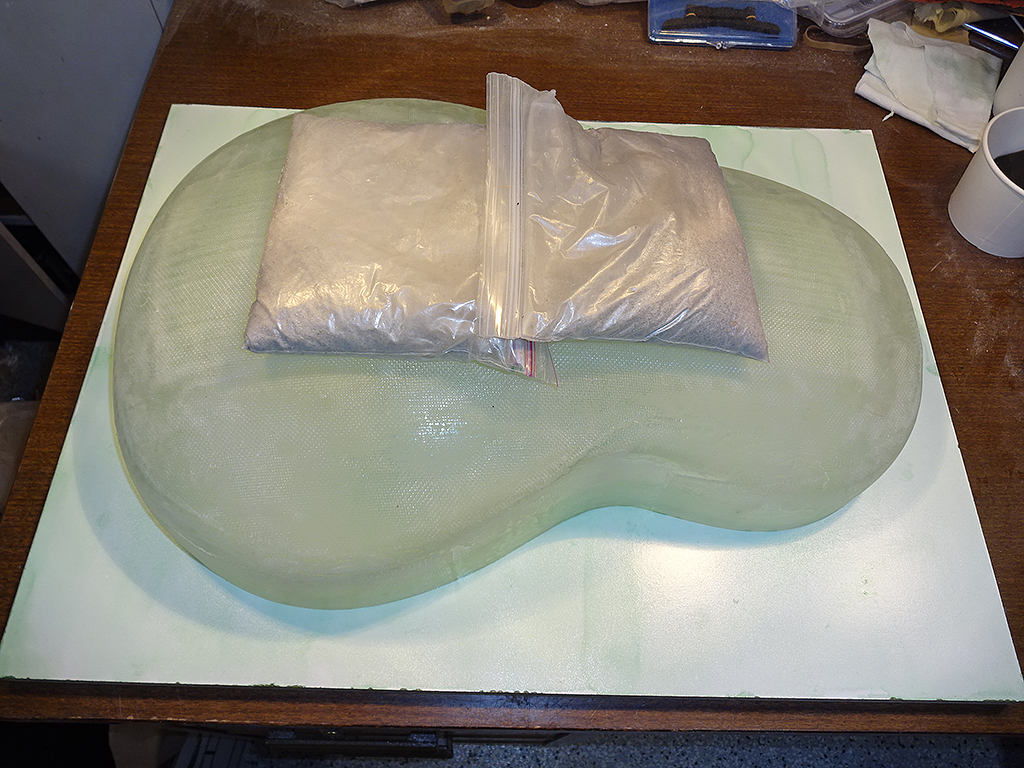
Parlor insert is temporarily attached to the parting plate with screws.
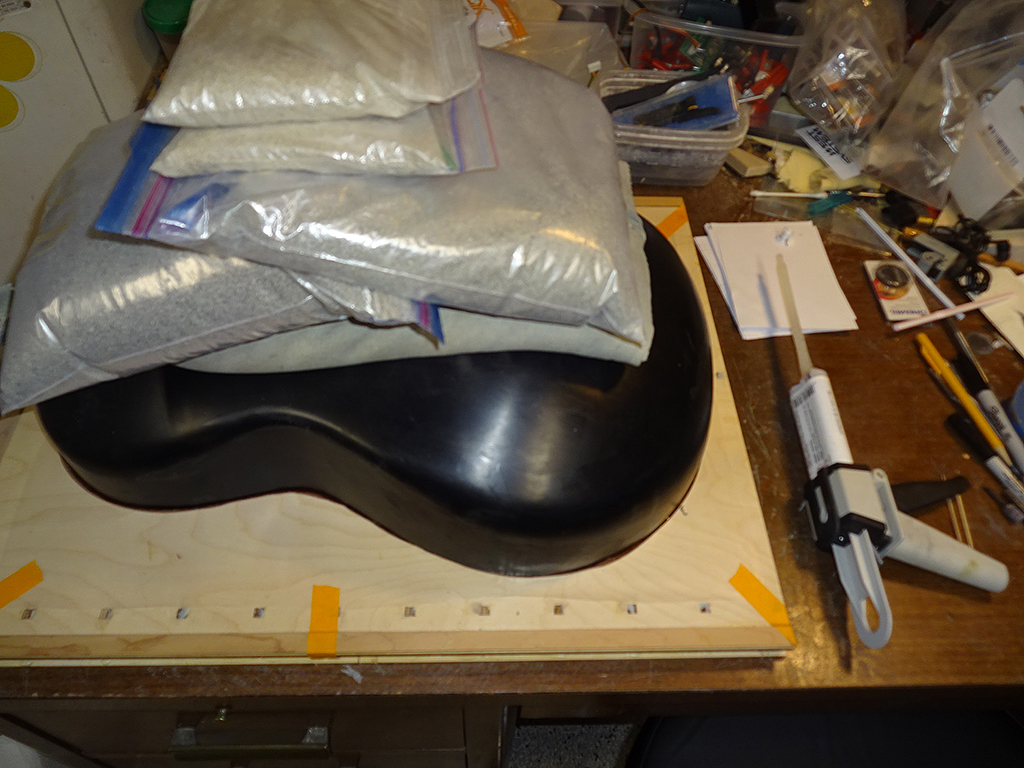
Because I want the insert to remain attached to the bowl, but not to the parting plate, I taped a layer of visqueen to the parting plate, then re-attached the insert. I did the same thing to the deep bowl.
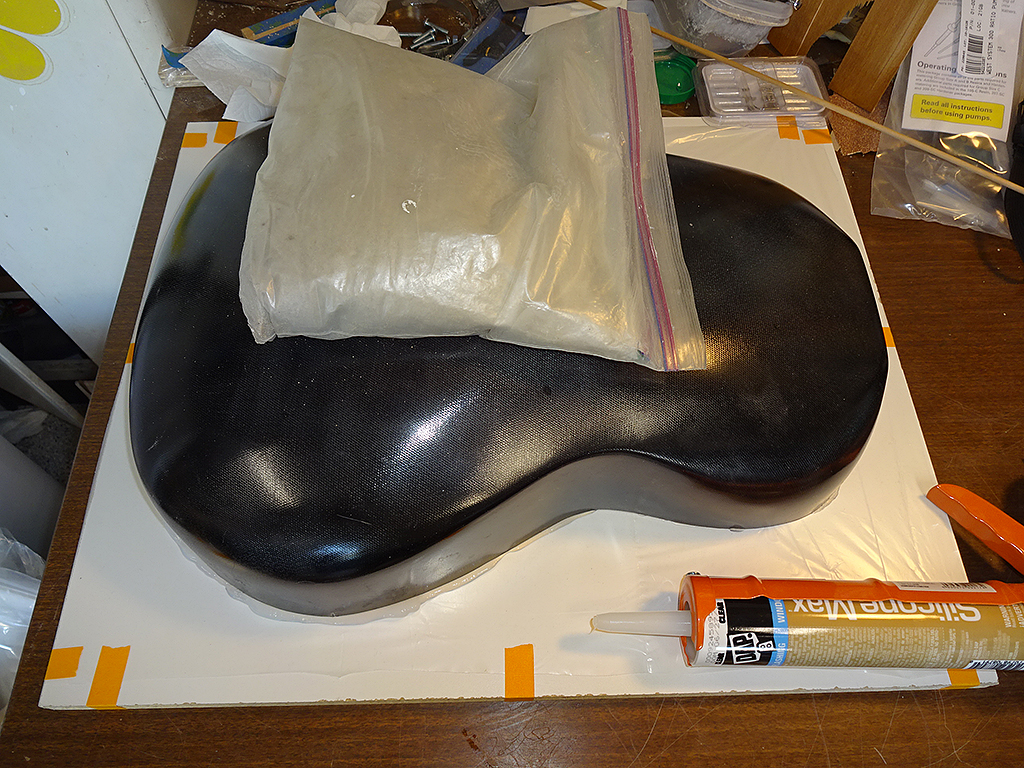
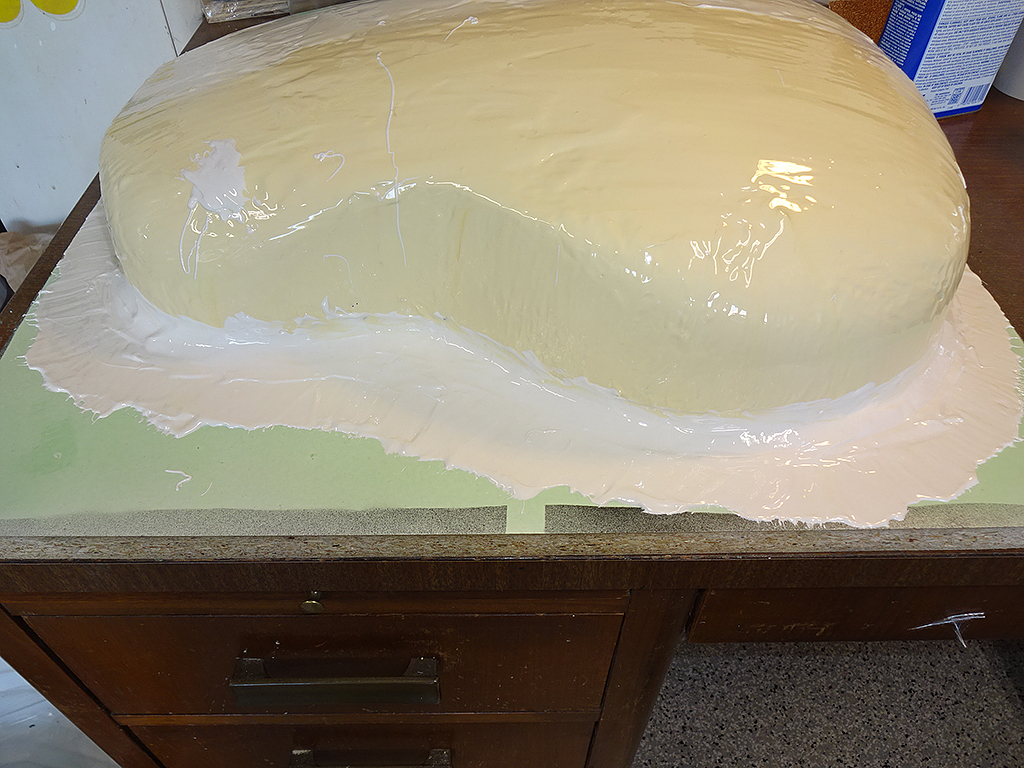
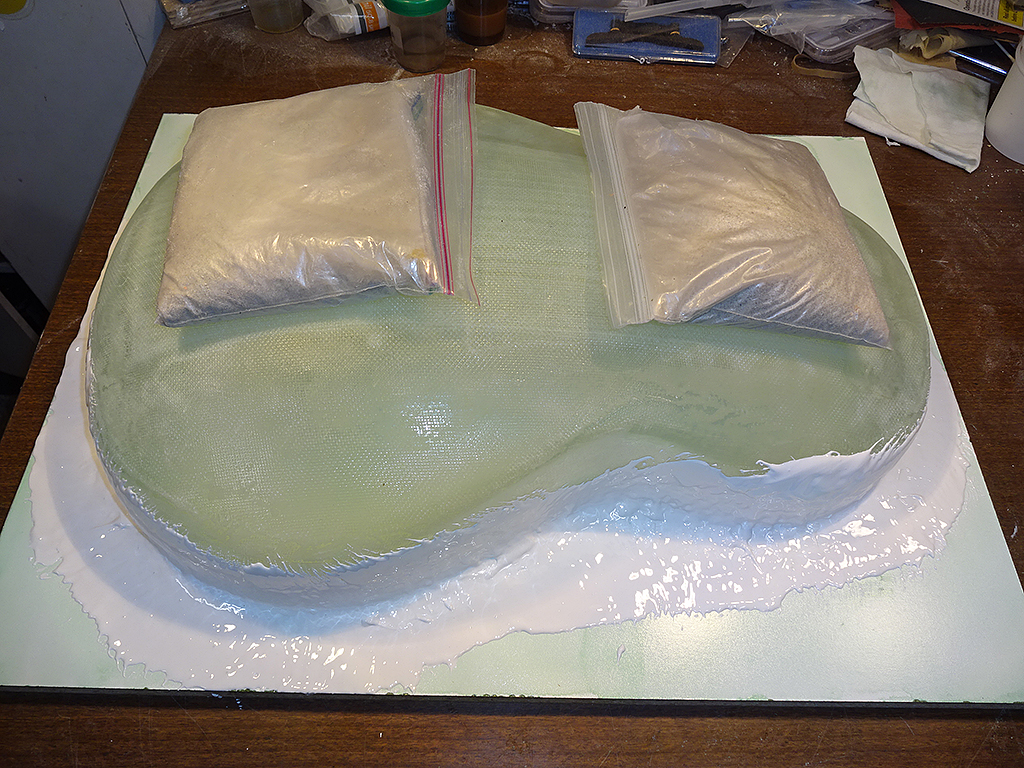
I ran a large bead of silicone around the insert(s), then pushed the bowl(s) onto the insert(s) so the top(s) were flush with the parting plate(s), then thew a sandbag(s) onto the bowl(s) to hold them in place while the silicone dries. I'll let the silicone dry for 24 hours, then pull the bowl(s) off the parting plate(s).
Posted 2017-12-02 11:46 AM (#538198 - in reply to #537422) Subject: RE: Patch's Parlor Build...
Joined: June 2012 Posts: 2303
Location: Lake Forest, CA
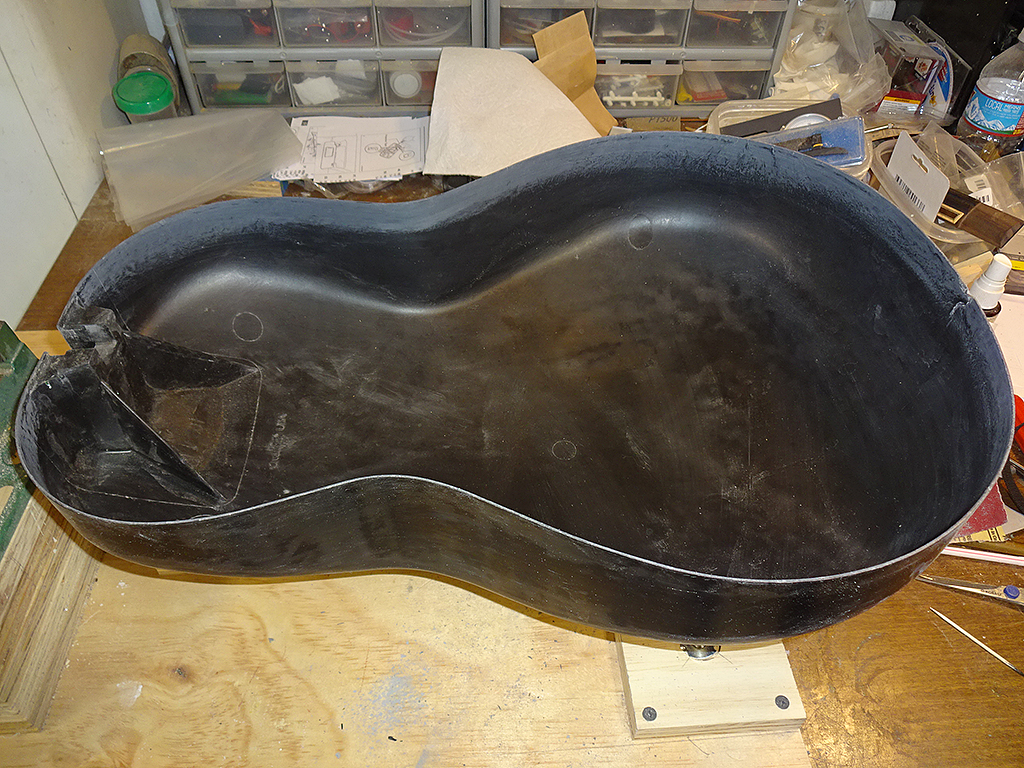
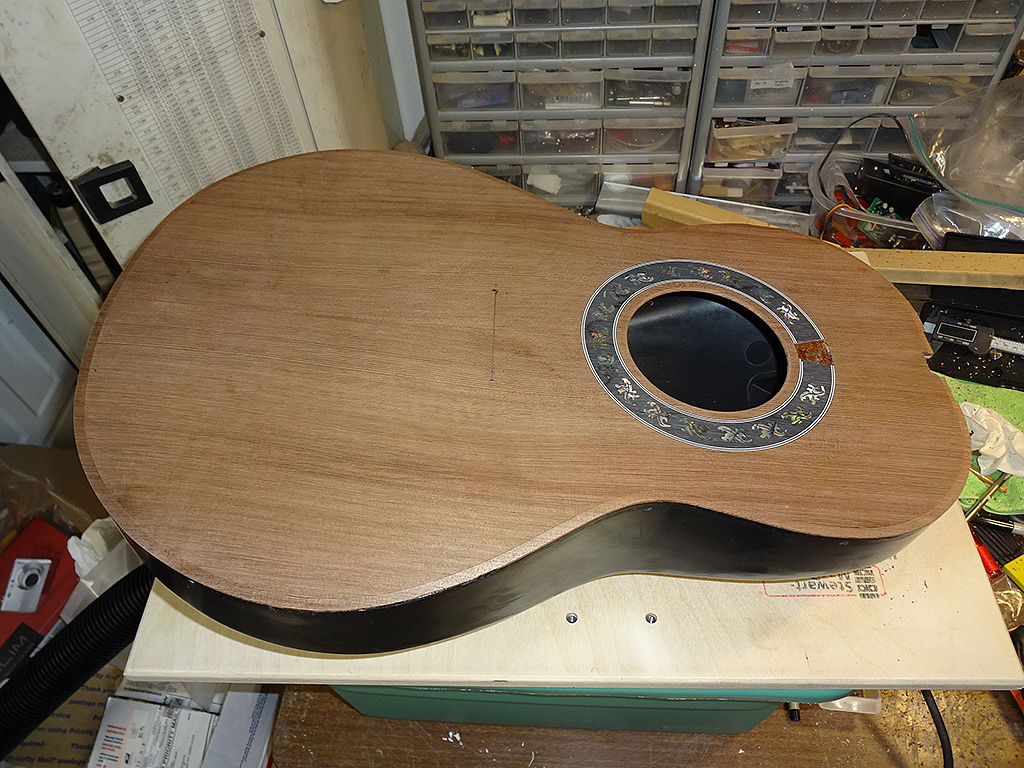
When we last met I had temporarily glued the bowls to the inserts. Now it's time to start prepping them for molding.
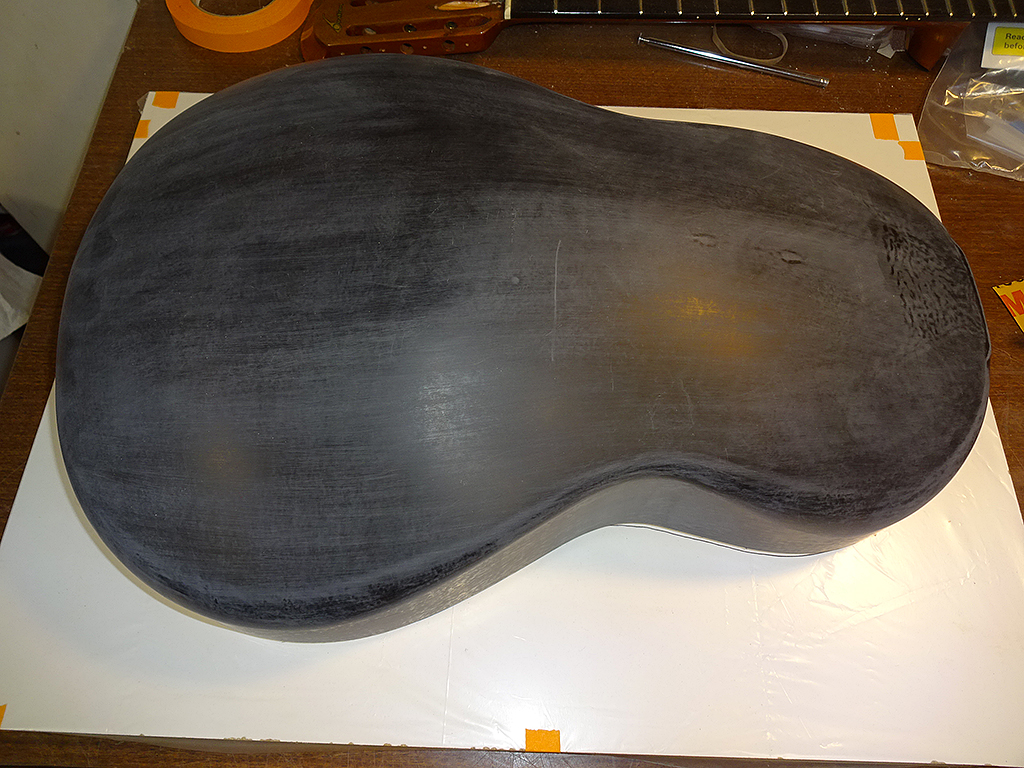
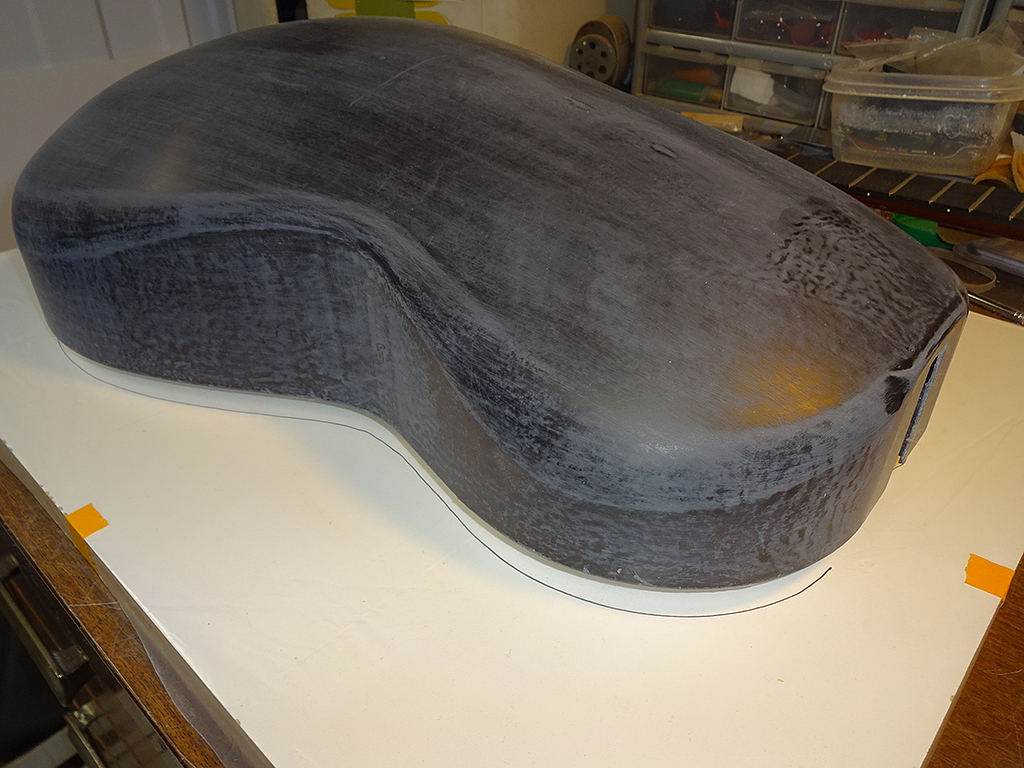
First step is to sand them in preparation for priming. As you can see, even though the parlor bowl looks smooth, it really has a fair amount of wrinkles that resulted from the compression molding of the SMC. Without preparation, these would have been transferred to the new molds.
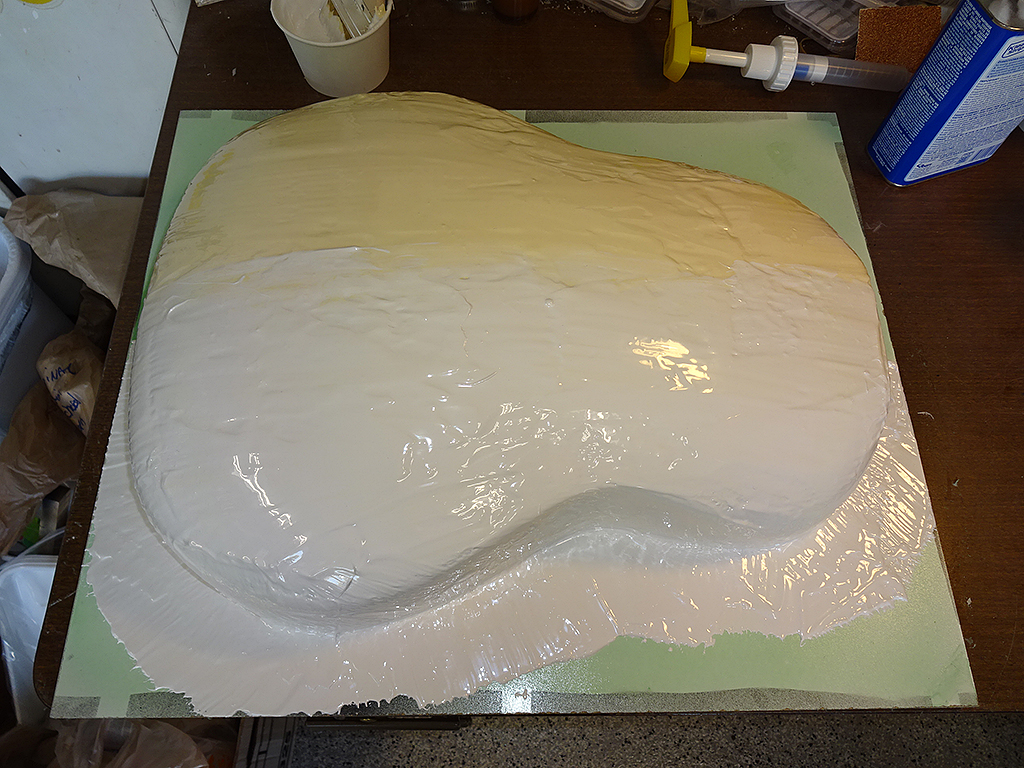
The parlor bowl has been primed and sanded. It's ready for waxing and the mold release layer.
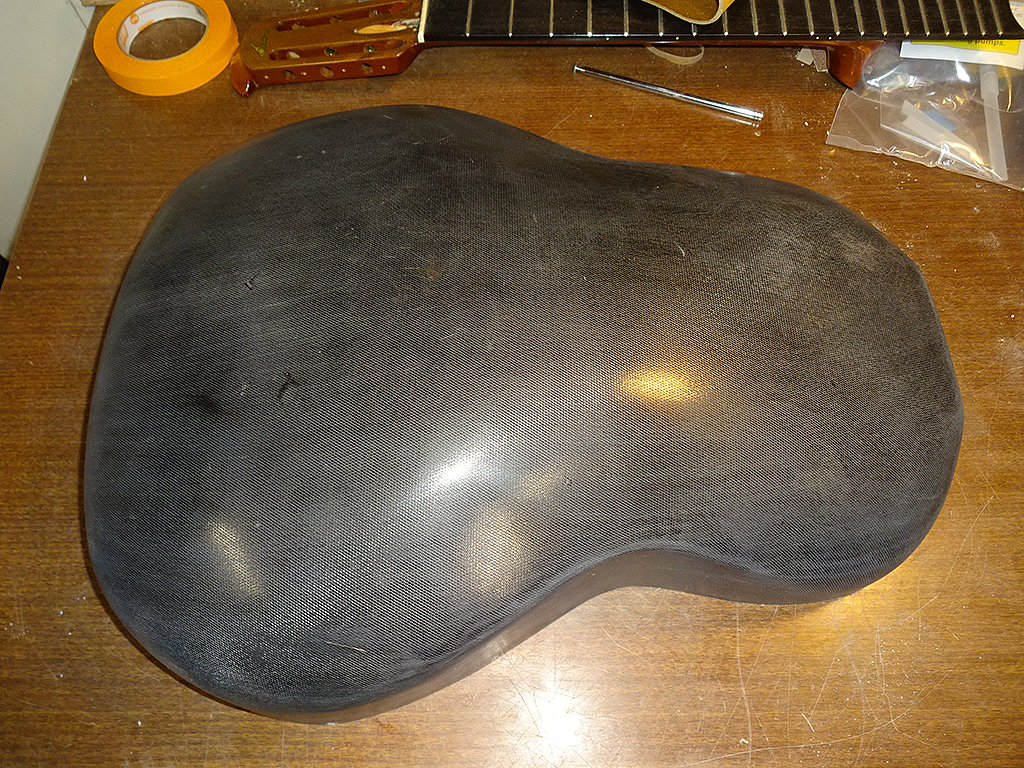
The deep bowl had a similar problem. The weave of the cloth needs to be filled to provide a smooth surface.
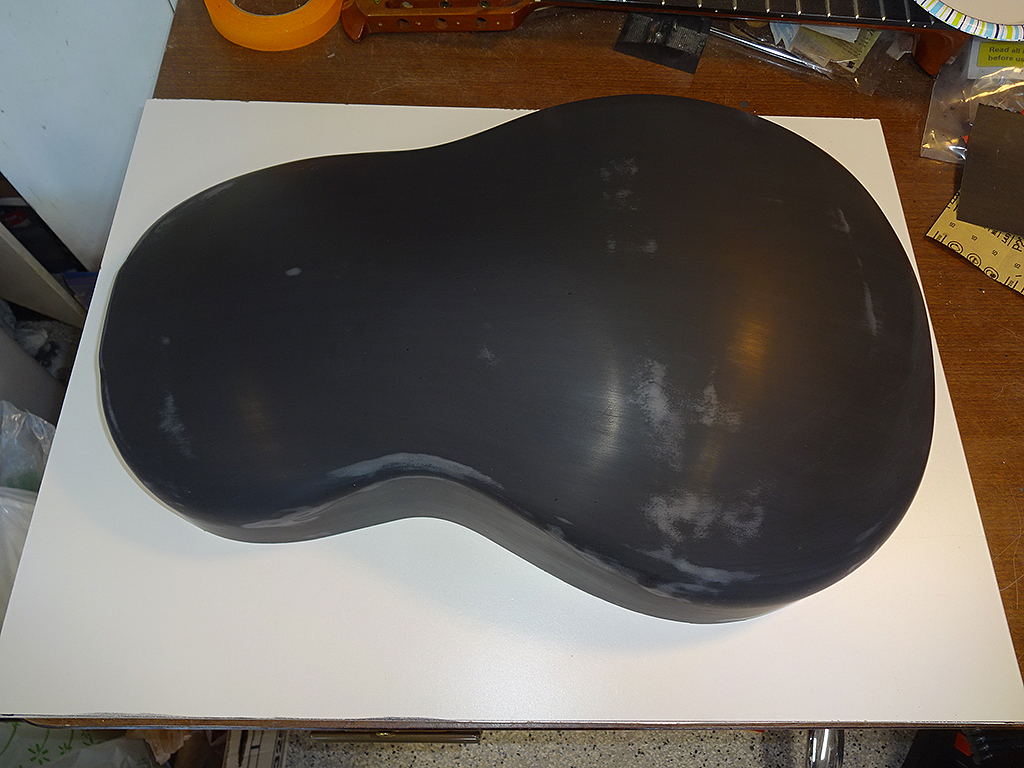
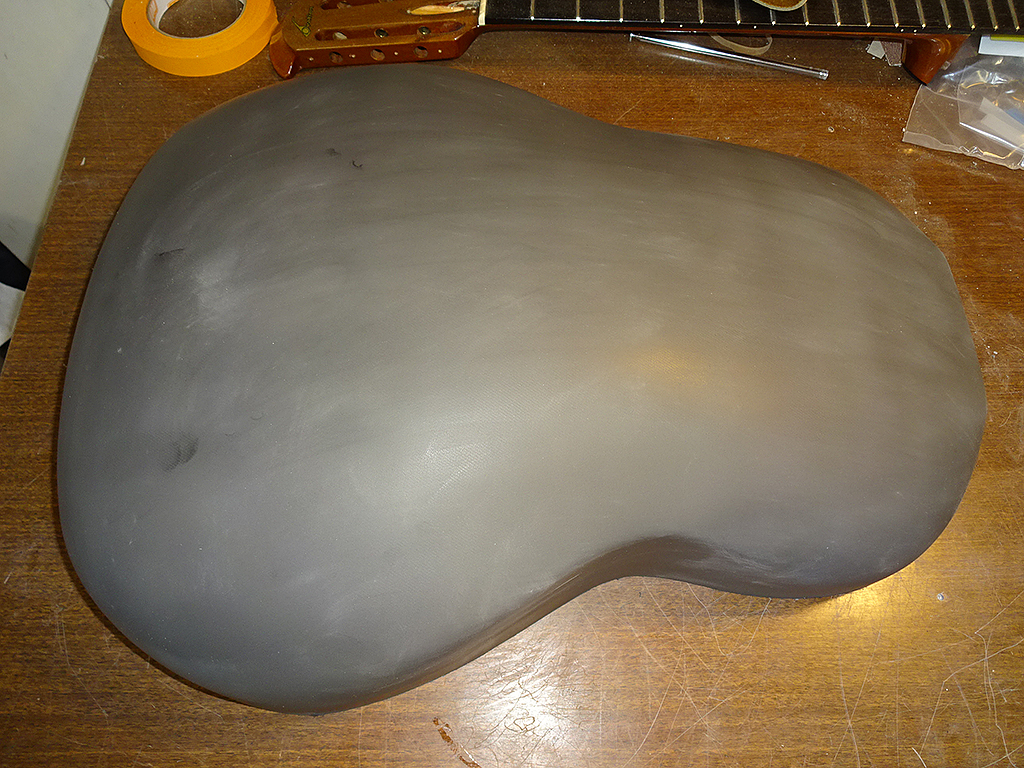
The deep bowl has also been primed and is ready for the waxing and applying the mold release layer.
The parlor bowl and deep bowls have had 3 layers of wax, then a layer of poly-vinyl alcohol (PVA) mold release. The basic idea is to prevent the molding epoxy from sticking to the molds. First the plug, in this case, the bowls are waxed. Then the PVA mold release is applied.
The wax keeps the PVA from sticking to the plug. The PVA keeps the epoxy from eating through the wax and bonding to the plug. The PVA is an interesting compound. When dry, it forms a barrier that the epoxy can't penetrate, but can be dissolved with plain water.
The surface of the PVA is a lot smoother than it looks in the photos below. Next job is to start laying up the molds.
Posted 2017-12-02 11:53 AM (#538199 - in reply to #537422) Subject: Re: Patch's Parlor Build...
Joined: June 2012 Posts: 2303
Location: Lake Forest, CA
I might add that when I first started making molds I would paint the plug with a hard finish like epoxy paint, then polish the plugs to a mirror finish. I waxed the plugs, but didn't use PVA, so the epoxy would eat right through the wax and bond to the paint. I had a problem with the molds sticking to the plugs. The only way to get the plug out of the mold was to destroy the plug.
When I started using PVA I discovered that the mirror finish on the plugs really didn't matter because the PVA was a new layer and that was the surface that was molded.
Now I just prime the plugs, then sand it smooth with up to 600-grit, then wax and spray the PVA. It's a lot easier and a lot less time-consuming.
Posted 2017-12-03 9:12 PM (#538223 - in reply to #537422) Subject: RE: Patch's Parlor Build...
Joined: June 2012 Posts: 2303
Location: Lake Forest, CA
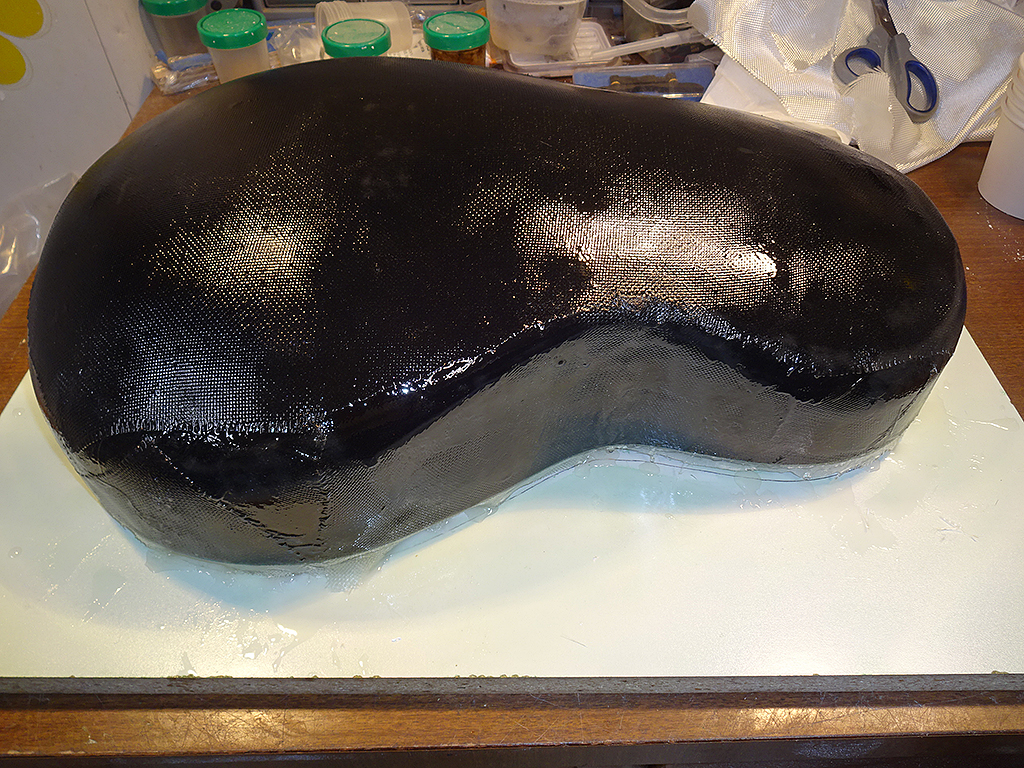
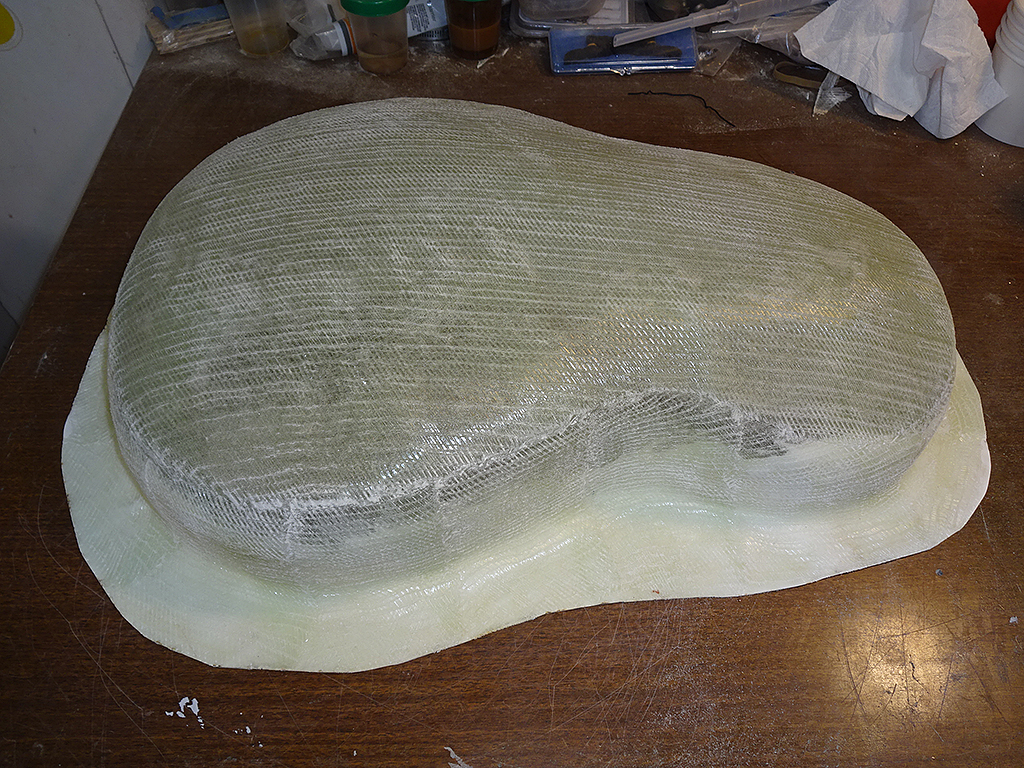
The molding process has begun. Because I'm using a different brand of epoxy than I normally use I decided to mold my deep bowl first. This way, if there's any problems Patch's parlor bowl is still safe. (Made from unobtainium)
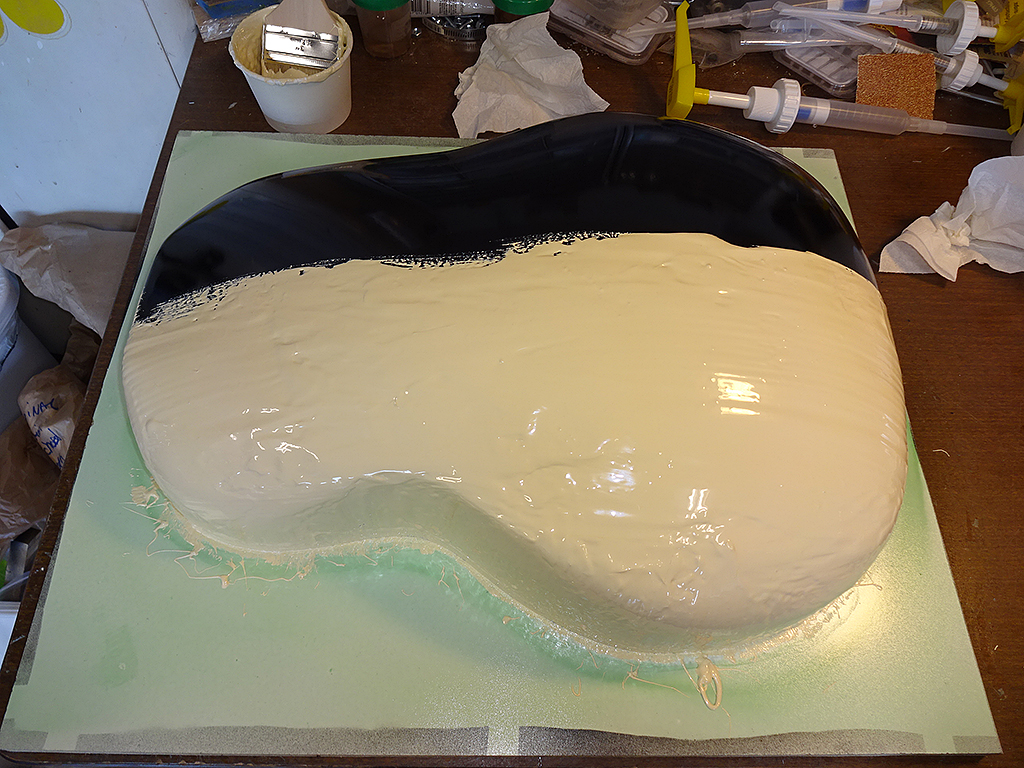
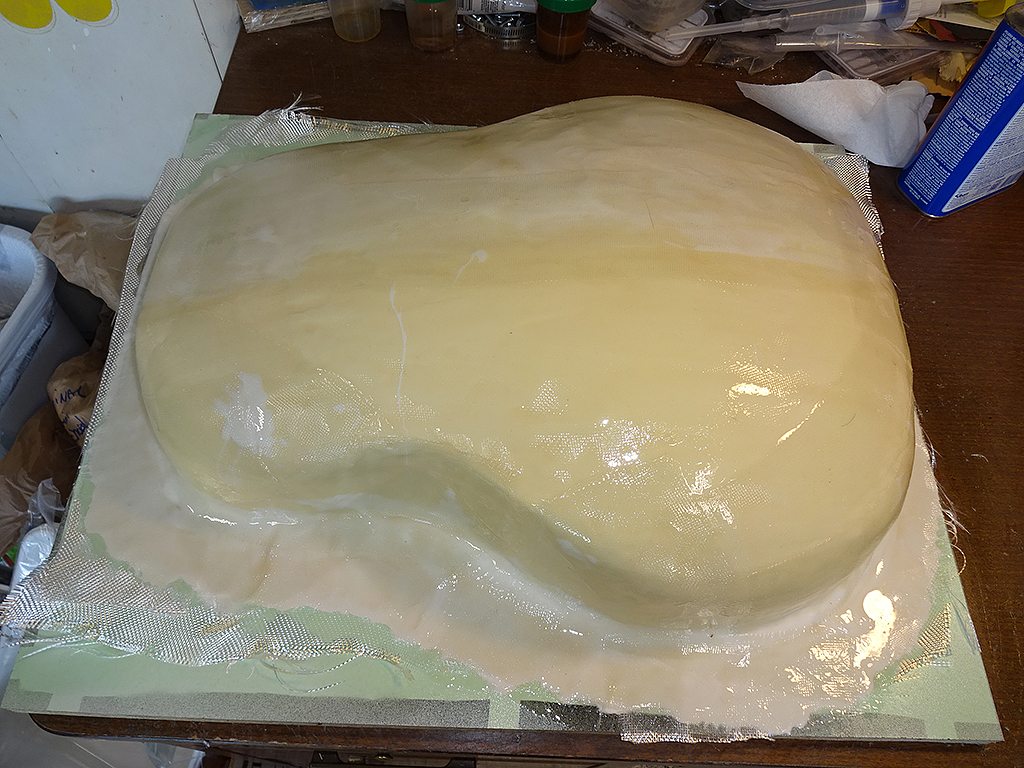
First step is to apply the surface coat. This is similar to a gel coat, but with thickened epoxy instead of polyester resin.
I'm sure you've noticed the difference in color between the treble and bass bouts. I'd originally planned to add some yellow dry artist pigment to the surface coat so that I could see the difference between the white surface coat and the parting plate. But, because the PVA is tinted green, this is really unnecessary. Also the surface coat is really thick, so blending in the pigment was a royal pain in the butt.
Next, a fillet of surface coat is laid into the joint of between the bowl and the parting plate. This is done for two reasons. First, it adds strength to this area of the mold. Second, the cloth doesn't really want to conform to a sharp angle, so this helps prevent voids from forming during the lay-up.
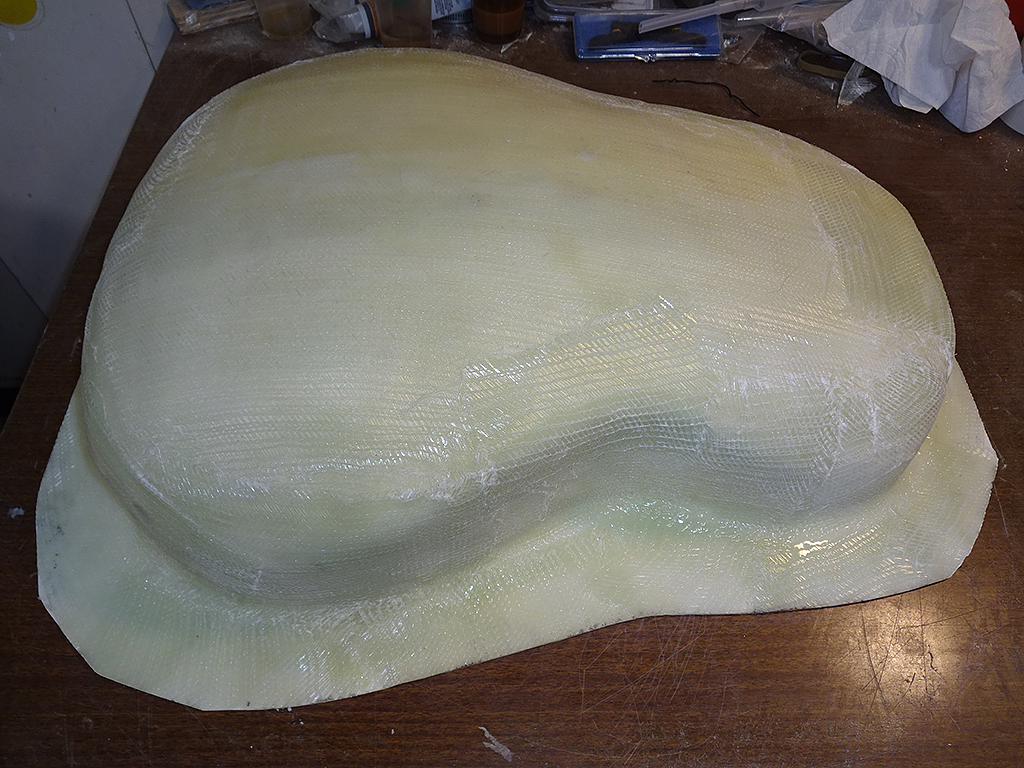
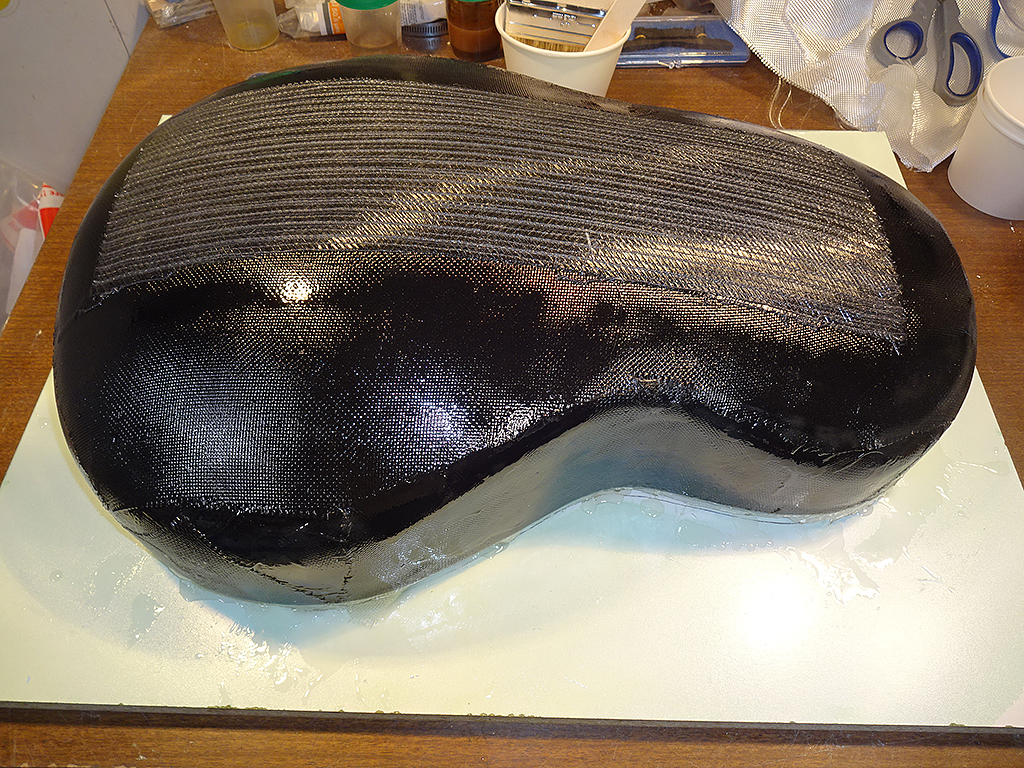
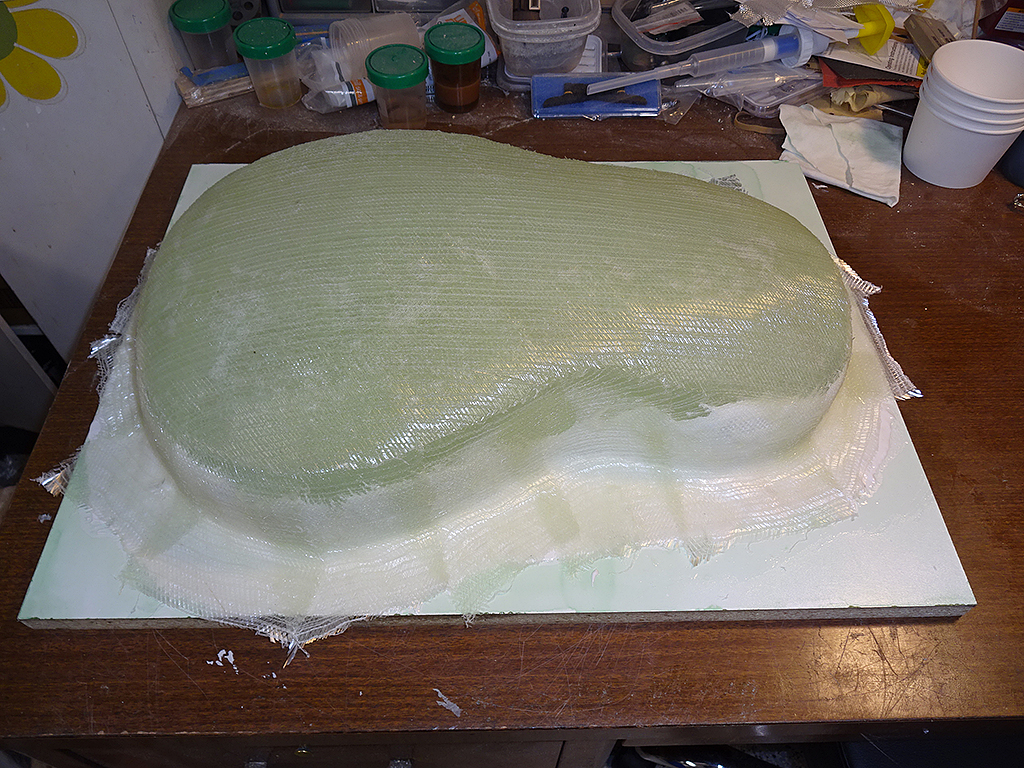
First layer(s) of 5-oz. cloth are laid-up.
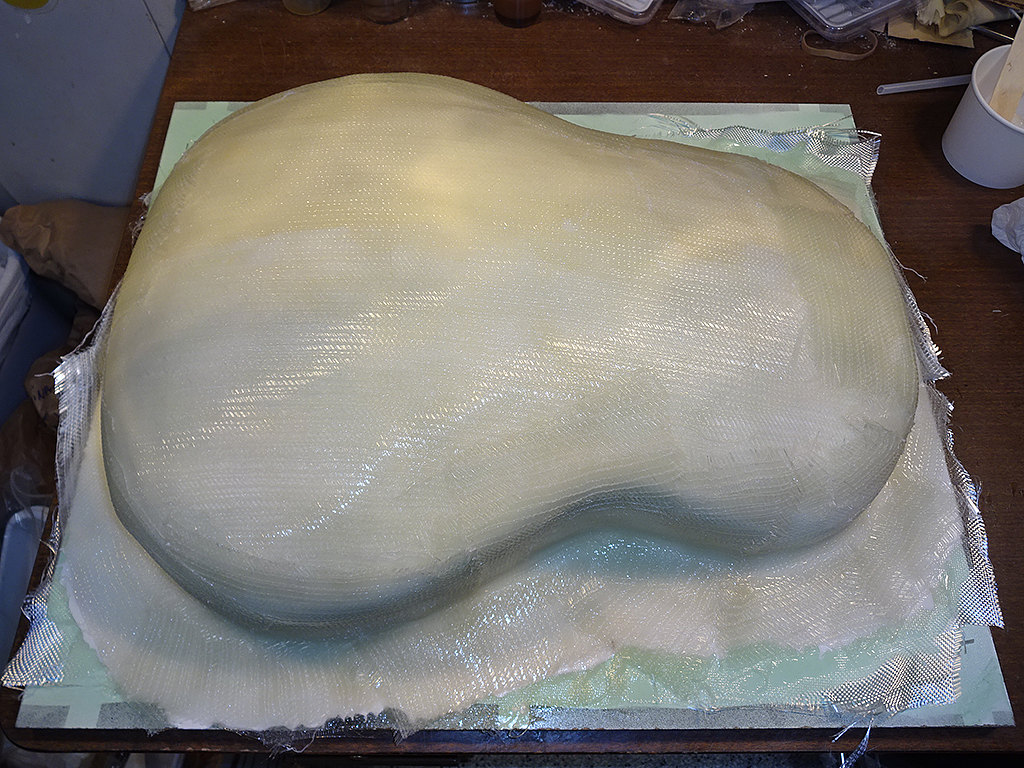
Final layer(s) of 17-oz. bias knitted cloth are on the plug. I'll let the epoxy cure for 24 hours, then I'll separate the plug and mold.
Posted 2017-12-04 8:03 PM (#538234 - in reply to #537422) Subject: RE: Patch's Parlor Build...
Joined: June 2012 Posts: 2303
Location: Lake Forest, CA
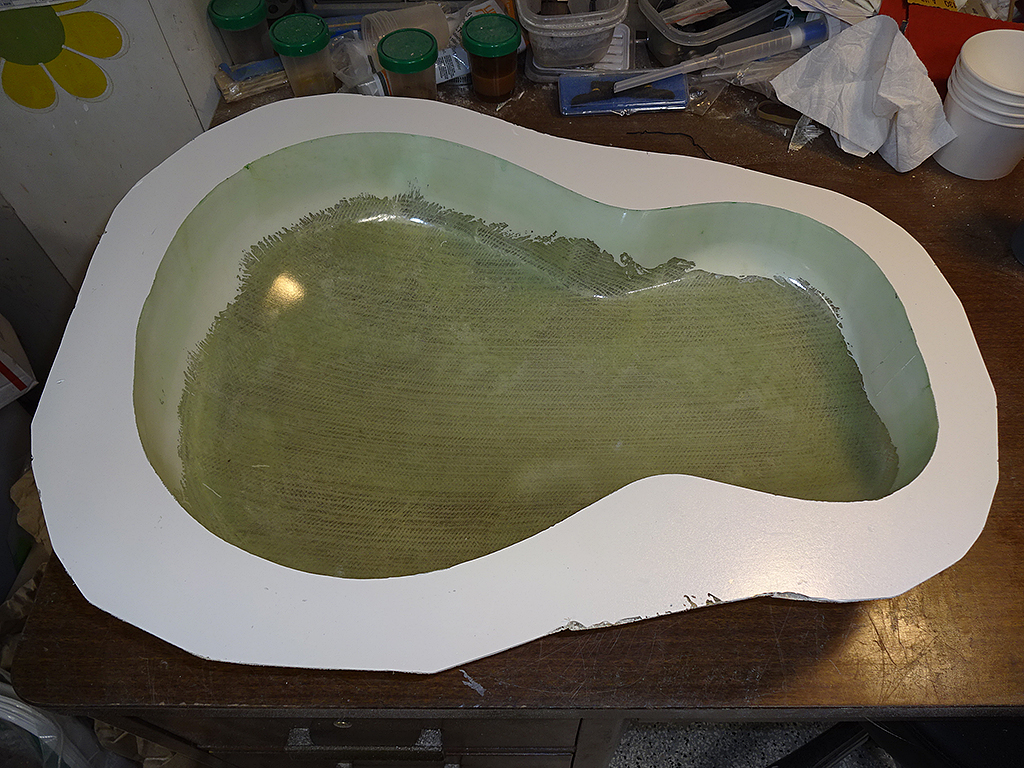
And now, the moment of truth...
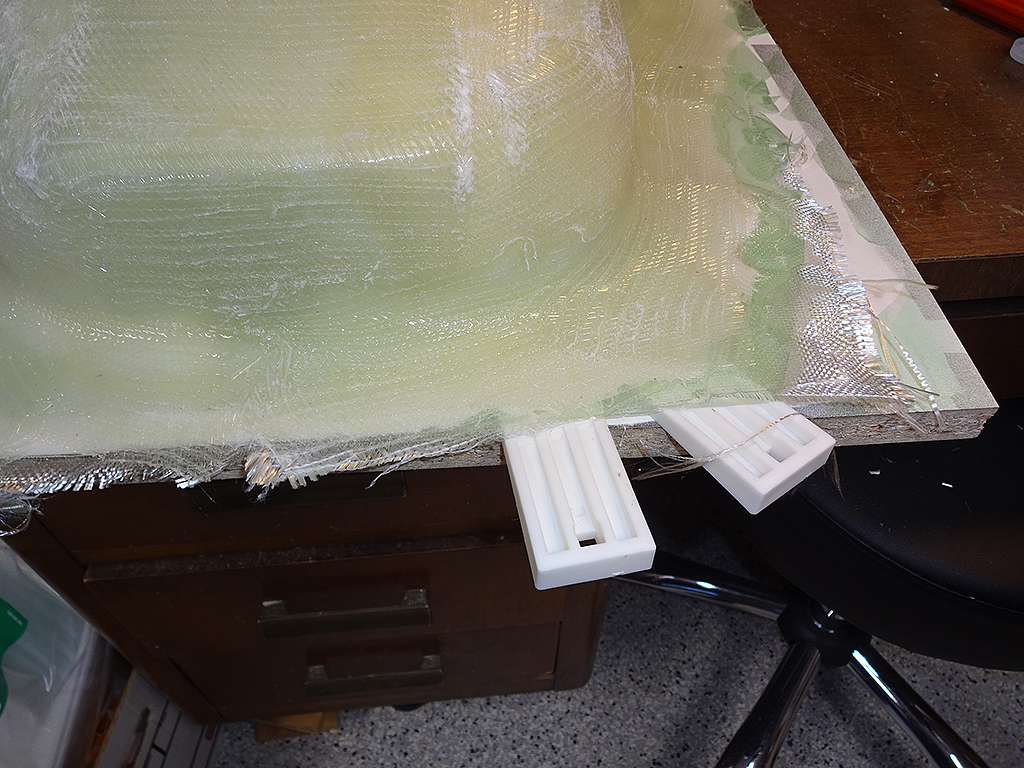
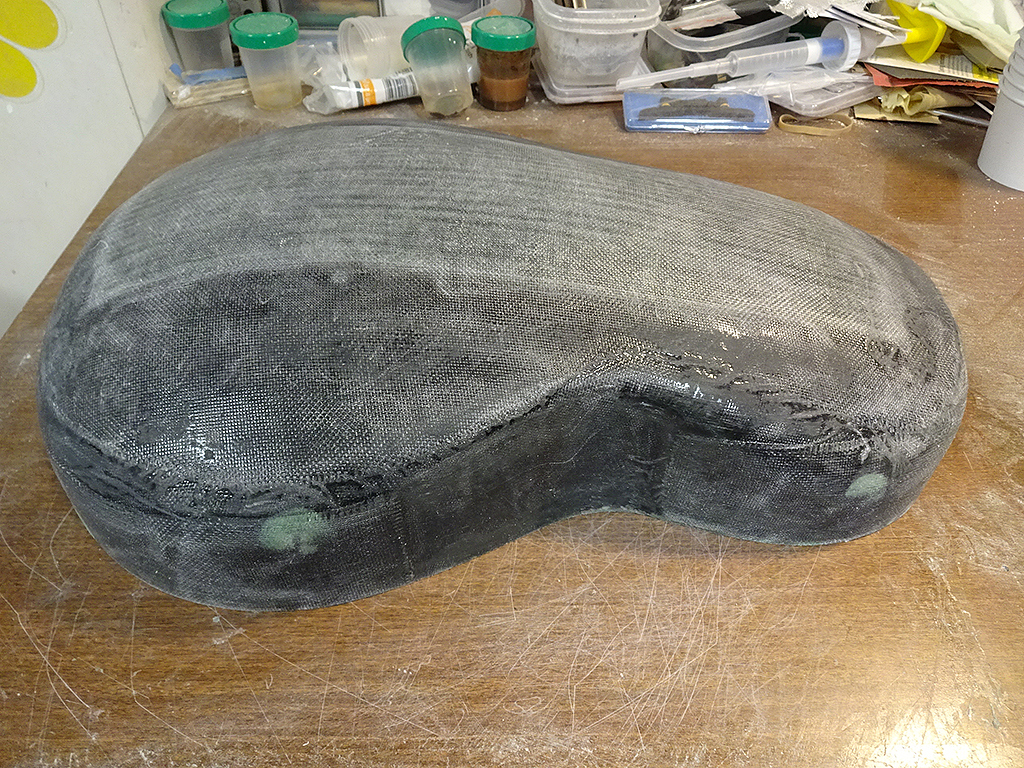
The first step to de-molding the plug is to use a couple of plastic wedges to walk around the periphery to break loose the parting plate.
Normally the next step would be to pour water in the gap to start dissolving the PVA. While looking into the gap between the mold and the parting plate I saw that the parting plate was loose from the mold, but that the bowl was still stuck to the inside of the mold.
And, success! After some careful use of the wedges working my way around the bowl and pouring water into the gap I was able to get the bowl out of the mold with no damage to either one. (Woo hoo!)
This is why I built the plug to be disassembled and with the hole in the insert. I've had too many plugs stuck inside the mold. I unscrewed the parting plate from the bowl/insert which gave me access to the bowl/insert. I had to pretty much destroy the MDC insert to separate it from the bowl. This would allow the bowl to flex enough for me to pour water down in the gap between the bowl and the mold.
There are a couple of very minor flaws in the mold where some un-cured (poorly mixed?) surface coat were applied, but for the most part, I'm very happy with how it turned out and it can be used to lay up my own bowls. I'll use my Dremel and cutoff wheel to trim the excess mold flange in the next few days.
This bowl is still very usable. I've on;y been saving it so I could splash a mold from it. Now that this is done and because this is a very high quality molded piece, I'll use this to build a guitar, probably an Elite with quintad braces and definitely a torrefied top.
Posted 2017-12-05 7:13 PM (#538251 - in reply to #538234) Subject: RE: Patch's Parlor Build...
Joined: December 2016 Posts: 128
DanSavage - 2017-12-04 8:03 PM
This is why I built the plug to be disassembled and with the hole in the insert. I've had too many plugs stuck inside the mold. I unscrewed the parting plate from the bowl/insert which gave me access to the bowl/insert. I had to pretty much destroy the MDC insert to separate it from the bowl. This would allow the bowl to flex enough for me to pour water down in the gap between the bowl and the mold.
I just reread this.
Question, since it seems the surface of the hollowed MDC has less adhesion to the parting plate than the bowl does inside the mold, have you thought about temporarily attaching the insert to the parting plate with screws, then separate the bowl/mold as you did before, but mostly pre-cut the insert as a disposable part of the molding process?
While it was probably a RPIN to destroy the MDC, it's a fair trade-off.
Posted 2017-12-05 8:44 PM (#538256 - in reply to #538251) Subject: RE: Patch's Parlor Build...
Joined: June 2012 Posts: 2303
Location: Lake Forest, CA
DarenSavage - 2017-12-05 5:13 PM
I just reread this.
Question, since it seems the surface of the hollowed MDC has less adhesion to the parting plate than the bowl does inside the mold, have you thought about temporarily attaching the insert to the parting plate with screws, then separate the bowl/mold as you did before, but mostly pre-cut the insert as a disposable part of the molding process?
While it was probably a RPIN to destroy the MDC, it's a fair trade-off.
Oooh! High-end stuff!
I got it wrong, sorry. It's MDF, not MDC. (medium density fiberboard)
Yes, I agree. You and I have been down this road too many times for me to think that the plug and mold would separate cleanly. (it didn't) So, I designed this with the worst-case scenario in mind. LOL!
Actually, I just used a pair of water-pumps (channel lock pliers) to destroy the insert. It went pretty fast once the first section was broken away. That's also why I 'glued' the bowl and insert using silicone.
The insert and the parting plate were screwed together with four screws. When I pushed the wedges between the mold and the parting plate, the plate flexed because there were too few screws to keep the plate from flexing, even though it was 3/4" thick. But, the mold flange was also flexing and even cracked in a couple of spots. More screws may or may not have kept the insert and flange from flexing.
In this case, the only thing that saved the day was that the bowl was pretty flexible, so I was able to force the wedges between the bowl and the mold after I'd pulled the insert from inside the bowl. As I forced the wedges between the bowl and the mold I poured water into the gap to soften the PVA. Eventually, as the perimeter of the bowl was able to be pulled away from the mold I got to the point where I used the water-pumps to grab onto the bowl and was able to work the bowl out of the mold.
In retrospect, I did the right thing by molding my bowl first. This has me re-thinking how I'm going to mold Patch's bowl. The SMC is not nearly as flexible as the woven cloth deep bowl, so I won't be able to use the same technique I did on the deep bowl. In the past, I've read that some modeling guys (on RCGroups) like to make their molds flexible so that it makes it easier to de-mold the plugs, and eventually the molded fuselages. So, I'm thinking of going down this route.
Instead of making a completely rigid mold like I did with the deep bowl, I'm thinking about ditching the surface coat and instead laying up the mold like I used to lay up the fiberglass parts so the mold will be flexible enough to be pulled away from the plug. This will entail laying up a 1-3/4-oz layer, then a 5-oz. layer. This will prevent any print-through of the cloth into the mold. I'm even thinking of ditching the flange in the initial lay-up.
Once the mold is separated from the SMC bowl, I'll reinforce it with additional layers of the 17-oz. tooling cloth I used on the deep bowl mold to make it completely rigid. To this end, I'm thinking of applying some dacron peel ply fabric to the top of the 5-oz cloth so that the 17-oz tooling layer will have complete adhesion. This is the same stuff we used to use on the seam of the Su-27 inlet duct seams. It will allow good adhesion without sanding. Then, once bowl and the mold is separated, I'll add the flange.
Posted 2017-12-06 12:12 PM (#538268 - in reply to #537422) Subject: Re: Patch's Parlor Build...
Joined: February 2016 Posts: 1769
Location: When??
Reading above, it sounds like the Savage brothers are buttering each other up for premium Christmas presents this year.. so we'll expect a full report on the results of that afterward. Oh, and please don't forget this year's family photo, including Greta!
please-thank-you
Posted 2017-12-06 9:06 PM (#538279 - in reply to #538256) Subject: RE: Patch's Parlor Build...
Joined: December 2016 Posts: 128
DanSavage - 2017-12-05 8:44 PM
I got it wrong, sorry. It's MDF, not MDC. (medium density fiberboard)
Yes, I agree. You and I have been down this road too many times for me to think that the plug and mold would separate cleanly. (it didn't) So, I designed this with the worst-case scenario in mind. LOL!
Ahh, the heartbreak part.
Instead of making a completely rigid mold like I did with the deep bowl, I'm thinking about ditching the surface coat and instead laying up the mold like I used to lay up the fiberglass parts so the mold will be flexible enough to be pulled away from the plug. This will entail laying up a 1-3/4-oz layer, then a 5-oz. layer. This will prevent any print-through of the cloth into the mold. I'm even thinking of ditching the flange in the initial lay-up.
Once the mold is separated from the SMC bowl, I'll reinforce it with additional layers of the 17-oz. tooling cloth I used on the deep bowl mold to make it completely rigid. To this end, I'm thinking of applying some dacron peel ply fabric to the top of the 5-oz cloth so that the 17-oz tooling layer will have complete adhesion. This is the same stuff we used to use on the seam of the Su-27 inlet duct seams. It will allow good adhesion without sanding. Then, once bowl and the mold is separated, I'll add the flange.
I think all of this is a great idea. I'll just throw out another one. You have a perfect test bed in your deep bowl. You don't have to go through the complete flange adding and strengthening process for this test.
Once the plug is pulled out of the mold, you'll know if the technique will work and then move onto Patch's bowl. You already have a rigid deep bowl mold, so the test is really to see if the flexible mold will work.
This would ensure that the technique will work without risking Patch's bowl (you can thank me later, monetarily Patch ).
Posted 2017-12-06 11:06 PM (#538281 - in reply to #538268) Subject: Re: Patch's Parlor Build...
Joined: December 2016 Posts: 128
Love O Fair - 2017-12-06 12:12 PM
Reading above, it sounds like the Savage brothers are buttering each other up for premium Christmas presents this year.. so we'll expect a full report on the results of that afterward. Oh, and please don't forget this year's family photo, including Greta!
please-thank-you
No, mon, I already have my dream guitar. While a parlor might be nice, my Custom Ultra sounds so sweet when played lightly that it's perfect for my parlor.
Happily, Greta is waiting with her sis Frannie for me at the Rainbow Bridge. I'll collect them on my way to heaven.
Posted 2017-12-06 11:56 PM (#538282 - in reply to #537422) Subject: Re: Patch's Parlor Build...
Joined: February 2016 Posts: 1769
Location: When??
Daren... my sincere condolences. I'm sure they'll both be happy to see you.. but we all rather hope it's later than sooner. And yes, your beautiful Custom Ultra still stirs envy in me.. no doubt.. and I don't even have a proper parlor to play in. I used to, but my wife stole it for a sewing room! So I one-upped her and turned the den into a studio... and I can say with certainty she's not going to be happy when I convert the kitchen into a shop like Dan's! That's what she gets for turning the garage into a workout room. It's a constant battle around here, I tell ya!
Posted 2017-12-07 11:14 PM (#538302 - in reply to #538282) Subject: Re: Patch's Parlor Build...
Joined: December 2016 Posts: 128
Thanks LOF. The Jr. B Girls and I had a great run together, pun intended. Greta and Frannie were littermates and remembered each other from puppyhood. There were a couple of initial squabbles like any siblings who get back together after being apart, but they learned pretty quickly he who buys the food makes the rules. The first rule is everyone has to get along.
The Jr. B part comes from their racing names; Jr. B's Greta and Jr. B's Frannie. Here's video that I managed to get their first summer back together when they were still puppy enough to love running together. While they would occasionally run together at the bark park, they never ran like this again. Once we had a treat of 4 greys running together at the bark park-Yowza! It was like a canine tornado. The other dogs just watched saying to themselves, "WTFudge?!"
I don't have video of Frannie racing, but I was able to download Greta's first 16 races at Bluff's Run in Iowa. Here's a video of her winning her second Maiden (training) race.
Here's a video of Greta racing on 06/06/06. Seriously.
Back on topic. My Custom Ultra means a lot to me on several levels; spiritually, brotherly, and musically. I appreciate your kind words. I don't have a parlor, unless you want to count my living room.
Posted 2017-12-08 2:41 PM (#538307 - in reply to #537422) Subject: Re: Patch's Parlor Build...
Joined: February 2016 Posts: 1769
Location: When??
Awesome videos. It's nice that you are able to have the keepsake footage. And speaking of nights on the couch.. I think I'm going to try out your line, "He who buys the food makes the rules" on my wife. See if I can get my "parlor" back. Wish me luck.
Posted 2017-12-09 2:23 AM (#538315 - in reply to #538307) Subject: Re: Patch's Parlor Build...
Joined: December 2016 Posts: 128
Love O Fair - 2017-12-08 2:41 PM
And speaking of nights on the couch.. I think I'm going to try out your line, "He who buys the food makes the rules" on my wife. See if I can get my "parlor" back. Wish me luck.
Good luck, but I'm not laying any money on your outcome. She'll probably come back with something like, "She who cooks the food makes the rules."
This is why I recommend every man tests a new couch to see how comfy it is in case you have to sleep on it for a night or three.
Posted 2017-12-09 9:52 AM (#538318 - in reply to #538279) Subject: RE: Patch's Parlor Build...
Joined: June 2012 Posts: 2303
Location: Lake Forest, CA
DarenSavage - 2017-12-06 7:06 PM
Ahh, the heartbreak part.
I think all of this is a great idea. I'll just throw out another one. You have a perfect test bed in your deep bowl. You don't have to go through the complete flange adding and strengthening process for this test.
Once the plug is pulled out of the mold, you'll know if the technique will work and then move onto Patch's bowl. You already have a rigid deep bowl mold, so the test is really to see if the flexible mold will work.
This would ensure that the technique will work without risking Patch's bowl (you can thank me later, monetarily Patch ).
That's a fair suggestion. If I make a flexible mold on the outside of the parlor bowl with no flange, it'll be much easier to remove, so I don't think there will be any risk to Patch's bowl.
Also, since the MDF insert is no longer inside, the deep bowl is really too flexible to make a flange-less mold and there's no way to mount the bowl for the lay-up. Plus, I really don't want to make another insert.
Posted 2017-12-15 12:58 AM (#538350 - in reply to #537422) Subject: RE: Patch's Parlor Build...
Joined: June 2012 Posts: 2303
Location: Lake Forest, CA
So, it's been a couple of weeks.
I sanded the outside of the deep bowl mold so the fiberglass splinters don't cut up my hands while handling it and trimmed the flange.
Now, this is ready to mold deep bowls. I've got some 8.5-oz 2x2 twill cloth on order, so I will probably mold a test bowl in the next couple of weeks or so.
I would have been done with the parlor bowl mold a few days ago, but I ran into a problem of my own making. Read on.
Since I'd planned to mold the parlor bowl and flange in two steps instead of one, I prepped the bowl and parting plate by waxing them and applying a fresh layer of PVA.
I mounted the bowl so it was about an inch off the parting plate, cut the cloth pieces I needed, mixed up the epoxy and laid up the bowl. Under normal circumstances the epoxy will start to gel, or what's known as the green state in a few hours. It's not gooey or tacky, but not yet fully cured. It's at this stage that it's easiest to trim.
After a few hours, the epoxy was still gooey. Given how slowly it was curing, I figured it would be a few more hours before it was green, so I turned on the heat lamps, then went to bed. When I got up in the morning, I checked it and it wasn't as gooey, but it was still was very soft and still very tacky. So, I carefully trimmed the edge of the bowl and left it under the heat lamps until I got home from work.
When I got home, I checked it and it was still very tacky. Weird. Since it hadn't been quite the full 24 hours for the epoxy to reach full cure, I left it for a couple more hours. I checked it again and still very tacky.
Hmmm... Normally, epoxy only acts like this when it's either very old, or not mixed properly. I knew I'd measured it carefully, so I checked the label on the can of hardener, which tells the proportion of mixing.
Whoopsie! I found the problem. The surface coat is mixed by weight to a ratio of 100:11. The epoxy is mixed by weight to a ratio of 100:27. I'd mixed the epoxy using the surface coat ratio, which means that I'd only put in less than half the amount of hardener than what was needed. No wonder it never cured.
Luckily, I'd put a layer of PVA on the bowl before I started, so I was able to carefully roll the epoxy and glass off the bowl leaving it pretty clean. I also cleaned the uncured epoxy off the parting plate using denatured alcohol.
Time to start over. I waxed the bowl and the parting plate and sprayed a fresh coat of PVA. (again) I cut new pieces of cloth while I waited for the PVA to dry. This time I carefully mixed up a new batch of epoxy using the correct ratio and started the lay-up again.
The 1-3/4 oz. and 5-oz cloth is on.
I added a strip of 17-oz tooling cloth to reinforce the center of the bowl, then another layer of 5-oz cloth on top of that.
I let this cure until it was green, then trimmed the lay-up so it was flush with the top of the bowl and let it cure for 24 hours.
Once it was cured, I separated the bowl from parting plate and fully sanded the outside while it was still on the plug so it was ready for building up the flange.
The bowl is separated from the plug and both are in good condition.
I cleaned up the parting plate, waxed it and added a fresh layer of PVA. I set the bowl onto the parting plate, then put a couple of small sand baggies on it to keep it from moving while I built up the flange.
Surface coat has been added to make the flange and to build up the fillet area between the bowl and flange.
Once the surface coat had kicked over to the green state, I removed the sand baggies and added tooling cloth to the sides and flange, then a final layer of tooling cloth to the bottom of the bowl. I turned on the heat lamps and left it to cure overnight.
Success! I removed the mold from the parting plate, trimmed the flange, sanded the outside so I don't cut up my hands and trimmed the flange.
I washed off the PVA and it is now ready to mold parlor bowls.
Phew! Finally I can get back to the process of building Patch's guitar.
Posted 2017-12-15 8:40 AM (#538354 - in reply to #538351) Subject: Re: Patch's Parlor Build...
Joined: June 2012 Posts: 2303
Location: Lake Forest, CA
Thanks, Art.
The only thing left on these molds is to glue on a couple of legs to the upper bout area of the flanges so they sit level.
I'll do that when I get ready to lay up the test bowls in a couple of weeks. Right now, I'd rather step away from the molding process and build Patch's guitar.
Posted 2017-12-15 12:43 PM (#538361 - in reply to #537422) Subject: Re: Patch's Parlor Build...
Joined: May 2011 Posts: 751
Location: Muenster/Germany
Again very exciting , almost incredible. How will you manage to build the structural reinforcements neccessary where the neck is going to be mounted? Do you want to copy the inside of the original bowls or do you have even better ideas?
Posted 2017-12-15 1:31 PM (#538363 - in reply to #538361) Subject: Re: Patch's Parlor Build...
Joined: June 2012 Posts: 2303
Location: Lake Forest, CA
Thanks, Jonmark and you're welcome.
Getting closer, Patch. After this molding stuff, building a guitar almost seems easy.
Michel,
Thanks. I'd planned to pretty much do it like the factory does with a large mahogany wood block. When I lay up the bowl, I'll add an extra layer of cloth at the neck block area to add strength.
Stewmac sells wood neck blocks, but I'm not sure it has enough height. I'll order one in the future to check it out. Failing that, I'll give JB a shout and see if I can get an OEM bolt on block like they use.
While the bare bowls are pretty flexible on their own, once you glue it to a top it forms a cantilever beam of sorts and gets really rigid.
Posted 2017-12-16 5:30 PM (#538380 - in reply to #537422) Subject: RE: Patch's Parlor Build...
Joined: June 2012 Posts: 2303
Location: Lake Forest, CA
Moving right along.
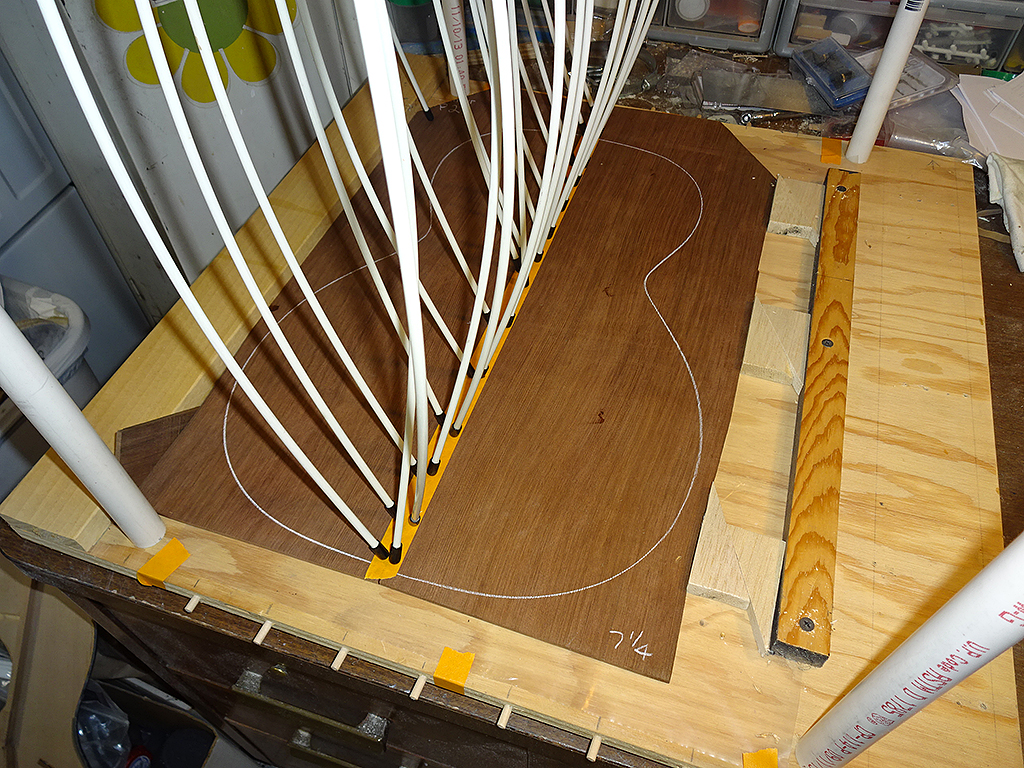
I'm jointing the top. Once that's done, I'll route the groove for the rosette, then take it over to my sanding buddy for thicknessing.
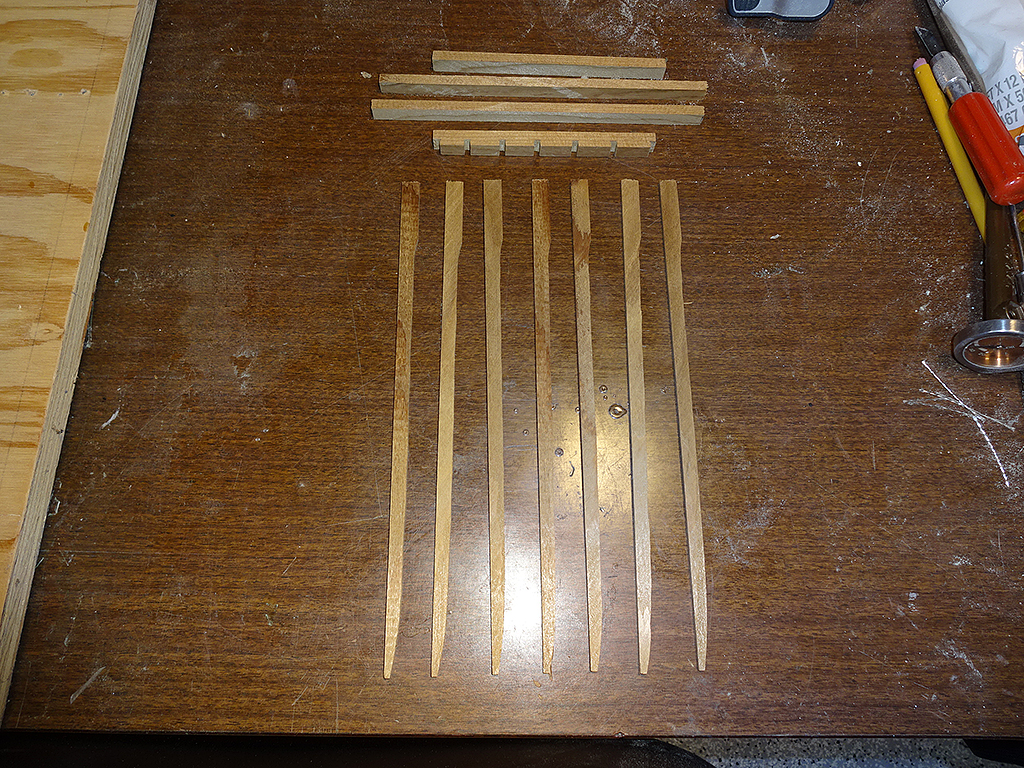
I also rough cut the braces. This guitar will be getting an A-brace pattern using torrefied Adirondack spruce.
One change of plans is that I was going to make this a bolt-on neck. Because the dovetail is so thin, I'm afraid that it would split the heel when I drill it or try to screw in the threaded insert.
So, this is going to be a glue-on neck, with the neck glued to an SMC bowl, just like the 1624 the neck came from.
Posted 2017-12-18 11:09 AM (#538400 - in reply to #538361) Subject: Re: Patch's Parlor Build...
Joined: May 2011 Posts: 751
Location: Muenster/Germany
DetlefMichel - 2017-12-15 7:43 PM
the structural reinforcements
I ment the arched structures inside on the neck heel, you can see them if you look in an Ovation. Aren´t they necessary to prevent torsion from the neck joint?
And if you want to built a bolt-on neck: My luthier used an incredibly thin CLV board for the inside reinforcement of my 12 string guitar with bolt-on neck (and for my other guitars). This may be better than a solid mahogany block.
(I hate guitars with set necks).
Posted 2017-12-19 10:11 AM (#538425 - in reply to #537422) Subject: RE: Patch's Parlor Build...
Joined: June 2012 Posts: 2303
Location: Lake Forest, CA
Ah, now I understand what you meant.
When comparing SMC bowl to a hand-laid bowl, the neck mount on the SMC bowl is quite a bit smaller. The trusses are necessary in the SMC bowl to spread the load of the string tension from the top of the bowl across the back of the bowl.
On the hand-laid bowl, the large wood block does the same thing. Another way to add strength to this area is to add another layer of cloth during the molding process.
Here's a pic of the inside of my 50th. This is a hybrid of the mahogany block and a bolt-on neck.
If you look at the bass bout where the strap mount is located you can see the extra layer of cloth. It wraps around the neck area down into the inner part of the cut-away.
Like I say, the bare hand-laid bowl is pretty flexible until the top gets glued to it. Once the top is joined, the bowl becomes a monocoque structure. I wrote cantilever before, but it's actually a monocoque structure.
Monocoque structures, also known as stressed skin structures, get their strength from the outer shell without any internal supports because they spread the load across the entire skin. (Think of an egg shell)
Posted 2017-12-20 5:40 AM (#538444 - in reply to #538442) Subject: Re: Patch's Parlor Build...
Joined: May 2011 Posts: 751
Location: Muenster/Germany
Now I see. I did several neck-resets on my old Ovations and I always wondered how the tiny neck mounts should hold up all the tension. It´s not only the strings, but whan I grab my guitar I always have it on the neck, never on the body, and thus there are enormous leverage forces on that point if you simply put the guitar out of the case...Since I have seen (and touched) this small construction inside I handle my Ovations with much more care. Especially when I have my heavyweight 1688 in hands I always remember that 2 screws in a 1,5 cm piece of plastic compound on a 55cm torsion arm...brrrrr...for me that is a nightmare.
Your woodblock joint looks more trustable to me.
Posted 2017-12-29 7:33 PM (#538560 - in reply to #537422) Subject: RE: Patch's Parlor Build...
Joined: June 2012 Posts: 2303
Location: Lake Forest, CA
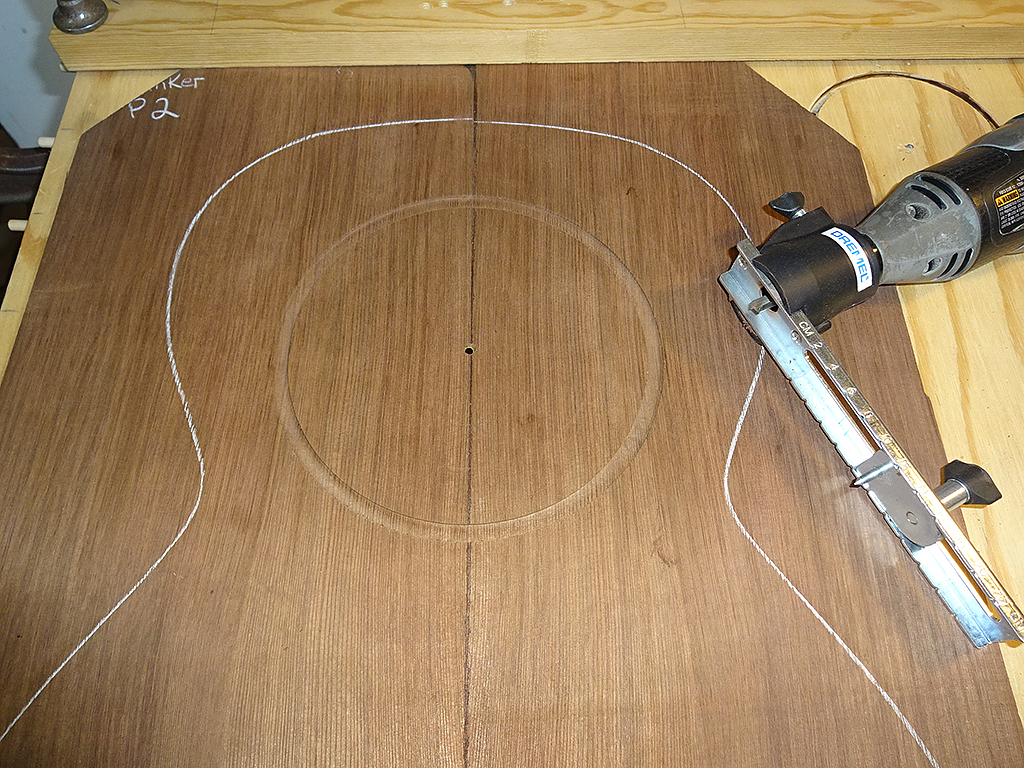
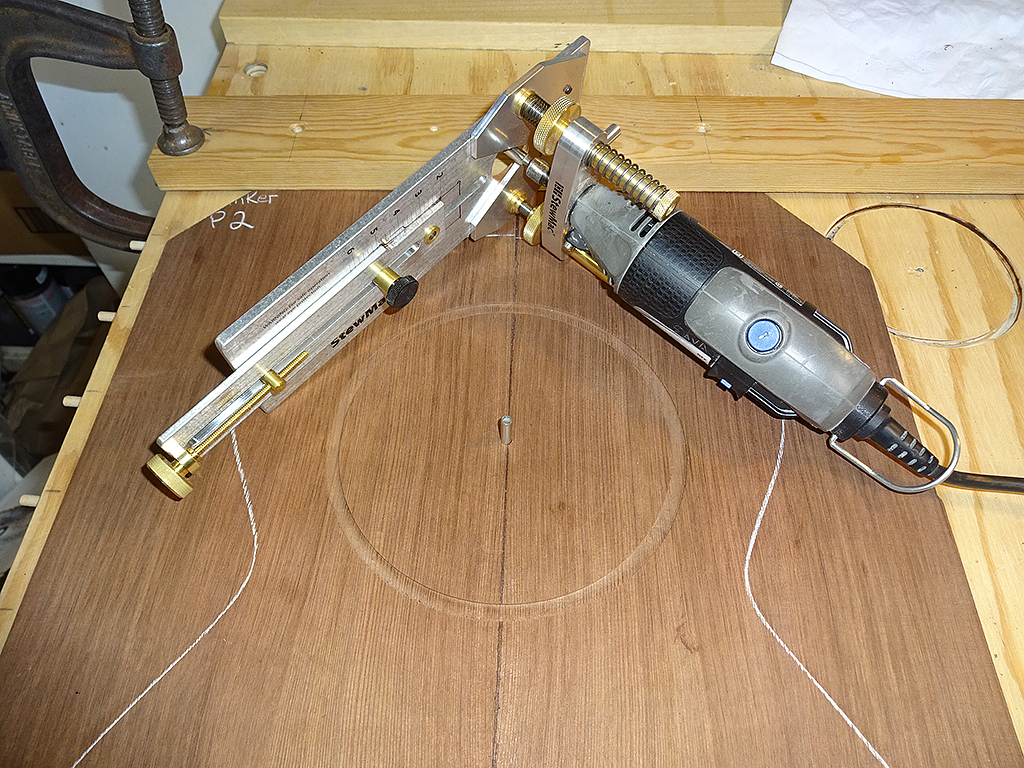
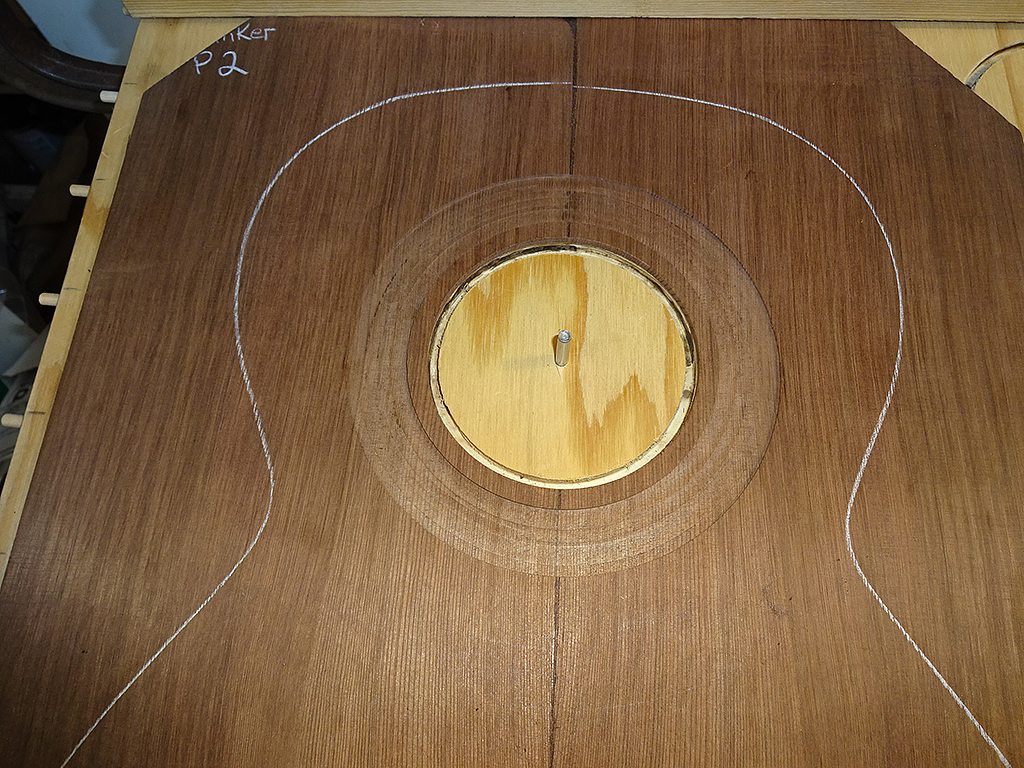
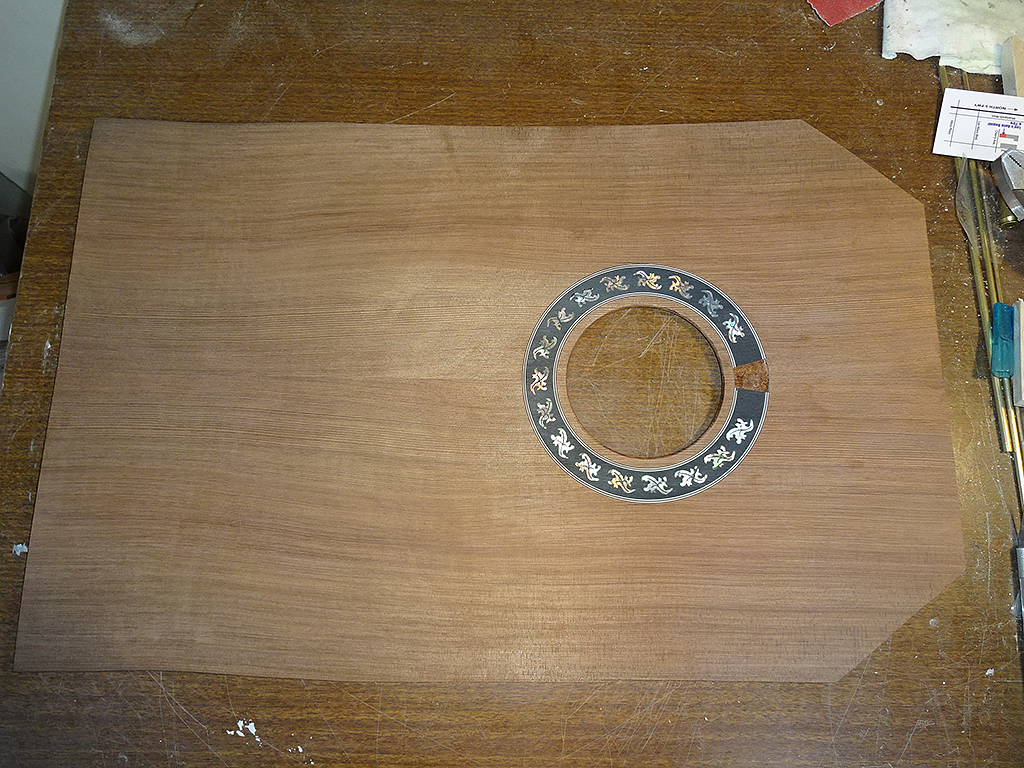
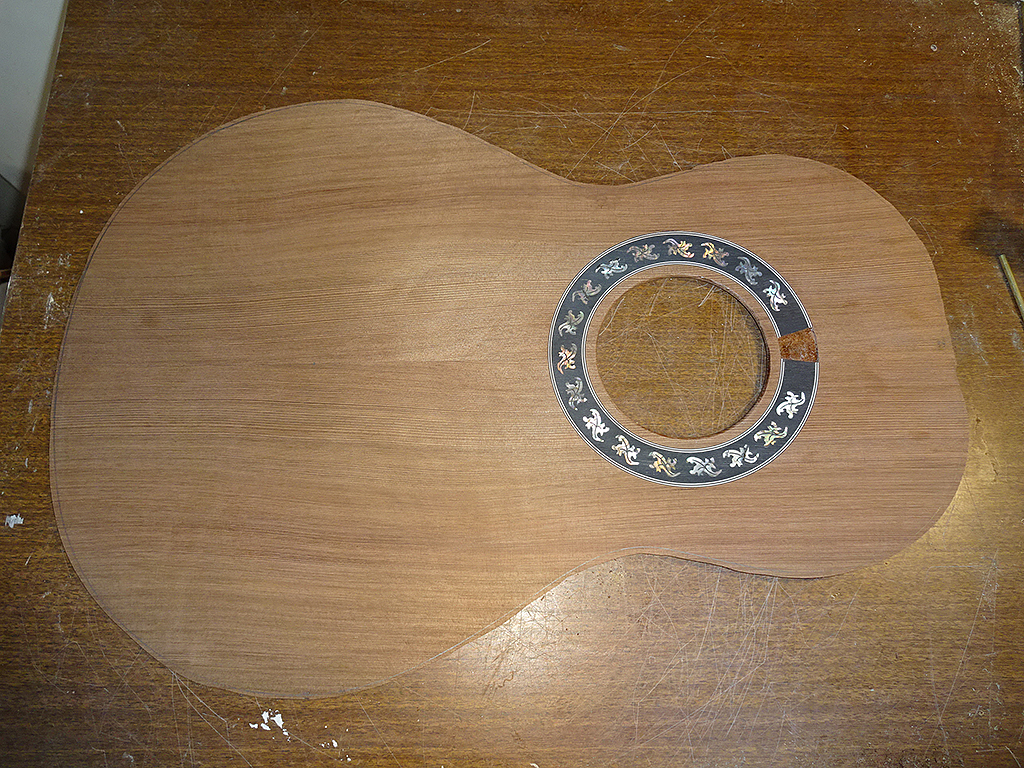
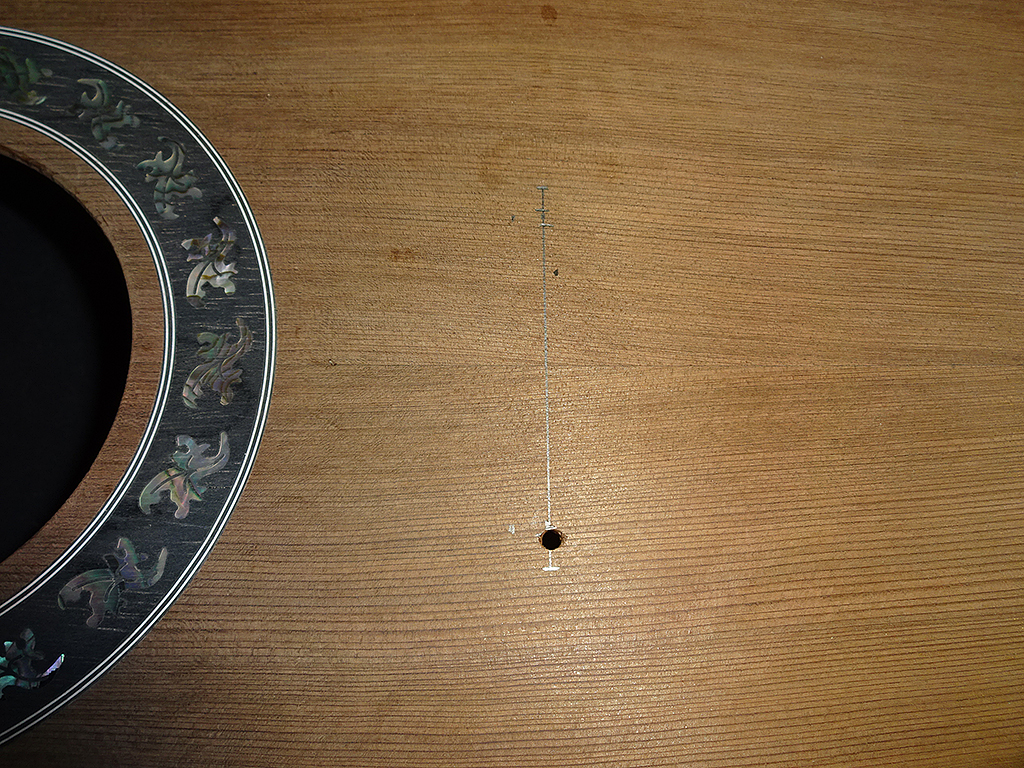
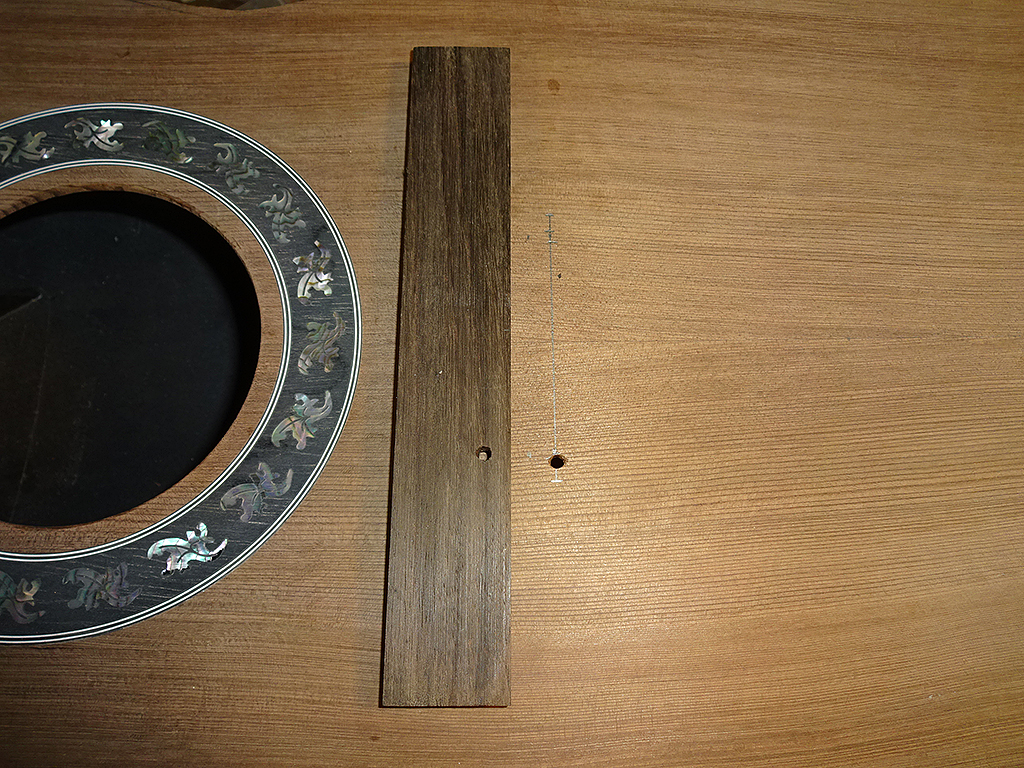
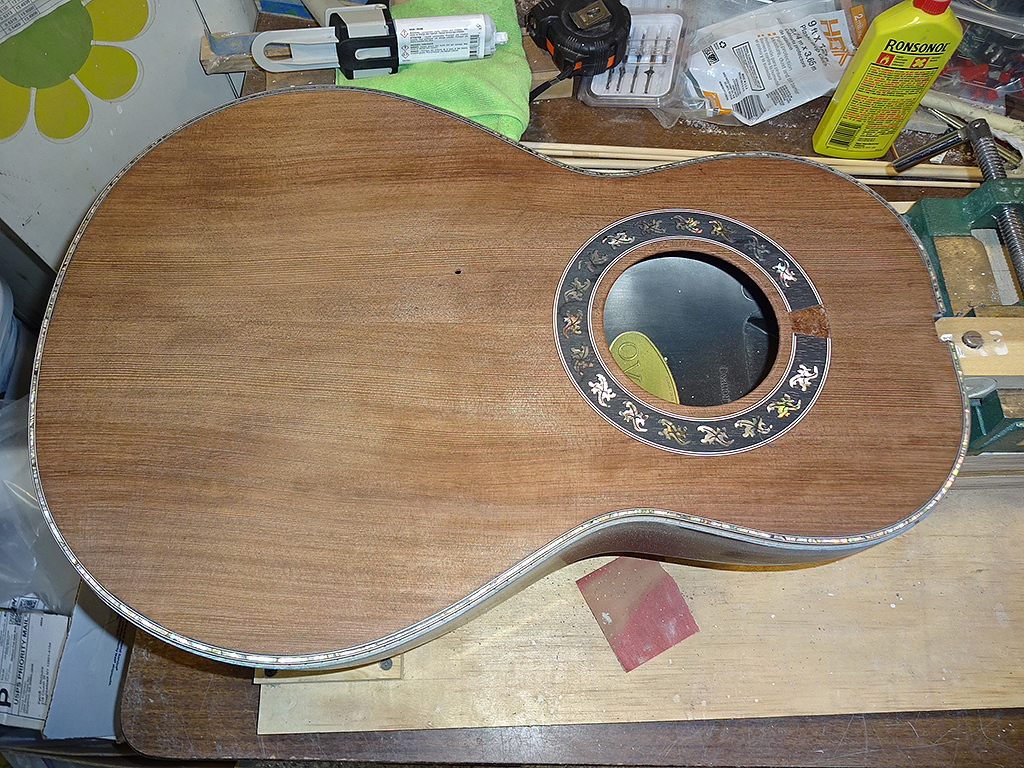
I had to acquire a couple of tools to route the rosette channel and cut and round the sound hole.
First step is to measure and drill the indexing hole. Even though it looks off center in the photo below, it's actually on-center for the glue joint. The glue line was caused by the masking tape I used when jointing the top.
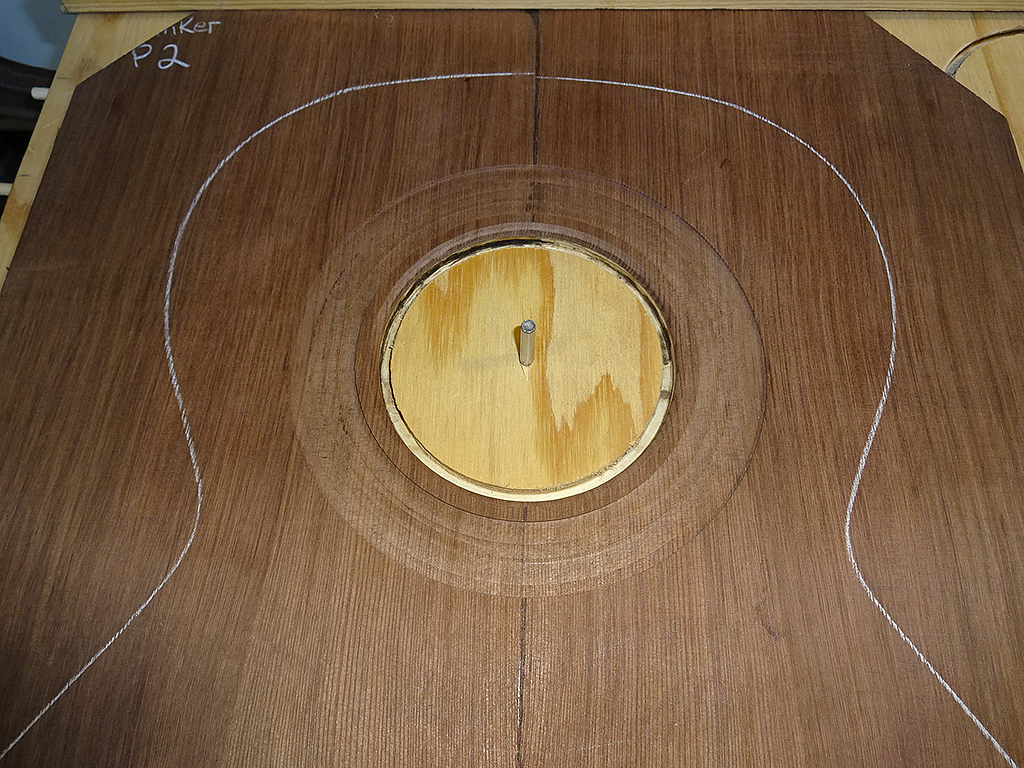
The Dremel circle cutter is pretty crude. So I decided to splurge and buy the Stewmac circle cutter. It's pretty nice, but it only cuts to 6" and the rosette for this guitar is ~6-3/8". So, I had to use the old Dremel to route the outside of the groove, then use the Stewmac to route the inside of the groove, the sound hole and round the sound hole.
The sound board is clamped into the routing fixture.
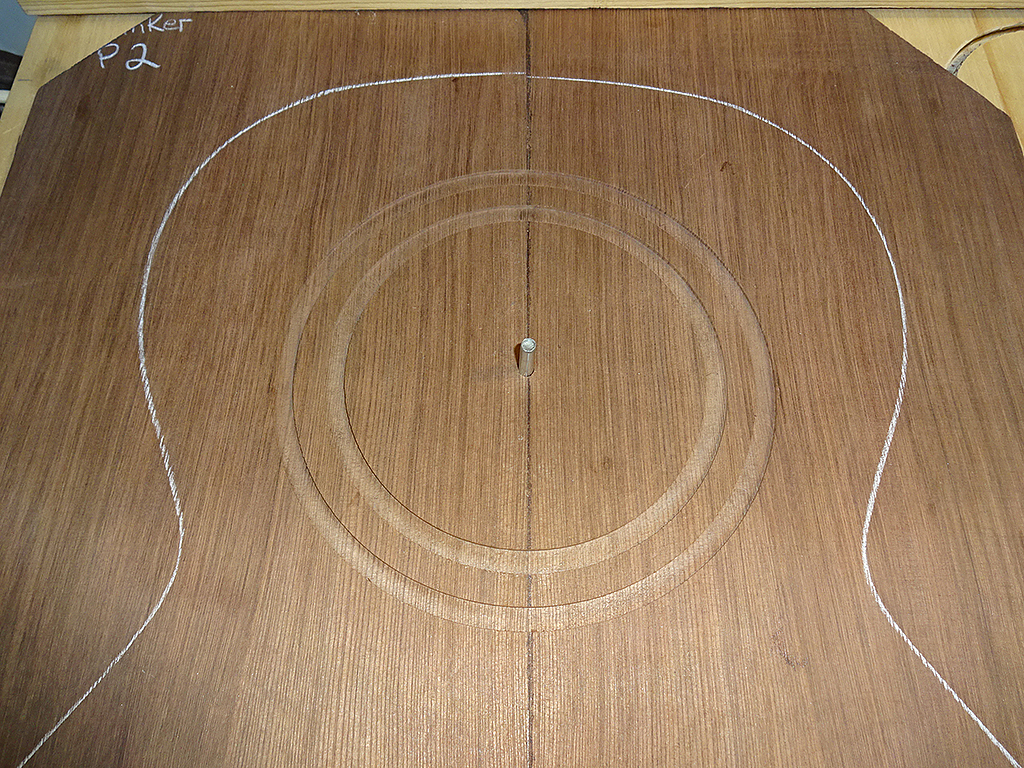
The outside of the groove has been routed.
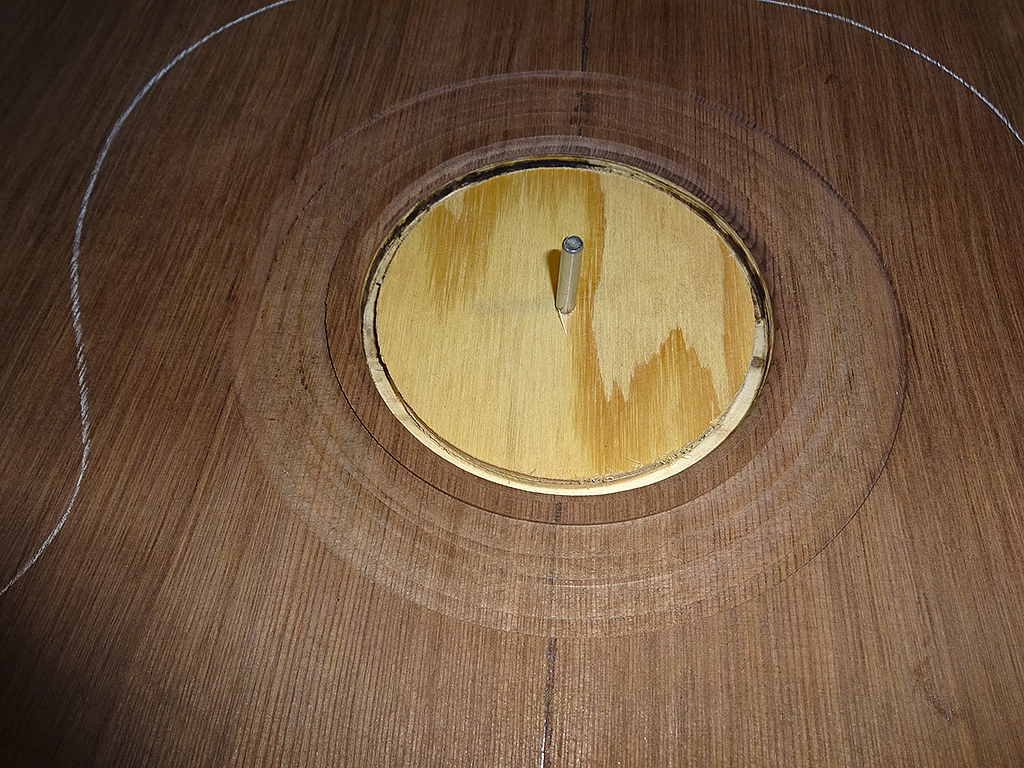
Now, switch to the fancy-schmancy Stewmac circle cutter. (All kidding aside, it is really nice)
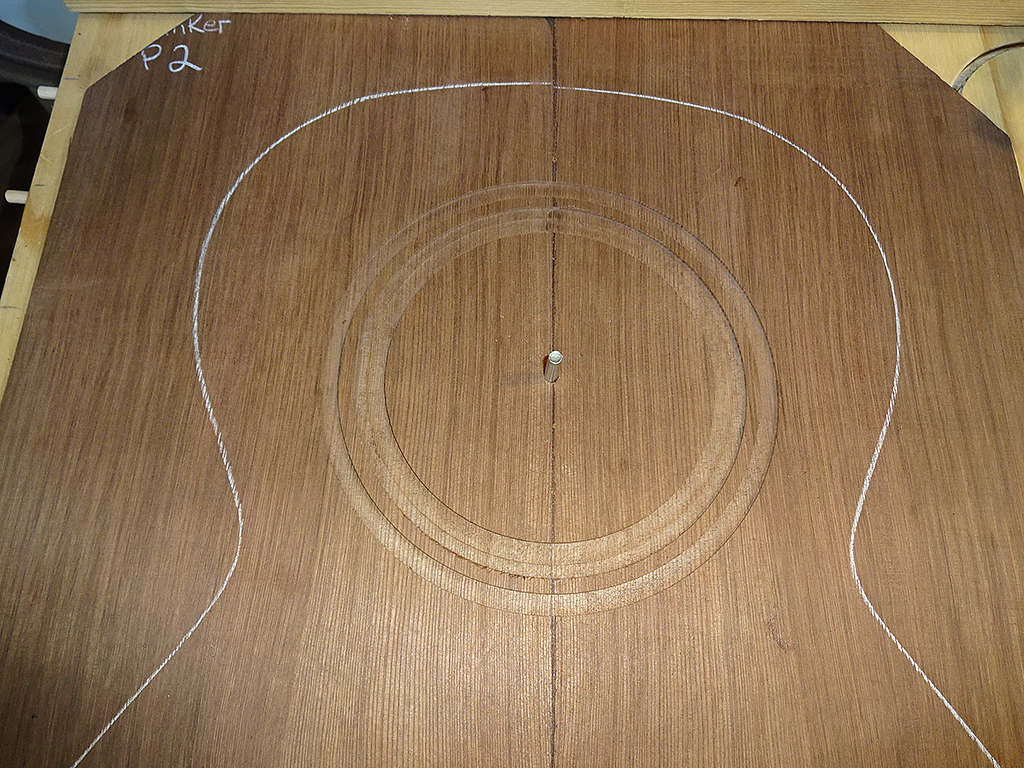
Inside of the groove has been routed.
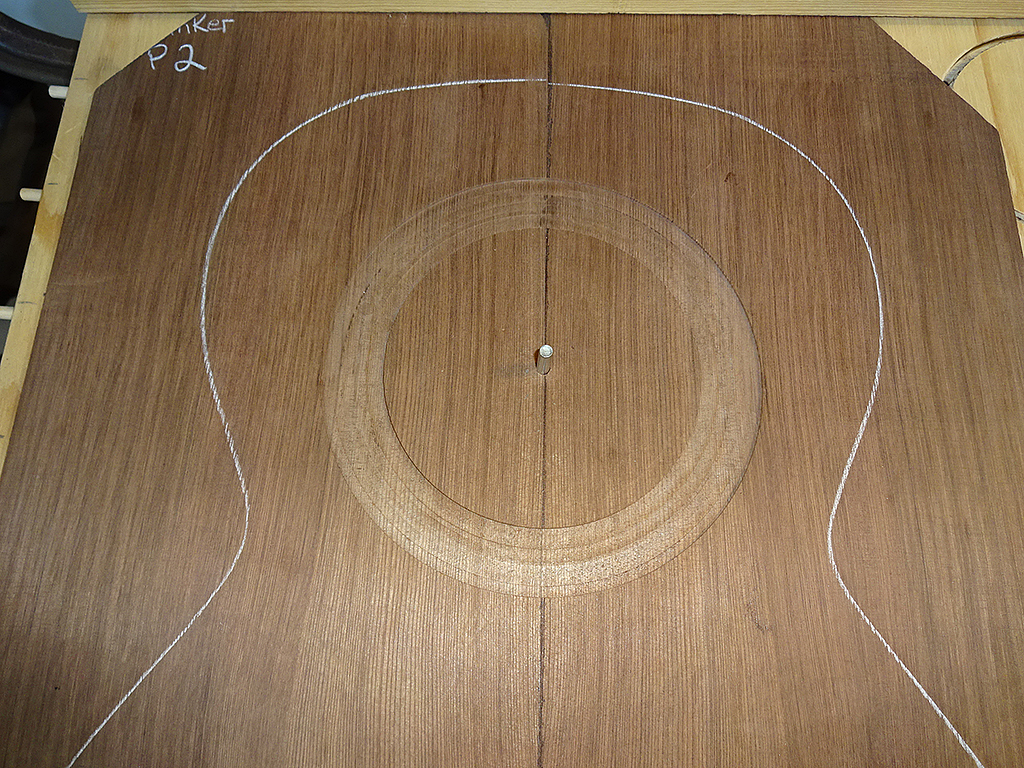
Routing off everything in-between.
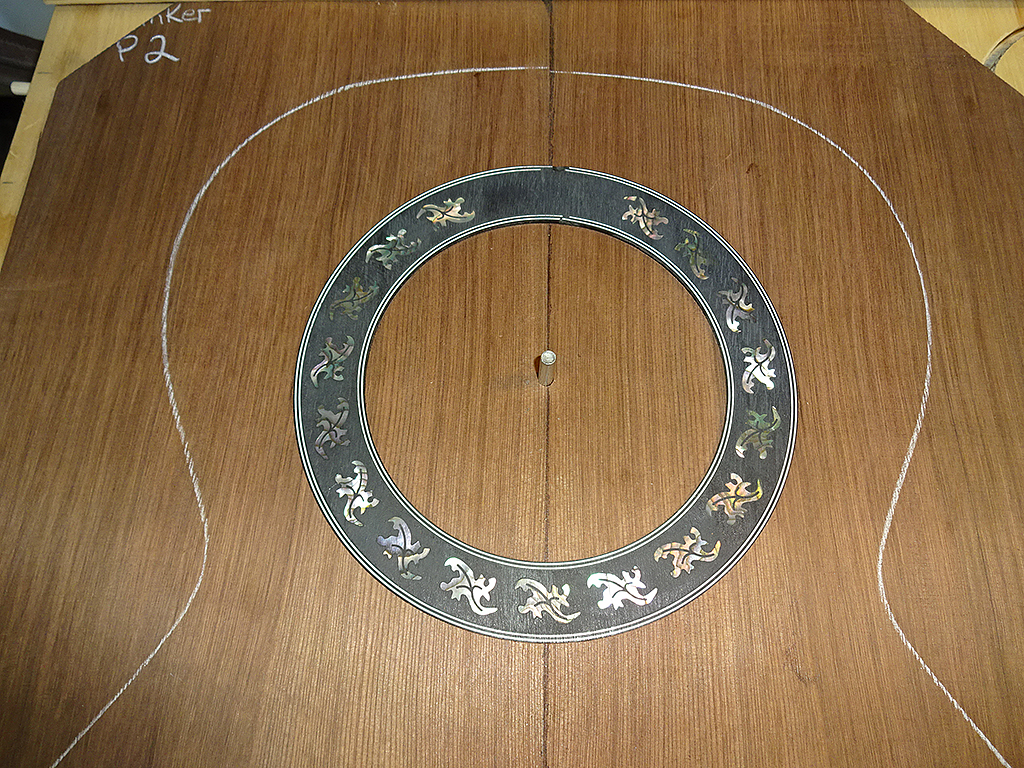
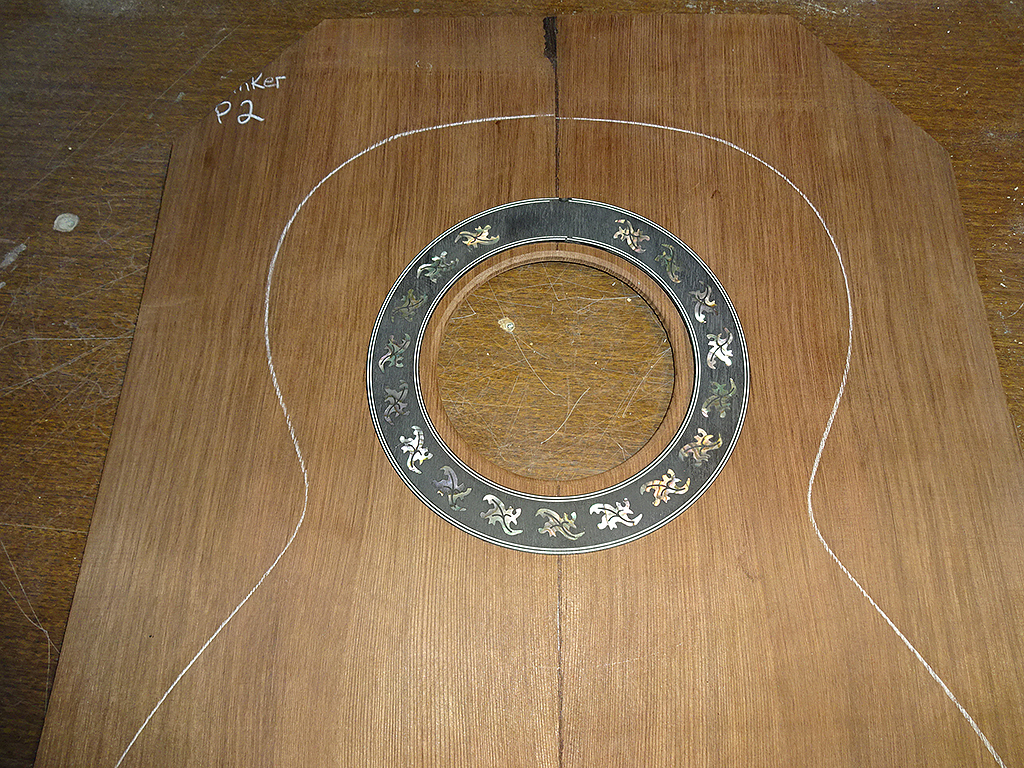
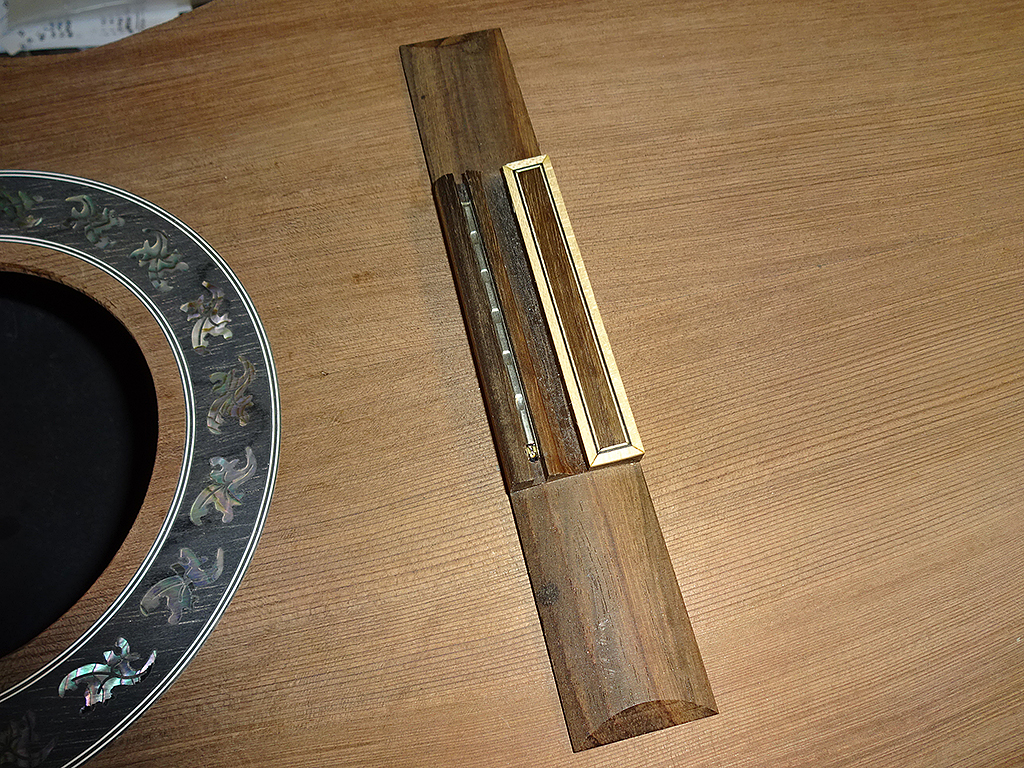
Test-fit of the rosette --success!
Route open the sound hole.
Route a round corner into the sound hole. This will get fine-sanding after the sound board has been thicknessed.
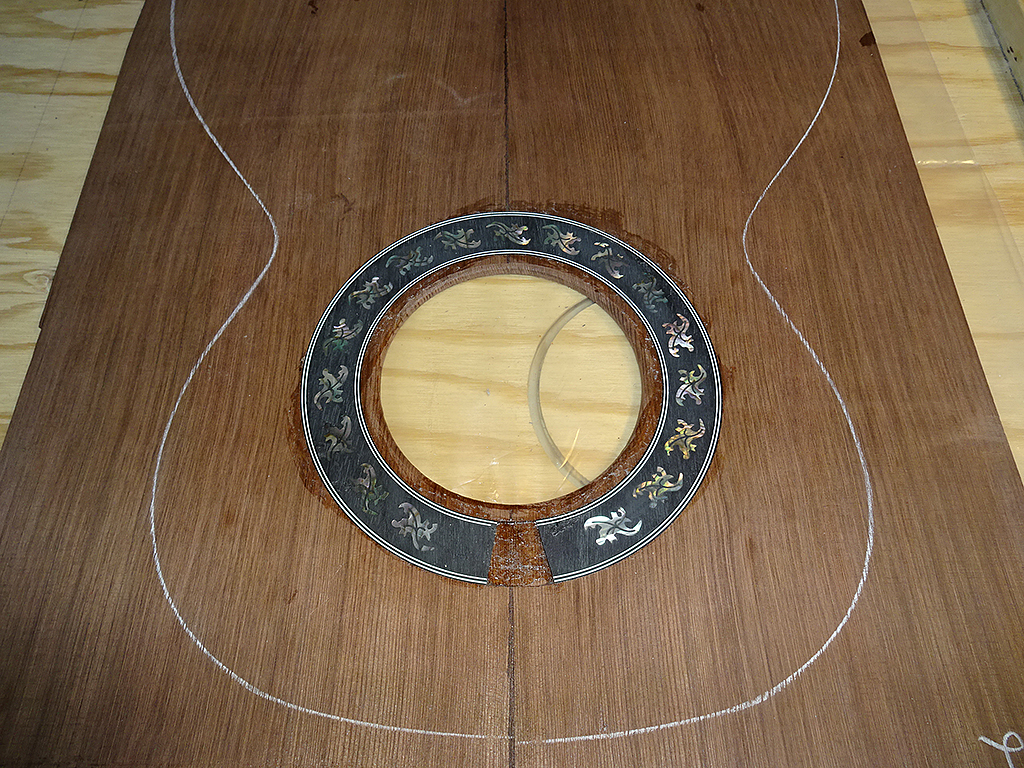
Test-fit the rosette into groove.
Wet down with naptha to get an idea of how it will look. It's pwetty...
Put the top into the go-bar deck to glue the rosette.
Squirted a bunch of binding cement into the groove, then pushed the rosette in all around. Laid down a disc of visqueen, then a clamping disc made from a scrap test piece.
I'll let this dry for 24 hours, then it'll be ready for the thickness sander. Once that's done, things will start happening pretty quickly.
Posted 2017-12-30 10:23 AM (#538566 - in reply to #537422) Subject: RE: Patch's Parlor Build...
Joined: June 2012 Posts: 2303
Location: Lake Forest, CA
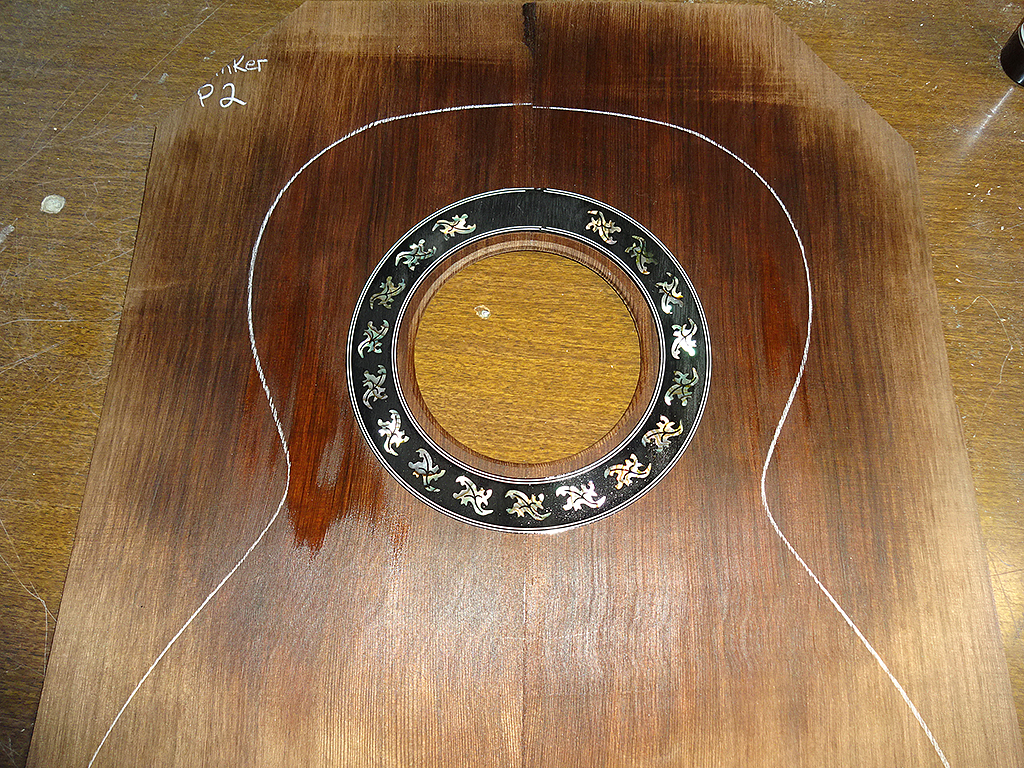
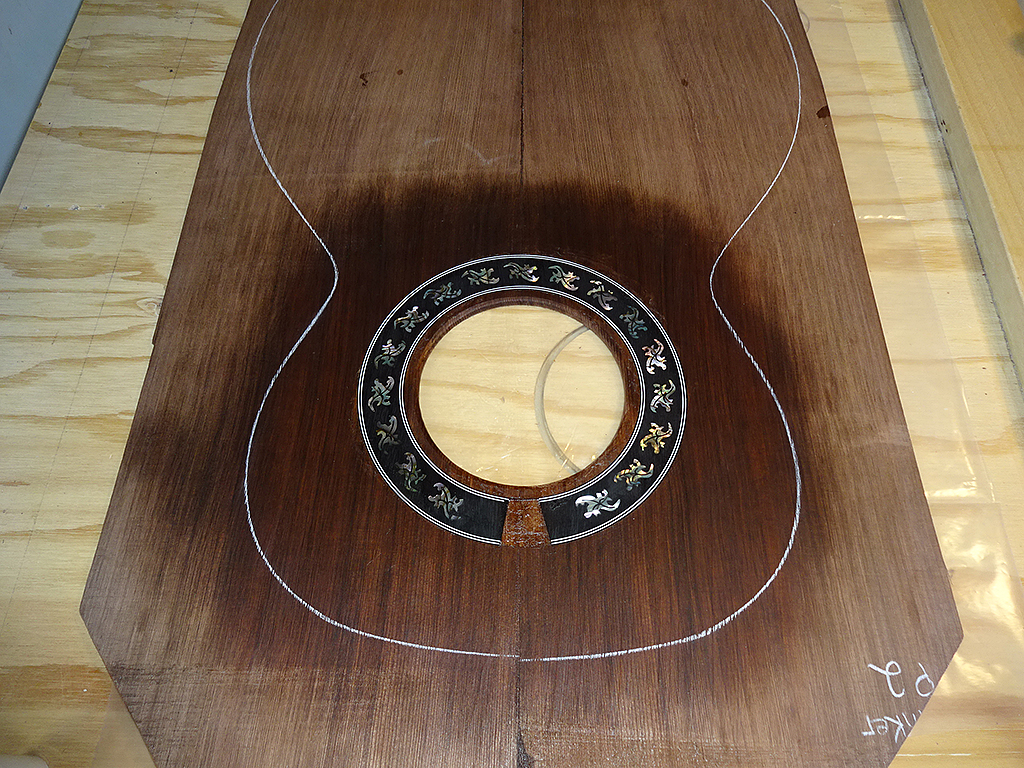
I pulled the top out of the gobar deck. I'm happy with how it turned out. It was easy to get very clean edges when routing the redwood. The spruce tends to fray a little bit which requires sanding to clean up the edges. The depth of the groove leaves the rosette just a little proud of the surface.
Here's a shot of the top and rosette wet with naptha.
I'll take the top to the sanders next week to surface sand the top, then thickness sand it. Then, it's time to rough cut the top and glue the braces.
Once the top is made, I'll glue the kerfed linings to the bowl. Things should start moving pretty quickly now.
Posted 2018-01-05 5:46 PM (#539689 - in reply to #537422) Subject: Re: Patch's Parlor Build...
Joined: December 2016 Posts: 128
Helping Dan with routing the groove for Patch's Parlor was a great experience. We did 4 tests, plus a couple of go-no-furthers. Mostly, I ran the vacuum except on the final cut when I was a human clamp, holding the top down to ensure an even cut. We cut a variety of woods during our tests, and the final cut in Patch's redwood was the cleanest. Whew!
Posted 2018-01-06 8:10 PM (#539709 - in reply to #537422) Subject: RE: Patch's Parlor Build...
Joined: June 2012 Posts: 2303
Location: Lake Forest, CA
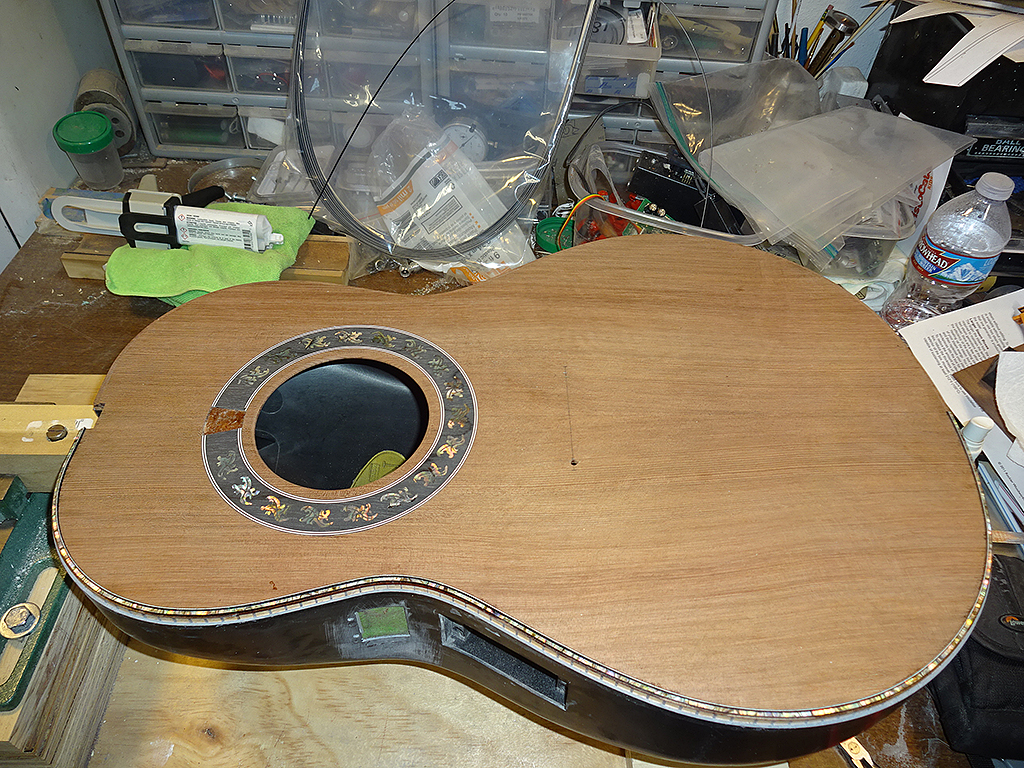
I got the top thickness sanded yesterday.
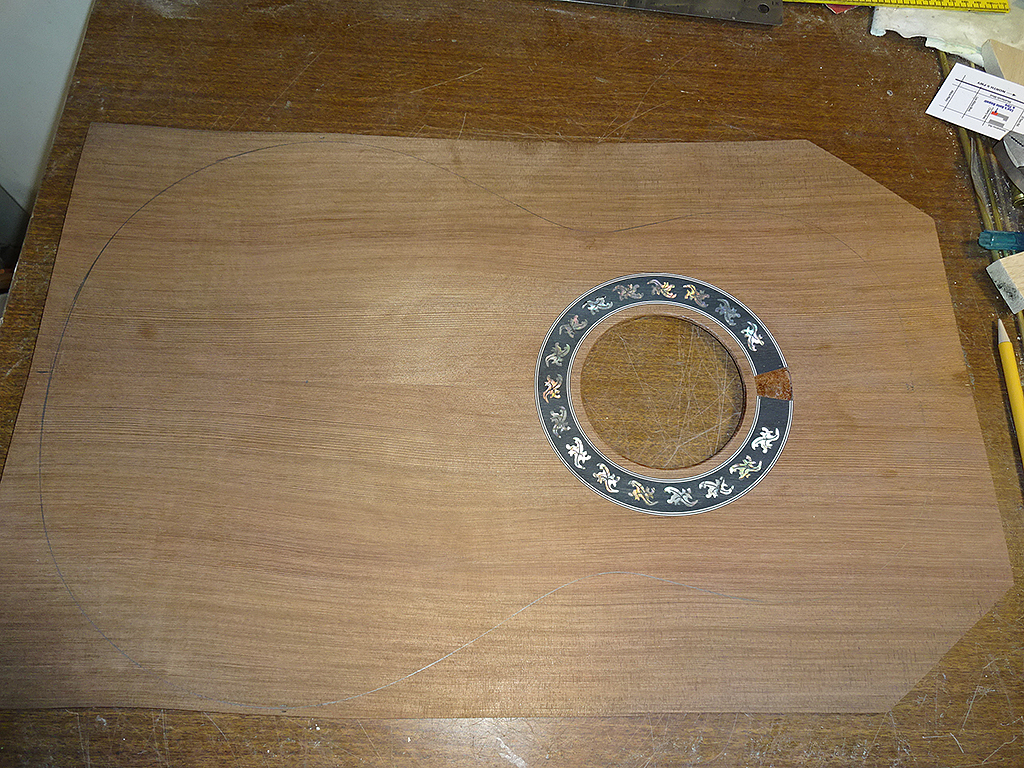
Bowl outline is traced onto the top.
Top is rough but to shape.
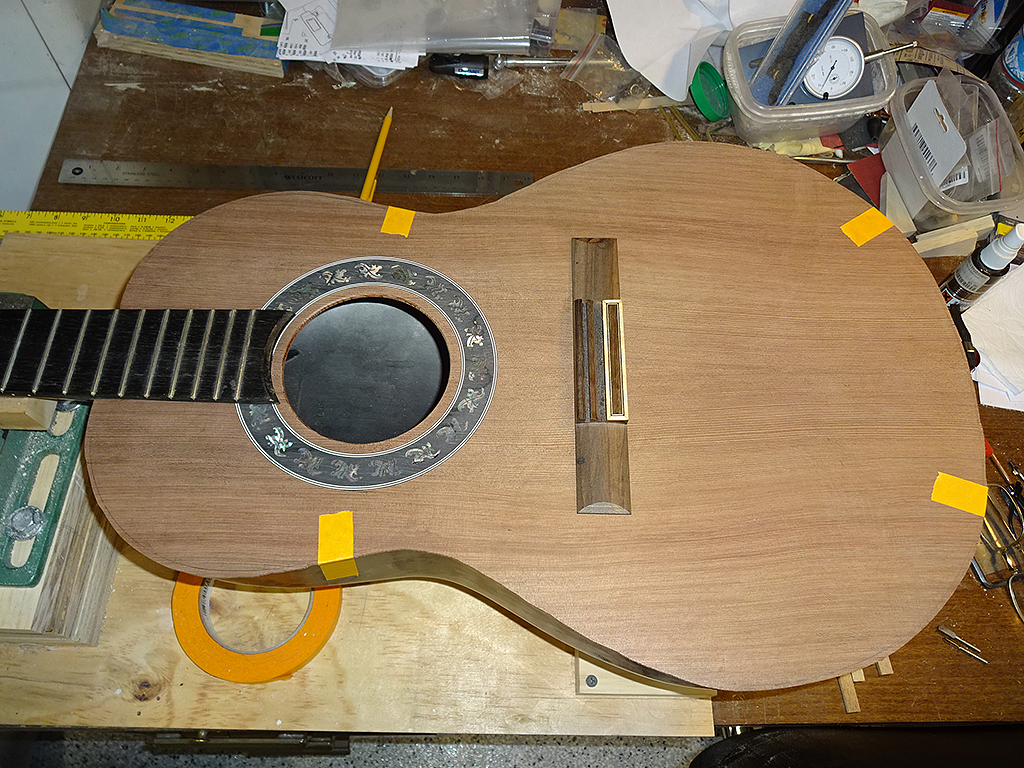
Time to start mating the top, bowl and neck. First job is to mock-up the bowl to the neck to fit the top.
Top is fitted to the bowl/neck. Bridge is in its approximate location.
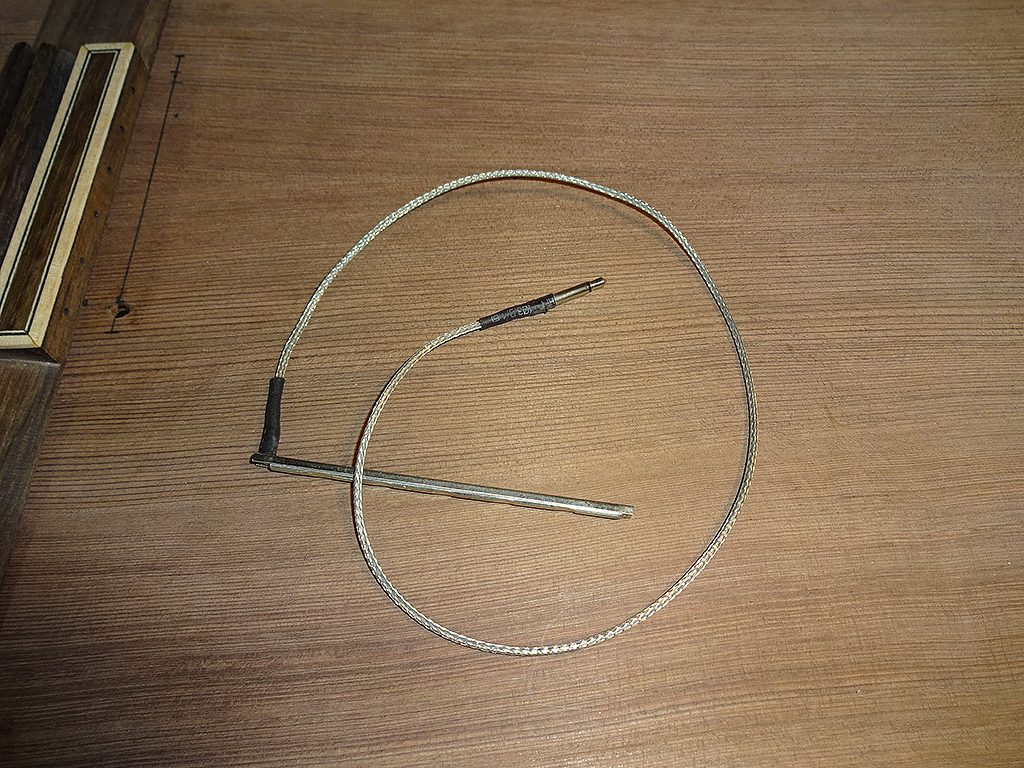
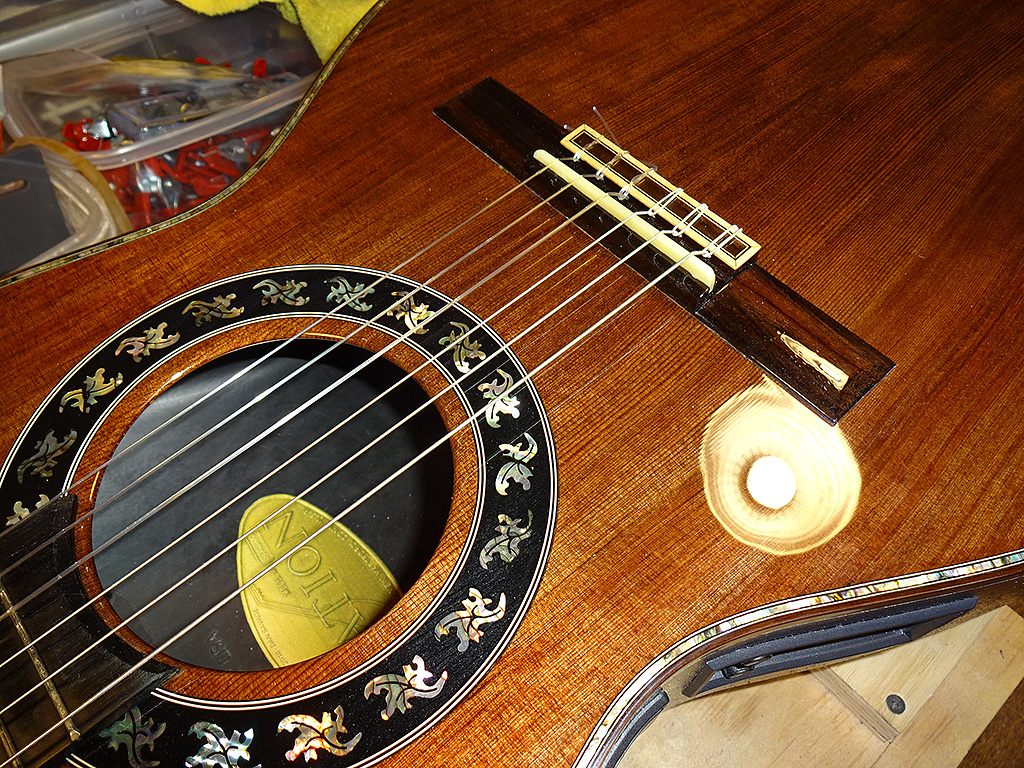
This guitar will be getting the same under-saddle pick-up I used on my Frankenvation.
Bridge location has been measured and hole for pick-up lead drilled.
Matching hole in bridge.
Bridge and pick-up mocked-up.
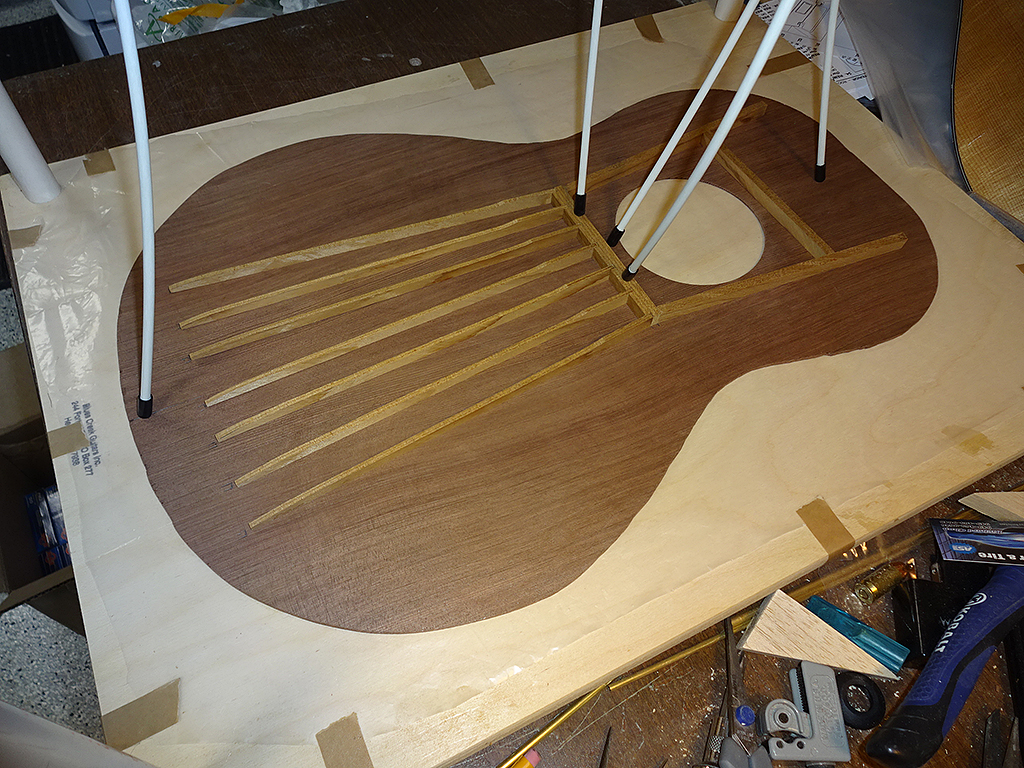
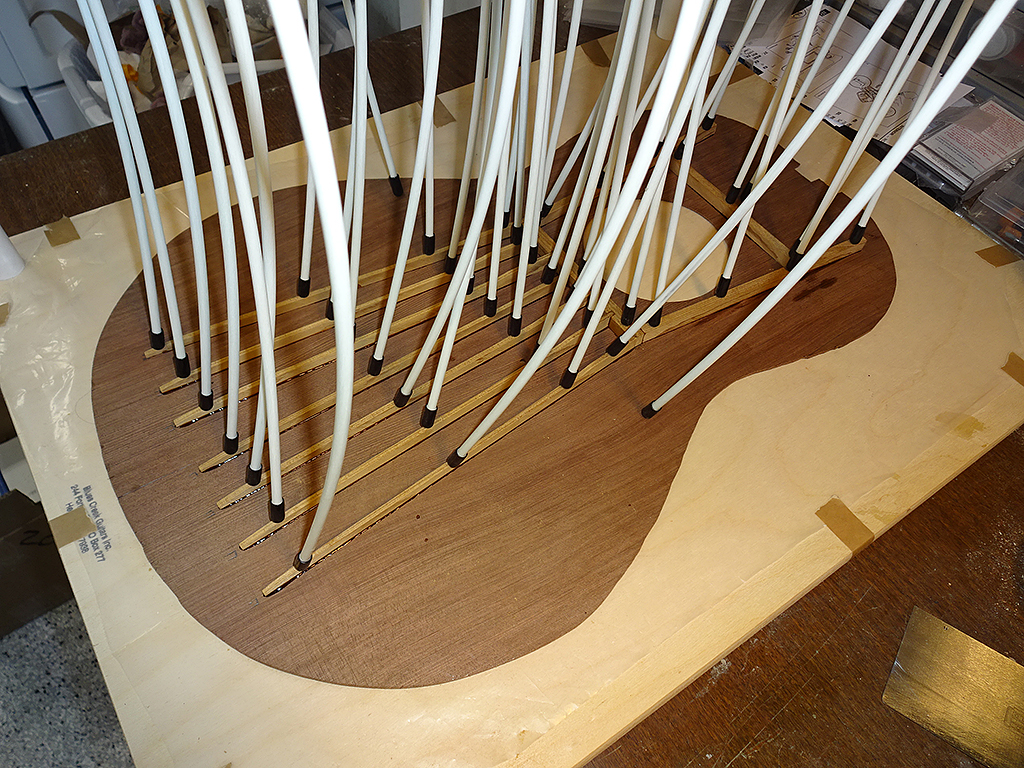
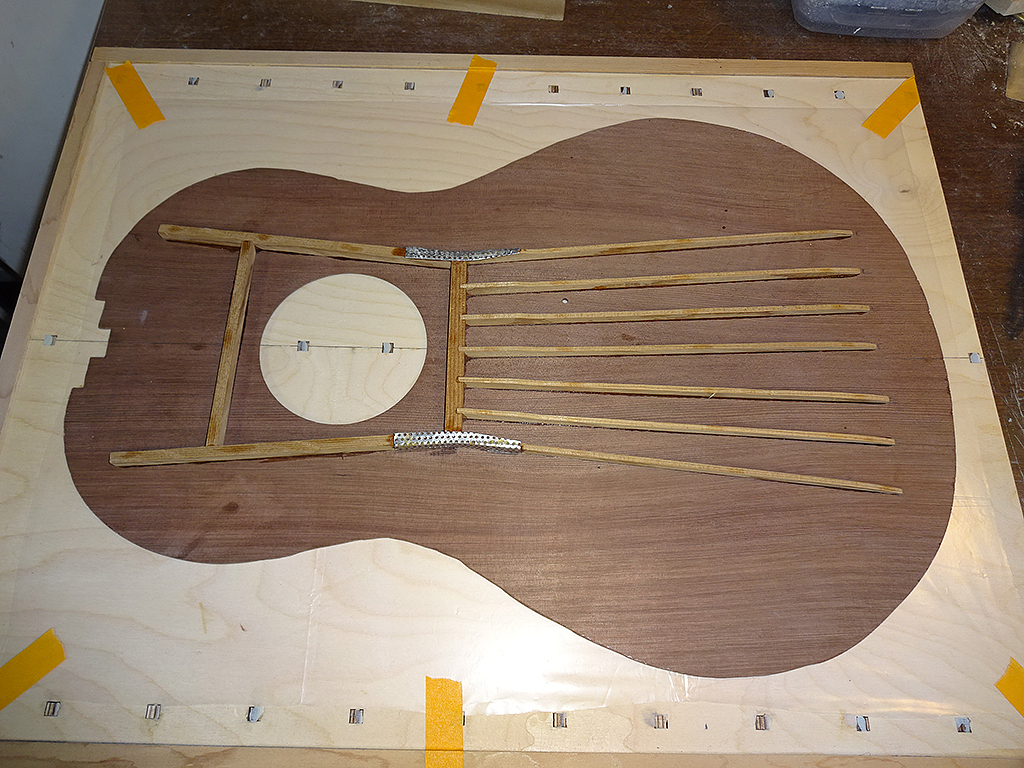
Brace locations are marked onto the underside of the top.
Braces being glued. I'll let the OBG dry for 24 hours, then glue the aluminum reinforcements.
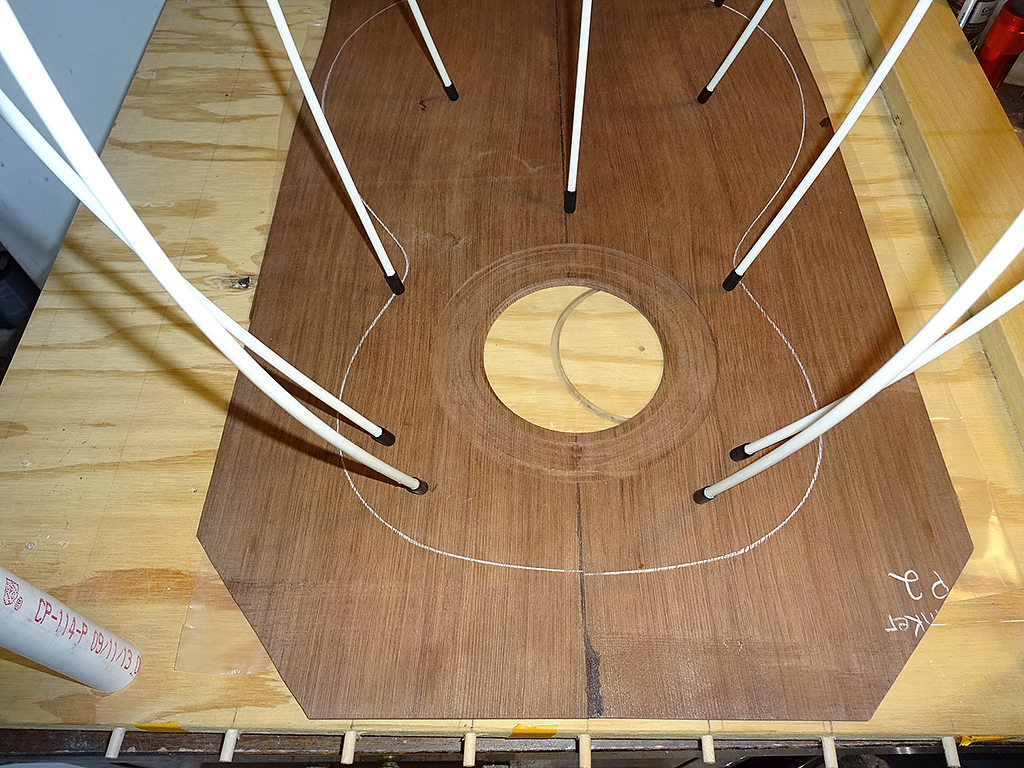
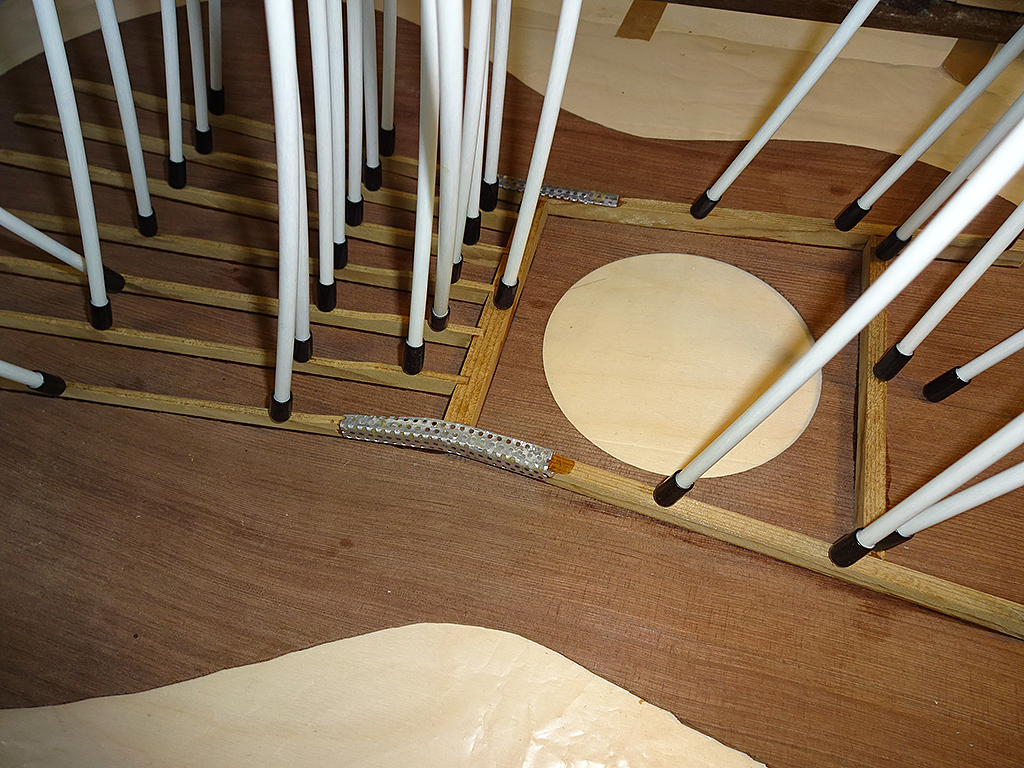
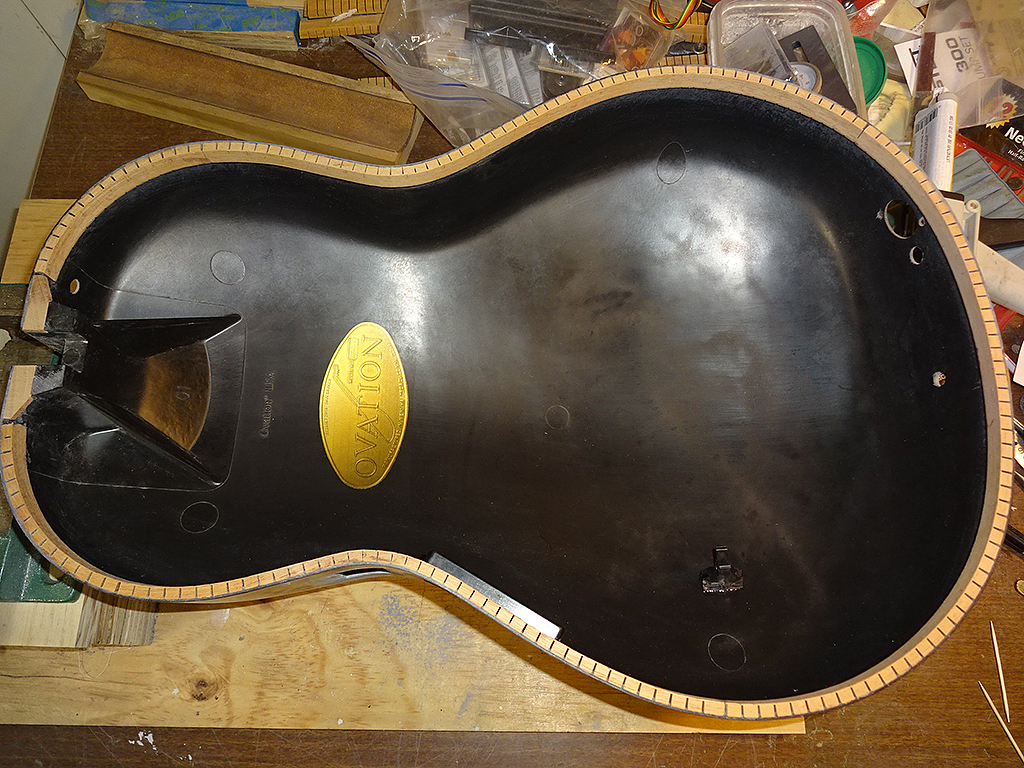
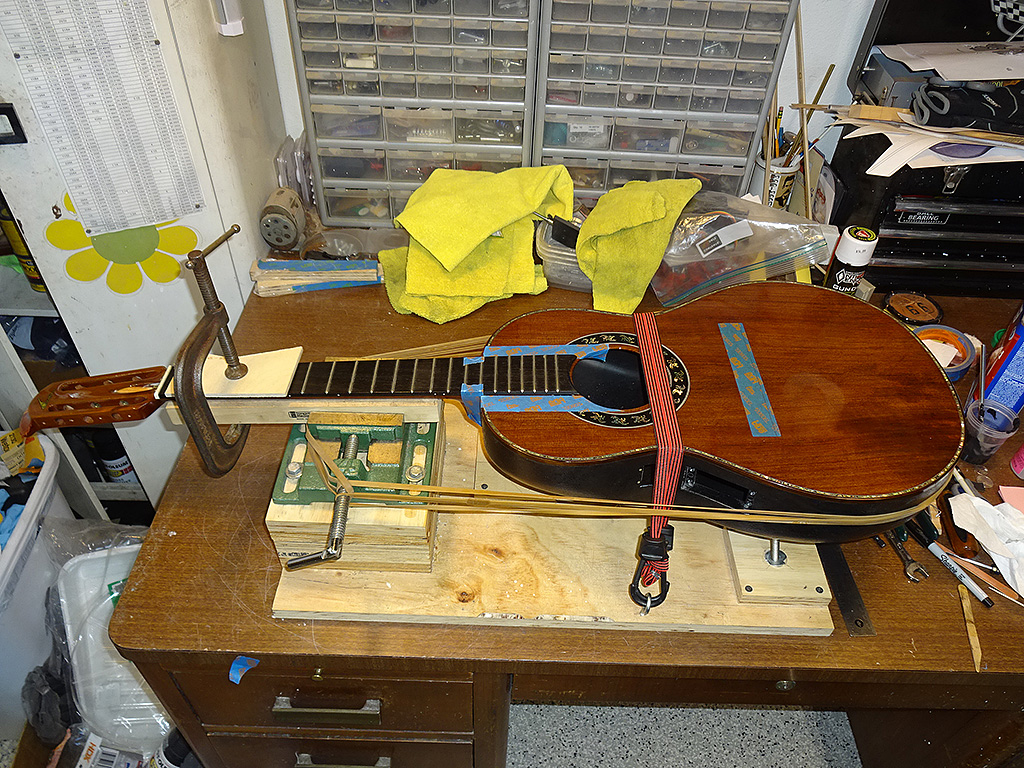
While that's drying, time to start prepping the bowl to get the top and neck glued to it. First step is to sand the periphery so the kerfed lining can be glued to it.
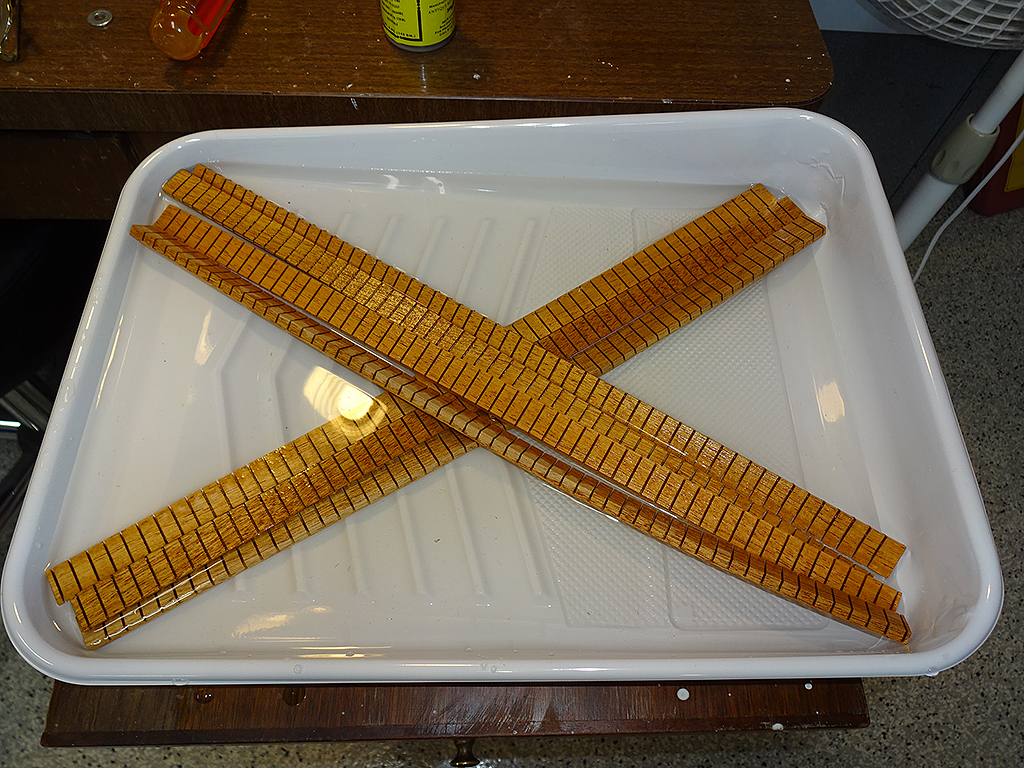
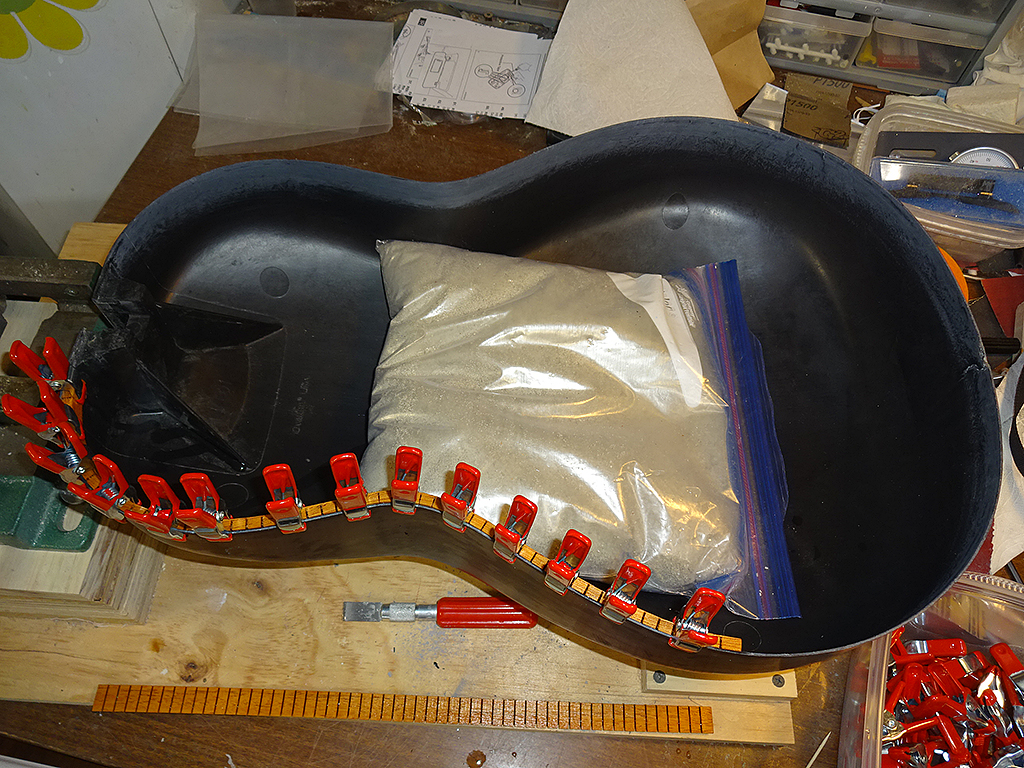
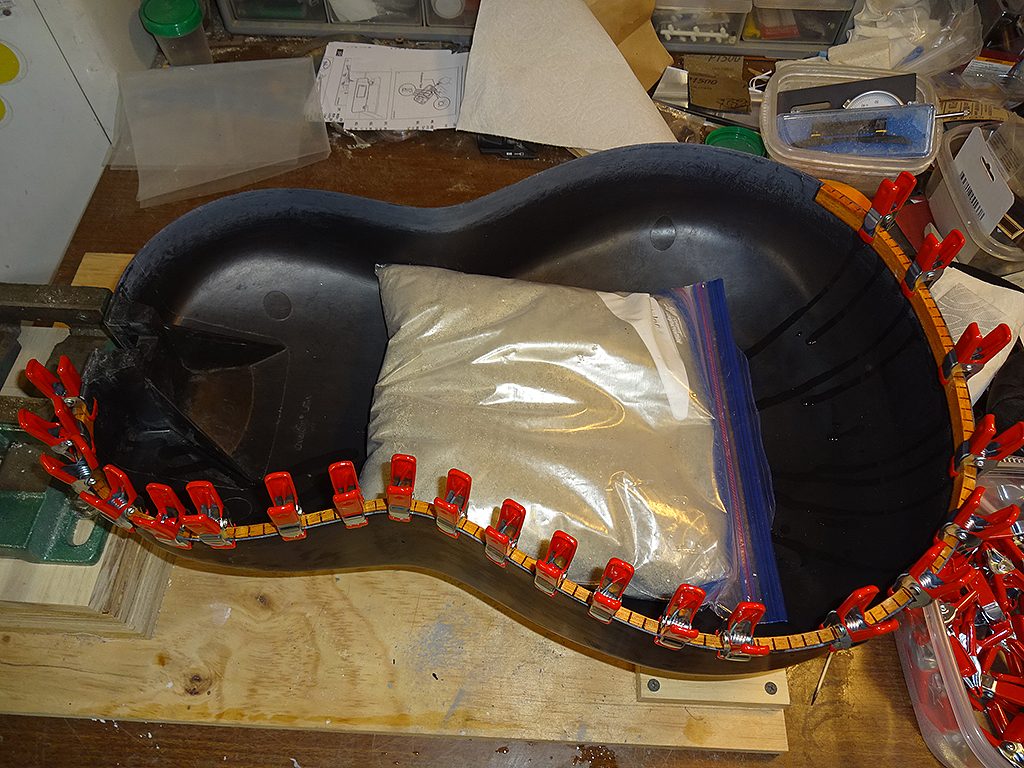
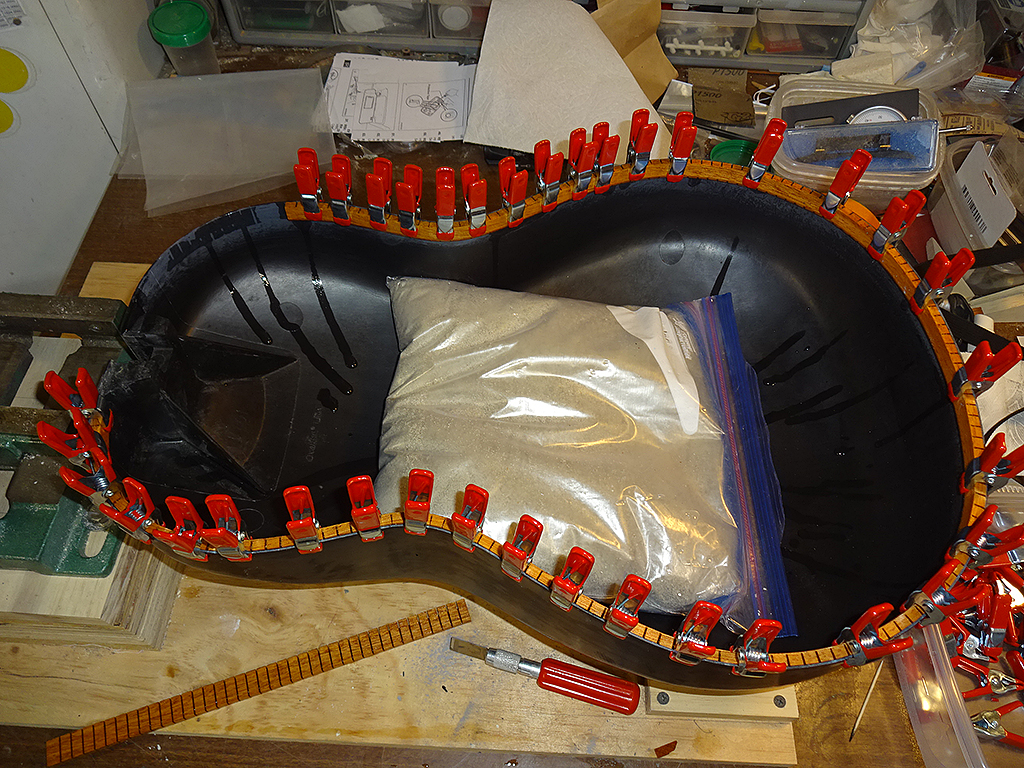
Soaking the mahogany reverse-kerfed lining in water to help minimize fractures.
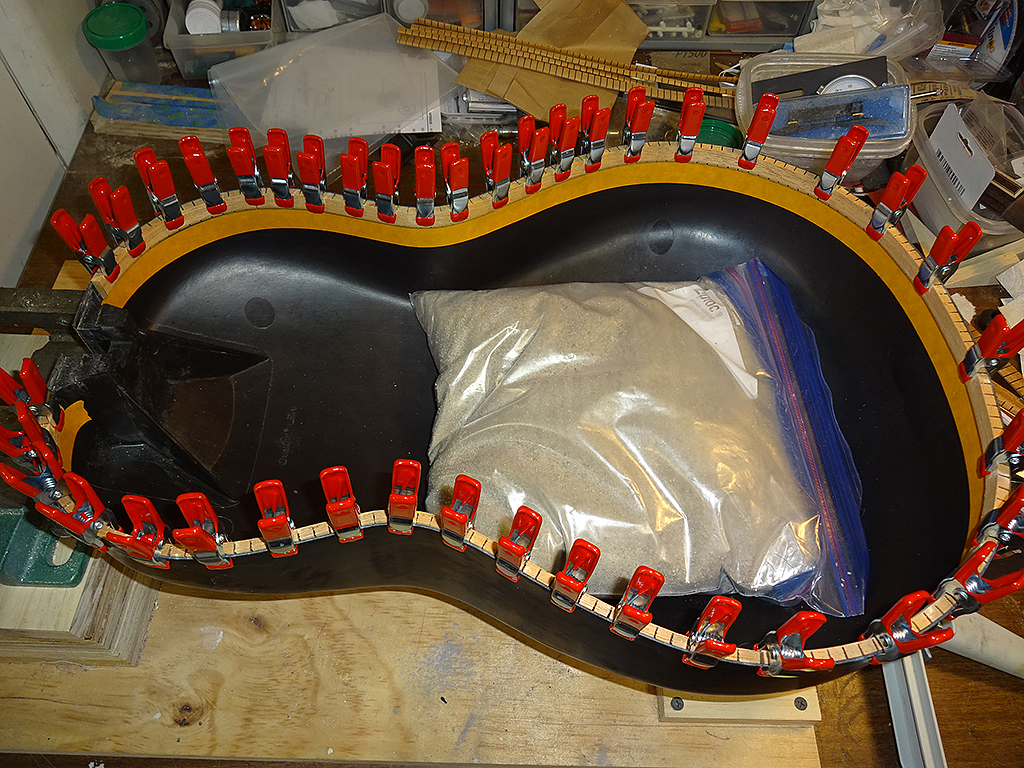
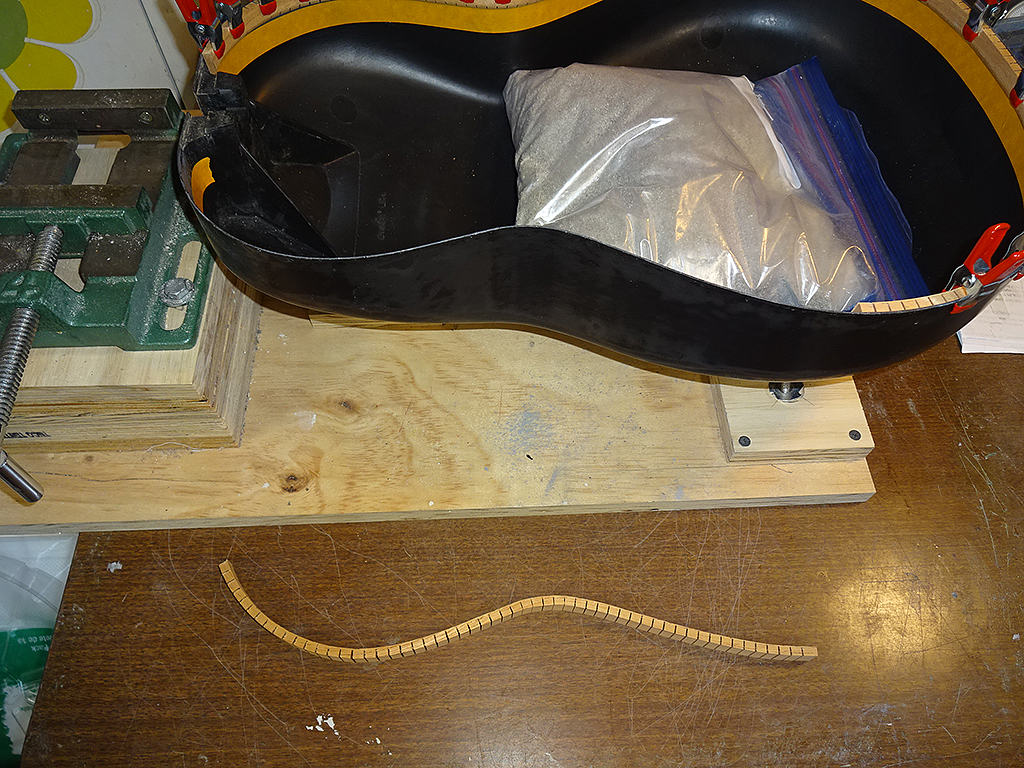
After soaking for an hour or so, it's time to start clamping the lining to the bowl to help mold it to shape. Piece #1 is clamped and working my way around the bowl.
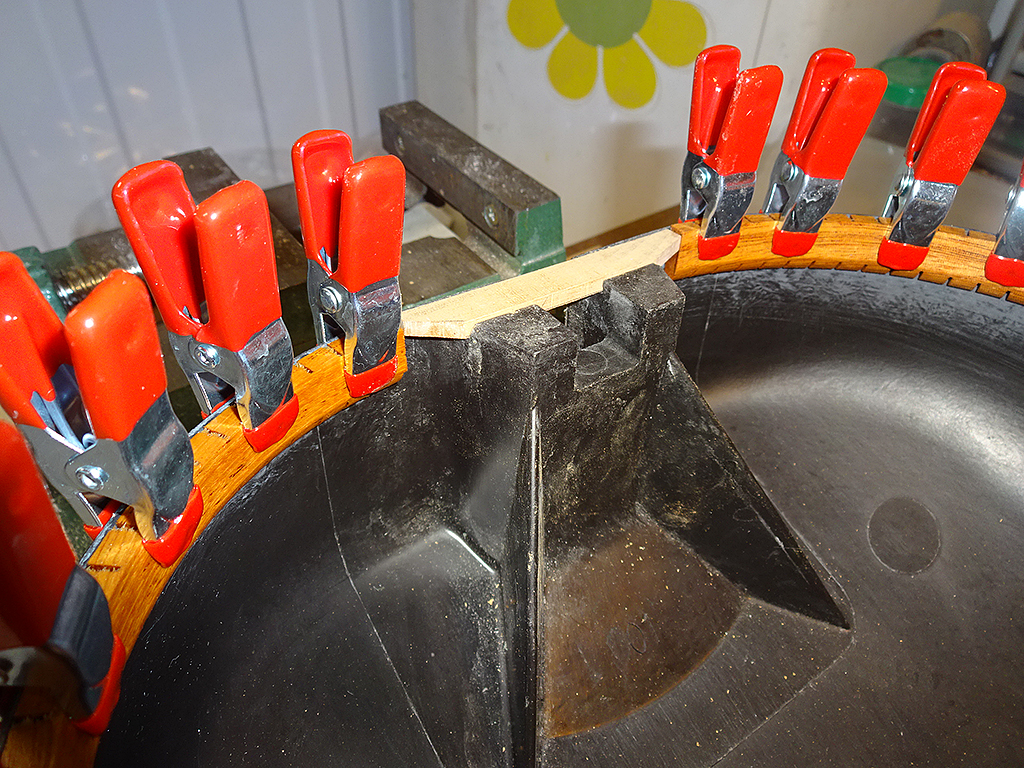
Filler piece made from scrap mahogany. I'll let the lining dry for 24 hours. Once it's dry, I'll remove each strip one at a time and glue it to the bowl.
Posted 2018-01-07 11:17 PM (#539716 - in reply to #537422) Subject: RE: Patch's Parlor Build...
Joined: June 2012 Posts: 2303
Location: Lake Forest, CA
Sorry to hear you've been under he weather, Patch.
Here's a little more of the same good medicine.
I glued the aluminum reinforcements this afternoon.
Once the aluminum reinforcements are cured, the top is pretty much done and can be set aside until it's time for final fitting.
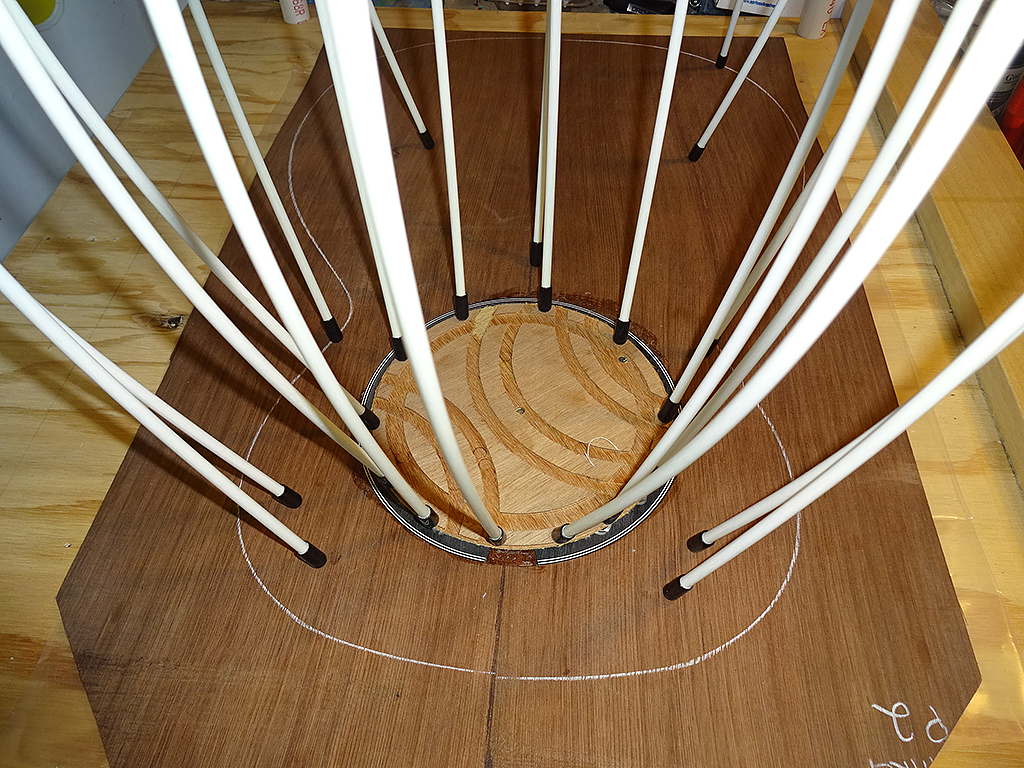
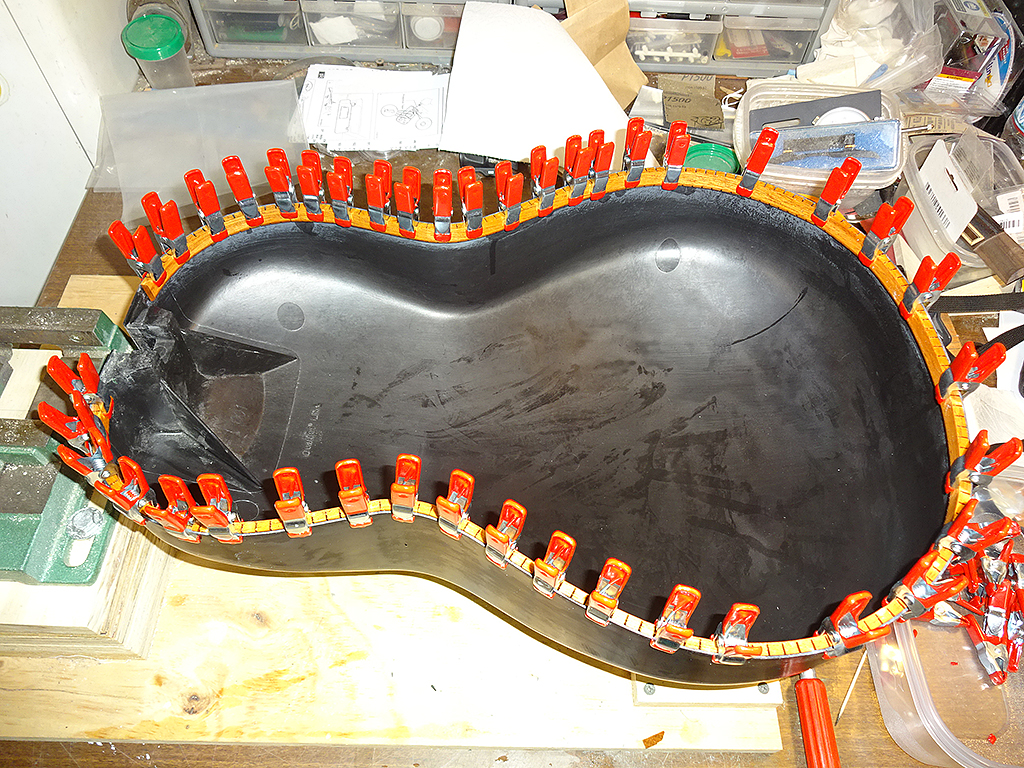
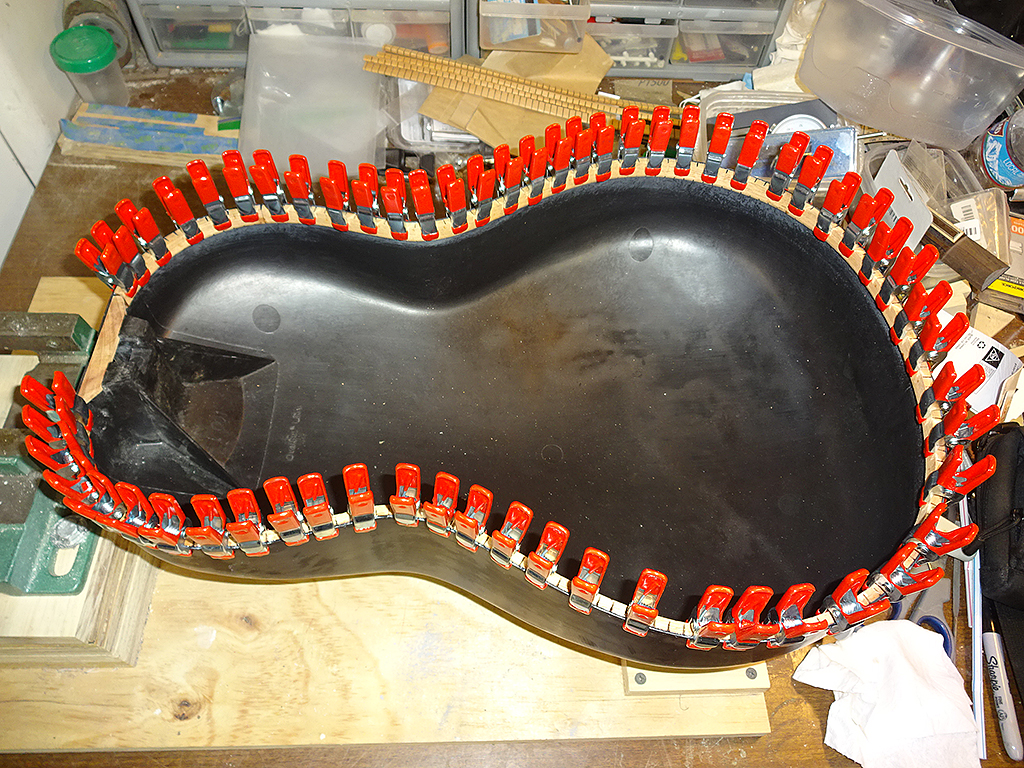
Time to give the bowl some attention. The kerfed lining is dry. I added a strip of masking tape to the inside of the bowl underneath the lining.
This will do two things for me. First, it'll show me where to stop gluing and second, once I get the lining clamped, I can peel the tape away leaving a clean glue line.
The linings come off one at a time. I ran a bead of Hysol 0151 on the inside of the bowl, then painted it smooth with an acid brush. Once the glue was spread out, I clamped the lining back into place.
All the linings are glued and clamped. The filler piece is also glued into place.
Posted 2018-01-12 1:50 AM (#540758 - in reply to #537422) Subject: RE: Patch's Parlor Build...
Joined: June 2012 Posts: 2303
Location: Lake Forest, CA
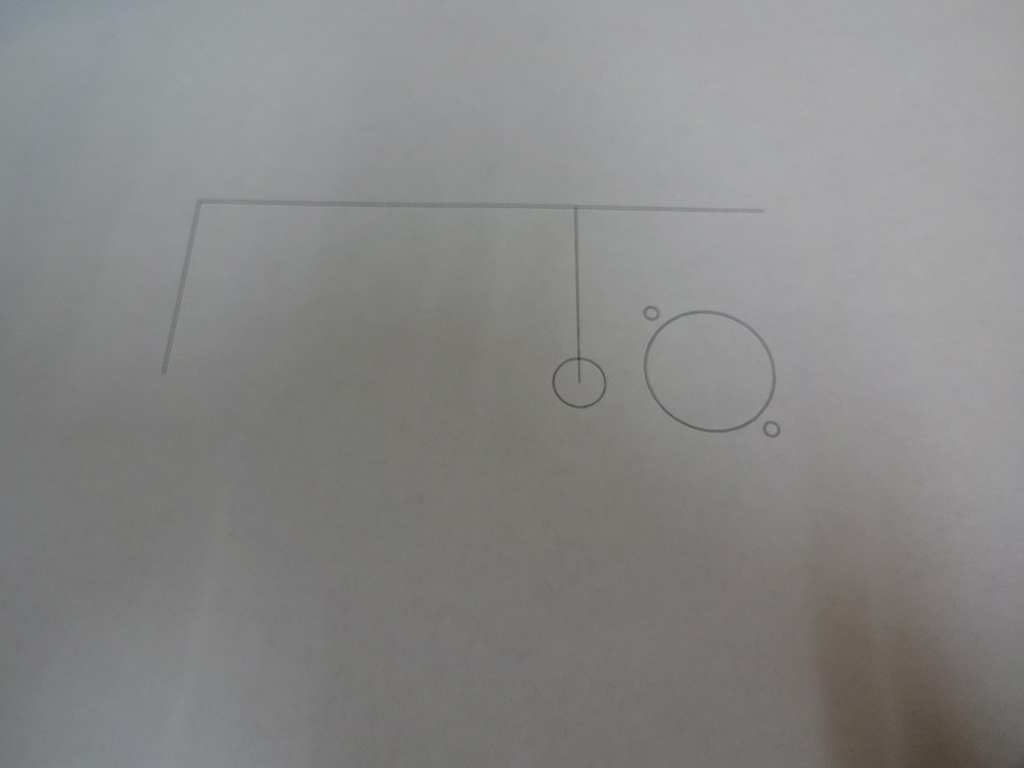
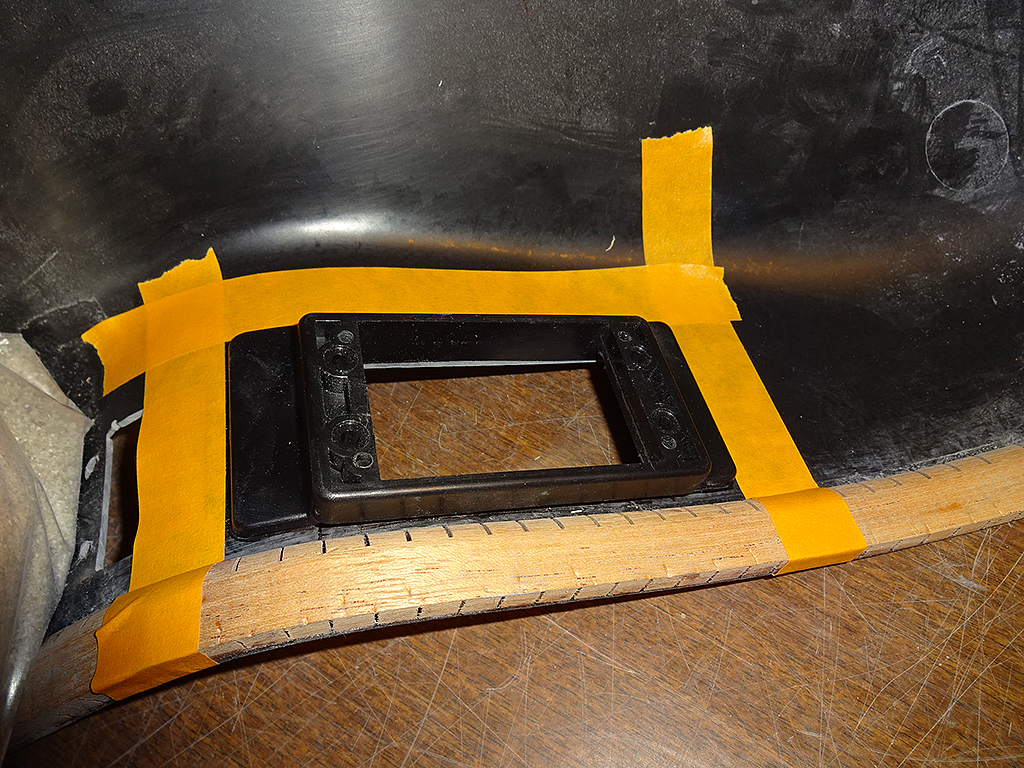
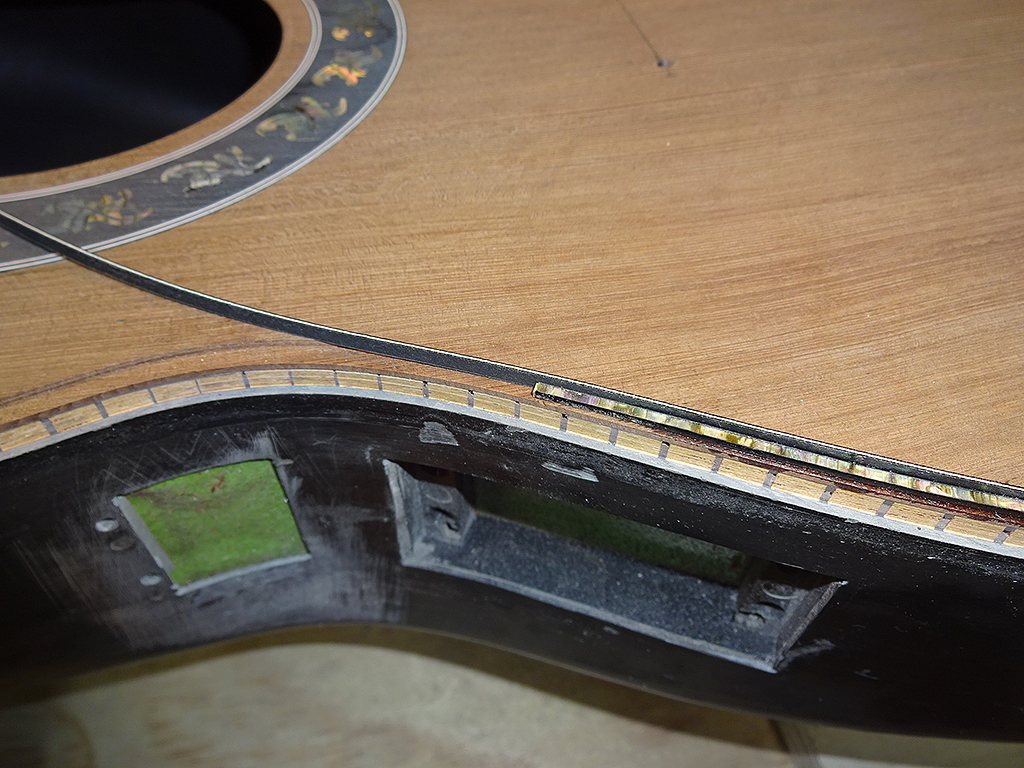
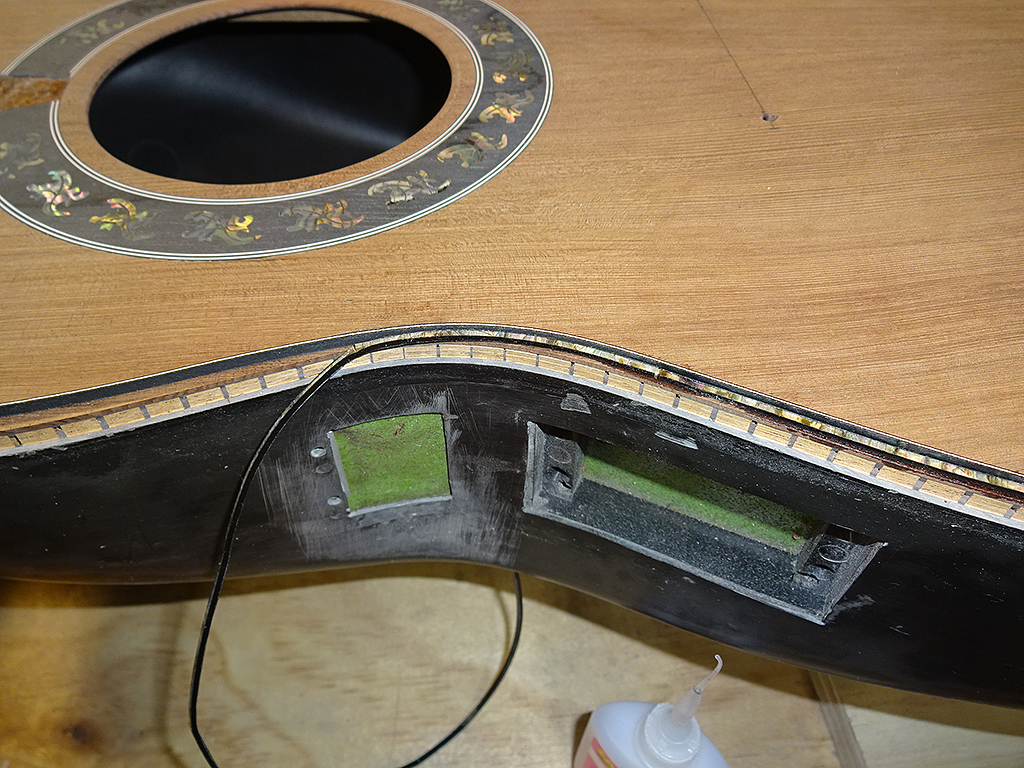
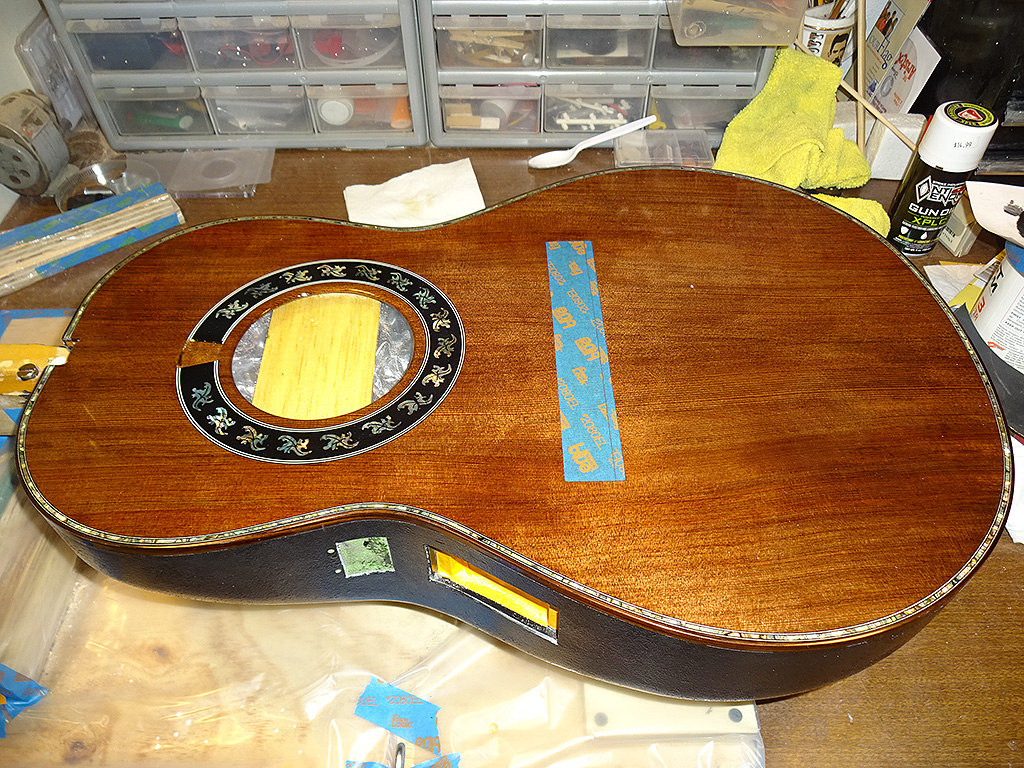
Next job is to get the electronics installed, which means cutting and drilling holes in the bowl.
First I drew a template in CAD for the jacks. The photo is kind of blurry, but you get the idea.
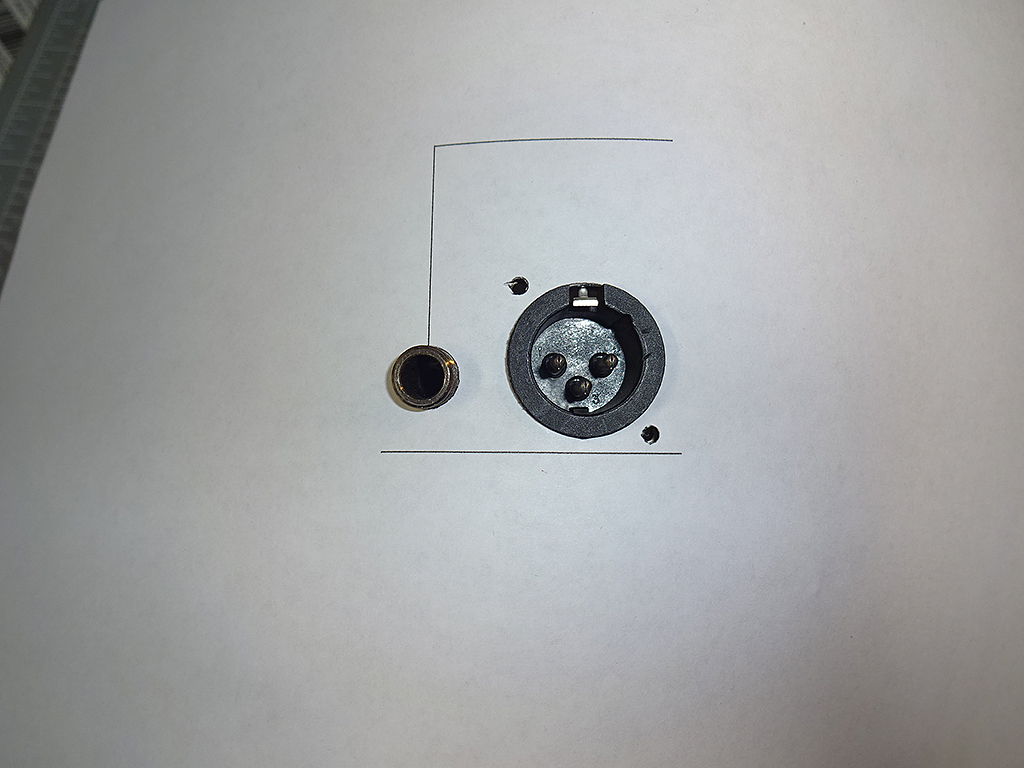
Test fit of jacks.
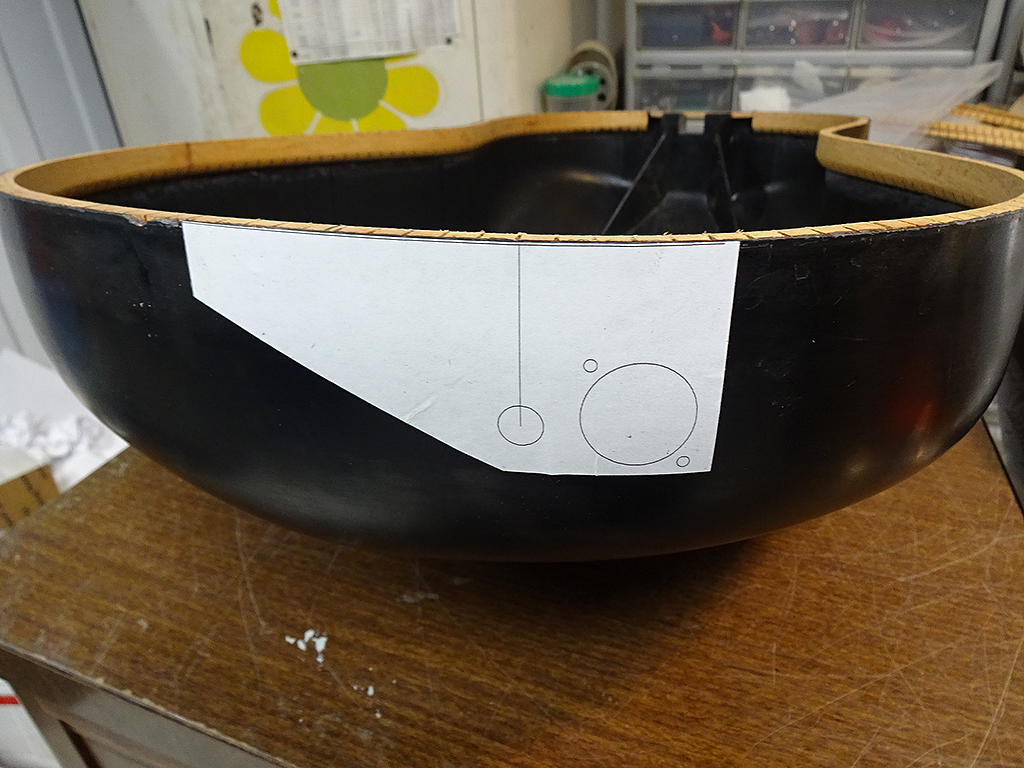
I used spray glue to secure the printed template to the side of the bowl.
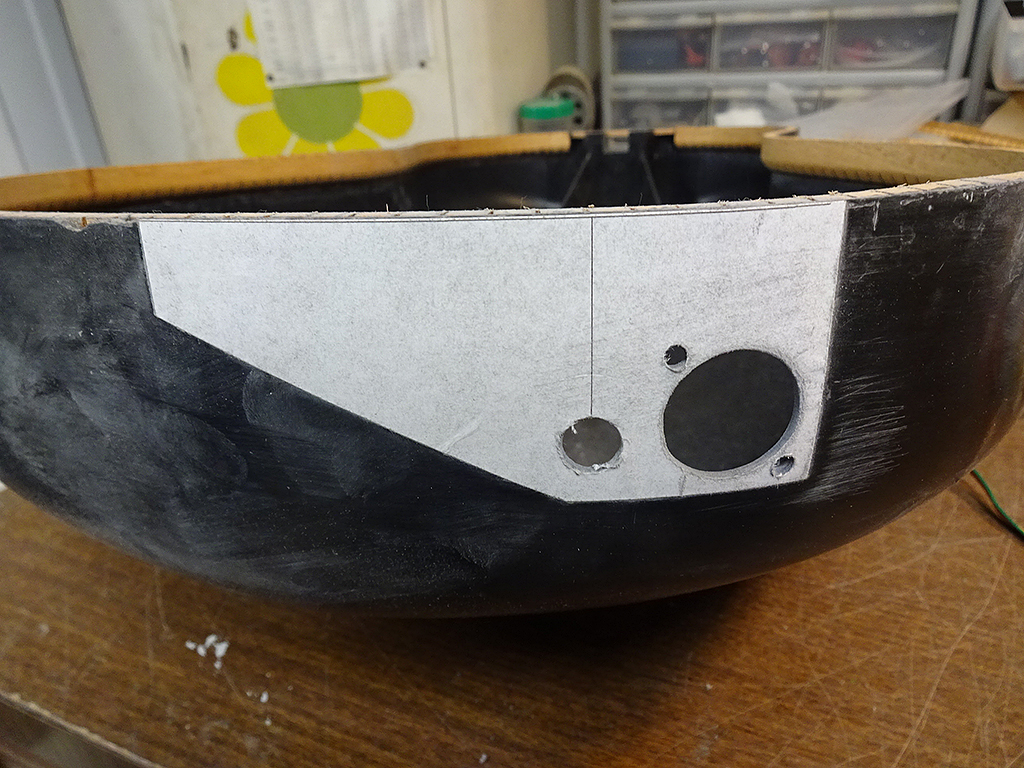
Jack holes all drilled and ready for installation.
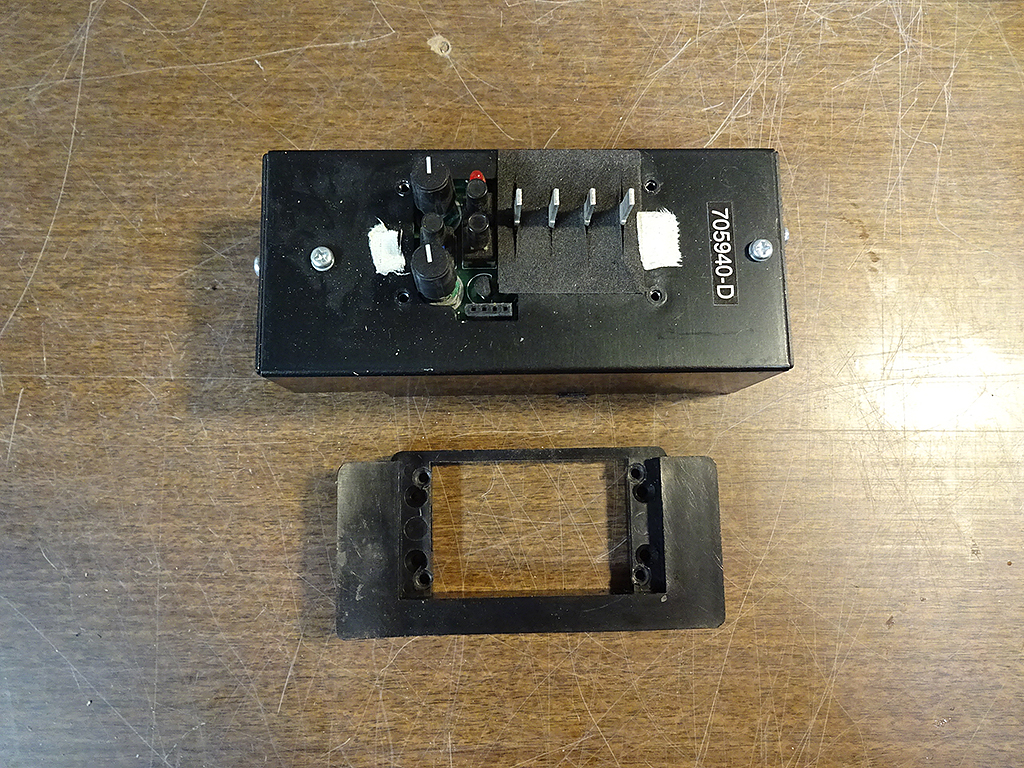
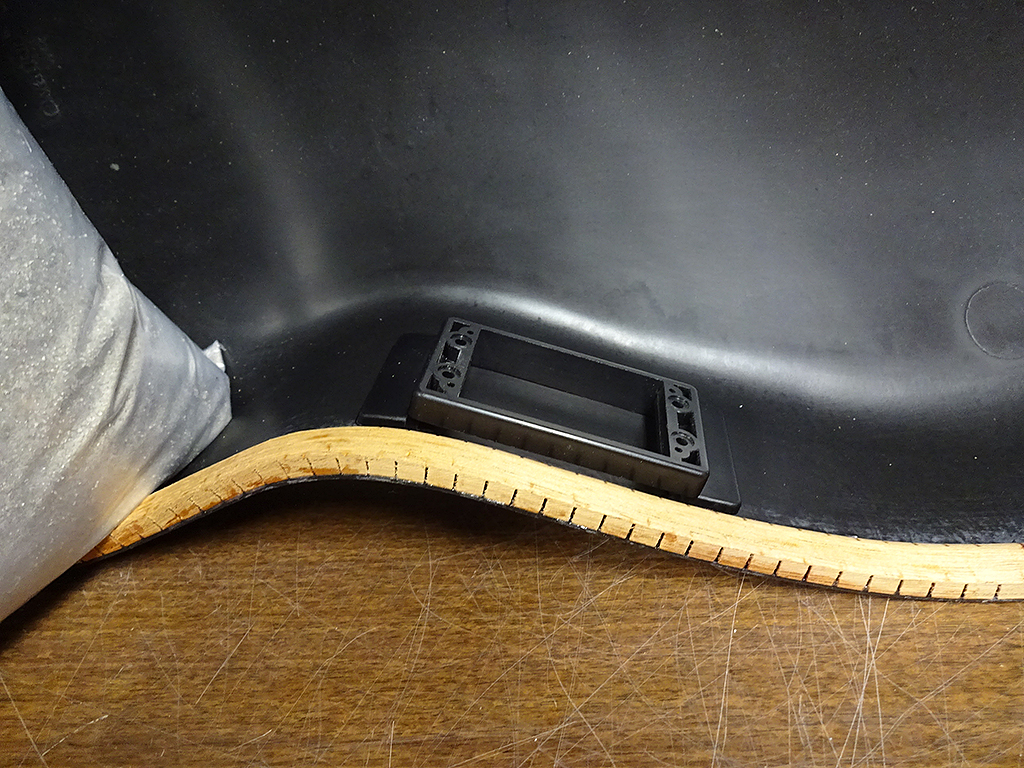
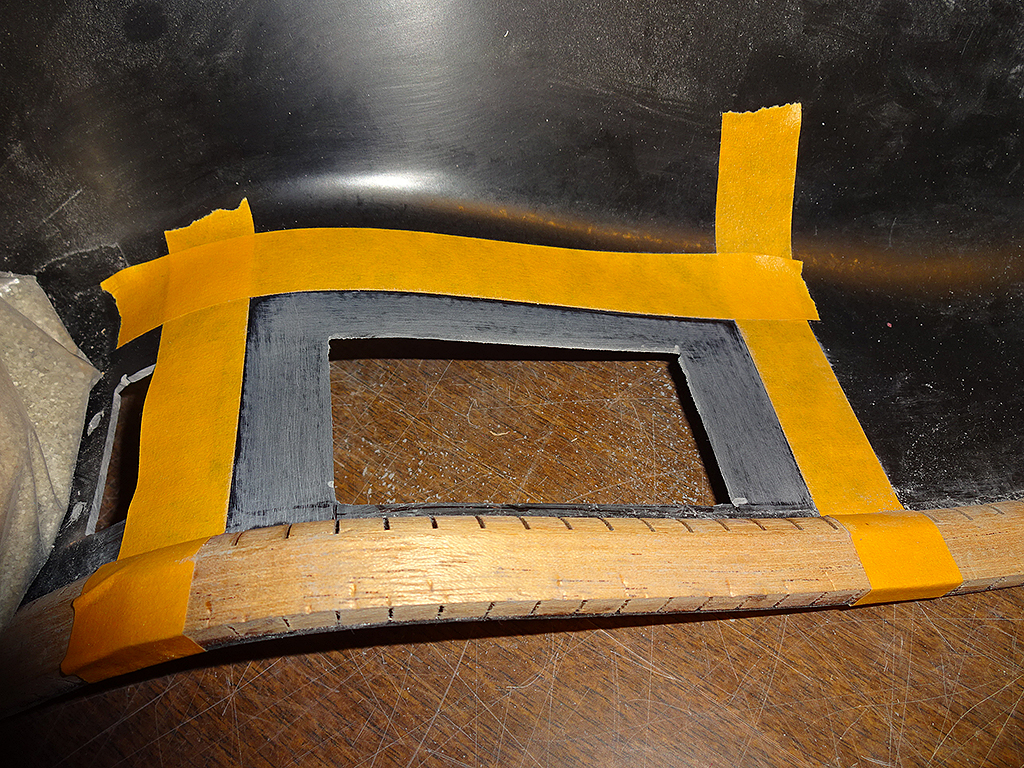
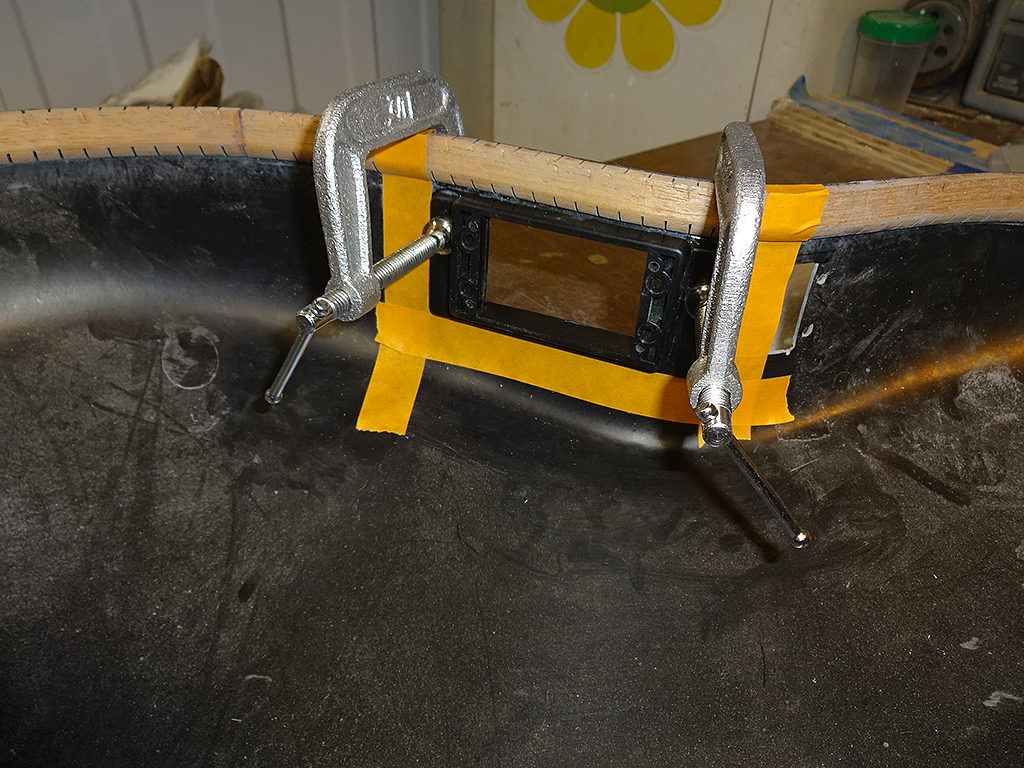
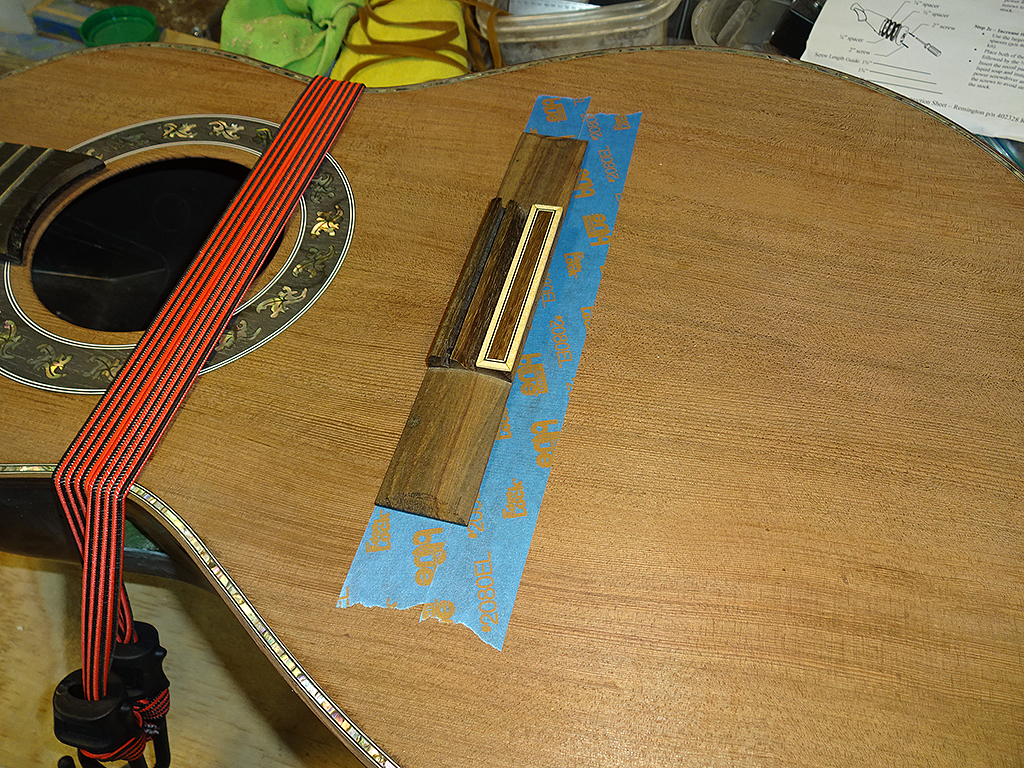
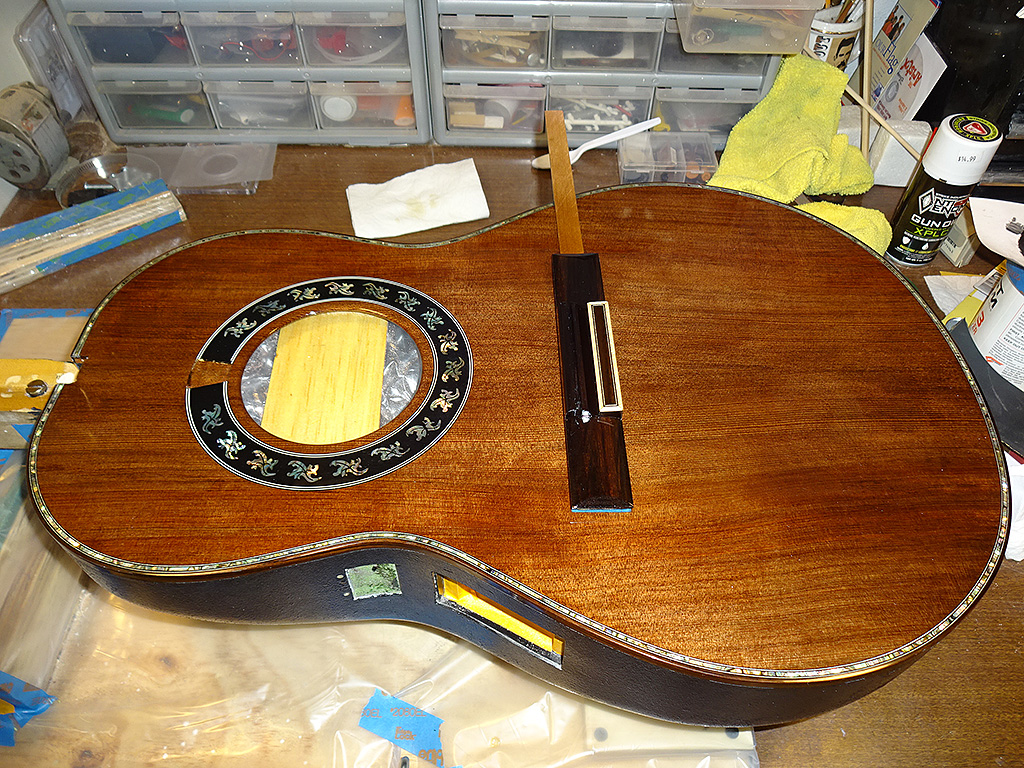
The Optima needs a molded mount to be glued to the inside of the bowl and a hole cut for the face plate/outer mount.
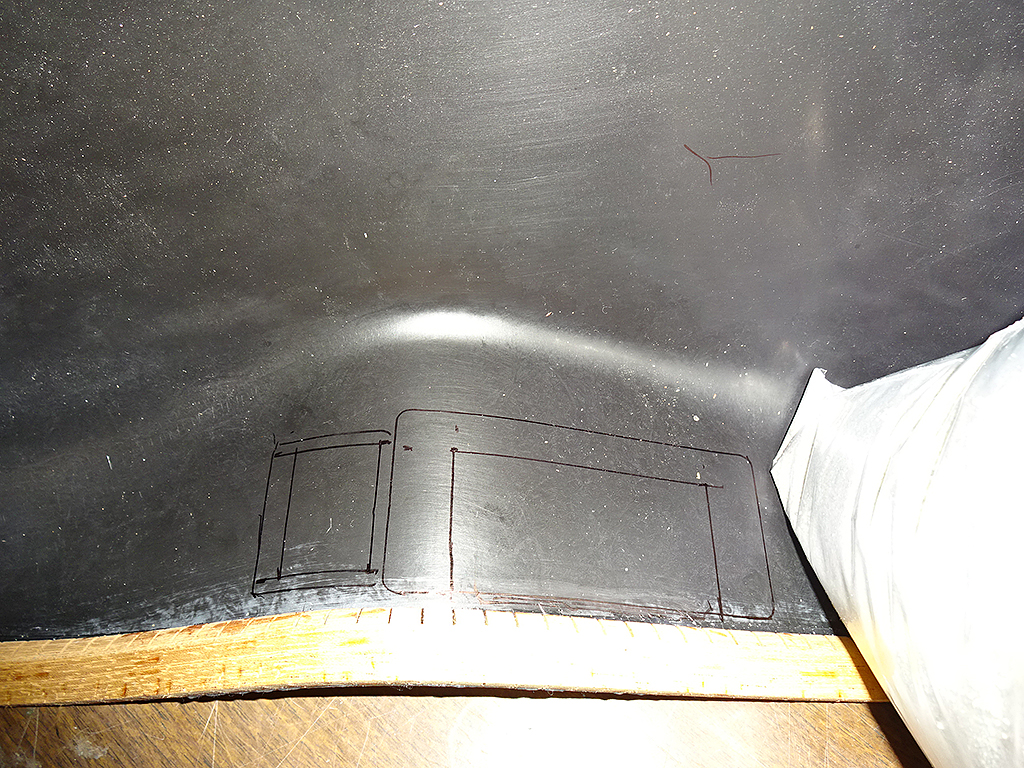
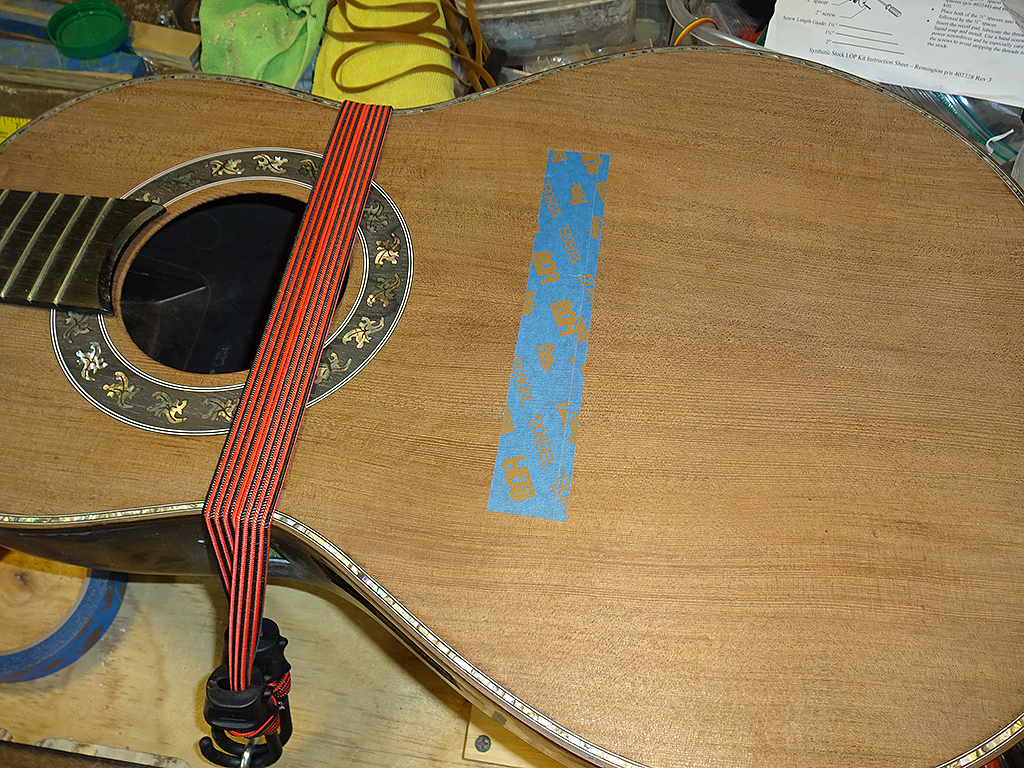
Mount location is marked on the inside of the bowl.
I also marked the location of the hole for the battery box.
Holes for Optima and battery box are cut.
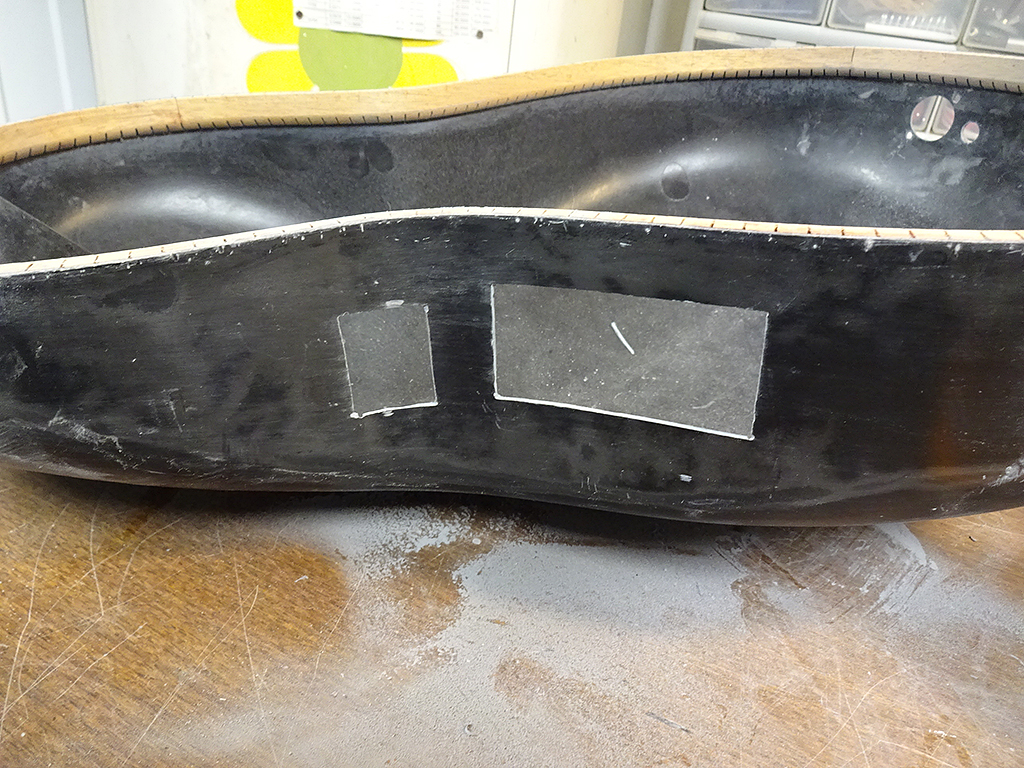
The area where the mount is glued to the bowl is masked off.
And, roughed up with 220-grit sandpaper, as was the underside of the mount.
Mount is glued with Hysol 0151 and clamped to cure for 24 hours. Then, it's time to start final fitting of the top in preparation to gluing it to the bowl.
Posted 2018-01-19 4:33 AM (#540863 - in reply to #537422) Subject: Re: Patch's Parlor Build...
Joined: May 2011 Posts: 751
Location: Muenster/Germany
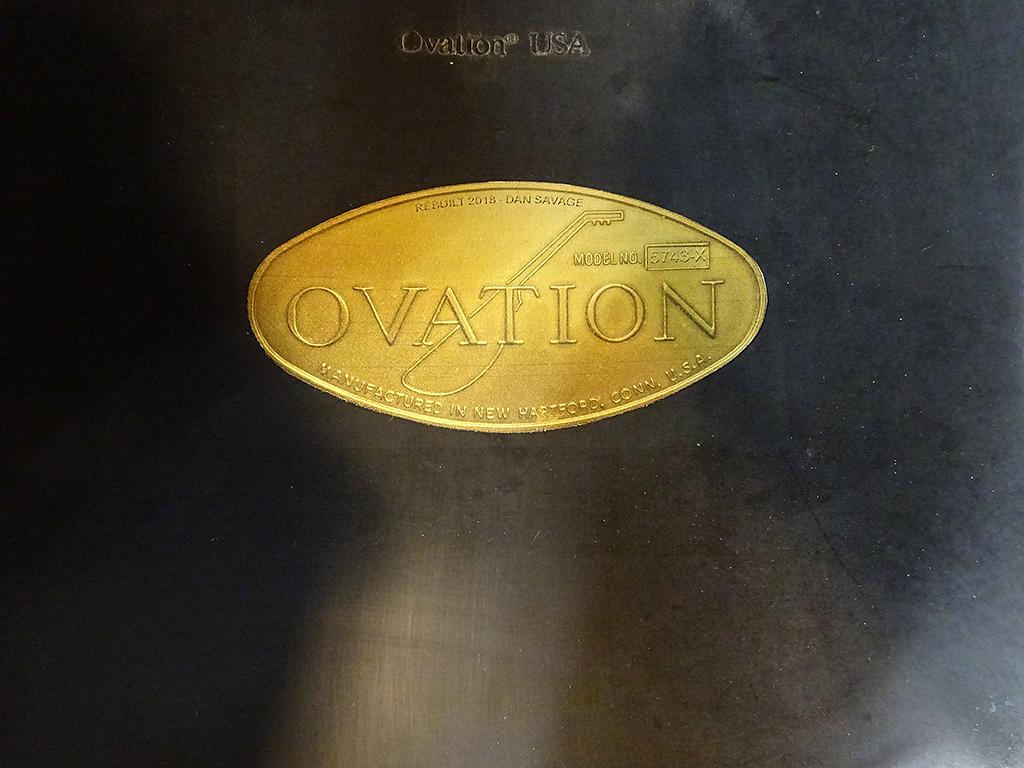
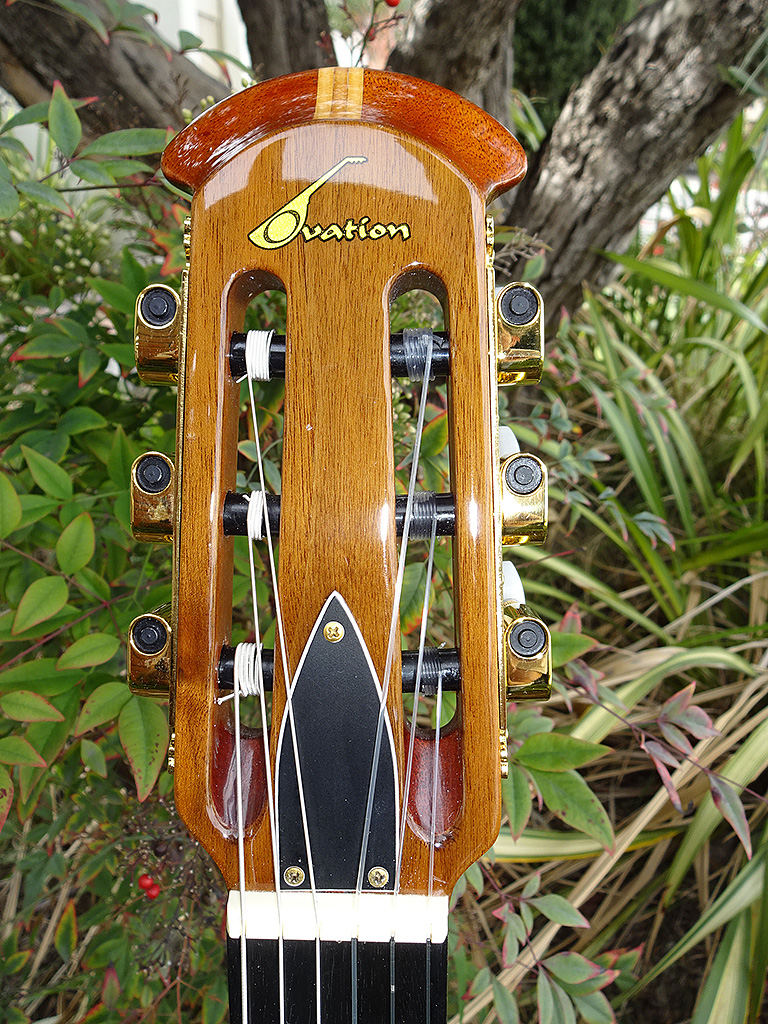
This is going to become a wonderful guitar.And I love the vintage style Ovation label. I never understood why Ovation exchanged these with those cheap and ugly-looking blueish paper labels. Inside of really expensive guitars!
I must say that I did not understand all technical specifications of this story but as far as I got it: you are able to built Ovation bowls?
Now that this is about to get complete, did you ever think about an Ovation JUMBO guitar?
Posted 2018-01-19 12:00 PM (#540865 - in reply to #540863) Subject: Re: Patch's Parlor Build...
Joined: June 2012 Posts: 2303
Location: Lake Forest, CA
Hi Michel,
Yes, I think you're right. The top has a nice tap tone. It sounds a lot like a wooden drum.
Thanks! I like the old foil labels, too. Especially in gold foil. I would suspect the change from the foil to paper had a lot to do with the bottom line. Too bad, because the foil labels really add a touch of class.
Yes, that's the gist of it. I can now mold my own bowls, both deep and parlor. As you know I'm not really a fan of cut-away guitars, so these two suit me just fine.
An Ovation jumbo would be interesting. I imagine it would be really loud.
Actually, my next project will be an interesting one. Not so much for what's being done, but for whom.
Posted 2018-01-22 12:47 AM (#540885 - in reply to #537422) Subject: RE: Patch's Parlor Build...
Joined: June 2012 Posts: 2303
Location: Lake Forest, CA
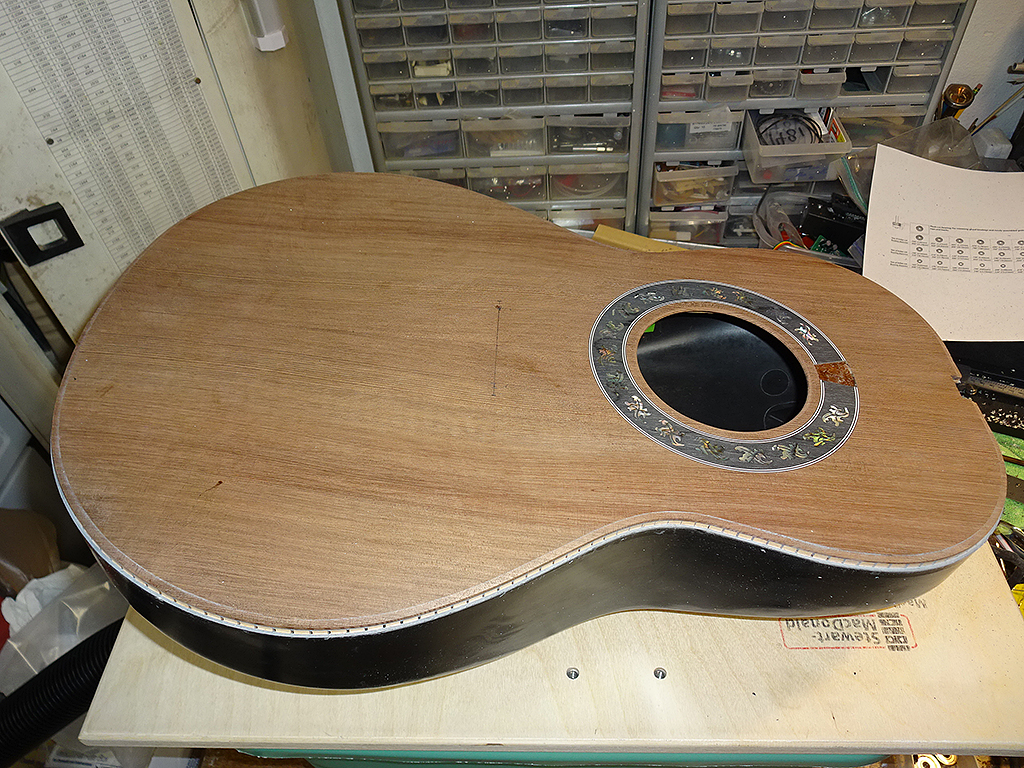
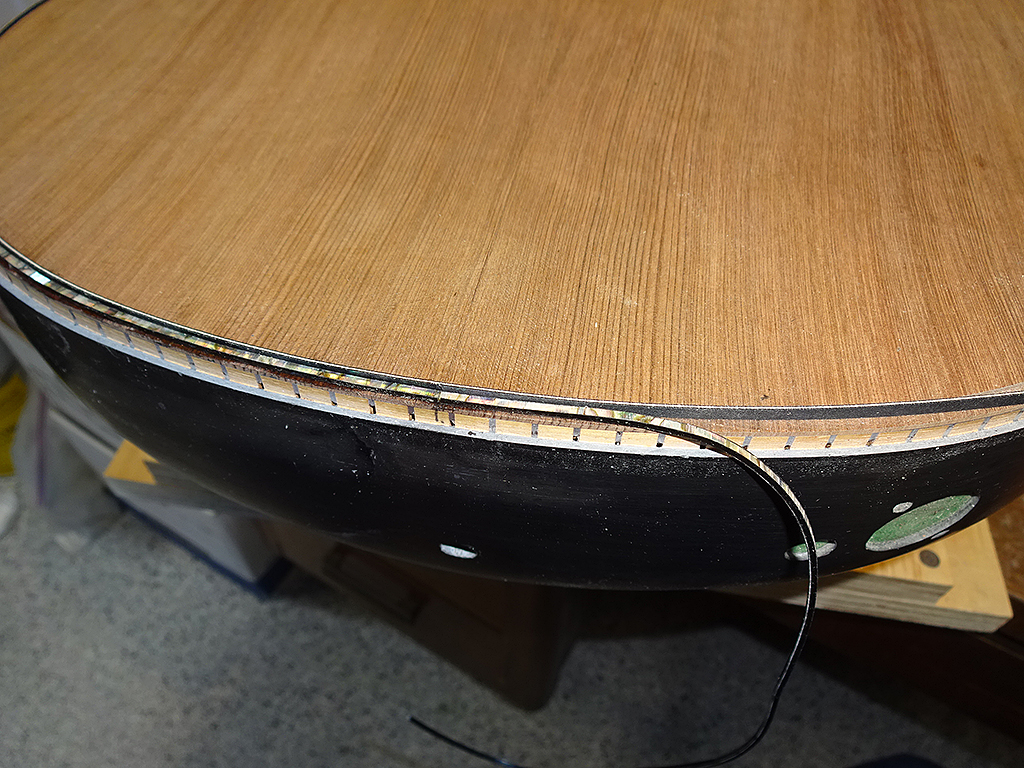
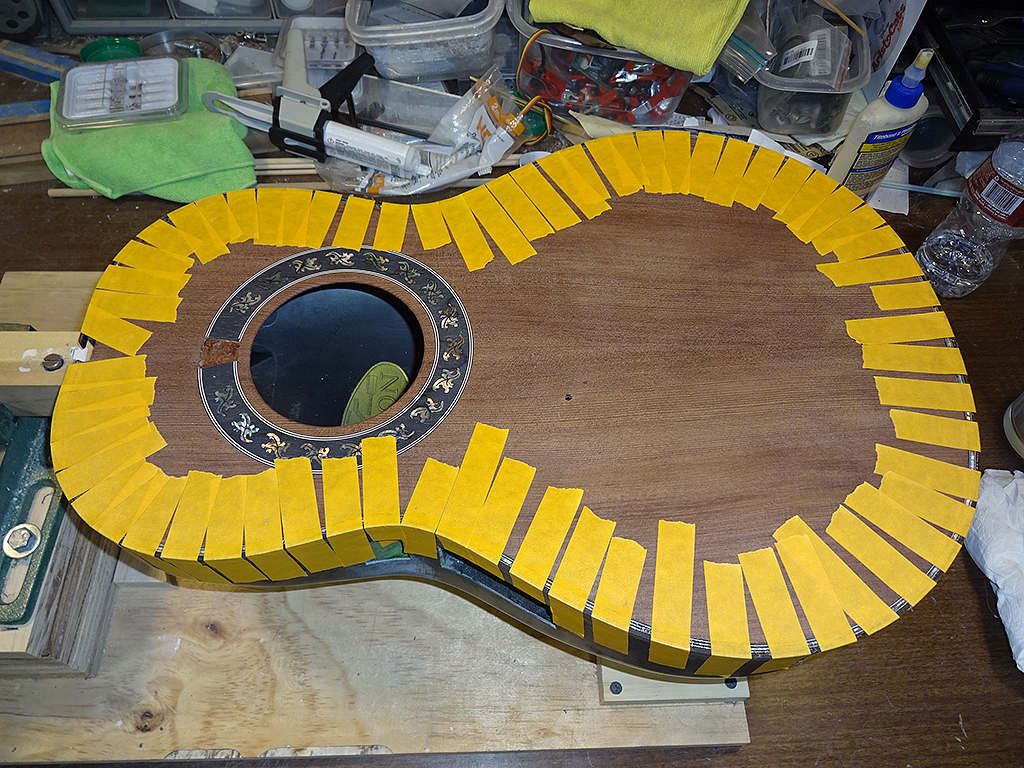
It's time to glue the purfling. It's actually a pretty easy process. It's a little time-consuming, but not all that difficult. I thought everyone would find this interesting.
The basic process involves gluing the inner BWB purfling and zipflex abalone purfling using thin CA glue. This is done all the way around the guitar, one side at a time. Then, the outer BWB purfling is glued to the zipflex purfling.
First step is to locate the center line of the guitar. The inner BWB purfling and zipflex are tack-glued about an inch at a time to the purfling channel in the top.
The process continues all the way around the top.
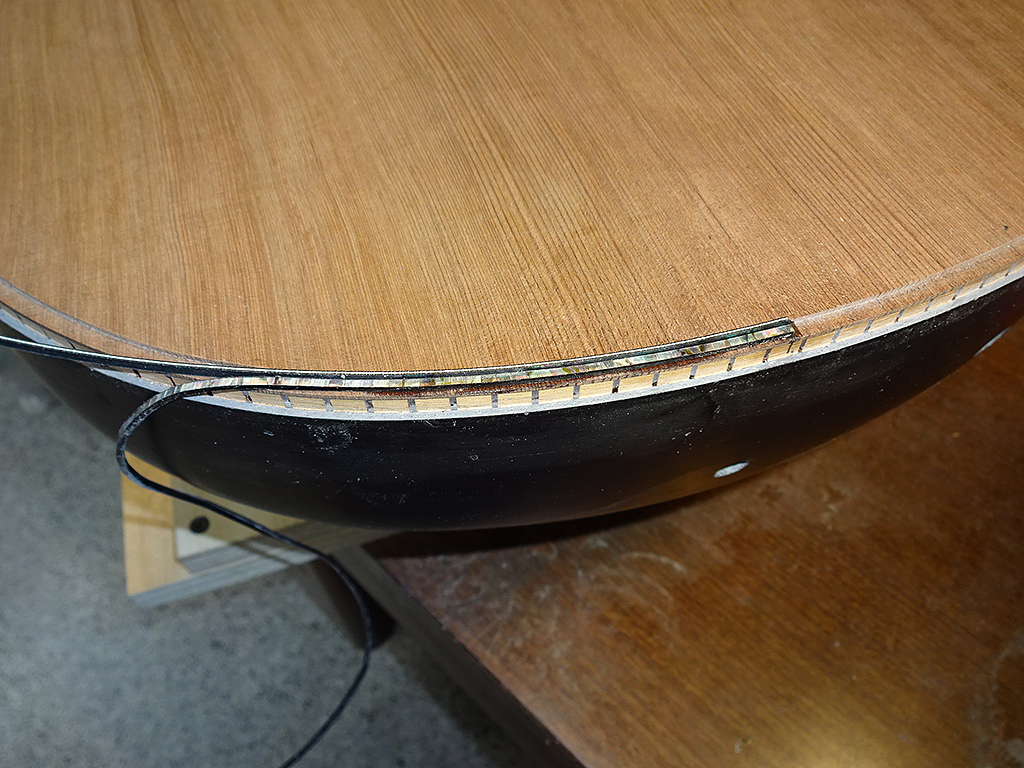
The zipflex comes in 15" sections. When you get to the end of the section, you glue right up to the end, but leave the last inch or so free so it can be glued at the same time as the new section.
The next section is pushed into place so the end is flush with the end of the previous section, then both are tack-glued into place. Then, you just continue gluing.
Bass side is done. This took about 30 minutes to do. Time to move onto the treble side.
The treble side BWB purfling is matched up to the bass side and a new section of zipflex is butt-glued into place.
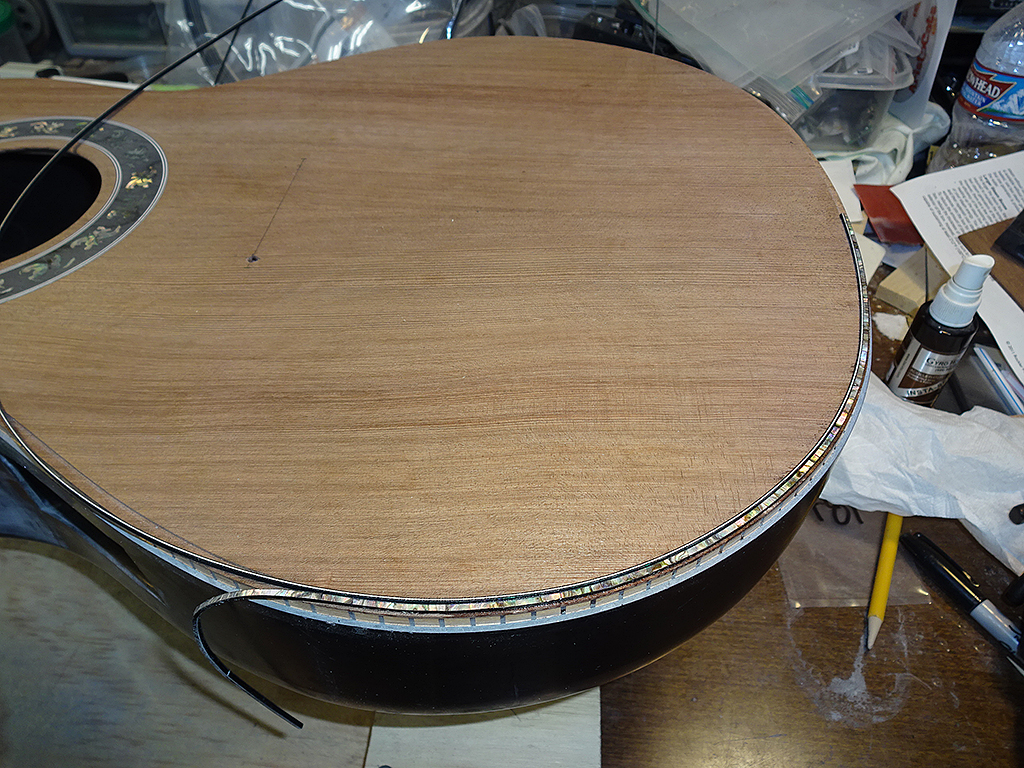
Both sides are done. Now, it's time to glue the outer BWB.
Outer BWB is glued on both sides.
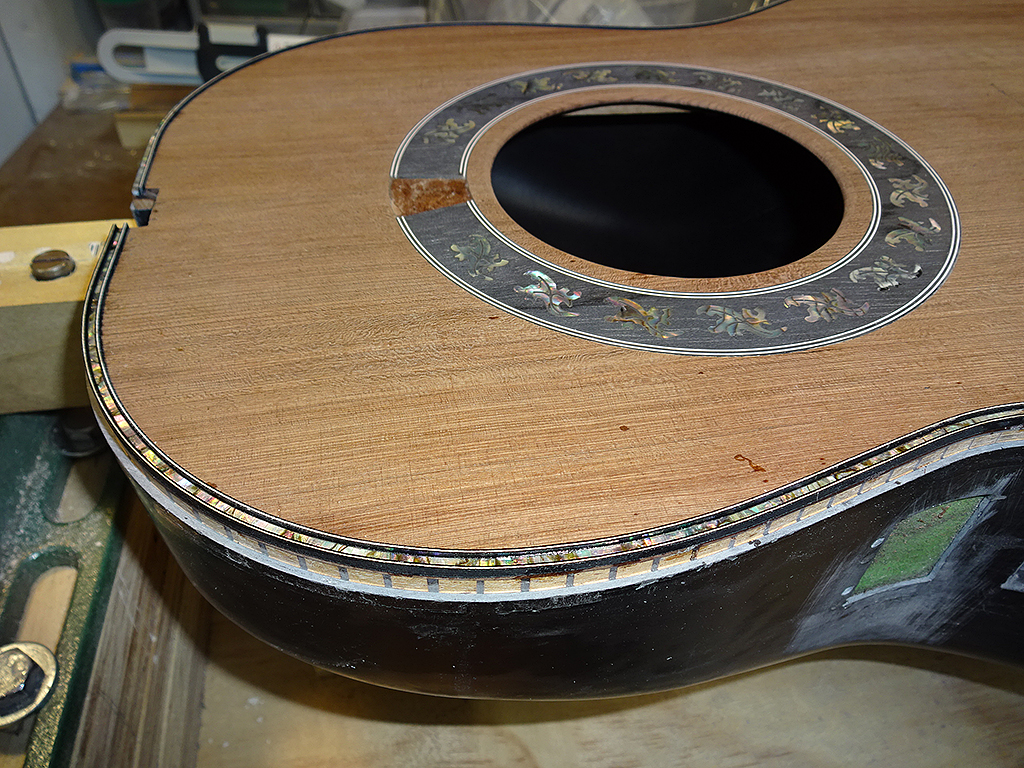
The inner and outer BWB purfling needs to be scraped down so it's close to the surface of the top. I like to do this to get a tight glue joint between the binding and the purfling.
Inner and outer BWB purfling has been scraped close to the surface of the top and I'm ready to start bending the rosewood binding. I'll do the final scraping of the purfling/binding once the binding is glued to the top.
Posted 2018-01-22 9:25 PM (#540894 - in reply to #537422) Subject: Re: Patch's Parlor Build...
Joined: February 2016 Posts: 1769
Location: When??
Curious.. what is the the inner/outer BWB purfling made of? And what method did you use to scrape it down flush with the abalone? Do they not manufacture size selection options of them both in the the same height to begin with so that this step can be avoided?
Posted 2018-01-23 11:42 AM (#540900 - in reply to #540894) Subject: Re: Patch's Parlor Build...
Joined: June 2012 Posts: 2303
Location: Lake Forest, CA
Thanks, Jonmark.
Al,
The BWB is made from fiber (black) and maple (white) layers that are bonded together. Stewmac sells a good selection of these.
I used a large rectangular steel scraper sold by Stewmac.
Not really. The zipflex is ~1/16" thick and the BWB purfling is ~1/8".
The scraping step is necessary to make sure the final height of the purfling/binding layers are even with each other. It's pretty difficult to do that in the gluing stage.
Posted 2018-01-31 12:50 AM (#541011 - in reply to #537422) Subject: RE: Patch's Parlor Build...
Joined: June 2012 Posts: 2303
Location: Lake Forest, CA
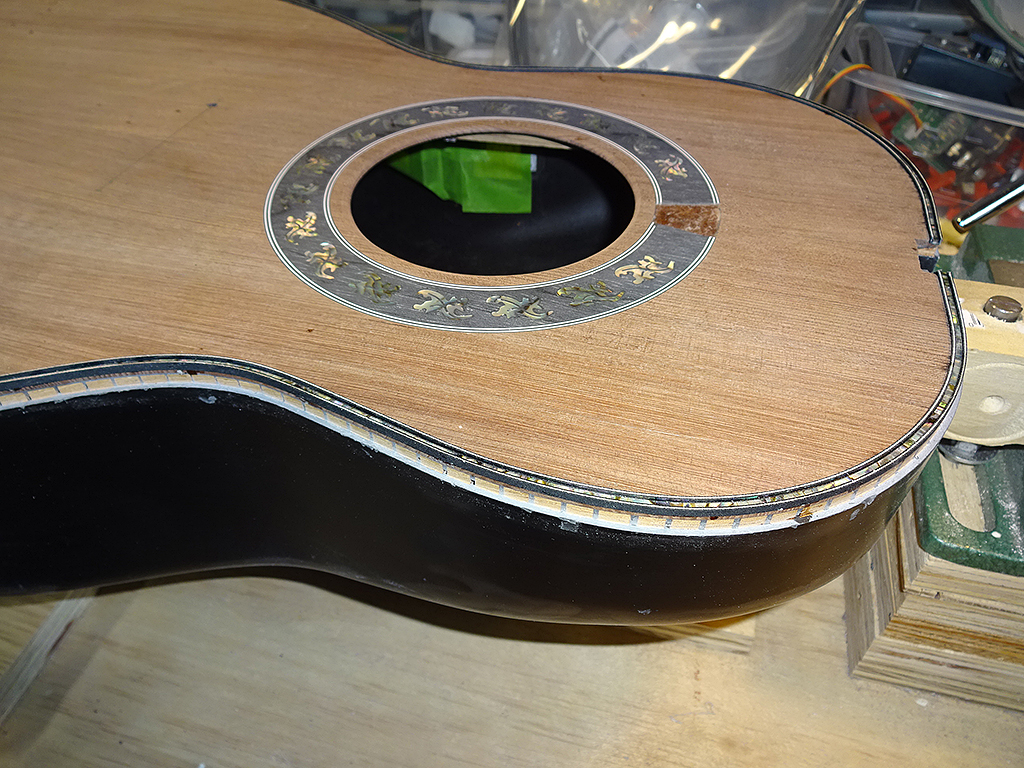
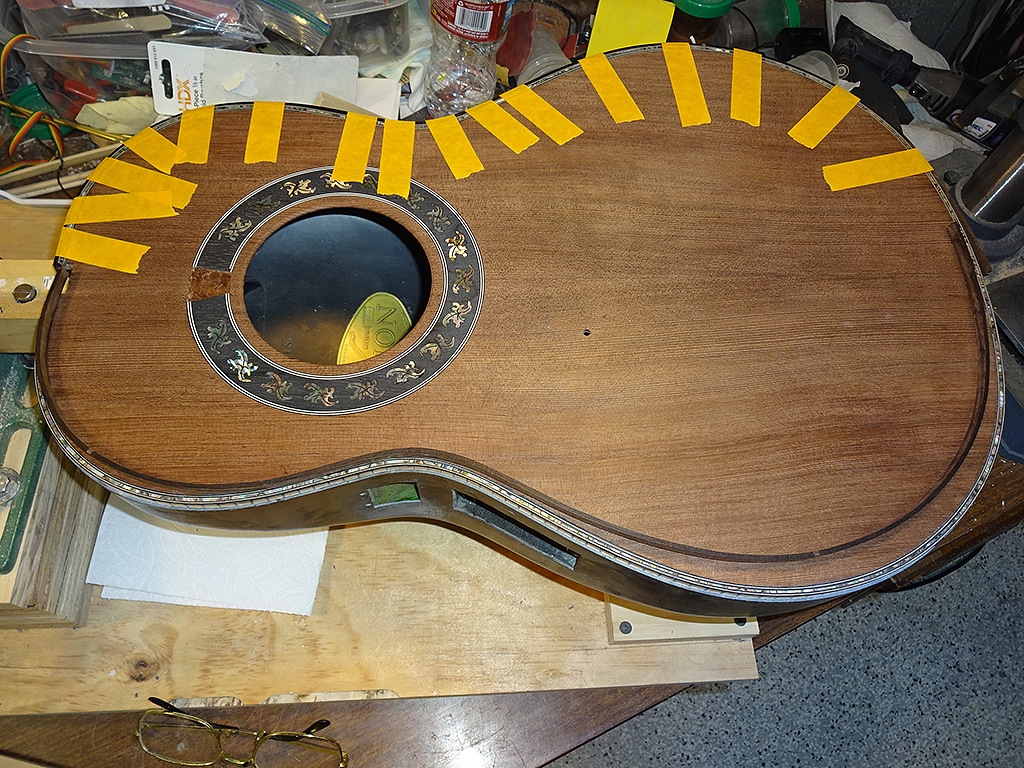
Patch asked for rosewood bindings. I've never done wood bindings before. I knew I needed to pre-bend the bindings, but I wasn't sure which method to use.
I tried the steam method first. I bought a steam box kit from Rockler's, then built a wood steam box. I steamed the bindings, then taped them to the body and left them overnight.
When I removed the tape, the bindings definitely took a bend, but there was quite a bit of spring-back.
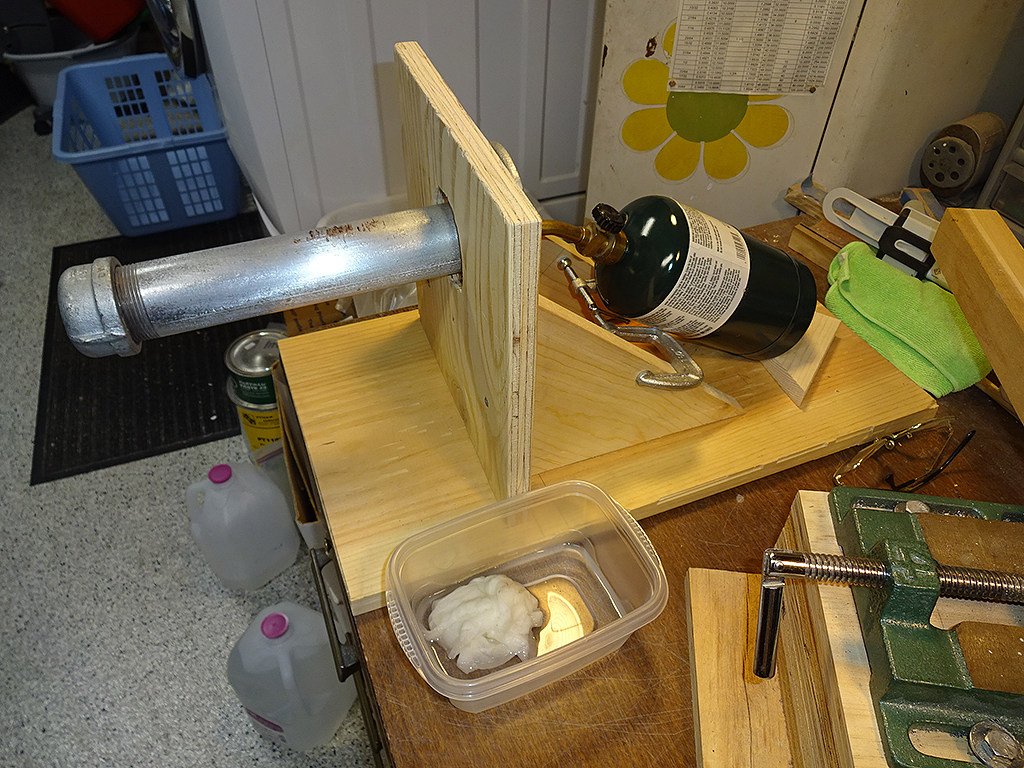
Onto the next time-honored bending method, a propane torch-powered hot pipe.
Much nicer.
I removed the tape from the other side and bent it to shape using the hot pipe.
Binding is glued to the body. I'll let the glue dry until tomorrow, then take off the tape to see how it looks.
Posted 2018-01-31 7:27 AM (#541018 - in reply to #541011) Subject: RE: Patch's Parlor Build...
Joined: October 2012 Posts: 1018
Location: Yokohama, Japan
DanSavage - 2018-01-30 2:50 PM
Patch asked for rosewood bindings. I've never done wood bindings before.
You coulda fooled me! That is really incredible work. I've been trying to get my wood bindings right for my 1868 for years, but every time I practice, I break more than I bend! You've definitely got the touch. As usual, thanks for your immaculate documentation. I go to school every time you post! Patch has got to be pretty excited about this!
Posted 2018-02-03 11:17 PM (#541070 - in reply to #537422) Subject: RE: Patch's Parlor Build...
Joined: June 2012 Posts: 2303
Location: Lake Forest, CA
Thanks, everyone.
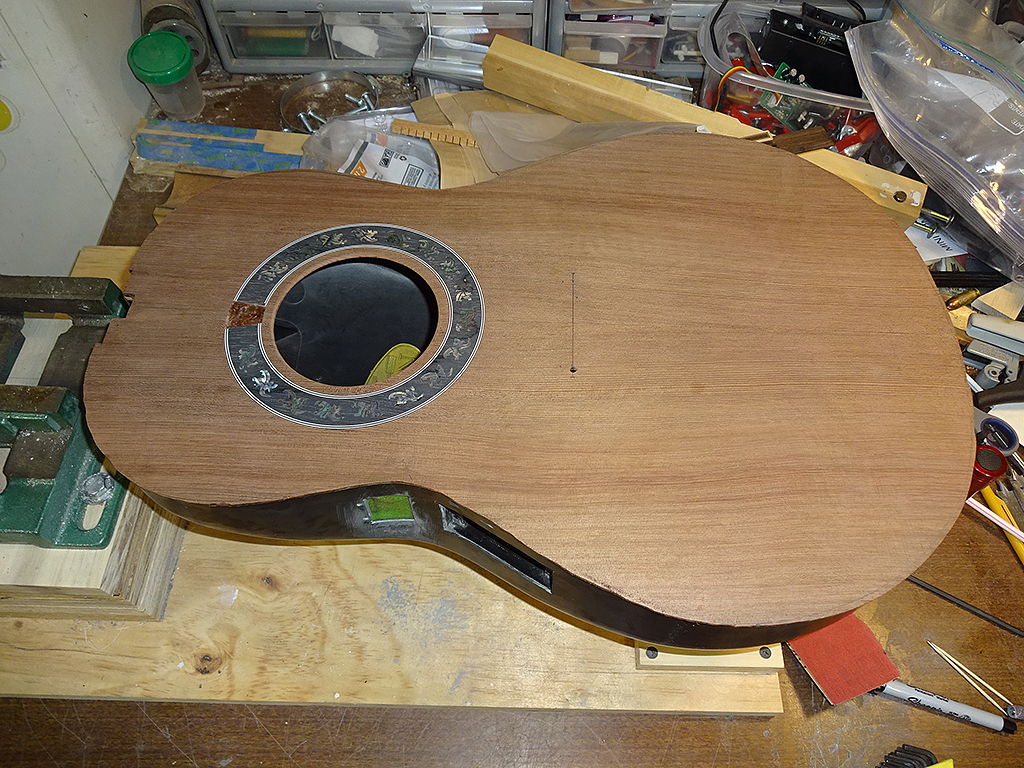
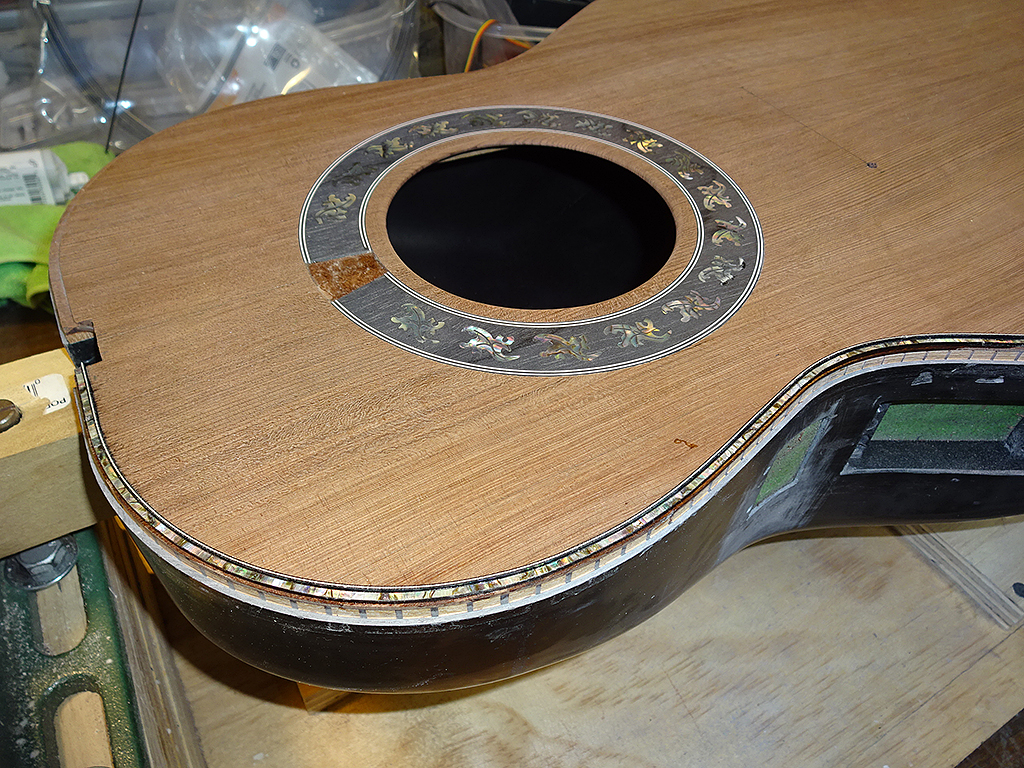
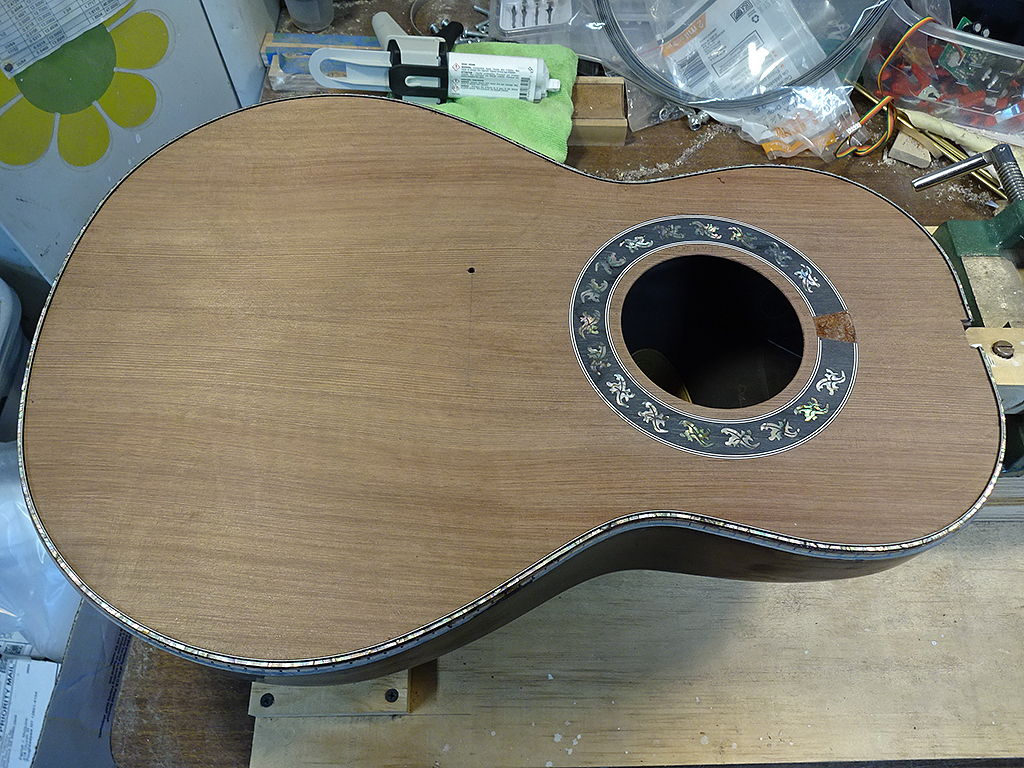
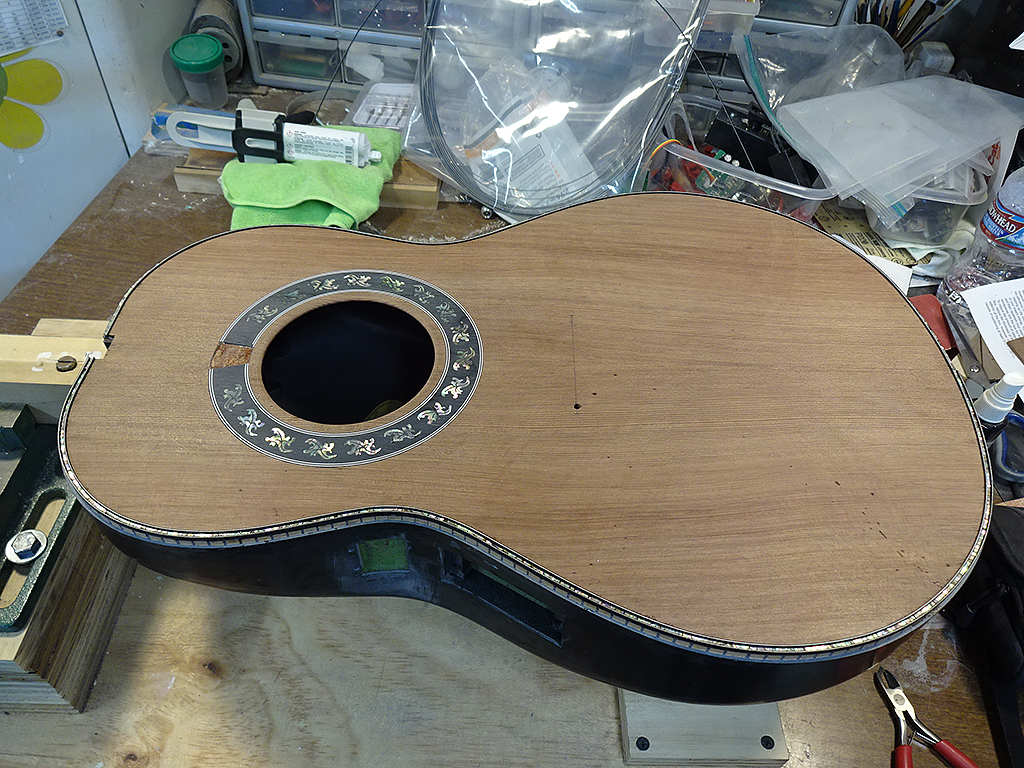
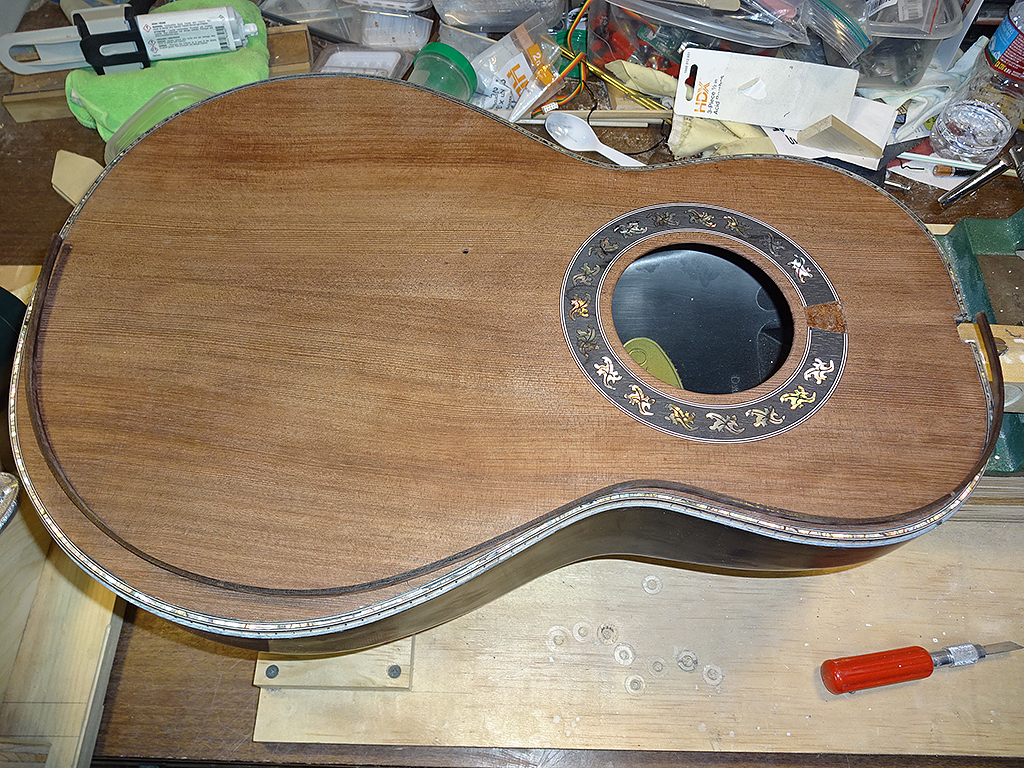
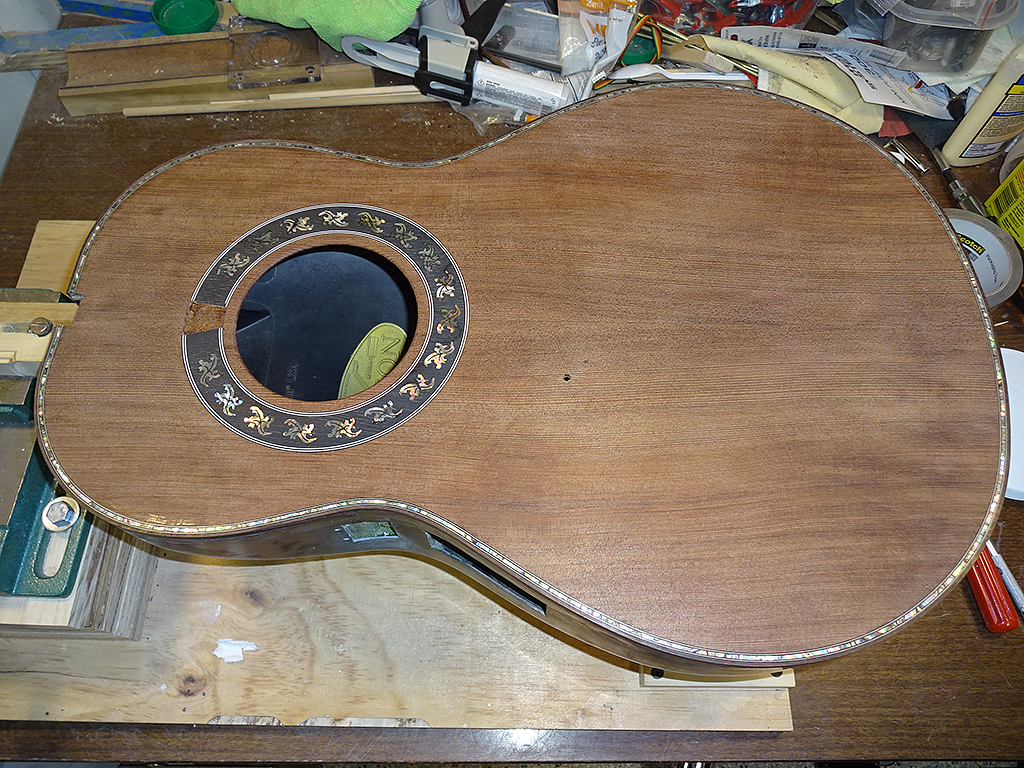
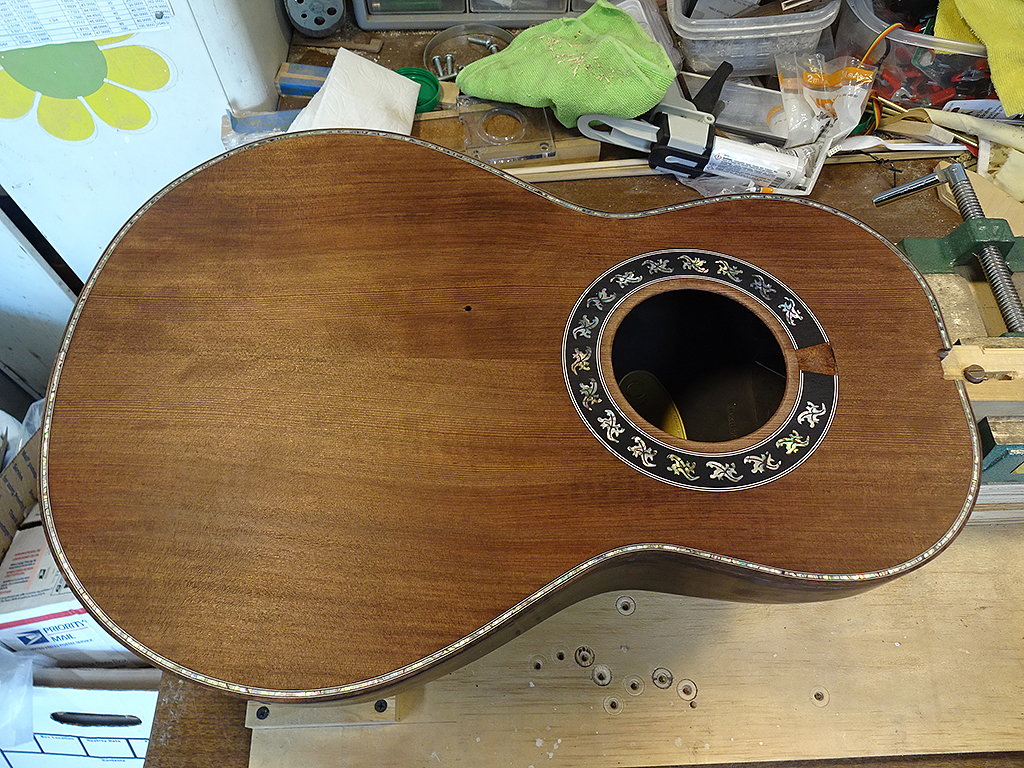
I pulled the tape off and scraped the binding/purfling flush with the top. I then used a flush-cut router bit to make the bindings flush with the sides.
I wiped the top down with naptha to get an idea of what the final finish would look like. Purty.
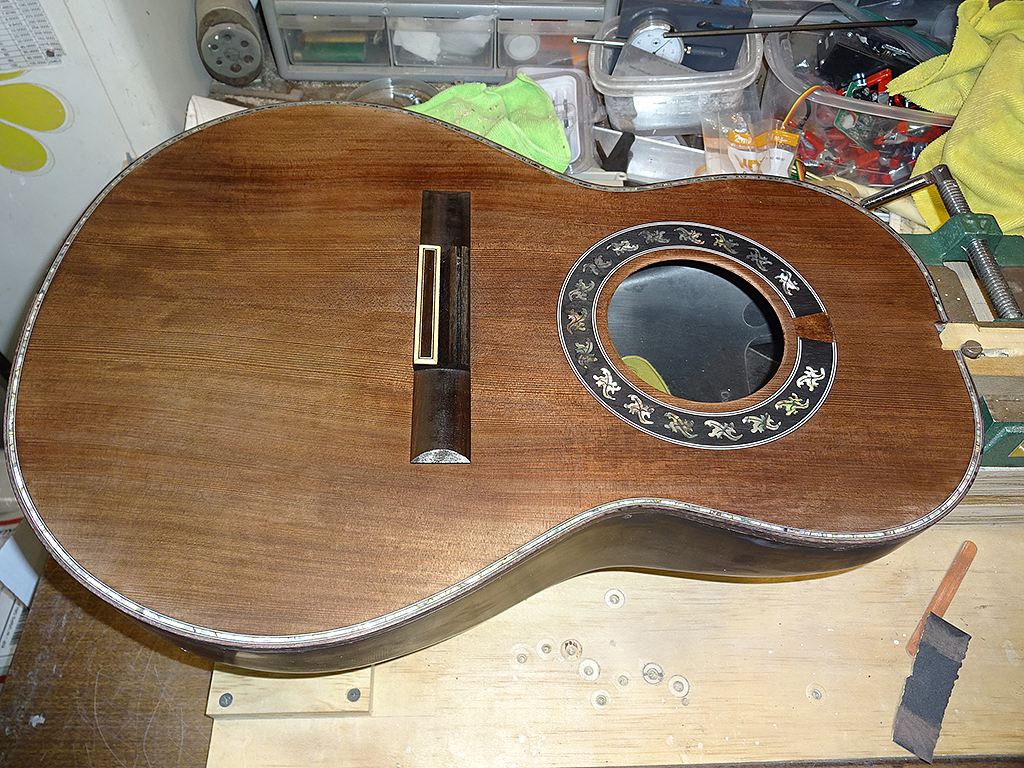
And a shot with the rosewood bridge, also wet down with naptha.
And, with that, the body is basically done. Next job is to verify the alignment/fit of the neck, then mask off the location of the bridge on the top. Once that's done, it's time to start the finishing process. (woo hoo!)
Posted 2018-02-04 7:23 AM (#541073 - in reply to #537422) Subject: RE: Patch's Parlor Build...
Joined: May 2006 Posts: 4221
Location: Steeler Nation, Hudson Valley Contingent
This is looking almost exactly like I pictured it in my mind. The bridge is just a little wider than I thought but with a bit of gloss it will really pop with that redwood behind it.
I'm also glad to have picked the rosewood binding for the same reason.
IT's looking GREAT Dan!
I'm already worried about having to ship it across the country.
Posted 2018-02-04 6:10 PM (#541081 - in reply to #537422) Subject: RE: Patch's Parlor Build...
Joined: May 2006 Posts: 4221
Location: Steeler Nation, Hudson Valley Contingent
Dan, you know I'm not in a hurry, so be sure to hang on to it until Moody gets a good look at it. Between the two of you, maybe you can post a sound clip or something. I'm playing the odds here and saying there's a good chance at least one of you can probably make it sound better than I can.
Posted 2018-02-04 7:19 PM (#541082 - in reply to #537422) Subject: Re: Patch's Parlor Build...
Joined: October 2012 Posts: 1018
Location: Yokohama, Japan
WOW Dan! Stunning work as usual. But this is a basically a complete build from the bowl-on-up (apart from the neck?). You've really perfected your craft. I can sense Patch's excitement all the way over here in Japan, and can't wait to see/hear the completed instrument! By the way, the redwood top looks uncharacteristically "brown". Is that because it is a "sinker" top? Thanks for sharing Dan!
Posted 2018-02-05 10:09 AM (#541087 - in reply to #541083) Subject: Re: Patch's Parlor Build...
Joined: June 2012 Posts: 2303
Location: Lake Forest, CA
Patch,
I was thinking about letting Paul have the guitar for a few days so he can play it at his leisure. Before I do that I'll shoot a short video so you can hear how it sounds.
Ken,
Yep. Apart from the neck and the pre-molded bowl, it's pretty much a scratch-built Ovation. Yes. the darker color is because it's a sinker redwood top.
Paul,
You're right. The bridge is a Stewmac classical guitar unit. It'll get a glossy finish like most classical guitar bridges.
Posted 2018-02-09 6:36 PM (#541131 - in reply to #537422) Subject: Re: Patch's Parlor Build...
Joined: February 2016 Posts: 1769
Location: When??
Dan.. that teaser post you tossed in a while back about your next project-- don't just assume it went over our heads forgotten. I've been sitting here waiting the whole time and could really use a restroom break.
In the meantime, it's looking like the wood on Patch's new baby is really gonna finish up nice! I assume the naphtha completely evaporates and doesn't stain at all? Another nifty trick learned from Savage University! And I never knew that nylon string guitars have gloss bridges, per se. Never noticed. Is that traditional?
Oh, great. Well.. forget the restroom break. No.. no.. it's okay. I needed a new office chair anyway.
Posted 2018-02-16 10:49 AM (#541241 - in reply to #537422) Subject: RE: Patch's Parlor Build...
Joined: June 2012 Posts: 2303
Location: Lake Forest, CA
Hi Al,
Yes, naptha evaporates without leaving a stain. It also doesn't cause the wood to swell or shrink and it doesn't affect any of the glue joints. Others use mineral spirits, which is also pretty benign.
Yep. Glossy bridges are pretty much standard on most classical guitars.
Posted 2018-02-17 10:01 AM (#541260 - in reply to #537422) Subject: RE: Patch's Parlor Build...
Joined: June 2012 Posts: 2303
Location: Lake Forest, CA
Final neck alignment/fitting is (finally) done. This part took a while because the neck angle was completely wrong for this guitar. Not only was it wrong, but it was too long. Instead of it being a 14-fret to the body neck, it was a 14.1-fret to the body. This mean that I had to take material off from the inside of the heel to bring the 14th fret into the proper position so it is right above the neck/body joint. It was about 1/8" too long. And, crooked, too.
Now it fits really nice.
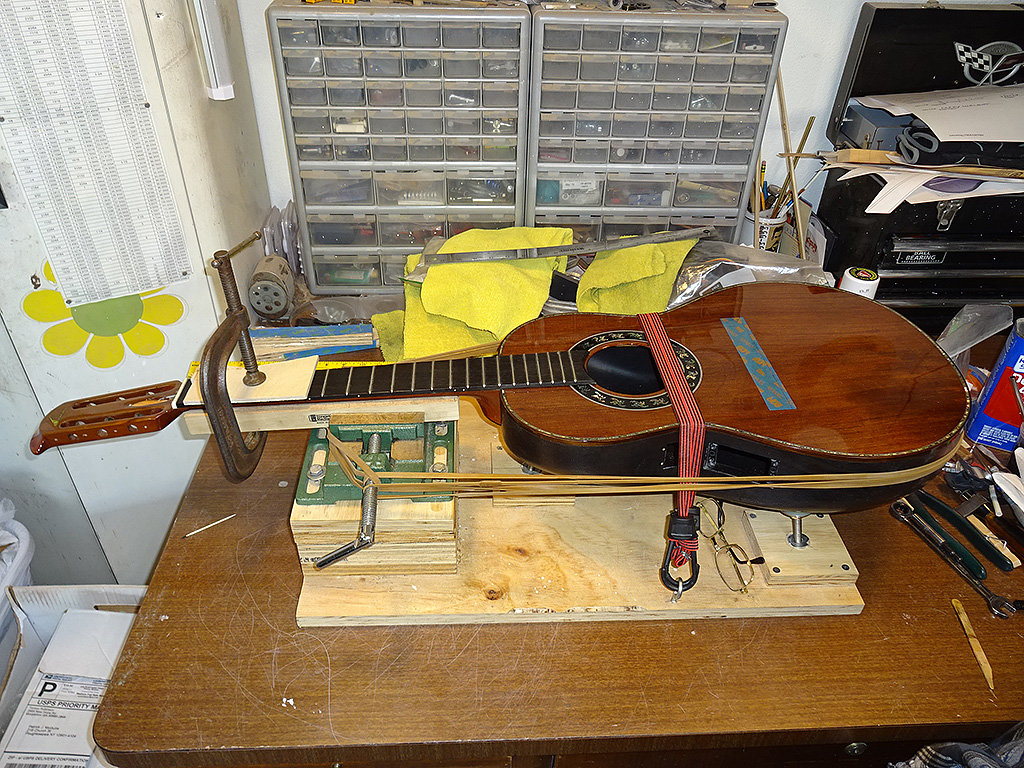
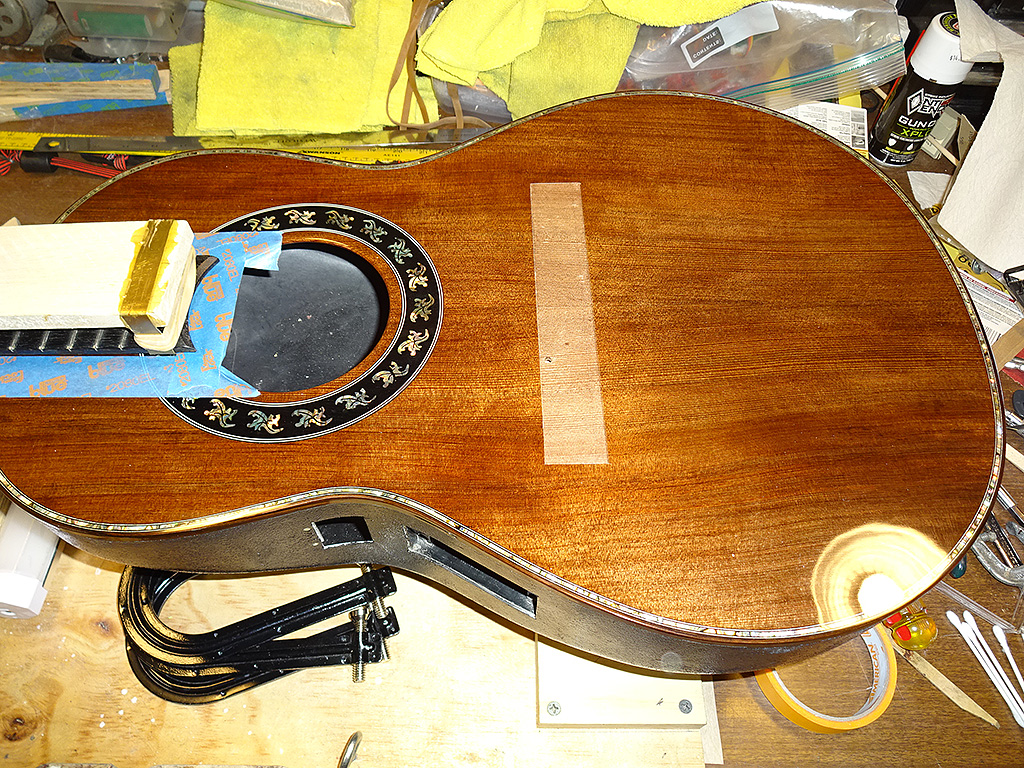
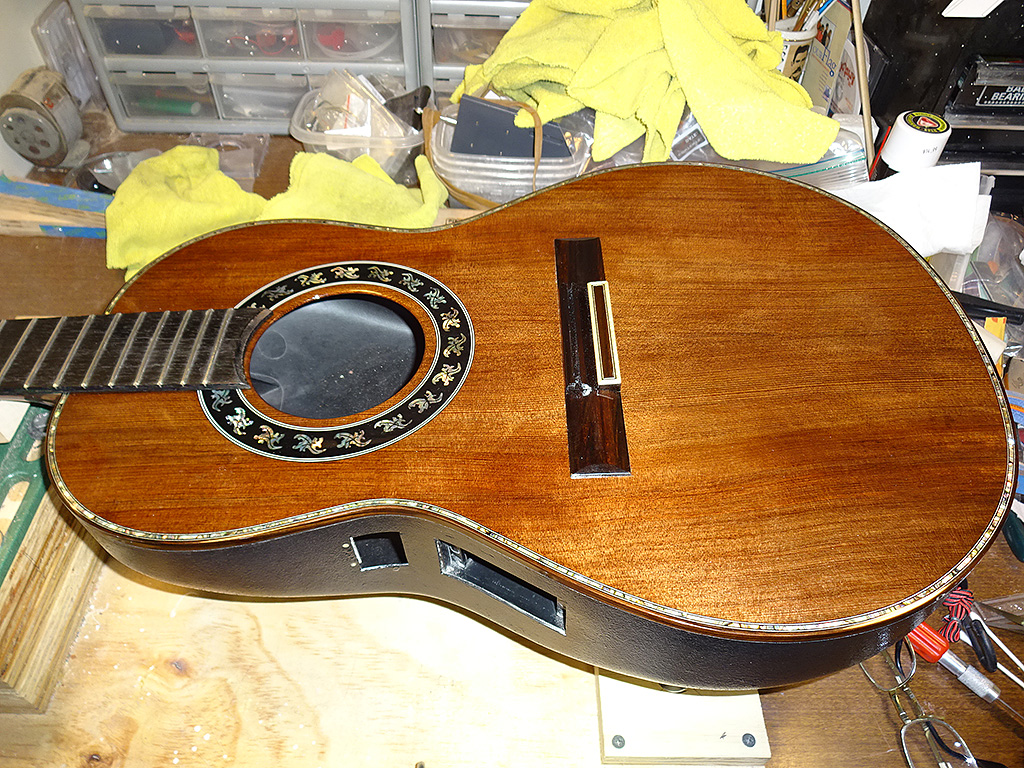
Bridge location is being masked.
Mask off the bowl. Time to start the finishing process.
First coat of clear. I probably won't be posting too many pics while I apply the finish.
Posted 2018-02-17 12:24 PM (#541262 - in reply to #537422) Subject: RE: Patch's Parlor Build...
Joined: May 2006 Posts: 4221
Location: Steeler Nation, Hudson Valley Contingent
This is starting to look EXACTLY like I thought it would. Dan and I had similar concerns about the darkness of the SRW top having too much color, but it is shaping up (Get it? ) to be what I hoped both in shade and grain.
Just as importantly from an aesthetic perspective, the rosewood binding and bridge are going to have some serious POP when finished and glossed. With the abalone serving as a counterpoint, they will sum up to a striking, but elegant, juxtaposition from dark (top) to light (purfling) to darker (binding/bridge).
Me? Getting excited? Why would you think that?
BTW Dan, you had no way of knowing this, but I find it borderline providential that my birthday is in a few weeks. No pressure or anything......
Posted 2018-02-18 2:32 PM (#541279 - in reply to #541260) Subject: RE: Patch's Parlor Build...
Joined: December 2003 Posts: 846
Location: Canada
DanSavage - 2018-02-17 10:01 AM
Final neck alignment/fitting is (finally) done. This part took a while because the neck angle was completely wrong for this guitar. Not only was it wrong, but it was too long. Instead of it being a 14-fret to the body neck, it was a 14.1-fret to the body. This mean that I had to take material off from the inside of the heel to bring the 14th fret into the proper position so it is right above the neck/body joint. It was about 1/8" too long. And, crooked, too.
Now it fits really nice.
Bridge location is being masked.
Is the fret spacing on the neck not a function of scale? If so, then I assume that bridge placement is crucial to get the scale spot on. With a shortened neck, or this new body-neck match in general, what is your approach to get the position of the saddle right?
Posted 2018-02-18 6:19 PM (#541283 - in reply to #541279) Subject: RE: Patch's Parlor Build...
Joined: June 2012 Posts: 2303
Location: Lake Forest, CA
d'ovation - 2018-02-18 12:32 PM Is the fret spacing on the neck not a function of scale? If so, then I assume that bridge placement is crucial to get the scale spot on. With a shortened neck, or this new body-neck match in general, what is your approach to get the position of the saddle right?
Good question. Looking back at what I wrote, I can see how this might not make sense.
Yes, the fret spacing on the neck is a function of scale, as is the bridge/saddle location. The fret spacing standard of 14-fret Ovations is made for scale of 25.25".
So that Patch can breathe easy, I'll say now that I carefully measured the bridge location relative to the neck so that the scale length (and, more importantly the intonation) is preserved. (I always align the bridge to the neck)
The problem wasn't that the fret board was too long. Rather, that the fret board was located in the wrong spot on the neck. Possibly. I can't really say what happened at the factory. Only that the 14th fret was not located at the neck/body joint. It was 1/8" away from it.
I don't have the top any more, so I can't measure whether the bridge was located in the correct spot relative to the neck, or if it was jigged in place on the top which would have made the scale on this guitar too long by about 3/32".
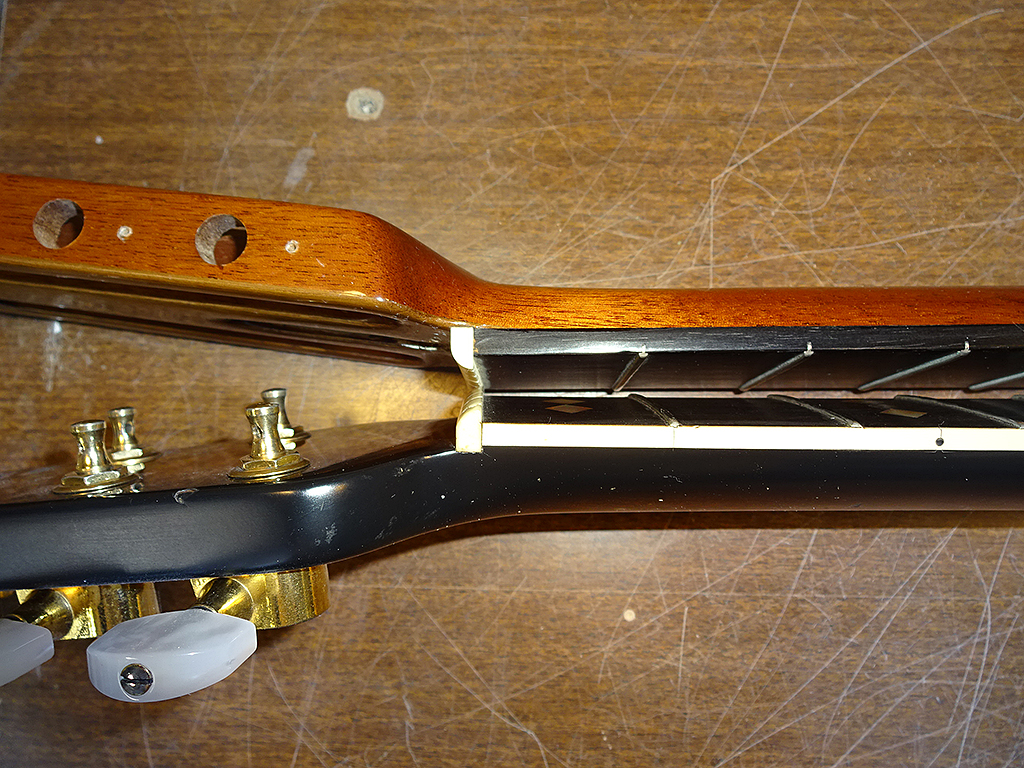
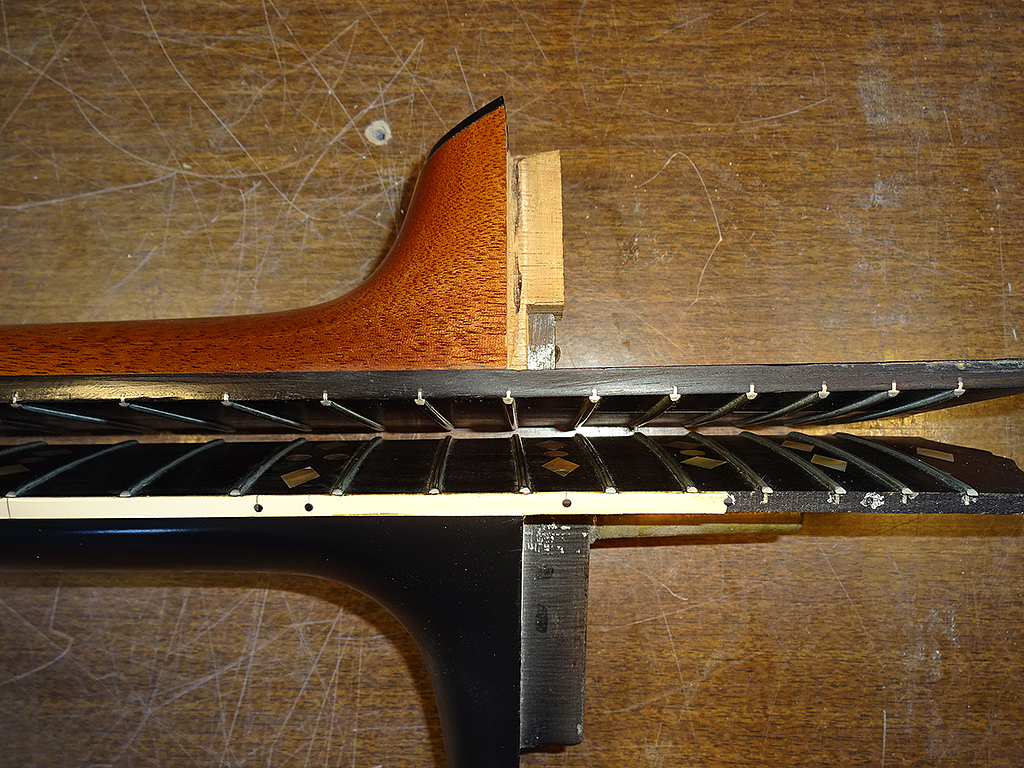
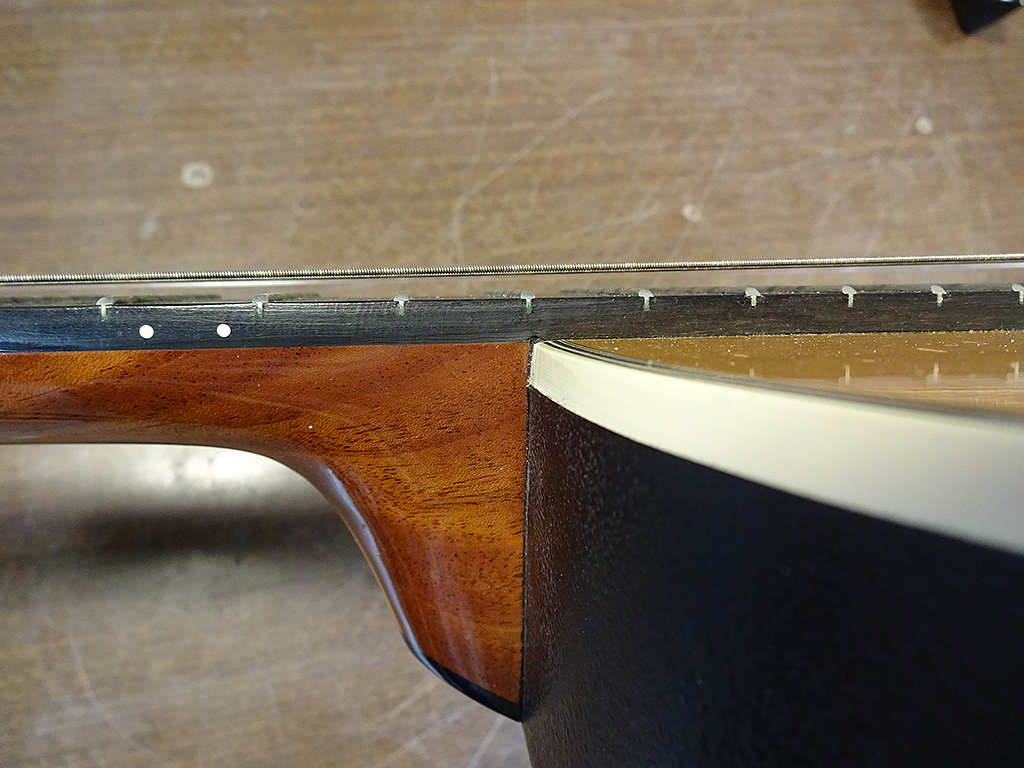
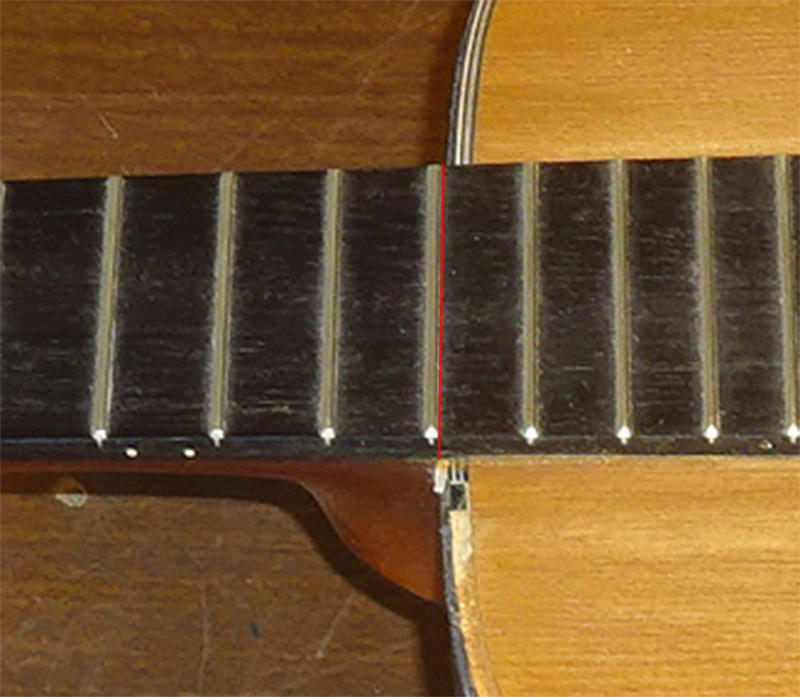
Here's a couple of pics that compares this neck (after alignment/fitting) to a CL neck. I lined up the nuts, and the frets are even with each other all the way up the fret board.
Here's my 1624 neck joint. Notice that the center of the 14th fret aligns with the neck/body joint, same as the CL neck above.
Here's a close-up of an early pic of this neck while it was still attached to the body. Notice that the lower edge of the 14th fret is pretty close to the neck/body joint, not the center of the fret.
This means that the heel of the neck is too long.
So, there were two things to do: relocate the fret board, or grind the heel down.
I didn't really have to do this work. In fact, unless I have to, I usually try to not mess with the heel.
I could have simply located the bridge so that it was in the right spot relative to the neck, but I needed to take material off the heel to align the neck and set the neck angle anyway, so I figured why not fix this at the same time.
Posted 2018-03-17 11:48 AM (#541675 - in reply to #541672) Subject: Re: Patch's Parlor Build...
Joined: May 2006 Posts: 4221
Location: Steeler Nation, Hudson Valley Contingent
DetlefMichel - 2018-03-17 9:18 AM Any progress? This last post was a bad cliffhanger
I talked to Dan last weekend. He's been busy, but making steady progress. The top will be finished anytime now. After that, all that's left is to paint the bowl and check for finishing touches.
He passed on a little detail I didn't know: He had the top shaved just a bit thinner than Ovation would have. He thinks it will work well with the A-bracing, and so far, he says it rings like a bell when tapped.
It's just as well that it's taking a little longer though, considering it has to travel from California to NY. I would have worried myself into a hospital if it was traveling through all the weather we've had recently.
Posted 2018-03-17 4:25 PM (#541679 - in reply to #537422) Subject: RE: Patch's Parlor Build...
Joined: June 2012 Posts: 2303
Location: Lake Forest, CA
As Patch wrote, the top is mostly done. I'll probably polish once more before I glue on the neck and bridge.
Speaking of the bridge, that's done, too. I'll polish it up a little bit before I glue it on.
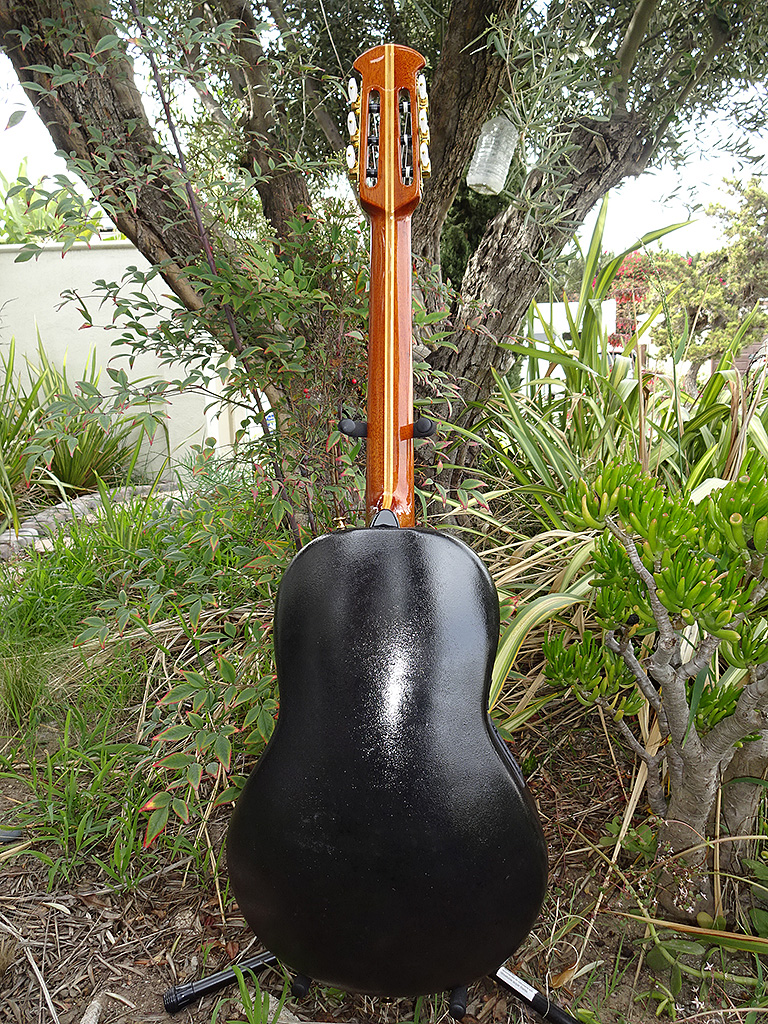
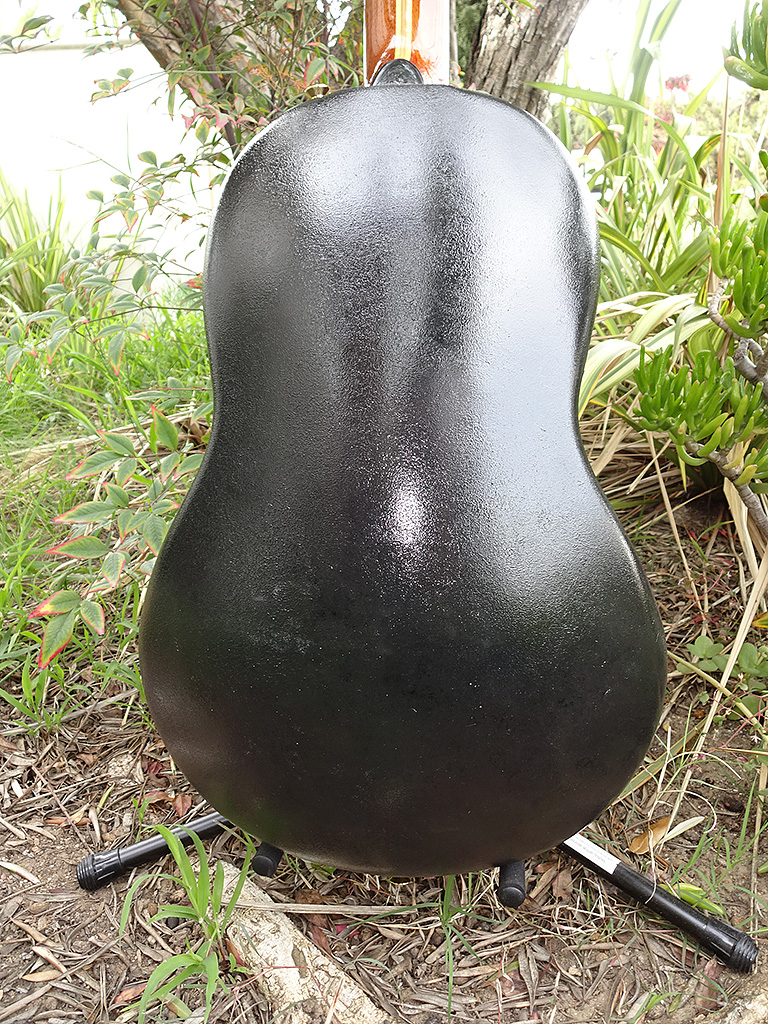
The bowl is textured. It's not an exact duplicate of the factory texture, but it's a close approximation.
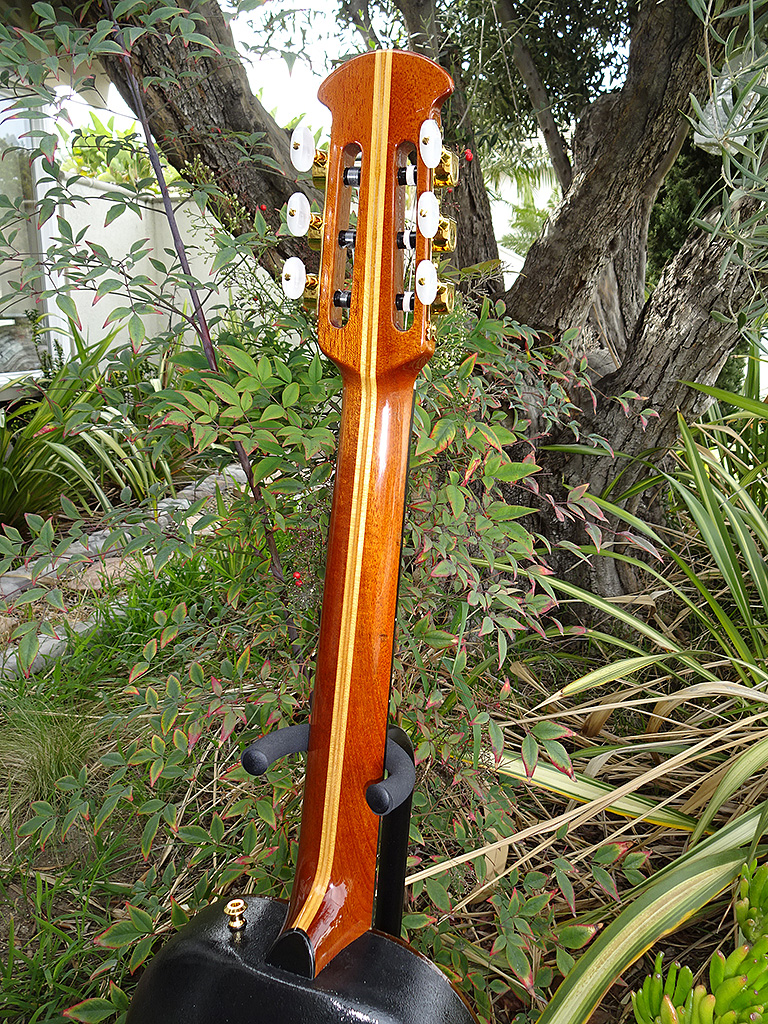
There's a couple of minor dings on the back of the neck that I'm now ready to address. Once these are filled and leveled, I'll give the neck a quick polish, then it's time to align and glue the neck, then the bridge.
I had unbelievable luck. I was able to actually find another set of hen's teeth -- NOS Schaller 541 gold tuners. One goes onto Patch's parlor and the other goes into my stash for future use.
Posted 2018-03-24 9:22 PM (#541851 - in reply to #537422) Subject: RE: Patch's Parlor Build...
Joined: June 2012 Posts: 2303
Location: Lake Forest, CA
Moving right along...
I put a final polish on the top. I filled the dings in the neck and polished it. I also did a quick polish on the bridge.
Now it's time to start putting it all together. (Woo hoo!)
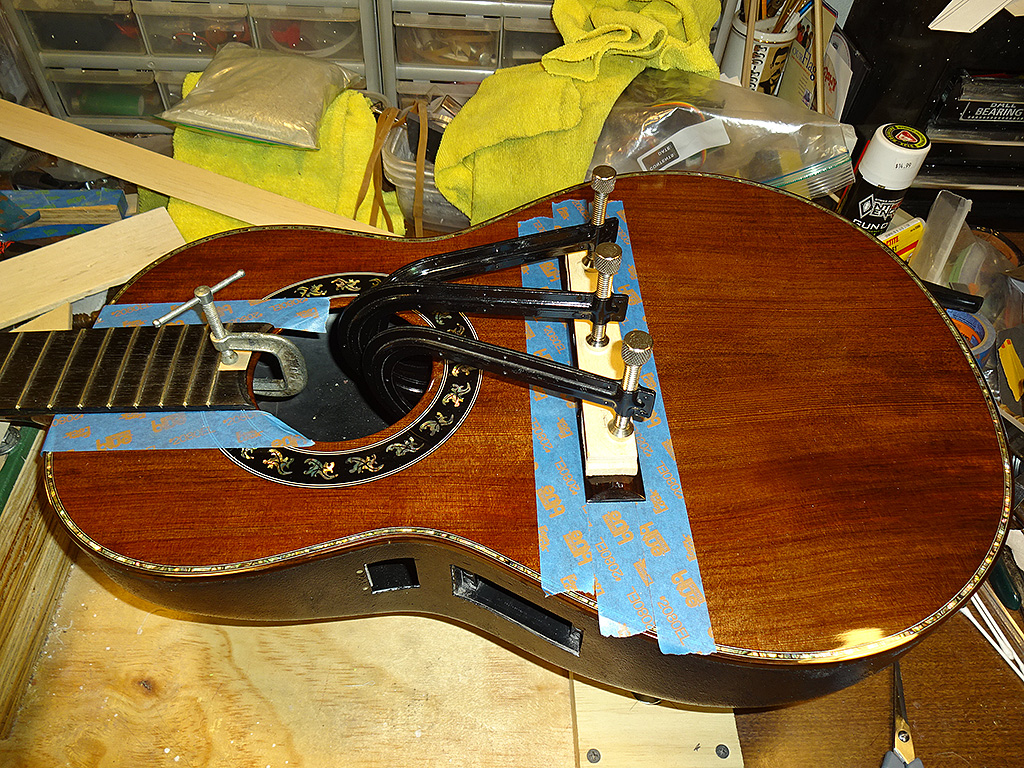
Neck and body are masked in preparation for joining. Neck is aligned and glued into place using Hysol 0151. I mixed in some West Systems 423 graphite powder to blacken the 0151.
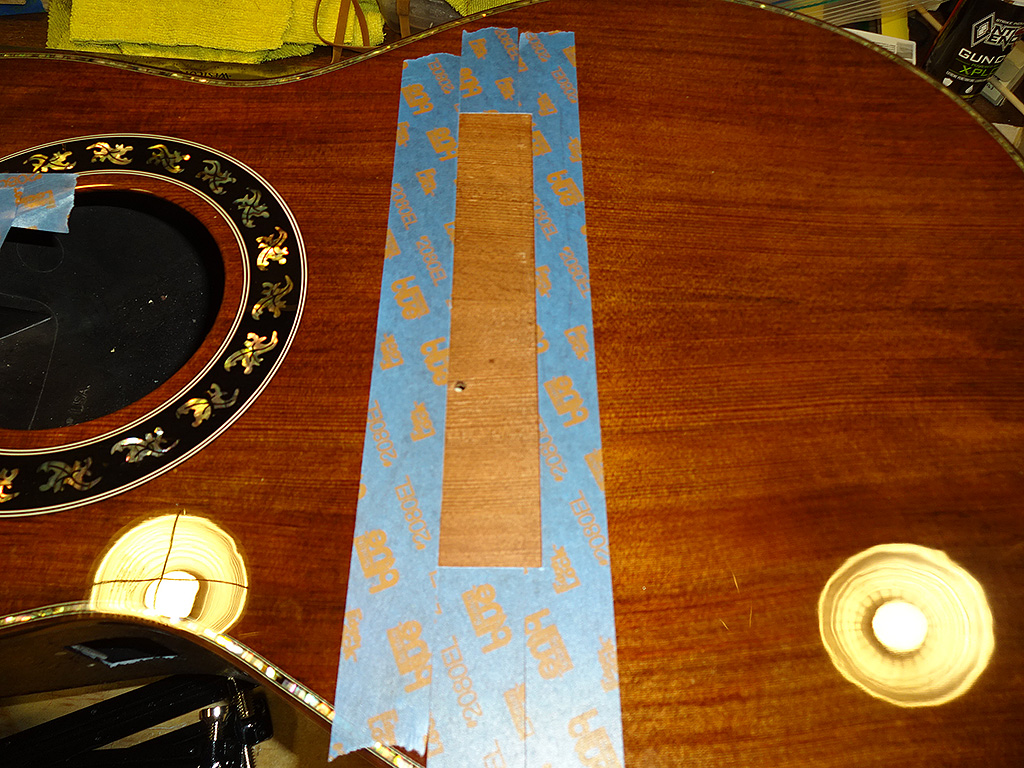
Masking is removed. I'll let this cure until tomorrow, then I'll pull the guitar out and prepare for gluing the bridge. (You should be getting excited now, Patch. In a couple of days it's going to be a playable guitar)
Posted 2018-03-26 10:17 AM (#541876 - in reply to #541859) Subject: Re: Patch's Parlor Build...
Joined: May 2011 Posts: 751
Location: Muenster/Germany
O don´t know what impresses me more: the work or the result. What a guitar! Thank you for this ducumentation, I learned a lot again (for instance the epic fixing construction...).
Posted 2018-03-27 7:09 AM (#541881 - in reply to #537422) Subject: RE: Patch's Parlor Build...
Joined: May 2006 Posts: 4221
Location: Steeler Nation, Hudson Valley Contingent
This has one of my favorite pictures so far; the one where Dan has removed the tape covering the bridge area and exposing the bare wood beneath. It is a perfect detail; illustrating the bare wood versus the end result. As I told my son, it's a "start to finish picture"....literally!
Posted 2018-03-30 3:29 AM (#541932 - in reply to #537422) Subject: It's Alive! IT'S ALIVE!!!
Joined: June 2012 Posts: 2303
Location: Lake Forest, CA
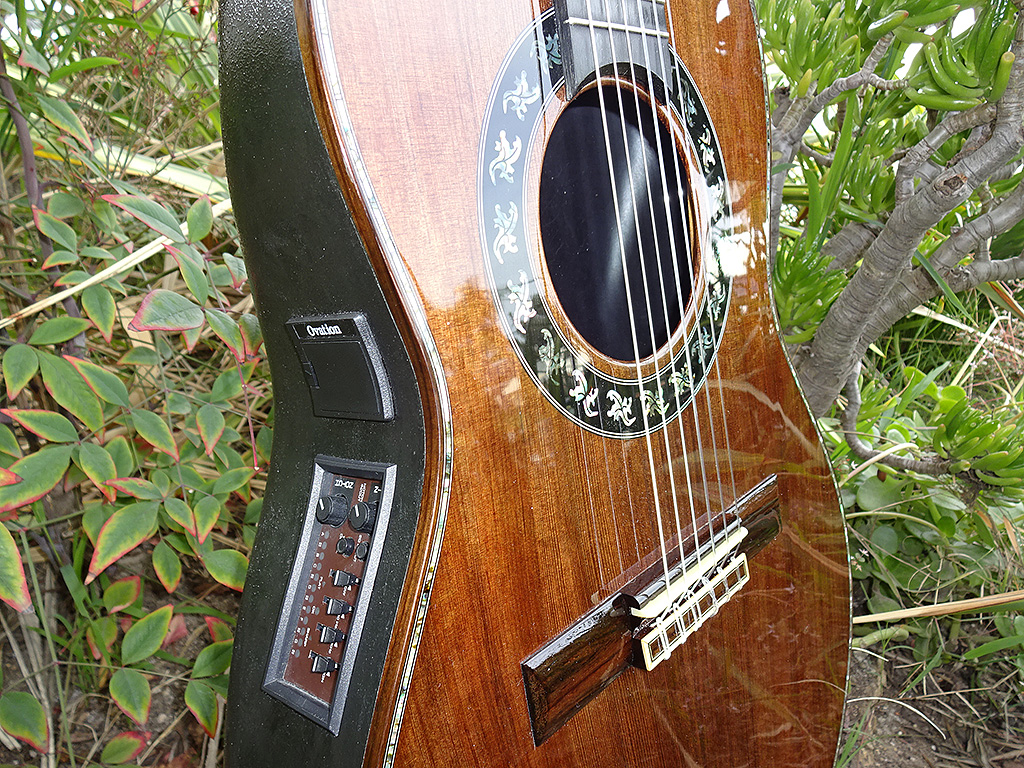
The title pretty much says it all. I'll glue the battery holder and pre-amp face plates on tomorrow, then take some proper beauty shots, either tomorrow or Saturday.
How does it sound? I like it. I think you're going to like it too, Patch.
It's a warm, pleasant sounding guitar. Acoustically, it's definitely a guitar for intimate settings. It wouldn't do well against a banjo, for example. I plugged it into my little practice amp and it sounds great.
Right now, I've got D'Addario EJ43, light tension strings on it. Because I've never built a guitar with a redwood top, I decided to start with light tension, then work my way up in tension until I find the guitar's sweet-spot.
It can definitely use some higher tension strings as the treble is a littel quieter than the bass. I'll leave these strings on for a day or so, then move up to the normal tension, etc.
Posted 2018-03-30 10:59 AM (#541940 - in reply to #537422) Subject: Re: Patch's Parlor Build...
Joined: February 2016 Posts: 1769
Location: When??
Yet another fine product from Savage Laboratories! That is SO pretty. On strings, I just installed some EJ45 D'Adds and they aren't behaving very nicely at all. Over two weeks now and they are still settling in daily. Has anyone here had good results with Martin mediums? I think I'd like to try a set. It's just an old CC-013-4, but it's in great shape and I want it to sound better. And I might even bite the baby bullet and try some ball ends. Any opinion on those? But no matter what I do, it won't even shine a dim light on this beauty of Patch's. Excellent work, Dan!
Oh.. PS: One reason I want the ball ends is because a small piece of the white ring around the bottom edge of the anchor of the bridge broke off with the crack being directly under the bass E string. I was able to glue it back on, but with all that pressure on the crack, the end tip may pop off again and get lost and I don't want the string curving up tight against raw wood. Does anyone have one of those in their parts box?
Posted 2018-03-30 12:51 PM (#541944 - in reply to #537422) Subject: Re: Patch's Parlor Build...
Joined: March 2005 Posts: 12750
Location: Boise, Idaho
Beautiful. Your work is inspiring, although I'm not inspired enough to change the long overdue strings on my 1713. I also have problems getting nylon strings to settle in. It may be at least partly my poor technique, but it also seems like they stretch forever. Or they stretch until it's time to change them.
I know this is a one-off guitar, but even any type of parlor, nylon string, redwood top guitar must be pretty rare, right?
Posted 2018-03-30 2:09 PM (#541946 - in reply to #541944) Subject: Re: Patch's Parlor Build...
Joined: June 2012 Posts: 2303
Location: Lake Forest, CA
Thanks for the kind words, everyone.
I'll probably change out the EJ43s for a set of EJ45s.
Mark,
Yes, redwood-topped guitars aren't really rare, but they are a little uncommon.
What is rare in our world is a redwood-topped A-braced nylon string guitar. The A-braces are usually reserved for steel string Os.
But, it still sounds pretty good with the nylon strings. It just needs a little stronger presences on the unwound strings. The bottom three wound strings sound great. They have almost as much sustain as torrefied spruce. Almost.
Posted 2018-03-30 10:10 PM (#541952 - in reply to #537422) Subject: Re: Patch's Parlor Build...
Joined: October 2012 Posts: 1018
Location: Yokohama, Japan
Amazing work Dan! You're setting a high standard for the BFLG! Bautiful and inspiring. The Redwood A-brace combination is really interesting for a nylon stringer. Hope you have a chance to post a recording. Are you planning on Prime Vibing this beauty? Again, thanks for sharing!
Posted 2018-03-31 10:16 AM (#541955 - in reply to #541952) Subject: Re: Patch's Parlor Build...
Joined: May 2006 Posts: 4221
Location: Steeler Nation, Hudson Valley Contingent
arumako - 2018-03-30 11:10 PM
The Redwood A-brace combination is really interesting for a nylon stringer.!
It's not the first time. My 1713-X from the factory is also A-braced backing redwood. It's wonderful, but Dan is right in that the bass can over-power the trebles. I have high-tension D'Addarios on mine, but am open to other ideas. I am curious about what he discovers with his string experiments.
Posted 2018-03-31 5:37 PM (#541960 - in reply to #541955) Subject: Re: Patch's Parlor Build...
Joined: June 2012 Posts: 2303
Location: Lake Forest, CA
Patch - 2018-03-31 8:16 AM
arumako - 2018-03-30 11:10 PM
The Redwood A-brace combination is really interesting for a nylon stringer.!
It's not the first time. My 1713-X from the factory is also A-braced backing redwood. It's wonderful, but Dan is right in that the bass can over-power the trebles. I have high-tension D'Addarios on mine, but am open to other ideas. I am curious about what he discovers with his string experiments.
So far, the combination I like best on this guitar is EJ45 on the three treble strings and EJ43 on the three bass.
It gives a really nice balance between the treble and bass response.
Posted 2018-03-31 5:57 PM (#541962 - in reply to #537422) Subject: Re: Patch's Parlor Build...
Joined: March 2002 Posts: 15654
Location: SoCal
This is a really wonderful little guitar. The Ovation parlor size, either as the slothead collectors or as the paddle head parlor the following year, were under appreciated. They have a bigger sound then they ever should have given their size. But this guitar has a full warm sound, and the country artist neck fits the body well. I would be very happy to have this guitar on a stand next to my reading chair.
Dan shaved the top a bit from Ovation's norm and it makes the top very lively, producing that great sound. I always felt that Ovation was building guitars for the rigors of the stage/road. Durability was important. Dan shaved the tops on my Legend and my classical and the resulting sound is wonderful (and I have medium strings on the Legend and high tension strings on the classical. Neither shows any sign of stress in the tops.
Patch, if you're not in a hurry, I'd be happy to play this guitar in, say, over the next 2 years. And i wouldn't charge much for the service......
Posted 2018-03-31 6:15 PM (#541963 - in reply to #537422) Subject: RE: Patch's Parlor Build...
Joined: June 2012 Posts: 2303
Location: Lake Forest, CA
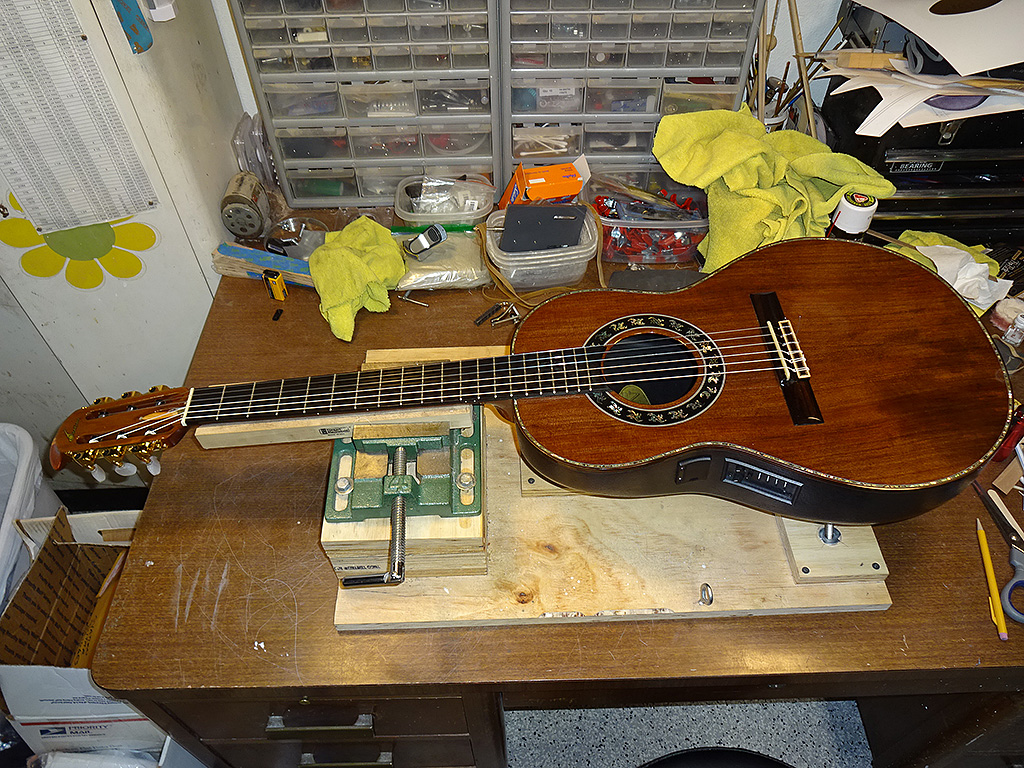
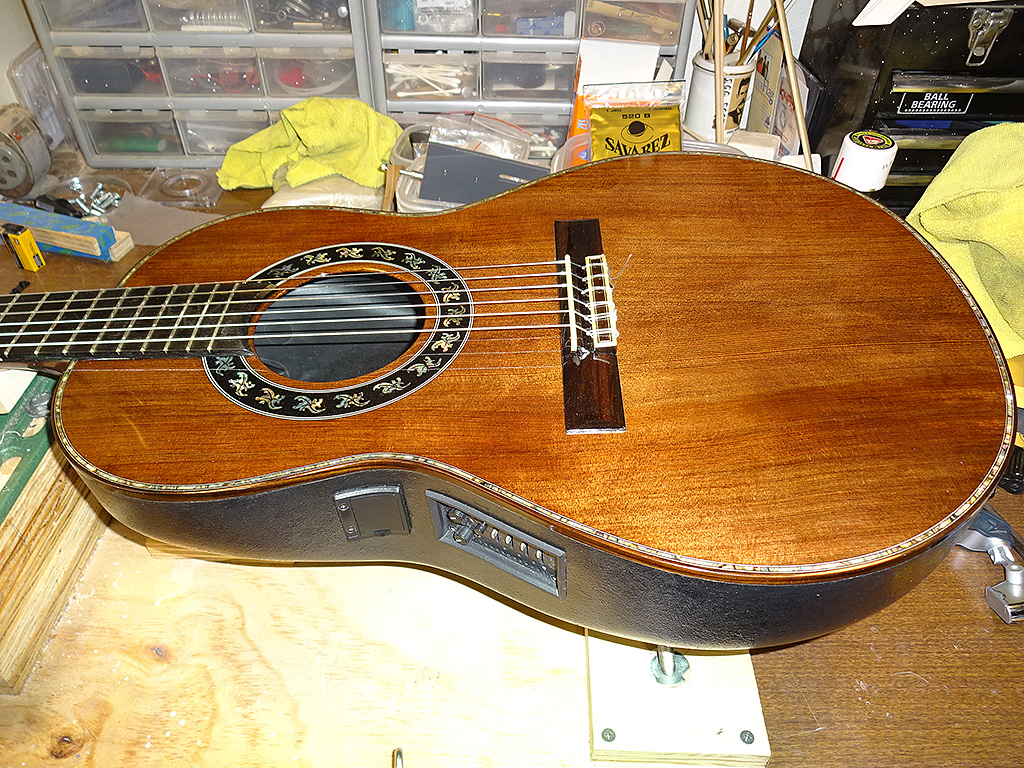
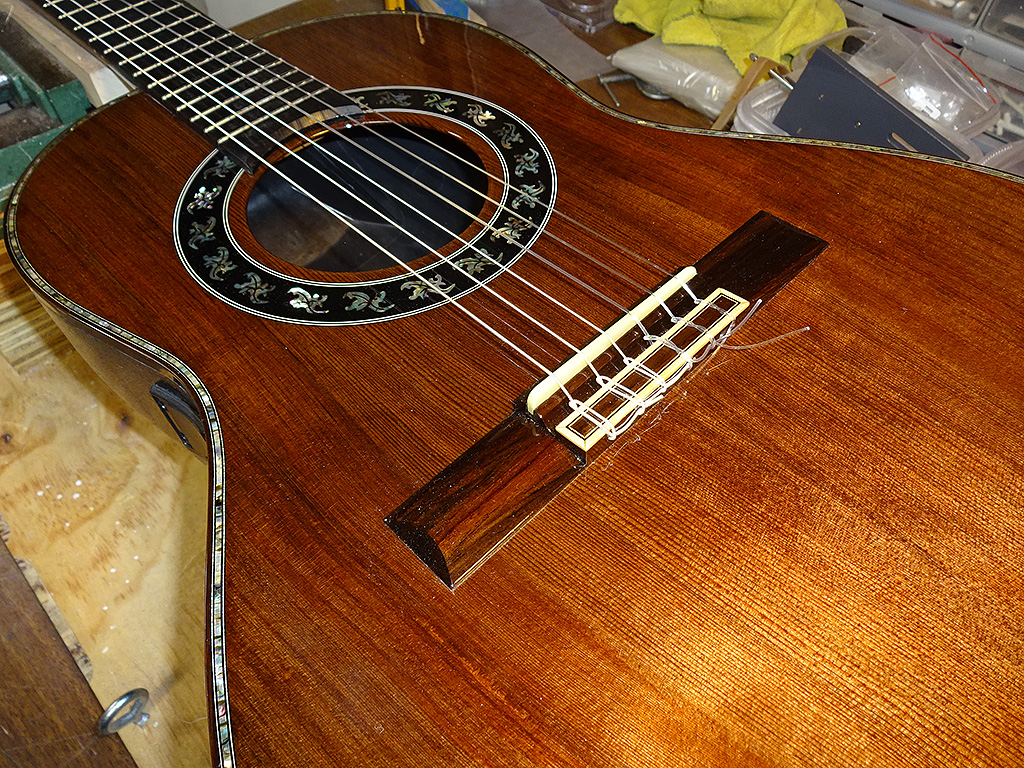
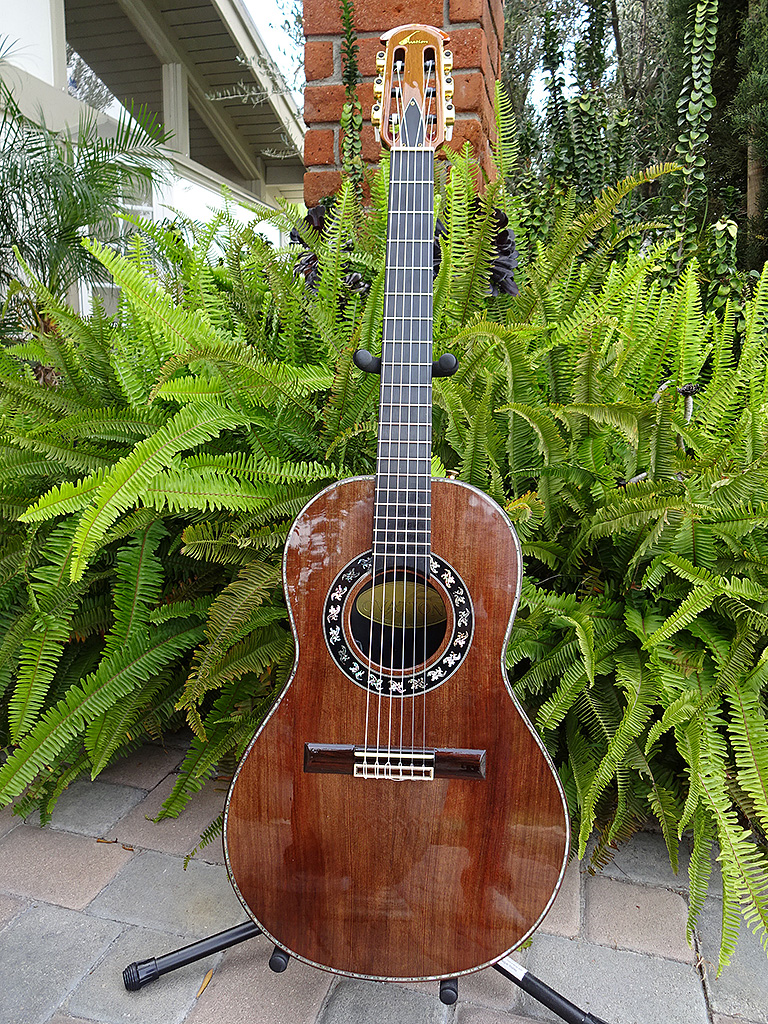
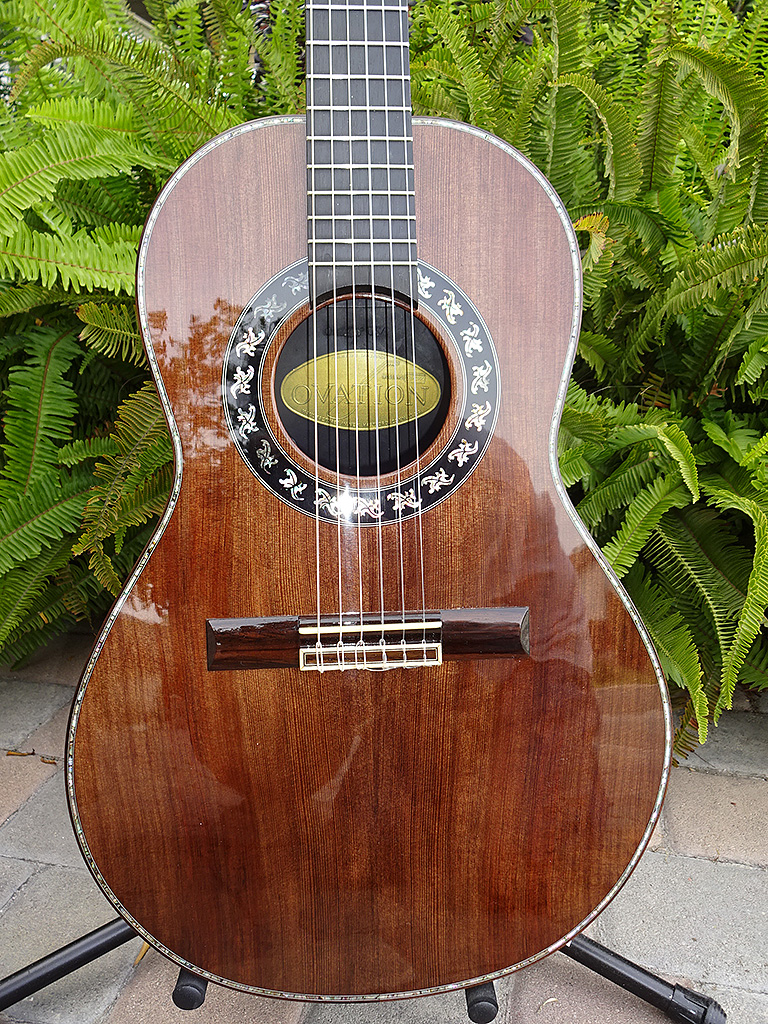
All done.
I'll let the pics, and Paul's video speak for themselves. (I looked into my crystal ball and I know which guitar will be the BLFG entry for next year's calendar)
Posted 2018-04-01 12:06 AM (#541969 - in reply to #537422) Subject: Re: Patch's Parlor Build...
Joined: March 2005 Posts: 12750
Location: Boise, Idaho
Beautiful job again, Dan. My 97 Collector isn't nearly as pretty, but I still think it's cool. And I agree with what Paul said. They play a lot better than they should.
Posted 2018-04-01 9:18 PM (#541982 - in reply to #537422) Subject: Re: Patch's Parlor Build...
Joined: June 2012 Posts: 2303
Location: Lake Forest, CA
Thanks, everyone.
I've been playing the guitar and it's a pretty cool guitar. It responds to every touch. If you want to play it quietly, it's got a soft, sweet sound.
Surprisingly, you can really hit it with a strong rhythm strumming and the top doesn't sound like it's being over-driven like how cedar can sound when you're too aggressive with the attack.
The strings are getting pretty tired with all the tuning/de-tuning I've been doing. I'll change them out in a day or so for the EJ43/EJ45 combo I liked, then send it along to Moody.
Posted 2018-04-10 12:35 AM (#543175 - in reply to #537422) Subject: Re: Patch's Parlor Build...
Joined: March 2002 Posts: 15654
Location: SoCal
This guitar came home with me tonight for a 1 week sleep over. So far, all I've done is compared it to my Dan Savage 1113 (torrefied addy top and braces). The tone of this guitar (what do I call it?) is really good, more than it should be given the body size. It's a front porch picker for certain, easy to play and delightfl to the ears. Not as deep or as resonate at my 1113, but much better than you would ever think from the size. Helluva job Dan did.....
Posted 2018-04-10 6:10 AM (#543178 - in reply to #537422) Subject: RE: Patch's Parlor Build...
Joined: May 2006 Posts: 4221
Location: Steeler Nation, Hudson Valley Contingent
There is something definitely different about the parlors. I've had both of Ovation's, and would probably jump at another 97C if I could. They just seem...I dunno... "friendly" to me. Although you can plug them in and they hold their own with pretty much anything if necessary, they really shine when you're just playing for yourself somehow. They have a tone and feel all their own that just draws you in. The sound doesn't bowl you over so much as say "Hi, how's it goin'?"
As I said way back when, I've had this idea for about 10 years now. I can't wait to see if it sounds like I thought it would. Lord knows it LOOKS exactly like I hoped when I sourced the top.
Not to mention, it will be interesting to compare it to my 1713-X with the figured redwood top.
Any other insights you come up with Moody, be sure to share. Hope you enjoy the visit.
Posted 2018-04-10 9:12 AM (#543181 - in reply to #537422) Subject: Re: Patch's Parlor Build...
Joined: March 2002 Posts: 15654
Location: SoCal
One of the things that comes to mind is why Ovation never built a deep bowl Country Artist (see the Vince Gill 1624 in another thread). Slightly narrower neck with 14 frets to the body. You'd lose a little tone because of the placement of the bridge, but I doubt if it would be that much.
Posted 2018-04-10 10:12 AM (#543182 - in reply to #543178) Subject: RE: Patch's Parlor Build...
Joined: March 2005 Posts: 12750
Location: Boise, Idaho
Patch - 2018-04-10 5:10 AM
There is something definitely different about the parlors. I've had both of Ovation's, and would probably jump at another 97C if I could. They just seem...I dunno... "friendly" to me. Although you can plug them in and they hold their own with pretty much anything if necessary, they really shine when you're just playing for yourself somehow. They have a tone and feel all their own that just draws you in. The sound doesn't bowl you over so much as say "Hi, how's it goin'?"
I agree, Patch. The parlors are just so inviting. I could see why someone thought many years ago that a small guitar sitting in the parlor would be perfect for picking up and playing on a quiet evening. If I had a parlor in the house, I'd put mine there. I'm glad Ovation made some.