|
|
Joined:
September 2005
Posts: 138
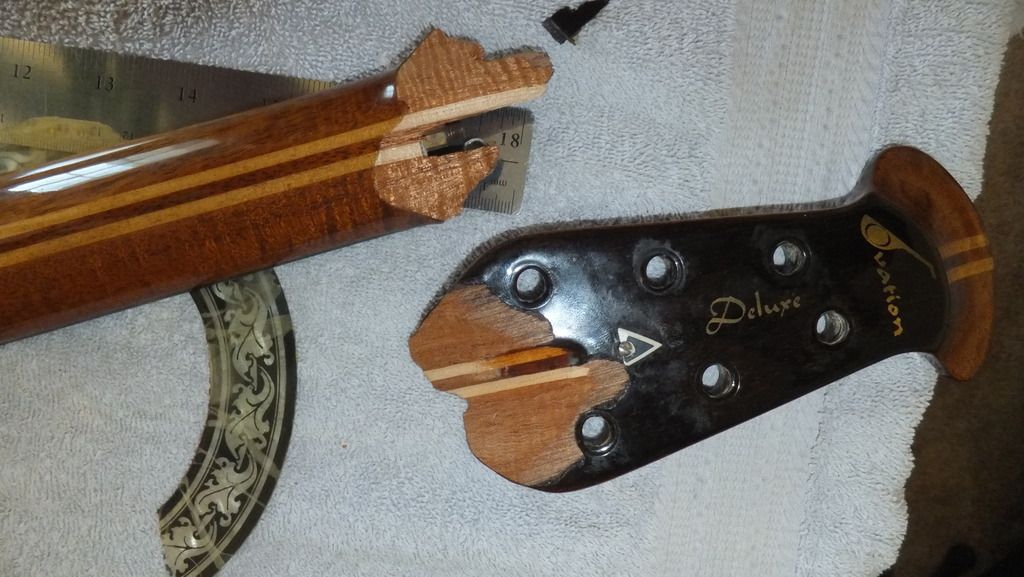
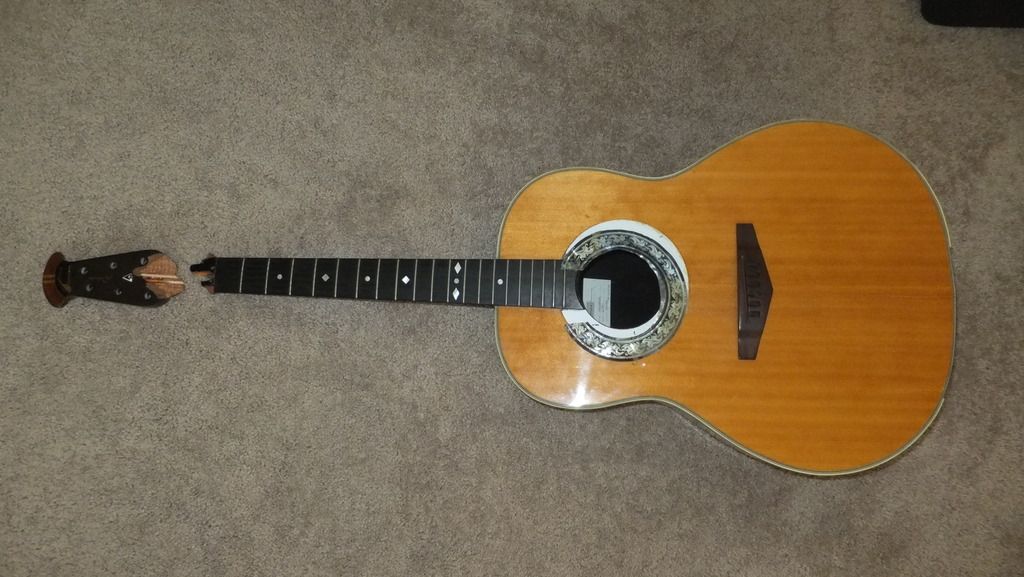
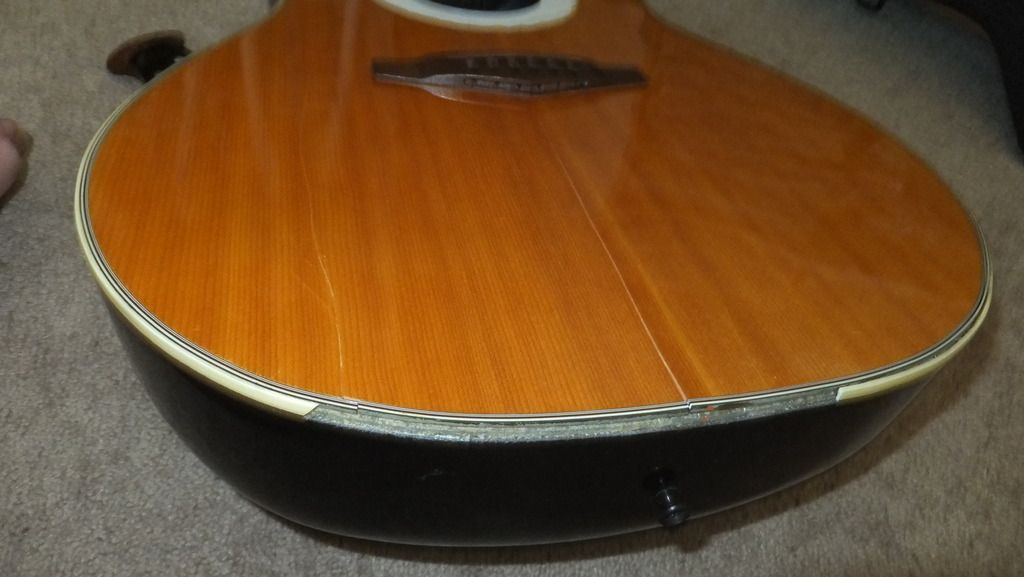
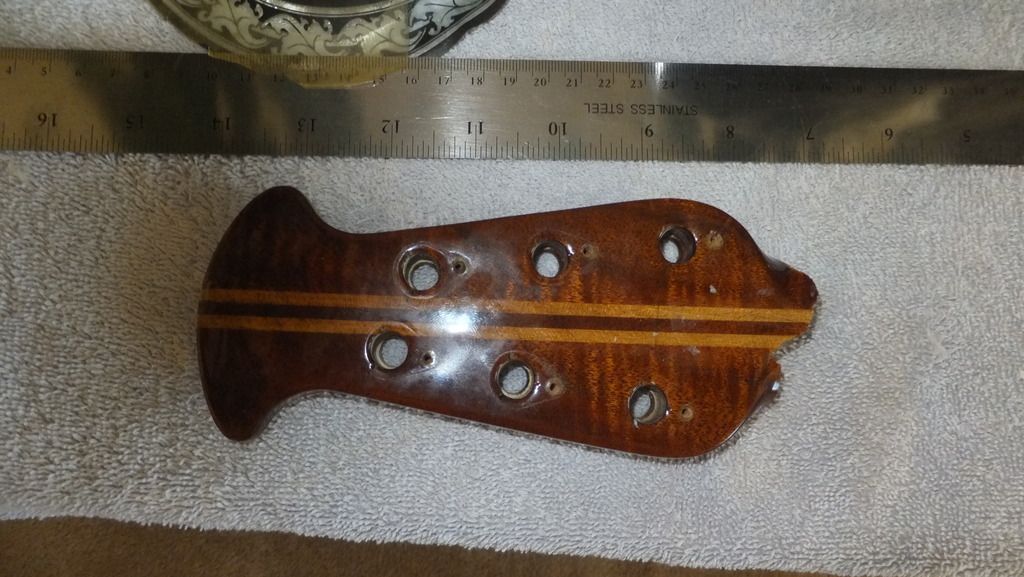
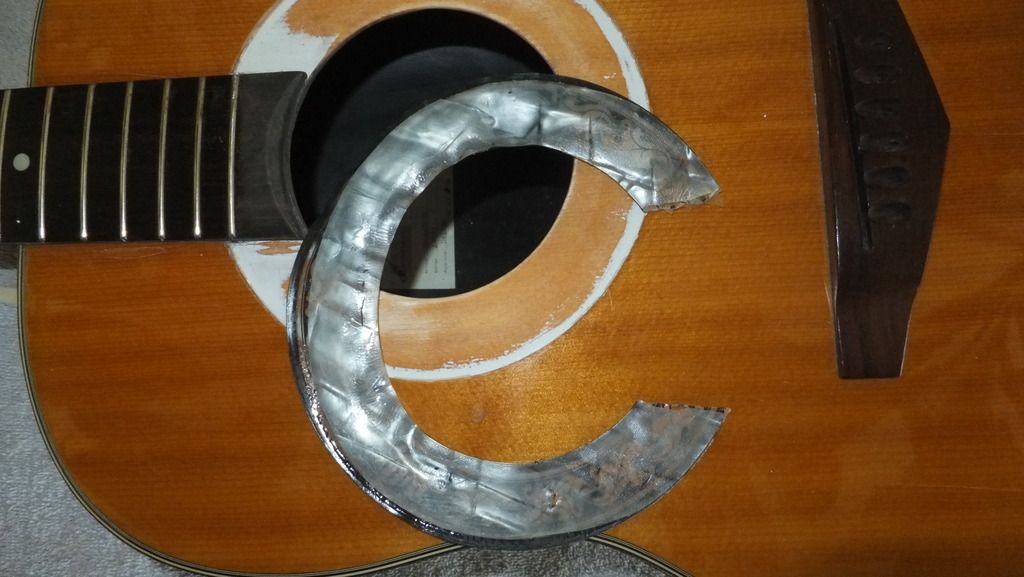
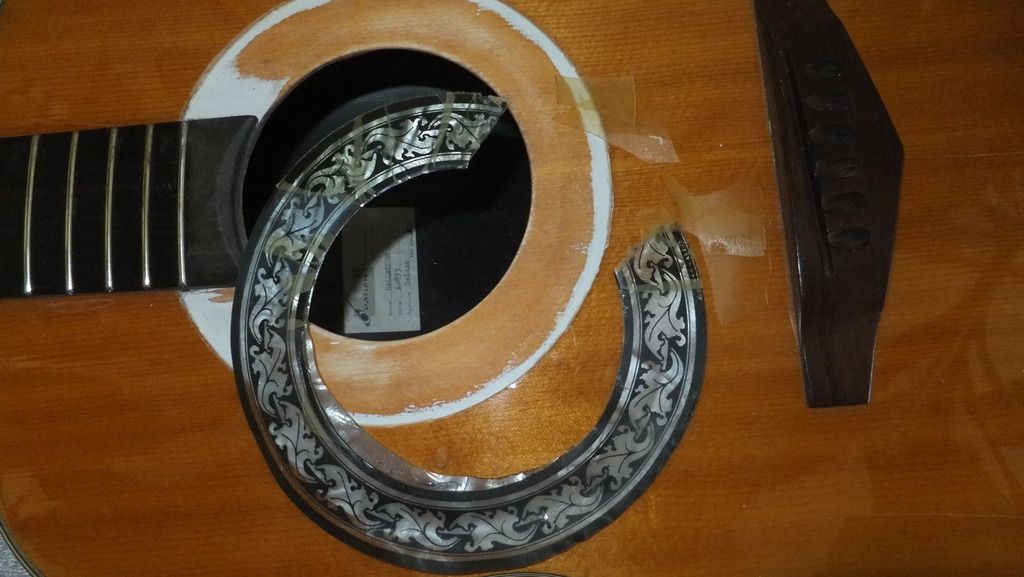
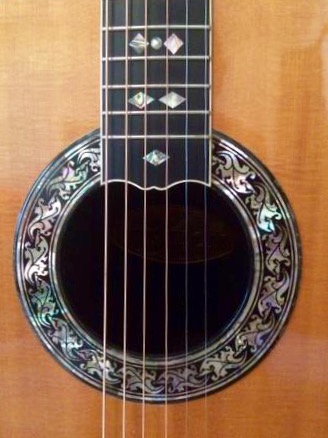
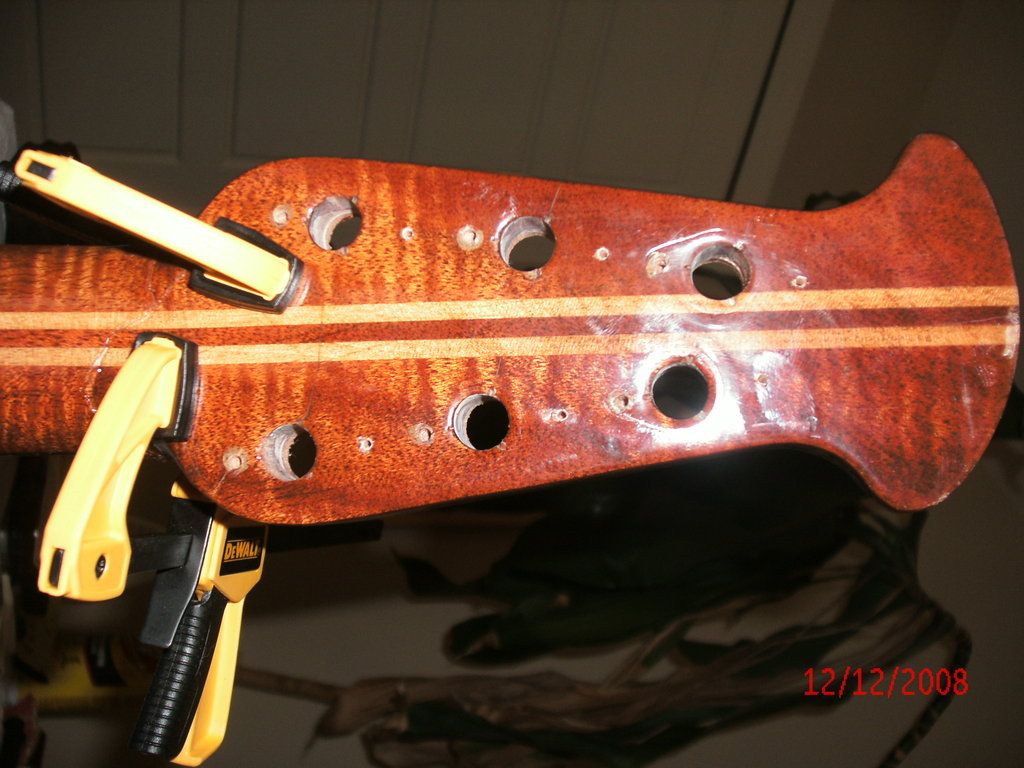
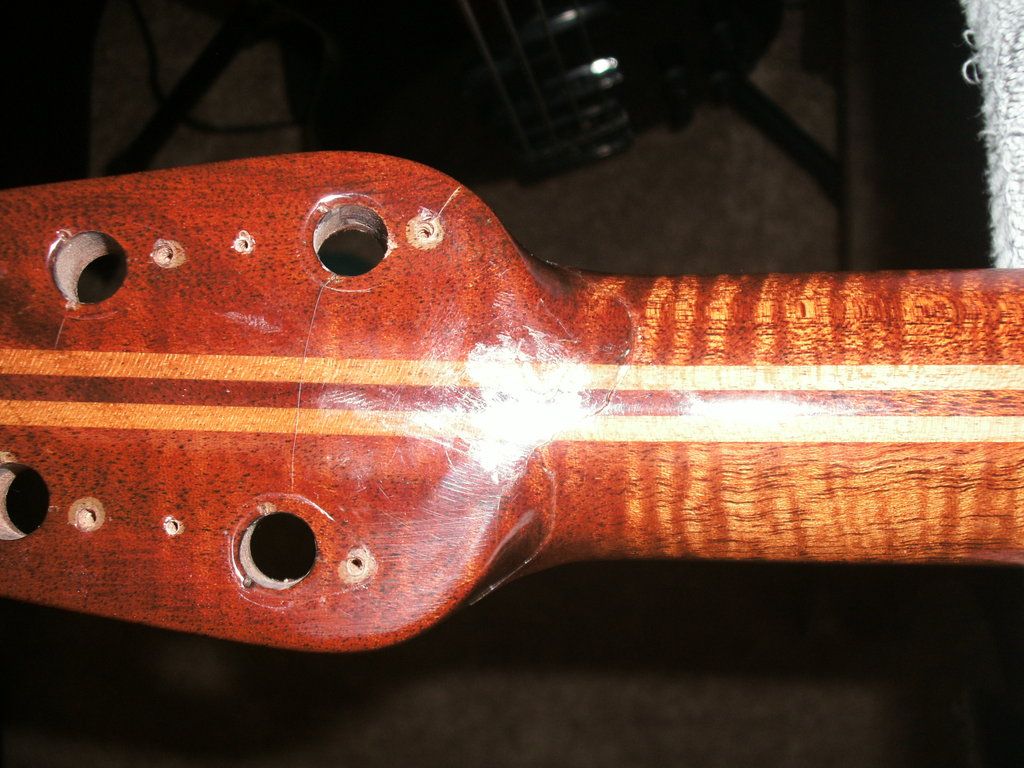
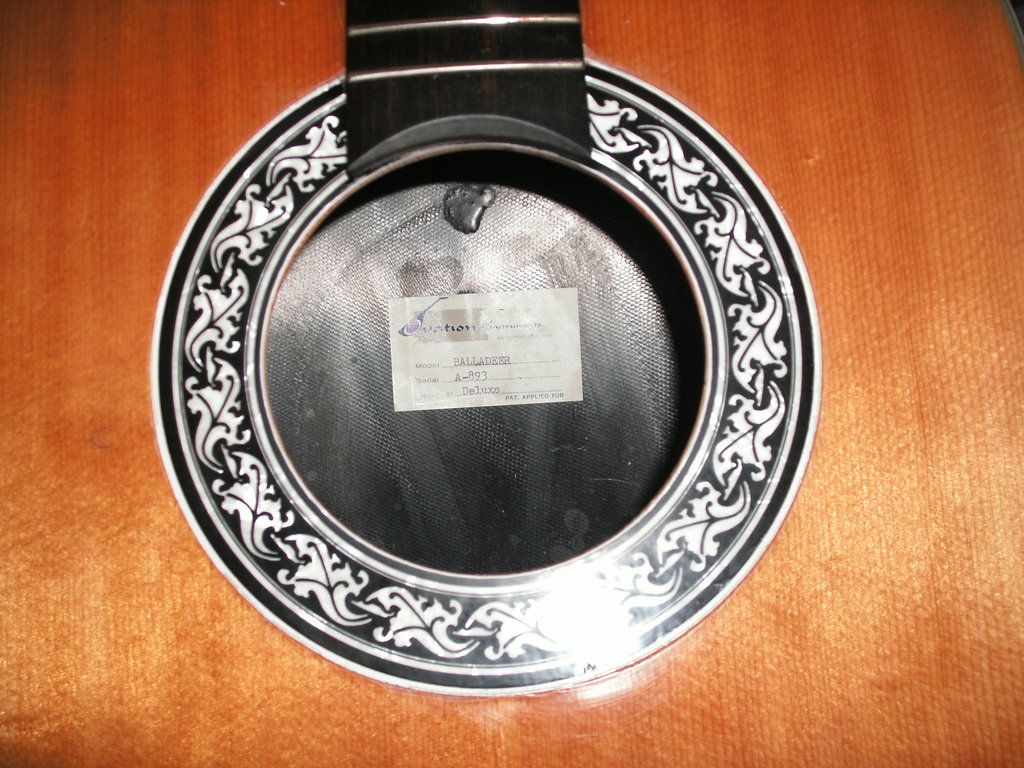
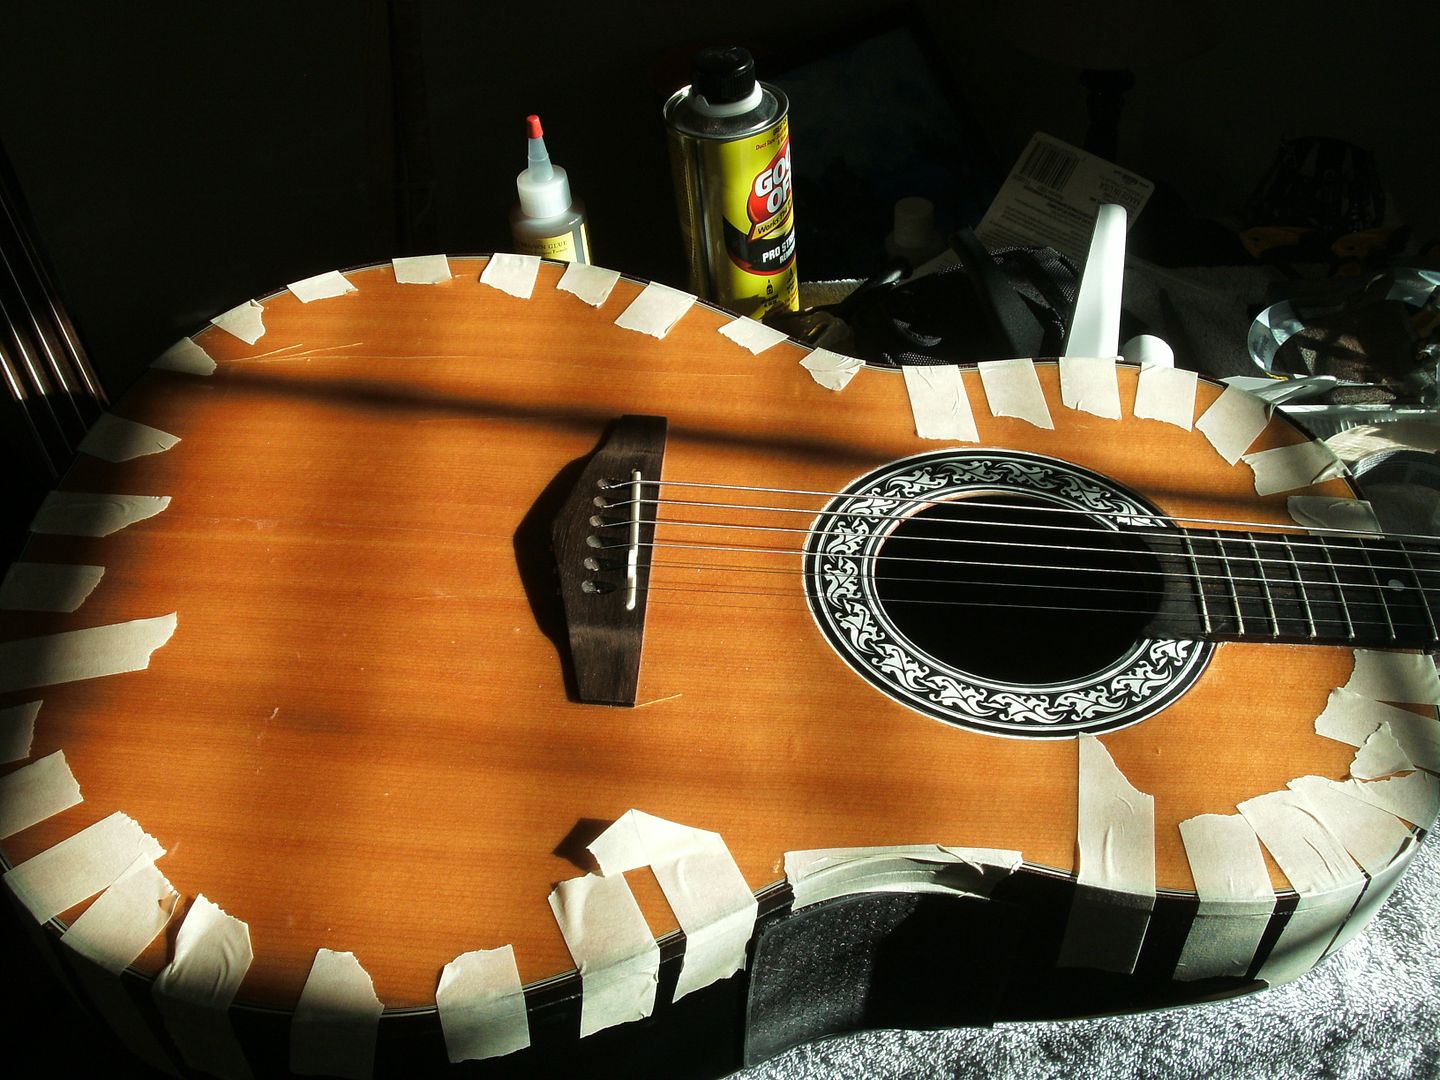
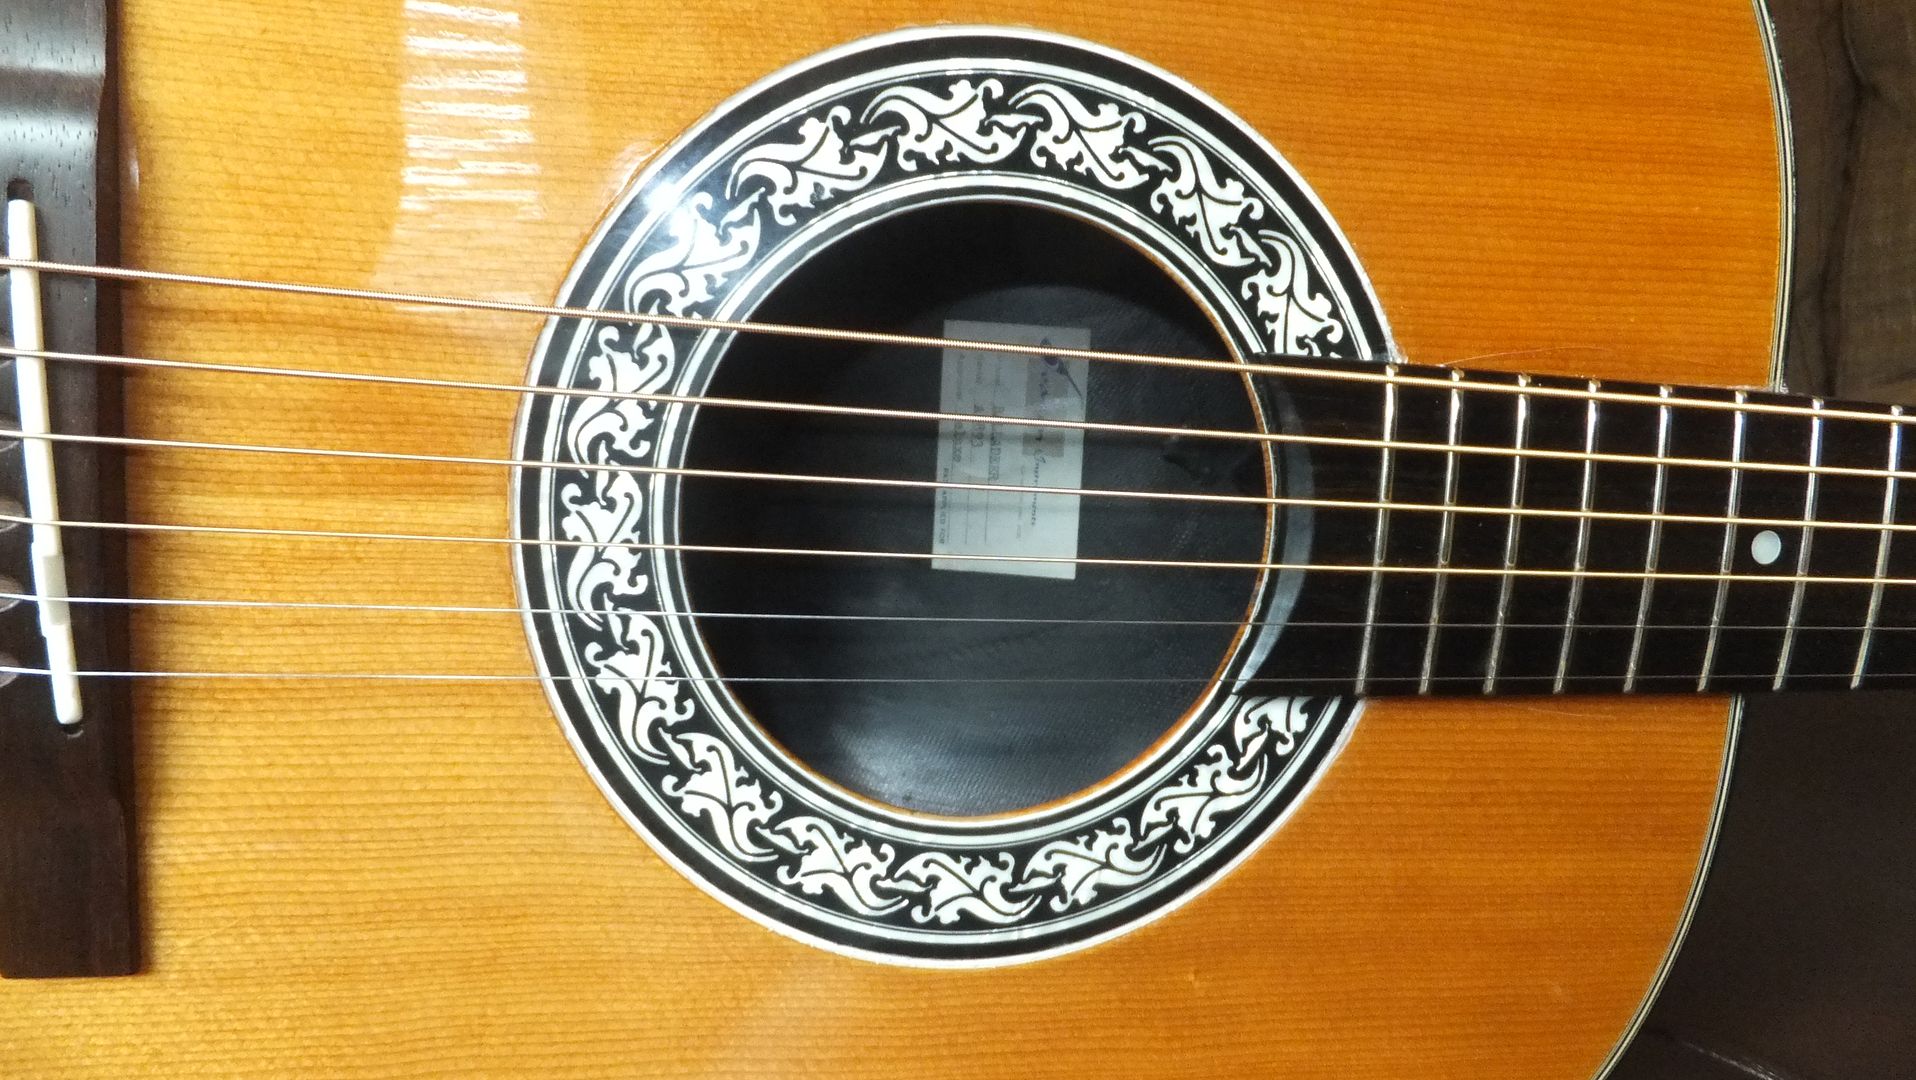
Location: Birmingham, AL | OK here we go. I ran up on this on on fleabay a few days ago. Probably paid too much but oh well....It has it 's good spots - overset neck, frets and fingerboard in very nice shape, neck a pretty burled mahogany, perfect gloss bowl. By the numbers it's a 68 just like my regular Balladeer. However it also has problems...looks like someone dropped it, binding gone from the bottom end, top cracked and separated from the bowl, headstock broken off. Oberving the headstock break it looks like the rosewood veneer suffered the most damage there are some pieces missing. The way it broke off also supports the fact that figured wood has it's weakness in the figure but it has a lot of glue surface to reattach it. The neck block area has some finish cracks but doesn't appear to have any separation or damage. The rosette shrunk, was pulled loose from the rest of the assembly and looks like it can't be reattached
My plan is to repair the broken headstock, repair the top cracks and reglue the top to the bowl and find some binding to replace the missing pieces. What I'm asking here is some guidance on glues, binding, and opinions on how to repair or replace the headstock veneer and where to get a rosette that would work on this top.
Option 2 is to let Dan have it, let him fix the headstock, put a Torriefied top on it and use the small white rosette, etc. I may go that route if I chicken out. I've repaired broken headstocks before but Ovation has their own way of doing things doesn't look any different so hopefully some insight can be realized...
Pictures:

Edited by clrules 2015-07-10 9:02 AM
|
|
| |
|

Joined:
June 2012
Posts: 2303
Location: Lake Forest, CA | I saw that on eBay, too. Very pretty figuring on the neck.
The headstock repair should be pretty straightforward. I would use hot hide glue (HHG) for that job. You could use carpenter's glue (PVA) but PVA can creep whereas HHG won't.
You should be able to order replacement rosettes like that from the Mother Ship. FWIW, when I bought the grapevine rosette for Jay's guitar JB said that he could only find two --one he sold to me and the other he was going to keep.
Gluing the cracks and top back to the bowl should be a pretty straightforward task. I would glue the top back to the bowl using a high-quality epoxy to stabilize the cracks, then use CA to repair the cracks. You'll also want to inspect the braces to make sure none popped off.
The cream binding that AllParts.com sells is a very close match in color to the Ovation binding. It's what I used for the moustache binding on my 1619 CL. None of Stewmac's bindings will match.
See: https://www.allparts.com/search.asp?keyword=cream+binding&search=
You could replace the entire headstock veneer, or you could patch in the missing pieces after the headstock is glued back together. Allparts.com also sells Rosewood veneer. But, with how dark it looks, that might be ebony. A closer look at the edge of the veneer along the break should confirm which wood it is.
https://www.allparts.com/search.asp?keyword=veneer&search=
It looks like AllParts is out of ebony, but Stewmac has some.
http://www.stewmac.com/Materials_and_Supplies/Bodies_and_Necks_and_...
Dan
Edited by DanSavage 2015-07-10 9:32 AM
|
|
| |
|
Joined:
September 2005
Posts: 138
Location: Birmingham, AL | Thanks, Dan, for all the info. I wasn't sure what kind of glue to use especially on the top-to-bowl rejoin. The rest of it by your guidance seems to be pretty much standard. I don't have any HHG equipment do you have an opinion on the hide glue that is bottled and ready for use? It may just be PVA in disguise.
The veneer is rosewood it's just a really dark reddish brown doesn't look like ebony. I have a really pretty piece of Cocobolo that would look really nice if the veneer gets replaced. I would want at least to restore the Ovation logo at the top. Can I buy a gold rub on decal somewhere similar to what you are using? If you have a link that I can use I would appreciate it if possible.
|
|
| |
|
Joined:
June 2012
Posts: 2303
Location: Lake Forest, CA | Your best bet for top-to-bowl gluing is Hysol 9462, which is available from McMaster-Carr.
See: http://www.mcmaster.com/#loctite-hysol-epoxy-adhesives/=xzueu2
For a small job like that you won't need the mixing nozzles, but you will need the dispensing gun as the glue cartridges don't have integral plungers like hardware-store epoxies. You can use Hysol to glue the binding, but something like Duco Cement (green tube) might be a better choice. I've never used liquid hide glues, so I couldn't really recommend one or the other.
Granular hide glue is available from either Stewmac or from Milligan & Higgins. See: http://www.milligan1868.com/index.html
Stewmac's HHG is 164 gram strength, which is a little on the low side. 192g is usually recommended for luthery. I did find an article online that discussed a couple of liquid HG compared to HHG. See: https://homegrownlutherie.wordpress.com/2012/09/25/liquid-hide-glues...
Old Brown Glue is regular HHG, but with urea added to extend the working time. Urea weakens the glue, but not by much. Old Brown Glue is available through Rockler Woodworking. See: http://www.rockler.com/old-brown-glue
I have a Rockler located close by, so I may have to try this glue out.
In any event using HHG in granular form is pretty easy and doesn't cost too much money. I spent less than $50 to get my setup together, including the glue.
Besides the glue, you only need a glue pot. Now, you could spend big bucks and buy it from Stewmac, but a cheaper and better alternative is to make one from a Sunbeam electric soup pot. The nice thing about using a soup pot, besides being dirt cheap to buy, is that the HHG is kept in an enclosed, hot moist environment so it doesn't skin over. Here's a couple of pics of my set up. 


I just used a coffee cup inside to make a double-boiler. Here's a page on Frets.com that talks about using HHG: http://www.frets.com/FretsPages/Luthier/Data/Materials/hideglue.html
Edited by DanSavage 2015-07-10 3:46 PM
|
|
| |
|
Joined:
September 2005
Posts: 138
Location: Birmingham, AL | Cool stuff....looks like more research is needed. I cleaned up the guitar and it's really in great shape. It was cared for until it got dropped. The bowl especially is very shiny with little marking and the top, except for the damage, is in very good shape.
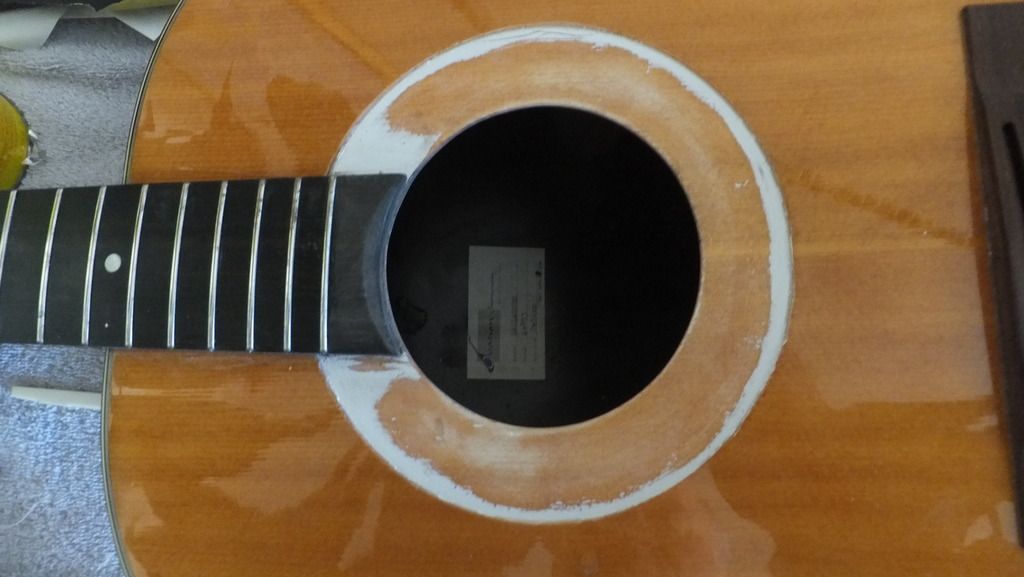
One more question. How do you get the white stuff that is on the area where the rosette was routed out. It looks like paint but it's stuck on pretty good.
Might be epoxy?
Thanks again |
|
| |
|
Joined:
June 2012
Posts: 2303
Location: Lake Forest, CA | clrules - 2015-07-10 3:19 PM
One more question. How do you get the white stuff that is on the area where the rosette was routed out. It looks like paint but it's stuck on pretty good.
Might be epoxy?
Hi Paul,
Hmmm... Now, that's interesting.
On both my 1976 1619 and my 1978 1617, and the later plastic rosettes I've gotten from the MS, the rosettes are a two-piece affair --a clear-plastic top piece that has the oak leaf patter printed on the underside and a faux pearloid ring that's glued to the underside of the top piece. See below:


When they're glued together, it looks like this: 
Back side, sprayed with flat-black spray paint. 
Here's a close-up of what they look like glued together. 
But, in looking at the pics you've posted, there's a third layer. Can you post a couple of close-ups of this area of the rosette around the sound hole so I can get a better idea of what it looks like? Also, you asked about the rub-down. I bought the supplies from a company called PulsarProFX. The product is called DecalProFx. See: http://www.pulsarprofx.com/decalpro/ Basically, it's a thin film that fuses to laser toner using heat and pressure, i.e.: a laminator. Their technique is to print the image onto a water-slide decal sheet, then fuse the film, in my case, satin gold. Next, you apply a carrier sheet to the rub-down and separate the rub-down from the decal sheet and spray on fabric adhesive which when applied to the final surface, in this case, the headstock, you peal off the carrier sheet leaving the final image behind. The final step is to apply the clear coat finish to seal in the artwork. I had thought about using my ALPS 5000 printer to print the gold layer onto a water-slide decal sheet, but I didn't want to have the ghosted-image of the carrier sheet show up under the final clear finish. The font used by Ovation for their headstock artwork is Arabian Normal. It's available online at: http://www.fonts2u.com/arabian-normal.font I just ran a quick test to duplicate the 'Deluxe' seen on your headstock and it's the correct font. As far as the early Ovation logo, I've got that so if you need it let me know and I can post a link to it here. Dan
Edited by DanSavage 2015-07-10 8:58 PM
|
|
| |
|
Joined:
September 2005
Posts: 138
Location: Birmingham, AL | This is all very interesting. I had no idea that Ovation changed their specs so much during the first 7 years or so.
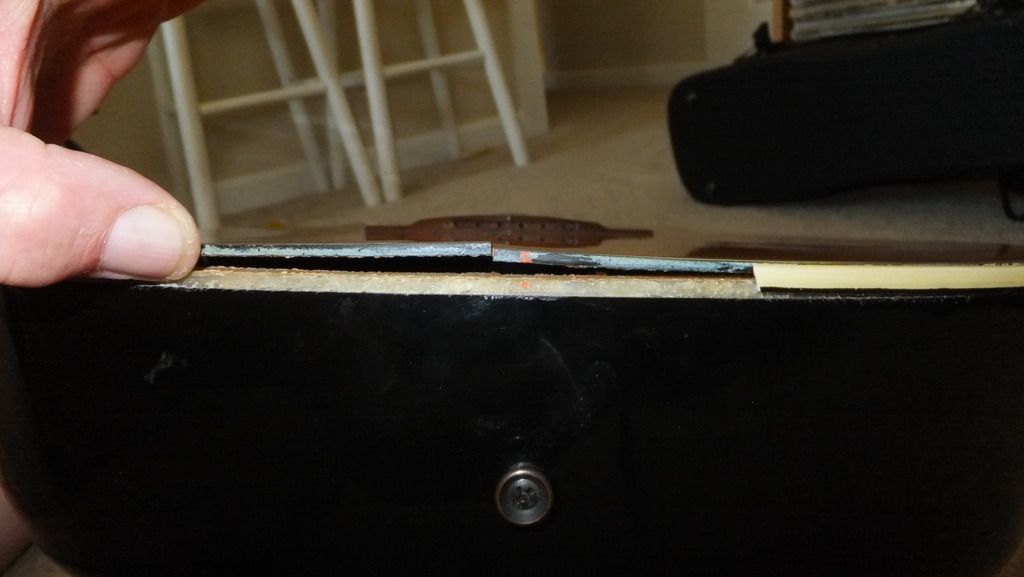
The rosette is a very thin plastic with the top, a pearl back and then a white painted on underlay. It does have a small black lip that went into the soundhole but that disintegrated when the rosette came off.
I was amazed at how thin the rosette channel is. The hard part is finding a replacement the original is just too warped to do anything with it.
I noticed that you removed the finish from the headstock on your project did you just sand away or is there anything else that will soften it?
Anyway, here's some pictures.
Edited by clrules 2015-07-11 7:58 AM
|
|
| |
|
Joined:
September 2005
Posts: 138
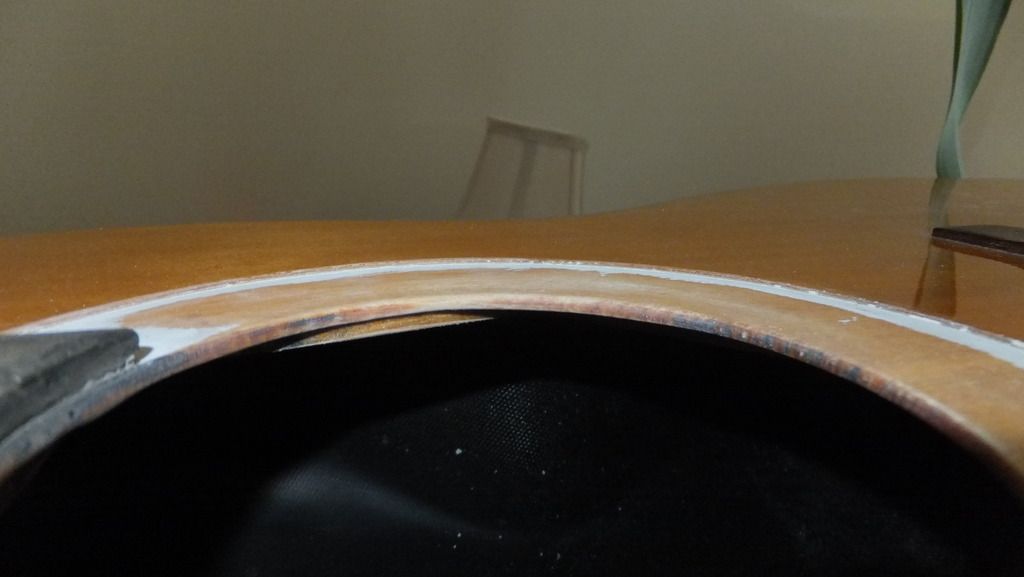
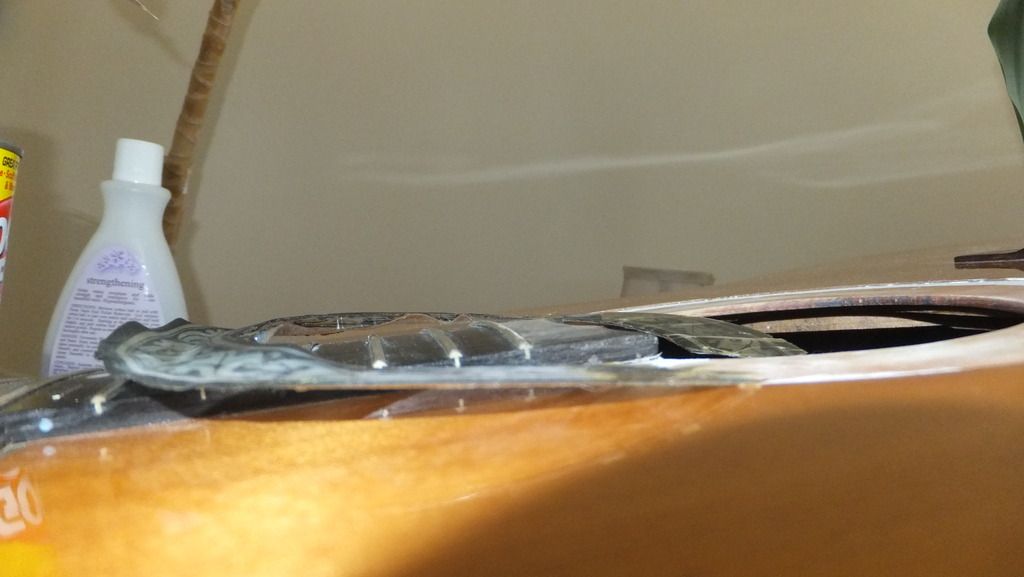
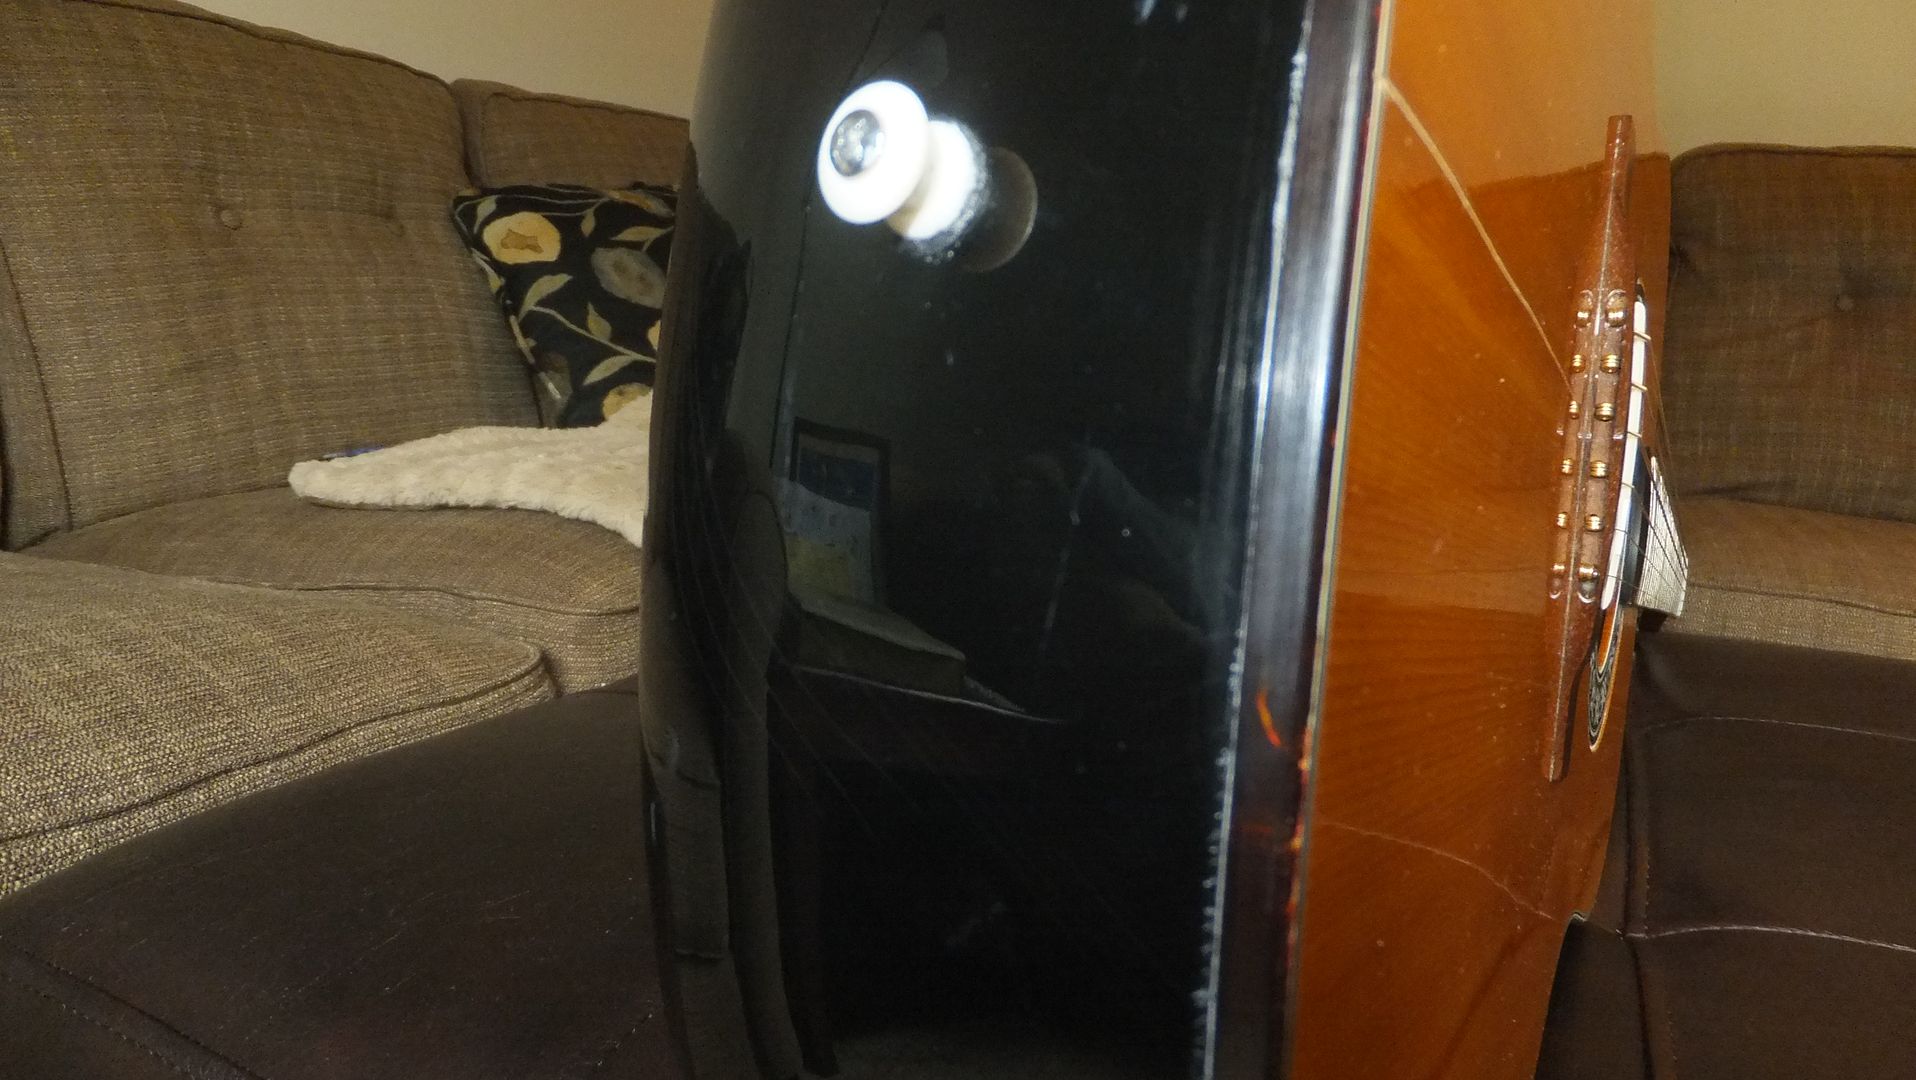
Location: Birmingham, AL | I forgot the side shot. You can see how really thin it is. I can imagine why Ovation got away from this pretty labor intensive. I think it's neat.
Edited by clrules 2015-07-11 8:18 AM
|
|
| |
|
Joined:
September 2005
Posts: 138
Location: Birmingham, AL | Well, heck, here we go. I started looking at what it would take to reglue the top to the bowl and I've found out this guitar must have taken a very hard lick. The top is loose all the way around the lower bout on one side. Having to remove so much of the outer binding I just took it all the way off the whole guitar. I cleaned out the binding channel and it's fine. The kerfing is still very well attached to the bowl (thank goodness) so now some interesting options on what the replacement should be. Here's a shot of the cleaned out channel. Pretty much standard stuff.
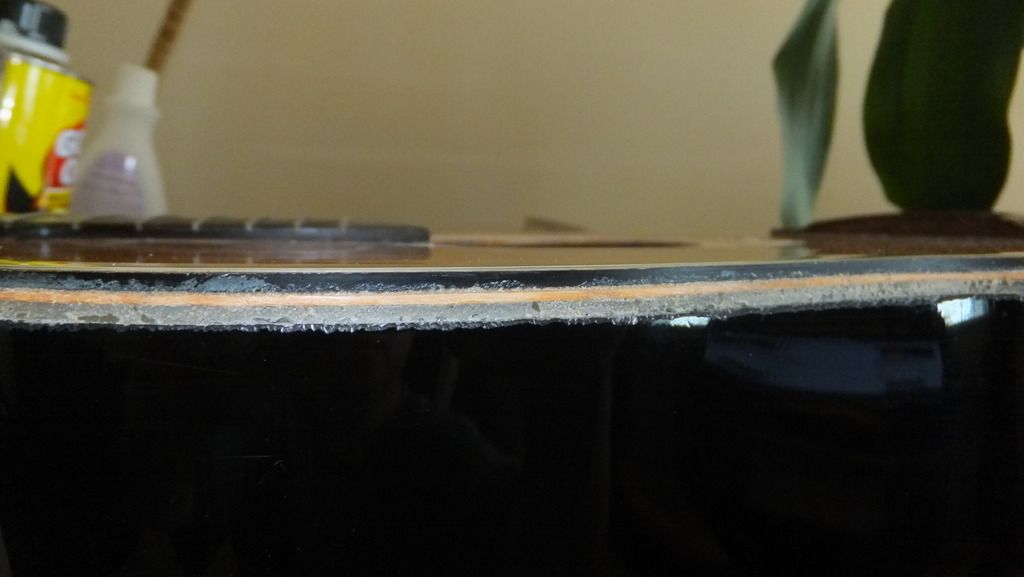
Was able to get a good chunk of the binding that goes under the neck so I can just slide the new stuff up under the neck.
|
|
| |
|
Joined:
June 2012
Posts: 2303
Location: Lake Forest, CA | I've never seen the Deluxe rosette off the guitar.
I knew it was inlaid, like the grapevine rosette, but it's interesting to see it taken apart like that.
Is the pearl layer real pearl or pearloid? It looks like pearloid.
That inlaid rosette will be difficult to replace. You could contact the MS to see if they have any, but I doubt it. You'll probably have to use a modern raised rosette like the one in the pics I posted.
I measured the modern raised rosette:
O.D.: 6-1/8" (6.125")
I.D.: 4"
Soundboard hole size: 4-3/16" (4.1875")
WRT the headstock on Jay's guitar, I had to sand off the finish. It's polyester, so there aren't any chemicals that will strip it.
Speaking of rosettes, here's a few pics our fellow OFCer, TJR, sent me of the original MOP rosettes. Talk about a lot of trouble. It's too bad they didn't keep making them this way. It sure is purty. 


Edited by DanSavage 2015-07-11 9:12 AM
|
|
| |
|
Joined:
June 2012
Posts: 2303
Location: Lake Forest, CA | clrules - 2015-07-11 6:54 AM
Well, heck, here we go. I started looking at what it would take to reglue the top to the bowl and I've found out this guitar must have taken a very hard lick. The top is loose all the way around the lower bout on one side. Having to remove so much of the outer binding I just took it all the way off the whole guitar. I cleaned out the binding channel and it's fine. The kerfing is still very well attached to the bowl (thank goodness) so now some interesting options on what the replacement should be. Here's a shot of the cleaned out channel. Pretty much standard stuff.
Was able to get a good chunk of the binding that goes under the neck so I can just slide the new stuff up under the neck.
It looks like the purfling is still in place, which is a good thing. I'd leave it and just replace the binding after the top is glued back down and cracks repaired. |
|
| |
|
Joined:
September 2005
Posts: 138
Location: Birmingham, AL | The purfling is fine. The Deluxe's rosette pearl is pearloid, my 1119 and 1658 Custom Legends have the puzzle piece abalone rosettes. The rosette channel dimensions on the Deluxe are exactly the same as the raised ones so it would fit perfectly.
Whom would I need to contact about buying a new rosette at the Mother Ship?
BTW, Dan, I want to thank you very much for all the insight. I really feel good now that I can tackle this project with good results. I wasn't familiar at all with how Ovation manufacturered their guitars so this has been really fun.
Here's a shot of the 1658 rosette. Always thought this one was especially "purty"....
Edited by clrules 2015-07-11 10:20 AM
|
|
| |
|
Joined:
June 2012
Posts: 2303
Location: Lake Forest, CA | That's a pretty sweet looking rosette. I wonder when they stopped using the real stuff and started using the pearloid and abalonoid.
For parts, contact John Budny. (jbudny@dwdrums.com)
You're welcome. I'm glad to help. For the most part, they're like most other guitars. |
|
| |
|
Joined:
September 2005
Posts: 138
Location: Birmingham, AL | DanSavage - 2015-07-11 10:31 AM
That's a pretty sweet looking rosette. I wonder when they stopped using the real stuff and started using the pearloid and abalonoid.
For parts, contact John Budny. (jbudny@dwdrums.com)
You're welcome. I'm glad to help. For the most part, they're like most other guitars.
Oh, yeah, already talked to John. That's how I found out about you. Just didn't put the two together.
Everybody went to the manufactured abalone/pearl probably because it's cheaper to install. Even Martin uses that type of pearl now. I like looking at the CL guitars and seeing how the abalone pieces fit together and how someone made each piece complimentary.
|
|
| |
|
Joined:
June 2012
Posts: 2303
Location: Lake Forest, CA | clrules - 2015-07-11 9:47 AM
Everybody went to the manufactured abalone/pearl probably because it's cheaper to install. Even Martin uses that type of pearl now. I like looking at the CL guitars and seeing how the abalone pieces fit together and how someone made each piece complimentary.
Ovation needs to talk to this gal who had these rosettes made. I paid $166 off eBay. All hand-cut & fitted real MOP & abalone. (edit: I just checked eBay and these are going for $136)I paid $150 for the abalonoid rosette for my CL and $120 for the pearloid one seen in the pics above. 
This one cost me $77. All hand-cut & fitted white MOP, black MOP & abalone. I really like this one and want to use it on one of my guitars some day. It's very striking in person. 
Edited by DanSavage 2015-07-11 8:59 PM
|
|
| |
|
Joined:
September 2005
Posts: 138
Location: Birmingham, AL | I have been looking and saw these on ebay. The only thing is the hole on the Deluxe is 4" but the Ovation looking one would work it would just have 1/4" of exposed wood around the soundhole. It would look sort of like the 12 string which is cool by me. I'll ask if she'll do one in black. As long as the outer dimension is no larger than 6" should be fine.
Thanks Aagin!! |
|
| |
|
Joined:
June 2012
Posts: 2303
Location: Lake Forest, CA | The outer dimension of the Ovation knock-off is 6-5/8", so it is noticeably larger than the standard plastic rosette.
The outer diameter of the diamond rosette is ~6-1/8" which is about the same size as the standard rosette, but the inside diameter is ~4-1/2" which makes it more narrow than the standard rosette.
I did ask her if she could make an Ovation knock-off using black MOP and abalone and she said she could and it would take 45-60 days. The bummer is that I asked if I could return the white MOP and abalone and exchange it for the new one and she blew off the deal. I've been too chicken to ask her again. I did order some other inlays from her and she was happy to sell them to me. So, if you ask her to do it, make sure she's clear that you will buy it and not return it. |
|
| |
|
Joined:
September 2005
Posts: 138
Location: Birmingham, AL | She just wrote back and said she would not do a custom order. She has another Ovation knock off that has the 4.5" inner circle but the rosette is 1 1/8" (1.125)" thick so that only calculates to 5.625". I asked her to verify that and if correct I'm going to use that one. Heres a picture:
http://www.ebay.com/itm/191625820808?_trksid=p2055119.m1438.l2648&s...
It's more than the other one but that's fine. If I can get the headstock to glue back together successfully then I can proceed and probably get one of these.
I noticed also she has some rope style ones that resemble the rosette on the Balladeer but of course in pearl but they may be too different to look decent.
Edited by clrules 2015-07-13 7:38 PM
|
|
| |
|
Joined:
September 2005
Posts: 138
Location: Birmingham, AL | One more thing  ...... I am considering using the Hysol on the headstock also, they say it can be used on wood, and I would want a strong bond in that area. Any misgivings, opinions, etc ? I know the HHG and equivalent can be taken apart and the epoxy is pretty much a one shot deal. ...... I am considering using the Hysol on the headstock also, they say it can be used on wood, and I would want a strong bond in that area. Any misgivings, opinions, etc ? I know the HHG and equivalent can be taken apart and the epoxy is pretty much a one shot deal. |
|
| |
|
Joined:
June 2012
Posts: 2303
Location: Lake Forest, CA | Well, that's too bad about her not wanting to do custom work. It looks like I poisoned the well.
I just measured my Ovation knock-off and those dimensions are the same, which means the OD will be 6-5/8".
Yes, she has some really nice, reasonably-priced rosettes. But, IMO, they are better suited to a new top rather than trying to retrofit them to an existing groove.
Hysol would work fine. It will give you plenty of working time and it will be plenty strong, too. It's an aerospace-grade epoxy that's good to 250° F.
WRT HHG for the headstock repair, the biggest advantage is the lack of creep at elevated temperatures, i.e.: anything above 150°-170° F, which is likely to be experience when a guitar case is left in a car or out in the sun. PVA glues are notorious for softening at these temps, whereas HHG will hold tight. Other than a high-temp epoxy, the only other glue I've used that does not creep is CA.
So, if you use Hysol 9462, it will hold tight at these temps. If you really want to be sure, you could always use Hysol 9460, which is good to 350° F.
Another point to consider is that HHG will dry transparent and Hysol 9462 is beige and 9460 is grey. So, you might see a seam line with the Hysol whereas the HHG seam line will be mostly invisible, assuming you've realigned the joint to perfection.
One other point to consider is that the HHG glue joint will continue to shrink as the glue dries, which draws the two pieces closer together. The epoxy glue joint will only be as tight as you clamp it.
I'm not trying to talk you out of using Hysol and into HHG, only pointing out the pros and cons of both. |
|
| |
|
Joined:
September 2005
Posts: 138
Location: Birmingham, AL | Thanks. That's the info I need. I've used epoxy before I just want this one to come out really well and I've never used Hide Glue before. I think I need to get some equipment and get used to the HHG. It seems to be the choice of many luthiers.
Onthe rosette, looks like she's shut down her ebay store until Aug. 14th so I'll have a lot of time to consider my options. I emailed John to see what he has and i found another Ovation style rosette that would work on the Deluxe but it's more like the original and if it fits suppose tha twill be OK and it's only 9 bucks..
|
|
| |
|
Joined:
November 2002
Posts: 3599
Location: Pacific Northwest Inland Empire | Don't want to rain on your parade, but those cheap ones- if they're the same ones I bought a few months ago- are the correct pattern, but printed on flat, 1 mm, self-adhesive. foil-looking material. Anyway, they have no depth to them, so be sure they are what you desire. What's that?- Caveat Emptor? |
|
| |
|
Joined:
June 2012
Posts: 2303
Location: Lake Forest, CA | HHG is the choice of woodworkers because it forms an electro-chemical bond with the wood. Which is the say that it bonds directly to the wood at a molecular level. The smoother the wood surface, the better HHG works.
All other glues rely on a mechanical bond. You have to rough up the surface with sandpaper to give the glue something to grab onto.
To use HHG, you don't even need to go to the trouble I did. I made myself a glue pot because I plan on using HHG in the future.
Here's a page on frets.com that talks about the ultra-simple way to prepare HHG using a simple double-boiler on the stove.
http://www.frets.com/FretsPages/Luthier/Technique/Glue/UseHideGlue/... |
|
| |
|
Joined:
September 2005
Posts: 138
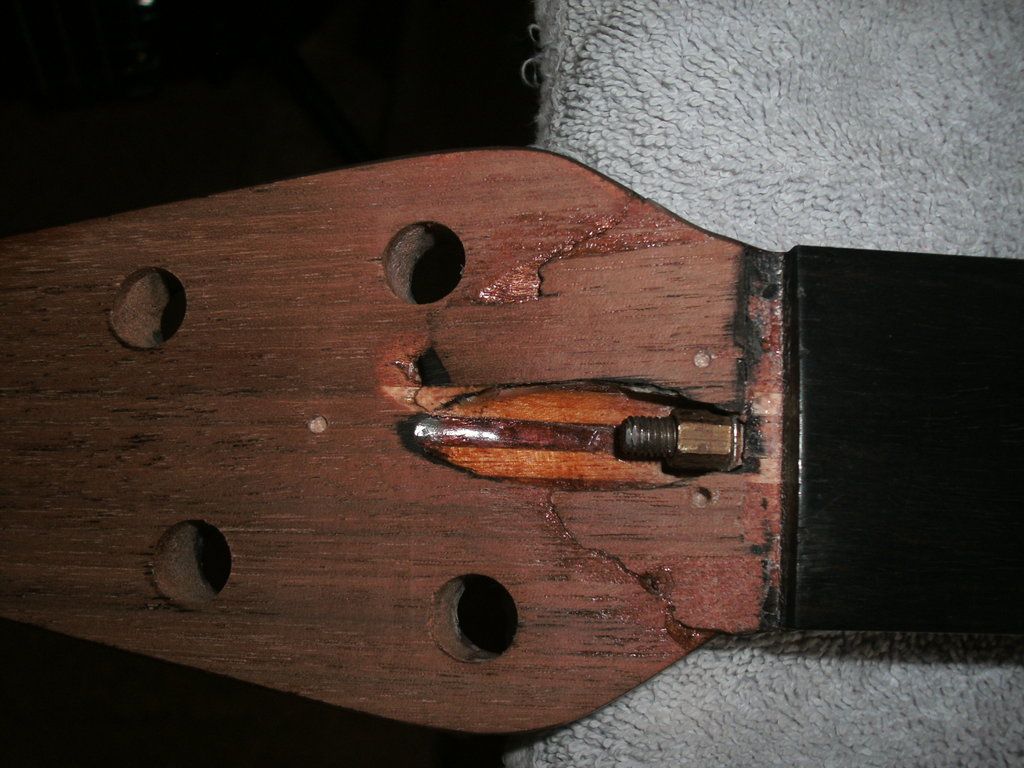
Location: Birmingham, AL | OK, I haven't proceeded any further so I'll give it a look. The surface where the head split is far from smooth because of the figure of the wood it's very rippled go back and look at the pictures. There's no way that I could get a smooth surface or is "smooth" a relative term?
I probably won't use the cheapo rosette John Budny is shipping me a couple to try.
Edited by clrules 2015-07-16 7:31 PM
|
|
| |
|
Joined:
June 2012
Posts: 2303
Location: Lake Forest, CA | Smooth is a relative term. You wouldn't want to take a sandpaper to the broken headstock. The grain of the wood will provide plenty of tooth to the epoxy as it is right now.
But, if you were gluing two pieces of fresh wood together using HHG, you would want to get the surfaces as smooth as you could by using very fine grit sandpaper. (320 or higher)
If you were gluing these two pieces of wood together using epoxy, you would want to stop sanding at 220 grit.
It's sort of like painting. If you're applying paint to a surface, you rough it up unless you're applying a second coat before the first coat has fully dried. The fresh coat needs some tooth otherwise the paint will peel off. The second coat relies on a chemical bond.
Edited by DanSavage 2015-07-17 10:16 AM
|
|
| |
|
Joined:
December 2014
Posts: 1713
Location: Frozen Tundra of Minnesota | DanSavage - 2015-07-14 9:18 AM
Well, that's too bad about her not wanting to do custom work. It looks like I poisoned the well.
No you didn't Dan, Vivian gets irate if you try to return ANYthing. I received a broken rosette,and asked to exchange it for a new one, she was furious, refunded my money, then wrote me that the rosette was not broken, and I was wrong. If you look at her feedback on eBay, anytime someone tries to return something, she blocks them from ever buying from her again.
She has nice pieces, but I have found someone who does Custom Work, and their pieces are Incredible, Detailed, and reasonably priced. They are out of Oregon, and Buddy is Great to work with. They are doing the Custom Design fretboard inlays, and headstock inlay for my Custom CL that I will have made when John B is ready.
You can check them out at: http://luthiersupply.com/productspage.html
or on Instagram:
https://instagram.com/depaulesupply/
DePaule Supply
It is really fun watching your project CLRules! Please keep the pictures and updates coming!
Edited by Nancy 2015-07-17 4:28 PM
|
|
| |
|
Joined:
September 2005
Posts: 138
Location: Birmingham, AL | Hopefully I'll get the glue and equipment Monday. I should be able to get started next Thursday. Thanks for all your help and advice, Dan.
Nancy, when I get started I'll post pics as the work progresses and thanks for the leads to the other source for rosettes.
Edited by clrules 2015-07-17 7:45 PM
|
|
| |
|
Joined:
June 2012
Posts: 2303
Location: Lake Forest, CA | I did contact DePaule Supply previously about custom work. They're pretty pricey.
They charge $25.00 for the first 1/2 hour and $12.50 every 15 minutes after that. |
|
| |
|
Joined:
September 2005
Posts: 138
Location: Birmingham, AL | Now we begin. My glue stuff unexpectedly came in today so now I've glued and clamped the headstock. The way it broke gave a lot of gluing area so we'll see....
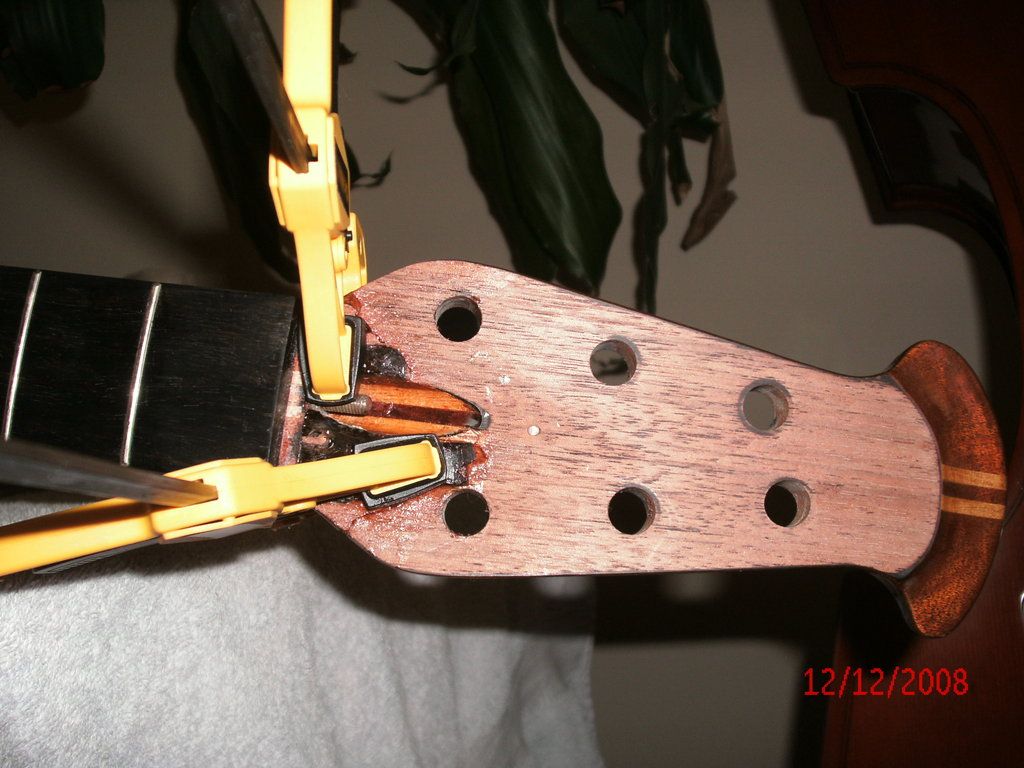

There is some finish loss along the crack but the wood appears to match up exactly.
Next.....glue the top back on the rim and string her up to see if she'll hold together. |
|
| |
|

Joined:
October 2012
Posts: 1018
Location: Yokohama, Japan | Nice work clrules...question, are the black plastic covers on your clamps made of non-adhesive materials? Looks pretty cool! Also, couldn't resist noticing the date on the pics...do you live down under? But wait, it's winter down there, but the dates don't change do they? Just teasing...lol. |
|
| |
|
Joined:
June 2012
Posts: 2303
Location: Lake Forest, CA | clrules - 2015-07-18 3:24 PM
Now we begin. My glue stuff unexpectedly came in today so now I've glued and clamped the headstock. The way it broke gave a lot of gluing area so we'll see....
...
There is some finish loss along the crack but the wood appears to match up exactly.
Next.....glue the top back on the rim and string her up to see if she'll hold together.
Looking good. What glue did you end up using?
The finish loss is pretty normal. When I did the headstock on my Ibenez I tinted some finishing resin using dry artist's pigment to match the color.
I also notice you sanded the finish off the headstock veneer. Let me know when you're ready for the logo artwork and I'll post a link to this thread.
|
|
| |
|
Joined:
March 2002
Posts: 15652
Location: SoCal | I'm looking forward to this thread getting back to the actual Balladeer Deluxe project...... |
|
| |
|
Joined:
September 2005
Posts: 138
Location: Birmingham, AL | immoody - 2015-07-20 1:45 PM
I'm looking forward to this thread getting back to the actual Balladeer Deluxe project......
Last time I checked this guitar was/is a real Balladeer Deluxe. Put on your glasses. If you would bother to read the other posts Dan has his own project which is totally different from this one. Go to that one and troll if you must.
Have a nice day. |
|
| |
|
Joined:
September 2005
Posts: 138
Location: Birmingham, AL | DanSavage - 2015-07-20 1:09 PM
clrules - 2015-07-18 3:24 PM
Now we begin. My glue stuff unexpectedly came in today so now I've glued and clamped the headstock. The way it broke gave a lot of gluing area so we'll see....
...
There is some finish loss along the crack but the wood appears to match up exactly.
Next.....glue the top back on the rim and string her up to see if she'll hold together.
Looking good. What glue did you end up using?
The finish loss is pretty normal. When I did the headstock on my Ibenez I tinted some finishing resin using dry artist's pigment to match the color.
I also notice you sanded the finish off the headstock veneer. Let me know when you're ready for the logo artwork and I'll post a link to this thread.
I used the hot glue. It worked well and I was surprised it was so easy to use. The veneer was so damaged that I felt that it couldn't be repaired as it was. I think I can fill in the cracks and chips and refinish the veneer in a dark color again with good results. |
|
| |
|
Joined:
September 2005
Posts: 138
Location: Birmingham, AL | arumako - 2015-07-19 9:22 PM
Nice work clrules...question, are the black plastic covers on your clamps made of non-adhesive materials? Looks pretty cool! Also, couldn't resist noticing the date on the pics...do you live down under? But wait, it's winter down there, but the dates don't change do they? Just teasing...lol.
It appears that the clamps were somewhat non-adhesive, at least to hide glue.... didn't think about that until I tried to remove them, they were stuck to the guitar, but came off fairly easily.. It's a good thing that the Ovation finish is pretty much impervious to everything. I found the clamps at Lowe's and they worked really well.
The camera I used is an older one, the batteries had run down, and I didn't reset the date on it.
Thanks for the comments! |
|
| |
|
Joined:
March 2002
Posts: 15652
Location: SoCal | clrules - 2015-07-21 6:02 AM
immoody - 2015-07-20 1:45 PM
I'm looking forward to this thread getting back to the actual Balladeer Deluxe project......
Last time I checked this guitar was/is a real Balladeer Deluxe. Put on your glasses. If you would bother to read the other posts Dan has his own project which is totally different from this one. Go to that one and troll if you must.
Have a nice day.
My mistake.
I'm now a troll? Fuck off kid..... |
|
| |
|
Joined:
June 2012
Posts: 2303
Location: Lake Forest, CA | Play nice, boys. We're all friends here. |
|
| |
|
Joined:
September 2005
Posts: 138
Location: Birmingham, AL | immoody - 2015-07-21 8:42 AM
clrules - 2015-07-21 6:02 AM
immoody - 2015-07-20 1:45 PM
I'm looking forward to this thread getting back to the actual Balladeer Deluxe project......
Last time I checked this guitar was/is a real Balladeer Deluxe. Put on your glasses. If you would bother to read the other posts Dan has his own project which is totally different from this one. Go to that one and troll if you must.
Have a nice day.
My mistake.
I'm now a troll? Fuck off kid.....
What? You can't take a little sarcasm? No hate intended but obviously recieved. We all like Ovations and that's why we're here.
Edited by clrules 2015-07-21 9:09 AM
|
|
| |
|
Joined:
June 2012
Posts: 2303
Location: Lake Forest, CA | clrules - 2015-07-21 6:08 AM
I used the hot glue. It worked well and I was surprised it was so easy to use. The veneer was so damaged that I felt that it couldn't be repaired as it was. I think I can fill in the cracks and chips and refinish the veneer in a dark color again with good results.
Yep. Almost as easy as licking an envelope, which, BTW, is hide glue. (Yum, yum)
Seriously, though, a lot of people are intimidate by HHG, but as you found out, it's pretty easy to use.
One good thing about it is that if you make a mistake, you can use steam to loosen the glue joint, clean off the glue with water, then try again. I had a problem jointing Jay's 485 because I re-used glue that I had cooked up previously and reheated. The water had evaporated out and the glue became really thick and didn't want to spread. This caused really big gaps in the joint. So, I used steam to soften the glue joint, cleaned it up, cooked up a new batch of glue and all was well.
I learned my lesson. Now whenever I'm going to use HHG, I cook up a fresh batch. It's too cheap to waste my time fighting with it.
Yes, that's a good decision. If you have all the pieces, you can jigsaw-puzzle them back into place and fix the missing finish. But, if you don't, and have to add new wood, you're better off taking it back down to bare wood.
Keep up the good work.
Edited by DanSavage 2015-07-21 9:09 AM
|
|
| |
|
Joined:
September 2005
Posts: 138
Location: Birmingham, AL | DanSavage - 2015-07-21 8:55 AM
Play nice, boys. We're all friends here.
I'm trying. Even my wife says I'm a smart ***...but you must have to understand in my family it's a birthright. |
|
| |
|
Joined:
June 2012
Posts: 2303
Location: Lake Forest, CA | clrules - 2015-07-21 7:03 AM
What? You can't take a little sarcasm? No hate intended. We all like Ovations and that's why we're here.
Paul's a nice guy who can give and take with the best of `em. Since sarcasm is sometime hard to detect in the written word, I suggest adding a winky next time so there's no misunderstanding. |
|
| |
|
Joined:
September 2005
Posts: 138
Location: Birmingham, AL | From one Paul to another...next time I'll winky.  |
|
| |
|
Joined:
September 2005
Posts: 138
Location: Birmingham, AL | DanSavage - 2015-07-21 9:05 AM
clrules - 2015-07-21 6:08 AM
I used the hot glue. It worked well and I was surprised it was so easy to use. The veneer was so damaged that I felt that it couldn't be repaired as it was. I think I can fill in the cracks and chips and refinish the veneer in a dark color again with good results.
Yep. Almost as easy as licking an envelope, which, BTW, is hide glue. (Yum, yum )
Seriously, though, a lot of people are intimidate by HHG, but as you found out, it's pretty easy to use.
One good thing about it is that if you make a mistake, you can use steam to loosen the glue joint, clean off the glue with water, then try again. I had a problem jointing Jay's 485 because I re-used glue that I had cooked up previously and reheated. The water had evaporated out and the glue became really thick and didn't want to spread. This caused really big gaps in the joint. So, I used steam to soften the glue joint, cleaned it up, cooked up a new batch of glue and all was well.
I learned my lesson. Now whenever I'm going to use HHG, I cook up a fresh batch. It's too cheap to waste my time fighting with it.
Yes, that's a good decision. If you have all the pieces, you can jigsaw-puzzle them back into place and fix the missing finish. But, if you don't, and have to add new wood, you're better off taking it back down to bare wood.
Keep up the good work.
Didn't know that about glue on envelopes. Here's some pics of the repair.
The flash kind of covered up some of the repair but the pic wasn't clear without it. Old camera.....
 |
|
| |
|
Joined:
March 2013
Posts: 359
Location: undisclosed | HHG comes in different strengths but it is all much stronger than the non hot variety. I learned that as a kid going my first violin neck set, nothing like having to do things twice.... Cleanliness is very important in the heating apparatus since it is a organic substance decay can be a problem. Violin making forums probably have some of the most detailed instructions these days as well as sources for the supplies. |
|
| |
|
Joined:
June 2012
Posts: 2303
Location: Lake Forest, CA | clrules - 2015-07-21 7:34 AM
Didn't know that about glue on envelopes. Here's some pics of the repair.
The flash kind of covered up some of the repair but the pic wasn't clear without it. Old camera.....
Oh, yeah. Animal gelatin is used in all kinds of products. Basically, even though its edible, HHG is made from cow hides and is not used in food products. Food product gelatin is made from pig skin.Things like shampoos, face masks, and other cosmetics; fruit gelatins and puddings (such as Jell-O); in candies, marshmallows, cakes, ice cream, and yogurts, and in vitamins as a coating and as capsules, and it is sometimes used to assist in “clearing” wines. (Don't tell the muslims!)
Again, nice work. |
|
| |
|
Joined:
October 2012
Posts: 1018
Location: Yokohama, Japan | Nice work clrules! Did a great job on the headstock! Thoroughly enjoying your progress and DanSavage's extraordinary advice. Can't wait to see what you do with the soundboard. Keep up the awesome work, and keep posting so that we can all benefit from your journey! |
|
| |
|
Joined:
September 2005
Posts: 138
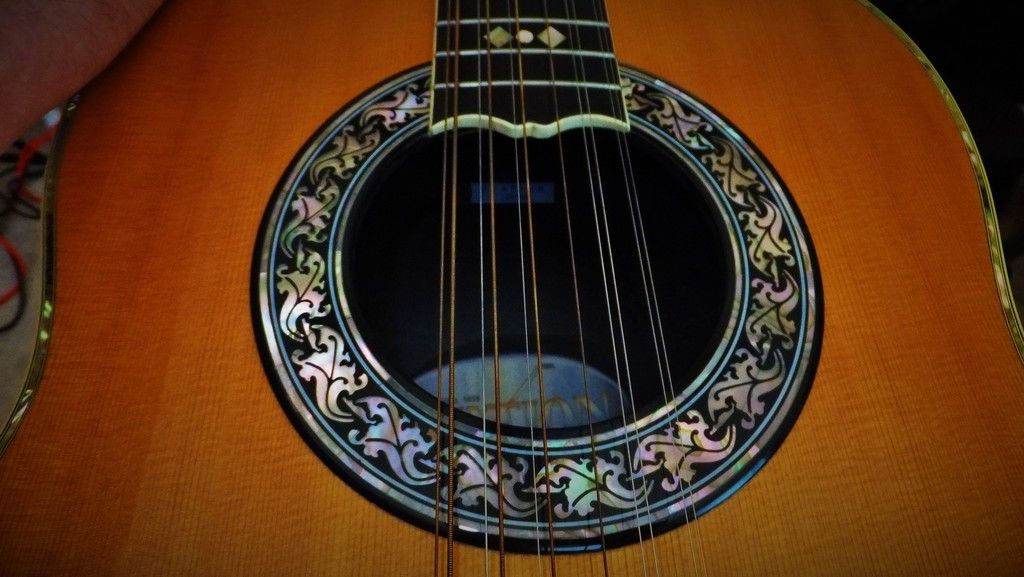
Location: Birmingham, AL | Got the thin rosette from John Budny and although just a little smaller fits pretty well. I didn't take off all the white undercoat on the old one so there's a white border around the outside. The hole on the rosette was smaller so just sanded the hole out with #400 then smoothed out with #600. It now has a white border around the soundhole looks cool. Once the rosette is finished over it might not look too bad.
Looked over the bracing and the X is attached completely to the top. There was a small reinforcement strip on the top almost at the end block that had practically come completely loose so I just removed it. Think it provided the same function as the fiberglass reinforcement on the older models. I got out the Hysol and ran a bead around the top and secured the glued area with some clamping tape, a 20lb 2x4 block of Brazilian Rosewood and my Granny's old iron. Looks like it's holding well didn't have clamps that would fit the Ovation.
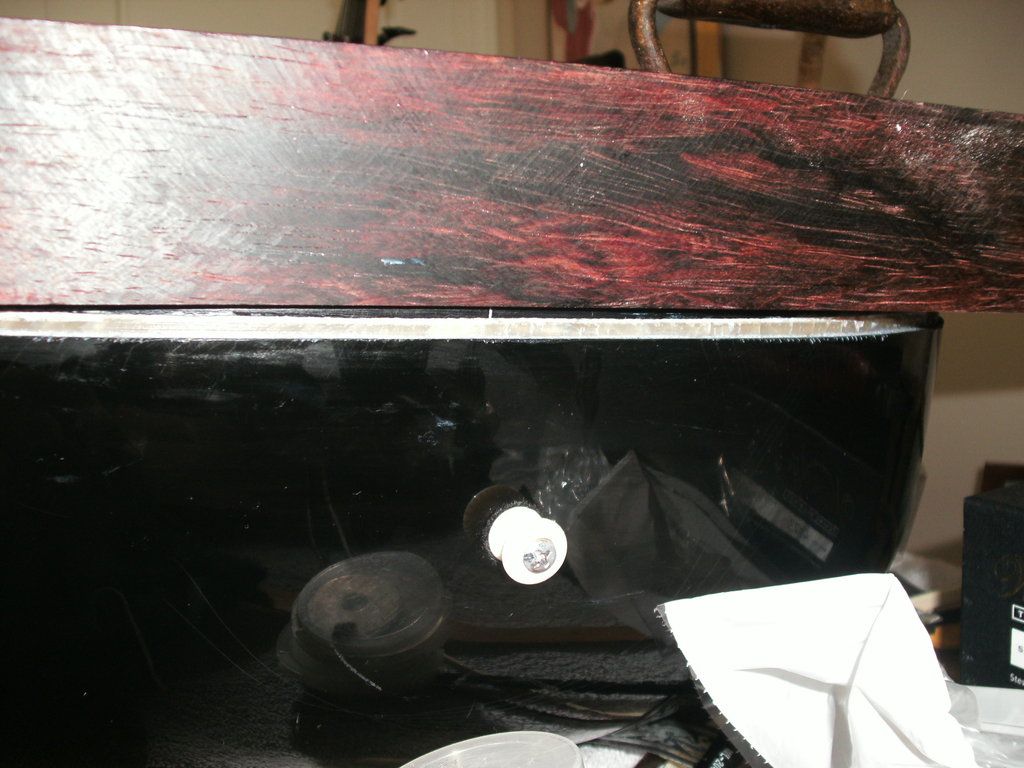
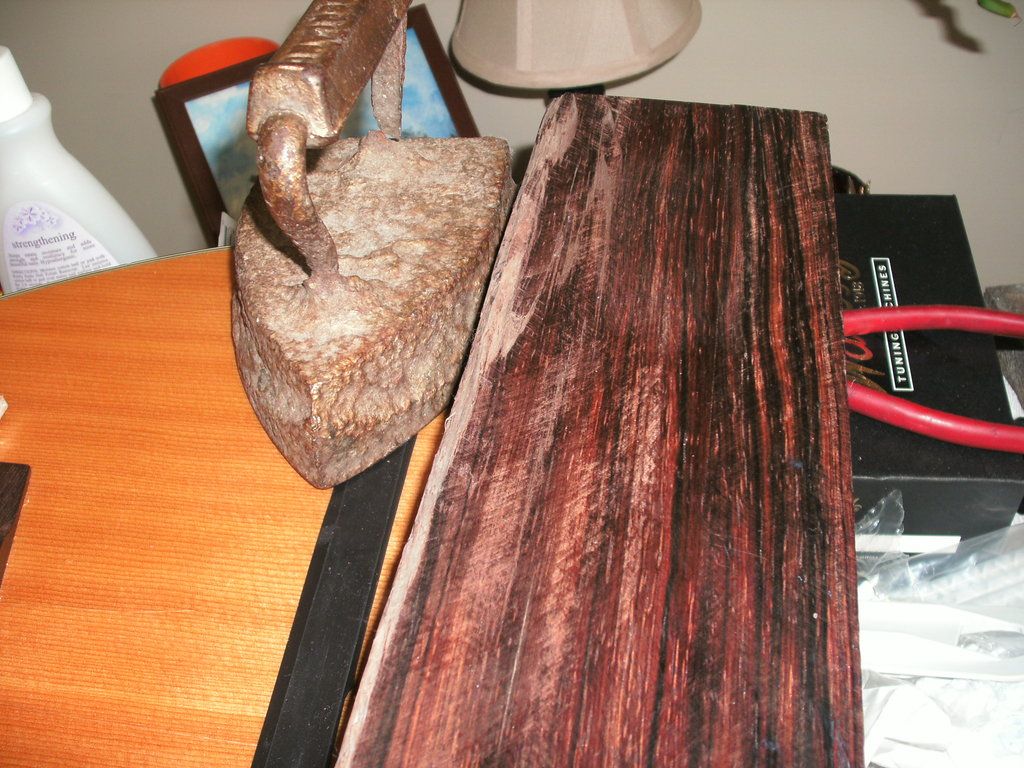
Hopefully that will be cured in a few days and I can put the tuners on it and string it up to see if it'll hold up.
If it does then on to finish up the top crack repair, installing the binding, refinishing the headstock and making a new TRC
Edited by clrules 2015-07-24 4:01 PM
|
|
| |
|
Joined:
June 2012
Posts: 2303
Location: Lake Forest, CA | Sweet!
The new rosette looks cool and it really fits in.
Even though the hysol requires 72 hours to fully cure, it's pretty strong after 24. For this application I'd wait the full 72 hours, just to be sure.
While you've got the binding off, do me a favor. Try to measure the thickness of the top at the upper bout up by the neck and at the lower bout down by the strap button.
I'm curious if it's tapered in thickness like the 1967 or if, by 1968, they started making the tops a constant thickness like the later guitars. |
|
| |
|
Joined:
September 2005
Posts: 138
Location: Birmingham, AL | I'll look at the top when the weights come off. Just looking at it I'd say it's tapered. At the top near the rosette there's a definite channel for the purfling and at the end block the top is even thickness with the purfling. I'll take pictures and measurements later. |
|
| |
|
Joined:
June 2012
Posts: 2303
Location: Lake Forest, CA | ABSOLUTELY DO NOT TRY TO MEASURE THICKNESS WHILE THE GLUE IS DRYING!
That being said, thanks!
Edited by DanSavage 2015-07-24 6:30 PM
|
|
| |
|
Joined:
September 2005
Posts: 138
Location: Birmingham, AL | Took off the clamping tonight, put on the tuning machines, tuned up to standard and so far she's held up. Now I can breathe....Going to let it set up tuned to pitch for a few days and we'll see....
OK, Dan, here's the info you wanted. The top is definitely tapered. At the neck it is about .180" and at the tail block about .109"
Could you please send the link to the person who made your logos? I'm interested in the Ovation logo only. I am still on the fence about adding the "Deluxe" back to the headstock.
Thanks
Paul |
|
| |
|
Joined:
June 2012
Posts: 2303
Location: Lake Forest, CA | Kewl!
Thanks for the info. Two questions I still have about the tapered top, which I'm not sure who can answer is, when did the they stop tapering the thickness of the tops and did the K1111 Reissue have a tapered top.
I made the logos. I used Adobe Illustrator. What file format are you interested in? |
|
| |
|
Joined:
June 2012
Posts: 2303
Location: Lake Forest, CA | I put the PDF file I'm planning to use online. Here's the link to it. OvationBalladeerLogo.pdf |
|
| |
|
Joined:
September 2005
Posts: 138
Location: Birmingham, AL | Thanks for the PDF. Just curious what decal material did you use to make the logo for your Balladeer?
Everything is holding up on the repairs so hopefully in the next week or so I can start on the headstock refinish, binding install, and complete the crack repair.
BTW I bought a 1970 Ovation catalog a couple of days ago and it states the tops are tapered. Thought you'd like to know that. |
|
| |
|
Joined:
June 2012
Posts: 2303
Location: Lake Forest, CA | I haven't made the logo just yet. I've been pretty busy lately. Now that I've cleared the decks, so to speak, I'm able to get back to work on it.
I bought the 'Toner Transfer Paper' from DecalPro, but it's really just a laser printer water-transfer decal paper. I also bought the satin gold foil and clear mylar carrier foil from DecalPro.
The gold foil is the same as Deco Foil and others available from craft stores, such as Michael's. These foils are heat-activated and stick to laser toner. Usually, they're used to add foil to an image printed on paper by laying the foil onto the image and running it through a laminator. If you search YouTube you can see a ton of videos of people using Deco foil.
DecalPro developed a technique to use the decal paper and fabric pattern glue to make 'rub-down' decals.
Yes, thanks for the info. I wonder when they stopped tapering the tops? |
|
| |
|
Joined:
September 2005
Posts: 138
Location: Birmingham, AL | Don't know why they quit. My guess is labor costs. The newer tops still cracked below the bridge so top thickness apparently didn't matter. I do know that the tapered top ones sound bigger and fuller that the later ones.
I found someone who would make the logos but they are pretty expensive. I went ahead and ordered one just to save time at least for this one.
I've finished the gluing the binding now later I'll clean the glue off of the crack repair and start on the headstock.
Edited by clrules 2015-08-07 8:18 AM
|
|
| |
|
Joined:
June 2012
Posts: 2303
Location: Lake Forest, CA | Looking good.
I found out they never stopped tapering the top wood, or at least they were tapered up to the time fender took over. They used pretty much the same technique I'm going to use for Jay's guitar --top wood sitting in a tapered platter that's run through a thickness sander.
I checked the top on my 1978 1617 and it's tapered. The standard taper was .140" at the top down to .100" at the bottom. The more or less standard thickness of most guitar tops is .100". I had the entire top of my 1619 sanded down to .094" which is about as thin as you'd want to take a steel-string guitar. I've got extra light strings on it to keep the bellying under control.
|
|
| |
|
Joined:
December 2003
Posts: 846
Location: Canada | DanSavage - 2015-08-07 8:19 AM Looking good. I found out they never stopped tapering the top wood, or at least they were tapered up to the time fender took over. Interesting, can you elaborate if that included ALL wood topped O's or just some specific models (which)?
Edited by d'ovation 2015-08-07 10:23 AM
|
|
| |
|
Joined:
June 2012
Posts: 2303
Location: Lake Forest, CA | As near as I can tell, all wood-topped Os. I got this info from Beal, so if he wants to chime in, he can. The 1960s Balladeers were tapered, as is my 1978 Legend.
All the top wood needs to be thickness sanded, anyway. The only difference for Ovation was to place the wood onto the tapered platter, which is similar to the one I built, then run it through the thickness sander which sanded a taper into the top wood.
When thickness sanding, the wood needs to be run through the sander a few times to get it down to the desired thickness as the sander is usually set up to take off a few thousandths at a time. This allows you to 'sneak' up to the desired thickness without overshooting it and getting the wood too thin.
When I've done my wood, we run it through the sander, then I use a digital caliper to check the thickness in several spots. We repeat the process until it's down to the thickness I want. This will be the same process for the tapered platter except that instead of making sure it's the same thickness all the way through, it'll be 1/32" thinner at the bottom than the top. We'll put some pencil marks along the length of the face of the top wood so we can see when the taper is uniform.
In the case of the factory, they were shooting for .140"/.100". I measured my Legend top and it's thinner than this, about .122"/.110" (from memory) so it's got less of a taper than what is spec, but it's still definitely tapered. As I say, thickness sanding is an iterative process, so it's a reasonable assumption that in a production environment, no two tops would be exactly the same thickness.
|
|
| |
|
Joined:
September 2005
Posts: 138
Location: Birmingham, AL | Done!
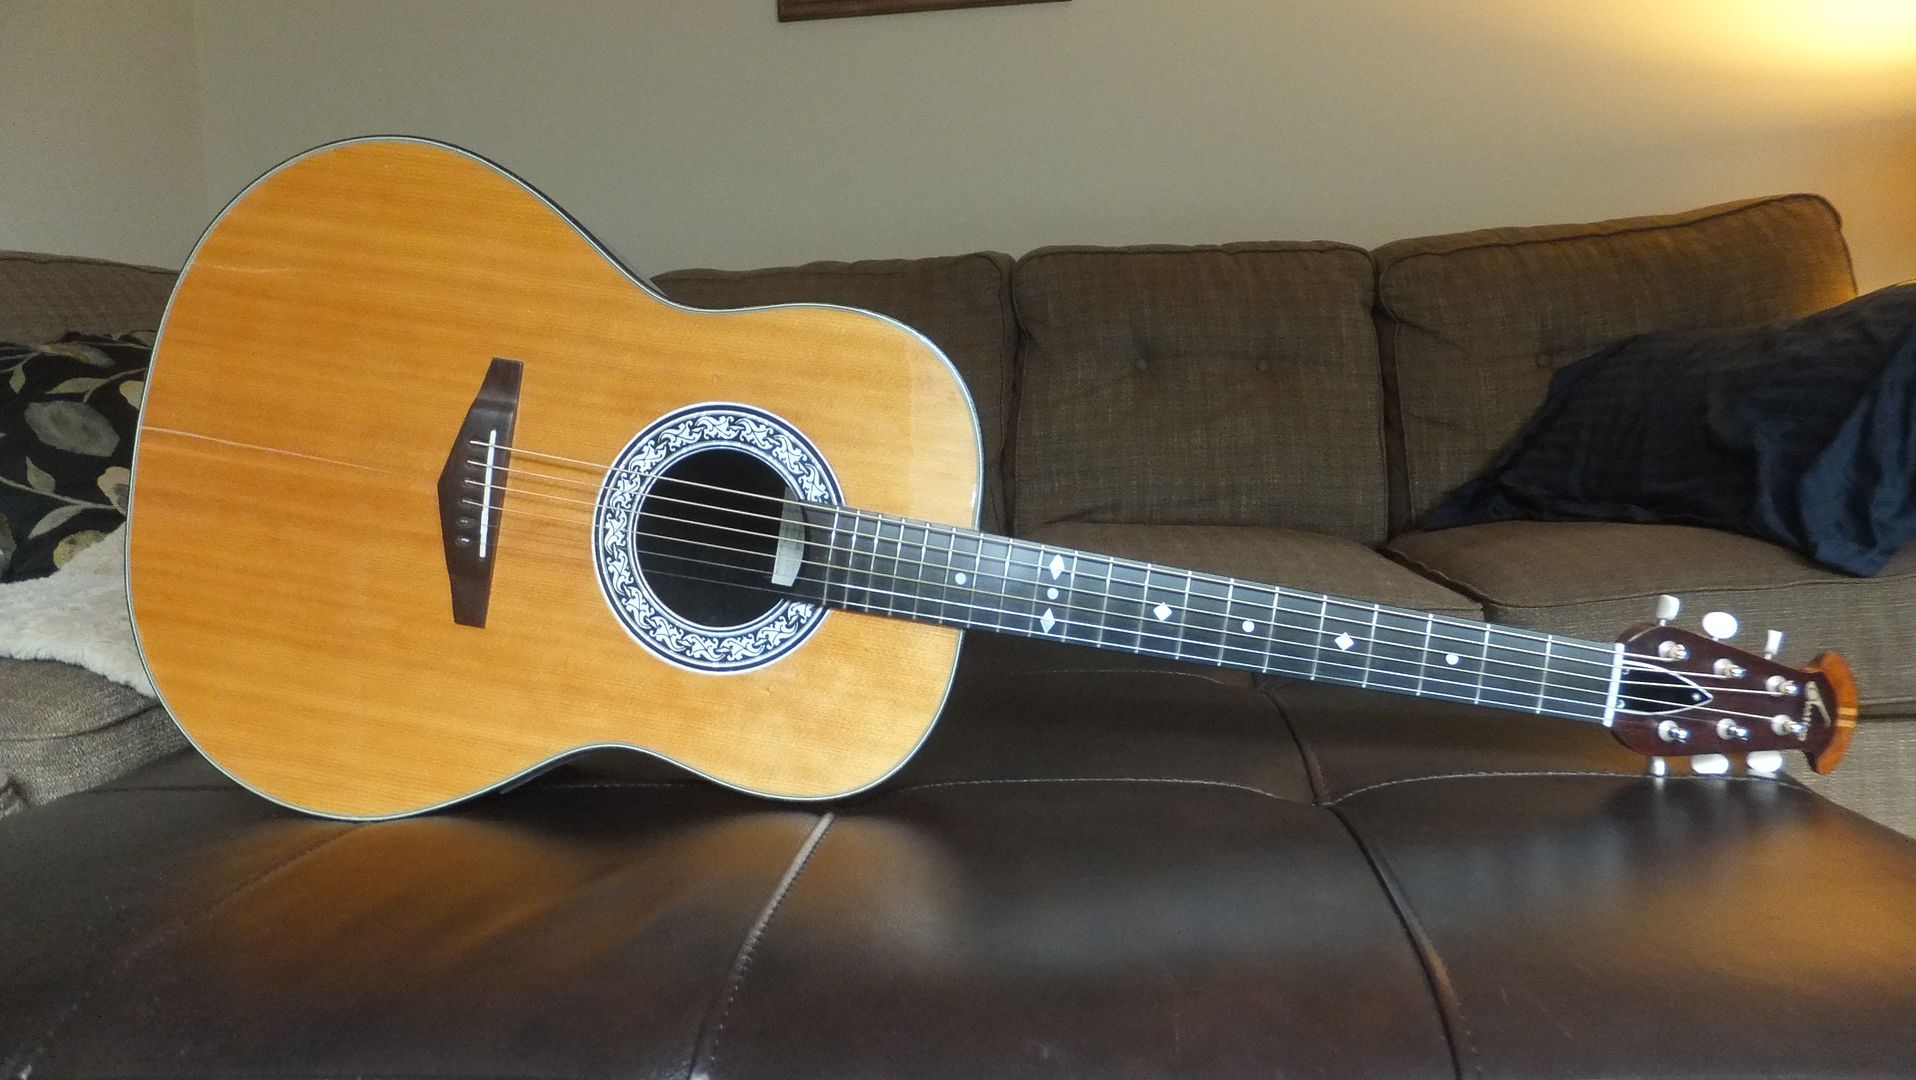
It turned out way better than I thought it would. Thanks to Dan for all the help and insight.
Now for takeaways and lessons learned:
Used the HHG for neck repair. Very easy to use all the hype about difficulty is way overblown.
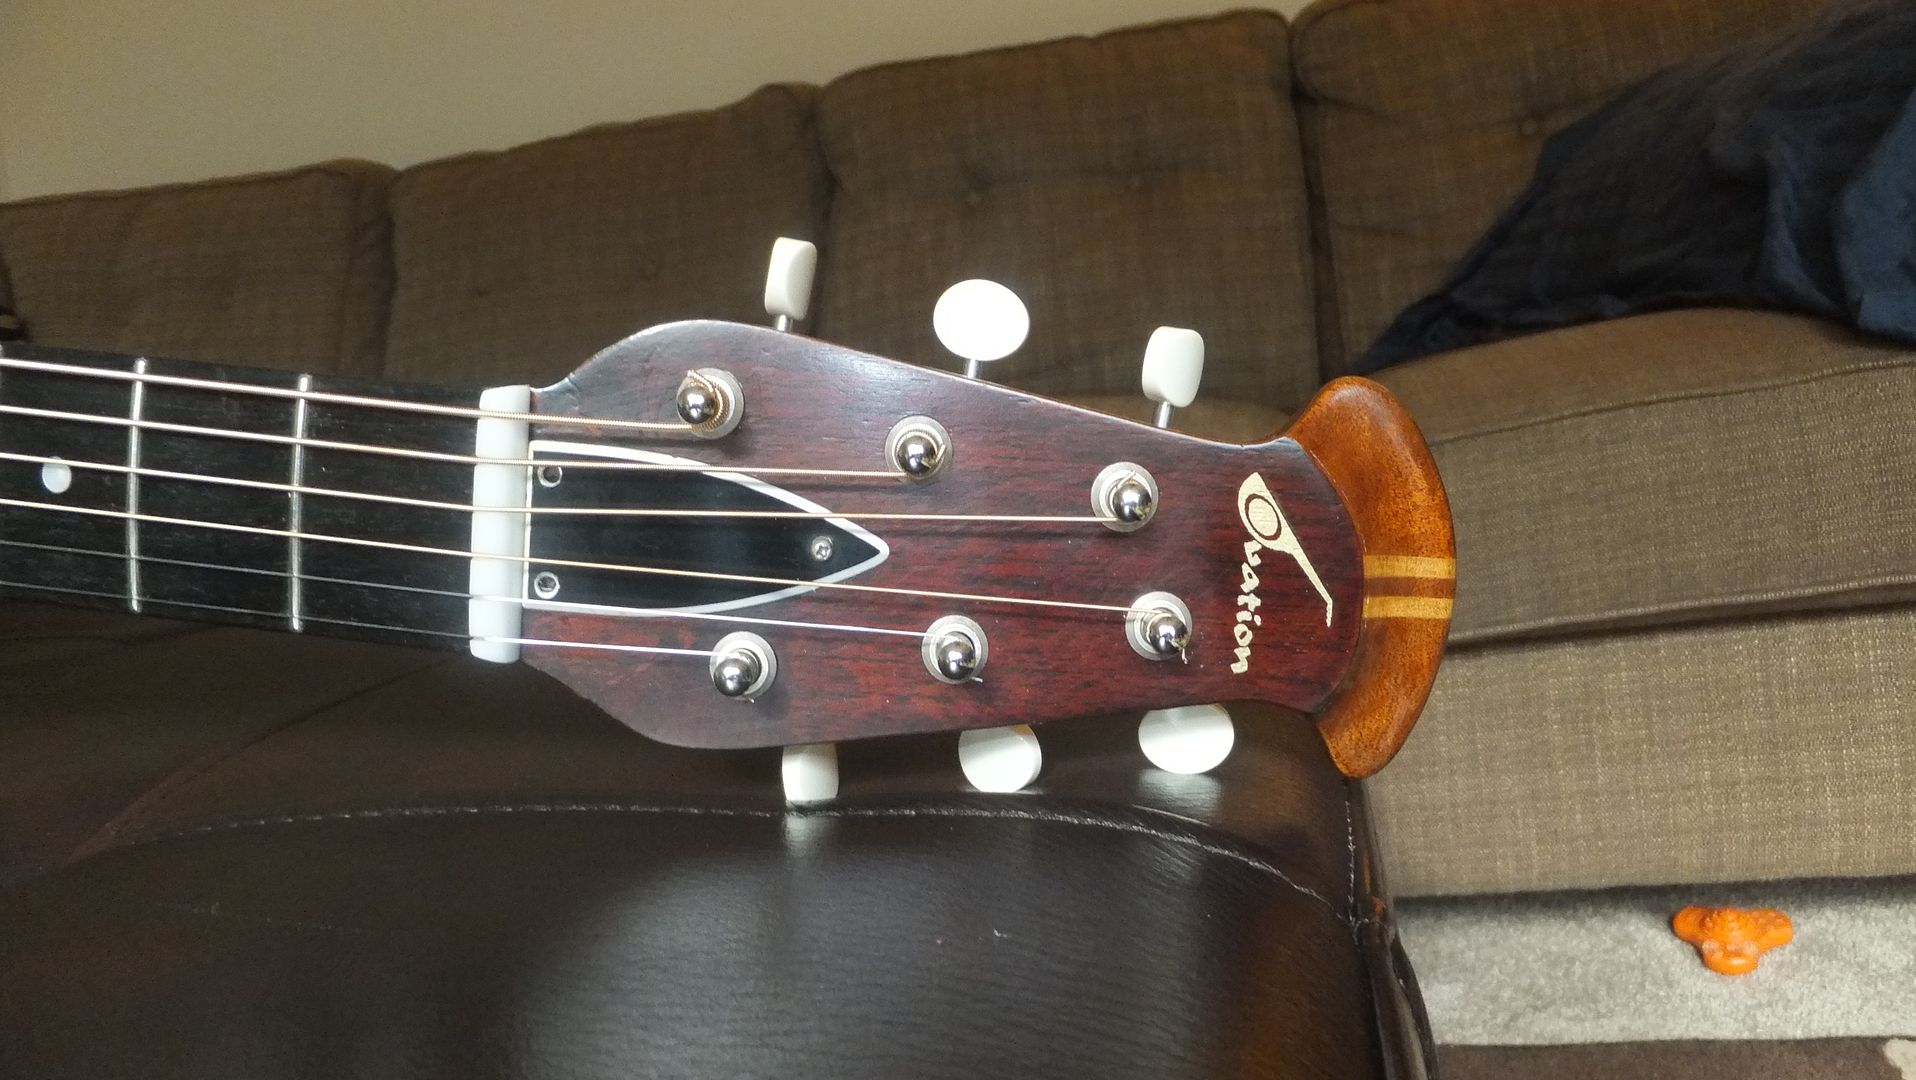
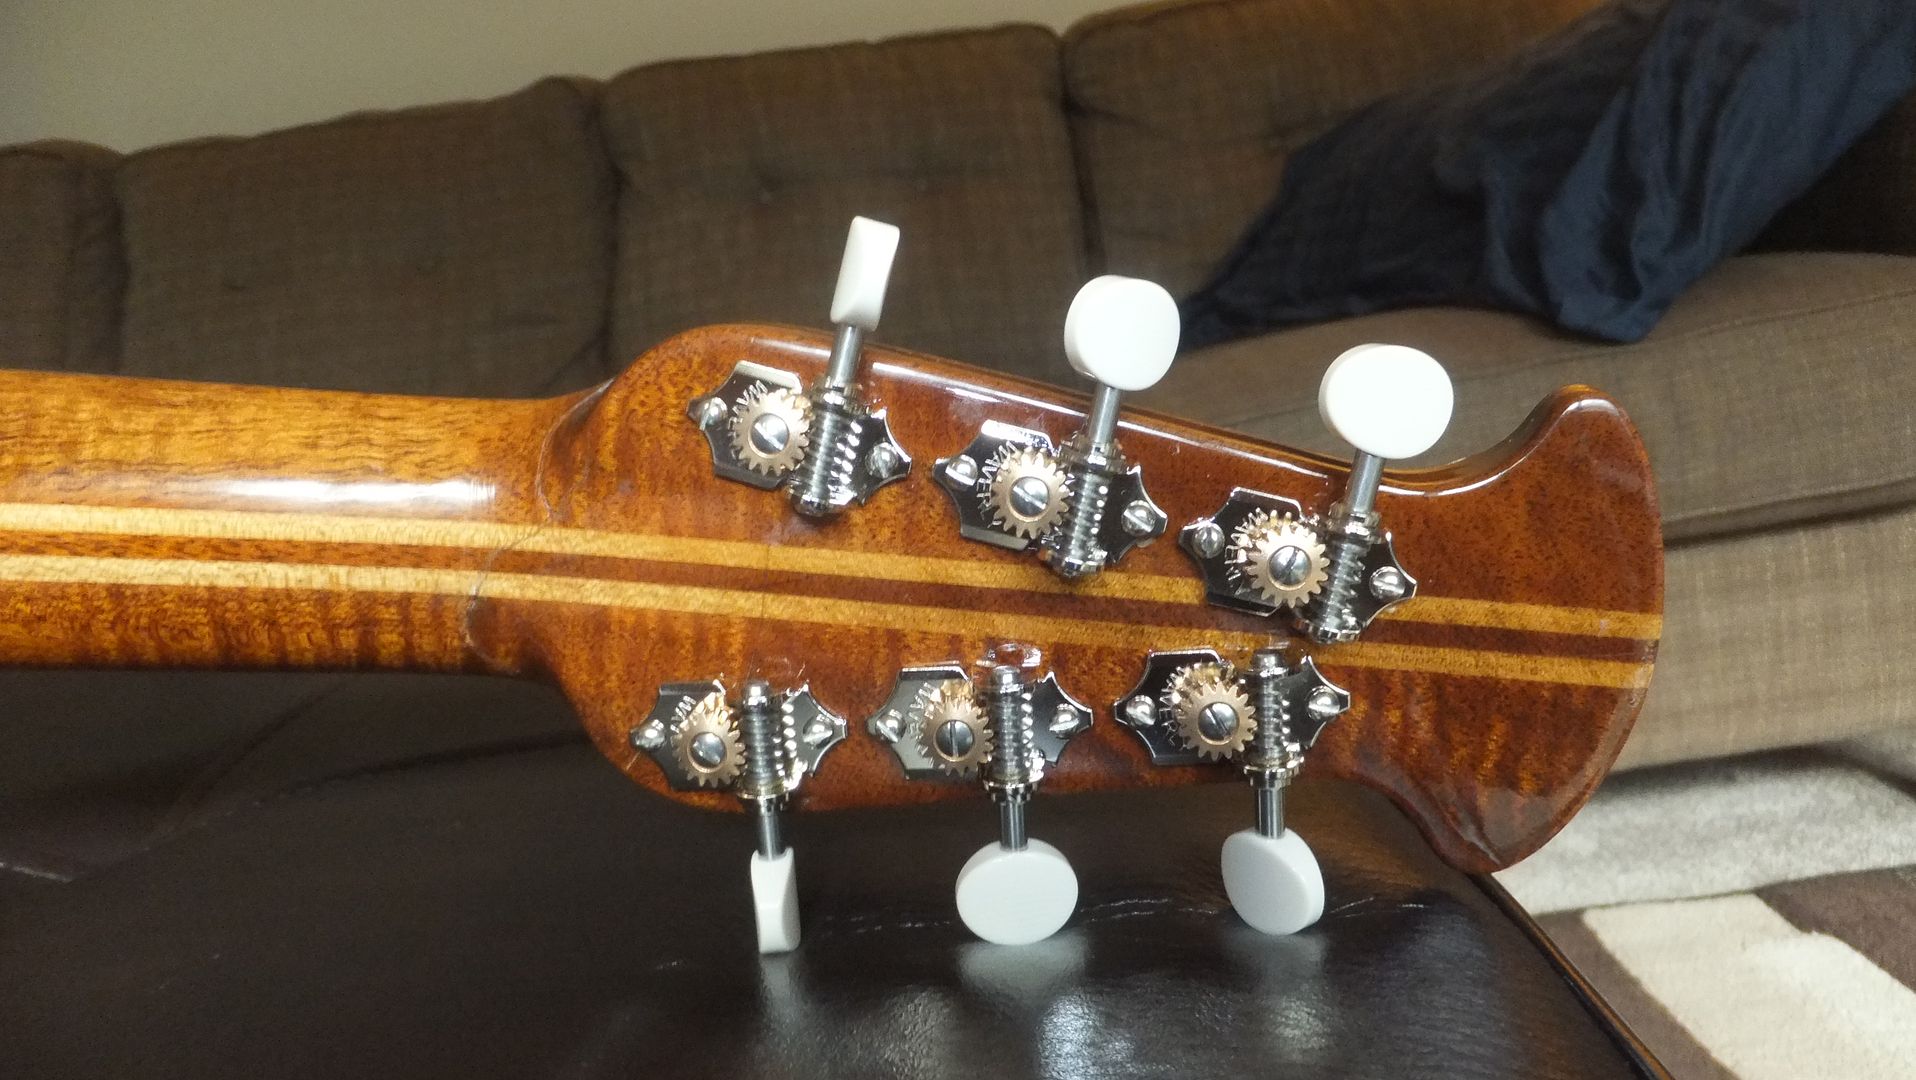
Finished the headstock with ReRanch Clear Satin. I wanted to use the gloss but the repair was just too obvious to see with gloss and kinda like the satin look. The logo is a waterslide decal. I had the logo made from the pattern that Dan is using.
Tortoise binding was from LMII and worked out well the .060 thickness was just right didn't have to scrape much of it off to level it with the installed purfling. The used tuning machines and strap pins I had in my supplies and think it adds a nice vintage look to the guitar.
Finish repair is almost impossible. All of the crack repairs that had finish damage didn't have much luck with them as well as the binding repair. The shiny finish on the bowl overlapped the original binding and even after scoring the area it still caused chipping where the bowl met the binding when the binding was removed. I haven't found anything that will fill in the chipping so I could at least try to touch up that area.
I did slightly shape the edges of the bracing to give it a more graceful look and think it added a slight increase to the bass response but hasn't caused any significant top deflection behind the bridge.
I still need to do some fret work but it plays quite nicely like it is. I did find there is a significant neck profile difference between the Balladeer and this Deluxe being the Balladeer is a great deal chunkier and the Deluxe has the more slimmer current neck perofile. They are both from 1968 suppose this was intentional?
I just might try this again if I can find another repairable one down the road at the right price. |
|
| |
|
Joined:
March 2002
Posts: 15652
Location: SoCal | Beautiful! That's an elegance to the early Ovations that has rarely been matched. From one troll to another, you done good....
|
|
| |
|
Joined:
April 2010
Posts: 823
Location: sitting at my computer | Kudos! Ya fixed (saved) it!  Thanks for sharing the journey. You, Dan, and all the other daring DIYers help keep us BFLG neophytes educated, entertained and inspired. |
|
| |
|
Joined:
September 2005
Posts: 138
Location: Birmingham, AL | Thank you for all the comments, and, moody p.i. I hope to get another one that you can troll all over.
My Martin D-18 has the tortoise binding on it I'm a big fan of that type. I bought the ivoroid also but the tortoise won out this time.
Edited by clrules 2015-08-22 4:09 PM
|
|
| |
|
Joined:
June 2012
Posts: 2303
Location: Lake Forest, CA | Nice job, Paul.
It's a great feeling to be able to play a guitar that you fixed yourself, isn't it?
Yes, you're right. Once you've used HHG, the intimidation goes away. Personally, for me, after having used Old Brown Glue a few times I don't really see myself going back to using granulated HHG. HHG is pretty easy to use, but OBG is easier and achieves the same results due to the longer open time.
For the finish cracks on the top wood, you can use thin CA or medium CA applied in layers. You would use a scraper, a single-edge razor blade or even a new Xacto chisel to level the repair with the surrounding area. Then once the crack is completely filled, you would use progressively finer grades of sandpaper, starting with somehthing like 600-grit and work your way up to 1000- or 1500-grit. Then, finally polish it back to a high-gloss using polishing compund.
Or, you could just play it and enjoy your handiwork. :D
Anyway, like I say, great job! |
|
| |
|

Joined:
September 2006
Posts: 10777
Location: Keepin' It Weird in Portland, OR | Looks Nice.
|
|
| |
|
Joined:
March 2002
Posts: 15652
Location: SoCal | How's it sound? |
|
| |
|
Joined:
June 2012
Posts: 2303
Location: Lake Forest, CA | immoody - 2015-08-22 3:20 PM
How's it sound?
Yeah! I think you (clrules) need to come out to Trabuco Canyon with the Guitar Gang and have Paul (Moody) play it and have me videotape it so we can all listen to how it sounds!
Edited by DanSavage 2015-08-22 10:06 PM
|
|
| |
|
Joined:
September 2005
Posts: 138
Location: Birmingham, AL | immoody - 2015-08-22 5:20 PM
How's it sound?
Actually it sounds very O like but with a lot of presence, balance and clarity. It's loud also. You dont have to drive it very hard at all to get a great sound out of it. Now that we know the tops are still tapered it must be the bowl that makes these older models sound so different than the later ones.
|
|
| |
|
Joined:
September 2005
Posts: 138
Location: Birmingham, AL | DanSavage - 2015-08-22 10:05 PM
immoody - 2015-08-22 3:20 PM
How's it sound?
Yeah! I think you (clrules ) need to come out to Trabuco Canyon with the Guitar Gang and have Paul (Moody ) play it and have me videotape it so we can all listen to how it sounds!
Good idea! As long as I don't have to get on camera that'll work.
Edited by clrules 2015-08-23 5:39 AM
|
|
| |
|
Joined:
June 2012
Posts: 2303
Location: Lake Forest, CA | clrules - 2015-08-23 3:36 AM
Actually it sounds very O like but with a lot of presence, balance and clarity. It's loud also. You dont have to drive it very hard at all to get a great sound out of it. Now that we know the tops are still tapered it must be the bowl that makes these older models sound so different than the later ones.
IMO, it's the X-brace pattern. When I got it from him, I noticed how much Jay's 1967 Balladeer sounded like my X-brace 1619 CL. |
|
| |
|
Joined:
September 2005
Posts: 138
Location: Birmingham, AL | DanSavage - 2015-08-23 7:31 AM
clrules - 2015-08-23 3:36 AM
Actually it sounds very O like but with a lot of presence, balance and clarity. It's loud also. You dont have to drive it very hard at all to get a great sound out of it. Now that we know the tops are still tapered it must be the bowl that makes these older models sound so different than the later ones.
IMO, it's the X-brace pattern. When I got it from him, I noticed how much Jay's 1967 Balladeer sounded like my X-brace 1619 CL.
Sometimes you just don't need to mess with things that work |
|
| |
|
Joined:
June 2012
Posts: 2303
Location: Lake Forest, CA | Yep. As I like to say, 'if it works, don't fix it.' |
|
| |
|
Joined:
December 2014
Posts: 1713
Location: Frozen Tundra of Minnesota | SOBeach - 2015-08-22 12:44 PM
Kudos! Ya fixed (saved) it! Thanks for sharing the journey. You, Dan, and all the other daring DIYers help keep us BFLG neophytes educated, entertained and inspired.
+10!!!
Thank You for sharing, I learn so much, and enjoy going along on the journey!!!
Edited by Nancy 2015-08-25 7:21 PM
|
|
| |
|
Joined:
September 2005
Posts: 138
Location: Birmingham, AL | Thanks for all the comments! It's still holding up and still sounds great. I can't wait for Dan to finish his project.
BTW, Nancy, are you still accepting pictures for the '16 calendar? I may have to send you some of my Ovation stuff this weekend.
Edited by clrules 2015-08-26 10:18 PM
|
|
| |
|
Joined:
December 2014
Posts: 1713
Location: Frozen Tundra of Minnesota | clrules - 2015-08-26 10:11 PM
Thanks for all the comments! It's still holding up and still sounds great. I can't wait for Dan to finish his project.
BTW, Nancy, are you still accepting pictures for the '16 calendar? I may have to send you some of my Ovation stuff this weekend.
Oh No, I don't do the Calendar, that is Patch! I think he is still accepting pictures, and this beauty certainly deserves to be in it!!!! You should PM him, and see where to send the pictures!!! |
|
| |
|
Joined:
September 2005
Posts: 138
Location: Birmingham, AL | Sorry about that....I thought it was you. Thanks for the info! |
|
| |
|
Joined:
May 2015
Posts: 186
Location: Glendora, CA | Inspiring!! |
|
| |


