|
|

Joined:
October 2012
Posts: 1018
Location: Yokohama, Japan | So... I won an auction for a 1990 Elite 1868; but because of my own careless biding, I ended up paying more than I had bargained for. The 1868 arrived today with a multitude of issues. I'm hoping that sharing here, might garner some discussion and much needed advice (for me) from the experienced BFLG members. I'm also hoping that documenting this might help others dealing with similar issues. Of course, sending the guitar to the Mini-Mother would be the most wise and obvious choice, but I know the repairs alone would cost more than the guitar not to mention round trip shipping costs from Japan to New Hartford! So...I took off all the hardware to get started... 
This 1868 was dropped some years ago, splitting the bowl from the top. The previous owner attempted to epoxy the top and bowl back together on several occassions leaving an enormous amount of epoxy build up all over the place. I cleaned up the old epoxy build up first, and it looks like I've got my work cut out for me... 
Eventually, the previous owner just stuck this poor thing in her case and left it there for several years. It looks like the string tension has permanently changed the shape of the top. It takes quite a bit of force to push the top back down into position. I'm thinking Z-Poxy will get the adhesive job done, but I'm wondering if I need to flatten the top back down somehow before glueing? 
Another big challenge is the chipped clear coat near the edge of the binding. Once I glue the top back down, I'm going to have to find a way to fill in these cracks. I think thin ZAP CA's capillary action will fill-in the areas of the clear coat that is pulling away from the top, but I think I'm going to need to add some kind of polyurethane filler to fill-up the gapping cracks and holes. A lot of sanding and filling to keep it smooth. It's really interesting how the original clear coat has yellowed like vintage instruments often do. That will obviously be impossible to match. 
Years of neglect in the case made the foam on the manhole cover brittle so I just removed it. I'll need to cut out some foam with the right density to get the manhole cover back into shape... 
One of the really surprising things about this guitar was the seemingly sloppy woodworking inside the guitar. You can see the rough "file-like" grooves in the bracing. I'm wondering if at some point this guitar went through some extensive repairs and the bracing needed to be replaced. It seems odd to me that something like this would come out of the New Hartford factory. 
Here's another apparent woodwork flaw. It looks like the epaulet holes were cut right into the edges of the bracing, strange... 
Notice the messy wiring hole cut into the left side of the bridge slot. It looks like it was manually performed. The soundboard's black paint is showing in portions of the bridge saddle slot. No doubt an attempt to lower the action of the guitar as the top pulled further and further away from the bowl. An attempt to route the bottom of the bridge saddle slot probably failed leaving an uneven surface. I'm debating whether or not to install a new bridge (if they are even available) or not. I can't even imagine how I would go about clamping something like this! 
A small piece of the epaulet cracked off, and was poorly glued back into place. It looks like I'll be able to remove, clean and re-install this piece. That should be relatively easy. Whew... 
The inside of the guitar looks to be in good order, but I noticed that the spruce seems to be covered with some other layer near the epaulets? Notice the change in wood grain...or is that a change in sanding stroke...or something? What is that? 
Here's another shot of the gapping mouth. Keep in mind that the strings are removed! I'm going to need to think through each of these repairs carefully before I get started, and just progress slowly. Is this 1868 beyond hope, or is there still a chance that I might here her sing again? Any advice and/or suggestions from the OFC would be most appreciated and welcome. Thanks!
Edited by arumako 2014-11-16 12:30 PM
| |
| | |
Joined:
June 2012
Posts: 112
Location: Bristol England | Hi Ho Dan Savage. Cue William Tell overture. | |
| | |
Joined:
March 2005
Posts: 2791
Location: Atlanta, GA. | If you can't repair it, any chance of recovering you investment by parting it out?
Neck, tuners, OP pre amp, case, etc. | |
| | |
Joined:
October 2012
Posts: 1018
Location: Yokohama, Japan | cholloway - 2014-11-16 4:31 AM
If you can't repair it, any chance of recovering you investment by parting it out?
Neck, tuners, OP pre amp, case, etc.
Yes, I can. tpa suggested the same on my post in the "General" forum. All the separate parts would more than recover my investment. That really gives me some assurance, and frees my mind up to dive into this project...but oh, so slowly...
And after taking measurements, it's very clear that the bowl was filed down at the butt end of the guitar. That's why it takes a lot of pressure to push the top down to contact the bowl. At it's lowest point, the ring of the bowl that adheres to the sound board has been shaved down by 1 full millimeter. If I can't raise that area back-up to the proper specs, the top will not be flat!
Does anybody know of some good plastic material that will adhere strongly to lyrachord? It looks like I'll need to make a shim to fit between the bowl and the top...
jamesholl's got it right. DanSavage! HELP...
Oh, yeah...I remember DanSavage talking about the different lyrachord bowls...I'd better go back and look at the "1619-4 Rebuild" thread for a refresher course on "O" bowls...here goes nothing!
Edited by arumako 2014-11-17 6:05 AM
| |
| | |

Joined:
December 2003
Posts: 13983
Location: Upper Left USA | If it were on my project shelf...
I would plan a re-topping project. | |
| | |

Joined:
August 2007
Posts: 1008
Location: Tuscany, Italy | I just recognized that pics of your 1868 are here. Forget my request on the other post.....  | |
| | |

Joined:
June 2012
Posts: 2303
Location: Lake Forest, CA | arumako - 2014-11-17 3:57 AM
Does anybody know of some good plastic material that will adhere strongly to lyrachord? It looks like I'll need to make a shim to fit between the bowl and the top...
jamesholl's got it right. DanSavage! HELP...
Oh, yeah...I remember DanSavage talking about the different lyrachord bowls...I'd better go back and look at the "1619-4 Rebuild" thread for a refresher course on "O" bowls...here goes nothing!
Quite an undertaking, Arumako.
Personally, I would not use a 'plastic' as a shim. I would use G10, which is an industrial-grade fiberglass sheet. It comes in different thicknesses. The thinnest G10 I've seen is .08mm. (1/32")
For gluing the G10 to the bowl and top, I would use Loctite Hysol 9462. It's an aerospace-grade epoxy. It glues wood, plastic, fiberglass (epoxy & polyester), metal, etc. It's temperature range is -65° to 250° F and is impact-resistant. It's the strongest glue I've ever used and forms a nearly unbreakable bond.
Remember that Lyrachord is simply the trade name used by Ovation for the fiberglass bowls. The hand-laid bowls are epoxy-based and use woven cloth. The SMC bowls are polyester-based and use fiberglass roving.
To bond either one, you'll need to make a purely mechanical bond since the resin has already fully cured. Chemical bonds with resin can only be made if it is not fully cured. (polymers not fully cross-linked) Once the polymers are cross-linked, then you can only scuff the surface to give the new glue some tooth.
Dan
Edited by DanSavage 2014-11-17 1:21 PM
| |
| | |
Joined:
June 2012
Posts: 2303
Location: Lake Forest, CA | MWoody - 2014-11-17 5:46 AM
If it were on my project shelf...
I would plan a re-topping project.
Yep. If the top requires a lot of pressure to keep it in contact with the kerfing, that might be the best solution in the long run. | |
| | |
Joined:
October 2012
Posts: 1018
Location: Yokohama, Japan | DanSavage - 2014-11-17 3:13 AM
Quite an undertaking, Arumako.
Personally, I would not use a 'plastic' as a shim. I would use G10, which is an industrial-grade fiberglass sheet. It comes in different thicknesses. The thinnest G10 I've seen is .08mm. (1/32")
For gluing the G10 to the bowl and top, I would use Loctite Hysol 9462. It's an aerospace-grade epoxy. It glues wood, plastic, fiberglass (epoxy & polyester), metal, etc. It's temperature range is -65° to 250° F and is impact-resistant. It's the strongest glue I've ever used and forms a nearly unbreakable bond.
Remember that Lyrachord is simply the trade name used by Ovation for the fiberglass bowls. The hand-laid bowls are epoxy-based and use woven cloth. The SMC bowls are polyester-based and use fiberglass roving.
To bond either one, you'll need to make a purely mechanical bond since the resin has already fully cured. Chemical bonds with resin can only be made if it is not fully cured. (polymers not fully cross-linked) Once the polymers are cross-linked, then you can only scuff the surface to give the new glue some tooth.
Dan
Thanks for commenting DanSavage. The wealth of knowledge and experience you bring to every BFLG discussion are just priceless. Reading your comments and analysis always brings perspective and direction that would otherwise be unattainable...which puts you up there in the clouds beyond "Master Luthier" and into the realm of "Luthier-Guru!" 
So, I'll need to take a look to see if any of these materials are available here in Japan. If not, I'll need to have them sent from the States. I am considering the top change that MWoody also suggested, but it looks like I'll first need to restore the SSBs dimensions and verify structural integrity before I worry about the top. I've got a really nice Sakura (Japanese Cherry) wood blank that I'm planning on using when I change the top on my CC54i next summer, but I think spruce or cedar would be more appropriate for this 1868. The only thing that really worries me about changing the top on an Elite (a scenario I'll eventually have to face when I work on my CC54i) is clamping. I'd need to make some jig that will enable me to clamp the top to the bowl, bridge to the top, and neck to the body assembly. When the back is round, it all seems pretty intimidating because there is no "C-clamp friendly" centrally located sound hole!
Right about now, I'm feeling like Pooh-bear, "think, think, think..." 
Edited by arumako 2014-11-17 9:22 PM
| |
| | |
Joined:
November 2002
Posts: 3599
Location: Pacific Northwest Inland Empire | Three words.......surgical rubber tubing. Takes care of the "C-clamp-friendly" issue. Makes everything line up, too. Whether it wants to, or not. | |
| | |
Joined:
October 2012
Posts: 1018
Location: Yokohama, Japan | seesquare - 2014-11-17 1:30 PM
Three words.......surgical rubber tubing. Takes care of the "C-clamp-friendly" issue. Makes everything line up, too. Whether it wants to, or not.
Ah ha, thanks seesquare! I've seen pictures with guitar tops wrapped up in some rubbery looking mess! I never would have guessed - surgical rubber tubing! Very cool! Now this is starting to get interesting. I found out that the Mini-Mother has a new 1868 bridge that I can buy...must be some kind of divine direction or something...
For now, I wrapped my Elite in (not the surgical tubing, but the more common) rubber band, ha! Had a bunch in different sizes just laying around. I know it's a long shot, but I was hoping the banding force my encourage the top to straighten out just a little. In this condition, the neck angle seems to be perfect, but I'll still probably need to perform a very minor neck reset, because the bridge saddle slot was routed too deeply (thank God for bolt on necks).
I think I'll leave her this way until the G10 material arrives. Loctite Hysol 9462 is sold in Japan, but because of its "industrial" designation, they will sell it to businesses and licensed individuals only! I'll need to order it from the States! Anyway, thanks for all the valuable BFLG input! I really appreciate it! Now to source, order and wait for the materials to arrive...patience is a good thing... The rubber bands kind of give my Elite an Eddie Van Halen-ish flair!
Edited by arumako 2014-11-18 9:40 AM
| |
| | |

Joined:
October 2005
Posts: 4025
Location: Utah | A couple of thoughts.
Your current top needs to be significantly changed due to warping and the bowl being trimmed. Wetting the wood might be worth trying, and if it ends up worse, it doesn't matter because it is not usable the way it is now.
Could you cut down the rest of the bowl to match the part which was trimmed? So rather than trying to get some material to stick to the damaged part of the bowl you could instead trim the rest of it down. You'd then have a SSSB.
You may be able to make (or buy from the service department) a suspension ring? The ring does raise the top a small amount compared to the same bowl without the ring. It may be easier to glue the top down to the suspension ring than to the damaged bowl or even to a repaired bowl.
When it comes to gluing the bridge on a new top, you could dry fit the top but don't glue it down yet to the bowl. If the top fits snugly into the bowl it won't move, and you can accurately place the bridge. Once you get it measured and mark the top, remove the top and glue the bridge on. Then you can glue the top to the bowl.
It looks like a big job ahead for you on this one. Good luck! | |
| | |
Joined:
June 2012
Posts: 2303
Location: Lake Forest, CA | Rubber bands work good, too.
You can get G-10 and 9462 online from McMaster-Carr. (mcmaster.com) I'm not sure if they ship to Japan, but it's worth checking.
Loctite adhesives: http://www.mcmaster.com/#high-strength-adhesives/=unexl8
For some jobs, the dispenser gun and mixing nozzles work really well and are worth the money.
G-10: http://www.mcmaster.com/#grade-g-10-phenolic/=uney8h
| |
| | |
Joined:
December 2004
Posts: 553
Location: Denmark | Since the neck seems bolt-on it could make sense trying to disassemble neck/top/bowl. | |
| | |
Joined:
December 2004
Posts: 553
Location: Denmark | Regarding the saddle slot in the bridge being too deep you could also just glue in a piece of wood of suitable quality and thickness to form a new bottom on correct depth. Then you will not risk the top finish in trying to remove the old bridge.
If you find a glue/surface preparation that will stick to the inner side of the bowl you can make a new surface to glue the top to by making a kerfing based on a profile that matches the shallow cowl and the top. This will be easier if the top can be removed, but this removel has other challenges.
http://jcclarkukuleles.wordpress.com/my-guitarmaker-articles/making...
Edited by tpa 2014-11-18 2:07 PM
| |
| | |
Joined:
November 2002
Posts: 3599
Location: Pacific Northwest Inland Empire | That's an excellent suggestion, tpa! Glue in the kerfing strips, to the original bowl/top specs, and glue a new top to the "raised" kerfing, then route a-bit-wider binding channel, glue on the new binding, & "nobody's-the-wiser"!
As they say, "Run it up the flagpole, & see who salutes"
Best of luck there, arumako. Our collective opinion, & a dollar, may get you some cheap glue!! | |
| | |
Joined:
October 2012
Posts: 1018
Location: Yokohama, Japan | seesquare - 2014-11-18 4:34 AM
...Best of luck there, arumako. Our collective opinion, & a dollar, may get you some cheap glue!!
Thanks seesquare, and everybody else for the valuable input! It's all going to get me more than cheap glue! It's going to get me a restored 1868 Elite! I really like the wood kerfing idea! That should be pretty easy to make. The only issue (for me, anyway) will be to make sure the kerfing adhere's to the bowl and top adequately. I'll definitely need to get the hysol 9462 (thanks for the link DanSavage). But I also like the idea of the suspension ring. I think I'm going to see if the Mini-Mother has one available that they can send along with the bridge.
One of the advantages of the neglect that this guitar has gone through is that the original epoxy has become quite brittle. With a sharp chisel, the epoxy is just flaking off. That probably means that the guitar is really in need of a sound board upgrade with fresh adhesives, and the sound board should be pretty easy to take off. Removing the neck and top make it easier to repair the bowl; and if I get a suspension ring, I'll need to take the top off anyway.
Taking the top off will also give me the opportunity to see if the top will flatten out. I can sandwich the top between some flat aluminum sheets - applying steady heat and some humidity should flatten out the top real nicely. If not, bear claw spruce? This is getting interesting...thanks again for all the valuable advice!
Edited by arumako 2014-11-19 10:29 AM
| |
| | |
Joined:
August 2007
Posts: 1008
Location: Tuscany, Italy | Dan, is this the adhesive you are talking about ...?
http://www.ebay.it/itm/Loctite-Hysol-9462-Aeropoxy-/321436112051?pt... | |
| | |
Joined:
June 2012
Posts: 2303
Location: Lake Forest, CA | maremagnum - 2014-11-19 9:51 AM
Dan, is this the adhesive you are talking about ...?
http://www.ebay.it/itm/Loctite-Hysol-9462-Aeropoxy-/321436112051?pt=UK_ToysGames_RadioControlled_JN&hash=item4ad715d4b3
Yep. That's the one.
I forgot that to use it you do need to dispenser gun, or at least a 1.69ml 1:1 plunger to squeeze the glue out of the tubes.
See:
http://www.mcmaster.com/#high-strength-adhesives/=unyuof
http://www.mcmaster.com/#74695a71/=unyuazThe mixer nozzles aren't necessary unless you're intending to lay out a long bead of adhesive. If you do decide to get some mixer nozzles, make sure they're the long nozzles as the short nozzles don't adequately mix the two parts of the epoxy.
Edited by DanSavage 2014-11-19 1:22 PM
| |
| | |
Joined:
October 2012
Posts: 1018
Location: Yokohama, Japan | I had a day off today, and made some progress on disassembling my 1868 Elite... found some interesting things as I progressed. 
I love these bolt on necks. This one came off clean and easy, BUT...notice the masking tape, strange. The top has markings on it that said 1868-5. The soundboard was much thicker than I expected, about 3mm! I also noticed that there is another layer of wood under the spruce. Are all Elite's made that way? 
Lots of glue under the neck, and on the body where the fingerboard meets the soundboard, but I should be able to clean this up and get it to adhere to the top when I reassemble her. 
Whoever worked on this guitar messed up the bridge pretty badly...routed right through the bridge and... 
Lots of epoxy to fill in the over routed bridge saddle slot. The router went through the black paint and into the spruce top in some spots...cringe factor! But, JB at the Mini Mother sent me a new walnut bridge saddle (he is just the nicest guy), so if I fill in the over routed area with epoxy or CA glue, I should be able to just glue the new bridge into place with out much fuss! 
The top came off really clean too! The epoxy has become very brittle over the years making removal a slow, but simple task. I might even be able to re-use it...only... 
Now that the top is completely off of the bowl, the whole thing is concave! Weird! I was also wondering about an extra layer of wood that is apparently under the epaulets as shown in the next picture. 
Are the Elite soundboards laminated under the epaulet area? The wood was very soft and I had to work really slowly to get this part off clean. You can tell by the change in the wood grain and color. Is this standard Elite design? 
Finally, the bowl...the bowl is in good shape, but looking at the epoxy residue on the bowl. It is pretty clear to me that the top and bowl had flatness and fitting problems. I don't know if it was a factory issue or a failed restoration, or what, but when I measured the epoxy thickness between the bowl and the soundboard, there were variation in epoxy thickness. In some places the epoxy was 2mm thick, in other places it was too thin to measure. I know Ovations were notorious for the amount of epoxy used to adhere the bowl to the soundboard, but was this kind of variance seen in a lot of Ovation assemblies? In any case, I'm really glad I was able to make some progress on this project. As usual, I sure would appreciate your comments and analysis. Oh yeah, as I was heating the bridge, the finish on my Elite bubbled up in a really small area around the bridge. It looks like if I heat the whole top, the paint will just peel right off, so if removing the paint will help the top flatten out, I might re-use the top and re-finish the whole thing! This is getting exciting!
Edited by arumako 2014-11-24 9:00 AM
| |
| | |
Joined:
October 2005
Posts: 4025
Location: Utah | Looking good so far! I am impressed you were able to disassemble it without damage. | |
| | |
Joined:
March 2005
Posts: 12750
Location: Boise, Idaho | Nice work! Regarding the extra piece of wood under the epaulets, I only know that the earliest Elites, the 1537s, had that extra piece of wood there. I don't know how long they continued doing that. | |
| | |
Joined:
December 2004
Posts: 553
Location: Denmark | arumako - 2014-11-24 8:51 AM
Lots of glue under the neck, and on the body where the fingerboard meets the soundboard, but I should be able to clean this up and get it to adhere to the top when I reassemble her ... The top came off really clean too! The epoxy has become very brittle over the years making removal a slow, but simple task....
Somewhere I read that on the (older?) Adamas guitars this overlapping fretbord end was not fixed to the soundbord, but on cut-away guitars this part of the soundboard is probably relatively dead soundwise anyway. Regarding the brittleness - I suppose that there diferences in the long-term degradation of properties depending on type and brand. I am no specialist but I have the impression that short term properties are normally considered better for the slow and/or elevated temperature curing types.
I follow the work of You and DanSavage with admiration, pleasure and interest. Thank you for sharing.
http://en.wikipedia.org/wiki/Phoenix_%28mythology%29
Edited by tpa 2014-11-24 11:18 AM
| |
| | |
Joined:
March 2005
Posts: 12750
Location: Boise, Idaho | tpa is right, but the "floating fretboard" was also used on the first of the Elites. I don't know how long they continued to do that, either. When I saw the pictures with all the glue under the end of the fretboard, I thought someone might have tried to glue it down, thinking that it had pulled up. We've seen several examples of people trying to fix that on old Elites when it wasn't really broken. On the old ones, there should be a slight gap, probably credit card thickness. | |
| | |

Joined:
September 2006
Posts: 10777
Location: Keepin' It Weird in Portland, OR | "Are the Elite soundboards laminated under the epaulet area?"
My 1735 is like that also...

| |
| | |
Joined:
June 2012
Posts: 2303
Location: Lake Forest, CA | The doubler(s) on my 2078TX-5 is only under the immediate area around the epaulet holes. This may be because the neck is glued on and doesn't need to be self-supporting like the bolt-on neck models. 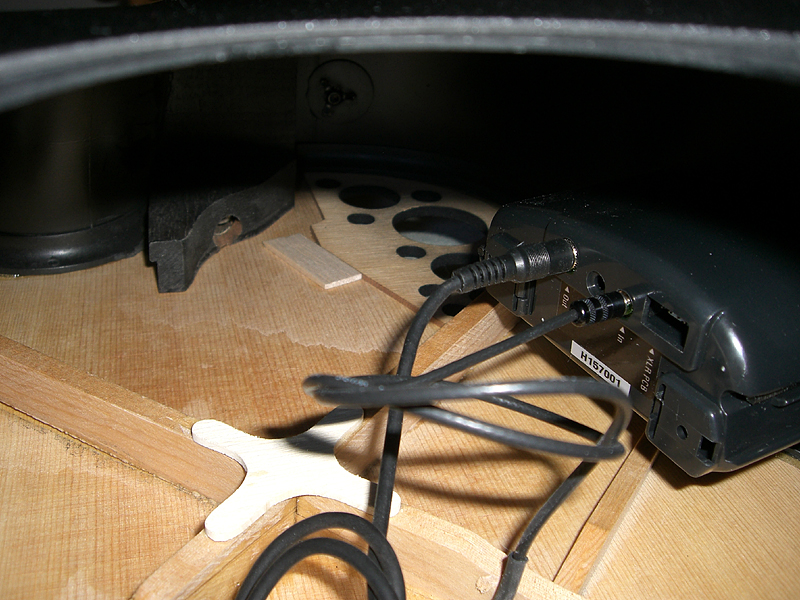
Edited by DanSavage 2014-11-24 1:37 PM
| |
| | |
Joined:
June 2012
Posts: 2303
Location: Lake Forest, CA | arumako - 2014-11-24 6:51 AM I had a day off today, and made some progress on disassembling my 1868 Elite... found some interesting things as I progressed. Whoa! You don't waste much time, do you? (heh heh heh...)
The masking tape was probably a shim to make the neck fit right.
The routed bridge saddle slot was probably an attempt to lower the saddle height in response to the change in neck geometry that was raising the height of the action. This solution is not uncommon.
Personally, I would not attempt to re-use the old top. Besides being old and warped, it will be difficult to get it aligned which will make it harder to put in new purfling and binding.
I would guess that the excess epoxy on the kerfing was a result of a botched restoration rather than something done at the factory. The amount of epoxy between the top wood and kerfing has been pretty consistent on all three of the guitars I've got in my shop.
The US factory wasn't shy about using a lot of glue, which translated into excessive amounts of squeeze-out. But the actual glue joint thickness has been fairly consistent.
In contrast, the Chinese always seem to pay bonuses to their workers based on how little glue they use. The inside of my 2078TX-5 has little to no squeeze-out along the edge of the kerfing and binding. When I was building/flying model airplanes, this as a running joke. One of the things that always needed attention first was to reinforce the glue joints. Otherwise the model could and often did, disassemble itself in the air.
Like I say, personally, I would just plan to re-top the guitar using fresh wood and save the old top for reference for bracing & epaulet hole size/location.
Edited by DanSavage 2014-11-24 1:56 PM
| |
| | |
Joined:
August 2007
Posts: 1008
Location: Tuscany, Italy | I think all guitars with epaulettes have the area around the sound port reinforced. My elite (single epaulet) has the reinforcement.....just saying... | |
| | |
Joined:
October 2012
Posts: 1018
Location: Yokohama, Japan | tpa - 2014-11-24 1:17 AM
Somewhere I read that on the (older?) Adamas guitars this overlapping fretbord end was not fixed to the soundbord, but on cut-away guitars this part of the soundboard is probably relatively dead soundwise anyway. Regarding the brittleness - I suppose that there diferences in the long-term degradation of properties depending on type and brand. I am no specialist but I have the impression that short term properties are normally considered better for the slow and/or elevated temperature curing types.
I follow the work of You and DanSavage with admiration, pleasure and interest. Thank you for sharing.
Thanks for the kind comment tpa, I really appreciate all the input and encouragement. After reading your post and Mark in Boise's post...
Mark in Boise - 2014-11-24 2:52 AM
tpa is right, but the "floating fretboard" was also used on the first of the Elites. I don't know how long they continued to do that, either. When I saw the pictures with all the glue under the end of the fretboard, I thought someone might have tried to glue it down, thinking that it had pulled up. We've seen several examples of people trying to fix that on old Elites when it wasn't really broken. On the old ones, there should be a slight gap, probably credit card thickness.
...I'm beginning to think that this might have been a floating fret board Elite. It's a 1990 model. I wonder if they made the 1868s that way back in those days? Looking at the glue under the neck and on the body, it certainly looks like the glue was added later. I need to try to learn more about the original condition of this guitar. If it was a floating fret board, then I would sure like to restore it to that condition, as those are probably few and far between now...
On closer inspection, I can see that this was a botched up re-gluing of a soundboard that was peeling away from the body. Some of the braces were also re-glued or replaced; hence the messy wood work in several areas. Who ever replaced and re-glued the braces used a glue that dries white...as in Elmers? Holy molly I hope I am wrong about that assessment! I placed the bowl on a perfectly flat surface and the flatness of the top of the bowl is way-off. It's been filed down by the butt end and the two sides of the bowl. So I can either take everything down a bit or build the butt end and sides up a bit. JB at the Mini-Mother seems to think that rebuilding the filed down areas of the bowl with epoxy (may not be the best solution, but) should be structurally sound.
And thanks for all the comments regarding the reinforcement under the epaulets. Especially OMA and DanSavage for looking under the hood of their 1735 and 2078TX-5 respectively. I took a look at my iDea and it also has a reinforcement that is only applied directly under the 3 oval sound holes. OMAs 1735 looks closest to my 1868 and as marenostrum says, apparently all Elite style guitars have reinforcements under the epaulets...very interesting. The reinforcement on my 1868 is super soft. If I didn't know any better, I'd say it was some kind of balsa wood...I'm sure my assessment there is definitely off, but I had to go really really slow removing that section from the bowl because the wood was so soft...
So at this point, I'm thinking I want to keep the guitar in as original condition as possible. I'm planning on rebuilding the sides of the bowl with G10 and Hysol 9462. Get a nice flat surface on the bowl. For the top, I'm going to heat the polyurethane finish, scrape it off nicely and see if it returns the top to a flat state. If it does, I think I'm going to re-use the top and return it to as original a condition as possible. If not, I'll have to take the re-top route which will obviously be the best way to completely revive this beauty.
By the way, if this is a floating fret board Elite, I'm assuming I need to bolt and glue the heel of the neck to the bowl. There's a very thin residue of glue on the heel of the neck where the Kaman bar meets the body. The adhesive would have to work on aluminum, wood and fiberglass. Does anybody know what kind of glue is used for that? Perhaps CA glue?
I sure do appreciate your input OFC! Domo Arigato Gozaimasu! | |
| | |
Joined:
December 2003
Posts: 1889
Location: Central Massachusetts | DanSavage - 2014-11-24 2:35 PM
The doubler(s) on my 2078TX-5 is only under the immediate area around the epaulet holes. This may be because the neck is glued on and doesn't need to be self-supporting like the bolt-on neck models.
Dan, is that a loose brace there on the left of this pic? | |
| | |
Joined:
June 2012
Posts: 2303
Location: Lake Forest, CA | dvd - 2014-11-25 6:54 AM
Dan, is that a loose brace there on the left of this pic?
Good eye. It was loose at the time I took the pic. Afterward I went in and glued it down. That was my first ever Ovation repair. 
The back story is that I bought the husk off ebay. It was a factory reject that didn't have any hardware. So, I bought the hardware and put it together. I liked the sound, but the low E and A had a dead tone. I took the pics of the inside because there was some discussion about the imported guitars having top wood that was twice as thick as the US of the same model. After taking the pics I saw that the brace looked loose, so I went back in and sure enough, it had popped loose. So, I used some medium CA to glue the brace back down and the dead tone of the E and A strings went away. I also cleaned up some of the squeeze-out on the other braces and it improved the overall tone of the guitar.
The guitar still sounded stiff, so I bought a PrimeVibe and used it on this guitar and it really loosened up the top and improved the sustain and depth of the sound, especially the bass. | |
| | |
Joined:
June 2012
Posts: 2303
Location: Lake Forest, CA | Hi Arumako,
I don't think yours has a floating fretboard. Someone (OMA?) posted pics of one of his Elites with a floating fretboard a while ago after he'd taken off the neck and there's a pocket in the top and the fretboard extension sits on an extended support block that extends almost to the end of the fretboard extension. I don't see either one on your guitar. There's an article in Guitar Player magazine from 2005 that talks about it and the other new features of the LX series guitars. (See: Ovation LX Series) Edit: I found a thread here on OFC that shows the floating fretboard. See: Tension Rod question
Elmer's glue dries clear or slightly translucent, so if the glue you're seeing on the braces is white, it's probably some sort of epoxy, like Hysol or possibly, polyurethane glue like Gorilla Glue.
I agree. I would use G-10 and Hysol to build up the sides of the bowl rather than try to take the high spots down. These two materials will give you something that's as strong and stable as the original material used. I think trying to take the sides down will be pretty difficult and will cause other problems, such as too big of a gap where the fretboard joins the top. Also, lowering the top will, in effect, raise the neck, which will also raise the action.
In looking at the pics of the cross-grain reinforcement, I don't think it's balsa. Balsa, like spruce, has a tight grain structure. The cross-grain wood looks to me like either basswood or maybe soft pine. One way to check if it's balsa is to try to make a splinter of a piece of it and see if it wants to pierce your skin. (gently, please... LOL!) Balsa is used in the entertainment industry for visual effects exposions because it won't splinter and break the skin like pine, etc.
You don't want to glue the heel to the body. Bolting it is plenty strong. If someone tried to glue the heel to the body, then they didn't know what they were doing. Hysol 9462 will bond all of those materials, but like I say, you don't want to glue the heel. The only part that should be glued is the fretboard extension to the top and even then, you only want to apply a thin bead around the edge to keep it stable. If you leave it unglued, the strings will have a dead sound when you fret them above the 14th fret.
Dan
Edited by DanSavage 2014-11-25 12:25 PM
| |
| | |
Joined:
May 2008
Posts: 1553
Location: Indiana | Enjoying watching your progress, arumako.
Regarding the bridge routing, I have two guitars that came from the mothership routed through to the top. One from the 80's, one from the early 90's.
Keep up the good work! | |
| | |
Joined:
October 2012
Posts: 1018
Location: Yokohama, Japan | Jonmark Stone - 2014-11-25 2:40 AM
Enjoying watching your progress, arumako.
Regarding the bridge routing, I have two guitars that came from the mothership routed through to the top. One from the 80's, one from the early 90's.
Keep up the good work!
Thanks for the kind comments Jonmark Stone. I'm surprised to hear that the Mothership actually routes into the top! But I guess in so many vintage O restorations, the only other option is a "bowl bend" like DanSavage is doing with the "1967 Balladeer Rebuild". That seems pretty risky! I am learning a ton about guitar rebuilds from the OFC, and I am just glad to share my journey! Please pray that I won't end up tanking this beauty in the trash. The more hours I put into it, the more I want to save her!
DanSavage - 2014-11-25 2:20 AM
Hi Arumako,
I don't think yours has a floating fretboard...
...In looking at the pics of the cross-grain reinforcement, I don't think it's balsa... Balsa, like spruce, has a tight grain structure. The cross-grain wood looks to me like either basswood or maybe soft pine. One way to check if it's balsa is to try to make a splinter of a piece of it and see if it wants to pierce your skin. (gently, please... LOL!)...
...You don't want to glue the heel to the body. Bolting it is plenty strong. If someone tried to glue the heel to the body, then they didn't know what they were doing...
Dan
Thanks for the heads up and links to the thread with the floating fretboard pics! You saved me from making a huge mistake! Like an idiot, I would have glued the heel to the bowl with a credit card thick gap between the fretboard and soundboard, and wondered why my fretboard keeps bending and hitting the soundboard everytime I play on the higher frets! Doh!
Balsa or pine? Ouch! PINE...pass the bandaid please...(so thankful that this 1868's well-being is NOT dependent on my observation skills!)
Yup, someone tried to glue the heel! And the comment thereafter, kind of "sums up" the jist of the condition of this guitar!
However, I am not going to give up yet! If you are not used to seeing guitar carnage, the next few pictures may not be for you. Don't say that I didn't warn ya!
So, I wanted to see how far I could go to salvage this top. She was bone dry and curling up at the sides, and I wanted to learn what it would take to re-finish an O...you know, just in case... so I took out my iron and heated up the polyurethane finish, and boy did she peel off easily!
It actually took a pretty long time to do, but the work was actually pretty easy...just needed patience. And the next pic might just make you want to kill me! 
I know, I know, "O-Abuser"...please forgive me! So since she was bone dry and curling up at the sides, I decided to put her in an 80% humidity room. She's been there for 12 hours and... 
She's flattening out! Whoa Cool! But alas, I've decided to take everybody's advice and go with a top change. One more dry spell and this top is going to crack like so many acoustic tops do... My daughter made me promise to re-store this to the original black condition. She really likes the 1868 "-5" finish, and seems to be intent on using this guitar when I'm done so... The original 1868-5 specs say the soundboard is made from AA Spruce. So, I checked out Stewmac's website and dreadnought size AA Spruce is going for a mind-boggling 20 bucks! No wonder why you all were saying, "Swap the top!" I must say, I am learning so much from this project, and I am just addicted to guitar restoration! I thought GAS was the abyss, but the BFLG is the abyss within the abyss!
Edited by arumako 2014-11-26 4:47 AM
| |
| | |
Joined:
October 2005
Posts: 4025
Location: Utah | Do you have a source of tone wood nearby? I've seen videos of people tap testing wood to find the piece with the nicest sound when tapped. Some pieces sound dull, others have a clear resonance. StewMac is a good source, I'm just wondering if you can do better. | |
| | |
Joined:
June 2012
Posts: 2303
Location: Lake Forest, CA | Howdy!
That's one of the great things about working on guitars, with a few exceptions, nothing is permanent. Most mistakes can be fixed, albeit with a certain amount of effort.
When I was gathering materials for my 1619, I bought Stewmac's cheap sound board to practice on. It's actually pretty nice wood, with good tap tones.
What I've learned about grading is that it has more to do with appearance than with acoustic qualities. The higher grades have grain that is tighter, straighter and is evenly spaced across the entire piece.
If you're going to paint your black, then you may as well get the cheap wood. In fact, if you're going to buy the cheap wood, order two sets while you're at it. This will give you something to practice on.
Here's a good site that shows step-by-step guitar building. While a lot of it is about building a wood box, the parts about joining the top wood, making and gluing the braces are applicable to the job at hand. (See: Hoffman Guitar Building) Keep up the good work! Dan | |
| | |
Joined:
October 2012
Posts: 1018
Location: Yokohama, Japan | DanSavage - 2014-11-26 2:01 AM Howdy!
That's one of the great things about working on guitars, with a few exceptions, nothing is permanent. Most mistakes can be fixed, albeit with a certain amount of effort.
When I was gathering materials for my 1619, I bought Stewmac's cheap sound board to practice on. It's actually pretty nice wood, with good tap tones.
What I've learned about grading is that it has more to do with appearance than with acoustic qualities. The higher grades have grain that is tighter, straighter and is evenly spaced across the entire piece.
If you're going to paint your black, then you may as well get the cheap wood. In fact, if you're going to buy the cheap wood, order two sets while you're at it. This will give you something to practice on.
Here's a good site that shows step-by-step guitar building. While a lot of it is about building a wood box, the parts about joining the top wood, making and gluing the braces are applicable to the job at hand. (See: Hoffman Guitar Building) Keep up the good work! Dan Thanks a bunch DanSavage. I will definitely get two sets of the AA Spruce StewMac soundboards to practice on. Actually, I was thinking of trying out the bearclaw spruce that you used on the 1619, or redwood (like Patch's or DVD's) beauties. The exotic woods are very tempting, but my daughter was unusually insistent; and this being my first complete guitar top build, I figured, I'd better take the conservative approach, and try more exotic stuff as I build experience! @FlySig, yup, two tone wood suppliers around here. Gave them a call and found out they get their stuff from, guess who...? StewMac, and their imported AA spruce tops are 4 times the price! Ouch! I haven't read any bad reviews on those AA spruce tops; so I think, I'm going to go ahead and take the plunge. Now, to order all the parts and wait...I'm hoping to finish the project before the year is out... Anyway, thanks for all the valuable advice! I pray a very happy Thanksgiving for all of the BFLG and OFC folks out there! | |
| | |
Joined:
June 2012
Posts: 2303
Location: Lake Forest, CA | You're welcome.
The bearclaw (BCS) did sound different from the AA during tap tests. The BCS had a slightly sharper tone and was slightly less resonant. The AA was slightly lower in pitch and had just a little more resonance. IMO, either one would make a nice-sounding guitar.
I've never heard what a redwood guitar sounds like, so I'll let Patch chime in. (pun, intended)
In all fairness to your local suppliers, they need to make a profit, so it makes sense that they would roll the shipping costs and a mark-up into their wood prices. I'm not sure I'd be willing to pay $80/set unless I was unable to get it anywhere else.
Thanks and you're very welcome. I enjoy watching and reading about your progress. Happy Un-Thanksgiving to you, too. | |
| | |
Joined:
October 2012
Posts: 1018
Location: Yokohama, Japan | Getting all excited after seeing DanSavages 1967 Balladeer Rebuild, just awesome... but it has become apparent, that I won't be able to get Hysol 9462 here in Japan (although it is available, licensing is required as it is categorized as an industrial grade adhesive). Bummer... Instead of using some less effective substitute I thought I'd better wait for opportunity to strike, and it looks like I'll be in the States for a week at the end of the August! So, I can buy it and ship it to myself. Cool!
On another note regarding the bowl repair, a friend of mine who builds surf boards suggested that I repair the bowl using resin and fiberglass sheets. It sounds possible if I building a dam around the kerfing to make sure the resin stayed where it needs too. Cut the fiberglass sheets into thin slices and build up the entire kerfing area and sand down to flatness... It sounds like it would be trickier than fixing the back of the bowl like in DanSavage's 1619-4 Rebuild, but I wonder if the fiberglass/resin will adhere to the bowl. Since it is the kerfing, the newly applied fiberglass resin layer will need to withstand quite a bit of force. Using G10 will no doubt be easier, but... hmmm, decisions, decisions... | |
| | |
Joined:
October 2012
Posts: 1018
Location: Yokohama, Japan | FlySig - 2014-11-18 12:30 AM
Your current top needs to be significantly changed due to warping and the bowl being trimmed. Wetting the wood might be worth trying, and if it ends up worse, it doesn't matter because it is not usable the way it is now.
This 1868 project has been sitting on the shelf for quite a while. Just waiting for some open time to dig into it, but the other day, as I walked by the sound board that was leaning against the wall in front of my work desk, I spilled a cup of water that splashed all over the soundboard! I wiped off the sound board, and left it where it was; then to my great surprise, the next day, the board was slightly flatter than it was the day before. So I went back and read through this post again, and saw FlySig's comment about "wetting" the wood.
I also did some research on how wood workers flatten veneers, and I decided to give this warped sound board one more try! A slightly wet rag was used to wipe on the moisture, and after a few minutes I could tell the surface was softening up a bit...Cool!
I also wet the back a bit and put the sound board between some weights... 
I learned that the paper towel and air pockets above and below the weighed down sound board was essential to ensure the wood dried out sufficiently. Since this top is now 26 years-old, I suspect it might be a little like DanSavage's torrefied tops. The thing is the top came out completely flat! So, since I had nothing to lose, I sanded the black residue from the top of the sound board as best I can, and used some Japanese Calligraphy ink called "sumi" (which is filled with minerals) to see if I can get a bit of a black wash effect on the sound board... 
If I darken the edges with a solid black color , add the standard epis and clear coat it with polyurethane, this might turn out kinda nice! The neat thing is, now that the top is flat, it seems to fit the bowl much better than before! My daughter originally wanted this guitar when it was fixed, and asked that it stay black, but the long wait seems to have waned her interest; so I kinda have my sights set on a blackwash finish. Anyway, a little mishap has steered this 1868 Project in an interesting direction. Being a 26 year vintage, the sound board has excellent tap tone, and would certainly be worth re-using! Need to experiment more on blank wood to find the right black washing technique. Thanks for the tip FlySig!
Edited by arumako 2016-05-01 8:33 AM
| |
| | |
Joined:
June 2012
Posts: 2303
Location: Lake Forest, CA | arumako - 2016-05-01 6:24 AM
I spilled a cup of water that splashed all over the soundboard! I wiped off the sound board, and left it where it was; then to my great surprise, the next day, the board was slightly flatter than it was the day before. So I went back and read through this post again, and saw FlySig's comment about "wetting" the wood.
I also did some research on how wood workers flatten veneers, and I decided to give this warped sound board one more try! A slightly wet rag was used to wipe on the moisture, and after a few minutes I could tell the surface was softening up a bit...Cool!
The thing is the top came out completely flat! So, since I had nothing to lose, I sanded the black residue from the top of the sound board as best I can, and used some Japanese Calligraphy ink called "sumi" (which is filled with minerals) to see if I can get a bit of a black wash effect on the sound board...
If I darken the edges with a solid black color , add the standard epis and clear coat it with polyurethane, this might turn out kinda nice! The neat thing is, now that the top is flat, it seems to fit the bowl much better than before! My daughter originally wanted this guitar when it was fixed, and asked that it stay black, but the long wait seems to have waned her interest; so I kinda have my sights set on a blackwash finish. Anyway, a little mishap has steered this 1868 Project in an interesting direction. Being a 26 year vintage, the sound board has excellent tap tone, and would certainly be worth re-using! Need to experiment more on blank wood to find the right black washing technique.
It's nice to see this project back on the move again.
WRT to wetting wood, when I was building models and the rounded fuselage needed a fully-sheeting surface, I used to wet the outside of the balsa, which caused it to both soften slightly, and swell on only one side, which warped it in the direction I needed for it to fit on the curved surface. I glued the wood to the framework while it was still wet, then let it dry.
If you want to check what the finish will look like after the clear coat is applied, spray or wipe naptha (white gas - Coleman camp fuel) on the bare wood. It does a good job of simulating the look of the finished wood without any permanent sealing. It evaporates after a few minutes leaving no residue. You could do the same thing with denatured alcohol, but that contains water which might cause the top wood to warp again.
| |
| | |
Joined:
October 2012
Posts: 1018
Location: Yokohama, Japan | DanSavage - 2016-05-01 4:05 AM
It's nice to see this project back on the move again.
WRT to wetting wood, when I was building models and the rounded fuselage needed a fully-sheeting surface, I used to wet the outside of the balsa, which caused it to both soften slightly, and swell on only one side, which warped it in the direction I needed for it to fit on the curved surface. I glued the wood to the framework while it was still wet, then let it dry.
If you want to check what the finish will look like after the clear coat is applied, spray or wipe naptha (white gas - Coleman camp fuel) on the bare wood. It does a good job of simulating the look of the finished wood without any permanent sealing. It evaporates after a few minutes leaving no residue. You could do the same thing with denatured alcohol, but that contains water which might cause the top wood to warp again.
Thanks Dan! Again, being totally inspired by your 1113 Project, and in the process of doing some homework for my CC54i iDea Project (meaning balsa!), I decided to devote a few minutes to my 1868.
It's amazing how much these sound boards respond to humidity. Like Dan said, adding water on the top of the sound board, expands the top and the sound board curls up (convex shape). Adding water to the bottom (between the braces) expands the bottom and the sound board curls downward (concave shape). Very interesting! I wet both and it flattens out completely! But after drying out again, there is still a bit of a curl downward (concave). By the way, I had to be really careful to make sure the epoxy holding the braces didn't get wet (could loosen up the bracing causing it to pop-off later after re-assembly).
But to my great surprise, once the top flattened out, the bowl fit the top nearly perfectly! Raising the kerfing in certain areas of the bowl is still necessary, but no more than 1mm in only 2 places each having approximately a 3cm span! Cool! So, instead of using G10 or the Black Onyx casting resin, I figured just using extra Hysol 9462 in those areas should be sufficient. WOW! What a relief! Really interesting because this suggests that the bowl changes shape depending on how the top is glued on to the bowl (or drastic changes in weather). I remember Dan mentioning that in one of the other threads.
After the top dries; however, there's still a bit of a concave curl, but nothing severe enough to render the sound board useless. But Elite's are really difficult to clamp for me...whether it be the bridge, the neck or the top...so, I've decided to change the order of assembly a bit. First order of business is to get the bridge glued to the sound board...
No fancy balsa cauls for this 1868, but some shims and pads do nicely when the top is seperate from the bowl. Waited 48 hours and glued the sound board back to the bowl! YES! 
For lack of wisdom intelligence or both, I'm resorting to some strange assembly techniques...a hybrid of rubber bands, clamps, weights and straps... So far, things seem to be lining up really nicely; Since my daughter's lost interest in the color of this guitar (previously demanded the "-5" black finish), I've decided to try some ebonizing using Iron Acetate as a stain (often used when finishing furniture). The batch of iron acetate is about 2-weeks old now, and is a deep red rust color. When applied to the spruce, it should have a deep, deep interesting hue. Wanted the epi's to be under the clear coat; so I'm planning on shallow routes to glue the epi's in place before a final rub on lacquer finish. The routed epi slots need to be completely flat; hence, the sound board was glued to the bowl before installing the epis. A lot of work left, but am very pleased with the progress made in the minimal time spent! Thanks for the inspiration Dan!
Edited by arumako 2016-05-21 12:09 AM
| |
| | |
Joined:
October 2012
Posts: 1018
Location: Yokohama, Japan | And 24 hours later, the Hysol is secure! Now is the time to trim the flashing! After 48 hrs. the glue is very hard and can be difficult to trim... 
Everything is lined-up perfectly! Woohoo! Iron Acetate ebonizing in 24 hours! | |
| | |
Joined:
June 2012
Posts: 2303
Location: Lake Forest, CA | Very cool, Ken. Nice job.
I kind of like the rustic look the top has in that last pic. I also think it looks cool with just the holes sans epaulets.
It would be interesting to see what it looks like under a clear-coat. | |
| | |
Joined:
October 2012
Posts: 1018
Location: Yokohama, Japan | DanSavage - 2016-05-21 2:51 AM
Very cool, Ken. Nice job.
I kind of like the rustic look the top has in that last pic. I also think it looks cool with just the holes sans epaulets.
It would be interesting to see what it looks like under a clear-coat. Thanks Dan! So....this is what ebonized spruce looks like! 
I really like it. As I'm sure most of you all in the BFLG know, ebonizing is basically iron acetate reacting with "tannins" that are naturally found in wood. Spruce is not really known for its tannin content, so treating the wood with super concetrated coffee or tea helps to darken the wood. It gives the wood that nice rustic "faux" look. One of the reasons for returning to the original sound board for this project is the tap tone. The two sets of new AA Sitka that I purchased from Stewmac were actually nice pieces, but the tap tone was just not the same - probably because this sound board from 1990 is 26 years-old and fully seasoned. Maybe similar to Dans torrefied sound boards? However, because the spruce is 26 years-old, there is practically very little tannin content in the wood. For this project I brewed some super concentrated espresso and applied it to the sound board. After the espresso dried, the iron acetate was applied and the reaction was immediate. In the photo above, the sound board is still wet, and it should be a fair representation of what the guitar will look like after the final finish is applied. I'll let the sound board dry out completely for a week or more, then seal the stain before proceeding... Was worried that mixing concentrated espresso with iron acetate (essentially steel wool melted in vinegar) would cause an unbearable odor; but alas, after keeping both in a sealed container for over two weeks, the odor was practically non-existent. Cool!
Edited by arumako 2016-05-22 10:39 AM
| |
| | |
Joined:
February 2013
Posts: 176
Location: Cologne/Germany | Really interesting and amazing, what skilled people are able to do....
Keep it goin'! | |
| | |
Joined:
June 2012
Posts: 2303
Location: Lake Forest, CA | Ken, Thanks for the info about the staining process. It's always good to learn about new techniques. I'll give it a try on some scrap pieces of spruce I've got in the shop. WRT the tap tones of the new wood, keep in mind that until the wood is jointed and thickness sanded you don't really get an idea of how it's going to sound. It changes again once the braces are glued to it. No doubt the older wood is going to sound better than the new wood. But, until you've actually built the top, it's difficult to make a comparison between a fully-built top and bare stock. Re-topping the few guitars I have done has given me a little (and only just a little bit) of insight into how much the tap tone can change as the top building process continues. arumako - 2016-05-22 8:32 AM One of the reasons for returning to the original sound board for this project is the tap tone. The two sets of new AA Sitka that I purchased from Stewmac were actually nice pieces, but the tap tone was just not the same - probably because this sound board from 1990 is 26 years-old and fully seasoned. Maybe similar to Dans torrefied sound boards? | |
| | |
Joined:
October 2014
Posts: 267
| I can see why the tap tone would change as construction continues but, all things being equal, is the best tap tone bare stock just going to get better or is a piece with a poorer initial tap tone going to surpass a piece with better initial tap tone after jointing and adding braces? | |
| | |
Joined:
June 2012
Posts: 2303
Location: Lake Forest, CA | Again, my experience is pretty limited, but from what I've seen so far, tap tones will get better (more resonant, or bell-like) as construction continues.
So, by knowing what the finished piece started off sounding like and how it sounded when completed, it's possible to closely estimate a good piece of bare stock the next time around.
| |
| | |
Joined:
October 2012
Posts: 1018
Location: Yokohama, Japan | Thanks Dan & great question BCam. I'll closely monitor tap-tone changes in the build of each of the two AA Sitka bare stock that I bought. Interestingly enough, they both have different tap tones. This is my first time really even considering "tap-tone"; but it is a mysterious and wonderful component of guitar voicing. One of them will be used to re-top my work horse 12-string, and the other will be used to re-top my Kramer Ferrington fretless bass.
Gives me a deep appreciation for the folks at the Mother Ship who've consistently selected excellent sound board material. Even my 1861 (grade A Sitka) sounds amazing!
DanSavage - 2016-05-22 6:07 AM Ken, Thanks for the info about the staining process. It's always good to learn about new techniques. I'll give it a try on some scrap pieces of spruce I've got in the shop. Thanks for mentioning that Dan, I didn't document the various samples that I practiced on, but it's really important. You could easily spill some iron acetate into the soundhole of the guitar and ruin the label forever. FWIW, I practiced ebonizing on rosewood, spruce, pine and maple BEFORE I took to the 1868! I probably don't need to mention this, but my iron acetate is made from "000" grade steel wool placed in a jar of vinegar. Since, I'm in Japan, I use rice vinegar, but distilled vinegar is probably better for most applications because it is colorless. The chemical reaction between the steel wool and the acids in the vinegar create the acetate, but the reaction requires that the top of the jar be "Unsealed" to allow the gases to release; otherwise...EXPLOSION! I sealed the jar after the reactions settled and waited about two-weeks. Oh yeah, you should also wash your steel wool with unscented plain dish washing soap thoroughly before combining with vinegar. I don't know about the States, but in Japan most brands of steel wool have lots of oil residue. Depending on the wood (tannin content) and the intensity of the stain desired, some folks dilute the acetate with water before application. Some of my sample woods turned deep amber (because of the rust particles and no coffee) while others just turned black...still others hardly changed colors or had different shades of black. Some came out splochy and messy. In any case, experimenting with this stuff is great fun! Here's the top after drying over night... I think I'm going to keep the epis on this 1868, but some variation in binding and purfling might be in order here! Woohoo!
Edited by arumako 2016-05-22 8:41 PM
| |
| | |

Joined:
December 2015
Posts: 287
Location: Katmandu | I find it great that you decided to reinstate the old top again; not a fan at all of the "greywash" though. | |
| | |
Joined:
October 2012
Posts: 1018
Location: Yokohama, Japan | leonardmccoy - 2016-05-22 2:08 PM
I find it great that you decided to reinstate the old top again; not a fan at all of the "greywash" though.
Thanks leonardmccoy! I originally thought wetting and drying the top would just ruin its integrity after a while (like plastic). I'm really glad I did my homework. It would have been a total waste to toss a 26-year old vintage solid Sitka spruce top!
As for the "ebonizing", well I hope the cringe factor is not unbearable for you! By the time I'm done with this thing you may not "be a fan of 'greywash'", but hopefully it won't be at the very bottom of your list of guitar finishes (like the DJ Ashba stuff...oops, I apologize if that's in any of your "fav" category)! Once the epi's are in place and I install the binding and purfling, you "maybe" pleasantly surprised? Of course, for the "natural finish purist" that may never happen, but...I'm just hoping I don't botch this thing up completely somewhere along the line...Lord help me!
Edited by arumako 2016-05-23 6:56 PM
| |
| | |
Joined:
October 2012
Posts: 1018
Location: Yokohama, Japan | Just waiting to apply the sanding sealer, and... 
dreaming of just the right bling... Cream binding with gold (brass)/black/brass trim. Getting closer! | |
| | |
Joined:
June 2012
Posts: 2303
Location: Lake Forest, CA | That's turning out to be a really pretty guitar, Ken. | |
| | |
Joined:
October 2012
Posts: 1018
Location: Yokohama, Japan | Thanks Dan. Been working up the courage to move forward with this project. Since my CC54i iDea Project is on-hold (waiting for some parts to arrive), I decided to get back to work on this Elite. Three coats of sanding sealer brought out the beauty of the ebonized sound board. It also protects the wood and finish from any scratching that might come about from usage of the Dremel plunge router. So, it's time to route the epi slots in the sound board.
The first order of business is alignment. The new epis that Mr. Budny of Mother Ship fame sent me has some nice pre-drilled alignment holes. So to take advantage of these markers, the sound board was covered with pink masking tape, the center of the holes in the sound board were marked with easily visible blue ink. Once the marker holes were aligned with the blue center markers, it was easy to trace the outside of the epis. 
The outside edges of the epis were traced on the masking tape and I used an exacto to cut out the shape of the epis, The process was painstakingly slow... 
After a bunch of dry runs and practice runs... onto routing with my plunge router! The spruce sound board was surprisingly challenging to route. While I routed in the direction "with the grain", the sound board seemed to be softer in some areas and harder in others, interesting. After my first rough cut, I felt a bit relieved... 
Edging the epi holes required a lot of time and concentration! Whew...intense! 
After the final cut, I stuffed some newspaper into the bowl (in case the epoxy spills into the bowl or onto the label) and applied Z-Poxy 30-minute Epoxy into the epi slots routed into the sound board. Put a sheet of saran wrap on top of the epis and weighed the whole thing down and in place! Cool! 
...and now, for the treacherous 48 hour wait! Don't touch the assembly, Ken! Oh, hurry, hurry, hurry!
Edited by arumako 2016-07-18 11:31 AM
| |
| | |

Joined:
September 2012
Posts: 809
Location: Thredbo, NSW, Australia | Wow! I'm looking forward to seeing the weights come off. | |
| | |
Joined:
May 2011
Posts: 751
Location: Muenster/Germany | The special neck joint, the dark guitar top and the idea of inlaid epis are phantastic! Will finally look much better than any original Ovation. I wish my Elite had inlaid epis. too.( I made similar hand-made routings before, it´s really rough going. I decided to value it as worthwhile experience, but spend my time on other things in the future;-) ) | |
| | |
Joined:
October 2012
Posts: 1018
Location: Yokohama, Japan | My goodness, it has been hard to get some time-in "edgewise" to make progress on my 1868! Alas, the weights have come off, and was able to get some preliminary sanding and scraping to prepare for another three to four coats of sanding sealer. No need to worry about the scratches around the epi's, they'll disappear with more sealer coats. Just got everything set-up and ready to go. Needed to make sure the paint wasn't going to get all over the bowl and binding/purfling channels... 
I used the leveler to make sure I was spraying onto a completely flat surface. Needed to make sure the thin coats of sanding sealer wouldn't pile up in corners. It's been a while since I put my airbrush to work. This is for small plastic models and is really not suited for this big of a job, but didn't feel like forkin' out the bucks to get a new one; and this little unit forces me to manage my spraying better, it also uses a "can" compressor! 
After "goin' to school" on Dan's 1617 Rebuild, I decided to use a nitrocellulose lacquer sanding sealer. Was a bit worried about using Japanese products, but it turns out the stuff is really really good (finishes evenly, fills gaps, and finishes very clear). It also dried to the touch in about 5 minutes. Whoa! I wasn't expecting that! Probably because of the thin coats? The neck extension was also cleaned up to prepare for reassembly. 
After three light coats the sealer looked to be in pretty good shape. Gotta stop at this point for today, but the top needs another three coats or so; however, the binding and purfling will need to be installed first, followed by opening up the multiple epi sound holes, then three additional thin coats of sealer, and finally on to the final finish. Planning on staying with a lacquer clear coat. Apparently, the company that makes this sealer makes a killer "clear coat" as well. One interesting note is that the ebonized top looks black under certain lighting and brown under others! Wow, that was also an unexpected result. 
Isn't that just too cool? I'm hoping the final lacquer coat can maintain this feature. Getting closer and closer...don't mess-up, Ken! Please don't mess-up!
Edited by arumako 2016-07-28 8:50 AM
| |
| | |
Joined:
September 2012
Posts: 809
Location: Thredbo, NSW, Australia | This is coming along nicely Ken.
I'm enjoying this rebuild and I'm looking forward to hearing and seeing the final result. | |
| | |
Joined:
October 2012
Posts: 1018
Location: Yokohama, Japan | BanjoJ - 2016-07-29 6:21 AM
This is coming along nicely Ken.
I'm enjoying this rebuild and I'm looking forward to hearing and seeing the final result.
Grateful for your encouraging comments BanjoJ! Applying binding and purfling is a new endeavor for me, so I need to take the next few steps thoughtfully and carefully!
DetlefMichel - 2016-07-18 6:11 PM
The special neck joint, the dark guitar top and the idea of inlaid epis are phantastic! Will finally look much better than any original Ovation. I wish my Elite had inlaid epis. too.( I made similar hand-made routings before, it´s really rough going. I decided to value it as worthwhile experience, but spend my time on other things in the future;-) )
Thanks DetlefMichel! Just to clarify, the special neck joint is for my CC54i Project that I'm currently working on in a parallel thread. For my 1868, the original neck just needs to be cleaned and reinstalled. A dry install tells me the neck angle is perfect as is! As far as the final look goes, I think it's gonna look really good; but as it turns out, I'm pretty much copying the 1984 Collector's Edition. The following pic is none other than Damon67's '84 Collector's (hope you don't mind my borrowing your pic from your website Damon67).
She's magnificent isn't she? There's no way, mines gonna look this nice! But, if I can get mine half as nice, I'll be satisfied. Since, my 1868 originated from the Mother Ship, it's going to sound magnificent, as long as I don't mess up on the re-assembly. The look of the inlaid epis is quite nice. However, for an amateur tinkerer like me, it takes an enormous amount of concentration and time. Your conclusion - "worthwhile experience, but time better spent on other things" - hits the nail on the head! The other factor is the final bling. Messing up on binding and purfling selection could make my 1868 look outright fugly. Can't seem to settle on just the right bling. Wanted to go with something different from the white/orange/white scheme. Currently thinking Maple (wood)/Gold (brass)/Black (pvc)/Gold/Maple. I can order direct from Stemac now, and their shipping costs to Japan are pretty reasonable, so some bling is on the way. Just never really exceled at design and color combinations and stuff, so I'll be consulting my son and daughter for that kind of advice! Again, thanks for the encouragement comments and the suggestions along the way!
Edited by arumako 2016-07-29 5:19 PM
| |
| | |
Joined:
May 2008
Posts: 1553
Location: Indiana | Great job, Ken. | |
| | |
Joined:
October 2012
Posts: 1018
Location: Yokohama, Japan | Thanks Jonmarkstone! Not going to rush it, but I should be done in a week or two! BFLG encouragement is definitely providing the momentum! | |
| | |
Joined:
October 2016
Posts: 13
| Hi arumako, I think I can help with your question about the wood laminate on the underside of the top at the upper bout. While researching Ovation's elite models I came across some info from their 1987 catalog that says this about the elites:
"With its Adamas-derived, Quintad II brace pattern, the top is 0.100" thick overall and constructed from our best grade spruce reinforced with birch veneer in the upper bout for outstanding highs"
Check out the 5th image down at this link. Hope this helps! | |
| | |
Joined:
October 2012
Posts: 1018
Location: Yokohama, Japan | Hi davegardnerp0. Thanks for the link. That's it isn't it! A birch veneer! Cool, and all along I thought it was pine. It's really interesting that the birch veneer helps to accentuate the higher frequencies! Who'd a guessed that? I only have the binding and finishing to complete on this 1868. Unfortunately this project, like all my others are on hold right now. Just dyin' to finish up. Even in the condition she's in, the '90 AA Spruce top has excellent tap tone. Thanks again for finding and sharing that info! | |
| | |
Joined:
October 2012
Posts: 1018
Location: Yokohama, Japan | Well...two and a half years into this project, and still going no where! Was able to squeeze in just enough time to open up the epi's on the sound board; so I thought I'd update this thread... Really glad to have reverted to the original top, but that means the epi holes in the sound board already exist; however, I need to drill the holes in the epi's themselves. Misalignment could be disastrous. Fortunately, I kept the original epi's for reference, and they served perfectly as a hole alignment jig... 
It's very interesting to note that the new epi's from the Mother and the original epi's are slightly different in shape. However, the hole alignments are exact. Had I installed a completely new sound board, I could just drill right through the epi and sound board. However, in this process that would pose a high misalignment risk. I had to approach shaping the epi's in a different way. 
Some guide holes were drilled based on the original epi alignment jig. My trusty Dremel with the small routing bit was called into service. Needed to use slow speeds and work real slow. The bit was placed into the guide hole and rotated into bigger and bigger concentric circles. The cut was really challenging because of the different wood types used in the epis. The light inside the bowl helped me to see the edge of the original epi hole cut in the sound board. To allow for some "room for error", I practiced on the bigger epi holes, and after that I focused on the smaller ones. After some successful practice runs, I jumped into the cutaway epi. 
After verifying consistency in method, I jumped right into the bass side epi's. 
Needed some serious concentration, but the final results were acceptable. Right now, the epi's look more like one of the Asian Celebrity models as the circles are not perfect and will need to be sanded down; however, the results are satisfactory for now. I also found that my clamping method did not fully secure the epi's into their respective sound board cavities. I'll need to fill the very thin gaps with some king of adhesive to ensure there is no buzzing. It'll still be a while before I get this completely finished, but it feels good to get back into the fray after a long hiatus, and the sound board seems to be resonanting quite a bit when I tap it. Can't wait to get this baby done! | |
| | |
Joined:
June 2012
Posts: 2303
Location: Lake Forest, CA | Thanks for the update, Ken.
Looking good. It's getting there. | |
| | |
Joined:
October 2012
Posts: 1018
Location: Yokohama, Japan | Thanks Dan! Nothing like your brother's "Ultimate" Ultra, but I think I'll be able to finish her up in the summer (famous last words!). I decided to simplify and put aside the nice exotic wood bindings (save those for when I'm a bit more experienced with this stuff) and ordered some standard plastic ones - they'll arrive tomorrow. As I was verifying the neck alignment, I noticed the frets really need some attention; so I've been wanting to try some Warwick brass alloy frets that I got awhile back (alternative for EVO Golds??? - worried about that green discoloration). I heard they add some interesting timbre to the guitars voice.
Thanks to you and the OFC, my fret work is done "in-house" now (saves a lot of mulla), and I'm really itching to get this thing done. Not even close to the quality of your work, but I'm kinda feeling like your on-line apprentice by correspondence! | |
| | |
Joined:
October 2012
Posts: 1018
Location: Yokohama, Japan | ...Well, I couldn't stop workin' on this thing (yeah, it's gonna come back at me in spades!) Oh well...took the frets off; and although fret wear was not bad at all, some frets were popping out of the slot, and the Warwick brass frets look pretty neat... 
One thing that seems kind of odd is how the rosewood grains on the fret board are standing up...like it got too much moisture at one point. It looks almost like some oil was rubbed into the fret board... Anyway, this fret board is going to be leveled down to a 20" radius before the refret. The Warwicks are not as shiny as the EVO Golds. It's gonna be interesting how these frets affect the tone of this guitar; of course, having never been in playable condition, I have nothing to compare it to...Lol. | |
| | |
Joined:
September 2012
Posts: 809
Location: Thredbo, NSW, Australia | Nice work Ken. The new epis look great!
The fretboard will come up nicely I'm sure. | |
| | |
Joined:
June 2012
Posts: 2303
Location: Lake Forest, CA | arumako - 2017-05-02 7:06 PM
Thanks Dan! Nothing like your brother's "Ultimate" Ultra, but I think I'll be able to finish her up in the summer (famous last words!). I decided to simplify and put aside the nice exotic wood bindings (save those for when I'm a bit more experienced with this stuff) and ordered some standard plastic ones - they'll arrive tomorrow. As I was verifying the neck alignment, I noticed the frets really need some attention; so I've been wanting to try some Warwick brass alloy frets that I got awhile back (alternative for EVO Golds??? - worried about that green discoloration). I heard they add some interesting timbre to the guitars voice.
Thanks to you and the OFC, my fret work is done "in-house" now (saves a lot of mulla), and I'm really itching to get this thing done. Not even close to the quality of your work, but I'm kinda feeling like your on-line apprentice by correspondence!
Thanks for the kind words, Ken.
I've read some good things about the Warwick bell brass frets. I think the green discoloration is simply tarnishing of the surface which will go away when you dress the frets.
Plus, working on my own guitar gives me a sense of pride to be able to say that I did such and such work myself, and now I'm able to enjoy the fruits of my labors. I got the same enjoyment from designing/building and then flying the models I designed and built.
Thanks again.
Dan | |
| | |
Joined:
June 2012
Posts: 2303
Location: Lake Forest, CA | arumako - 2017-05-02 11:49 PM
...Well, I couldn't stop workin' on this thing (yeah, it's gonna come back at me in spades!) Oh well...took the frets off; and although fret wear was not bad at all, some frets were popping out of the slot, and the Warwick brass frets look pretty neat...
One thing that seems kind of odd is how the rosewood grains on the fret board are standing up...like it got too much moisture at one point. It looks almost like some oil was rubbed into the fret board... Anyway, this fret board is going to be leveled down to a 20" radius before the refret. The Warwicks are not as shiny as the EVO Golds. It's gonna be interesting how these frets affect the tone of this guitar; of course, having never been in playable condition, I have nothing to compare it to...Lol.
FWIW, I oil my fingerboards every time I change strings.
I'm curious. Why a 20" radius instead of the standard 10" radius? | |
| | |
Joined:
October 2012
Posts: 1018
Location: Yokohama, Japan | Thanks for the comments OFC! DanSavage - 2017-05-02 10:23 PM
FWIW, I oil my fingerboards every time I change strings.
I'm curious. Why a 20" radius instead of the standard 10" radius?
Really? I thought I heard of folks oiling their finger board, but I never really gave it much thought. Does it help to protect the wood? WRT the 20" radius, just always liked the flatter fret boards; just feels more "acoustic" to me. Although I feel right at home with the 10" radius, Os have always felt a bit on the electric side of the things. The incredibly fast neck design seemed compatible with a larger radius. It also gives me cleaner attack with the 6th and 1st strings.
So recalling to mind your re-fret of the 1717, I took to sanding the fret board down to the new radius.
I really like these dual purpose radius sanding blocks. It took quite a while starting from 360 grit. After several hours of careful sanding, I simply placed the sanding block directly on the fret board. No unusual gaps throughout the length of the fret board, and I'm done. Followed that with some 600 grit and 1000 grit and voila... 
You can't tell from this pic, but the rosewood just glimmers with a beautiful sheen. In retrospect, the standing grain on the fret board was probably from a lot of sweating by the previous owner. Of course a 20" radius means the middle of the fret board was sanded more vigorously than the sides... 
I was afraid this might happen, but gaps in the inlayed fret board markers became apparent. Just need to fill them up with some black inlay filler. Not a big deal. Well, I was hoping to get the frets on today, but I should probably take my time, and use a fret saw to get the depth right, just in case the re-radiusing affected the fret slot depth significantly. So, time to call it a day...maybe again on Friday...btw, Really really liking the feel of the 20" radius on this neck. Can't wait to take her for a spin! | |
| | |
Joined:
June 2012
Posts: 2303
Location: Lake Forest, CA | arumako - 2017-05-03 8:41 AM Really? I thought I heard of folks oiling their finger board, but I never really gave it much thought. Does it help to protect the wood? I couldn't say whether it (Old English Oil) protects the wood, but it sure makes it look a lot better! I usually wait to oil the fretboard and bridge until everything else is done. Typically, I do that right before stringing up the guitar. arumako - 2017-05-03 8:41 AM So recalling to mind your re-fret of the 1717, I took to sanding the fret board down to the new radius. I did sand the fretboard, but I used the same 10" radius as is standard for Os. arumako - 2017-05-03 8:41 AM I really like these dual purpose radius sanding blocks. It took quite a while starting from 360 grit. After several hours of careful sanding, I simply placed the sanding block directly on the fret board. No unusual gaps throughout the length of the fret board, and I'm done. Followed that with some 600 grit and 1000 grit and voila... You can't tell from this pic, but the rosewood just glimmers with a beautiful sheen. In retrospect, the standing grain on the fret board was probably from a lot of sweating by the previous owner. Of course a 20" radius means the middle of the fret board was sanded more vigorously than the sides... I was afraid this might happen, but gaps in the inlayed fret board markers became apparent. Just need to fill them up with some black inlay filler. Not a big deal. Nice sanding block and nice job on the fretboard. Yeah, you'll definitely want to clean all the gunk out of the fret slots before you install the new ones. I use two tools for that job: Refret Saw
Fret Slot Cleaning Tool
Edited by DanSavage 2017-05-03 3:44 PM
| |
| | |
Joined:
December 2004
Posts: 553
Location: Denmark | Nice to see this guitar again. Has 2½ years passed since You began working on this? How Time surely flies. Warwick frets aren't they big for a guitar?
Edited by tpa 2017-05-03 4:48 PM
| |
| | |
Joined:
October 2012
Posts: 1018
Location: Yokohama, Japan | DanSavage - 2017-05-03 5:42 AM arumako - 2017-05-03 8:41 AM So recalling to mind your re-fret of the 1717, I took to sanding the fret board down to the new radius. I did sand the fretboard, but I used the same 10" radius as is standard for Os. Oops, I looked back through the archives and it was your '78 1617 Legend Rebuild from 1.5 years ago. Man, this site is just filled with useful inspiring information for anybody who wants to take a shot at guitar repairs or builds! That was also sanded to the standard 10", I think.. I was thinking about this pic, remember that? 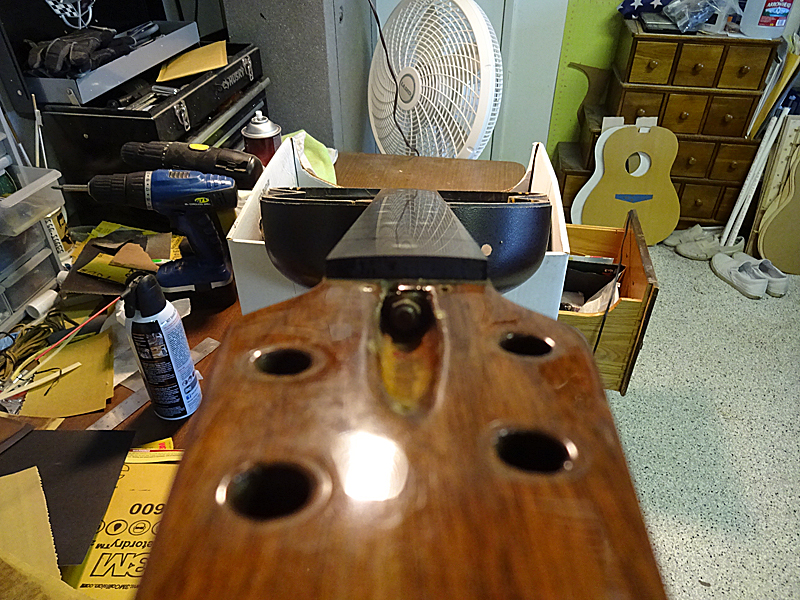
I see something like this and in my naivity, I think...who needs oil! Look at that thing shine. Right now, after going up to 1000 grit, my fret board looks like this too. But then no fret board on a guitar that's being used ever looks this clean! Yeah, you'll definitely want to clean all the gunk out of the fret slots before you install the new ones. I use two tools for that job: Refret Saw
Fret Slot Cleaning Tool Cool. thanks for the useful links Dan. Those are really cool tools. Always been using my trusty standard refret saw, but that thing is perfect! I've got a friends Yamaha that needs a fret job, but it has binding, and I was wondering how I'll ever really get the fret slots clean. I don't think I've ever seen this tool in any of your projects...maybe I just missed it! Gotta use the right tools to get optimum results! Gonna get me one of these today...kinda obvious question, but you never know...so, I'm guessing fret tang size determines the tool size? tpa - 2017-05-03 6:46 AM
Nice to see this guitar again. Has 2½ years passed since You began working on this? How Time surely flies. Warwick frets aren't they big for a guitar? Thanks tpa...yup, 2.5 years! Giving the word "slow" a new definition! Lol. Warwick frets (they're named "Bell Bronze" but in their store they're described as "brass" - confusing...) are basically the same size as I guess what would be super jumbo frets. Actually, they are the same width as the frets that came with the 1868 (2.9mm x 1.3mm). They're 2.9mm x 1.6mm or so - quite a bit taller than standard guitar frets (probably because they're originally for bass guitars, but they are harder than your standard nickel based frets and I like the tall profile. Can't wait to see what they sound like!
Edited by arumako 2017-05-03 6:48 PM
| |
| | |
Joined:
June 2012
Posts: 2303
Location: Lake Forest, CA | arumako - 2017-05-03 4:42 PM Oops, I looked back through the archives and it was your '78 1617 Legend Rebuild from 1.5 years ago. Man, this site is just filled with useful inspiring information for anybody who wants to take a shot at guitar repairs or builds! That was also sanded to the standard 10", I think.. I was thinking about this pic, remember that?
I see something like this and in my naivity, I think...who needs oil! Look at that thing shine. Right now, after going up to 1000 grit, my fret board looks like this too. But then no fret board on a guitar that's being used ever looks this clean!
Yep. I remember it well. I think I took it down to 800 grit. This looks really nice from a shallow angle like what's seen in the photo. But, when viewed straight on, it looks dry. The oil gives the bare wood a rich, lustrous look.
arumako - 2017-05-03 4:42 PM Cool. thanks for the useful links Dan. Those are really cool tools. Always been using my trusty standard refret saw, but that thing is perfect! I've got a friends Yamaha that needs a fret job, but it has binding, and I was wondering how I'll ever really get the fret slots clean. I don't think I've ever seen this tool in any of your projects...maybe I just missed it! Gotta use the right tools to get optimum results! Gonna get me one of these today...kinda obvious question, but you never know...so, I'm guessing fret tang size determines the tool size?
No, you're correct. I've never posted pics of these tools.
I don't use the refret saw all that much. I do use the fret slot cleaning tool, though. The hooked shape works really well for getting into the corners next to the binding. Given the choice, I'd pick the fret slot cleaning tool over the refret saw. Like I say, I hardly use the saw.
I'll drag the tool until the tip reaches the corner, then rock (roll?) it to let the tip lift the gunk out of the slot.
Nah, the fret cleaning tool is narrow enough to fit inside the Ovation fret slots. Since these are pretty much the only guitars I work on, that's all I care about.
Also, when preparing the new frets, I remove enough of the fret tang so that it doesn't interfere with the binding as I'm installing the frets.
Another tool I've used on every refret job is Stewmac's Fret Tang Nipper. This tool is worth every penny. | |
| | |
Joined:
October 2012
Posts: 1018
Location: Yokohama, Japan | Thanks again for all the helpful tips Dan. Decided to give the project a few more hours and made some huge progress today. Started off with the easy stuff by filling the fret marker holes. I tried using my inlay filler, but it's a bit old and was not usable; so, I opted to use some automotive touch up paint. I had flat black available and its viscous enough to fill the gaps well and hardens pretty well because its polyurethane. Just put enough paint on the end of a toothpick to create a droplet, when the hole touches the paint it just sucks the paint in. Repeat until a bead shows up like so... 
Then just sand it down. The flat black paint color was just a bit off...oh well, I don't think it will be too noticeable. 
I also began my binding installation. Had to approach this a bit differently. Used a hair dryer to bend the plastic binding into general shape then the outter binding was CA'd to the bowl. 
Then I inserted the rest of the binding/purfling in between...this is just a dry run... 
Settled on a white black/white/black and gold (brass) trim... 
Unfortunately, there are some big gaps between the binding and the edge of the sound board... 
The sound board must have been just a tad bit off when I Hysoled the top back on to the bowl! Think I'm gonna need some pigmented wood filler to fill the gaps...oh well. Feels good to make some progress anyway. Gettin' closer! | |
| | |
Joined:
June 2012
Posts: 2303
Location: Lake Forest, CA | Nice job on the filling of the gaps on the inlays of the fretboard.
If you haven't already glued the purfling, I'd add another thin strip to fill the gaps.
When I glue the binding and purfling, it's done at the same time to minimize the gaps.
The exception was the abalone purfling on the 1528. That demanded the purfling be glued first, then the binding outside of that in a separate step.
How are you planning to get the brass strip level with the sound board? Are you going to use a dremel, cabinet scraper, sandpaper?
| |
| | |
Joined:
February 2016
Posts: 1769
Location: When?? | Arumako.. taking nice shape and no doubt going to be beautiful in the end. If I were trying to do that detail work with my goat hoof hands the gaps would have been big enough to make a whole other sound hole!
Edited by Love O Fair 2017-05-05 11:36 AM
| |
| | |
Joined:
October 2012
Posts: 1018
Location: Yokohama, Japan | Okay...this baby has been on the shelf for over an year! My daughter has been playing my 97C, and she's learning really quickly. This Elite was originally for her until she lost interest. The other day as she was practicing she asked about this guitar. So, I started explaining about the difficulty of the brass binding, and how I was hoping to go with some difficult wood binding... she starts looking through my stash of wood and plastic binding, and says, "Plastic! Black/white/black, Dad..." Taped her up (the guitar, I mean...) for a dry run, and... 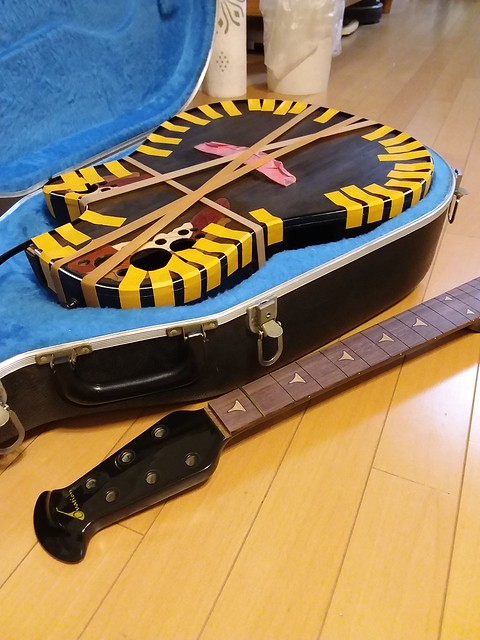
Hey, I like plastic b/w/b binding! Cool! Much easier than wood and brass! Doh! 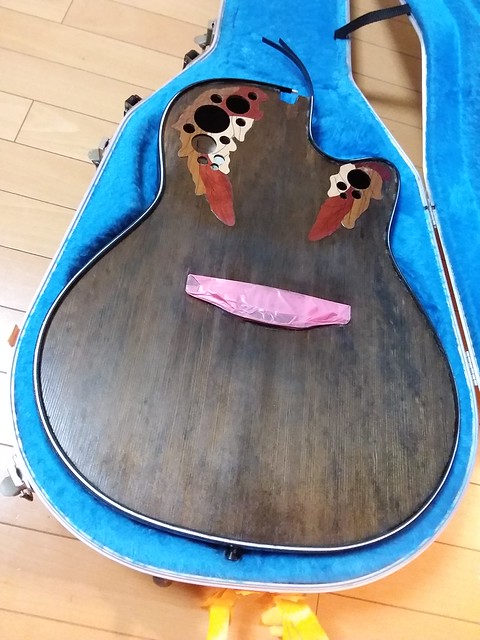
This Elite is off the shelf and on the go... AGAIN! Glued the binding into position, and will start scraping the binding down this weekend. Looking for a 2018 finish! About time!
Edited by arumako 2018-11-24 8:11 AM
| |
| | |
Joined:
December 2004
Posts: 553
Location: Denmark | Reviving the project. Nice to see it back on track :-) | |
| | |
Joined:
March 2002
Posts: 15652
Location: SoCal | Just read thru this whole thread, like a novel. Really interesting. Looking forward to see how it comes out (find out who done it?)..... | |
| | |
Joined:
October 2012
Posts: 1018
Location: Yokohama, Japan | Thanks for reading through the entire thread moody, p.i. Throughout these 4 years, this project has taken a lot of twists and turns. Come to think of it, the whole thread kind of reflects my journey as a guitar repairman. From my mistaken bidding to my countless incorrect observations, the thread also reflects my deepening appreciation of these incredible instruments. Through the interesting and sometimes strange twists and turns, the OFC/BFLG was always helpful, informative and encouraging (thanks tpa, et. all!)!
In retrospect, I re-assembled this guitar in the wrong order. I should have completed the binding installation BEFORE I "ebonized" the top. That sure would have made things easier. As it stands, shaving the binding down will be a slow process. Still, excited to have this project closer to completion. Finished my preliminary run of scraping down the binding. Found the edge of my trusty chisel to be an excellent scraping tool! 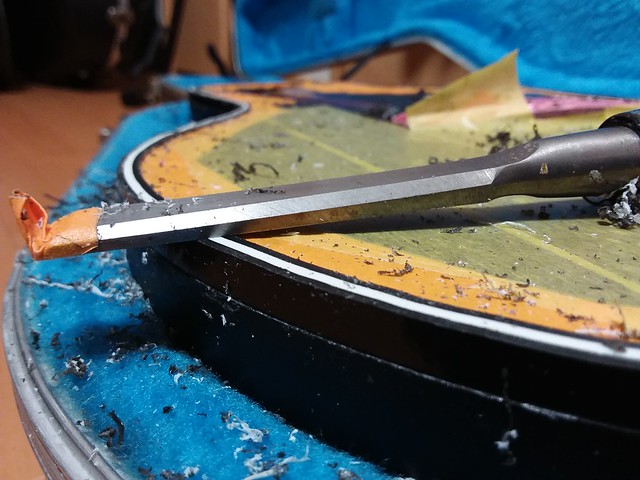
Nothing you all haven't seen before, but because the assembly order is incorrect, the top needed to be covered with tape just in case my make shift scraper went astray. Oherwise it would have been an easy scrape, some overall sanding, "ebonizing" and finishing. In any case, when the scraping is done, I plan to use Z-Poxy's Finishing Resin (really dig this stuff) instead of a poly-finish. Should be an interesting December! Thanks for the encouragement BFLG! | |
| | |
Joined:
May 2011
Posts: 751
Location: Muenster/Germany | The colour of the top is absolutely stunning.Makes me feel like removing the clear coat from my old blonde 12string... | |
| | |
Joined:
October 2012
Posts: 1018
Location: Yokohama, Japan | DetlefMichel - 2018-11-28 2:56 AM
The colour of the top is absolutely stunning.Makes me feel like removing the clear coat from my old blonde 12string...
Thanks DetlefMichel. Some people really dislike these stained finishes and the local reviews over here are pretty mixed, but I really really like the grainy coloring of spruce after "ebonizing". Getting really close to the end of the shaving/scraping process.
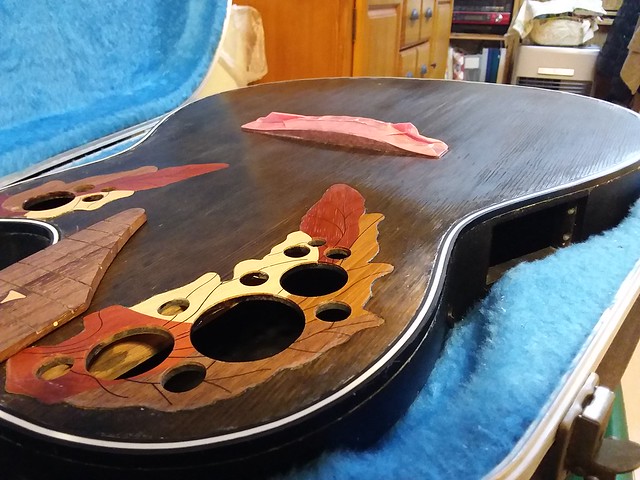
Will need a lot of concentration to get the wavy binding completely flat, but she's gonna be worth all the patience I can muster! Slow and steady... | |
| | |
Joined:
October 2012
Posts: 1018
Location: Yokohama, Japan | And continuing with the progress... all done with the scraping process, and down to leveling off the wavy binding. Using my edge sander to get the job done without jeopardizing the semi-finished guitar. 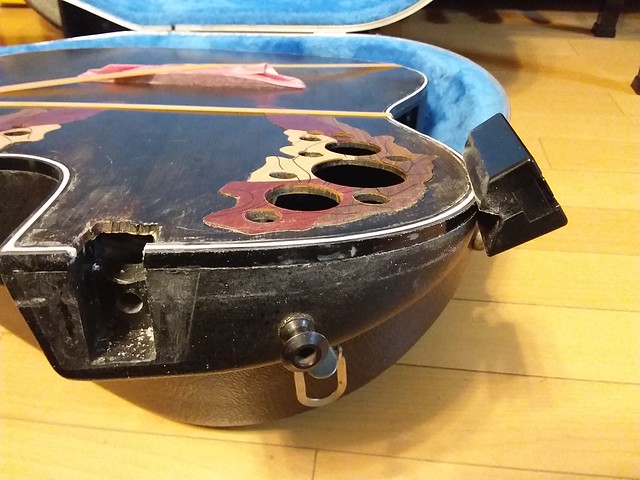
It's a really slow inefficient process, but the waves are really leveling nicely. The four coats of lacquer based sanding sealer are really protecting the ebonized top at this point. The small blemishes caused by my edge sander will only be lacquer deep. Additional thin coats of lacquer will melt right into the existing coats; and the lacquer will basically clean itself up. Once the edges are flattened, an additional coat of sanding sealer, then on to the Finishing Resin final coats. Still need to complete the fret job as well, but it's slowly getting there. Finishing this project sure would be a great way to close out the year! | |
| | |
Joined:
October 2012
Posts: 1018
Location: Yokohama, Japan | Finally got the binding leveled off, well to the best of my amateurish hands anyway. So now the sanding sealer coat needs to be thickened. Just using locally available nitrocellulose lacquer sanding sealer at this point. This stuff works well, but I wouldn't be too surprised if this stuff was just US product repackaged for the Japanese market. Using my trusty model spray gun to apply nice thin coats - one coat at a time... 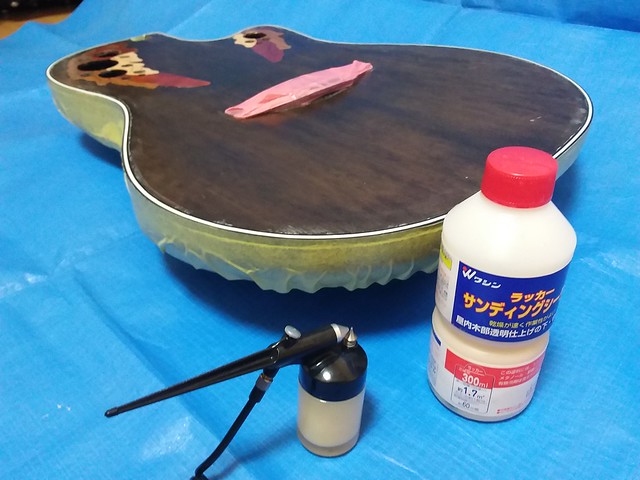
This stuff dries pretty quickly; and after an hour, I can take some 400 grit sand paper to smooth things out. I'll end up using nearly all 300ml of this bottle (maybe 5 thin coats) before I go to the finishing resin. By then all the micro-surface irregularities will be completely leveled and filled. After two coats she's already starting to level and fill nicely. 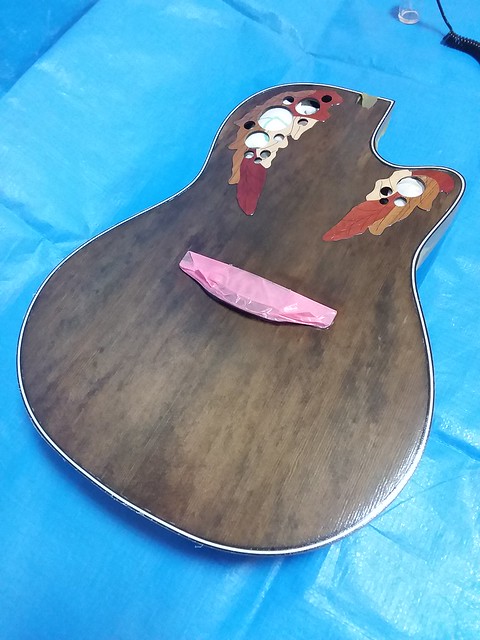
Really important to keep these lacquer products warm as you work to prevent splattering. Sheesh, I just might get this thing done this time! Yes! | |
| | |
Joined:
February 2014
Posts: 699
Location: moline,illinois | That top is looking really beautiful love the way the grain showing keep up the good work!!! | |
| | |
Joined:
May 2011
Posts: 751
Location: Muenster/Germany | I love it, maybe you should use black tuning machines. | |
| | |
Joined:
February 2016
Posts: 1769
Location: When?? | We've been watching that sound board go through what at times looked like a military boot camp obstacle course. All the rigors. But now.. oh, my.. that is one of the most beautifully unique finishes I've ever seen. I'm anxious to see the entire finished product in all its gleam!
@Ken - >>>Looking for a 2018 finish! About time!<<<
...6...5...4...3...tick, tick, tick. | |
| | |
Joined:
October 2012
Posts: 1018
Location: Yokohama, Japan | Love O Fair - 2018-12-27 7:03 AM
I'm anxious to see the entire finished product in all its gleam!
...6...5...4...3...tick, tick, tick.
Hey, thanks for all the encouraging comments everybody! It's already the 29th over here, and the pressure is definitely on! LOl! So, despite using a spray gun, and multiple thin coats (applying thin layers helps the consistency of the finish, but lacquer layers actually mesh into each other) the nitro-lacquer based sanding sealer finished up with the inevitable "orange peel" effect. Used the tools pictured below to prepare for the finishing resin.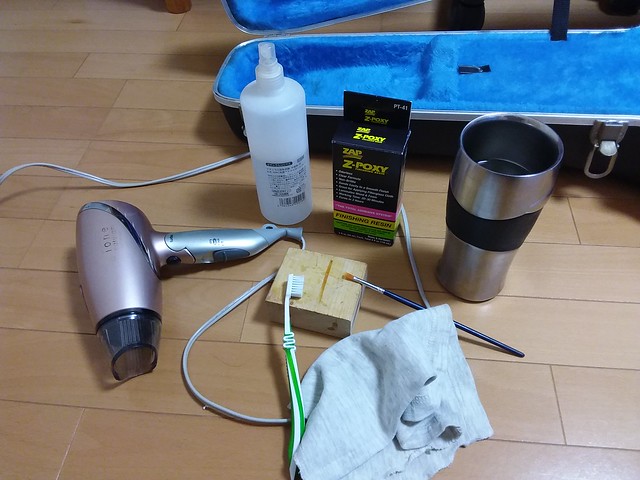
The tooth brush is essential to clean edges and crevices after wet sanding is done. The clean soft cotton cloth wipes away the rest of the debris. The water sprayer has one drop of unscented dish washing fluid to provide some lubrication during the wet sanding process. The finishing resin components are warmed in the cup which is filled with one part boiling water and one part warm tap water. The hair dryer and brush will help to spread the finishing resin. First, the sanding sealer is wet sanded with 400 followed by 1,000 grit sand paper to eliminate the "orange peel" effect. 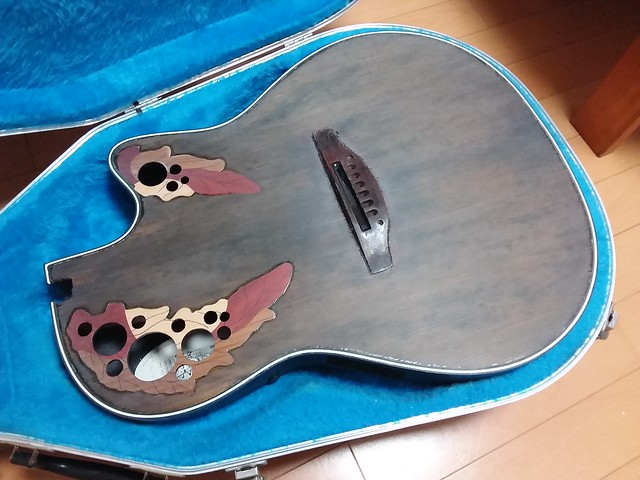
After thorough cleaning, the top was left to dry for 24 hours. Now onto the finishing resin. The epis and edges were taped up to create a reservoir for the finishing resin. Warming up the resin makes it more viscous and easier to work with. The resin was mixed and poured onto the top, but my estimation was way to conservative, and there wasn't enough to go all the way around. The resin gathered in thin blobs all over the top... 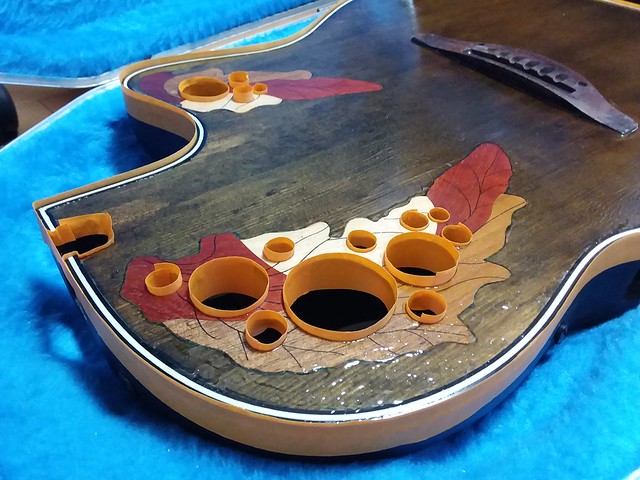
Oops, no need to panick... just need to prepare some more, but this time the proper amount was calculated. Grabbed the drier, brush, and expired credit card to distribute the resin... OH SH...eep Feces, calculation error! Too much resin... Ahhh, two hands not enough... "Daughter, oh daughter, please help Dad! Bring your hair drier... HURRY! Yikes, just about tanked the project (thank God for the 30 minute working time!), but I scooped out the excess resin while my daughter kept the surface warm...glad I was working on my blue sheet - what a mess! Still, my daughter helped me salvage the project. Whew! 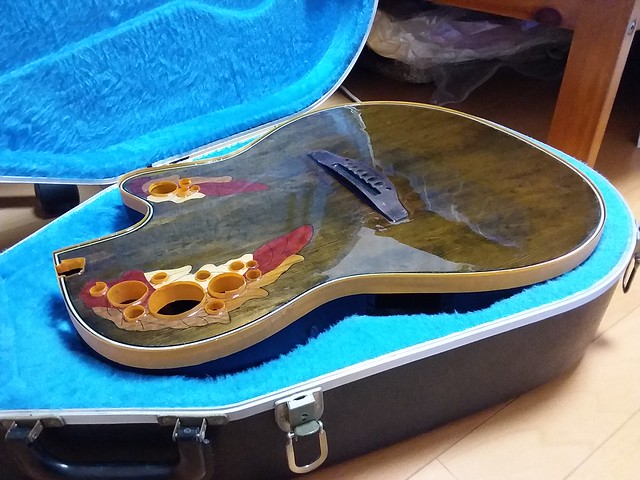
3 hours to dry. Some touch up of areas that may have been missed, and I'm down to the final stages of wet sanding, polishing and buffing! Gotta finish up the frets, final assembly and adjustments. BUT I will RUSH no more! Oh man... goog night! | |
| | |

Joined:
January 2009
Posts: 1249
Location: Texas | Wow...I would have choked and it would have been my last project. So much work up to this point and you avoided what seems to have been a disastrous ending. I am as impressed with your save as I am with the beautiful body. Congrats!!!! | |
| | |
Joined:
December 2003
Posts: 846
Location: Canada | That was an exciting finishing run. Hopefully guitar will be complete next year. | |
| | |
Joined:
February 2016
Posts: 1769
Location: When?? | For some reason I thought you had planned to leave it at a matte finish and just rub it out for grain highlighting. Not sure where I got that, but silly me. The gloss is fantastic! Glad you were able to duck into the phone booth and dawn your cape for the final moment's rescue. | |
| | |
Joined:
October 2012
Posts: 1018
Location: Yokohama, Japan | HAPPY NEW YEAR OFC/BFLG! So here's my 1868 all finished up! Just in time to ring in the New Year! 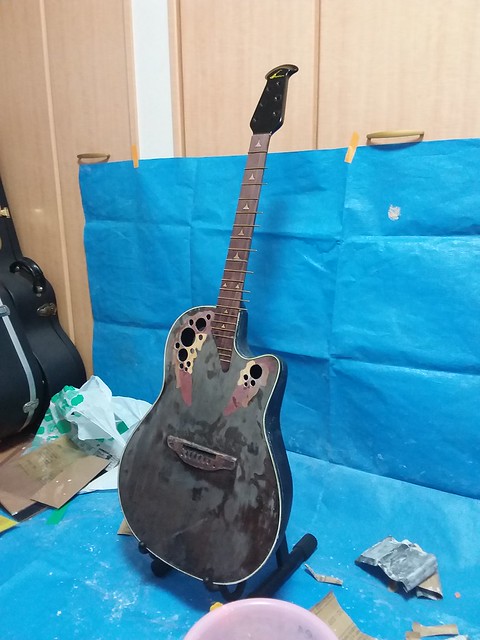
NOT! Well, this is as far as I got! I'm actually counting my blessings! I almost did choke with this one! When I poured my second "calculated" run of the finishing resin, I completely forgot to account for the finishing resin used in my first run! After my daughter helped me "save" the project; she said, "Dad your hands are shaking like crazy!" They really were shaking! After waiting 48 hours, (to calm the nerves as much as to let the resin cure), it was time to start the wet sanding process. Immediately noticed a battle scar from 48 hours before... 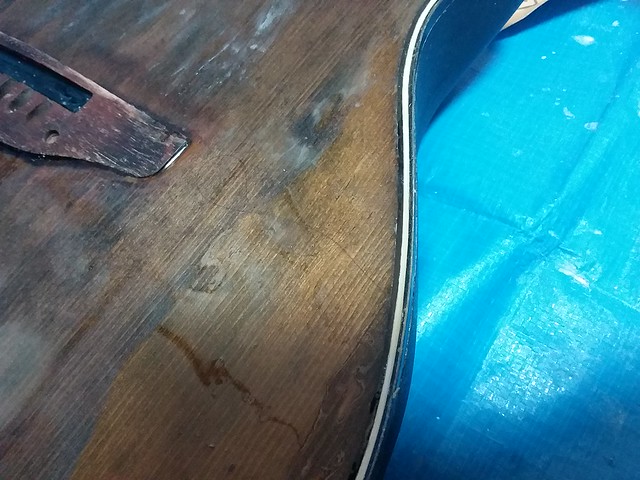
Do you see it? Just to the right of the bridge? Yeah, that one strand of hair! My daughter's (too long, dark and healthy to be mine, Lol). We were both beside ourselves in a mad rush to salvage the project that neither of us saw this! Crazy! We both examined the whole guitar carefully for air bubbles too! Oh well, this will sand out as the project nears completion. After removing the "reservoir tape", it's easy to see all the flashing built up all around the edges. 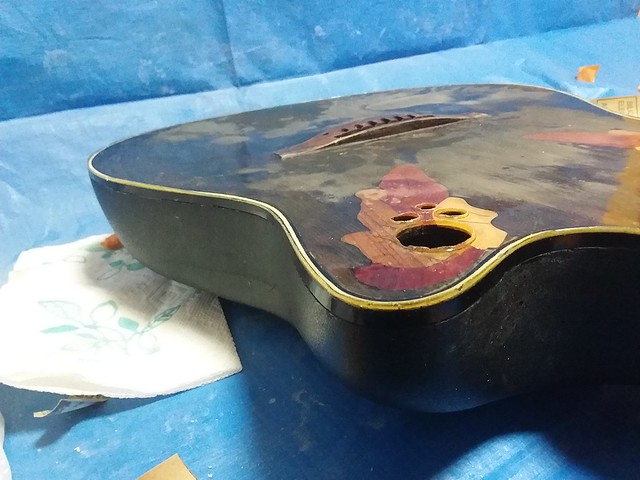
At this point, the final finish is right at 1mm thick. That gives me plenty of room to sand, polish and buff the finishing resin to a gleaming luster! Dissappointed that a 2018 finish was not realized, but this will be one of the first out of the shop in 2019! Meanwhile, hope you all have a fun and safe New Year celebration! May 2019 be a banner year for you all! Thanks for all the encouragement too! | |
| | |
Joined:
October 2005
Posts: 4025
Location: Utah | Happy New Year, Aramako! This build has been quite an exciting adventure as a spectator. | |
| | |
Joined:
October 2012
Posts: 1018
Location: Yokohama, Japan | Thanks FlySig. It's been quite a nerve racking adventure for sure. Hope this thread helps folks to remember what not to do when re-building a valuable USA O! Along with my inexperience, one of the other "excitement" inducing features of this project (in retrospect) has been the fact that I've introduced too many experimental variables in one project. Ebonizing and routing the epis into the sound board, attempting an all epoxy finish, radiusing the fret board to 20 inches (instead of the 10 inch standard), and using Warwick's brass alloy frets... jeepers are these frets hard to work with! Had to resaw the fret slots wider and deeper (due to the change in fret board radius), and they were a bear to get seated properly. After wrestling with the frets, I finally got them filed down and dressed up... 
The neck angle is absolutely perfect! Assuming disasters are avoided until completion, she should be a beauty with depth and clarity of voice. Just can't wait to finish her, string her up and take her for a spin! Getting really close! | |
| | |
Joined:
September 2018
Posts: 11
| Arumako,
It is the persistence, talent and vision exemplified in this build that is so inspiring to all of us arm chair viewers. You improved a great guitar, in a manner that elevated the guitar as an example of ‘what can be’...most would have simply walked away, but the talent of you and others on this forum is always amazing.
Respectfully,
Notalent | |
| | |
Joined:
October 2012
Posts: 1018
Location: Yokohama, Japan | Thanks for the generous comment, Notalent! The OFC/BFLG really gave me encouragement and direction every time I felt like walking away. This, and nearly all of my projects, would have never made it to completion had it not been for the patient inspiration shared by the members here. Speaking of "completion", this 1868 is really coming down to the wire... Having avoided a major disaster, I've found it better for my blood pressure to slow down; and man, have I slowed down! The epoxy finish was leveled with a 220 grit "wet" sand. My daughters healthy strand of hair was happily eliminated by this step... 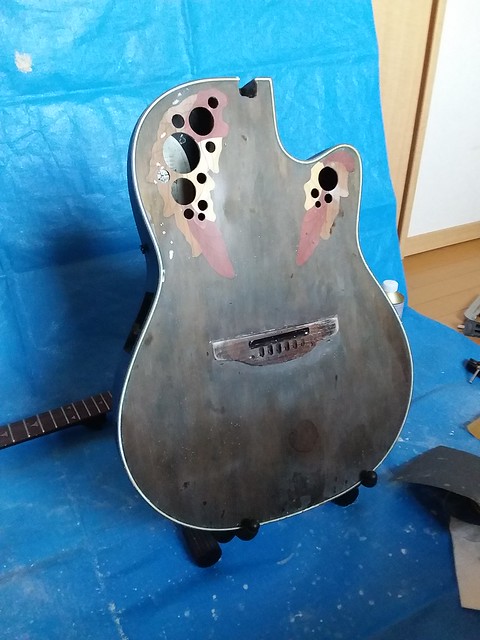
As the pic clearly shows, there were still small dips in the final finish, so three thin epoxy coats were applied using an expired credit card. The thin credit card application of epoxy prevents the formation of tiny air bubbles (which I found to be a risk when working with this Finishing Resin product); however the credit card or window squeegy application leaves very subtle streaks that will need to be sanded away later. The glossy finish in the pic below is deceiving. 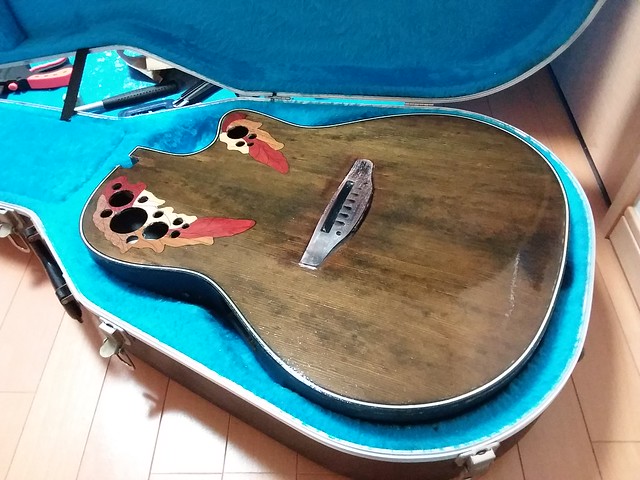
After the standard 24 hour wait, the subtle streaks were wet sanded with 1000 grit sand paper and wiped down with a slightly damp cloth. After another 24 hours, the whole top was lightly dry sanded with 1000 grit paper. This ensures theres no build up of wet epoxy residue in any micro-air bubbles if they exist. Finally, the whole top is cleaned with naptha (lighter fluid). The left photo was taken after cleaning with naptha, and the right photo was taken after my first pass using 7 micron polishing compound... 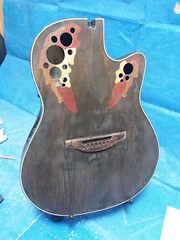 
Stayed with the 7 micron polishing compound... wax on, wax off; wax on, wax off; wax on and on and on.... 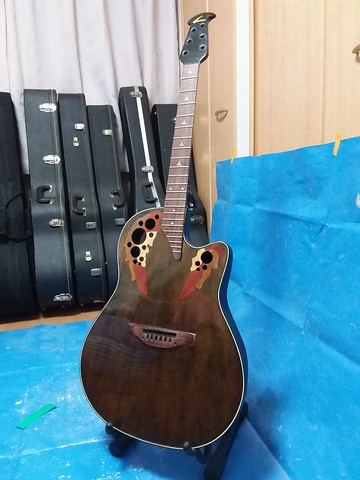
Final polishing is still going to take quite a bit of time. Need to go through 1 micron, 0.2 micron, and plain polishing compound as a substitute for going through a buffer. While the Z-Poxy's Finishing Resin is great for touching up finish cracks and dings, I've found it a bit difficult to work with as a complete finishing solution. Of course, my application method leaves much to be desired, but having worked with lacquer, poly, and shellac (French polish); epoxy would be my least favorite finishing solution. However, it's more durable than lacquer (not as strong as poly), and ounce for ounce, I think it's the least expensive of the finishing methods I've tried to date. It would have been much easier if the Finishing Resin could have been sprayed. Still, when all is said and done, it will provide protection and beauty for years. Still have a few more steps to go but getting really close! Don't blow it, Ken!
Edited by arumako 2019-01-11 12:39 PM
| |
| | |
Joined:
February 2014
Posts: 699
Location: moline,illinois | Looking really pretty,that's going to be one shiny baby when your done,perseverance and patience will pay off in the end!!!!
| |
| | |
Joined:
October 2012
Posts: 1018
Location: Yokohama, Japan | 2wheeldrummer - 2019-01-11 8:17 AM
...perseverance and patience will pay off in the end!!!!
Thanks 2wheeldrummer! Not looking for a big pay-off. Hoping for an instrument that "sound" that we all love so much. Already seeing limitations with the epoxy finish I used. Because of my miscalculation and resin over flow, there was a lot of flashing that needed to be cleaned up around the bowl and epis. Maybe my mixing was bad or the resin just got old. The stuff is very brittle, and chips off too easily. The chips are hardly noticeable, but I was hoping for a more durable result. Good lesson learned! Anyway, the bridge's saddle slot needed to be routed, and the handy jig used for my 5986 Nakao came in handy again... 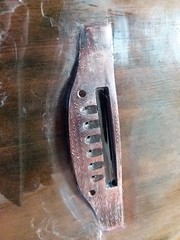 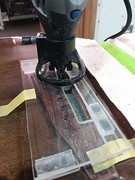 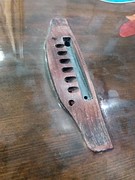
Everything fit together pretty well; so after some dry runs of clamping the neck into place, I decided to put it all together. Despite my misgivings about the Finishing Resin, I have nothing but praise for Z-Poxy adhesives. Scuffed up the body with 100 grit sp to ensure good adhesion. Put everything in the right place to ensure process efficiency. Turned to Z-Poxy's 30 Minute Epoxy product again. Applied just the right amount of adhesives under the fret board extension. Placed the neck in the correct position and finger-tightened the neck bolt (I know I've said this many times before; but man, I love these K-bar necks). Grabbed my first clamp... squeeze, squeeze, squeeze... okay, that's about right... turned around to grab my second clamp, and CRACK! No, no, not the guitar, (thank God! That was my first thought too) but my first clamp... looks fine, but something in the clamping mechanism must have cracked... wasn't expecting this! Would have been SOL , had this been a mid-depth bowl! Time to invest in some better clamps... After the minor mishap, I was able to run to my shed and grab a standard C-Clamp... not exactly "textbook", but nothing about this project has been "textbook" after all. LOL! 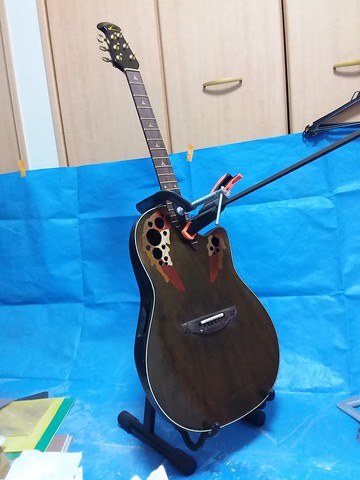
Neck fit and position - perfect! Fret maintenance in 24-hours, install pre-amp and take her for a spin! Woohoo... Got a GOOD feeling about this one! | |
| | |
Joined:
June 2012
Posts: 2303
Location: Lake Forest, CA | arumako - 2019-01-14 12:50 AM Already seeing limitations with the epoxy finish I used. Because of my miscalculation and resin over flow, there was a lot of flashing that needed to be cleaned up around the bowl and epis. Maybe my mixing was bad or the resin just got old. The stuff is very brittle, and chips off too easily. The chips are hardly noticeable, but I was hoping for a more durable result. Good lesson learned! Hi Ken, I've been following your progress on this. I'm glad to see it nearing completion. Generally speaking, the slower an epoxy cures the more rigid (brittle) it will be once cured. The ZPoxy finishing resin is pretty much the most rigid formulation ZPoxy sells. It's main use in modeling is as a laminating resin to apply lightweight fiberglass to the outer skin of the model as a base for the painted finish. I'm curious to read how it sounds. Dan | |
| | |
Joined:
October 2012
Posts: 1018
Location: Yokohama, Japan | DanSavage - 2019-01-14 6:45 AM Hi Ken, I've been following your progress on this. I'm glad to see it nearing completion. Generally speaking, the slower an epoxy cures the more rigid (brittle) it will be once cured. The ZPoxy finishing resin is pretty much the most rigid formulation ZPoxy sells. It's main use in modeling is as a laminating resin to apply lightweight fiberglass to the outer skin of the model as a base for the painted finish. I'm curious to read how it sounds. Dan Hi Dan! I've surely missed your wisdom and insight! Thanks for chimming in! Yeah, I'd have to say my Finishing Resin experiment ended as a failure. The chipping also seems to indicate that the epoxy finish isn't adhering well to the nitro based sanding sealer. I'm guessing using the Finishing Resin instead of the sanding sealer, and following that up with a finishing epoxy would have been better. I was getting a lot of bubbling with the FResin; so as an experiment, I tried some 30-minute Z-Poxy on some wood blanks, and that was much easier to work with (no bubbling) and my sample finished durable without chipping. Unfortunately, I opted to use the FResin because, I kept assuming the 30-minute product as an "adhesive". Still, a good lesson learned. This current finish will probably chip off after a year or two. Will probably remove the epoxy and shoot a nitro clear coat when the time comes. While you're at it... got any other advice for me? Oh yeah, my son is building his 1st electric kit from Stewmac @ college (X-mas gift). He's planning on using the Eastwood 2K over a sonic blue lacquer. Will that work out okay? | |
| | |
Joined:
October 2012
Posts: 1018
Location: Yokohama, Japan | After at least four years of silence my 1990 Elite sings again! Woohoo! The recycled AA Sitka spruce top is only just starting to get back into the swing of things... 
She is looking & sounding mighty fine indeed! Here's another shot of her resting in her case! 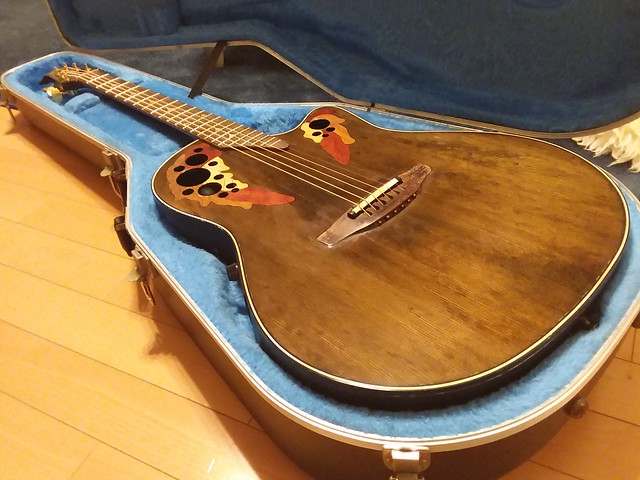
Will post sound byte later, but I can't thank the BFLG enough for all your generous encouragement. Think I'm gonna take DetlefMichel's advice and swap my stock gold tuning buttons for some black ebony ones. Woohoo!
Edited by arumako 2019-01-16 11:09 AM
| |
| | |
Joined:
August 2007
Posts: 1008
Location: Tuscany, Italy | Well done job, Ken. Congratulations ! | |
| | |
Joined:
May 2008
Posts: 1553
Location: Indiana |  | |
| | |
Joined:
February 2016
Posts: 1769
Location: When?? | Just think how nice it would have turned out if you hadn't rushed through the project.
--or--
That promise you wouldn't shave your beard until you finished this has at least kept the floor swept nicely.
--or--
Don't worry, there will eventually be a red light and the train will stop.
--or--
--or--
--or..
Nice job, Ken! Congratulations, and thanks for an interesting journey. Your skill and talent once again shine through! Oh, and your patience, too.
(sorry, couldn't resist)
Edited by Love O Fair 2019-01-16 1:45 PM
| |
| | |
Joined:
March 2002
Posts: 15652
Location: SoCal | Looks beautiful! Looking forward to hearing it..... | |
| | |
Joined:
June 2012
Posts: 2303
Location: Lake Forest, CA | arumako - 2019-01-15 7:12 PM Hi Dan! I've surely missed your wisdom and insight! Thanks for chimming in! Yeah, I'd have to say my Finishing Resin experiment ended as a failure. The chipping also seems to indicate that the epoxy finish isn't adhering well to the nitro based sanding sealer. I'm guessing using the Finishing Resin instead of the sanding sealer, and following that up with a finishing epoxy would have been better. I was getting a lot of bubbling with the FResin; so as an experiment, I tried some 30-minute Z-Poxy on some wood blanks, and that was much easier to work with (no bubbling) and my sample finished durable without chipping. Unfortunately, I opted to use the FResin because, I kept assuming the 30-minute product as an "adhesive". Still, a good lesson learned. This current finish will probably chip off after a year or two. Will probably remove the epoxy and shoot a nitro clear coat when the time comes. While you're at it... got any other advice for me? Oh yeah, my son is building his 1st electric kit from Stewmac @ college (X-mas gift). He's planning on using the Eastwood 2K over a sonic blue lacquer. Will that work out okay? One good thing about using the finishing resin is that the hardness won't deaden the sound. Keep in mind that the finishing resin and 30-minute are both epoxies. AFAIK, the main difference is the cure time and viscosity. There are very few materials that epoxy will form a chemical bond. It usually only makes a mechanical bond. If you use sandpaper with too fine of a grit the epoxy won't get enough tooth and it can separate. I'll usually use 320-grit as the final prep. I agree. If it starts looking too bad you can always peel it off and put something else down. Eastwood 2K over lacquer should be fine, but finishing a test piece first would be in order. At the very least the lacquer will need to be sanded to give the finish some tooth.
Edited by DanSavage 2019-01-16 6:56 PM
| |
| | |
Joined:
February 2016
Posts: 1769
Location: When?? | @Dan - >>>'ll usually use 320-grit as the final prep.<<<
A step that I am curious about. Is that wet or dry? If wet, do you first dampen the paper, or the surface, or both? How deep? | |
| | |
Joined:
June 2012
Posts: 2303
Location: Lake Forest, CA | Love O Fair - 2019-01-16 6:59 PM
@Dan - >>>'ll usually use 320-grit as the final prep.<<<
A step that I am curious about. Is that wet or dry? If wet, do you first dampen the paper, or the surface, or both? How deep?
Whether I dry sand or wet sand depends upon how far along in the finishing process I'm at.
Initial sanding is done dry so I don't get the wood wet. Once I've got a decent base, I'll switch over to wet sanding.
Once I get to the wet-sanding step I move up to 400-grit.
I sand the top using a 2"x2"x3" styrofoam block with whatever grit sandpaper I'm using. I keep a small plastic bowl with some water in it. I dip the sanding block in the water, shake off the excess, then sand a 6"x6" area at a time.
When I'm done sanding that area, I wipe off the sanding slurry with a paper towel and move on to the next area.
I try to sand off as little as possible. It's really easy to take off too much and burn through the finish into the bare wood.
So, I only sand the area a little bit, clean off the slurry and dry the area to check my progress, then repeat until all the surface imperfections, such as orange peel, etc., are gone.
Edited by DanSavage 2019-01-17 1:41 AM
| |
| | |
Joined:
May 2011
Posts: 751
Location: Muenster/Germany | ...if I go back to page 1 and watch the pics...you made a wonderful guitar out of this piece of junk. The top with the inlaid epis makes it look look like a 3k$ guitar. I just love it. Chapeau! | |
| | |
Joined:
February 2016
Posts: 1769
Location: When?? | Thanks for the reply and sanding tips, Dan. I missed it from last week, but I AM paying attention. We have an old oak table here with a top finish that looks beaten to something like the surface of your workbench, and since I so badly suck at finish woodwork I think I'd better start my career as such with the table top and hope that one day I am able to graduate tongue-in-cheek to a decent musical instrument. In the meantime I'll buy a tablecloth just in case. You guys amaze me. | |
| | |
Joined:
October 2012
Posts: 1018
Location: Yokohama, Japan | DanSavage - 2019-01-16 8:53 AM There are very few materials that epoxy will form a chemical bond. It usually only makes a mechanical bond. If you use sandpaper with too fine of a grit the epoxy won't get enough tooth and it can separate. I'll usually use 320-grit as the final prep. Thanks for the valuable tip Dan. Yup, went all the way up to 1000 grit with the sealer. That pretty much left the epoxy with nothing to grab on too. But I've learned so much from the BFLG on this project. Can't wait to tackle my next project. And thanks to everyone for the nice comments. Really appreciate your interest and encouragement! Been real hectic over the last few weeks; after stringing her up with my fav Adamas 1919E strings, I've been taking her through the paces. She took a few days to 'open-up', and I was tempted to Prime Vibe the stiff sound board, but resisted the temptation. I took DetlefMichel's advice and ordered the ebony tuning buttons. They arrived the other day and were immediately installed. WOW! I really like the understated look! The inlayed epis really look nice too.  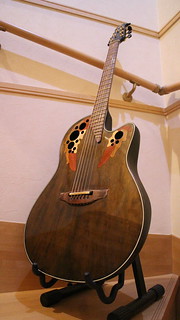 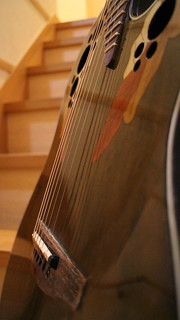
Unfortunately, the brittle epoxy finish has already started chipping around the epis and edges of the guitar. However, the 'Ol New Hartford label reminds me of her noble lineage which promises articulate resonance chips or not! 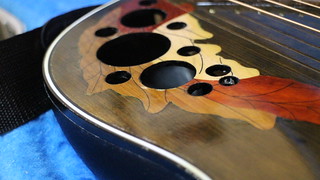 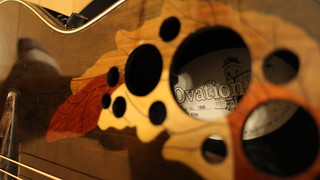
And despite the polishing and buffing, I couldn't get the finish completely level. Of course, the over-spill from my epoxy miscalculation will need to be covered with black paint. 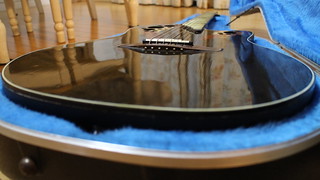 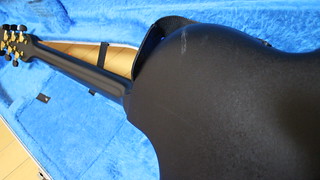
Was able to make a foam pad for the manhole cover... not exactly uniform or symmetrical, but good enough to secure the cover in place. All-in-all she's a joy to play. 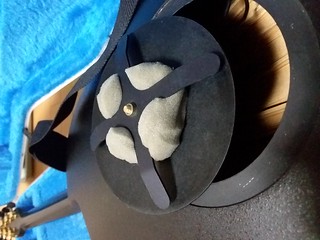 
So, wanted to leave some conclusions about my various experiments implemented in this project as I close this running 4-year thread down... 1. Re-purposed original AA Sitka Spruce top with ebonized stain: excellent results. 2. Inlayed Epaulets: excellent results. 3. Warwick Bell-bronze frets: Bear to install, but looks very good. 4. Re-radiused 20" fret board: improves finger's attack angle, but brings the strings just a hair closer, making it difficult for my stubby fingers to get clean access to the strings. Need a new nut to resolve this issue. 5. Nitro-cellulose sealer & Epoxy Resin finish: Failure. Sanded sealer with sand paper that was too fine (1000 grit). Epoxy could not securely adhere to sealer. The chosen finishing epoxy was too brittle and began chipping away. However, despite the failed experiment, this SSB sounds incredible! She is the loudest SSB I've ever heard. No doubt the original sound board chosen and built at the Mother Ship combined with the cosmetically failed, but resonantly successful nitro/epoxy finish, and the bell-like toned Warwick frets all contribute to that dynamic and punchy uniquely Ovation voice. Bass tones are not deep, but very strong; as a matter of fact, she blows away my Mid Depth bowl CC247 that just came out of a 190 hour Prime Vibe session (Prime Vibe really opened up the spruce-lamInate top of my Celebrity - definitely recommend the treatment for all laminates!). Here's a short demo... My pudgy fingers are still trying to get used to the closer strings of the 20" radiused fret board so forgive my uninspiring technique! <iframe src="https://www.youtube.com/embed/HMQtKKXyWVk" frameborder="0" width="560" height="315"> a link just in case... https://youtu.be/HMQtKKXyWVk As is always the case, the camera's mic doesn't do this beautiful sounding instrument justice, but with a new nut and maybe a full epoxy or nitro-cellulose finish down the road somewhare, I might be able to say, "She sounds as good as she looks." But for now, I'll just settle for, "She sounds way better than she looks!" Thanks for letting me share BFLG!
Edited by arumako 2019-02-05 8:18 AM
| |
| | |
Joined:
June 2012
Posts: 2303
Location: Lake Forest, CA | Hi Ken,
Thanks for the closing comments of this project. It turned into a really nice guitar.
WRT to point #5, the finish, I'm finding that the fewer different types of finish applied to the top, the better.
For example, a lot of luthiers recommend that you lay on a coat of shellac before routing the binding/purfling channel to help prevent tear-outs. But, what I found is that once I started scraping down the binding/purfling I would inevitably scrape off some of the shellac exposing the bare wood underneath. Because the shellac is not translucent, this would leave parts of the top that was lighter than other areas. So, I stopped doing the shellac layer.
As you know I was a fan of Minwax poly-u finish, either as an 'primer' to the Eastwood 2K, or as the sole finish. What I found was that the poly-u actually behaved a lot like lacquer in that it really should be allowed to dry for a full month so that all the solvents had time to evaporate and 'shrink' the finish prior to cutting and polishing. Not doing so led to the finish shrinking which left the guitar top with what looked like a 'vintage' finish instead of the glassy-smooth finish usually seen on Ovations, even when top-coated with EW2K. On the plus side, a thinner finish is always better than a thicker one.
I've arrived at the point where I have decided to stick with EW2K as the sole finish, mainly because it's a catalytic finish instead of an evaporative one. This means, low shrinkage during the post-polishing period. Of course, I've only done one guitar finished only with EW2K and that one got shipped off a couple of months ago so I haven't had a chance to view it long-term, and probably won't have the chance unless the buyer posts photos a year or so from now.
I'm not sure if you've done a nitro finish on a guitar, but I have and I probably won't do it again. It was a major pain. Because the coats go on so thin, it takes a lot to build up the finish to a decent thickness for finishing. Then, once it's done it's still a pretty delicate finish.
Edited by DanSavage 2019-02-06 11:59 AM
| |
| | |
Joined:
October 2012
Posts: 1018
Location: Yokohama, Japan | DanSavage - 2019-02-06 1:58 AM
WRT to point #5, the finish, I'm finding that the fewer different types of finish applied to the top, the better.
I've arrived at the point where I have decided to stick with EW2K as the sole finish, mainly because it's a catalytic finish instead of an evaporative one. This means, low shrinkage during the post-polishing period.
Hey Dan! Thanks for your insights.
Fewer different finishes makes a lot of sense, and I think I'll stick to one type of finish from now on. I've read and heard about the shellac top coat to protect the wood when scrapping the binding down; and in addition to sealing the AA spruce top, the relatively thick coat of nitro sanding sealer did just that. Interestingly enough the JP brand sanding sealer I used is catalyzed, and dries and finishes really quickly and nicely. For some reason, polyurethane spray-can finishes are unheard of over here. Other poly finishes are generally very very expensive (and almost always water-based).As the temperature changes here in Japan (incidentally it's snowing out today!) begin to affect the various finishes on my 1868, I'm pretty sure there's going to be some shrinkage differences that will make chipping and peeling more and more pervasive. However, like the sanding sealer I used, there's a plethora of catalyzed nitro products over here and I'm kinda keen to try some of those.
DanSavage - 2019-02-06 1:58 AM
I'm not sure if you've done a nitro finish on a guitar, but I have and I probably won't do it again. It was a major pain. Because the coats go on so thin, it takes a lot to build up the finish to a decent thickness for finishing. Then, once it's done it's still a pretty delicate finish.
I used nitro on my electric guitars in the past with great results, never on acoustics though. "Major pain" is a good description! However, nowadays if I'm going to go through the pain of using nitro, I would much rather do a French Polish (shellac). With nitro, you gotta spray and wait and wait and wait, and do it all over again, but with FP, instead of waiting you get to rub and rub and rub; and for some reason, I find the pore filling to the final finish process a lot of fun! Of course, you don't get real polyurethane type of protection, but classical guitars are not meant to be banged around like our Os!
Having said that, I'm really impressed with the acoustic characteristics of my 1868. It is like no other O that I own. Of course, it's no "torrefied wonder", but the response of the re-purposed AA top is clear, resonant and sustaining. As mentioned previously in the thread, it out performs my mid-depth CC247, even after the 190 hour PV session (which really improved the voice tremendously). My only other "onhand" SSB is my sons 1861-5 - no contest. I loved the 5986 Nakao too - it's close, but it can't keep up with this Elite. Of course, I must admit that maximizing the resonance of the top of an SSB is somewhat of an exercise in stupidity (since these were designed to be plugged-in), but I keep wondering what my 1117-4 and my CS249 (nylon) would sound like with a FP or catalyzed nitro finishes. Won't get to my iDea project for awhile, but my head is mulling things over...that could be dangerous!
By the way, I never could embed YT videos very effectively. Apologize for the link only in my previous post. Ran out of time, as I tried to edit the video into the post - oh well. So, here's some info that I was hoping to include in my last post; string action: 6th string 12th fret - 2mm; 1st string 12th fret 1.7mm with no buzzing. Also, while Warwick's Bell Bronze frets work well and provide sparkling highs, the gains are not worth the extra effort they take to install them (slightly wider fret slots needed). Just go with EVO Golds.
Okay, I think that's it! Stay warm and Happy strumming!
Edited by arumako 2019-02-09 2:27 AM
| |
| | |
Joined:
May 2011
Posts: 751
Location: Muenster/Germany | " maximizing the resonance of the top of an SSB is somewhat of an exercise in stupidity"....NO! It´s always an heroic deed!!
| |
| | |
Joined:
October 2012
Posts: 1018
Location: Yokohama, Japan | Redemption Time!
Since her restoration, this 1868 has seen a lot of action. Especially with outdoor use through heat and cold during the pandemic. Well, while getting ready to shoot a video comparing my 1868, 1680 and 1678AV-50, I decided to examine the failed epoxy finish and noticed a bit of peeling on the side. Well, "How about a little pull on that little piece?" I thought to myself, and a nice section peeled off. "Whoa, COOL!" Grabbed a plastic paint spatula, and in a matter of minutes, voila... 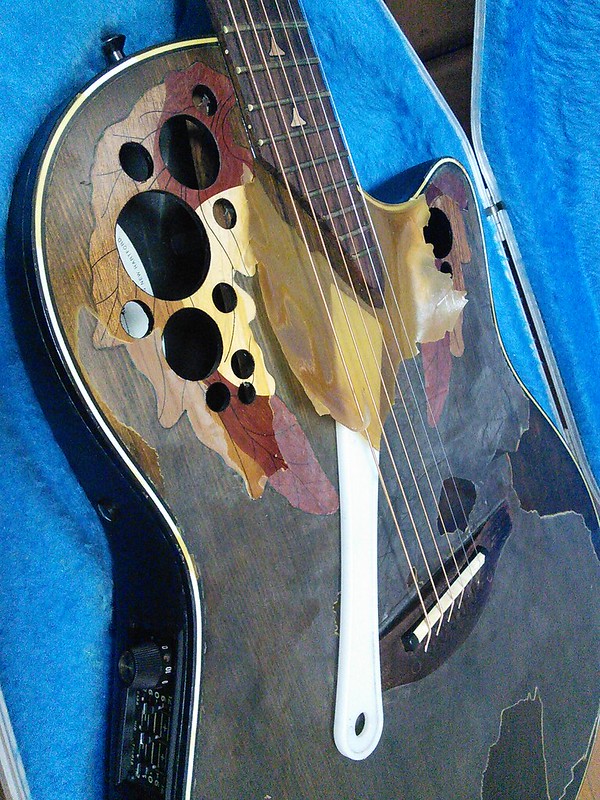
As Dan said, sanding the sanding sealer down to 1000 grit really gave the epoxy finish nothing to grab onto! It just peeled off like the shell of a boiled egg! The discoloration of the epoxy (although it is a bit colored to begin with) suggests either a mixing or shelf-life problem. In either case, it's redemption time! Still need to think things through; but leaning toward a lacquer finish this time. Will sand this baby down to 300 grit, shoot a few thin sanding sealer coats and finish her up with some nice clear lacquer, polishing and buffing! To my great surprise, this 1868 holds its own alongside the 1678AV50, and even the 1680 (even with the finish peeled off!) - completely different, but spectacular nonetheless! Gosh, this is fun! | |
| | |
Joined:
February 2016
Posts: 1769
Location: When?? | Dang! And she was so pretty.. but glad to know it was from usage in the elements instead of peeling in the closet. I'm amazed at how "boiled egg" clean it comes off. | |
| | |
Joined:
May 2008
Posts: 1553
Location: Indiana | arumako - 2021-09-27 3:22 AM Still need to think things through; but leaning toward a lacquer finish this time. Dan used an Eastwood product on my parlor. It's top-notch. | |
| |
|
