So, after my adventure rebuilding my 1619-4, Jay contacted me asking if I would like to take a stab at his 1967 Balladeer.
Being the adventurous-type, I naturally said, "You betcha!"
It arrived in the mail today.
We had discussed many different ways to proceed. Among these was using bearclaw spruce and the forward X-brace I used on my 1619 and using one of the rosettes I bought off eBay. We also discussed using hardwood binding instead of the plastic binding.
In the end, we decided to make a 3-piece top using straight-grain Sitka spruce like the original. I'm also leaning toward recreating the plastic binding it already has. I contacted JB and he managed to find a couple of 40th RI rosettes, one of which he was willing to sell me.
All I can say about these rosettes is: CHEAP!!! They're printed on pearloid paper which was glued into place after the guitar was finished.
Also, for the 40th RI, it looks like they used the original printing plates because all the detail of the grapes seen in the original rosette is all but gone and all the lines are thicker, which is what happens as printing plates wear out.
Jay already had a 5-point rosewood bridge, which he included in the guitar case when he shipped the guitar to me.
I've heard from a few people that the original X-bracing used by Ovation sounded really good, so I was looking forward to hearing how it sounded and to comparing to the forward X-bracing I used on my 1619.
In short, it sounds really good. I'm very impressed. It's hard to make an accurate comparison because Jay's guitar is strung with PBs and mine is strung with 80/20s. I bought a set of the same strings I put on my 1619 (Elixir 80/20 Lights) and I'm going to restring Jay's guitar so I can see how it sounds with 80/20s.
Because the bridge on Jay's guitar is lifting, I hope it doesn't pop off when I restring it for aural testing.
But, based on what I'm already hearing, I can see real benefit to using Charlie's original X-bracing. The pic below shows what braces are on the inside of Jay's guitar. If I decide to go with the original X-braces, I'll probably also use the fiberglass reinforcement strip seen in the lower bout.
I'm not sure why Charlie changed the original brace pattern unless he was a "dyin' to improve it" kind of guy. Martin tends to be a "benign neglect" kind of manufacturer, which is to say, "if it works, don't fix it." But, from what I gather from all the different brace patterns Ovation guitars had on them, and from what I read in the "Book", Charlie was always chasing after the 'perfect' brace pattern. IMO, this isn't necessarily a bad thing, but it's hard to beat the sound of his original, simple X-braces.
Another thing we discussed was the fading logos on the head stock. I've already got artwork for the Ovation logo in vector format. It will be easy enough to duplicate the Balladeer text. I've got an ALPS 5000 printer that can print gold leaf, and I'm familiar with how to create decals having done it for many years for my model airplanes. My only real concern is whether I can make sure the clear carrier sheet of the decals are able to disappear under the finish. When I get to that point, I'll do a few tests to make sure before I do it on Jay's guitar.
Posted 2014-09-20 12:44 PM (#494318 - in reply to #494306) Subject: RE: 1967 Balladeer Rebuild...
Joined: June 2012 Posts: 2303
Location: Lake Forest, CA
Thanks, guys.
Well, I restrung the guitar with Elixir Nanoweb 80/20 Lights (.012-.053) which are the same strings that are on my 1619 and the two guitars sound very, very similar.
The Balladeer has a little more bass on the low E and A string, but only just a little. I attribute this to the lack of tone bars and finger braces, which allow the top to resonate a little more freely.
All-in-all, I'm very impressed with how good it sounds. IMO, the best thing for this guitar is to replicate the braces and keep the guitar as original as possible.
I'm going to start putting together a list of supplies, such as top wood, braces and binding, then get the parts ordered in the next couple of weeks.
It's interesting to note the differences between this guitar and later Ovations. The first thing is the headstock is noticeably smaller, as is the size of the body. The pic below, which I got from Talbert shows this difference between the size of the 1st Gen bowl and a later generation cloth bowl.
Another thing is that the binding is narrower than on later guitars. The binding on this one is just under 3/16". The binding on later Ovations is ~1/4".
Posted 2014-09-20 1:12 PM (#494319 - in reply to #494306) Subject: Re: 1967 Balladeer Rebuild...
Joined: January 2009 Posts: 1249
Location: Texas
I must say that this is extremely exciting, selfishly speaking. I cannot express how grateful I am that Dan agreed to 'restore" this early shiny. This guitar has been passed around between several folks on this board, I am pretty sure. I know that Nick Black owned it and then sold it to another gentleman on the board, after Nick realized it was a bigger restoration than he wanted to tackle $ wise. (I haven't seen Nick around in more than a year. I emailed him about this project and hopefully he will peek in). As it has gone through many hands, it has been triage'd here and there. Since it was in pretty poor shape, it was the house guitar. Thankfully the 40th RI came out. That made it possible to score the 5 point, Klusons and rosette from leftover stock, through the years, by some of the owners. You just don't see many 67's on the secondary market anymore. You certainly would be hard pressed to find an early one in playable condition...with a 2 piece neck. So, there are a couple of cool factors about this guitar and with Dan offering to take it on...it should see another 48-50 years of use, before I send it back to him. Thanks Dan!
Posted 2014-09-20 3:40 PM (#494321 - in reply to #494306) Subject: Re: 1967 Balladeer Rebuild...
Joined: June 2012 Posts: 2303
Location: Lake Forest, CA
You're welcome Jay.
I'm looking forward to jumping into it. I'm going to enjoy playing it with the new strings for a few more days, then start taking it apart and pulling the top off.
I'm going to tackle this a little differently than the 1619. The kerfing inside is a different style than the 1619. It's molded fiberglass and is thinner, which means it's more delicate. Instead of simply ripping the wood off the kerfing, I'm going to split the binding from the top and bowl, then use an Xactco chisel to carefully split the top from the kerfing. I'm going to try to get the top off in one piece.
Posted 2014-09-20 7:46 PM (#494325 - in reply to #494306) Subject: RE: 1967 Balladeer Rebuild...
Joined: April 2010 Posts: 823
Location: sitting at my computer
Dan, threads like this encourage voyeuristic tendencies. Yay!!!
"All I can say about these rosettes is: CHEAP!!! They're printed on pearloid paper which was glued into place after the guitar was finished."
I've seen that guitar rosettes are commonly just paper labels, but it is a bit of a let down to see that this one is too. Now I wonder if that's the case for the other O rosettes also. ??
"Another thing is that the binding is narrower than on later guitars. The binding on this one is just under 3/16". The binding on later Ovations is ~1/4"."
Did the early models have pop'd top problems that prompted the switch to wider bindings? Or maybe it was just a supplier / manufacturer change?
Posted 2014-09-20 9:42 PM (#494326 - in reply to #494325) Subject: RE: 1967 Balladeer Rebuild...
Joined: June 2012 Posts: 2303
Location: Lake Forest, CA
SOBeach - 2014-09-20 5:46 PM
Dan, threads like this encourage voyeuristic tendencies. Yay!!! :laugh
I'm glad you approve. :D
SOBeach - 2014-09-20 5:46 PM
I've seen that guitar rosettes are commonly just paper labels, but it is a bit of a let down to see that this one is too. Now I wonder if that's the case for the other O rosettes also. ??
I hate to be the bearer of bad tidings, but it looks to me like all the O rosettes use the same cheap paper in their construction, even the (very expensive to buy) abalone rosettes.
Here's a few pics:
First, the rosette with which we're all very familiar:
Next, the dark underbelly of the beast. (DUBOB):
If we take a closer look at how it's constructed, we see that it's the same cheap pearloid paper glued to the back of the plastic rosette.
The oak leaf pattern is, either printed or silk-screened to the back of the clear plastic frame. The pearloid (or, abalone) paper is glued to the back of the frame, then the whole thing is sprayed with flat black paint.
The back of the abalone rosette I used on my 1619 looked just like this.
SOBeach - 2014-09-20 5:46 PM
Did the early models have pop'd top problems that prompted the switch to wider bindings? Or maybe it was just a supplier / manufacturer change?
I don't know the answer to that question. Going to the wider bindings could have been a result of using different molded kerfings. Once I get the top off Jay's guitar I'll take a couple of pics to show what the early molded bindings look like. They don't have the same radiused (filleted) underside as what I saw on the 1619.
Posted 2014-09-21 5:47 PM (#494349 - in reply to #494306) Subject: Re: 1967 Balladeer Rebuild...
Joined: July 2002 Posts: 288
Location: Maine
The early abalone custom legend rosettes had sectional abalone pieces glued into the rosettes frame. The oak leaf pattern pretty much masked the butt joint of the individual cut pieces of shell. I'm my opinion they look a lot nicer than the later ones as it's a more subtle "bling " effect.
Posted 2014-09-21 9:36 PM (#494352 - in reply to #494306) Subject: Re: 1967 Balladeer Rebuild...
Joined: June 2012 Posts: 2303
Location: Lake Forest, CA
Thanks, Talbot.
I agree and it's too bad they had to resort to using artificial pearl and abalone instead of the real thing. Costs often rise quickly and a company can't always raise prices to remain profitable.
Posted 2014-10-05 11:51 PM (#494707 - in reply to #494306) Subject: RE: 1967 Balladeer Rebuild...
Joined: June 2012 Posts: 2303
Location: Lake Forest, CA
So, I'm back to work on 485. I wanted to finish up a 3D printed parts project for my brother.
In the meantime, I've been looking here and there at the guitar assessing it's general condition and what will need to be done during the re-top.
Not only does 485 sound really good, it also plays pretty nice. The action is a little higher at the nut end than I prefer, but it's still playable. The action at the bridge end is also pretty low.
While checking the neck angle I found the fretboard does point slightly above the top of the bridge. But, the bridge has a funny profile for an O.
I compared the bridge height to the replacement 5-point bridge. =8^0 (Yikes!)
I compared the 5-point bridge to an OEM walnut bridge and they're both the same height.
I used a small carbon fiber rod to get a basic idea of the neck angle. I laid it on the bowl.
Then, I looked at the neck from the side. It should be angled slightly down away from the bowl, but it's angled slightly up, which explains the shaved bridge.
I moved the CF rod to different positions to get an idea of how the top was warped. Overall, the top is cupped inward.
There is a noticeable bulge below the bridge.
Looking at the guitar from the top to the bottom, the reason for the deformation of the top is that the sides of the bowl in the upper bout area have warped inward. This is most apparent when compared to the lower bout in the next few photos.
I compared this guitar to all my other Ovations and this is the only one with the warping on the upper bout. All my other Os are flat in this area. Here's a close-up that shows the warped upper bout.
It will be interesting to see what happens to the neck position once I get the top off it. Ideally, 'stretching' the sides with piece that's slightly oversize will pull the neck back into proper alignment without having to heat the bowl. If 'stretching' the sides of the upper bout doesn't pull the neck into alignment, then the only other thing to do is a bowl bend, like what MWoody did recently to his 12-string.
While I was messing around in the bridge area, I decided to measure the scale. This was about 1/16" short. I used my strobe tuner and found the intonation was sharp on all six strings at the 12th fret, so this confirms that the bridge location is slightly off. It could have been glued into the wrong place when the replacement bridge was attached, or it could be a result of the top warping.
The plan is to put a new top onto the guitar and new binding. I used my CAD program to make samples of lines with differing widths to determine the thickness of plastic I'll need. The one below is the winner.
Unfortunately, while I can buy binding that's a close match to the ivory-colored binding used on Os, what I can't buy is binding that's the same thickness used in 485's binding. Which means I'll probably need to design and build a machine or a tool that will allow me to precisely thickness-shave or grind the binding.
Posted 2014-10-06 11:36 AM (#494719 - in reply to #494306) Subject: Re: 1967 Balladeer Rebuild...
Joined: March 2005 Posts: 12750
Location: Boise, Idaho
I can imagine that most of the issues with this guitar were caused by the collapse of the neck and top into the sound hole, which is a problem with all guitars over time. It would be interesting to see if other standard box guitars of similar age had the same problems. This was one of the reasons for the Adamas multihole design. It would also be interesting to see what happens to a 1537 or Adamas when they get to be the same age.
Posted 2014-10-06 11:54 AM (#494720 - in reply to #494714) Subject: RE: 1967 Balladeer Rebuild...
Joined: June 2012 Posts: 2303
Location: Lake Forest, CA
It looks like it's mostly tension/age related. The splits in the lower bout probably contributed, too.
My guess is that over time, the tension of the strings caused the top wood to cup inward. The plasticity of the bowl sides allowed them to be warped as the cupping top wood rolled the top of the sides inward.
Based on my experience with fiberglass, I'd say the sides have probably taken a set to this new shape. The tricky part is whether the upper bout sides can be warped back into shape.
Maybe. It's hard to say why the bridge was replaced. I can say that once this one comes off, it's not going to work on too many other guitars.
Thanks! I'm proceeding slowly right now so I can make a list of what needs to be done and map out the course of action so everything gets done in the right order.
amosmoses - 2014-10-06 5:26 AM
I guess my question is...is it the tension/age that caused the multiple shifts...the lack of hydration on the top...
Is it a good bet that the original 5 point was removed (and possibly damaged?) so that the guitar could be playable?
Posted 2014-10-06 1:09 PM (#494722 - in reply to #494719) Subject: Re: 1967 Balladeer Rebuild...
Joined: June 2012 Posts: 2303
Location: Lake Forest, CA
I agree. It looks to me like this is exactly what happened.
I've got a 1975 Yamaha FG-260 12 string. It's got a bit of a bellying problem that's caused an increase in the action over the years. I'll take a look at it tonight to see if the sides have warped at all, or if it's just top wood itself that's caving in.
I did compare 485's top wood to the other Os I've got and they're all warped to some degree. Interestingly, the least warped is the Book Elite, which has the Adamas quintaid bracing.
Mark in Boise - 2014-10-06 9:36 AM
I can imagine that most of the issues with this guitar were caused by the collapse of the neck and top into the sound hole, which is a problem with all guitars over time. It would be interesting to see if other standard box guitars of similar age had the same problems. This was one of the reasons for the Adamas multihole design. It would also be interesting to see what happens to a 1537 or Adamas when they get to be the same age.
Posted 2014-10-06 1:17 PM (#494724 - in reply to #494719) Subject: Re: 1967 Balladeer Rebuild...
Joined: March 2002 Posts: 15652
Location: SoCal
Mark in Boise - 2014-10-06 9:36 AM
I can imagine that most of the issues with this guitar were caused by the collapse of the neck and top into the sound hole, which is a problem with all guitars over time. It would be interesting to see if other standard box guitars of similar age had the same problems. This was one of the reasons for the Adamas multihole design. It would also be interesting to see what happens to a 1537 or Adamas when they get to be the same age.
My 1537 is 31 years old and shows no sign of problems with the top. We'll see what the next 10 years bring.
I've seen a lot of the early guitars with the original 5 point rosewood bridges gone and replaced by the walnut rounded bridge. I don't know why that was necessitated except maybe the original glue wasn't good and they came up?
Posted 2014-10-06 4:04 PM (#494731 - in reply to #494306) Subject: Re: 1967 Balladeer Rebuild...
Joined: October 2005 Posts: 4025
Location: Utah
My 1537 is dead flat across the top. It looks like a brand new guitar. My Patriot on the other hand has a bit of bellying behind the bridge. There may be many differences in construction other than multi-hole vs single hole, but there is no question the single hole looks aged.
Posted 2014-10-14 8:33 PM (#494988 - in reply to #494306) Subject: RE: 1967 Balladeer Rebuild...
Joined: June 2012 Posts: 2303
Location: Lake Forest, CA
So, after a bit of thought and research online, I think I have a pretty good idea of how to proceed.
The first thing to do is to remove the strings, tuners, TRC and bridge saddle.
These were stashed into a compartmentalized container.
Next, remove the bindings. And, as it turns out, the purfling, too.
Now the edges of the top are exposed.
I used an Xacto chisel to split the glue joint holding the top into place. As you can see, the style of the kerfing is completely different.
Voila! The top is off. This poor, poor top. What a hard life it's had. More on that later.
I used the Xacto chisel to clean the kerfing of all the wood fibers. That looks 100% better already. Of note in this photo are the molded kerfing and the vertical lines around the sides of the bowl underneath the kerfing. This is an important feature. More on this later, too.
The only step remaining in the top removal is to clean out the area between the underside of the fretboard extension and the top of the neck block.
I used the same tools and techniques as on my 1619. And, for whatever reason, the progress stops right around the 15th fret. These next two pics also show the molded cloth kerfing really well.
IMO, the molded kerfing is an important factor that makes the the early Os sound so good. This, along with the simple X-bracing allows the top to vibrate really freely. The molded kerfing reminds me of the patented suspension ring used on the Adamas guitars.
Moving right along...
Nah! Just kidding!
Seriously, I used the practice top wood from my 1619 so I could check the neck geometry. (Ewww...)
One idea I had to push the sides of the bowl back into place was to cut down some Go-bars. (didn't work --the bowl flexes in all the wrong places.)
Getting back to the top. It has had a hard life. It's got several cleats used to reinforce crack repairs. These look to me like bass wood. (Think: popcycle sticks) Whomever did the repairs obviously loved epoxy as it was generously slathered on.
But, let's talke a little about how its construction. It's a 3-piece top. But, what's interesting is that it's hand-made and full of pencil marks for the alignment of the bracing. Here's a few pics that show the pencil marks, starting at the upper bout and moving down to the lower bout.
The fiberglass tape reinforcement across the lower bout looks entirely ordinary and should be easy enough to duplicate.
Noteworthy is the extra tone bar across the lower bout between the two lower legs of the X-braces. Obviously, not a part of the original construction. It was probably done as a doubler for the crack repairs.
Also interesting is the 'loose' manner in which the bracing parts were aligned to the marks during assembly. So loose that one of the reinforcement strips overlapped the sound hole and needed to be sanded to match the opening.
Since I had the top off the bowl, I was curious about comparing the 1st Gen bowl vs. a 2nd Gen bowl. If you'll recall from my The History of the Bowl thread, the 1st Gen bowl was a cloth and resin layup vacuum bagged over a male mold. The 2nd Gen bowl was also cloth and resin, but was done inside a female mold and without vacuum.
From my own knowledge of molding fiberglass parts, I know what difference these methods makes in the final part, but I was curious what if any difference it made in the bowl, i.e.: weight, resonance, etc.
Luckily, I just bought a BFLG 1978 1617 project off eBay that was missing its top and hardware, so it's a fairly accurate apples-to-apples comparison between 1st Gen and 2nd Gen.
First, the weight. The two are within ounces of each other. The 1617 weighed in at 3 lbs. 8 Oz. while 485 weighed in at 3 Lbs. 4 Oz. So, the 1st Gen. is lighter than 2nd Gen.
I tried a tap-test of both bowls. What a difference. The 1st Gen. has real tone. The 2nd Gen. sounded dull. It still had tone, but it was being muted. It was about then that a light bulb went off.
From a purely construction standpoint, the two guitars, although separated by 12 years, are nearly identical. But, the 1619 weighs 4 ounces heavier. The 2nd Gen. layup method can result in heavier pieces, but not 4 ounces in a piece this size. And, the 1617 kerfing is beefier, but not significantly heavier than what was used on 485. The only difference between these two that would add that much weight is the finish applied to the bowls.
When flying model airplanes, weight is critical. As a result, serious modelers are very weight conscious. One thing I've learned is that paint is heavy. Thick paint is really heavy. And, thick paint can easily add ounces on a piece the size of the bowls on Os. But, more importantly to guitars is that thick paint impedes the vibration of the parts.
IMO, this is just one more thing that gave the early Os the reputation of good sounding guitars. And, any Ovation knock-offs I produce will have thin paint on the bowl.
Posted 2014-10-14 8:34 PM (#494989 - in reply to #494306) Subject: RE: 1967 Balladeer Rebuild...
Joined: June 2012 Posts: 2303
Location: Lake Forest, CA
So, getting back to the vertical lines on the inside sides of the bowl.
When I first saw these, I assumed they were just drips of epoxy.
A closer examination revealed that they're actually wrinkles. And, not just any wrinkles but the type of wrinkles that happen when a molded part is vacuum-bagged.
So, what 485 represents is a transitional model between the 1st Gen bowl and the 2nd Gen bowl methods.
To wit, 1st Gen bowls were vacuum bagged over male molds. 2nd Gen. bowls were hand-layups inside a female mold.
485 is a vacuum bagged part molded inside a female mold, which is very unusual.
Obviously, Charlie was looking for ways to speed up the layup process, but still keep the quality.
In the end, it's clear they decided to just lay up parts using the fastest and easiest methods. (2nd Gen.)
Posted 2014-10-15 10:35 AM (#494997 - in reply to #494991) Subject: RE: 1967 Balladeer Rebuild...
Joined: June 2012 Posts: 2303
Location: Lake Forest, CA
My Stewmac Dreadnaught plans show the reinforcement strips spaced at about 1/8" away from the sound hole. That's where I placed them on my 1619. I don't think the placement of these strips is very critical. They only keep the sound board from splitting around the sound hole.
When I was getting ready to brace my 1619, I read up on whether to tuck the braces or not. What I mean is making notches in the X-braces for the tone bars and finger braces and making notches in the kerfing for the ends of the X-braces.
The Stewmac plans show the braces tucked. They also show the reinforcement strips butted up to the X-braces, but not tucked under.
I looked at my 2078TX-5, which has the LX bracing and my Alvarez PD100S, which also has X-braces. None of the braces on these two guitars are tucked.
No one really seems to know the true purpose behind why some guitar makers tuck their braces. The general consensus is that manufacturers do this to keep the braces from popping off the sound board if the guitar gets bumped. From what I read, it's best to keep the bracing spacing at about 1/8", which is what I did on my 1619.
IMO, yes, tucking the braces would inhibit response because it limits the top vibration. I did not tuck the braces on my 1619.
Interestingly, the X-brace is about 2" from the bottom of the hole. The rear-shifted X-brace is usually 1-1/2" and the forward-shifted X-brace is 1". (I used the forward X-brace on my 1619)
I haven't measured the angle of the X-brace on the Balladeer, but I will soon. I'm curious what angle it's at.
Posted 2014-10-15 1:15 PM (#495001 - in reply to #494306) Subject: Re: 1967 Balladeer Rebuild...
Joined: March 2002 Posts: 15652
Location: SoCal
This is interesting to watch. Dan, that original top needs to be kept for postarity. Also, can you put a new face on a headstock? My Legend has a light headstock face and I would love it to be dark rosewood to match the bridge.
Posted 2014-10-15 2:06 PM (#495002 - in reply to #494306) Subject: Re: 1967 Balladeer Rebuild...
Joined: March 2005 Posts: 12750
Location: Boise, Idaho
The reference to the imprecise placement of the bracing reminded me of my 77 Folklore. It had issues when I got it from ebay. Looking inside for the source of a rattle, I found a brace had been split where the hole drilled to accomodate the piezo saddle and wire had gone through part of the brace. I glued the brace and it has been fine. In fact, it sounds great. I wondered then why they put the brace right under where they had to drill for the saddle. Maybe that was just the way mine is, not the way the Folklores were designed.
Posted 2014-10-15 4:05 PM (#495995 - in reply to #495001) Subject: Re: 1967 Balladeer Rebuild...
Joined: June 2012 Posts: 2303
Location: Lake Forest, CA
Thanks, Paul. I'm glad you're enjoying it.
Other than trying to remove the pickups, I have no plans to do anything with the top, other than to send it back to Jay, if he wants it back. The pickups appear to have been glued to the underside of the sound board with CA. CA really grabs onto rubber, so it will be tricky to remove them without damage.
The headstock overlay veneer probably can't be split from the headstock. The only way to change it would be to stain it, or sand it down to the headstock, then glue on a new one and refinish it.
immoody - 2014-10-15 11:15 AM
This is interesting to watch. Dan, that original top needs to be kept for postarity. Also, can you put a new face on a headstock? My Legend has a light headstock face and I would love it to be dark rosewood to match the bridge.
Posted 2014-10-15 4:13 PM (#495996 - in reply to #495002) Subject: Re: 1967 Balladeer Rebuild...
Joined: June 2012 Posts: 2303
Location: Lake Forest, CA
If your Folklore had the rear-shifted X-brace, then it's possible that the problem was simply that the placement of the brace predated the need to drill a hole for the p/u.
Or, it's possible that the brace was just glued into the wrong place, as are the braces on 485. The combination of rear brace placement and misalignment could have put the brace then under the area where the hole for the p/u was supposed to go. (error cascade)
Mark in Boise - 2014-10-15 12:06 PM
The reference to the imprecise placement of the bracing reminded me of my 77 Folklore. It had issues when I got it from ebay. Looking inside for the source of a rattle, I found a brace had been split where the hole drilled to accomodate the piezo saddle and wire had gone through part of the brace. I glued the brace and it has been fine. In fact, it sounds great. I wondered then why they put the brace right under where they had to drill for the saddle. Maybe that was just the way mine is, not the way the Folklores were designed.
Posted 2014-10-15 6:14 PM (#496002 - in reply to #494306) Subject: Re: 1967 Balladeer Rebuild...
Joined: October 2005 Posts: 4025
Location: Utah
Dan, great pictures documenting the original construction. I am surprised the bracing was set up with pencil marks. Presumably some kind of template was used to draw the lines, then hand place the braces.
All that epoxy must have had a significant effect on the tone of that old top!
Posted 2014-10-15 9:52 PM (#496005 - in reply to #494306) Subject: Re: 1967 Balladeer Rebuild...
Joined: December 2008 Posts: 1453
Location: Texas
Very interesting and informative Dan.
"While I was messing around in the bridge area, I decided to measure the scale. This was about 1/16" short."
Just a thought/question: If the neck angle was high (as you indicated), and the upper bout was indented, could those combined factors have been enough to account for the shortened scale? If so, the bridge may have originally been exactly where it belonged.
Posted 2014-10-16 9:33 AM (#496010 - in reply to #496002) Subject: Re: 1967 Balladeer Rebuild...
Joined: June 2012 Posts: 2303
Location: Lake Forest, CA
Thanks, Steve.
Yes, I agree. It looks like they used a template to draw the lines and then placed the braces by hand. I seem to recall seeing a factory tour video with one of the workers doing just that.
Yep, there is a lot of epoxy. It'll be interesting to see how it sounds with the original brace pattern on clean wood.
FlySig - 2014-10-15 4:14 PM
Dan, great pictures documenting the original construction. I am surprised the bracing was set up with pencil marks. Presumably some kind of template was used to draw the lines, then hand place the braces.
All that epoxy must have had a significant effect on the tone of that old top!
Posted 2014-10-16 9:38 AM (#496011 - in reply to #496005) Subject: Re: 1967 Balladeer Rebuild...
Joined: June 2012 Posts: 2303
Location: Lake Forest, CA
Thanks!
The collapsing top wood could account for some of the shortened scale. But, remember that this is not the original bridge. This is a replacement that was added at some point in the guitar's life.
But, you do bring up a good point. I'll measure the scale just to make sure it's not a short-scale neck. Because all six strings intone sharp, I don't think it is but I can't hurt to verify.
standing - 2014-10-15 7:52 PM
Very interesting and informative Dan.
"While I was messing around in the bridge area, I decided to measure the scale. This was about 1/16" short."
Just a thought/question: If the neck angle was high (as you indicated), and the upper bout was indented, could those combined factors have been enough to account for the shortened scale? If so, the bridge may have originally been exactly where it belonged.
Posted 2014-10-16 11:28 AM (#496012 - in reply to #494306) Subject: Re: 1967 Balladeer Rebuild...
Joined: June 2012 Posts: 2303
Location: Lake Forest, CA
I measured the scale this morning. It's 12-5/8" (12.625" ) from the nut to the center of the 12th fret. This puts the scale length at 25-1/4". (25.25" )
Posted 2014-10-16 11:42 PM (#496023 - in reply to #494306) Subject: Re: 1967 Balladeer Rebuild...
Joined: December 2008 Posts: 1453
Location: Texas
DanSavage - 2014-10-16 11:28 AM
I measured the scale this morning. It's 12-5/8" (12.625" ) from the nut to the center of the 12th fret. This puts the scale length at 25-1/4". (25.25" )
Which, I believe, is what it should be. I guess the reason for the old slightly-shortened scale length is actually irrelevant; once you've corrected the neck angle and added a new (flat) top, you'll be able to place the bridge precisely where it belongs and avoid the intonation problems you found on the "before" version anyway.
(Whether or not Jay will be able to sing in tune with it will remain to be seen/heard.)
Posted 2014-10-17 3:57 AM (#496025 - in reply to #494306) Subject: Re: 1967 Balladeer Rebuild...
Joined: October 2012 Posts: 1018
Location: Yokohama, Japan
Once again, a really interesting and informative thread DanSavage. Thank you! My '82 Fxxxxr F-330 12-string and my '74 Yamaha FG-160 are starting to bow inward at the sound hole (just slightly), and I've been wondering what my options were. Is there a way to fix bowing like this without resorting to a sound board upgrade? The previous owner of my FG-160 actually had a luthier shave the bridge down to try to keep the string action manageable, and it looks like that's what happened to the bridge of the '67 Balladeer you're working on. Anyway, keep up the great work as usual. Thoroughly entertaining stuff!
Posted 2014-10-17 9:28 AM (#496029 - in reply to #496023) Subject: Re: 1967 Balladeer Rebuild...
Joined: June 2012 Posts: 2303
Location: Lake Forest, CA
Yes. I checked the Ovation Guitars site and 25-1/4" is the scale length used on these guitars.
Yes, but discussion of the causes does make for interesting conversation.
(Having made a few eardrums bleed myself, I'm not going to throw stones about anyone's singing abilities, no matter how bad they sound...)
standing - 2014-10-16 9:42 PM
Which, I believe, is what it should be. I guess the reason for the old slightly-shortened scale length is actually irrelevant; once you've corrected the neck angle and added a new (flat) top, you'll be able to place the bridge precisely where it belongs and avoid the intonation problems you found on the "before" version anyway.
(Whether or not Jay will be able to sing in tune with it will remain to be seen/heard.)
Posted 2014-10-17 9:31 AM (#496030 - in reply to #496025) Subject: Re: 1967 Balladeer Rebuild...
Joined: June 2012 Posts: 2303
Location: Lake Forest, CA
I've got a `75 FG-260 12-string that's got the same problem. I tried the JLD Bridge Doctor, but it didn't really help. I've decided it's a wall-hanger. I'll probably never get rid of it because it's my first guitar and the one I learned to play on, if you can call what I do, 'playing'.
Thanks, Arumako.
arumako - 2014-10-17 1:57 AM
Once again, a really interesting and informative thread DanSavage. Thank you! My '82 Fxxxxr F-330 12-string and my '74 Yamaha FG-160 are starting to bow inward at the sound hole (just slightly), and I've been wondering what my options were. Is there a way to fix bowing like this without resorting to a sound board upgrade? The previous owner of my FG-160 actually had a luthier shave the bridge down to try to keep the string action manageable, and it looks like that's what happened to the bridge of the '67 Balladeer you're working on. Anyway, keep up the great work as usual. Thoroughly entertaining stuff!
Posted 2014-11-01 1:40 PM (#500490 - in reply to #494306) Subject: RE: 1967 Balladeer Rebuild...
Joined: June 2012 Posts: 2303
Location: Lake Forest, CA
It's been a few weeks since my last update. Mostly, I've been contemplating the steps to take to bend the bowl to realign the neck. It's important to do this first as this will be the foundation for everything else to follow.
Since the bowl is a vacuum-bagged part, it's very thin as most of the resin has been scraped and squeezed out.
The second concern is the kerfing. Or, more specifically, the glue joint holding the kerfing to the bowl. Since all of this is epoxy, any or all of it could be softened by the heat being applied to the bowl.
Third and last concern is warps. The entire rim of the bowl needs to be supported equally while being heated.
After playing out the pros and cons of all the different ways, I decided on making a fixture or jig that will both push the neck and bowl into alignment, fully support the entire rim and shield the kerfing from heat.
Working in 3D CAD I came up with the design seen in the screen shots. The first shot is the basic design drawing of the jig and the parts needed. Basically, the jig consists of two parts: the neck base and clamp and the body table.
The desired neck angle when viewed from the side is 1.5 degrees. The guitar is turned upside down so the top faces down. The fretboard lies flat on a 1/4" birch ply bed which is bolted to the bench. A Stewmac neck caul is placed on the back of the neck and another 1/4" birch ply plate is screwed to the bench using 3" drywall screws.
The bowl rests on the table which is built up from 1/8" birch ply. The base of the table uses interlocking egg crate construction. The table top is built in two halves which are glued to the top of the base. I'll build the table in my gobar deck so it's flat.
There's a 1/4" birch ply ring that will get glued to the periphery of the top of the table. A 1" strip of nomex paper will get glued to the inside face of the ring to form the kerfing heat shield.
This pic shows the final parts laid out on 12" x 24" sheets, ready for the laser cutter. I'll be sending these drawings to him today or tomorrow. I decided to send these out rather than cutting them myself on my jig saw because of the accuracy. The black lines are cuts and the red lines are etches.
Posted 2014-11-02 2:20 AM (#500501 - in reply to #494306) Subject: Re: 1967 Balladeer Rebuild...
Joined: October 2012 Posts: 1018
Location: Yokohama, Japan
Holy Molly DanSavage! You are going all out on this project! This is going to be another precedent setter for all O restorations. Especially, as Os become rarer and harder to find, restorers all over the world are going to benefit from your work! Thanks a million! It's going to be really interesting to learn how you decide to apply the heat locally around the neck area and at what temperatures! Very cool!
Posted 2014-11-02 11:30 AM (#500505 - in reply to #494306) Subject: Re: 1967 Balladeer Rebuild...
Joined: December 2004 Posts: 554
Location: Denmark
Nice work good and thorough analysis as always. You could make a living out of reviving vintage Ovations. I dont know how the purists among collectors would relate to this, but I for sure would not mind a guitar saying "Rebuild 2014 by DanSavage" on the label sticker.
Posted 2014-11-02 11:47 AM (#500507 - in reply to #500505) Subject: Re: 1967 Balladeer Rebuild...
Joined: January 2009 Posts: 1249
Location: Texas
"Rebuild 2014 by DanSavage"
That would be an honor to have that in the bowl...an excellent idea, TPA.
While I was reading Dans post and comprehending about 10% of it (unlike Penthouse, the pictures didn't help), I thought to myself, as Dan is contemplating this bowl bend, thinking that originally it was just a re-top...he has to being saying my name like Jerry referred to Newman
Posted 2014-11-02 4:01 PM (#500510 - in reply to #494306) Subject: Re: 1967 Balladeer Rebuild...
Joined: March 2002 Posts: 15652
Location: SoCal
I would guess that Dan is going all out on this for two reasons. First, he loves the challenge, and second, because he knows that this will come in handy on some rebuild down the road.
Jay, don't stress. We ALL say your name like Jerry did Newman's........
Posted 2014-11-03 12:23 PM (#500552 - in reply to #500501) Subject: Re: 1967 Balladeer Rebuild...
Joined: June 2012 Posts: 2303
Location: Lake Forest, CA
arumako - 2014-11-02 12:20 AM
Holy Molly DanSavage! You are going all out on this project! This is going to be another precedent setter for all O restorations. Especially, as Os become rarer and harder to find, restorers all over the world are going to benefit from your work! Thanks a million! It's going to be really interesting to learn how you decide to apply the heat locally around the neck area and at what temperatures! Very cool!
Thanks!
The 'how' of applying the heat is already decided: heat gun. I also have an IR thermometer that will allow me to monitor the temperature of the bowl so it doesn't get too hot and so I know how warm it needs to get before the resin softens. As Paul correctly guessed, this probably won't be the last O bowl I bend.
There's two ways to alter the angle of the neck. One is to warp the back area below the neck inward. The other is to stretch the area around the neck pulling it away from the bridge. Of the two, pulling the neck away from the bridge is the best way. Which will happen will be determined by what part of the bowl is softened.
Preliminary tests show the area of the bowl where I'll apply the heat is the area between the of the shoulder of the upper bout and the neck.
To keep the bowl from squeezing in as it's being stretched I'll cut down some gobar rods so they fit inside the bowl across the upper bout, the waist area and the lower bout.
Posted 2014-11-03 12:38 PM (#500554 - in reply to #500505) Subject: Re: 1967 Balladeer Rebuild...
Joined: June 2012 Posts: 2303
Location: Lake Forest, CA
tpa - 2014-11-02 9:30 AM
Nice work good and thorough analysis as always. You could make a living out of reviving vintage Ovations. I dont know how the purists among collectors would relate to this, but I for sure would not mind a guitar saying "Rebuild 2014 by DanSavage" on the label sticker.
I've thought about doing that on my 1619, but instead of putting it on the bowl, I was going to put it on the underside of the top.
Posted 2014-11-03 12:48 PM (#500556 - in reply to #500507) Subject: Re: 1967 Balladeer Rebuild...
Joined: June 2012 Posts: 2303
Location: Lake Forest, CA
amosmoses - 2014-11-02 9:47 AM
"Rebuild 2014 by DanSavage"
That would be an honor to have that in the bowl...an excellent idea, TPA.
While I was reading Dans post and comprehending about 10% of it (unlike Penthouse, the pictures didn't help), I thought to myself, as Dan is contemplating this bowl bend, thinking that originally it was just a re-top...he has to being saying my name like Jerry referred to Newman
Hello, Ja-ay...
It's hard to explain something like the jig and how it's going to work. I could have build a 3D model and rendered it, but I'd rather just get the parts laser cut, then build it for real.
Normally, I wouldn't put my own sticker on someone else's guitar without their permission. To me, that reeks of car dealers that put their own emblems on the backs of car's they've sold. If you want something like that, I can probably come up with something tasteful.
Posted 2014-11-03 12:50 PM (#500557 - in reply to #500510) Subject: Re: 1967 Balladeer Rebuild...
Joined: June 2012 Posts: 2303
Location: Lake Forest, CA
immoody - 2014-11-02 2:01 PM
I would guess that Dan is going all out on this for two reasons. First, he loves the challenge, and second, because he knows that this will come in handy on some rebuild down the road.
Yep. I suspect this won't be the last O bowl I'll need to bend.
Posted 2014-11-05 11:47 PM (#500645 - in reply to #494306) Subject: RE: 1967 Balladeer Rebuild...
Joined: June 2012 Posts: 2303
Location: Lake Forest, CA
My laser cutting guy was able to turn around the order very quickly. I got the parts today.
I popped the parts (cut out, really) out of the carrier sheets and did a dry-run assembly of the 'table' base parts.
This next pic shows the 1-1/2 degree angle of the 'table' top.
I slid the neck base into place.
Put the 'table' top onto the base.
Placed the doublers/heat shield bases. The nomex paper strip will be glued to the inside lip of the doublers.
Here's the basic idea of how it will (should?) work. The guitar will rest on the 'table' and the neck base.
The neck base will be screwed to the work bench.
The neck caul will be put into place.
Then, the clamping plate will be screwed down to the work bench. This will pull the neck down and cause the bowl to warp away from the neck to the 1-1/2 degrees needed to bring the neck back in-line with the bridge. Once the neck is clamped, then it's time to apply the heat to re-shape (warp/bend) the bowl.
So far, so good. Next up is to break out the gobar deck, then glue the table together in preparation for the bowl bend. Pics to follow.
Posted 2014-11-06 6:38 AM (#500652 - in reply to #494306) Subject: Re: 1967 Balladeer Rebuild...
Joined: October 2012 Posts: 1018
Location: Yokohama, Japan
Wow, that was quick! Laser cutting and CNC routing make wood working so much easier nowadays. Immaculate planning and preparation DanSavage! Will bowl bends work on old hand laid fiberglass bowls as well as new molded bowls? Once the bowl bend is complete, how long does it take to cool off and set into its new position permanently? Don't mean to pester you with questions, but this is really interesting stuff!
Posted 2014-11-06 1:56 PM (#500666 - in reply to #494306) Subject: Re: 1967 Balladeer Rebuild...
Joined: January 2014 Posts: 402
Location: Taxed To Death State
Dan, man not only is your work, your home made jigs, fixtures, and ingenuity amazing, your attention to detail in writing these posts is incredible. Doing an extensive rebuild like this is engineering art, and your posts are no less impressive. I dream of having the time and patience you have. Kudos Dan. Just f'n awsome stuff.
Posted 2014-11-06 4:34 PM (#500672 - in reply to #500652) Subject: Re: 1967 Balladeer Rebuild...
Joined: June 2012 Posts: 2303
Location: Lake Forest, CA
Hi Arumako,
Yeah, I wasn't expecting to get the parts until the end of this week or the beginning of next week. Sometimes he's able to squeeze these little jobs in.
Fiberglass resin is plastic. Not the same type of plastic as say, ABS or polystyrene, but it's still plastic. And all plastics can be made to deform with heat. So, in theory, both old hand-laid bowls and the SMC bowls can be deformed.
The hand-laid bowls are probably trickier because they're thinner and heat up more quickly which makes it easier to overshoot the maximum temperature. The TG or translation temperature (basically, the temperature at which the resin softens) on resin depends on the maximum temperature used during the curing process. The higher the curing temperature, the more heat-resistant the part.
Room-temperature curing usually results in a TG temperature of around 160-180 degrees. SMC bowls are formed in molds heated to 300-degrees. Naturally, the SMC bowl would require higher temps than a hand-laid, room-temp cured bowl.
Since this guitar is hand-laid cloth that's been vacuum-bagged, there's a minimum of resin. This means that I'll need to be very careful and monitor the temperature of the bowl very closely to prevent overheating the resin.
Cooling times will vary, but generally the part only needs to cool to room temperature for the resin to take the new set. There is a little spring-back, but I'm planning to leave the guitar in the jig for 24 hours or so just to make sure the resin takes the new set. If it springs back too far, then I'l try another shot. I don't want to attempt this too many times because I'm afraid of crystallizing the resin.
Luckily, I've got a small piece of molded fiberglass used as a reinforcement of the A-braces on my 1617. I'm going to pop that off the braces, then experiment with that before going after 485's bowl. This should give me a good idea of what kind of temperature and what effect the heat has on the molded part.
Dan
arumako - 2014-11-06 4:38 AM
Wow, that was quick! Laser cutting and CNC routing make wood working so much easier nowadays. Immaculate planning and preparation DanSavage! Will bowl bends work on old hand laid fiberglass bowls as well as new molded bowls? Once the bowl bend is complete, how long does it take to cool off and set into its new position permanently? Don't mean to pester you with questions, but this is really interesting stuff!
Posted 2014-11-06 4:42 PM (#500674 - in reply to #500666) Subject: Re: 1967 Balladeer Rebuild...
Joined: June 2012 Posts: 2303
Location: Lake Forest, CA
Thanks, for the kind words, Dan. :D
danomyte - 2014-11-06 11:56 AM
Dan, man not only is your work, your home made jigs, fixtures, and ingenuity amazing, your attention to detail in writing these posts is incredible. Doing an extensive rebuild like this is engineering art, and your posts are no less impressive. I dream of having the time and patience you have. Kudos Dan. Just f'n awsome stuff.
Posted 2014-11-23 8:34 PM (#501194 - in reply to #494306) Subject: RE: 1967 Balladeer Rebuild...
Joined: June 2012 Posts: 2303
Location: Lake Forest, CA
It's been a few weeks since my last post.
First job was to assemble the table top. I used tape as the 'hinge' to keep the two halves in alignment.
Fold the halves back to expose the joint, then run a bead of medium CA.
Remove the 'hinge', then use go-bars to secure it to the deck.
Assemble and align the lattice and use more go-bars to keep them in place. Once everything aligned, I ran a bead of medium CA along each side of the lattice and top joints. I used ZIP kicker to speed up the process.
After all the glue joints were kicked, I laid the deck on each side so I could glue the lattice joints for extra strength.
The glue is dry and I pulled the table off the deck. Next task is to assemble the 1" wide nomex cloth heat shield to the 1/4" birch ply frame. I sprayed kicker on the cloth, then applied a bead of medium CA to the frame and pressed the cloth strip. When the two parts are pressed together the glue dries in a few seconds. Repeat for the other side.
My measurements were off slightly, so I omitted the bottom plate and just used the neck caul and top clamping plate. To speed the process and assure accurate alignment of the top clamp plate I drilled pilot holes in the workbench and drew alignment marks using a Sharpie.
Before clamping, the gap between the kerfing and the table top was about 1/4".
The screws are tightened to pull body down to the table top.
The heat shields were clamped into place and an extra strip was used to protect the neck to body joint. These were only used during the first heating session. I actually found I didn't need to use the heat shields, so these were omitted during later heating sessions.
Break out my handy-dandy heat gun and IR thermometer. As you can see, ambient temp was 72.3° F.
Before any heating the neck geometry is about 1/4" or so below the top of the bridge.
It took several heating/cooling sessions. I would heat the bowl, let it cool, then pull the screws to check the change. Here we see the neck geometry is about 1/8" below the top of the bridge.
I wasn't sure how hot the fiberglass needed to be, so I started off heating it to about 160° F, which is a safe starting point. I found I was able to make more progress by heating it to higher temps. My biggest fear was overheating the fiberglass and causing it to ripple.
By the end, I was heating it to about 210° F to 230° F. In addition to heating the sides of the upper bout, I also heated up the back up the upper bout.
The neck geometry is now about 1/16" above the top of the bridge. I could have kept going, but this is plenty good, so I think this is a good stopping point.
Next is to start gathering the materials to build a new top.
Posted 2014-11-23 9:02 PM (#501196 - in reply to #501194) Subject: RE: 1967 Balladeer Rebuild...
Joined: January 2009 Posts: 1249
Location: Texas
Nothing but incredibly awesome. So were you suprised that the bowl could take that much heat? Did you guess at the time the bowl needed to be heated, or could you visually gauge movement?
Posted 2014-11-24 8:15 AM (#501204 - in reply to #494306) Subject: Re: 1967 Balladeer Rebuild...
Joined: October 2012 Posts: 1018
Location: Yokohama, Japan
Man, that is good stuff DanSavage! Incredibly thoughtful and informative. 210 to 230 degrees is way up there... this Lyrachord stuff is pretty incredible stuff isn't it? Just awesome!
Posted 2014-11-24 10:55 AM (#501214 - in reply to #494306) Subject: Re: 1967 Balladeer Rebuild...
Joined: March 2002 Posts: 15652
Location: SoCal
Ok, I've got a couple of questions. First, how is the body of the guitar secured down, or is it? Second, when you heat the bowl, are you slowly applying pressure on the upper bout of the bowl, pushing it down to close the gap between the table and the top, which would push the neck back into proper alignment? Do I have that right?
I'm looking forward to playing this guitar before it goes back to Texas......
Posted 2014-11-24 11:21 AM (#501216 - in reply to #501196) Subject: RE: 1967 Balladeer Rebuild...
Joined: June 2012 Posts: 2303
Location: Lake Forest, CA
amosmoses - 2014-11-23 7:02 PM
Nothing but incredibly awesome. So were you suprised that the bowl could take that much heat? Did you guess at the time the bowl needed to be heated, or could you visually gauge movement?
Thanks, Jay.
Actually, I had no idea how much heat it was going to take because I didn't know what brand of epoxy was used during the lay-up.
Generally speaking, epoxy used in a room-temperature lay-up has a Tg (glass transition temperature) of about 170° F or so. The Tg represents the temperature where the resin transitions from a solid state to a rubbery state.
The Tg is determined by the initial curing temperature. If you know the piece is going to be used in an environment experiencing elevated temperatures, then you post cure the piece at a temperature of about 30° F higher than what you expect it to be. Post curing is done inside a hot box where the temps are raised a little at a time over the course of several hours up to the max temp, then kept there for a set period, and then brought down gradually so the piece doesn't warp. Post curing is usually done inside the mold, again, so the molded piece doesn't warp. Needless to say, in such cases, the mold is post cured before it's used to lay up any parts.
Some epoxies are so-called high-temp epoxies that can be post cured up to 300°-400° F. That's usually about the limit an epoxy can take. If you want higher temps you need to move to different chemistry of resins.
Getting back to the bowl, I wasn't sure what the Tg would be so I started at 160° F. I also didn't know what how much of the bowl would need to be heated to realign the neck. During the dry runs, I could see the area around the upper bout where the neck joint was warping, but I didn't think just heating this area would have the desired effect.
At first, I clamped the neck, heated up sides of the upper bout, down to the waist area, then let it cool back to ambient temperature. Once it was cooled, I removed the clamps and checked alignment and didn't really see any perceptible change. So, I repeated the cycle raising the temps until I did see an effect.
Once I found that the temp that the glass needed to be heated to effect a permanent change, (~200° F) I just worked to get the areas heated to that temperature.
Rather than attempt to bend the bowl all at once, I effected the changes a little bit at a time. If you look closely at the clamped bowl pic, you can see the top of the bowl is about 1/2" or so from the table top. With each heating/cooling cycle I gradually moved the bowl down the table top to keep increasing the neck angle. By the last cycle the upper bout overhang the table top by about 1/4".
Posted 2014-11-24 11:27 AM (#501217 - in reply to #501204) Subject: Re: 1967 Balladeer Rebuild...
Joined: June 2012 Posts: 2303
Location: Lake Forest, CA
arumako - 2014-11-24 6:15 AM
Man, that is good stuff DanSavage! Incredibly thoughtful and informative. 210 to 230 degrees is way up there... this Lyrachord stuff is pretty incredible stuff isn't it? Just awesome!
Thanks, Arumako.
Like I've said before, Lyrachord is just a name Ovation marketing gave to the fiberglass bowls. By itself, there's nothing special about the fiberglass they used.
The SMC bowls are made from the same materials as Corvette body panels and both use the same heated compression molds to make the parts.
Speaking of Corvettes, it should come as no surprise to anyone what kind of car I drive.
Posted 2014-11-24 11:57 AM (#501220 - in reply to #501214) Subject: Re: 1967 Balladeer Rebuild...
Joined: June 2012 Posts: 2303
Location: Lake Forest, CA
immoody - 2014-11-24 8:55 AM
Ok, I've got a couple of questions. First, how is the body of the guitar secured down, or is it? Second, when you heat the bowl, are you slowly applying pressure on the upper bout of the bowl, pushing it down to close the gap between the table and the top, which would push the neck back into proper alignment? Do I have that right?
I'm looking forward to playing this guitar before it goes back to Texas......
The body isn't secured to the 'table', per se. Rather, the table top raises the body above the work bench at a 1-1/2° angle, which is the angle needed to restore the neck geometry.
Clamping the neck down to the workbench pulls the body down into full contact with the angled table.
Because the bowl is flexible, clamping the neck distorts the bowl by the desired amount. Heating it, then cooling it causes the resin to take a new set.
Since I wasn't heating the bowl to fully melt the resin, it retained some 'springiness', which when the pressure was relaxed caused it to pull back a little bit. This springiness is what required several heating/cooling cycles to walk the neck back into alignment.
The last thing I wanted to do overheat the resin and cause the bowl or sides to sag, or worse, potato chip.
Sounds good. Once I get it finished, we'll get together so you can play it. I know I would really like to try your 1537 and/or your 1987 CE, neither of which I've ever played and both of which I would like get an earful.
Posted 2014-11-24 12:27 PM (#501221 - in reply to #494306) Subject: Re: 1967 Balladeer Rebuild...
Joined: March 2002 Posts: 15652
Location: SoCal
Sounds good Dan. When the factory was up and running, they had one guy in the repair shop who did bowl bends. Don't know if he still does them or how they were done.
Posted 2014-11-24 12:34 PM (#501222 - in reply to #501221) Subject: Re: 1967 Balladeer Rebuild...
Joined: June 2012 Posts: 2303
Location: Lake Forest, CA
That's interesting to know.
If I were to do this in a production environment, I would use several IR heat lamps instead of a single heat gun.
This would allow the tech to heat a whole area of the bowl at once instead of slowly passing the heat gun over small sections. This would also allow the tech to better control over the temperature. It's pretty easy to overheat a section by lingering too long in one spot.
Posted 2014-11-24 1:03 PM (#501226 - in reply to #494306) Subject: Re: 1967 Balladeer Rebuild...
Joined: March 2002 Posts: 15652
Location: SoCal
Wish you had been able to do this about 10 years ago. I had a 1763 that needed a neck reset and was told the factory couldn't do it. I still miss that guitar.
Posted 2014-11-24 1:04 PM (#501227 - in reply to #501217) Subject: Re: 1967 Balladeer Rebuild...
Joined: March 2002 Posts: 15652
Location: SoCal
DanSavage - 2014-11-24 9:27 AM
arumako - 2014-11-24 6:15 AM
Man, that is good stuff DanSavage! Incredibly thoughtful and informative. 210 to 230 degrees is way up there... this Lyrachord stuff is pretty incredible stuff isn't it? Just awesome!
Thanks, Arumako.
Like I've said before, Lyrachord is just a name Ovation marketing gave to the fiberglass bowls. By itself, there's nothing special about the fiberglass they used.
The SMC bowls are made from the same materials as Corvette body panels and both use the same heated compression molds to make the parts.
Speaking of Corvettes, it should come as no surprise to anyone what kind of car I drive.
It's not a Mustang Bullitt, but not bad regardless......
Posted 2014-11-24 1:35 PM (#501231 - in reply to #494306) Subject: Re: 1967 Balladeer Rebuild...
Joined: November 2002 Posts: 3599
Location: Pacific Northwest Inland Empire
"It's not a Mustang Bullitt, but not bad regardless......"
Wrong town. That would be Frisco.
Nice work, Dan. The IR lamp scenario would be ideal.
Persevere!
Posted 2014-11-24 1:59 PM (#501237 - in reply to #501226) Subject: Re: 1967 Balladeer Rebuild...
Joined: June 2012 Posts: 2303
Location: Lake Forest, CA
immoody - 2014-11-24 11:03 AM
Wish you had been able to do this about 10 years ago. I had a 1763 that needed a neck reset and was told the factory couldn't do it. I still miss that guitar.
IMO, the bowl bend success would probably be limited to hand-laid bowls. The SMC bowls would require so much heat that the paint on the bowl would bubble and scorch.
Posted 2014-11-24 2:06 PM (#501238 - in reply to #501227) Subject: Re: 1967 Balladeer Rebuild...
Joined: June 2012 Posts: 2303
Location: Lake Forest, CA
immoody - 2014-11-24 11:04 AM
It's not a Mustang Bullitt, but not bad regardless......
Thanks.
My first car was a 1967 big-block Mustang coupe. (390cid) I really like the 2005-2010 Mustangs because they took a lot of their styling cues from the 1st generation.
I rented a V6 convertible `Stang in 2005 and really liked how it drove. It felt light and nimble and was pretty peppy for a V6.
Then, I rented a Shelby GTH in 2006 and it was really nice, too.
When I was looking to replace my Chevy Astro last year, I seriously considered buying a Mustang convertible. In the end I decided on the Vette, mainly because I wanted a sports car.
Posted 2014-11-24 2:59 PM (#501242 - in reply to #494306) Subject: Re: 1967 Balladeer Rebuild...
Joined: March 2002 Posts: 15652
Location: SoCal
Dan, since 1996, Chevy has been building really great Vettes. Actually I'm not a fan of the new one, or the 2015 Mustang. Too busy looking on both, and I prefer the retro look of the pony. Your model Vette is one of the ones I really like.....
Posted 2014-11-24 3:06 PM (#501243 - in reply to #500666) Subject: Re: 1967 Balladeer Rebuild...
Joined: April 2010 Posts: 823
Location: sitting at my computer
danomyte - Dan, man not only is your work, your home made jigs, fixtures, and ingenuity amazing, your attention to detail in writing these posts is incredible. Doing an extensive rebuild like this is engineering art, and your posts are no less impressive. I dream of having the time and patience you have. Kudos Dan. Just f'n awsome stuff.
Posted 2014-11-24 3:47 PM (#501244 - in reply to #494306) Subject: Re: 1967 Balladeer Rebuild...
Joined: December 2004 Posts: 554
Location: Denmark
You really have done your research and apparently thought of everything. I follow the work of You and arumako with admiration, pleasure and interest. Thank you again for sharing.
Posted 2014-11-24 4:47 PM (#501247 - in reply to #501242) Subject: Re: 1967 Balladeer Rebuild...
Joined: June 2012 Posts: 2303
Location: Lake Forest, CA
immoody - 2014-11-24 12:59 PM
Dan, since 1996, Chevy has been building really great Vettes. Actually I'm not a fan of the new one, or the 2015 Mustang. Too busy looking on both, and I prefer the retro look of the pony. Your model Vette is one of the ones I really like.....
Yeah, GM really took a beating with poor reviews of the last of the C3 line. (1968-1982) So, when they sat down to build the C4, (1984-they started with a clean sheet of paper with the intention of building a sports car that could compete with the world's best and they did a really good job with improving it a little bit every year.
Then, for the C5 (1997-2004) they, again, started with a clean sheet of paper, not only with the body, but also with the drive train, including a brand new, all-aluminum small block (LS-series) producing 350HP and 350 Lb. Ft. torque out of 346cid displacement without resorting to overhead cams, etc. The engineers also designed the engine to give a service life of 200,000 miles, which is an unheard-of standard.
By all accounts, the C5 was a home-run. It's capable of sub-5 second 0-60 times and capable of 175+ mph top speeds and still able to get up to 30mpg on the highway. In 2003, (my year) they gave the car a revolutionary suspension system that included magnetic shocks. Even though it's technically a reactive suspension, the computer reacts so fast it feels like an active one. With a flip of the switch you can have the ride of a smooth touring car or a hard-charging sports car.
The C6 was an evolution of the C5 with minor cosmetic changes and an upgrade in HP. (2005-2013, 400HP base) The C7 is a further evolution of the breed. (2014-present, 450HP base)
The reception of the C7 has been mixed in the Corvette community. Either you like it or you don't. I like the convertible better than the hard-top. From the 3/4 rear view, the hard-top reminds me of the Datsun 240Z.
Interestingly, the Corvette and Ovation share a lot of similarities. Both use fiberglass as a major component of their construction and both have a small and very devoted fan base.
WRT the Mustang, there still may be one in my future. My wife likes her current car, but would like something a little more sporty. She really likes the `Stangs, so when we're ready to trade up, I'll put her in the driver's seat and let her have at it.
Posted 2014-11-24 4:52 PM (#501250 - in reply to #501244) Subject: Re: 1967 Balladeer Rebuild...
Joined: June 2012 Posts: 2303
Location: Lake Forest, CA
tpa - 2014-11-24 1:47 PM
You really have done your research and apparently thought of everything. I follow the work of You and arumako with admiration, pleasure and interest. Thank you again for sharing.
Posted 2014-11-24 5:52 PM (#501255 - in reply to #501217) Subject: Re: 1967 Balladeer Rebuild...
Joined: October 2012 Posts: 1018
Location: Yokohama, Japan
DanSavage - 2014-11-24 1:27 AM
Like I've said before, Lyrachord is just a name Ovation marketing gave to the fiberglass bowls. By itself, there's nothing special about the fiberglass they used.
The SMC bowls are made from the same materials as Corvette body panels and both use the same heated compression molds to make the parts.
Speaking of Corvettes, it should come as no surprise to anyone what kind of car I drive.
That is one sweet ride DanSavage! Love the color too. I don't imagine you're able to transport too many Os in that two seater?!
It's amazing that Mr. Kaman had the vision to use this kind of technology for guitars back in the 60s!
Posted 2014-11-24 6:04 PM (#501256 - in reply to #501255) Subject: Re: 1967 Balladeer Rebuild...
Joined: June 2012 Posts: 2303
Location: Lake Forest, CA
arumako - 2014-11-24 3:52 PM
That is one sweet ride DanSavage! Love the color too. I don't imagine you're able to transport too many Os in that two seater?!
It's amazing that Mr. Kaman had the vision to use this kind of technology for guitars back in the 60s!
Thanks, Arumako. I really like it, too.
Actually, this particular generation is the first one since the 1959 to have a trunk for carrying luggage, guitars, etc. With the top up, it's large enough to carry at least two Ovation deep bowl guitar cases.
Earlier Corvette coupes had a rear glass hatch, but the convertibles did not have a trunk.
Posted 2014-11-24 6:11 PM (#501257 - in reply to #494306) Subject: Re: 1967 Balladeer Rebuild...
Joined: March 2005 Posts: 12750
Location: Boise, Idaho
I heard a few complaints about GM skipping 1983 for the Corvette anniversary year. What happened? I've never been a Corvette guy, but noticed the similarities between Corvettes and Ovations. The only poster I ever saw comparing Ovations and cars (and girls) was with a Ferrari.
Posted 2014-11-24 8:07 PM (#501262 - in reply to #501257) Subject: Re: 1967 Balladeer Rebuild...
Joined: June 2012 Posts: 2303
Location: Lake Forest, CA
Mark in Boise - 2014-11-24 4:11 PM
I heard a few complaints about GM skipping 1983 for the Corvette anniversary year. What happened? I've never been a Corvette guy, but noticed the similarities between Corvettes and Ovations. The only poster I ever saw comparing Ovations and cars (and girls) was with a Ferrari.
Basically, the C4 Corvette was a complete redesign of the breed and included some of the most advanced techniques in automotive engineering. GM was set to introduce it, but before the production lines could be started, California voted to make emission standards more stringent than ever, which delayed production. GM decided to withhold the 1983 model year to make the necessary changes and started C4 production as the 1984 model.
Ha ha! What makes the Corvette and Ovation alike, more so than the Ferrari, is that like the Corvette, Ovation guitars give the user the most bang for the buck. Even today, Corvettes and Ovations give their owners features and performance that cost 2-3 times as much for other brands. (read: Ferrari & Martin/Taylor)
Posted 2014-11-24 8:13 PM (#501263 - in reply to #501259) Subject: Re: 1967 Balladeer Rebuild...
Joined: June 2012 Posts: 2303
Location: Lake Forest, CA
Jonmark Stone - 2014-11-24 5:42 PM
Another fascinating project Dan.
Thanks, Jonmark.
Now that the bowl bend has been completed, I can breath a sigh of relief. Truth be told, I was more than a little nervous about how it would turn out and thankfully, it was a complete success. It's one thing to try to bend the bowl on my own 1970s blah-blah-blah. It's quite another to be attempting to do it for the first time on someone else's 1967 shiny bowl which was the 485th Ovation produced. (talk about pressure! --Phew!)
Now I can start moving forward with the actual rebuilding process, starting with gathering the needed materials.
Posted 2014-12-04 1:09 PM (#501486 - in reply to #494306) Subject: Re: 1967 Balladeer Rebuild...
Joined: March 2005 Posts: 12750
Location: Boise, Idaho
I'm impressed. Every time I try to bend something back, I either break it or it snaps back. Dan has a lot of knowledge about plastics and fiberglass and is creating a lot more.
Posted 2014-12-04 3:14 PM (#501496 - in reply to #501482) Subject: Re: 1967 Balladeer Rebuild...
Joined: June 2012 Posts: 2303
Location: Lake Forest, CA
immoody - 2014-12-04 10:02 AM
Anything going on with this? Inquiring minds want to know (just 'cause it's so damned cool)......
Yep. I ordered the top wood and I'm awaiting its arrival.
As usual I can't do any sort of construction project without experimenting. I ordered Sitka spruce blanks from Stewmac to use for the bracing and it should be arriving with the top wood order.
I couldn't help but notice the sizes of the stock used for the original X-braces are standard aviation sizes used for stringers, longerons, etc. One of the woods extensively used in airplane construction is Sitka spruce, especially quarter-cut Sitka spruce.
The main X-braces are 5/16" x 3/8". The transverse brace is 1/2" x 5/8". The sound hole doublers (for lack of a better term) are 1/8" x 1/2".
All of these sizes are available from my local aviation supply house, so I'm going to pick up some this weekend and see if these are usable as brace wood for Jay's guitar.
Posted 2014-12-04 3:22 PM (#501497 - in reply to #501486) Subject: Re: 1967 Balladeer Rebuild...
Joined: June 2012 Posts: 2303
Location: Lake Forest, CA
Mark in Boise - 2014-12-04 11:09 AM
I'm impressed. Every time I try to bend something back, I either break it or it snaps back. Dan has a lot of knowledge about plastics and fiberglass and is creating a lot more.
Thanks, Mark.
I'm looking forward to making my own bowl mold laying up my own bowl. That will be a fun project.
Posted 2014-12-04 4:43 PM (#501500 - in reply to #494306) Subject: Re: 1967 Balladeer Rebuild...
Joined: March 2005 Posts: 12750
Location: Boise, Idaho
Could you come up and fill a couple of holes I drilled in the wrong side of our cabinet door? That's the kind of success I've had on my projects lately.
Posted 2014-12-10 2:30 AM (#502653 - in reply to #494306) Subject: RE: 1967 Balladeer Rebuild...
Joined: June 2012 Posts: 2303
Location: Lake Forest, CA
My wood order from Stewmac (SM) came in. As I noted earlier I ordered the brace wood blanks.
I also made a trip out to Aircraft Spruce (AS) in Corona, CA to pick up some spruce cap strips in the sizes used for the bracing on this guitar.
Now that I have both sets of wood in my hands, it's pretty clear they're both of comparable quality. They're both quarter-saw, high grain count with little run-out. It should work good as bracing.
Sorry for the funky yellow tinge in the photo. The CCD in my camera is dying.
I also got the top wood. Nothing left to do now, but start building the top.
Posted 2014-12-11 12:11 PM (#503703 - in reply to #503698) Subject: RE: 1967 Balladeer Rebuild...
Joined: June 2012 Posts: 2303
Location: Lake Forest, CA
amosmoses - 2014-12-11 8:52 AM
This is like a teaser post...
I am curious...the "patches" that were used to "stabilize" the cracks...is that the common method used? And is it really effective?
Yeah, I know. I'm sorry. I really couldn't do anything to the guitar until I received the basic building materials.
The next steps are to cut the wood needed to build the 3-piece top, sand the edges, then joint them together. Once the glue is dry, I'll take the top wood to the wood shop to have them thickness sand the wood.
The tricky part on this one is the cutting the sound hole and the groove for the rosette. On my 1619, I was allowed a certain amount of leeway because the rosette hid the opening. But, on this one, it's got to be perfectly round. Ditto for the rosette groove.
After that, it's cutting and shaping the braces and gluing them to the top.
But, before I join the top to the body, I'm going to spend time on the replacement decals to make sure they're going to look good. Once I'm satisfied, I'll sand the paint off the body and the finish off the neck.
Etc., etc., etc...
The small wood strips glued across the cracks are called cleats and AFAIK, it's a standard practice. As you surmise, they provide a base to keep the crack stabilized.
So when cutting these circles, I assume (yeah I know that's dangerous) you'd first route out the rosette inlay groove... then... using the same center pivot point, cut out the soundhole. ??
Posted 2014-12-12 7:34 AM (#503740 - in reply to #503728) Subject: Re: 1967 Balladeer Rebuild...
Joined: November 2002 Posts: 3599
Location: Pacific Northwest Inland Empire
Yeah, SOBeach, that's the way I've done it, on my rosette inlays. And, I have have the rudimentary, Dremel fixture for cutting circles, without the plunge feature. Kind of a flat bar, with a threaded fitting for the nose of the tool, and an adjustment for cutting depth. Requires a small center hole, but everything is concentric, after that.
So when cutting these circles, I assume (yeah I know that's dangerous) you'd first route out the rosette inlay groove... then... using the same center pivot point, cut out the soundhole. ??
Yeah, I know. Pretty cheeky of me...
But, if I don't get acceptable resulst using the store-bought tool, I'm not above making something of my own.
Correct. The rosette groove is cut first, then the sound hole.
Posted 2014-12-12 11:27 AM (#503743 - in reply to #503740) Subject: Re: 1967 Balladeer Rebuild...
Joined: June 2012 Posts: 2303
Location: Lake Forest, CA
seesquare - 2014-12-12 5:34 AM
Yeah, SOBeach, that's the way I've done it, on my rosette inlays. And, I have have the rudimentary, Dremel fixture for cutting circles, without the plunge feature. Kind of a flat bar, with a threaded fitting for the nose of the tool, and an adjustment for cutting depth. Requires a small center hole, but everything is concentric, after that.
That is the attachment I was going to buy until I saw the plunge router attachment. I bought some AA spruce from Stewmac to practice on before doing it for real.
Posted 2015-05-09 11:04 AM (#510036 - in reply to #494306) Subject: RE: 1967 Balladeer Rebuild...
Joined: June 2012 Posts: 2303
Location: Lake Forest, CA
So, as promisted here's the latest news on the Balladeer project.
I had to set aside work on it because first, because we bought a house and needed to move from the old place to the new one. Then, I had to get the house straightened up and ready for the housewarming party. Lastly, I had to get the shop set up so that I could get back to the project. Phew!
Before moving I found that the saws I had were unsuitable for cutting the top wood down to make a 3-piece top and for cutting the strip stock to make the braces, more on the braces shortly.
I had purchased the AAA Sitka spruce sound board wood from StewMac, but it comes from them in 8-1/2" width which works for a 2-piece top. Since this guitar has a 3-piece top I had to buy two sets of wood to make three 6" wide pieces. My new DEWALT 15-Amp 10-in Table Saw worked perfect for cutting down the top wood and the braces.
Speaking of braces. If you recall I'd bought some Sitka spruce from the local aviation supply house. It's really nice wood and would be perfect for this project except for one thing. It's quarter-sawn, which is good. What's bad is that the grain runs sideways through the wood instead of up and down. After a lot of thought, research and a discussion with Jay, we decided it would be best not to experiment on this guitar.
Stradivarius used sideways grain on the braces for his violins. A few luthiers have done experiments to determine whether the strength is compromised when the grain runs sideways instead of up and down and the wood is equally strong both ways. If anything, it's a little stronger when the grain runs sideways, probably because the wood behaves like a laminated piece with hard layers stacked on softer layers. What has not been done is long-term tests to see if the sideways grain warps. Maybe someday I'll try building a guitar with the grain running sideways through the braces just to see how it sounds, how long it lasts, etc. But, for this guitar I used my new table saw to cut the braces from the blanks I bought from StewMac. (sorry for the yellowed images below. The CCD on my old camera was dying)
The braces in the pic below are those I cut from the StewMac blanks. The top wood has also been cut and jointed and they're ready to be glued together.
The top wood is really nice. It has a tight grain and good lacing. It should make for a good looking, great sounding guitar.
Rather than try to glue all three pieces together in one go, I decided to glue one joint at a time.
All three pieces are joined. The second joint didn't turn out as good as the first one. I reused the hide glue from the previous day and it had thickened up so it didn't flow as easy when I painted it along the edges of the wood. This made for a thick glue joint with gaps in a few spots. So, I steamed the glue joint apart, cleaned off the old hide glue and made a fresh batch of glue. The lesson I took away from this is to always make a fresh batch of glue.
Next is to take this to the woodworking shop and have them thickness sand the wood. After that is to trace and cut the outline for the top, start cutting the rosette groove and sound hole and mark the bridge location and drill the alignment holes.
Once that is done, I can start making the braces and marking their location on the underside of the top wood.
Posted 2015-05-09 12:00 PM (#510040 - in reply to #510038) Subject: Re: 1967 Balladeer Rebuild...
Joined: June 2012 Posts: 2303
Location: Lake Forest, CA
Howdy!
The wood has great tap-tone. It's very resonant. With the original X-braces and hand-laid bowl and kerfing, it should make for a really great sounding guitar. I'm really looking forward to playing it when it's done.
Posted 2015-05-09 1:29 PM (#510050 - in reply to #494306) Subject: Re: 1967 Balladeer Rebuild...
Joined: June 2012 Posts: 2303
Location: Lake Forest, CA
I hold it lightly by one corner, then rap on it with my knuckle. Some people use xylophone mallets.
I listen for what type of musical tone it makes and how resonant it sounds.
I also use the tap tone to determine which side of the wood will go on the bass bout and treble bout. Like my 1619 wood, this wood has one side that is lower in pitch than the other. So, the lower pitch will go on the bass side.
Of course, this could change once it's sanded to the final thickness. That's why I'm waiting to do anything else until after it's thickness sanded. Once that's done I'll tap tone it again and make my final decision.
Posted 2015-05-20 6:38 PM (#510746 - in reply to #494306) Subject: RE: 1967 Balladeer Rebuild...
Joined: June 2012 Posts: 2303
Location: Lake Forest, CA
I was finally able to take the top wood down to the woodworking shop to have it thickness sanded.
Next I notched the top edge for the neck.
And, fit it to the guitar.
I broke out my handy-dandy bowl bending plate.
I used it because it's flat, raised up off the workbench and it's got a slot for the fingerboard.
I traced the outline of the bowl. I didn't want to trust that the hole drilled for the strap button was on-center. It wasn't. It's about 1/4" off-center. Had I relied on the strap button hole, the seams of the top would have been crooked.
Bowl shape is traced onto the bottom of the top wood.
And, it's cut out and ready for routing the rosette groove and sound hole.
I put together the Dremel plunge router/circle cutter I bought and noticed immediately one big problem. It won't allow me to cut, either the inside of the rosette groove or the sound hole. Doh!
So, I ordered a proper Dremel circle cutting attachment that can be used to cut holes/grooves from 3/4" to 12" in size.
I decided to cut some grooves anyway on the practice wood I bought to get an idea of how it's done. I tried a standard cutting bit and it worked okay. I bought a real router bit and it works much better.
The scratches you see in the surface are marks left in the shellac. I'd read that some luthiers use shellac to 'harden' the surface to prevent tear-out of the wood. While there is some fraying of the wood fibers, even when the wood is shellacked, routing without the shellac actually works better because the plastic router base drags on the shellac but it slides smoothly on the bare wood. So, I'll probably leave the wood bare.
I'll post more once the circle cutting attachment comes in and I've had a change to cut the rosette groove and sound hole.
Posted 2015-05-21 9:39 AM (#510756 - in reply to #494306) Subject: Re: 1967 Balladeer Rebuild...
Joined: October 2012 Posts: 1018
Location: Yokohama, Japan
Excellent as always DanSavage! The grain on that soundboard is beautiful! Looking forward to following your progress again! Thanks so much for sharing your journey!
Posted 2015-05-29 5:49 PM (#511114 - in reply to #494306) Subject: RE: 1967 Balladeer Rebuild...
Joined: June 2012 Posts: 2303
Location: Lake Forest, CA
Well, it's taken this long for Home Depot to ship my circle cutting attachment. Next time I'll just order it from Amazon and have it here in a couple of days.
I used some of the leftover practice wood to get a feel for the circle cutter. When it comes to setting it up to get the exact size circle or the depth of cut, it's definitely not a precision instrument. Once it is set up for the right size and depth, it does a pretty good job of both routing and circle cutting.
Before I began, I peeled a little bit of the rosette from the old sound board so I could get an idea of how deeply they routed the groove. I discovered that the old rosette is constructed completely different from the RI rosettes.
The RI rosette is a single piece of thin (~.010") domed pearloid plastic, probably ABS. The grapevine is printed directly onto the front of the pearloid.
The original rosettes were a two-piece affair. The pearloid is the back layer and is about .015" to .020". The front layer is ~.020" clear domed plastic. The grapevine is printed onto the front clear plastic. Also, the rosette groove is fairly deep and It looks like the rosette was epoxied into the groove before the finish was applied. The groove is about 3/64" to 1/16" deep.
Needless to say, because of how thin the RI rosette is, the groove needs to be fairly shallow so the edges of the rosette are pretty close to the surface of the top wood.
Time to get practicing. This was the first groove that was the proper size and depth.
Test the fit of the rosette. Rosette fits pretty good.
The sound hole has been cut and the inside corners have been rounded with the router.
Voila! The wood is a little darker because I sprayed it with naptha to give some contrast to the wood and rosette. Also, the lower right corner of the sound hole has a bung. This is why I wanted to practice as much as I did. Each time I went through the process I found some other pitfall that would have wrecked the top wood.
About the time I pretty much ran out of practice wood I had a fairly good feel for the process. I decided it was time to do it for real. The top wood is clamped to the work board and the center hole is drilled.
Rosette groove is routed.
Sound hole is cut.
And, routed. There is a few burn marks. With a little sanding, these will come out.
Clean up the sound hole a little bit. Fitting the top wood to the guitar body.
Rosette is slipped into place.
Phew! That was a nerve-wracking job, but the rosette fits perfectly into the groove and the sound hole is rounded nicely.
Next job is the cut and fit the braces, then glue them to the back of the sound board.
Posted 2015-05-29 6:38 PM (#511117 - in reply to #511116) Subject: Re: 1967 Balladeer Rebuild...
Joined: June 2012 Posts: 2303
Location: Lake Forest, CA
Yep.
I'm really looking forward to getting this one done and to hear how it sounds.
As we've been saying all along, there's a lot that Charlie got right, right out of the gate.
The thin, hand-laid, vacuum-bagged bowl.
The hand-laid kerfing which, IMO, acts just like the Adamas suspension ring.
The simple X-brace pattern.
One thing I always keep in mind reading in 'The Book' is that the standard they were trying to meet was the Martin D-45. IMO, they knocked it right out of the park.
Posted 2015-05-30 11:47 AM (#511138 - in reply to #494306) Subject: Re: 1967 Balladeer Rebuild...
Joined: October 2012 Posts: 1018
Location: Yokohama, Japan
WOW, DanSavage! Just phenomenal work! Your attention to detail is akin to classic historical art restoration! Bravo! Are you planning on going with a polyurethane finish?
Posted 2015-05-30 8:04 PM (#511144 - in reply to #494306) Subject: RE: 1967 Balladeer Rebuild...
Joined: June 2012 Posts: 2303
Location: Lake Forest, CA
Moving right along.
I remembered that before I can glue the braces to the top, I needed to align the bridge.
The rosewood RI bridge was drilled for the alignment pins, but didn't have any. So, I pulled some 3/16" hardwood dowel out of the scrap pile, and made my own alignment pins.
I sanded them to make sure they won't poke through the underside of the top when installed.
Measured and marked the location of the bridge alignment pins.
And, drilled the holes.
Perfect fit.
With that done, I can mark the underside of the top and start making the braces.
Number 1 brace is cut, rounded and scalloped. X-braces are cut, notched and scalloped. Finger braces are cut.
Shown next to the original top. The only things missing is the X-brace reinforcement, which I'll cut once the braces are glued to the top, and the fiberglass strip.
I'll do the fiberglass strip first using MGS epoxy resin, before any of the braces are glued down. Then, once the resin is dry (24 hours) I'll start gluing the braces down.
Although I used hot hide glue to join the top pieces, I'll be using Hysol epoxy to glue the braces, because that's how it was done on the original. Both MGS and Hysol are aerospace-grade epoxies and both dry very hard and will transmit the vibrations very well.
Posted 2015-05-31 7:30 PM (#511173 - in reply to #494306) Subject: RE: 1967 Balladeer Rebuild...
Joined: June 2012 Posts: 2303
Location: Lake Forest, CA
The first step to building the top is to apply the fiberglass cloth reinforcement strip across the lower bout.
A layer of visqueen (Saran wrap) was laid onto the gobar deck, then the top was placed and a few gobars were put into place to keep the top flat and to keep it in place while I applied the fiberglass.
Close examination of the original told me that the factory used the same 8.5 oz. 2x2 twill cloth for this strip as was used to make the bowls. This strip looks like a single thickness of the cloth whereas the bowl uses two layers.
Typically, when glassing a surface, a layer of resin is applied with a brush, then the cloth (1/2" x 12-1/2") is put onto the resin and the cloth is wet out with the brush. This is the process I used, but the cloth looked a little dry, so I applied a thin top coat of resin.
Lastly, I put the rest of the gobars into place so the top is dead flat.
I'll let this cure overnight and I'll be ready to apply the braces tomorrow.
Posted 2015-05-31 8:23 PM (#511176 - in reply to #494306) Subject: Re: 1967 Balladeer Rebuild...
Joined: March 2002 Posts: 15652
Location: SoCal
I"m looking forward testing driving this guitar when it's finished. I mean, somebody has to make certain that it's good enough for Jay, before it goes back to him. Right? Right?
Posted 2015-06-01 9:32 AM (#511185 - in reply to #511176) Subject: Re: 1967 Balladeer Rebuild...
Joined: June 2012 Posts: 2303
Location: Lake Forest, CA
immoody - 2015-05-31 6:23 PM
I"m looking forward testing driving this guitar when it's finished. I mean, somebody has to make certain that it's good enough for Jay, before it goes back to him. Right? Right?
Paul,
I would not even dream of sending this guitar back to Jay before you've had a chance to play it to your heart's content.
If it doesn't get your stamp of approval, I would have to tear it all down and start over from scratch.
The soundboard 16 is longitudinally tapered from a maximum thickness at its upper end to a minimum thickness at its lower end, as best shown in FIG. 2. For structural reasons it is desirable that the soundbox be of greatest strength in the region where the neck is joined thereto, and for this reason the soundboard is of greatest thickness in this upper region. The tapered configuration of the soundboard provides ample thickness in the region of the sound opening 18 and the bridge 28 while the decrease in thickness in the region of the lower bout 42 permits maximum excursion in the latter region. For added strength and durability it is desirable that the soundboard be further reinforced. Accordingly, a plurality of relatively flexible wooden ribs are *adhesively bonded to the soundboard rear surface 56 and are arranged in a manner illustrated in FIG. 6. A relatively heavy rib 64 extends transversely of the soundboard between the sound opening 18 and the upper bout 40 to reinforce the longitudinally extending grain structure of the board in the region of the neck connection. Diagonally extending ribs 66 and 68, somewhat lighter than the rib 64, cross each other below the sound opening 18 and in the vicinity of the bridge 28. Further reinforcement is provided in the bridge region by a thin gusset plate 70 secured to the rear surfaces of the ribs 66 and 68 proximate the point of crossing. Relatively light reinforcing ribs 72, 74 and 76 cooperate with the aforedescribed ribs 64, 66 and 68 to form a reinforcing structure surrounding the sound opening 18. In the lower region of minimum thickness the soundboard 16 is further flexibly reinforced by at least one elongated fabric strip 77 bonded to the rear surface 56 and extending transversely thereof.
There's a couple of interesting parts in this paragraph.
First, it says that the soundboard was longitudinally tapered from the neck to the bottom of the lower bout. I measured the original sound board and it is tapered from the top to the bottom. The upper bout is about .125" (1/8") and the lower bout is about .110". Interestingly, I measured the center of the lower bout and it tapers to a little less than .094". (3/32")
So, the center of the lower bout, which is the largest open, unsupported part was the thinest part of the whole soundboard. This means that, as the last sentence of the patent states, the purpose of the fiberglass strip is to reinforce the thinest part of the soundboard, presumably to keep it from cracking and splitting.
This brings up an interesting point. In order to completely duplicate the construction of the original would require that the sound board be tapered, not only longintudinally, but also that the center of the soundboard would need to be tapered from the edges inward.
The tapering from top to bottom could be accomplished by using a thickness sander that can be set up to sand one side thicker than the other, or one that changes the thickness as the piece moves through the machine. The other part, sanding thinner in the center as it tapers would be a bit more difficult.
So, did Ovation use use this custom thicknessed soundboard on the RI? I couldn't say. To find out, we would need to talk to the people who built them or take one apart and measure it. What I can say is that it would certainly complicate the construction process.
A lot of other guitar builders use tapered soundboards, and for the same reason --to increase the vibratory response for better sounding guitars. Usually though, they do it the opposite way, where the edges are thinner than the center. Taylor guitars don't taper the soundboard. Instead, they route a shallow groove around the periphery of the soundboard next to the kerfing so they get the same effect as tapering the thickness, but without all the trouble.
I couldn't say whether Ovation has always used the strip. We'd have to look at later models of guitars that used this original X-brace pattern and whether they had the fiberglass strip. I reviewed all the patents Charlie held and only this one mentions the strip. The 1970 German patent drawings show this strip, but I would say that is simply one to patent method of construction in Germany.
To my knowledge, no other acoustic guitar manufacturer has used fiberglass in the construction of the soundboard. The closest would be the cotton cloth used to reinforce the x-brace joint.
I'd imagine that the question on everyone's mind is, will a non-tapered soundboard, such as what I'm using on 485, sound as good as the original? I believe so, and here's why. When I was measuring the original top to determine how thin to take down, I did notice that the upper bout was a good .125", which is about the same as the wood I ordered. When I rebuilt my 1619, I intentionally had that sanded to .094". While the 1619 does sound really good, I have to use extra light strings to keep the bellying under control. So, I split the difference on this soundboard and had it sanded to .110", which is as thick as the original soundboard when measured in the area of the bridge.
Today's job is to glue, or as Charlie's patent says, 'adhesively bond' the braces to the soundboard.
Posted 2015-06-01 11:18 AM (#511192 - in reply to #511189) Subject: Re: 1967 Balladeer Rebuild...
Joined: January 2009 Posts: 1249
Location: Texas
Dan,
Thanks for the research and reply….
This means that, as the last sentence of the patent states, the purpose of the fiberglass strip is to reinforce the thinest part of the soundboard, presumably to keep it from cracking and splitting
That is interesting…I wonder, since #1911 remained in pristine condition (and of course we will never know) if it was thickness sanded? Something had to be different, to make it an exception to the norm… I think. Acoustically, you couldn't tell it apart from 485.
So, did Ovation use use this custom thicknessed soundboard on the RI?
I would bet they went for look…not exactness. Having owned both..the RI is a beautiful guitar … but, imo, it fell short of replicating the feel and response…which might be attributable to the head start the originals have in “opening up”…if that is indeed a factor. And of course the originals were totally hand made. I never looked at the bracing of my RI…I wonder if they were braced the same, using the fiberglass strip???
Ok...just one more question...why use a fiberglass strip, instead of a couple more braces, like Martin did with the D45 and Ovation did with the modified X?
Posted 2015-06-01 2:08 PM (#511198 - in reply to #511192) Subject: Re: 1967 Balladeer Rebuild...
Joined: June 2012 Posts: 2303
Location: Lake Forest, CA
amosmoses - 2015-06-01 9:18 AM
That is interesting…I wonder, since #1911 remained in pristine condition (and of course we will never know) if it was thickness sanded? Something had to be different, to make it an exception to the norm… I think. Acoustically, you couldn't tell it apart from 485.
I would bet they went for look…not exactness. Having owned both..the RI is a beautiful guitar … but, imo, it fell short of replicating the feel and response…which might be attributable to the head start the originals have in “opening up”…if that is indeed a factor. And of course the originals were totally hand made. I never looked at the bracing of my RI…I wonder if they were braced the same, using the fiberglass strip???
Ok...just one more question...why use a fiberglass strip, instead of a couple more braces, like Martin did with the D45 and Ovation did with the modified X?
Who is still around that was there in 66/67?
I don't see any reason why 1911 would have been built any differently than 485. I would say that if it has the fiberglass strip, then the top was probably tapered. Since they were acoustically alike, I'd say that would make it likely they were built the same way.
It would be easy enough for someone with an RI to look inside to see the brace pattern. The factory might have added the fiberglass strip for aestetic purposes.
Speaking of opening up, I'm not sure if you're familiar with the torrefaction process for musical instruments, but the idea is to pre-age the wood so that it duplicates the cellular strucure of old wood. Basically, the wood is put into an autoclave, the oxygen is removed and the wood is brought up to a temperature of a few hundred degrees. This process 'cooks' the wood and alters the cellulose and resinous lignin as well as a substance known as hemicellulose. Yamaha calls their process. Acoustic Resonance Enhancement. (A.R.E.) Martin, Taylor and Bourgeois have all jumped onto the torrefaction bandwagon. Even Stewmac is selling torrefied wood now.
I bought some torrefied red spruce to use on my 1617. I wanted to use torrefied wood on my 1619, but couldn't find any. So, I'm going to use it on my 1617 along with the identical brace pattern I used on my 1619 to see the difference in sound between the two guitars.
The point of this is one of the characteristics of torrefied wood is that it becomes completely opaque. I compared the torrefied red spruce to 485's original top and there are a lot of areas that are opaque, which means that the wood has aged and is becoming similar to torrefied wood in cellular structure. So, this aged wood certainly has a lot to do with the difference in sound between the originals and the RI.
WRT adding braces, recall from 'The Book' that Charlie used the D-45 as the standard of sound that he was trying to duplicate. I'm sure that while he wanted to get the sound, he didn't want to have someone look inside his guitars and say that Ovation simply copied the Martin brace pattern, as so many others did, and still do. But, remember that the additional braces between the lower half of the X-braces are about sound, not structure.
Posted 2015-06-01 2:18 PM (#511200 - in reply to #494306) Subject: RE: 1967 Balladeer Rebuild...
Joined: June 2012 Posts: 2303
Location: Lake Forest, CA
Back to the build.
I decided to sand the fiberglass strip to smooth it out, and thin it slightly. To keep from scarring the inside of the top, I laid two strips of masking tape.
And, it sanded smooth. This was actually also done on the original.
Taped some visqueen to the gobar deck.
Made the center gusset using the original as a pattern.
Got the Hysol 9462 ready and clamped the top to the deck.
Brace #1, the X-braces and the gusset are all glued, er, 'adhesively bonded' and clamped.
Finger braces are 'adhesively bonded' and clamped.
I could pull the top out of the deck tomorrow, but technically, 9462 takes 72 hours to fully cure. So, I'll just leave it clamped until Thursday. In the meantime, I'll start sanding on the bowl and neck getting those ready to refinish.
Posted 2015-06-01 6:56 PM (#511215 - in reply to #511192) Subject: Re: 1967 Balladeer Rebuild...
Joined: June 2012 Posts: 2303
Location: Lake Forest, CA
amosmoses - 2015-06-01 9:18 AM
I would bet they went for look…not exactness. Having owned both..the RI is a beautiful guitar … but, imo, it fell short of replicating the feel and response…which might be attributable to the head start the originals have in “opening up”…if that is indeed a factor. And of course the originals were totally hand made.
I wanted to add that if you really wanted to get the opened-up sound of the original I could remake the top using torrefied Sitka spruce soundboard and braces from Stewmac.
The soundboards and uncarved brace wood isn't that expensive and I'm not so far along in the process that we couldn't take a couple of steps back.
Once the soundboard is glued, er, 'adhesively bonded' to the body, this would become a lot more difficult. So, if you'd like to get that opened-up sound right out of the gate, now is the time to do it. I wouldn't mind taking a few steps back if you're willing to buy new wood.
There's always a chance that with this rebuild using brand new wood, 485 will sound more like a RI than an original.
If we compare the new sound board to the original one, the original one has the deep colorization of the torrefied wood.
Posted 2015-06-01 7:16 PM (#511217 - in reply to #511214) Subject: Re: 1967 Balladeer Rebuild...
Joined: December 2006 Posts: 6992
Location: Jet City
DanSavage - 2015-06-01 4:42 PM Is the brace pattern the same for 1911 & RI #03 as what I've done to 485? Which is to say, plain braces that are scalloped only at the ends with a plywood gusset at the intersection of the X-braces?
Identical except for that tone bar across the bottom
Posted 2015-06-02 7:01 PM (#511273 - in reply to #494306) Subject: RE: 1967 Balladeer Rebuild...
Joined: June 2012 Posts: 2303
Location: Lake Forest, CA
I sanded the neck today.
I could be mistaken, but I don't think they were using EIR back in the mid-1960s, which means the beautiful rosewood veneer on the headstock is probably Brazilian.
Sanding also exposed the beautiful two-piece mahogany neck and ebony heel cap.
The two-piece neck is unusual. I wonder why.
To simulate the final look once the finish is applied I sprayed the headstock with naptha. Simply gorgeous. When I first started, the finish had darkened so much that it was hard to tell the mahogany from the rosewood. Not any more.
Here's what the back of the neck will look like once the finish is applied.
The color of the wood is actually darker than what can be seen in the photos. The flash lightens the color a little bit.
Tomorrow's task is to sand the bowl and get it ready to patch the hole where the pick-up jack used to be located. This guitar will be a pure acoustic. I'm also going to make a bone nut and use a bone saddle.
Posted 2015-06-05 12:50 PM (#511335 - in reply to #494306) Subject: RE: 1967 Balladeer Rebuild...
Joined: June 2012 Posts: 2303
Location: Lake Forest, CA
After some discussion, Jay and I decided that this guitar deserved every chance to have the most original sound it could.
So, Jay ordered some torrefied Sitka spruce soundboard and brace stock from Stewmac and I'm going to re-do the top.
Here's one of the sets of the soundboard we got. It's got nice tight grain with good silking. Since I'll need two sets to make three 5-3/4" planks, Jay also ordered another set. But that set didn't really match the grain pattern of this set, so I'm returning it to Stewmac and asked them to match this set as closely as possible.
Both the soundboard and the brace wood have the aged look seen on the underside of the top.
While I'm waiting for the other wood, I'm going to finish sanding the bowl, patch the hole in the bowl left by the strap button jack. Then, cut and shape the brace wood.
Posted 2015-06-05 10:44 PM (#511356 - in reply to #494306) Subject: RE: 1967 Balladeer Rebuild...
Joined: June 2012 Posts: 2303
Location: Lake Forest, CA
Thanks, TPA.
Jay, Yeah, I don't think we'll be sorry for the extra time and expense of using the the torrefied wood. It's going to sound really special once it's done.
For those who want to see a comparison between a torrefied top and normal top, here's a video made by John Hall of Blues Creek guitars. He built two guitars with the only difference being the top wood: one torrefied spruce and the other normal spruce.
Posted 2015-06-06 11:27 AM (#511365 - in reply to #494306) Subject: Re: 1967 Balladeer Rebuild...
Joined: March 2002 Posts: 15652
Location: SoCal
I'm srarting to think that there may be one more guitar in me. Find an ear!y 70's balladeer or legend and have Dan rebuild it with an Adirondack top and braces using the same bracing pattern as #485. And use torrified wood for the top and braces. Add a 5 point rosewood bridge and that guitar would be killer!
Posted 2015-06-06 4:45 PM (#511374 - in reply to #494306) Subject: RE: 1967 Balladeer Rebuild...
Joined: June 2012 Posts: 2303
Location: Lake Forest, CA
Paul,
Yes, I would definitely recommend starting with as early of an O as possible to gain the benefit of the thinner, hand-laid bowl. If you can find a 60s O that has the molded fiberglass kerfing, that would be even better. IMO, the molded kerfing used on the 60s Os acts like the suspension ring used on the Adamii. I'm not sure when O went to the thick plastic kerfing, but both of my 1970s CL use them. As you know, my 1619 doesn't seem to suffer too much from this 'handicap.' I was surprised how much my 1619 sounded like 485.
Torrefied Adirondack spruce soundboards are available. I bought mine through Blues Creek Guitars, but they're out of stock right now.
Torrefied Adirondack braces might be a little more difficult to come by. Stewmac is the only supplier I've seen that offers torrefied brace wood, but that's Sitka. A lot of places sell Adirondack spruce brace stock, but none that I've seen sell torrefied Adirondack.
Posted 2015-06-26 8:48 AM (#512940 - in reply to #494306) Subject: Re: 1967 Balladeer Rebuild...
Joined: September 2005 Posts: 138
Location: Birmingham, AL
Very intersting. I haven't been on here for quite awhile and then run up on this.Just curious I have a Balladeer #2486 which should be a 68 or so. My guitar has the caving top thing going on but is still very playable and the neck set is still good. If you wouldn't mind, as a future consideration, could you please send me a private message about the approximate cost to do this?
Posted 2015-06-26 7:35 PM (#512960 - in reply to #494306) Subject: RE: 1967 Balladeer Rebuild...
Joined: June 2012 Posts: 2303
Location: Lake Forest, CA
If you recall from our last episode, Jay ordered two sets of torrefied Sitka spruce wood from Stewmac. When the order arrived, both sets were very nice looking, but they didn't match each other in grain or coloration. (batch 1)
So, we sent the least desirable set back to Stewmac and they sent out a replacement set once they came back into stock. (batch 2)
The batch 2 wood was still very nice, but alas, while a part of the grain was as tight as batch 1, it didn't have the silking or the coloration of batch 1.
After some consideration, Jay decided that we would make this a two-piece top using batch 1. As much as we wanted to duplicate the originality of the guitar, this was proving very difficult to do.
Here's batch 1. Notice the tight grain and beautiful silking.
Batch 1 behind the top template that gives a good idea how the guitar will look once it's complete.
Here's batch 2. Slightly looser grain and not as much silking.
Here's batch 2 behind the top template.
It's worth noting that both batches of wood have really nice tap tones and I'm going to keep batch 2 and use it on my 1978 1617. I'm going to buy some torrefied Sitka spruce uncut brace stock to duplicate the brace pattern on my 1976 1619 CL.
Here's a pic showing batch 1 and 2 behind the top template that shows the difference in coloration between the two. It's just different enough that the three-piece top would stand out for all the wrong reasons.
Just for the fun of it, I sprayed batch 1 with naptha to simulate what the wood will look like under the final finish, then compared it to the original top.
Now that this is settled, I'm going to get started on jointing the batch 1, then do some experimentation to taper the top just like was done on the original, which is no simple task.
Another area that needs development is the headstock markings. I found the font (Arabian Normal) online. I also found a company that supplies components that will allow me to create custom rub-down transfers using satin gold like what was used on the original guitar.
Here's a mock-up of the markings. Next-up is to make the rub-downs.
to see if he could find a blade we could use to recreate the three planks in the original top. It was just a couple hours drive for him.
For some reason we lost our connection and I guess his phone was on the blink for several days after that, because it appeared he couldnt hear it ring.
Anyway...this remains a project that continues to get better with each post...thanks again Dan!
Posted 2015-07-08 6:42 PM (#513260 - in reply to #511365) Subject: Re: 1967 Balladeer Rebuild...
Joined: December 2014 Posts: 1713
Location: Frozen Tundra of Minnesota
As per your usual, VERY interesting, educational and inspiring Dr Savage!!!
When you let Paul play it, could you perhaps video it, so that we can all hear it with the torrified wood? I had read about that at Stewmac's, and am interested to see if the artificial aging makes the difference they say!
It is so interesting to follow along with your Projects!! Thank You so much for sharing!!!
Posted 2015-08-01 10:20 AM (#513986 - in reply to #494306) Subject: RE: 1967 Balladeer Rebuild...
Joined: June 2012 Posts: 2303
Location: Lake Forest, CA
The stuff I needed to continue has arrived and work is continuing.
As you may recall, the top wood needs to be tapered. There are two ways to do this, well, three actually.
1) Use a jack plane and taper it by hand. 2) Use a power sander (orbital or belt) and taper it by hand. 3) Make a tapered fixture to hold the wood at the precise angle needed and run it through a thickness sander.
I don't relish choice #1 so, this method is out.
I have a orbital sander and tried tapering some scrap spruce. This is a long, laborious process, so this method is out, too.
Which brings us to choice #3. I had talked to the woodworking guy about the fixture previously and he made suggestions about the spacing and thickness of the wood used and we agreed that 1/4" birch ply spaced on 2" squares with a 1/4" birch ply top would probably be sufficient to hold the weight of the pressure rollers without distorting the top wood. In the end I decided to add a bottom layer of 1/4" ply to make the fixture very stiff. With a top layer alone, it might want to bend. Adding a bottom layer forms a cantilever beam.
Luckily, my laser-cutting guy is able to cut 1/4" birch ply. So, I was able to design the parts needed. Basically, the top wood will need to taper from 1/8" (.125") at the top by the neck to 3/32" (.094") down near the bottom of the lower bout. One of the nice things about CAD-designed laser-cut parts is that the measurements can be very precise.
At 2" centers, the size of the fixture requires 13 ribs and 11 spars. And, here they are.
Another requirement is that the fixture be very flat. If there's any cupping or curvature, it will transfer this warping to the top wood when it goes through the sander. So, my solution is to use the stone table tops from a couple of end tables that belonged to my wife's granddad. Not only are they very flat, but because they're heavy, they will clam the fixture with a very even pressure while the glue dries.
First, lay down the base and cover it with a piece of visqueen.
Lay down the bottom layer of wood. The maximum size of wood the laser cutter can handle is 12" x 48", so I had to make the top and bottom layers in two pieces. The brown lines are alignment marks I added and were etched by the laser.
Add beads of glue (Hysol 9462) where the ribs and spars will be.
Add the spars, and put a bead of glue on top.
Add the ribs and put a bead of glue on top of these, too.
Add the first half of the top layer.
Add the second layer and tape some visqueen on top of that to keep the glue from sticking to the stone.
Lastly, put the stone on top and let the glue dry.
I'll pull the fixture out later today.
In the meantime, I'm going to prepare the practice wood for jointing. One of the things the woodworking guy and I agreed on was that we should practice first before we run the real top wood through the sander. I also bought more practice wood to use to knock the rust from my rosette routing and sound hole cutting skills.
Posted 2015-08-01 8:04 PM (#514013 - in reply to #494306) Subject: RE: 1967 Balladeer Rebuild...
Joined: June 2012 Posts: 2303
Location: Lake Forest, CA
I've got the practice top wood jointed and I'm waiting for the glue to dry.
I've been wanting to try Old Brown Glue for a while now, so I decided the practice top wood joint would be a good place to try it. It's hide glue that's had urea added to it to extend the working time. You heat it up in a double-boiler just like regular hide glue to thin it down. So far, I like it.
I'll know tomorrow when I pull the top wood out of the go bar deck how strong the glue is.
After that, I'll take a couple of practice runs with the router and circle cutting tool and if everything works okay, I'll route the rosette groove and cut the sound hole on the practice wood and then again, on the torrefied top wood.
Posted 2015-08-02 2:04 PM (#514040 - in reply to #494306) Subject: Re: 1967 Balladeer Rebuild...
Joined: September 2005 Posts: 138
Location: Birmingham, AL
Dan, you're an inspiration to all of the Bottom Feeders. I had shied away from repairing acoustics but your knowledge and mentoring has been excellent. The realization that Ovations are pretty durable also makes them somewhat easy to repair.
Posted 2015-08-03 9:37 AM (#514061 - in reply to #494306) Subject: RE: 1967 Balladeer Rebuild...
Joined: June 2012 Posts: 2303
Location: Lake Forest, CA
Thanks, guys. I'm glad you enjoy me geeking out.
Thanks for the kind words, Paul. Yeah, once you realize that guitars are just bits and pieces of wood that have been glued and screwed together working on them becomes a lot less intimidating. I've been working on my own guitars since before I knew better. The knowledge gained building and repairing model airplanes transfers directly to building and repairing guitars, especially since the tools and materials are the same for both.
And, speaking of geeking out, back to the thread. I pulled the sanding fixture out from between the stones and added alignment strips. The woodworking guy suggested I add these so prevent the wood from slipping out of the fixture as it runs through the sander.
I also pulled the practice wood out of the go bar deck. Here it is sitting in the fixture. The Old Brown Glue seems to have worked pretty well.
And, here's the final wood sitting in the fixture.
The next job is to route the rosette groove and cut the sound hole. Once these are done on both the practice wood and the final wood, I'll take them in to get the taper sanded.
Posted 2015-08-03 6:35 PM (#514087 - in reply to #514061) Subject: Re: 1967 Balladeer Rebuild...
Joined: November 2002 Posts: 3599
Location: Pacific Northwest Inland Empire
Uh, is the tapering going to throw off your rosette channel? It should be slightly thicker/deeper at the neck-end, versus the bridge-end, right? Now, who's being finicky, here?
Posted 2015-08-03 9:45 PM (#514104 - in reply to #514087) Subject: Re: 1967 Balladeer Rebuild...
Joined: June 2012 Posts: 2303
Location: Lake Forest, CA
seesquare - 2015-08-03 4:35 PM
Uh, is the tapering going to throw off your rosette channel? It should be slightly thicker/deeper at the neck-end, versus the bridge-end, right? Now, who's being finicky, here?
The soundboard 16 is longitudinally tapered from a maximum thickness at its upper end to a minimum thickness at its lower end, as best shown in FIG. 2. For structural reasons it is desirable that the soundbox be of greatest strength in the region where the neck is joined thereto, and for this reason the soundboard is of greatest thickness in this upper region. The tapered configuration of the soundboard provides ample thickness in the region of the sound opening 18 and the bridge 28 while the decrease in thickness in the region of the lower bout 42 permits maximum excursion in the latter region. For added strength and durability it is desirable that the soundboard be further reinforced.
No, it won't throw off the rosette groove (channel) because the groove will be routed in the front of the top before tapering and the taper will be sanded on the back.
Measuring the top wood that came off Jay's guitar revealed that it is 1/8" at the top and 3/32" at the bottom. Paul confirmed this with his 1968 Balladeer.
Posted 2015-08-08 5:25 PM (#514188 - in reply to #494306) Subject: RE: 1967 Balladeer Rebuild...
Joined: June 2012 Posts: 2303
Location: Lake Forest, CA
I had a few free hours today, so I decided it was time to route the grooves and cut the sound holes into the practice top and the final torrefied top.
Before beginning, I cut the notches in the upper bout and fit the wood to the neck. I also decided to leave cutting the outline until after the wood is tapered.
I wasn't as rusty as I thought. I only needed four attempts on the extra practice wood I ordered. The final one turned out nearly perfect. I figured it was now or never, so I did the practice top first.
Here's the practice top, ready for the sander.
And, the torrefied top.
Here's the rosette in the torrefied top.
And, how it'll look on the guitar.
I'll call the woodworking shop first thing Monday morning and make an appointment to sand the tops.
Pics to follow. Just for the fun of it, I'll take some pics during the sanding process to share with everyone.
Posted 2015-08-08 9:35 PM (#514192 - in reply to #514190) Subject: Re: 1967 Balladeer Rebuild...
Joined: June 2012 Posts: 2303
Location: Lake Forest, CA
clrules - 2015-08-08 5:34 PM
Beautimus!!
Did you use the Old Brown Glue on both tops?
Thanks, kindly.
No. Actually, I used Hysol 9462 on the torrefied top and Old Brown Glue (OBG) on the practice top.
I'm still undecided whether to use the Old Brown Glue for the braces on the torrefied top. I know that Ovation probably originally used some sort of epoxy for the braces, and I know that 9462 has good acoustic properties and it'll never come loose, save a really hard hit on the top.
OTOH, the OBG will also have excellent acoustic properties, but in a super-humid environment the braces might loosen. The only unknown is how well the OBG grabs onto the torrefied wood. I have some scrap I'm going to use as a test.
Posted 2015-08-08 9:36 PM (#514193 - in reply to #514191) Subject: Re: 1967 Balladeer Rebuild...
Joined: June 2012 Posts: 2303
Location: Lake Forest, CA
merlin666 - 2015-08-08 5:41 PM
Dan you have a great way of documenting your projects. It certainly gives me GAS for a shiny bowl balladeer.
Thanks!
Yeah, I'm dying to hear how this one will sound when it's done. I might have to hang onto this for a while to make sure it's good enough to send back to Jay. (LOL! Just kidding, Jay!)
Posted 2015-08-14 9:33 AM (#514319 - in reply to #494306) Subject: RE: 1967 Balladeer Rebuild...
Joined: June 2012 Posts: 2303
Location: Lake Forest, CA
I took the wood to the woodworking shop to get the tops thickness sanded.
Here's the sander. It's a production size machine, so I'm sure Ovation used something similar.
The practice top is leaving the sander.
The final top is leaving the sander.
Although the platter did put a taper into the wood, the taper wasn't as sharp as I'd hoped. The belt that carries the parts through the sander is rubber. I figure that the pressure rollers were compressing the belt causing the angled platter to more or less level itself out. The wood still has a taper, but instead of it being a .030" taper, it's more like .020". In any event, the wood is sanded down and progress continues.
The body outline has been transferred to the wood.
And, cut out.
Looking good.
Bridge alignment holes have been measured, marked and drilled.
And, the positioning and alignment have been verified.
Tonight, I'll mark the position of the braces and the fiberglass reinforcement strip and get the strip laid down so that I can start laying down the braces tomorrow.
Posted 2015-08-15 2:59 PM (#514363 - in reply to #514358) Subject: RE: 1967 Balladeer Rebuild...
Joined: June 2012 Posts: 2303
Location: Lake Forest, CA
amosmoses - 2015-08-14 9:42 PM Pretty amazing how the warmth in color of both tops is so close.
Dan, do you think that all the additional bracing they threw on it, to address the cracking, had an adverse affect on the resonance?
Yeah, they are pretty close in color. I'm sure it had some effect, but probably not that much. I've got two similar bars across the lower X-brace in my 1619 and there's no shortage of resonance.
Interesting fact. As wood ages, it gets more opaque. Here's some photos.
First, a bright light shining through the top made from new spruce.
And a bright LED flashlight.
Next is the original 1967 top.
Finally, the torrefied top. Completely opaque.
What this means is that torrefied wood is the holy grail of counterfeit musical instruments. One of the ways that they check for counterfeit violins is to shine a light through the top and if they can see it, then they know that it's a fake. Well, that is, until torrefied tone wood became available. You can fake the look of old wood, but you can't fake the opacity. That's my useless bit of trivia for today.
Oh, yeah. I almost forgot.
I got the braces laid down today. Y`all should know the drill by now. Visqueen taped to the go-bar deck, apply glue to the braces, then use the go-bars to clamp them into place.
Next step is to patch the hole in the lower bout where the old strap button pick-up was, then get ready to glue the top into place.
Posted 2015-08-18 9:10 PM (#514455 - in reply to #494306) Subject: RE: 1967 Balladeer Rebuild...
Joined: June 2012 Posts: 2303
Location: Lake Forest, CA
The top is done and ready for gluing to the body. I decided to use the Old Brown Glue on the braces to maximize the acoustic resonance. The top has a real nice tap tone. It's deeper and more resonant than the top made with new spruce.
But, before I can do that I needed to plug the hole in the bowl. Here is the inside and the outside of the bowl after removing the visqueen.
And, after sanding.
I made sure to add a couple of reinforcement patches so that if Jay ever decides to add a strap button, he can do so without fear of the plug popping out.
Here's a molly I got from JB at the MS. This is what's used to mount virtually all strap buttons on Ovation guitars, and it would be my first choice if I were to add a strap button to the bottom of 485.
Next job is to honor Jay's request to add a (self-aggrandizement) label to the inside commemorating my rebuilding of this guitar. Once the sticker is added, I'll glue the top down.
Posted 2015-08-22 6:12 PM (#514635 - in reply to #494306) Subject: RE: 1967 Balladeer Rebuild...
Joined: June 2012 Posts: 2303
Location: Lake Forest, CA
I finished designing the label going inside.
Here's the artwork. The black, is well, black. The gold is gold foil.
The typeface is Arabian Normal, which is the same typeface used by Ovation.
And, here's the finished label inside the guitar.
Here's what it'll look like through the sound hole.
Of course, now Jay needs to make a couple of decisions before I glue it into place.
1) Is this where you want it?
If not, let me know where you'd like to see it.
2) The existing Balladeer label is crooked, meaning it wasn't square when it was stuck down.
I can do one of two things: make the new label match the crookedness of the existing label or I can stick the new label down so it's square, which will highlight the crookedness of the existing label.
My inclination is to stick it down so it's even with the existing label. Otherwise it will look funny, and I don't mean in a humorous way.
Posted 2015-08-25 9:51 PM (#514747 - in reply to #514745) Subject: Re: 1967 Balladeer Rebuild...
Joined: June 2012 Posts: 2303
Location: Lake Forest, CA
Thanks, Paul & Nancy.
I'm ready to glue the top down, but I've decided to apply a sealer coat to the top before I actually glue it into place.
So, right now, I'm running a few tests. I'm going to apply a polyurethane finish instead of the lacquer I used on my 1619, mainly because it won't take as many coats.
I tried Varathane. (nyet!) Too soft.
Now, I'm testing Min-wax. I tried the water-based and the solvent based. As I suspected, the water-based causes the wood to swell on the finish-side, which introduces a bow into the wood due to the swelling of the wood fibers as it absorbs the water. This effect is not unknown to me, and was totally expected as I used to take advantage of this when sheeting the fuselages on my model airplanes.
The solvent-based does not do this, so I'm leaning toward using this. I can explain more when my tests are done and the top is glued into place.
Posted 2015-09-03 11:43 AM (#514969 - in reply to #494306) Subject: RE: 1967 Balladeer Rebuild...
Joined: June 2012 Posts: 2303
Location: Lake Forest, CA
I still haven't glued the top down.
But, the sanding sealer coat on the top is done. Here's what it looked like before I wet-sanded it. Purty.
I'm going to finish the neck and prime the bowl before gluing the top down. I thought about trying to spray the clear coat on the top and neck at the same time and decided it would be easier to break the finishing into individual steps.
Here's what the back of the neck looked like after one of the clear coats. Purty.
I'm nearing the end of the sanding sealer coat on the neck and head stock. Once that's done I'll apply the logos, then shoot a final coat to seal them in. After that I'll shoot the bowl with a two-part flat black epoxy primer.
I decided to go with a two-part polyurethane finish from Eastwood. The neck and top will get shot with clear and the bowl with gloss black. I'm using poly-u because it's an extremely durable finish and I'll be able to keep it very thin and a thin finish means good sound.
Getting back to the water-based sealer comments. Even though water-based is easier to work with, I decided to go with the solvent-based for two reasons.
When wood gets wet it swells. When you wet one side of a piece of wood, it will swell on that side causing the wood to warp into a curve. While this is good when you're gluing a piece of sheeting to the side of of a curved surface like a model airplane fuselage, this is bad when you're trying to keep a guitar top flat. The main problem is that unless all the edges of the sheet are supported, the wood will warp unevenly and when it dries it can resemble a potato(e) chip.
The braces are glued with hide glue, which is water-based. If you want to separate a HG joint, you simply apply water and the glue will soften allowing the joint to be pulled apart. The last thing I wanted with a water-based finish was for the water in the finish to soak through the wood and soften the bracing glue joints.
Posted 2015-09-06 3:13 PM (#515053 - in reply to #515051) Subject: Re: 1967 Balladeer Rebuild...
Joined: January 2009 Posts: 1249
Location: Texas
I think I can answer this...The bowl had 50 years of use on it. It was pretty scratched up ...
I scored a RI shiny, but the bowl had been terribly abused. Aside from the excess belt buckle scratches...grooves...it had a 3x4 place on it that appeared to have been burned or melted. The top was in pretty good condition...so I called up Kim and asked how much a bowl would cost. He wanted to see it first, so I sent it in. Didn't need a thing other than the fine craftsmen at the MS to bring her back to NEW condition. I was amazed. I thought that bowl was history. Pretty amazing place...the factory...
Anyway...here are some of Dans pics...as you can see... it had seen some use.
Hopefully Dan will share with us what he did with the bowl, and what it takes to get that black shiny result.
Posted 2015-09-06 6:58 PM (#515061 - in reply to #515051) Subject: Re: 1967 Balladeer Rebuild...
Joined: June 2012 Posts: 2303
Location: Lake Forest, CA
clrules - 2015-09-06 12:50 PM
Since you're going to make the bowl shiny why did you take the finish off in the first place?
The torrefied top is awesome.....looks like a 50 year old piece of wood....this is gonna be one helluvagood axe!
Soundclips are required!!!!!
Two reasons.
The first, as Jay says, was that there were quite a few scratches. Now, it's true that I could have used glazing putty to fill the scratches and simply scuff up the bowl, then primed and painted.
But, the second reason to take it back was to keep the finish from getting too thick and deadening the resonance of the bowl. When it comes to Ovation bowls, thinner is always better.
There were basically, four generations of bowls.
1st Gen: Hand-laid woven fiberglass cloth over a male mold. These were vacuum-bagged and scraped to remove as much resin as possible, making the bowl as thin as possible.
2nd Gen: Hand-laid woven fiberglass cloth inside a female mold. These were simple room-temperature lay-ups.
3rd Gen: Polyester resin/roving fiberglass pre-preg (SMC) bowls molded over hot metal molds.
Technically, there's a fifth generations bowls, which are hand-laid fiberglass cloth inside a female mold which is both vacuum-bagged and cured in an autoclave.
The advantages and disadvantages to the various generation bowls are:
1st: Pluses: Thin, light, strong, flexible. (read: resonant) Minuses: Time-consuming to produce, not resistant to high temperatures. 2nd: Pluses: Fairly thin, strong, fairly flexible. Minuses: Somewhat time-consuming, but lay up can be done without the complicated vacuum-bagging step, not resistant to high temperatures. 3rd: Pluses: Fast to produce, (minutes vs. hours) resistant to high temps. Minuses: Fairly thick, fairly heavy, not very-flexible. 4th: Pluses: Fast to produce, (minutes vs. hours) resistant to high temps, lighter and more resonant than 3rd gen bowls.
The 5th gen bowls are a return to the 1st gen technology, but removes some of the time-consuming labor steps. The vacuum-bagging inside the female mold helps squeeze out the excess resin and the high temp of the autoclave cures the resin faster and makes the bowls more resistant to high temperatures.
Here's a pic of a guitar body inside a female mold being vacuum bagged.
Here's a couple of pics of a 5th gen Ovation bowl that I got with my 1619 CL. It's definitely made using the above technique. The 1st gen bowls which have wrinkles on the inside, but the weave of the cloth is not visible. The 2nd gen bowls are wrinkle-free, but the weave of the cloth on the inside is clearly visible.
This bowl is smooth and wrinkle free and is very thin. One day I'll use it to make my own bowl mold.
And, it's larger than the 1st gen bowls. Here's a pic of the 1st gen bowl inside the 5th gen bowl.
Posted 2015-09-06 7:20 PM (#515063 - in reply to #515053) Subject: Re: 1967 Balladeer Rebuild...
Joined: June 2012 Posts: 2303
Location: Lake Forest, CA
amosmoses - 2015-09-06 1:13 PM
Hopefully Dan will share with us what he did with the bowl, and what it takes to get that black shiny result
Well, the plan is to use Eastwood 2K Aero-Spray catalyzed (2-part) polyurethane gloss black over 2K Aero-Spray flat black epoxy primer.
I chose the two-part paint because it's harder and more durable than simple one-part paint.
I'll be using the Eastwood 2K Aero-Spray polyurethane gloss clear on the neck and head stock. The neck and head stock are pore-filled and have a seal coat on them. Ditto for the top.
I'm going to shoot a one-part clear over the sealer, put the logos on the head stock, do a light wet-sand to level the finish on the neck and then the neck will be ready to shoot the 2K clear.
I decided to get the neck and head stock done first because I'll need a handle when doing the top and bowl.
Next step after the neck is to prime the bowl.
Then, the top will get glued into place and the purfling and binding channels routed and glued down and scraped level.
After that, the top will get shot with the 2K clear.
Last, the bowl will get shot with the 2K gloss black.
Once all of this is done, I'll wet-sand the whole guitar.
The last job is to glue the bridge into place.
Unlike the dope I used on my 1619, the 2K poly dries hard in 24 hours, so I won't have to wait 3 weeks between the last coat of clear and the start of wet sanding, which speeds up the process tremendously.
Another reason I chose the 2K is that the poly can be applied in very thin coats, which will help keep from deadening the resonance of the guitar.
Posted 2015-09-07 8:03 PM (#515081 - in reply to #494306) Subject: Re: 1967 Balladeer Rebuild...
Joined: January 2009 Posts: 1249
Location: Texas
Heck, looks perfect to me. Just like the 68. The grain certainly shows up better (which is sweet), it seems, than what it originally looked like and the 68. Of course the logos had pretty much faded out. The crown is certainly unique without the skunk stripe. Getting closer! Fantastic job...
Posted 2015-09-08 9:10 PM (#515100 - in reply to #494306) Subject: Re: 1967 Balladeer Rebuild...
Joined: September 2005 Posts: 138
Location: Birmingham, AL
The logos look great and the Braz is definitely very attractive.
On the 68 Deluxe I discovered the headstock veneer is walnut instead of rosewood.. It was finished very dark so it wasn't obvious until the finish was removed.
Posted 2015-09-09 11:05 AM (#515111 - in reply to #515100) Subject: Re: 1967 Balladeer Rebuild...
Joined: June 2012 Posts: 2303
Location: Lake Forest, CA
Thanks, Paul.
Yeah, walnut is a lot easier to finish than RW because it's less oily. But, it's good that I (re)discovered this for when it comes time to glue down the bridge.
I created a thread in the General section called, "The History of the Bowl." If you're interested, it contains a lot more details.
Posted 2015-09-16 12:09 AM (#515227 - in reply to #494306) Subject: RE: 1967 Balladeer Rebuild...
Joined: June 2012 Posts: 2303
Location: Lake Forest, CA
Finally!
I got the neck and headstock finished to a point where I am happy. For a while there, it was one step forward, two steps back.
First, the Eastwood 2K Aero-Spray is very high-quality paint and it's worth the $25 per can. Even though it's a rattle-can paint, the nozzle sprays like it's a gun. It goes on thin and even and dries very hard.
Unfortunately, I sprayed the final coats on the front of the head stock outside and unexpectedly, it started to sprinkle. A few rain drops landed on the finish on the front of the head stock which was not quite dry and caused small craters. (Arghh!)
Fortunately, I was able to repair these and bring the head stock to an acceptable level.
I decided to wet-sand the head stock to make sure it was going to look okay before proceeding.
The photos don't really show what it looks like, but it's definitely an improvement over what it looked like when it arrived. Here's the front.
And, the back.
Next job is to prime the bowl with the Eastwood 2-part epoxy. The neck is masked and I'll be spraying the bowl tomorrow morning. After that, it'll be time to (finally) glue the top to the bowl.
Posted 2015-09-16 11:26 AM (#515235 - in reply to #515227) Subject: RE: 1967 Balladeer Rebuild...
Joined: January 2009 Posts: 1249
Location: Texas
"a while there, it was one step forward, two steps back."
I know there are a couple (Dan is thinking "Yeah right Jay, a couple...") of times I drug you back dan...more than two steps, more like a city block.
Ok...so Ovation had Black and Brown bowls...It appears they could have been any color... Does anyone know if Ovation did a custom with a bowl any other color than black/brown?
Posted 2015-09-16 6:02 PM (#515272 - in reply to #515235) Subject: RE: 1967 Balladeer Rebuild...
Joined: June 2012 Posts: 2303
Location: Lake Forest, CA
amosmoses - 2015-09-16 9:26 AM
"a while there, it was one step forward, two steps back."
I know there are a couple (Dan is thinking "Yeah right Jay, a couple...") of times I drug you back dan...more than two steps, more like a city block.
Well, I was talking about what it took to get the the neck and head stock finished. It's a long and sordid tale.
The bottom line is that it's at a point where the finish on the entire neck is at an acceptable level. It's not perfect, but it's a lot better than it was and I think you'll be very happy with it.
I applied the first coat of black primer to the bowl. I'll sand it this evening and decide then if it needs a second coat.
Posted 2015-09-17 11:37 PM (#515328 - in reply to #494306) Subject: RE: 1967 Balladeer Rebuild...
Joined: June 2012 Posts: 2303
Location: Lake Forest, CA
Progress continues...
I'm happy with the priming/sanding of the bowl, so it's time to glue the top.
But, before gluing the top I wanted to make a caul to use when it comes time to glue the bridge.
I cut the caul base plate out of 1/4" birch ply. I marked the center line and the location of the X braces.
Next, I traced the shape of the caul onto 1/2" hard balsa. Balsa is good for these types of jobs because it's dense enough so it doesn't crush under pressure, but soft enough so it won't mark the underside of the spruce top.
And, cut to shape.
Transfer the brace locations to the balsa.
Cut, and glued to the birch ply using CA.
A perfect fit.
Next job is to glue the rosette into place. Is it at 5:00 or 5:15? I dunno. But, it's permanent now.
I laid down a bead of Hysol 9462 around the kerfing and then laid the top into place. I flipped the whole she-bang over. I used the bowl-bending fixture so that I could apply an even pressure all the way around the periphery of the bowl.
A large bag of rags provides the weight needed to clamp the bowl to the top while the epoxy cures.
I'll let it sit here until Saturday morning to ensure the epoxy has fully cured.
After that, it's time to grind down the excess and route the groove for the purfling and binding.
Posted 2015-09-18 8:48 AM (#515334 - in reply to #494306) Subject: RE: 1967 Balladeer Rebuild...
Joined: June 2012 Posts: 2303
Location: Lake Forest, CA
Yeah, the rosette rotational placement is like Art's RI. The RI rosette is muddied up compared to the original because it's probably the original silkscreen that's worn out. The rosette I got from the MS was the same way.
Here's a pic I took of the original vs. the new one.
It's actually a lot like this one below on the left. They had pretty loose standards back then when it came to gluing in the rosettes. Both of these guitars are original shiny bowls and both had the grapes in different spots on the clock.
Well, it is what it is. The rosette is glued down and ain't coming back up.
I couldn't wait until Saturday. Like most epoxies, Hysol will cure faster in warmer temperatures. I checked it this morning and it was plenty hard to pull off the board.
I also added the bridge to verify the scale length and it's spot on. The bowl has relaxed a little but and the neck alignment dropped back about an 1/8", but it'll be fine and certainly a whole lot better than how it arrived to me.
When I tap on the top, it's got a great big hollow sound like a drum, which is very good.
Tonight's job is to grind down the edges of the top so it's flush with the sides of the bowl in preparation for routing the grooves for the purfling and binding.
Posted 2015-09-22 11:20 AM (#515436 - in reply to #494306) Subject: RE: 1967 Balladeer Rebuild...
Joined: June 2012 Posts: 2303
Location: Lake Forest, CA
Thanks, Paul! It's getting there. Not as quickly as I would have liked, but that's another story.
Any way, I got the top ground down and I'm ready to route the grooves for the purfling and binding. On one of the factory tour videos it shows a worker routing the groove on a router table. The body (sans neck) is placed face down on the table with the router bit sticking up through a hole in the center.
I can't do it the regular way because the neck is attached to the body. So, I bought the attachment from Stewmac, seen below.
Before I attacked the guitar body I wanted to test the attachment on some scrap wood. This attachment will work, but just barely. Here are the grooves I cut in the scrap wood. The upper groove is for the purfling and the lower one is for the binding.
Speaking of binding, I bought some cream binding from AllParts.com. Their cream binding matches the color of the Ovation binding almost perfectly. The .060" is the correct thickness, but it's too wide which will make it hard to glue and tape the binding and purfling to the body.
The binding on modern Ovations are about 1/4" wide. The early guitars used 3/16". So, I needed to remove 1/8". Now, I could have spent $200-$300 on a tool from Stewmac. Instead, I used my Stewmac router attachment to make a tool to narrow the binding, which is 5/16" wide.
Here's the tool with the binding clamped into place.
I used my cabinent scraper to shave 1/8" off the binding.
Now, I'm ready to route the grooves into the body. I'm going to try to get that job done tonight.
Posted 2015-09-23 8:57 AM (#515451 - in reply to #494306) Subject: RE: 1967 Balladeer Rebuild...
Joined: June 2012 Posts: 2303
Location: Lake Forest, CA
I was able to get the routing on the body done last night. (Yay!)
Here's the holder I made from a banker's box. I weighted the box with a sand baggie I had and the body is wedged into the banker's box.
This is a close-up of the grooves.
As expected, the attachment prevented me from routing all the way up to the sides of the neck, so the area on both sides of the neck will have to be carved by hand. It looks bigger in the pic than it really is. The unrouted area is only 1/2" on either side.
Posted 2015-10-03 12:40 PM (#515776 - in reply to #515771) Subject: Re: 1967 Balladeer Rebuild...
Joined: June 2012 Posts: 2303
Location: Lake Forest, CA
Thanks. The silking on this top wood is really amazing. Photos don't do it justice.
Your suggestion for the box works great. I put a small sand baggie inside bowl and a large sand baggie in the bottom of the box and the whole thing is very stable.
Posted 2015-10-09 1:41 PM (#515983 - in reply to #515981) Subject: Re: 1967 Balladeer Rebuild...
Joined: June 2012 Posts: 2303
Location: Lake Forest, CA
Mark in Boise - 2015-10-09 11:28 AM
Beautiful, Dan. What do you mean by "cut and polish"? I understand the polish part, but I don't know what you mean by "cut".
Thanks, Mark.
The 'cut' is the wet-sanding process. I'll start with 400-grit to (gently) get rid of any orange peeling and to level the surface, then progress with 600 all the way up to 2000.
After that, it's polishing with red jeweler's rouge on a buffing wheel, then white rouge for the final polish.
Posted 2015-10-09 5:58 PM (#515992 - in reply to #515988) Subject: Re: 1967 Balladeer Rebuild...
Joined: January 2009 Posts: 1249
Location: Texas
"red and white jeweler's rouge"
I remember my grandmother finishing up her makeup with it before she would take me to a movie. I think the Joker also used it. It should go with black just fine. You might try a little blush, also, Dan.
Posted 2015-10-10 6:11 PM (#516024 - in reply to #494306) Subject: RE: 1967 Balladeer Rebuild...
Joined: June 2012 Posts: 2303
Location: Lake Forest, CA
I got the bowl cut and polished, so I decided to take off all the masking so I could see what it looks like.
Front.
Back.
I'm going to let the back paint cure for a couple of days, then glue the bridge on. While the bridge glue is curing, I'll make the bridge saddle and nut.
Posted 2015-10-10 7:15 PM (#516028 - in reply to #516024) Subject: RE: 1967 Balladeer Rebuild...
Joined: January 2009 Posts: 1249
Location: Texas
It's beautiful Dan. Thank you! That top is awesome in the natural light. You gotta be proud...not to mention feeling a little relief that this restoration is almost over.
You think my Grandma's rouge will make my Grand Cherokee shine like that?
Posted 2015-10-11 7:19 AM (#516040 - in reply to #516028) Subject: RE: 1967 Balladeer Rebuild...
Joined: June 2012 Posts: 2303
Location: Lake Forest, CA
amosmoses - 2015-10-10 5:15 PM
It's beautiful Dan. Thank you! That top is awesome in the natural light. You gotta be proud...not to mention feeling a little relief that this restoration is almost over.
You think my Grandma's rouge will make my Grand Cherokee shine like that?
Hi Jay,
Yes, on both counts. I am happy with how it's turning out and that it's almost done.
Posted 2015-10-11 7:31 PM (#516058 - in reply to #494306) Subject: RE: 1967 Balladeer Rebuild...
Joined: June 2012 Posts: 2303
Location: Lake Forest, CA
I decided to glue the bridge down, after all.
Put the bridge into place and lightly scored the finish around it.
Peeled the masking tape up to reveal the bare wood.
Masked around the bare wood and scuffed it with 220-grit sandpaper, then cleaned it with naptha.
Scuffed the underside of the bridge with 220, then cleaned the underside of the bridge really well with acetone to remove the rosewood oils. (pretty greasy wood) Applied a layer of Hysol 9462 to the underside of the bridge and the top wood, then clamped it into place.
I'll pull the clamps off tomorrow night, then start making the bridge saddle.
Posted 2015-10-11 7:48 PM (#516059 - in reply to #516058) Subject: RE: 1967 Balladeer Rebuild...
Joined: January 2009 Posts: 1249
Location: Texas
It FINALLY gets used! That bridge was in the case when I got the guitar. I thought it was cool, but what the hell was I going to do with it? One of the many previous owners had gotten it (along with the kluson tuners) from the MS. One of the previous owners was Nick Black, who use to post here. He said he had envisioned "restoring" it. until he realized what it entailed. He may have scored those or some one else...but what is cool is that it appears evident that many owners of 485 have wanted to make sure that it lived to see another day...and thanks to you, Dan, it will. :-)
Posted 2015-10-11 9:07 PM (#516061 - in reply to #516059) Subject: Re: 1967 Balladeer Rebuild...
Joined: June 2012 Posts: 2303
Location: Lake Forest, CA
How long have you owned this guitar?
Yeah, it took a lot of intestinal fortitude to do a complete restore of this guitar. I can see how a lot of people might have wanted to restore it, but it was definitely a big job and not one for the faint of heart.
The photos above do a good job of presenting just how beautiful the top wood looks. Thumping the top gives a big hollow sound. I can't wait to get some strings on it.
Posted 2015-10-12 1:57 PM (#516077 - in reply to #516075) Subject: Re: 1967 Balladeer Rebuild...
Joined: June 2012 Posts: 2303
Location: Lake Forest, CA
The old top had strong silking like this one does. The new top also had good silking, but was a lot more pale.
The coloration between the old top and the new one is different. In natural light, the old top was more honey colored while this one has more of the color of brown sugar.
Yes, like you I'm really looking forward to how it sounds. I've been wanting to play/hear a torrefied top for the last few years.
The sound of thumping this top while holding it by the neck is like a kettle drum --very resonant. Lots of sympathetic vibration from the bowl.
Posted 2015-10-13 12:29 AM (#516087 - in reply to #494306) Subject: RE: 1967 Balladeer Rebuild...
Joined: June 2012 Posts: 2303
Location: Lake Forest, CA
The high temperatures we've been experiencing lately really helps epoxy cure faster, so I was able to pull the clamps off the bridge.
Here's the unbleached bone blanks that will become the saddle and nut. I'm using unbleached bone so the finished product will have a nice, vintage look.
Saddle cut to length, sanded to thickness and the ends rounded to fit into the bridge slot.
Saddle sanded to a 10" radius to match the fret board.
Compensation marked with pencil.
Although it's hard to see here, the compensation has been sanded into saddle and the saddle has been polished.
At this point, I'll leave the saddle height alone until I get the nut made and I'm able to adjust the action. I am going to try to get the saddle low enough so that I can put a couple of shims under it to allow for easy adjustments in the future.
Posted 2015-10-13 10:11 AM (#516091 - in reply to #494306) Subject: Re: 1967 Balladeer Rebuild...
Joined: March 2002 Posts: 15652
Location: SoCal
Cool Dan. One of the things I always found interesting about old Ovations is that the saddles always seemed loose in the bridges. They were never as long as the slot and with the strings off, they fell right out. I was always under the impression that you wanted the saddle to be snug in the slot for full contact with the bridge which should mean better vibration transfer.....
Posted 2015-10-13 10:51 AM (#516092 - in reply to #516091) Subject: Re: 1967 Balladeer Rebuild...
Joined: June 2012 Posts: 2303
Location: Lake Forest, CA
That's correct.
In addition to better vibration transfer, a snug fit also prevents the saddle from laying down as the strings are tightened which affects the intonation.
Posted 2015-10-13 12:13 PM (#516095 - in reply to #494306) Subject: Re: 1967 Balladeer Rebuild...
Joined: March 2002 Posts: 15652
Location: SoCal
Also Dan, when I see you, I've got 4 sets of strings to donate to you. Elixir light 80/20 HD's. Bought 5 sets, tried one and didn't care for it. But I know you like those. I seem to be too lazy to send them back so I'll give them to you if you want them.
Posted 2015-10-15 11:47 PM (#516182 - in reply to #494306) Subject: RE: 1967 Balladeer Rebuild...
Joined: June 2012 Posts: 2303
Location: Lake Forest, CA
I cut the nut slots, then strung up the guitar with D'Addario PB Extra Lights to set the action.
I tuned up the guitar because I was dying to hear what it sounds like and in the words of Moody, "Wow! Just, wow!"
The sustain is incredible. It's got a deep resonant voice with clear highs. And, that's just with the PBs. I can't wait to hear what it sounds like with 80/20s on it.
Here's the YouTube video of me plucking each string just to demonstrate the sustain and voice. I would have posted a video of me playing it, but since the action is so high, it doesn't really show how good the guitar can sound. There's a lot of background noise because I shot the video with my snapshot camera.
Posted 2015-10-16 4:08 AM (#516184 - in reply to #494306) Subject: Re: 1967 Balladeer Rebuild...
Joined: October 2012 Posts: 1018
Location: Yokohama, Japan
Wow! Incredible! Just a few more steps to go...It's been so exciting following your progress. You could be the West Coast Mothership for crying out loud. One of these days, DanSavage restored Os could have a value all their own! A 1967 Balladeer like no other...
Posted 2015-10-16 11:13 AM (#516196 - in reply to #494306) Subject: Re: 1967 Balladeer Rebuild...
Joined: June 2012 Posts: 2303
Location: Lake Forest, CA
I want to see which sounds better, PB or 80/20s. So, I'm going to use these strings to set the action and play and record a couple of songs.
Then, I'm going to change these strings out for the Elixir Nanoweb 80/20 Extra Lights and do the same thing.
I personally prefer the brighter sound of the 80/20 over the PB. I was playing the guitar again this morning I must say that the PBs do sound really good.
Posted 2015-10-16 11:54 AM (#516200 - in reply to #494306) Subject: Re: 1967 Balladeer Rebuild...
Joined: March 2002 Posts: 15652
Location: SoCal
Strings are so personal. The right strings are whatever sounds and feels right. Question Dan, do you think this guitar would be fine with mediums or should Jay not go heavier than lights?
Posted 2015-10-16 12:18 PM (#516201 - in reply to #516200) Subject: Re: 1967 Balladeer Rebuild...
Joined: June 2012 Posts: 2303
Location: Lake Forest, CA
immoody - 2015-10-16 9:54 AM
Strings are so personal. The right strings are whatever sounds and feels right. Question Dan, do you think this guitar would be fine with mediums or should Jay not go heavier than lights?
You're correct about personal preferences WRT string choices. Like I say, I like the brightness of 80/20s, but recording with the PBs and 80/20s will give everyone a chance to hear this guitar on both.
Personally, I wouldn't go any heavier than extra lights. But, if he wants to go to lights, then the guitar would be fine with them. I would not use mediums as it'll just warp the belly of the guitar and accelerate neck misalignment.
When I rebuilt my 1619, I had the soundboard sanded to .094" instead of the standard .10". I strung it with my then-go to light strings. After a few weeks I noticed the guitar was starting to belly, so I restrung it with extra lights and the bellying went away.
Now, I'm of the opinion that the less amount of tension you put on a top, the better, hence my preference for extra lights. This guitar has lots of volume already and the extra lights are super easy to play.
As an aside, after playing this guitar I went back and played my 1619. There is a noticeable difference with this guitar sounding much more alive. Don't get me wrong, the 1619 still sounds great, but it doesn't compare to this Balladeer. I am really glad Jay and I went back and put the torrefied top and braces on this guitar.
EDIT: I'm going to set the action tonight, so let's get together either Saturday afternoon or evening. I'll PM my phone number to you so we can set up a time.
Posted 2015-10-16 10:19 PM (#516253 - in reply to #494306) Subject: RE: 1967 Balladeer Rebuild...
Joined: June 2012 Posts: 2303
Location: Lake Forest, CA
Sounds good, Paul.
I set the action tonight.
I also made the shims to go under the saddle to allow easy saddle height adjustments in the future.
Instead of making them from plastic or fiberglass I decided to use some East Indian Rosewood scrap I had left over from my 1619.
I made two thick and one thin. The thick shims are about 1/32" and the thin one is about 1/64". (I know what you're all thinking --now he's just showing off. LOL!)
I put a thick and a thin under the saddle and I'll throw the extra thick one in the case when I send it back to Jay.
Except for mounting the TR cover, the guitar is done. I'll shoot some video with the PBs, then change to the 80/20s. I'll wait to shoot video of those until Paul and I get together.
Posted 2015-10-17 11:16 AM (#516268 - in reply to #494306) Subject: RE: 1967 Balladeer Rebuild...
Joined: June 2012 Posts: 2303
Location: Lake Forest, CA
Good suggestion, but I don't know any Carly Simon.
In any event, the video is up. Please overlook my less-than-stellar playing. Also, the condenset mic on the video camera doesn't capture the full fidelity of the guitar.
That being said, enjoy! I'll post another clip of the same 'song snippets' after I've changed strings to the 80/20s.
Posted 2015-10-17 5:32 PM (#516282 - in reply to #494306) Subject: Re: 1967 Balladeer Rebuild...
Joined: October 2012 Posts: 1018
Location: Yokohama, Japan
Unbelievably stunning! I love the custom label...is this the first to wear that badge of honor? Congratulations to you and "jay" and thanks for sharing your amazing journey!
Posted 2015-10-17 5:40 PM (#516284 - in reply to #516282) Subject: Re: 1967 Balladeer Rebuild...
Joined: July 2014 Posts: 154
Location: Canberra, Australia
You've done an outstanding piece of work, Dan. It looks and sounds gorgeous!
I can't help but wonder whether the new Mothership is going to be inundated with requests for X-braced torrified spruce tops once more people have seen and heard this one.
Posted 2015-10-18 6:56 AM (#516311 - in reply to #516295) Subject: Re: 1967 Balladeer Rebuild...
Joined: October 2012 Posts: 1018
Location: Yokohama, Japan
DanSavage - 2015-10-17 9:09 AM
Yep. I never would have added that label, but Jay insisted.
Nice! I'm sure you'd never want to draw attention to yourself, but for those of us who've followed your progress, that label is testimony of the care the instrument received in the hands of a craftsman dedicated to his instrument and its player. Kudos to "jay".
Btw, the pictures make it look like the strings are practically laying on the frets! What are your measurements at the 12th fret?
Posted 2015-10-18 7:30 AM (#516312 - in reply to #494306) Subject: RE: 1967 Balladeer Rebuild...
Joined: June 2012 Posts: 2303
Location: Lake Forest, CA
Thanks again, everyone.
Arumako,
At the 12th fret the strings are 6/64" or 3/32". I use Stewmac's String Action Gauge. To set the nut action I use the technique I learned from frets.com. (See: Checking Nut Action)
Posted 2015-10-19 11:54 AM (#516360 - in reply to #494306) Subject: Re: 1967 Balladeer Rebuild...
Joined: March 2002 Posts: 15652
Location: SoCal
This is true. I saw the guitar on Saturday and was greatly impressed. The workmanship was outstanding and the guitar just rang and rang. Dan is giving the mothership a run for it's money. Very impressive.......
Posted 2015-10-19 12:36 PM (#516364 - in reply to #516360) Subject: Re: 1967 Balladeer Rebuild...
Joined: June 2012 Posts: 2303
Location: Lake Forest, CA
Thanks, Paul. It reaffirms for me everything I've been reading about torrefied top guitars.
I've got a couple of projects I need to clear away, then take a short break. After that, I'm going to get started rebuilding the 1978 1617 Legend using another set of torrefied Sitka spruce top wood and brace stock I bought.
Posted 2015-10-19 2:06 PM (#516376 - in reply to #516374) Subject: Re: 1967 Balladeer Rebuild...
Joined: June 2012 Posts: 2303
Location: Lake Forest, CA
Sure thing. I'll be spraying the back of a Kramer bass in a couple of weeks (after Halloween) so that would be a good time to do your neck at the same time.
Posted 2015-10-27 9:05 PM (#516793 - in reply to #494306) Subject: Re: 1967 Balladeer Rebuild...
Joined: September 2005 Posts: 138
Location: Birmingham, AL
Wunderbar!!! That thing is gorgeous. It sounds so clear and the note separartion is fantastic. I wonder how it's going to sound after working that top a little.. Great job.
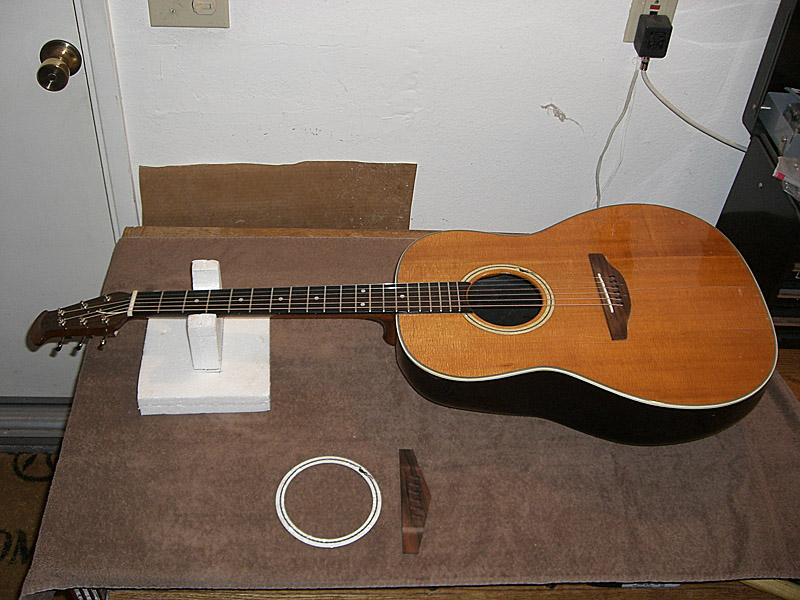
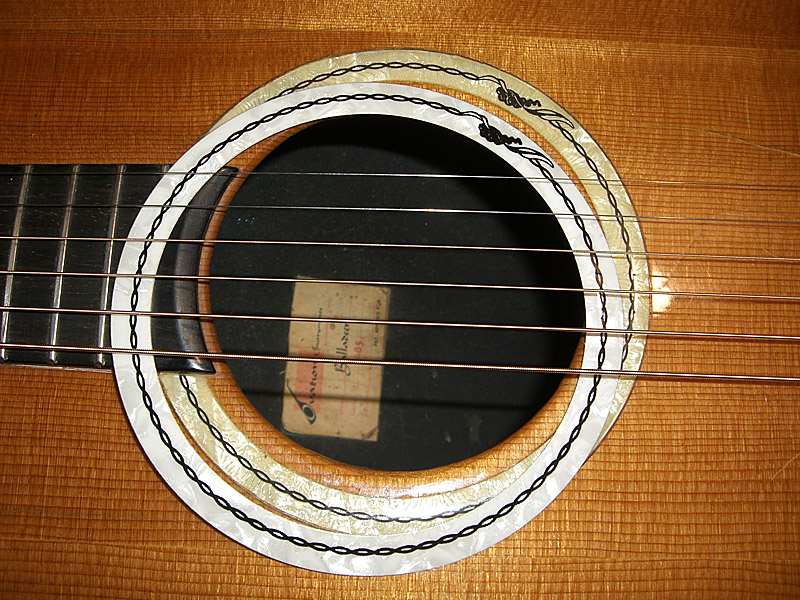
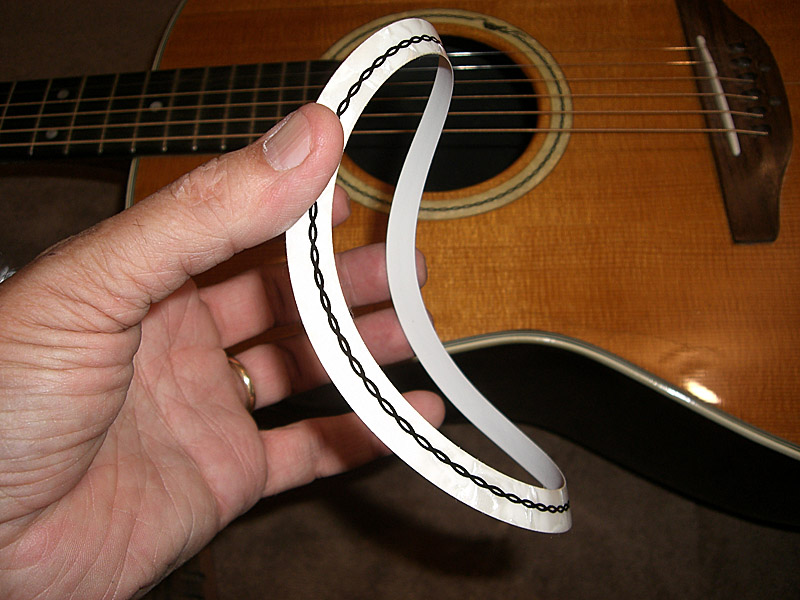
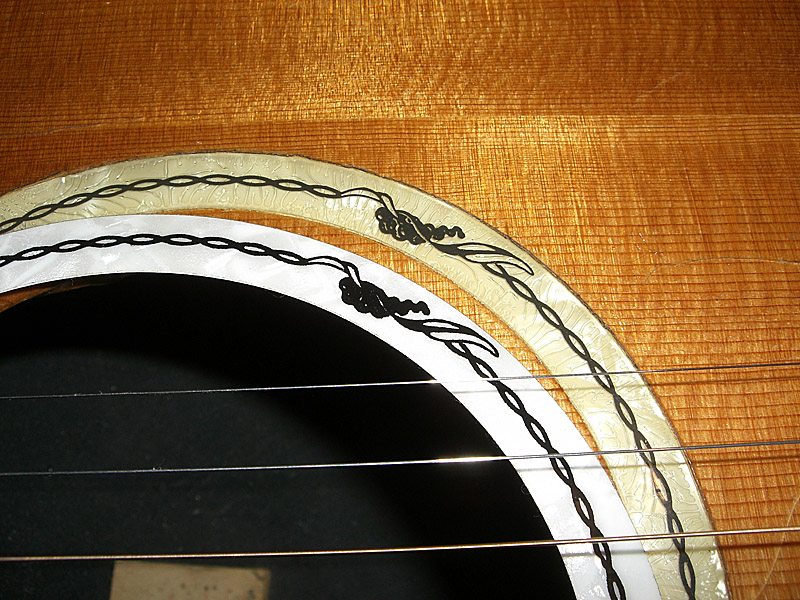

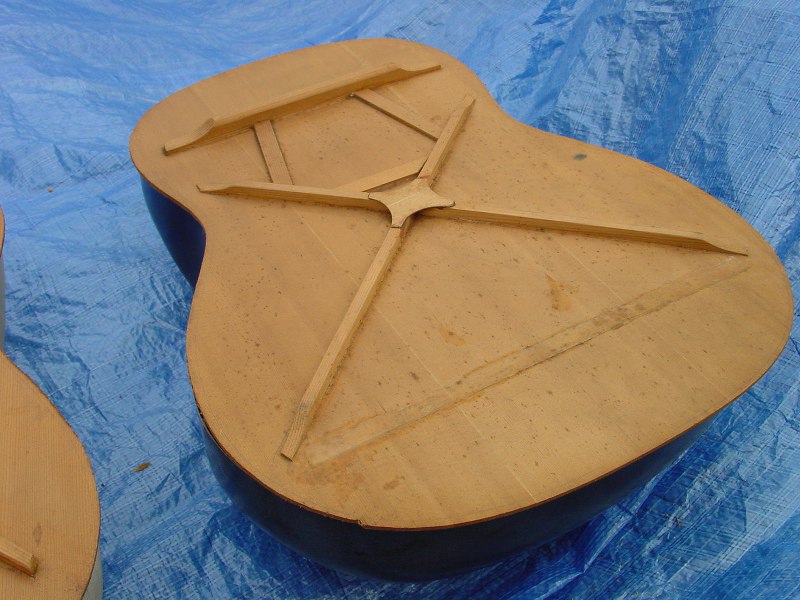
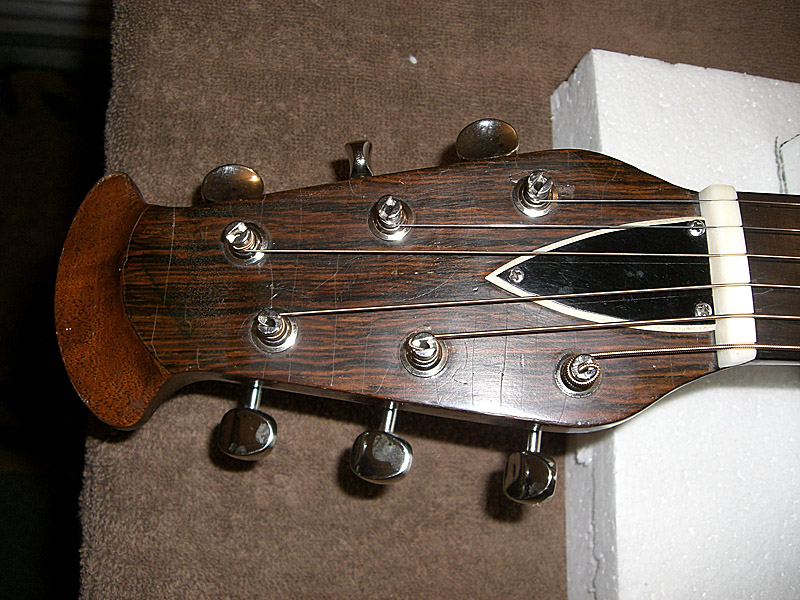

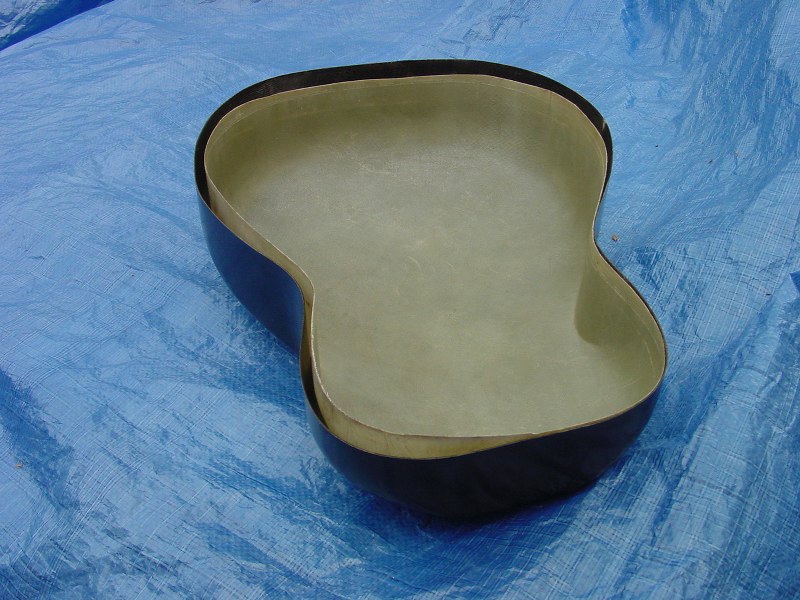
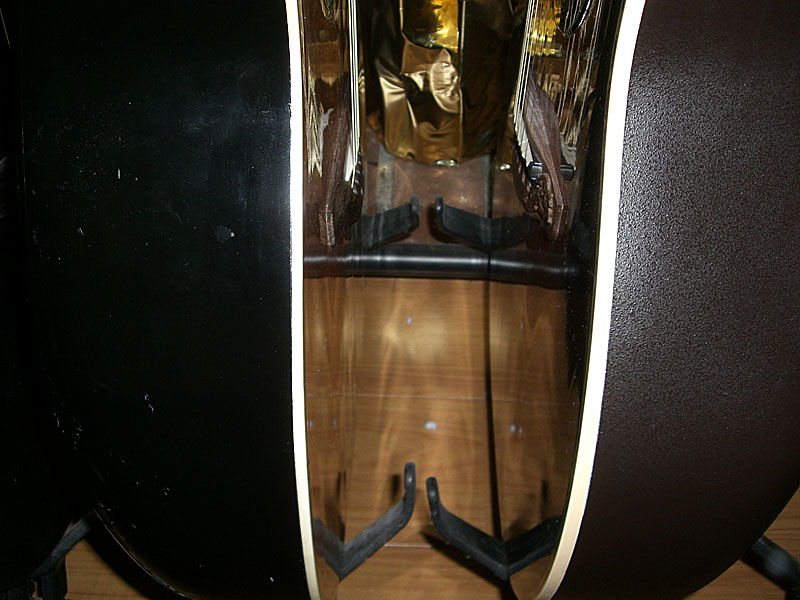


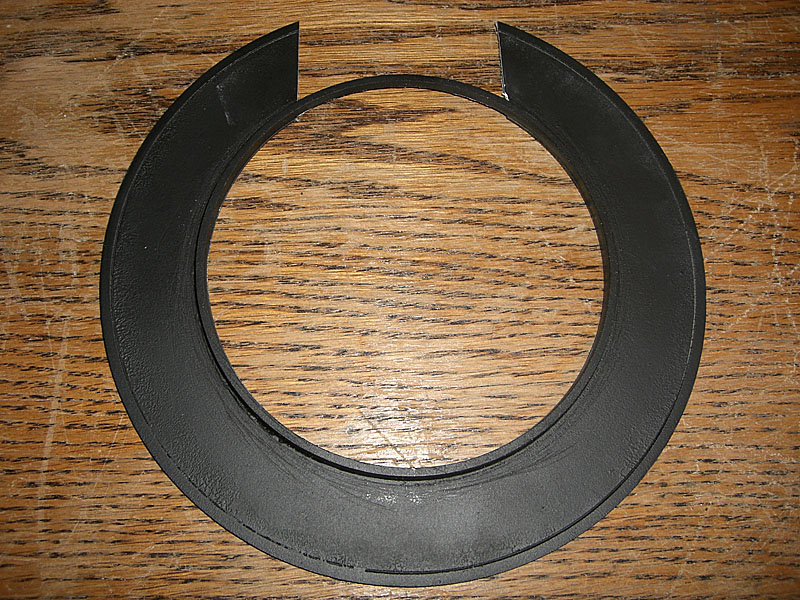
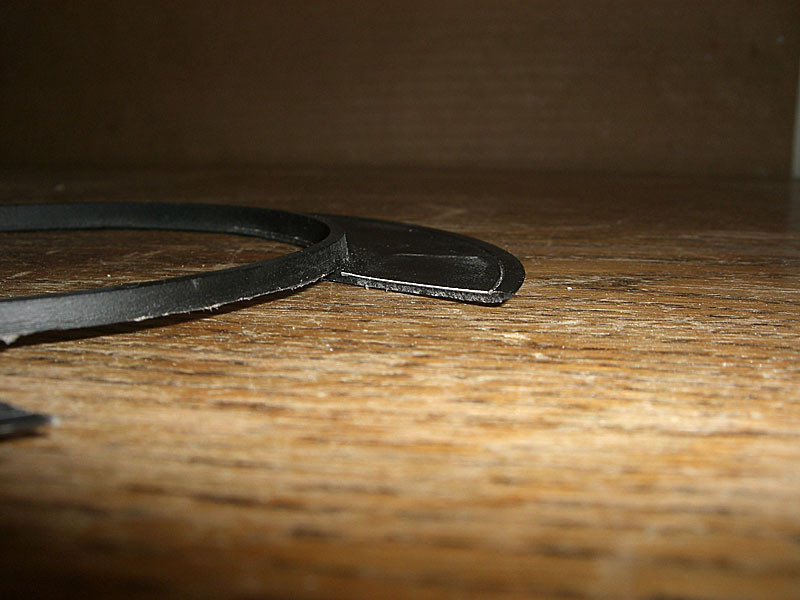
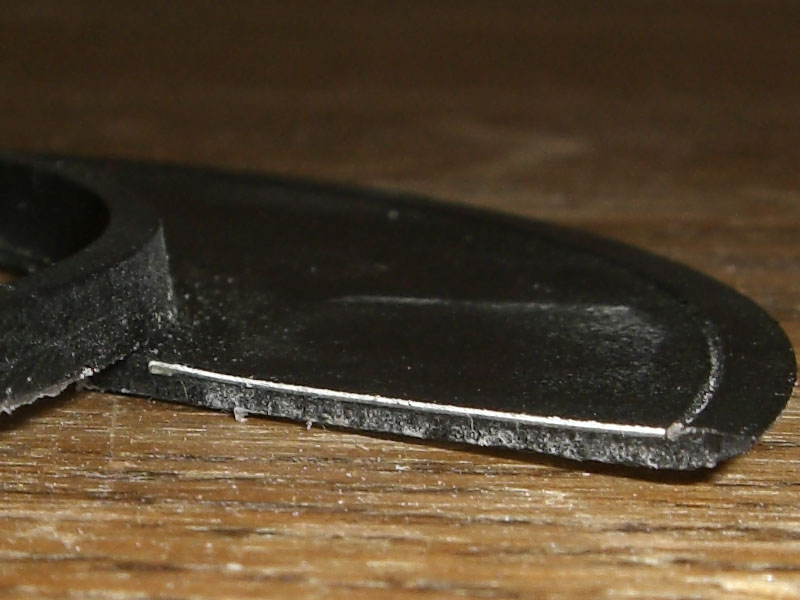
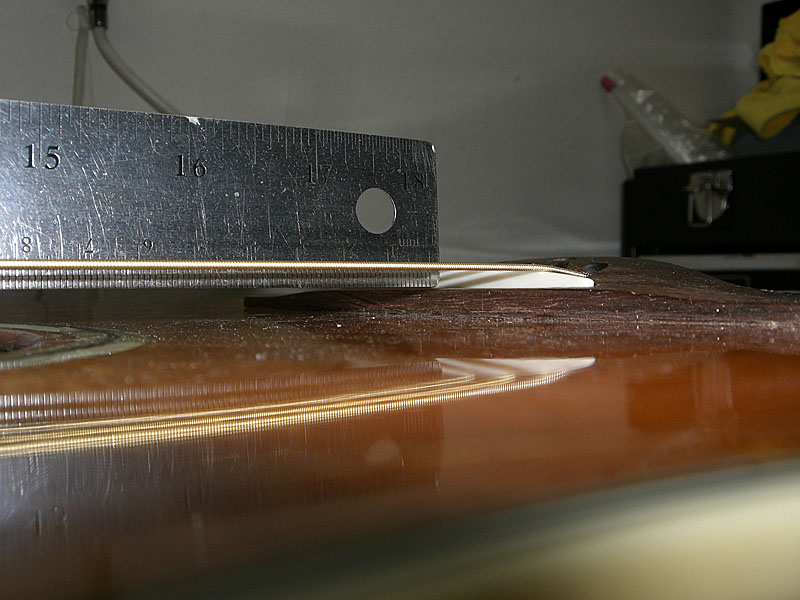
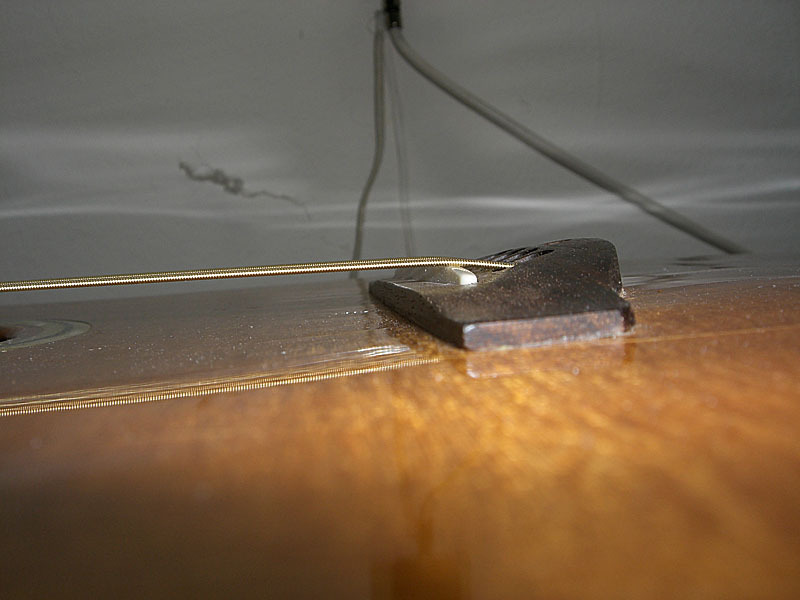
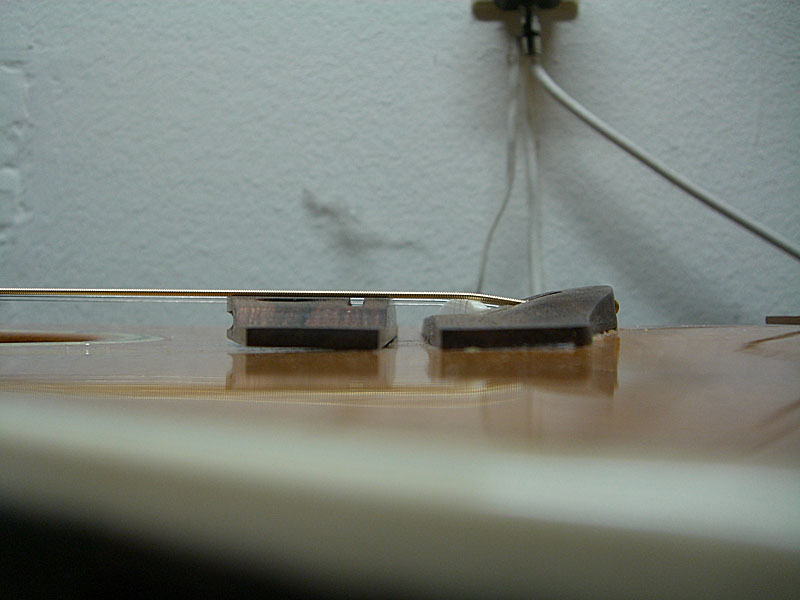
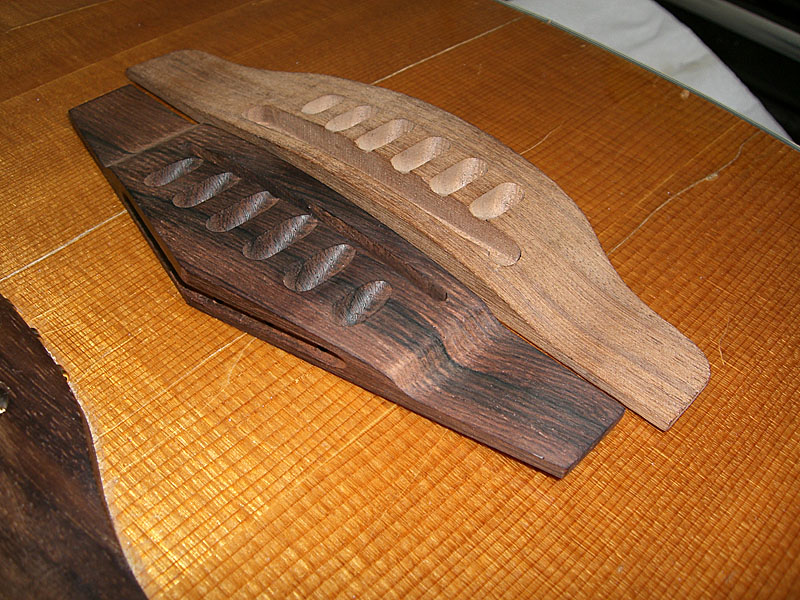
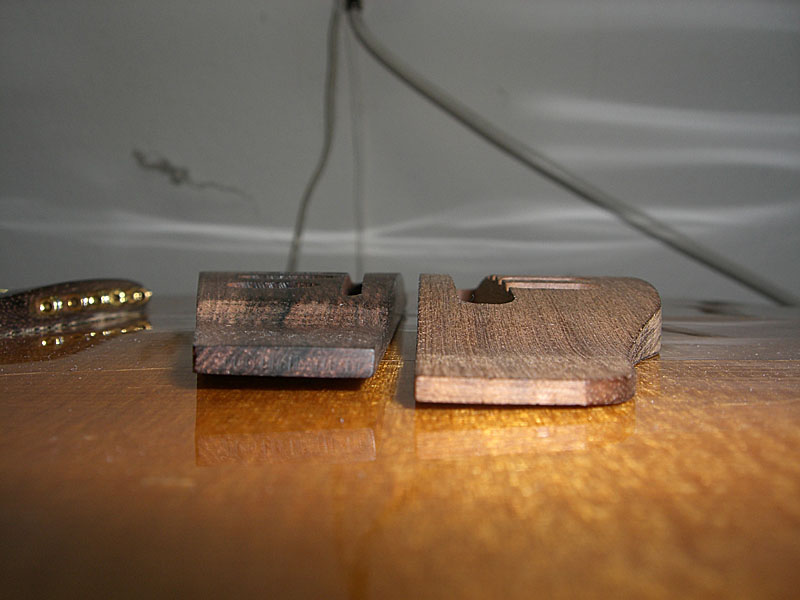
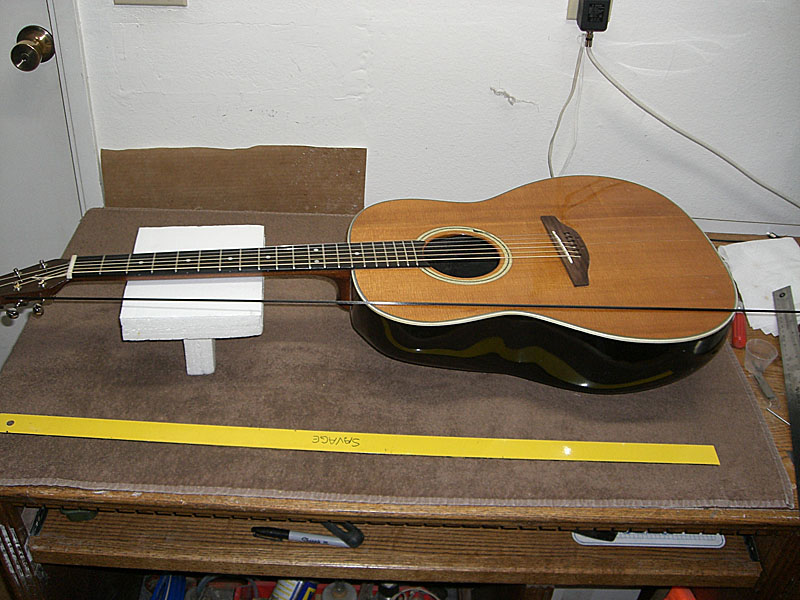
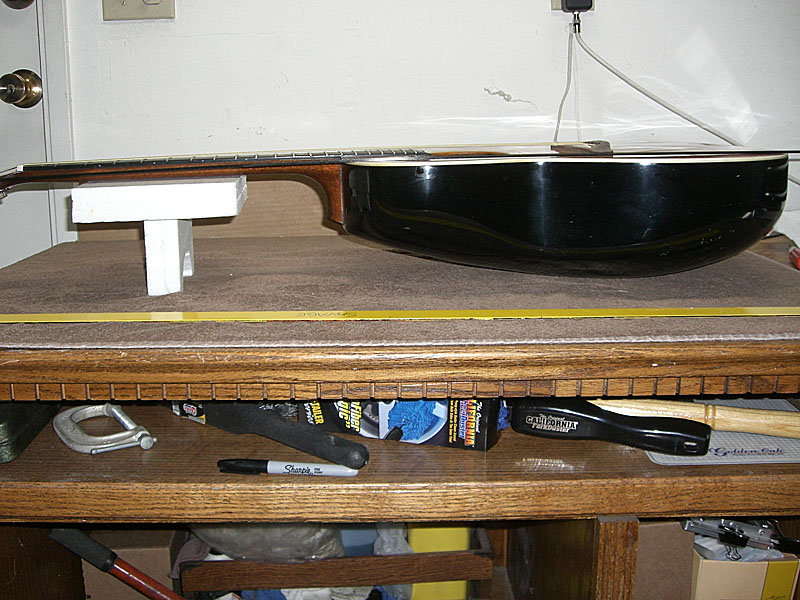
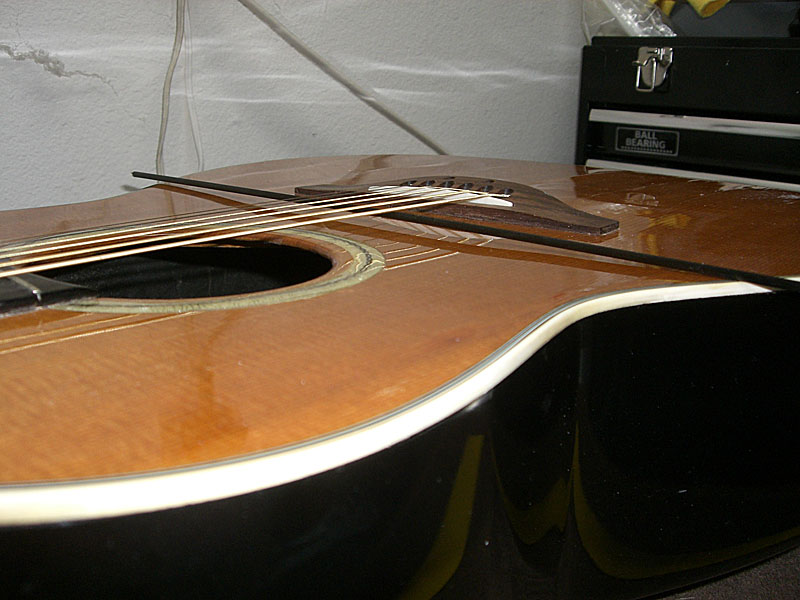
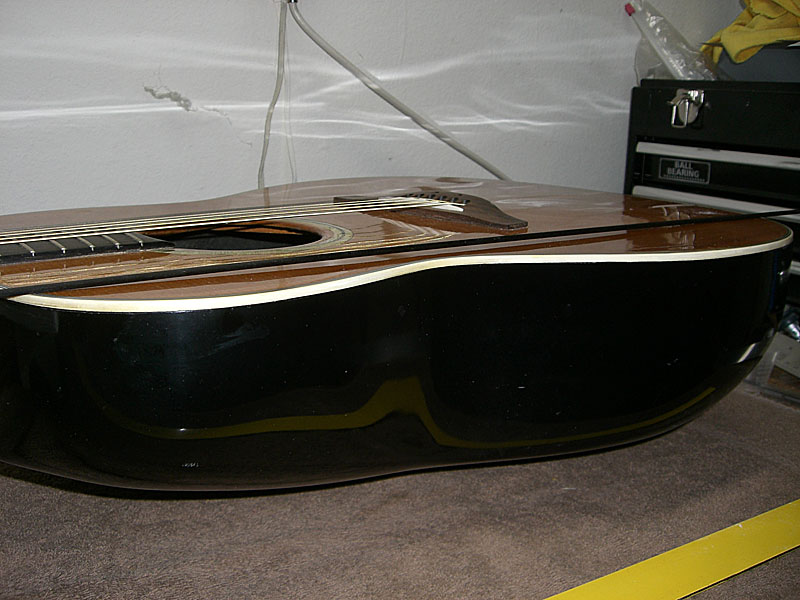

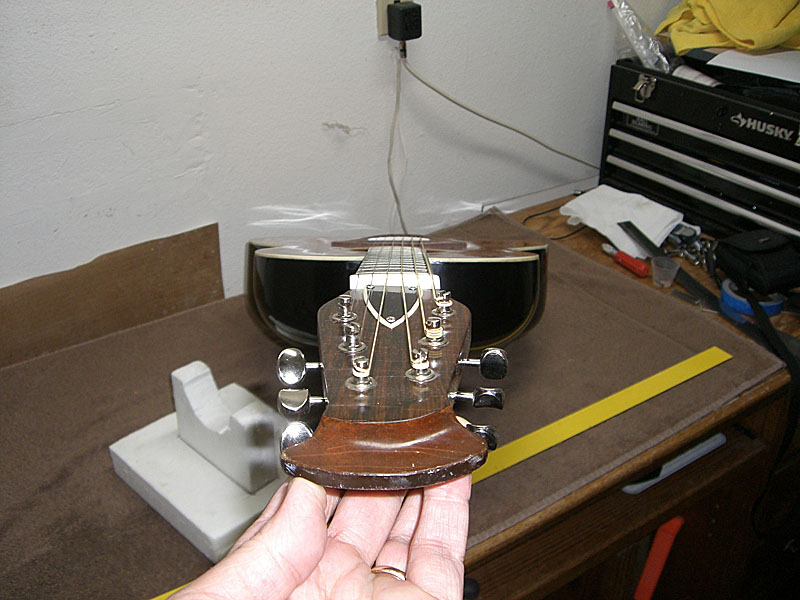
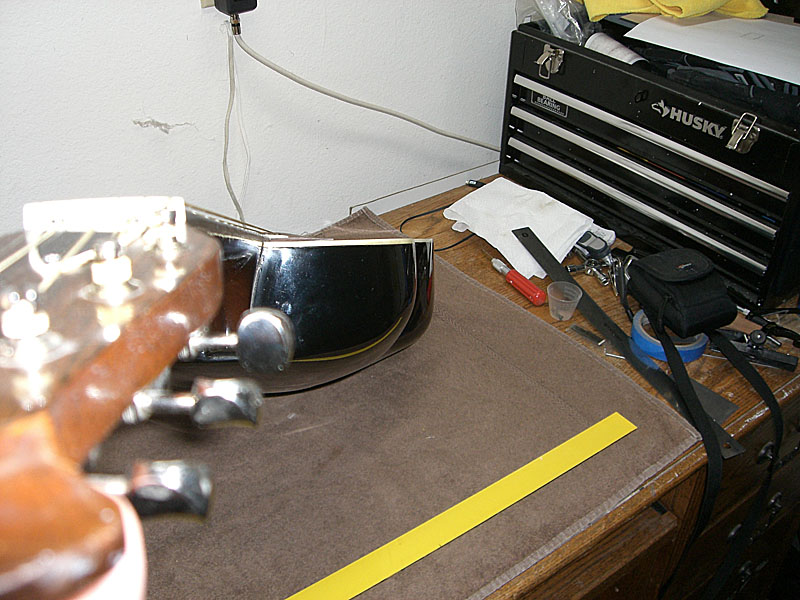
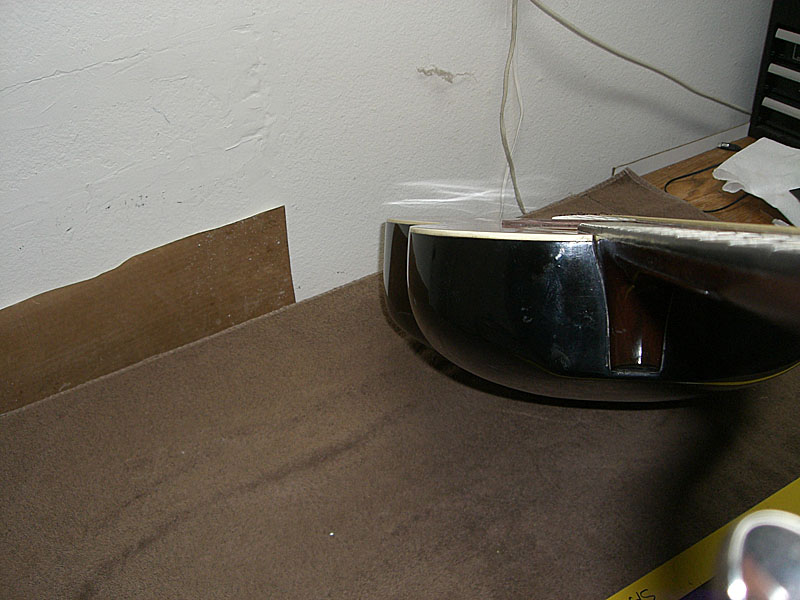
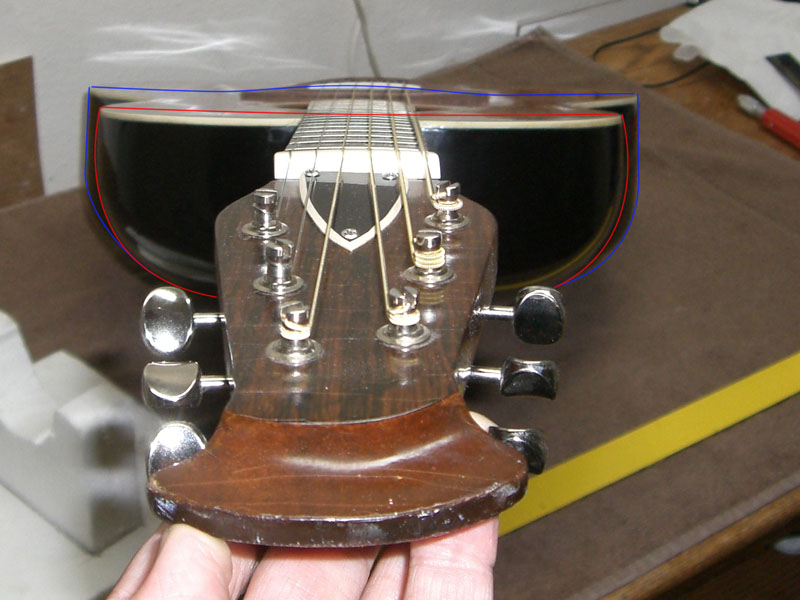
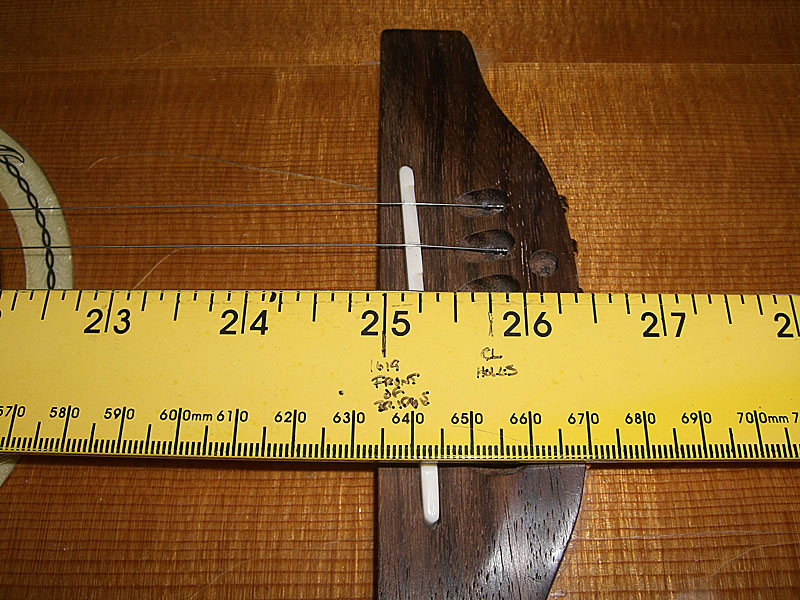
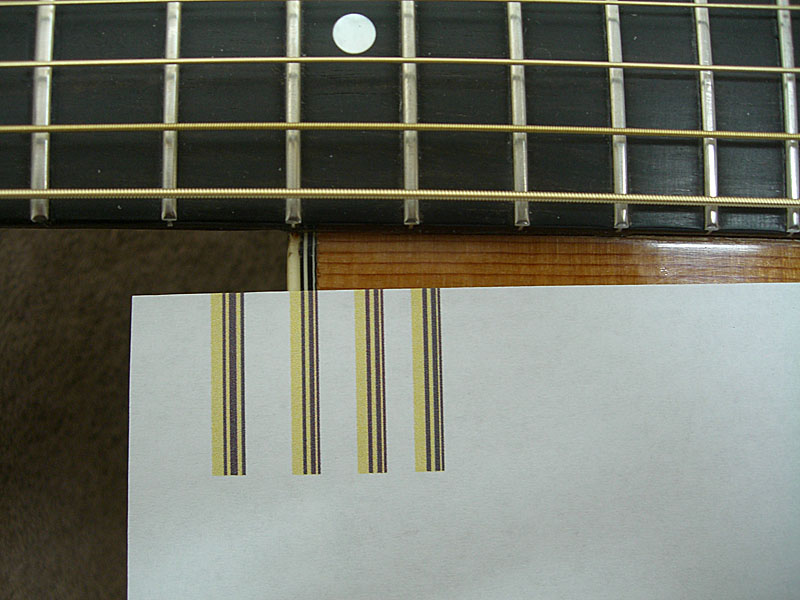
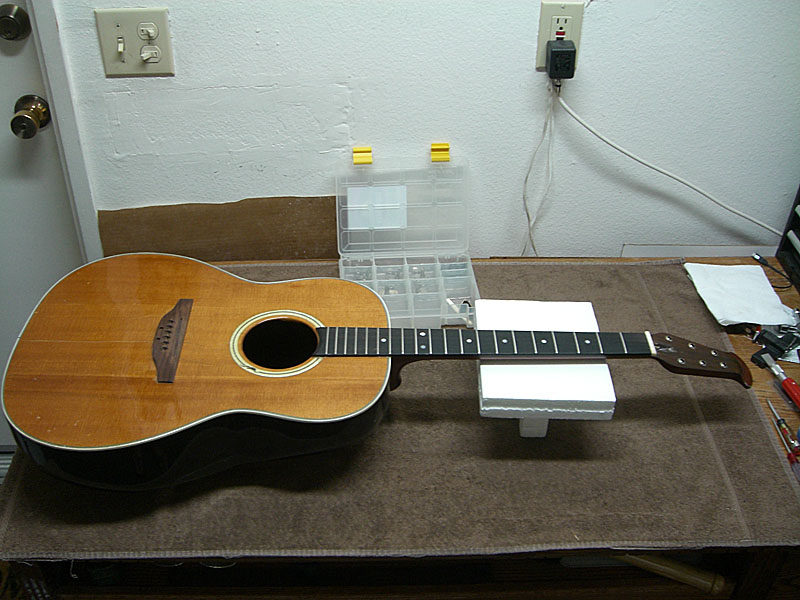
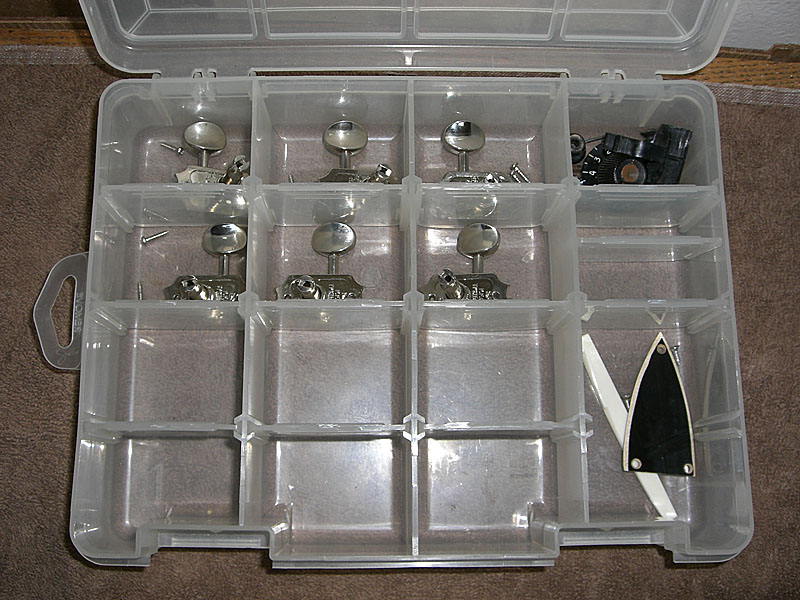
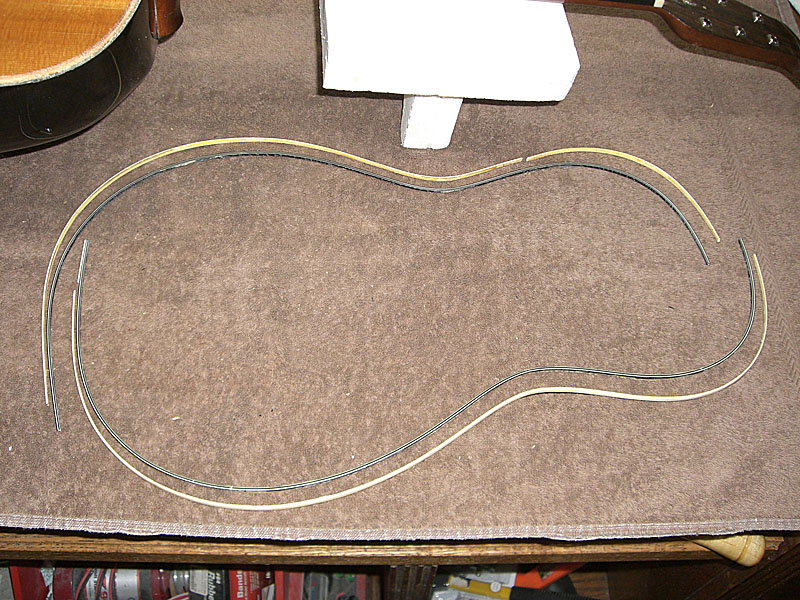
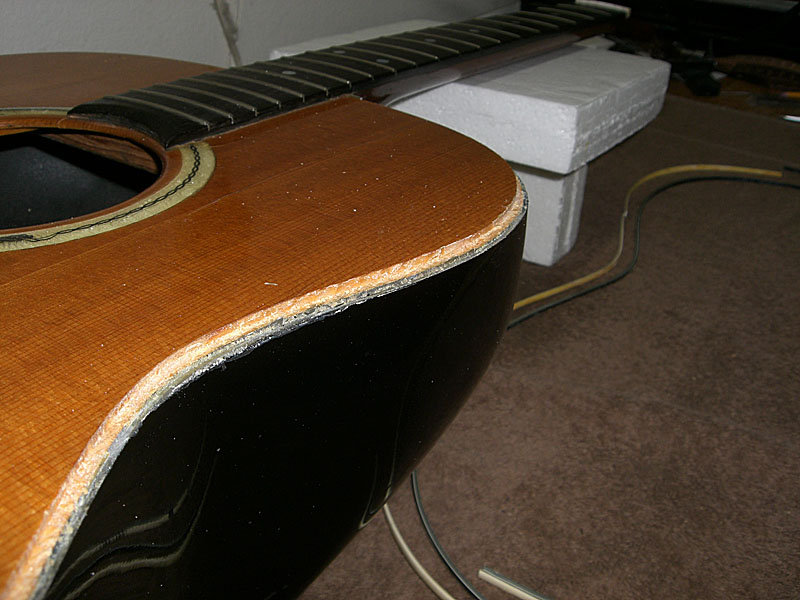

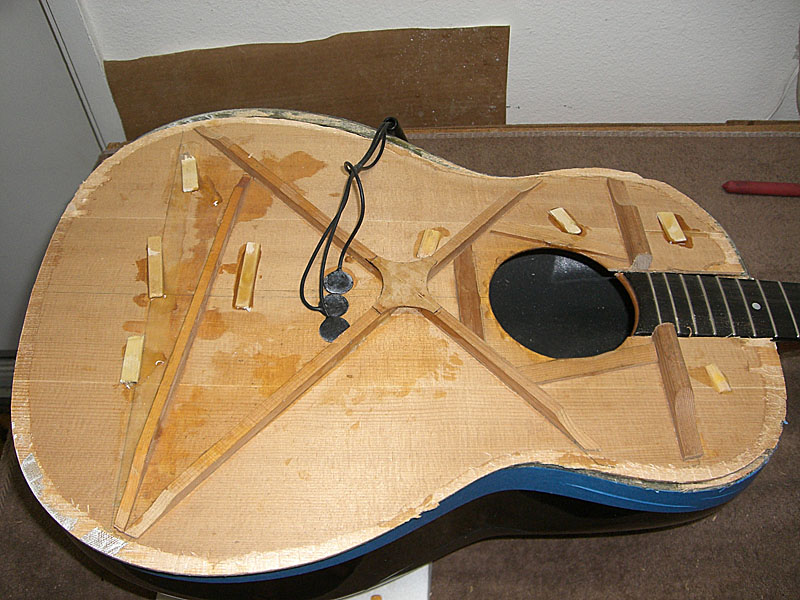
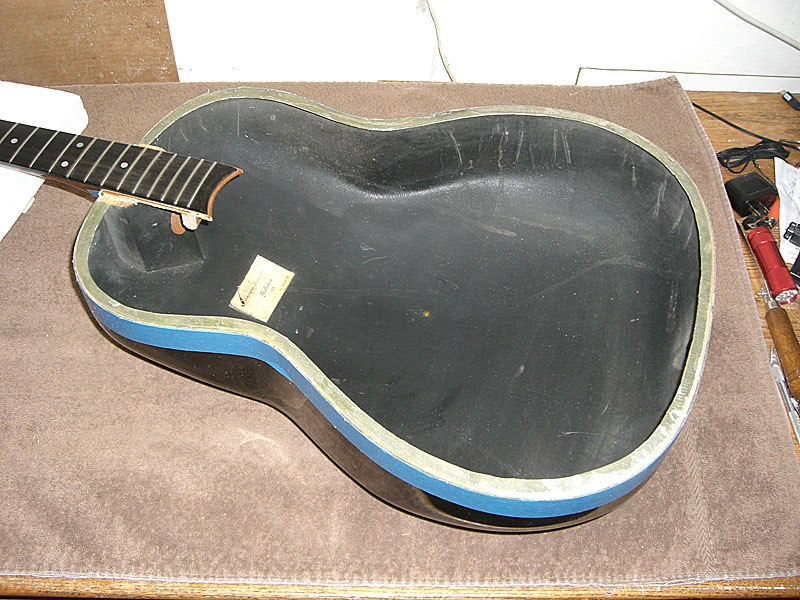
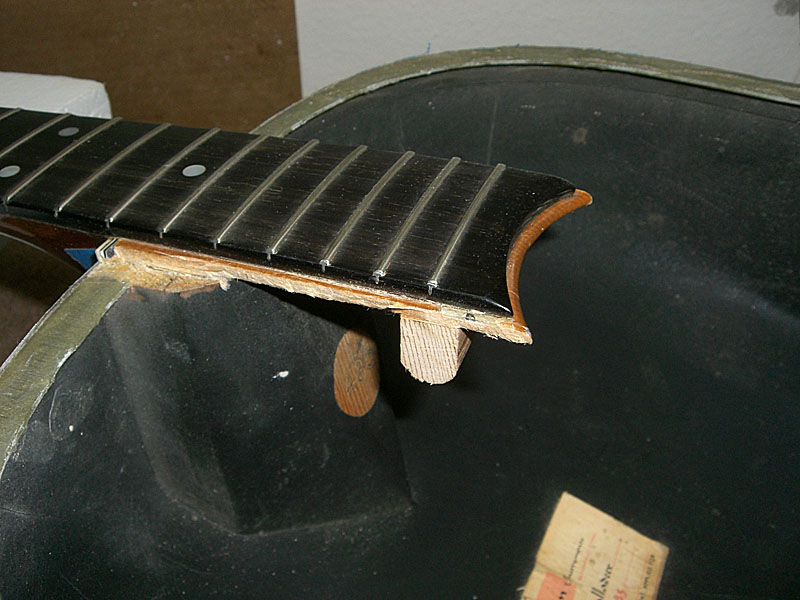
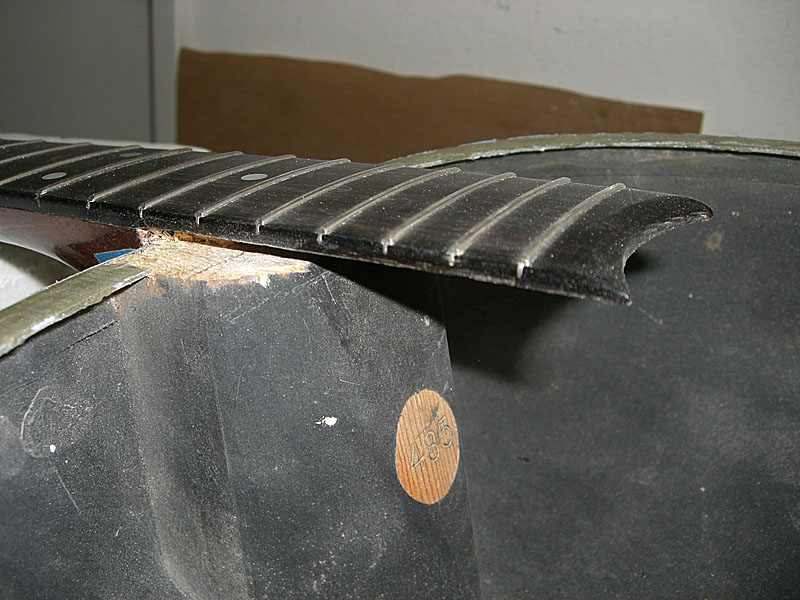

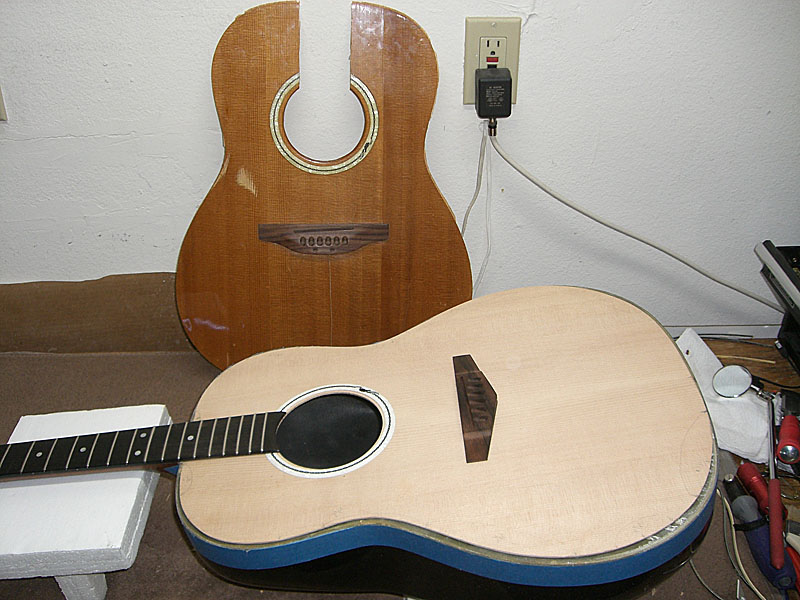
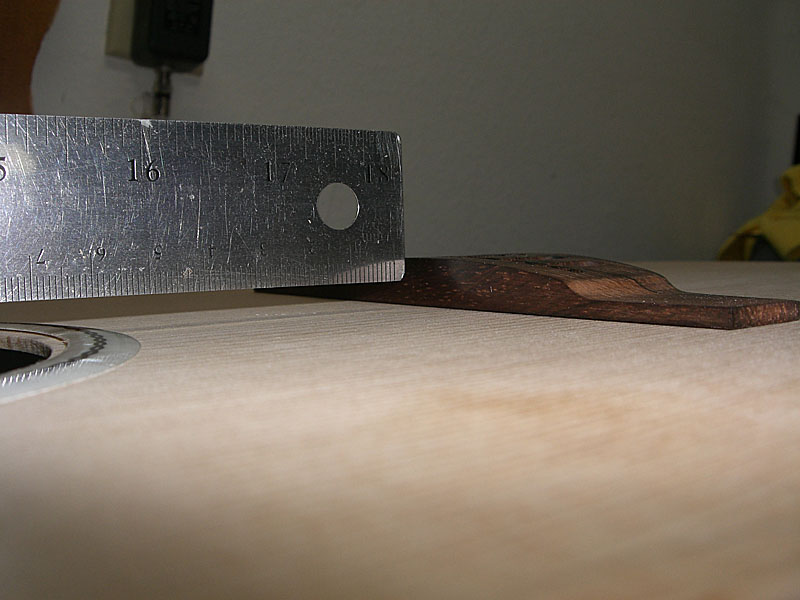
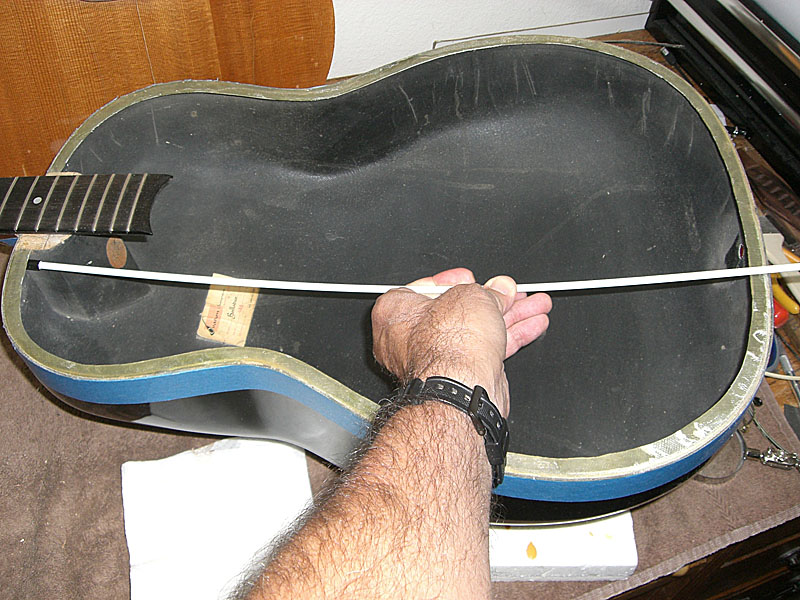
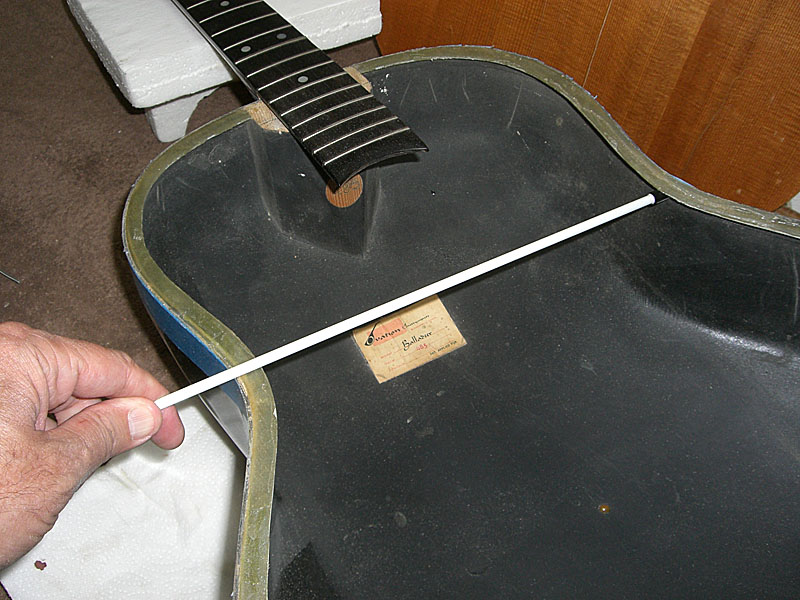
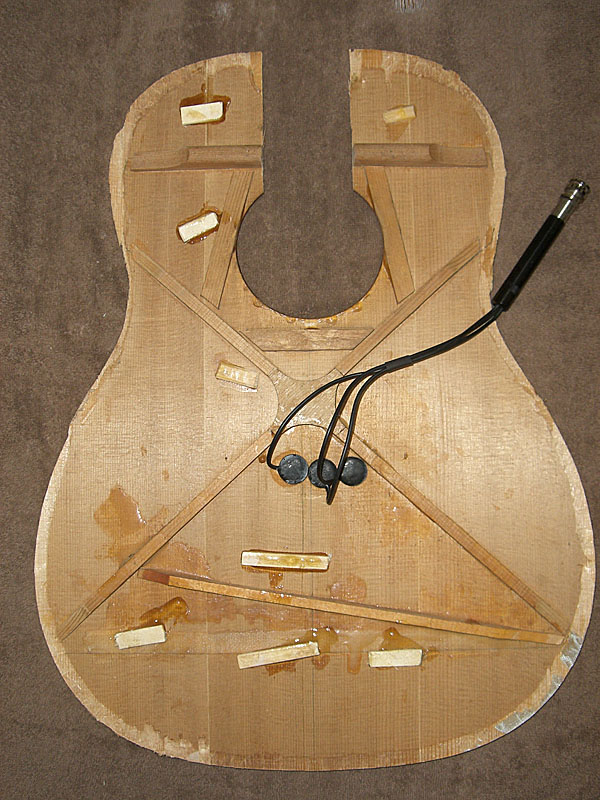
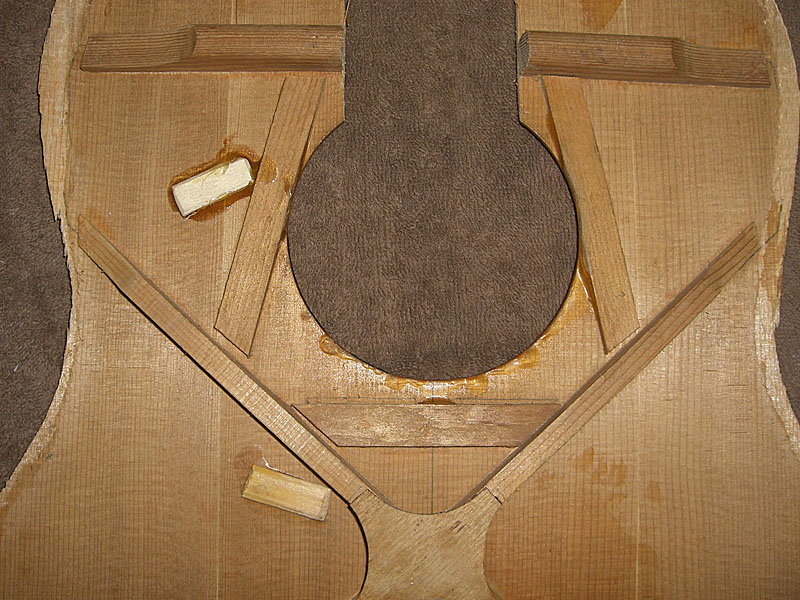
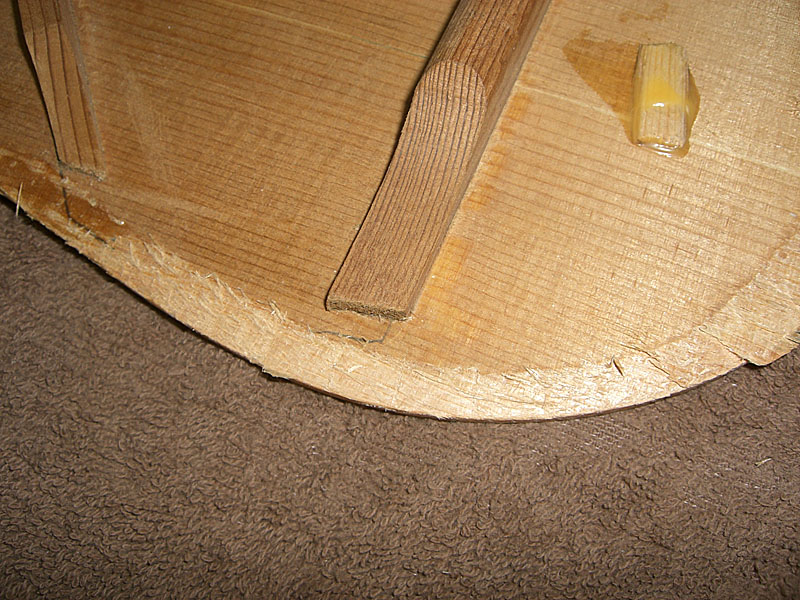
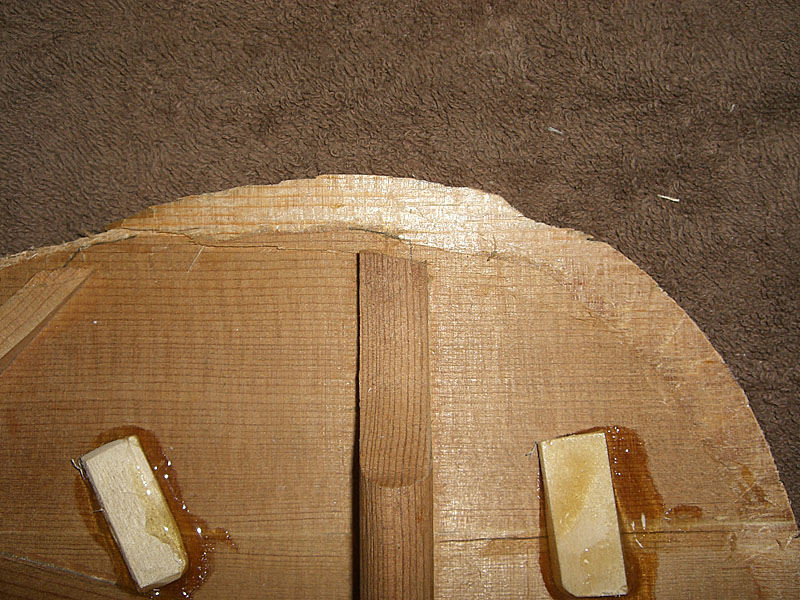
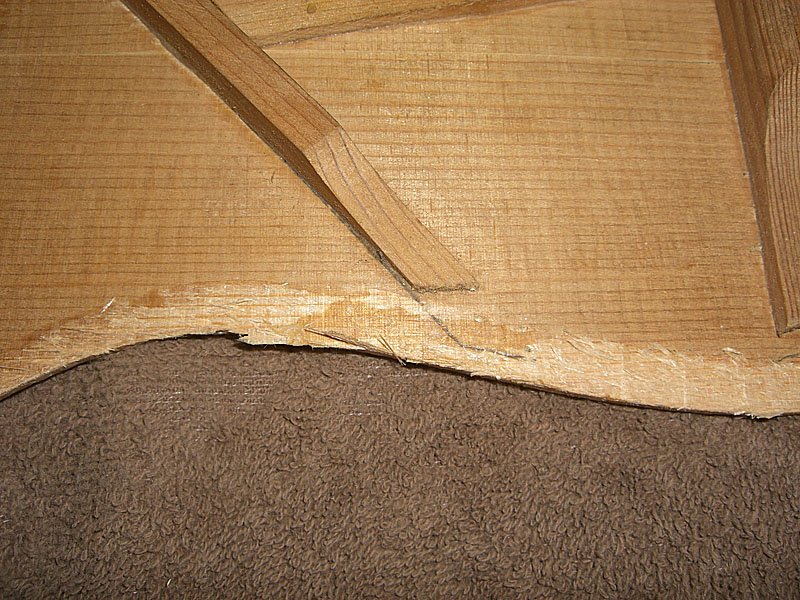
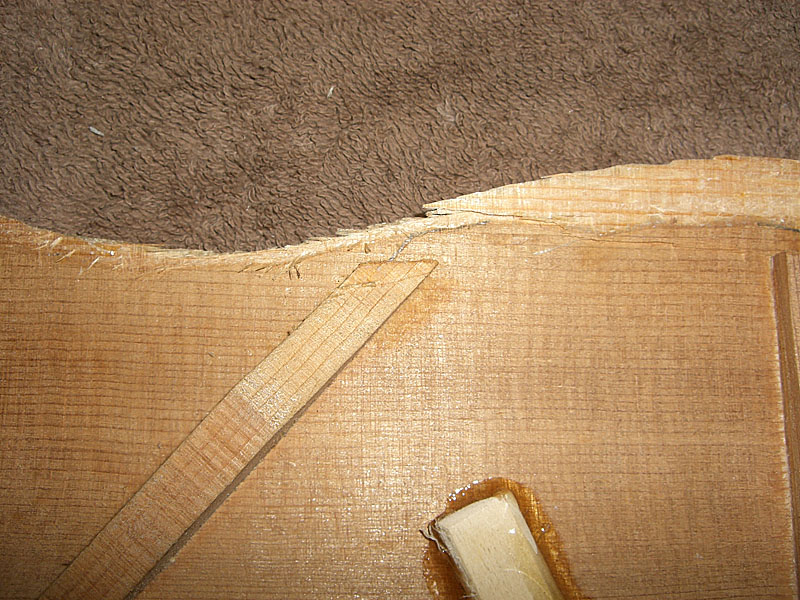
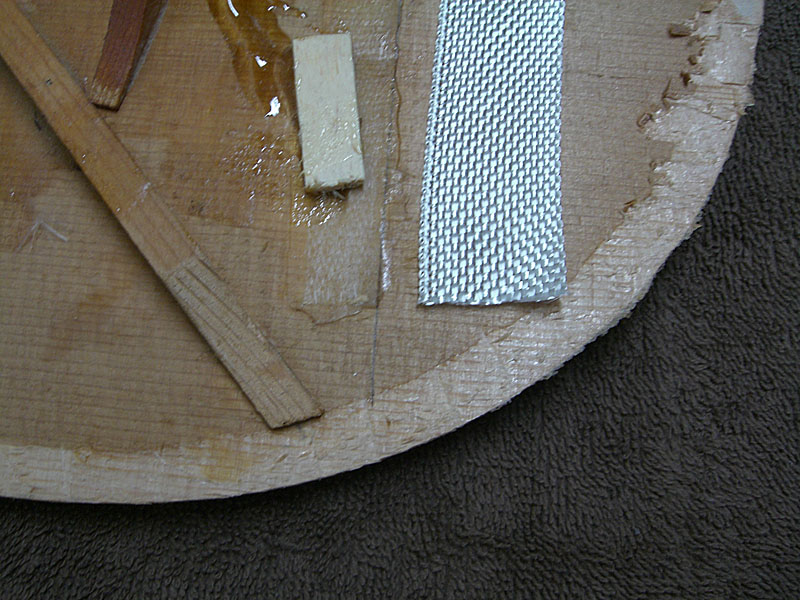
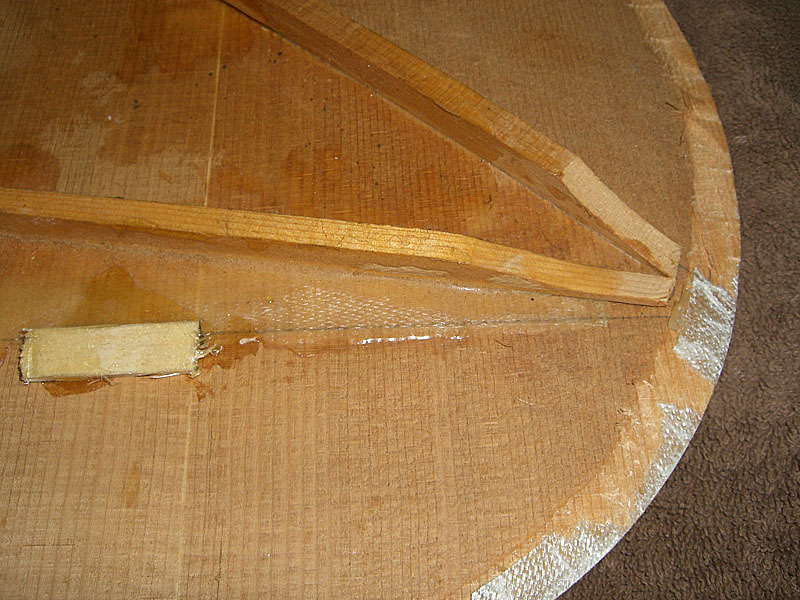


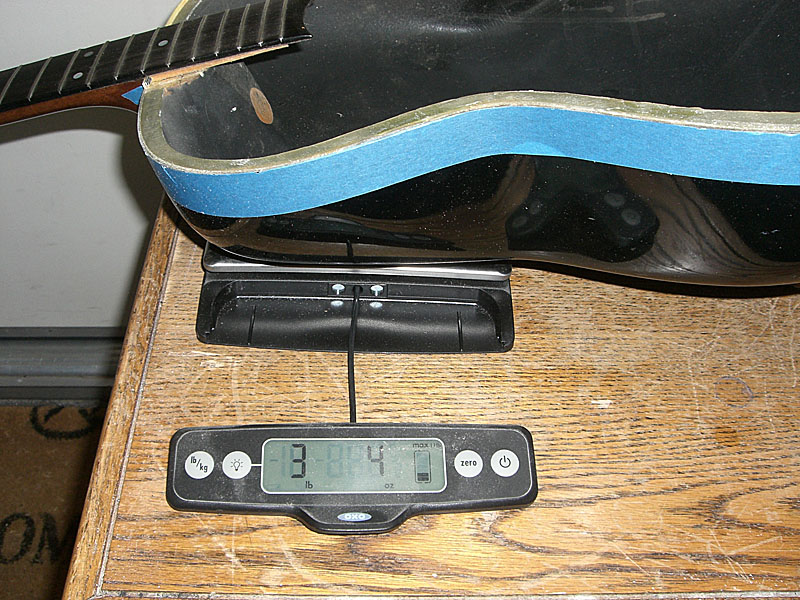
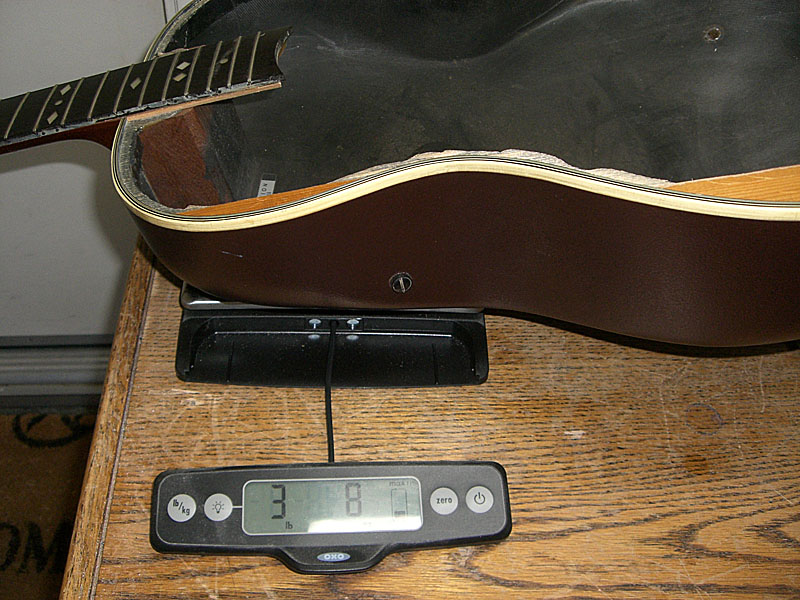
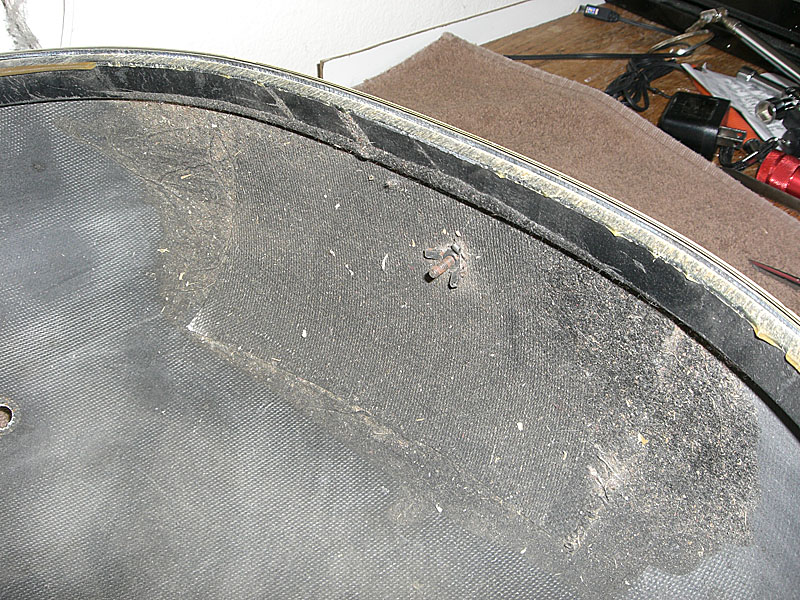


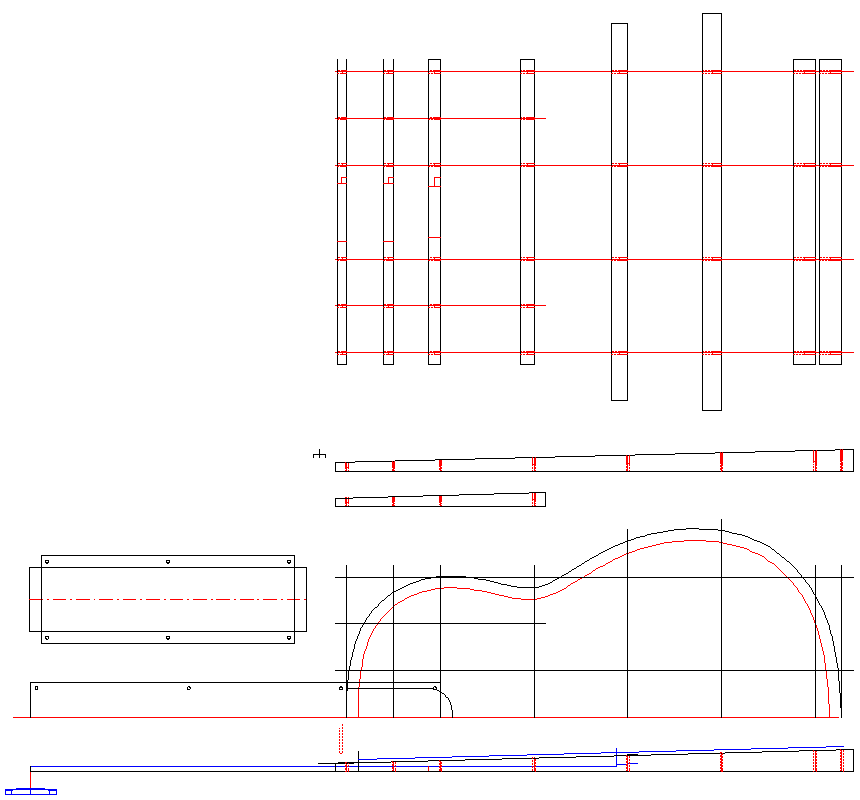
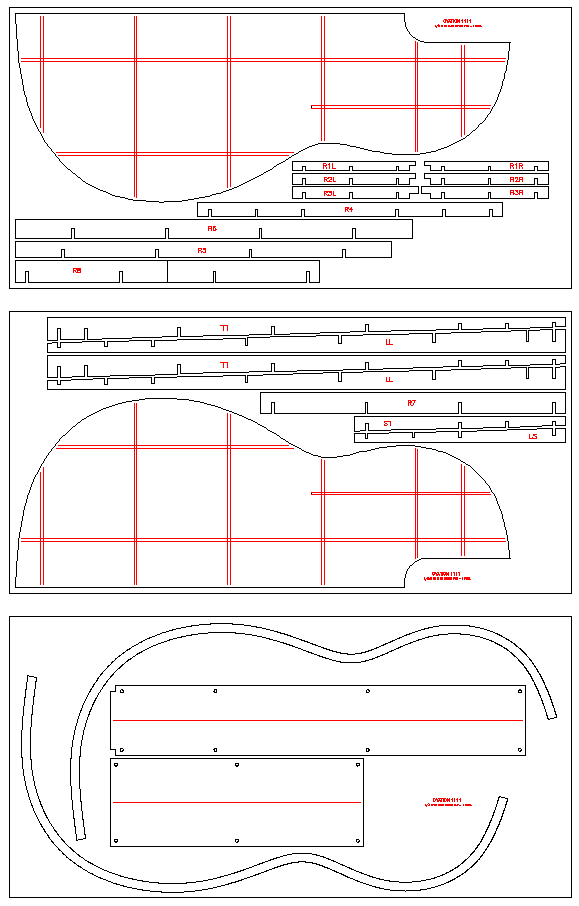
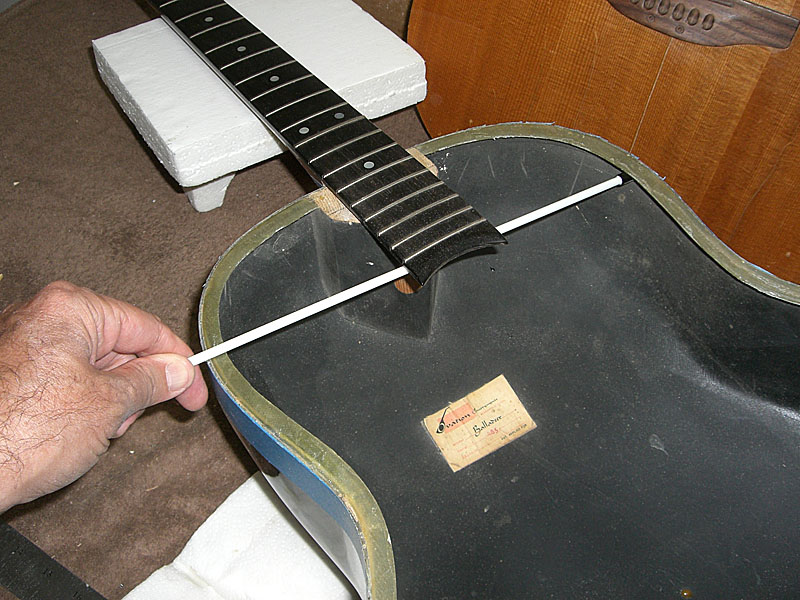
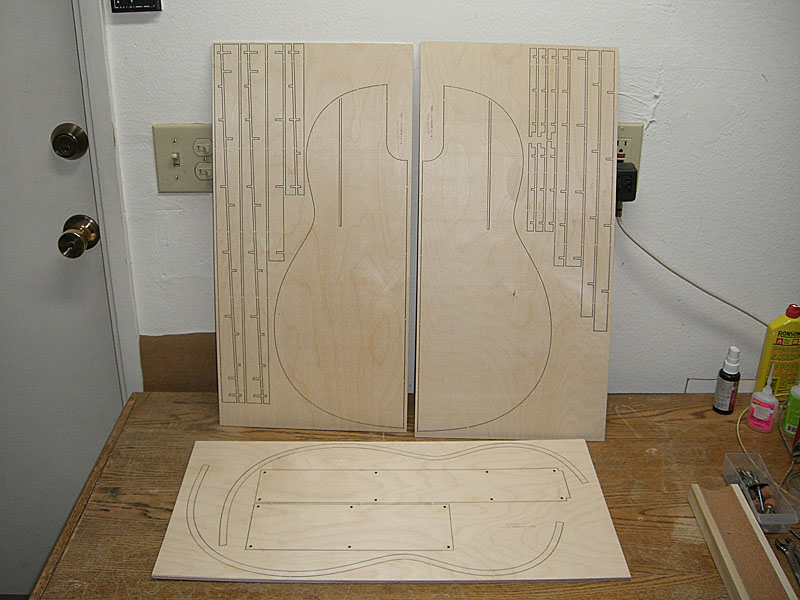
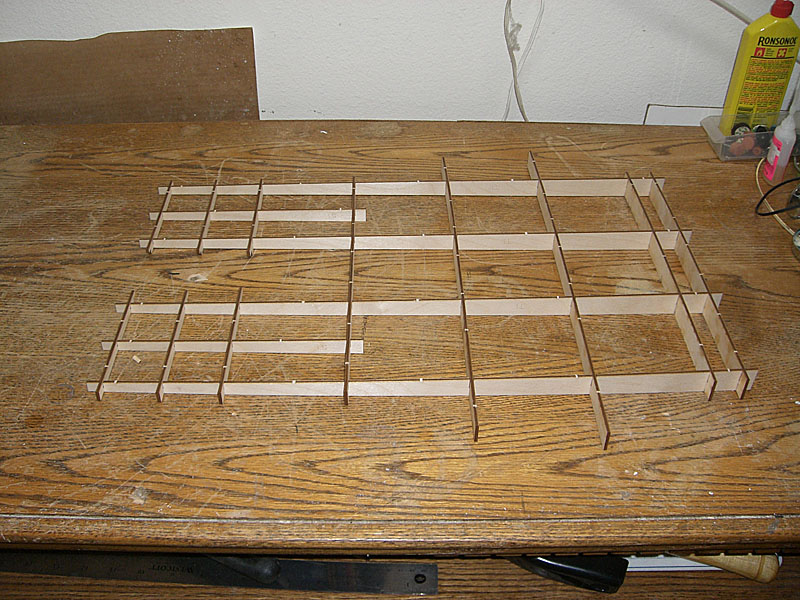
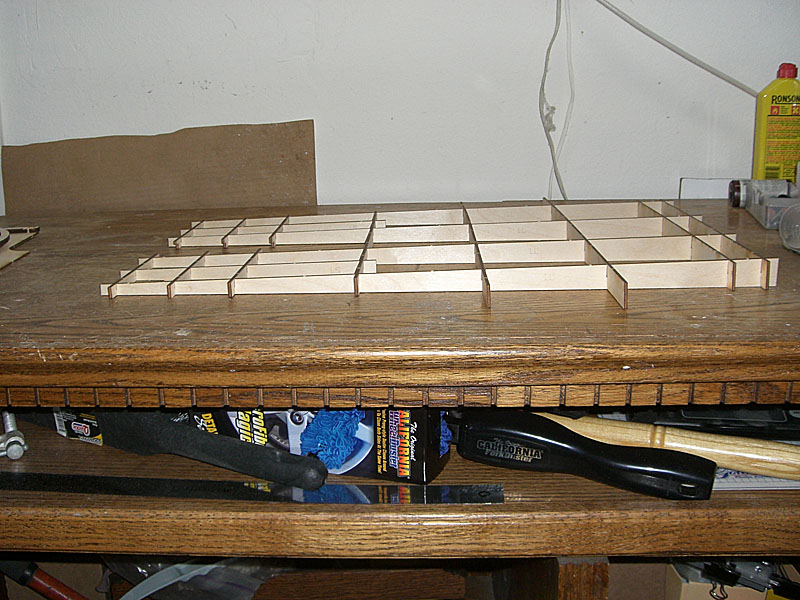
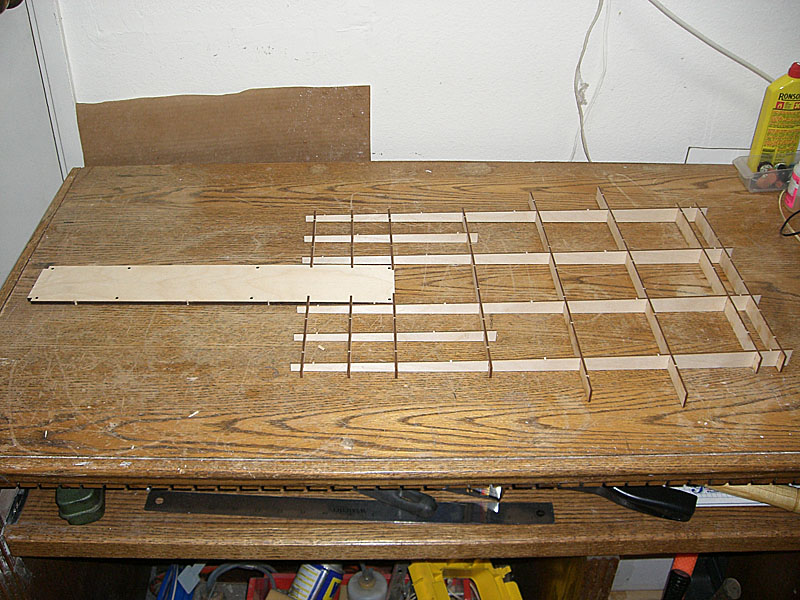
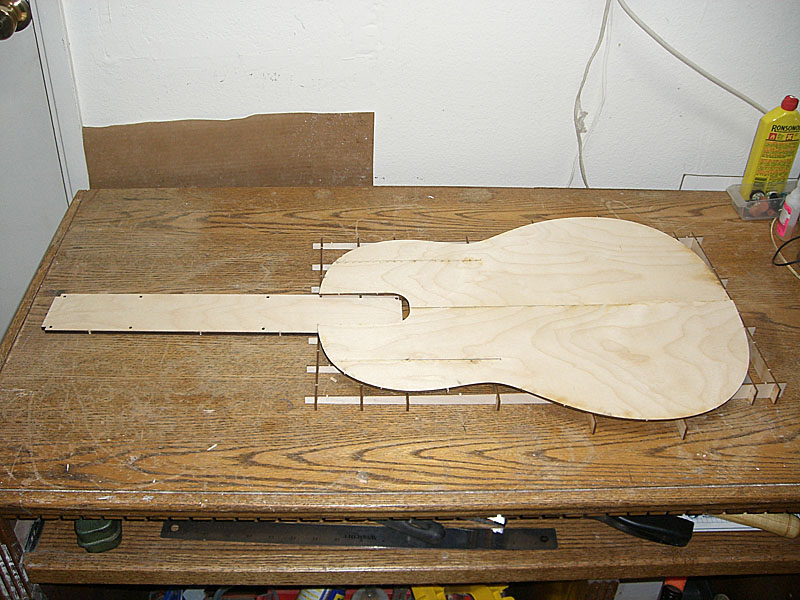
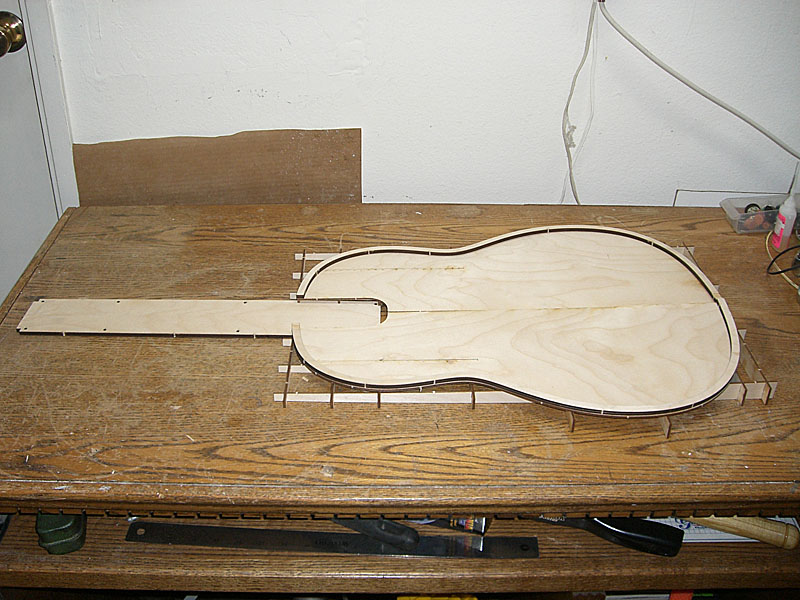
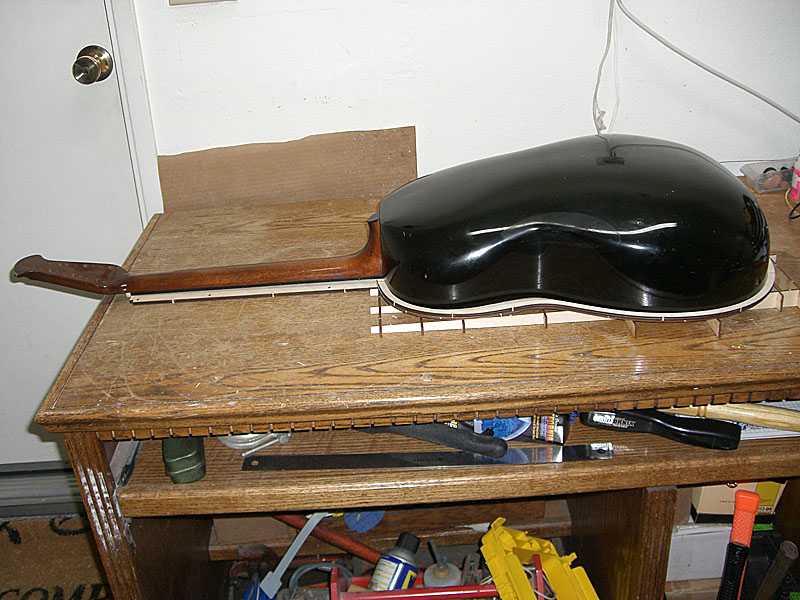
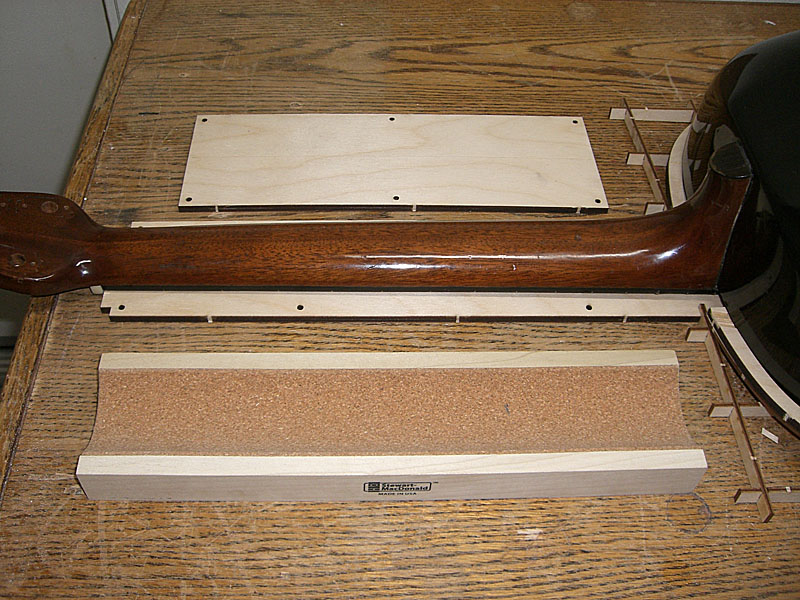
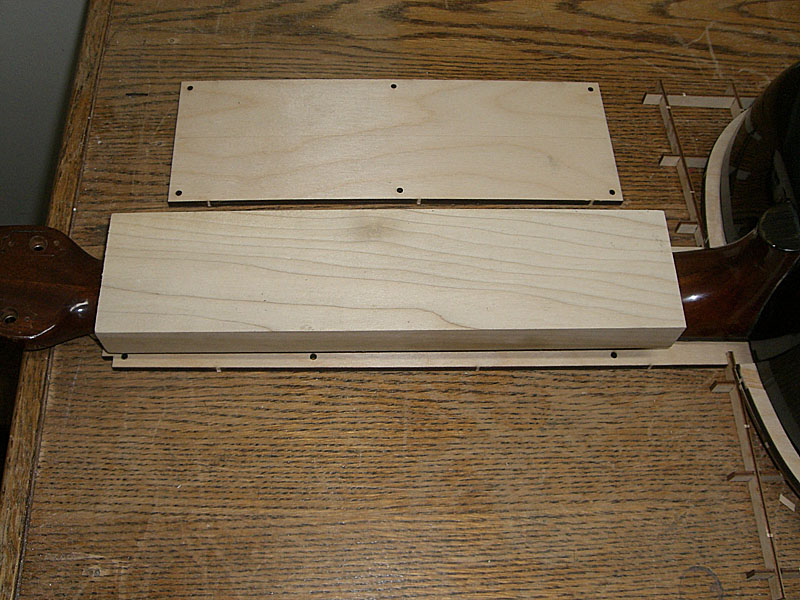
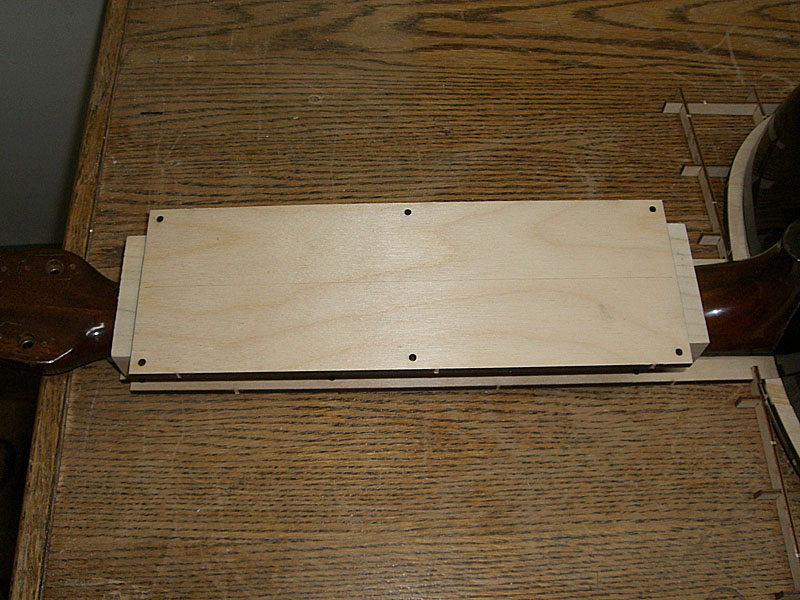
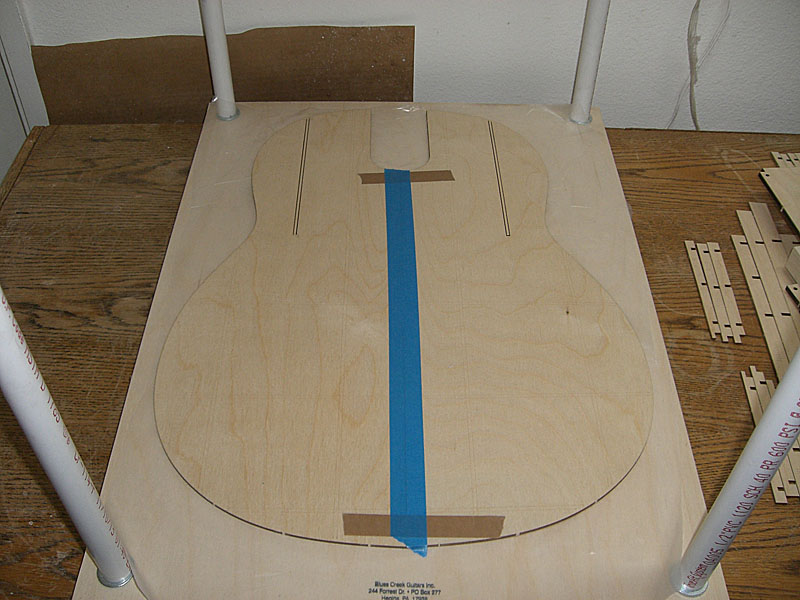
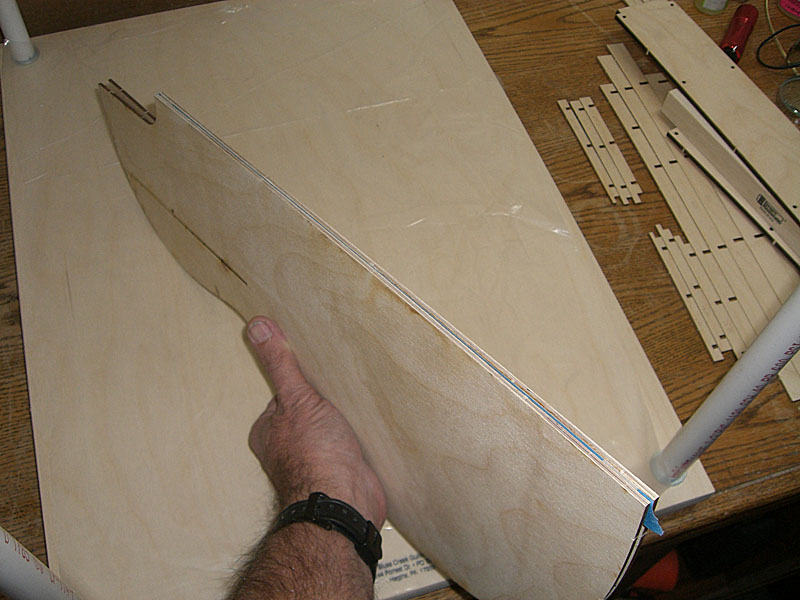
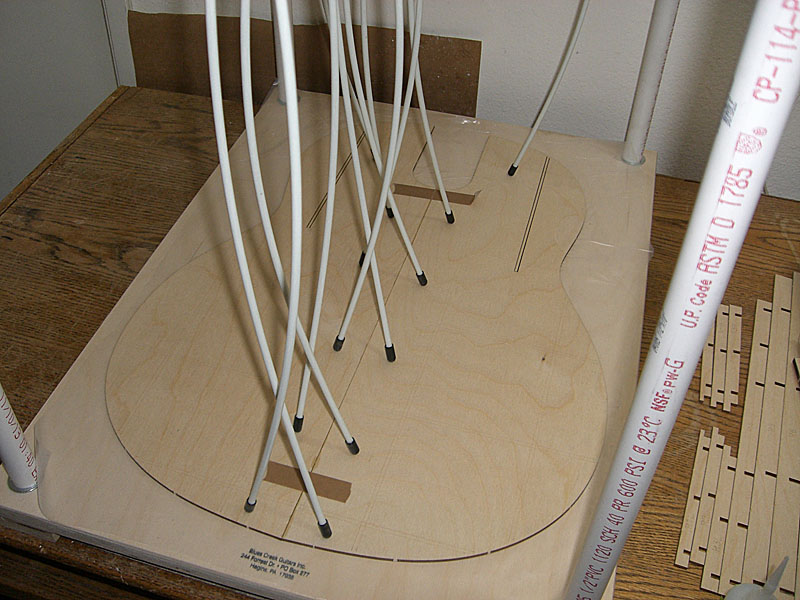
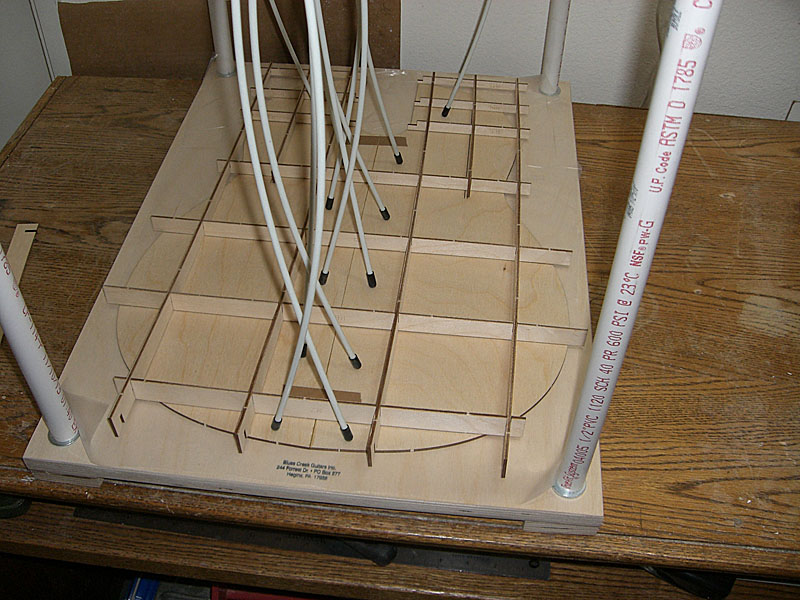
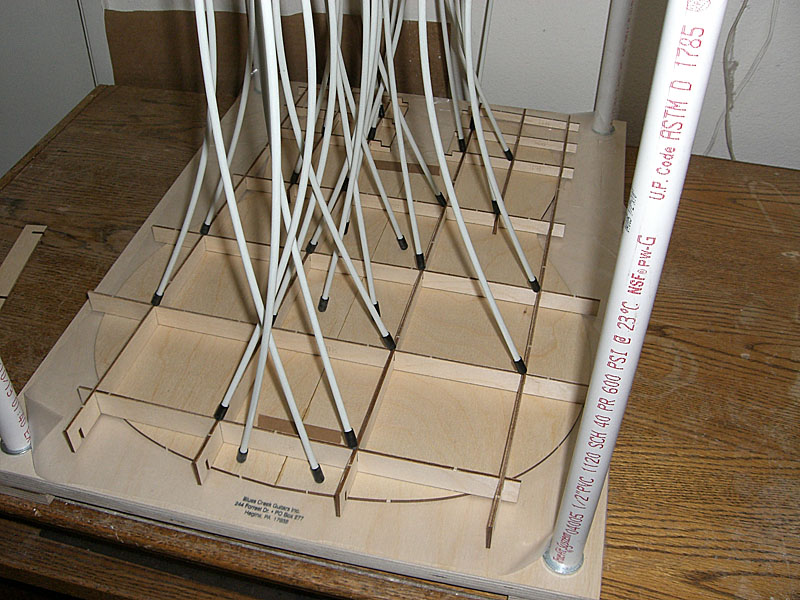
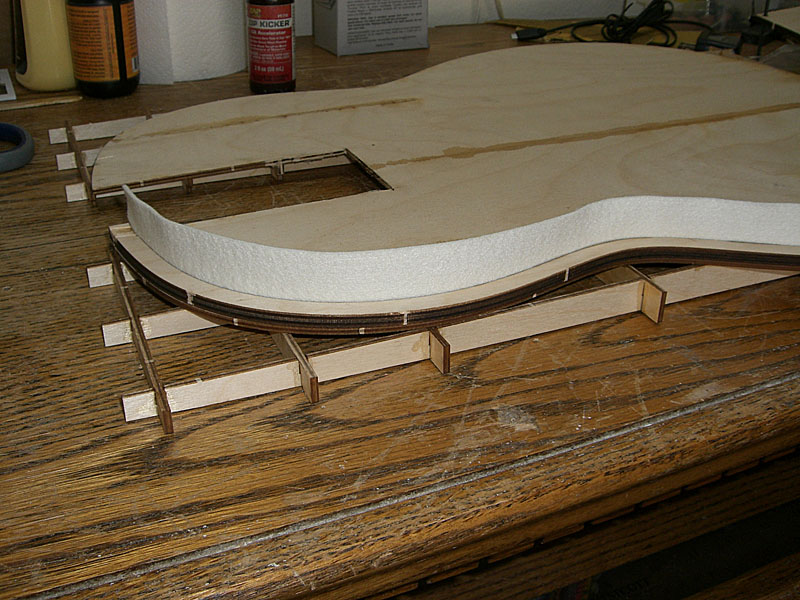
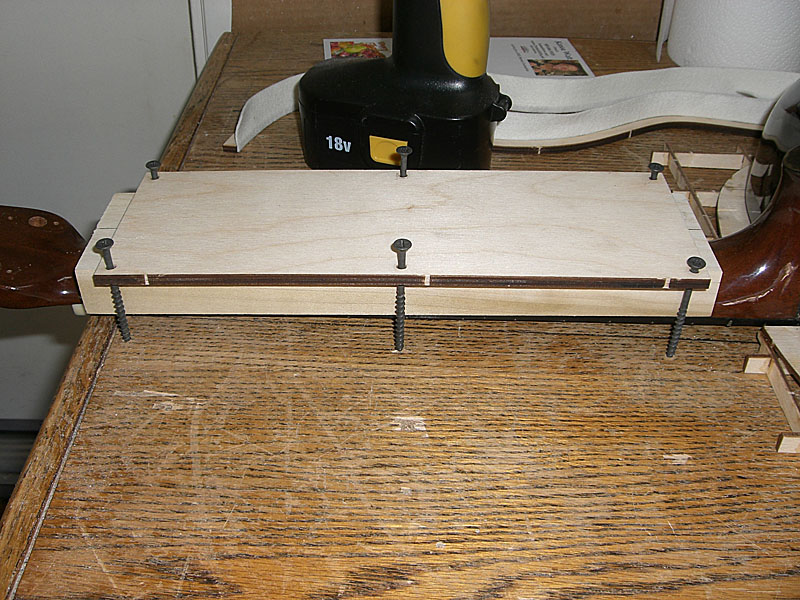
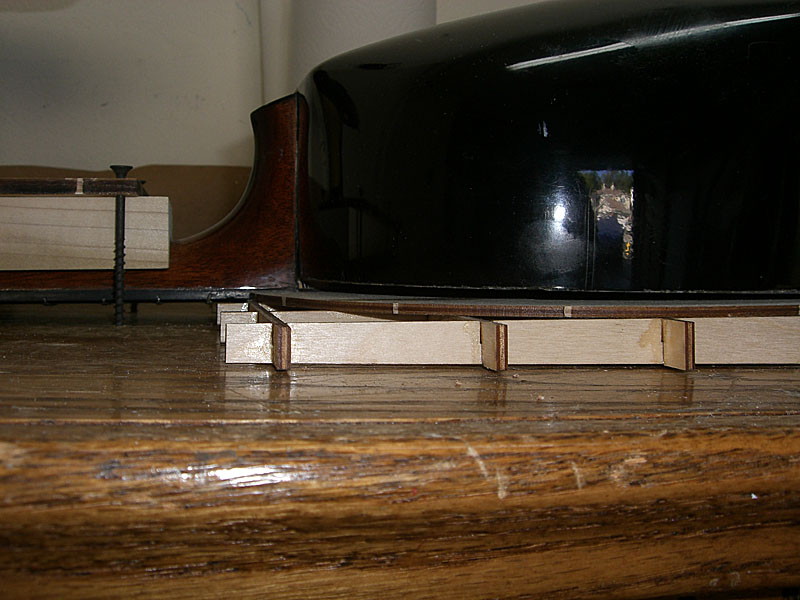
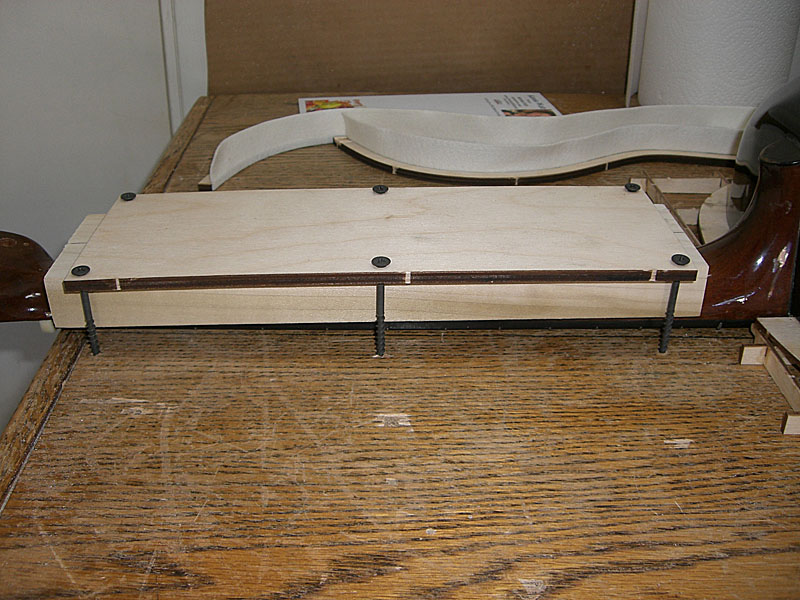
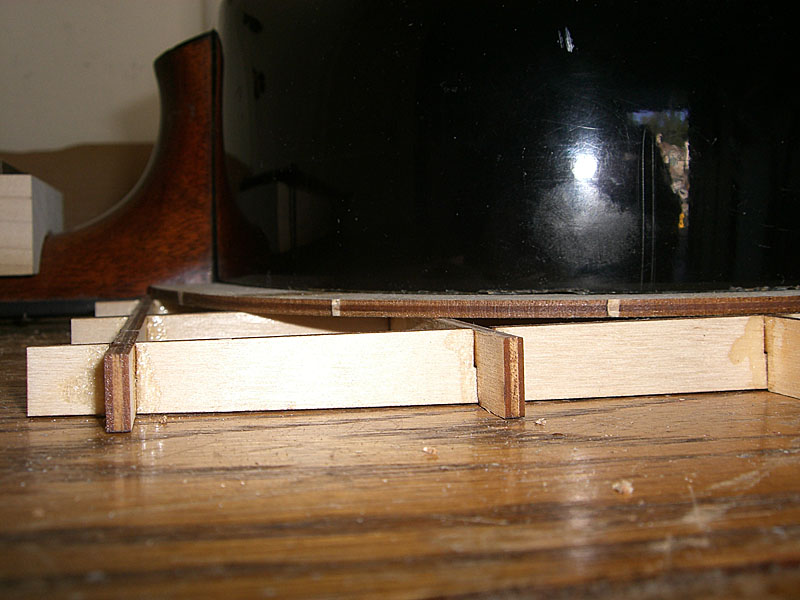
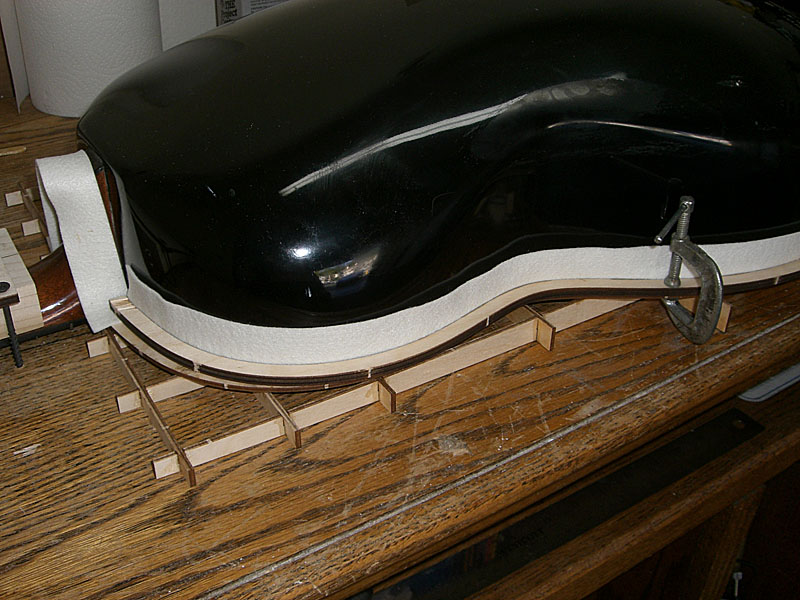

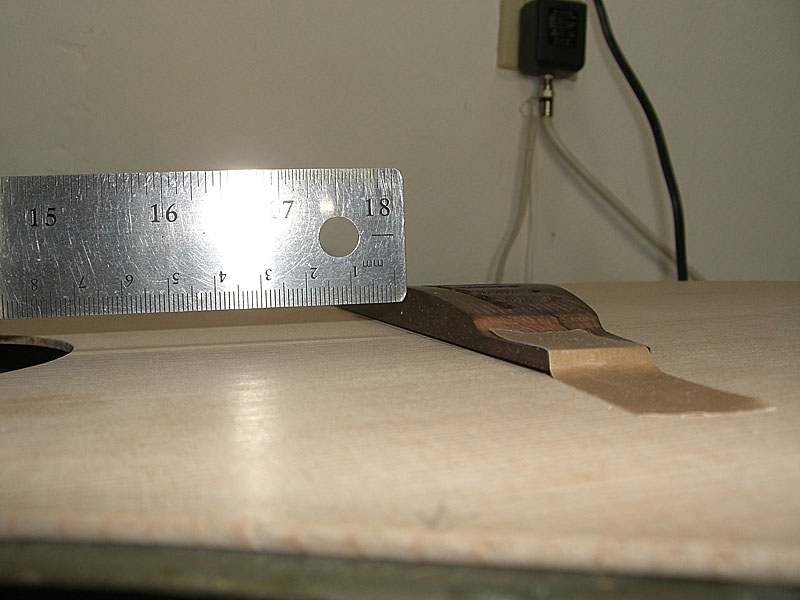
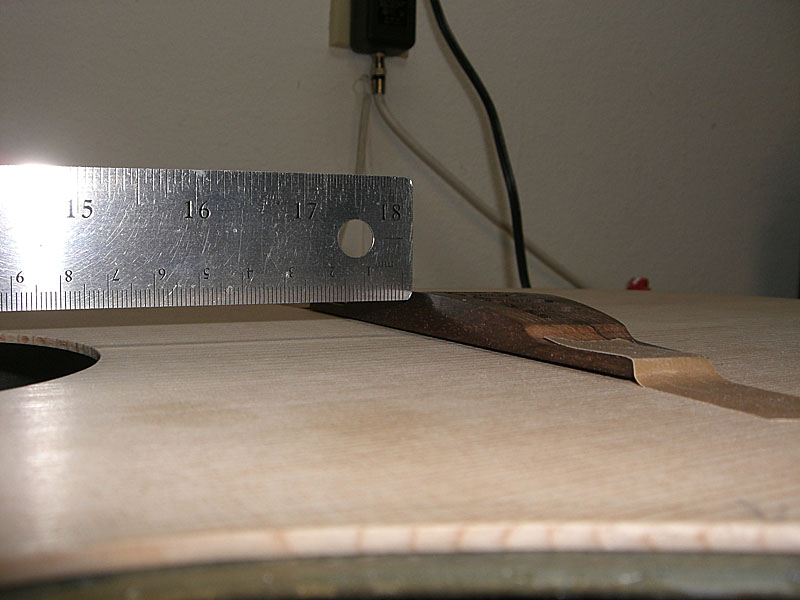
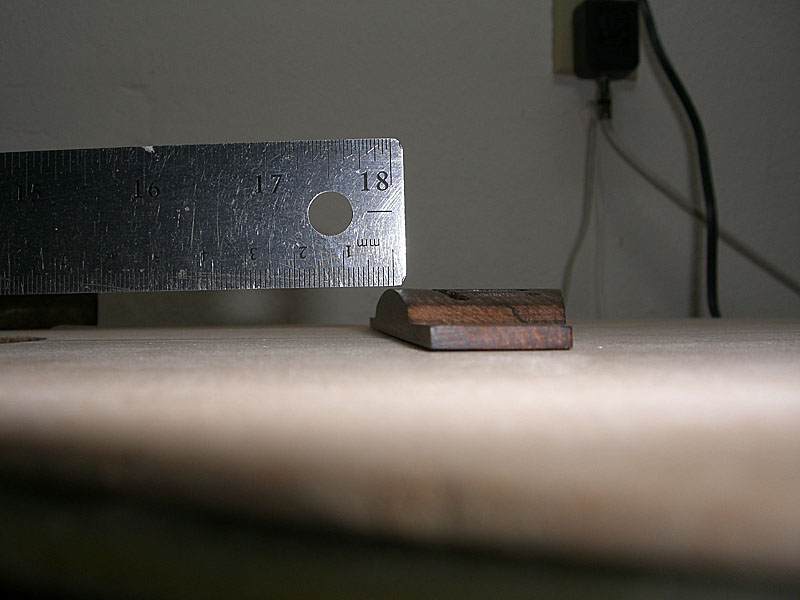
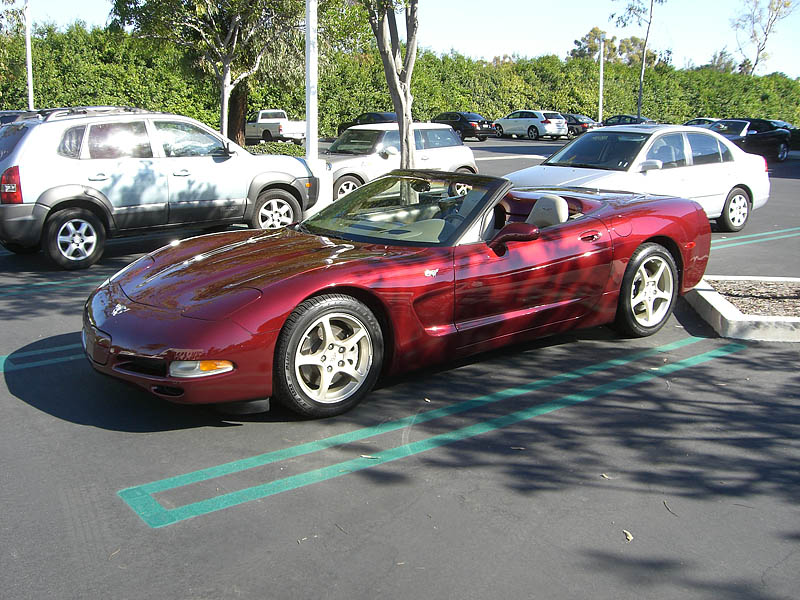

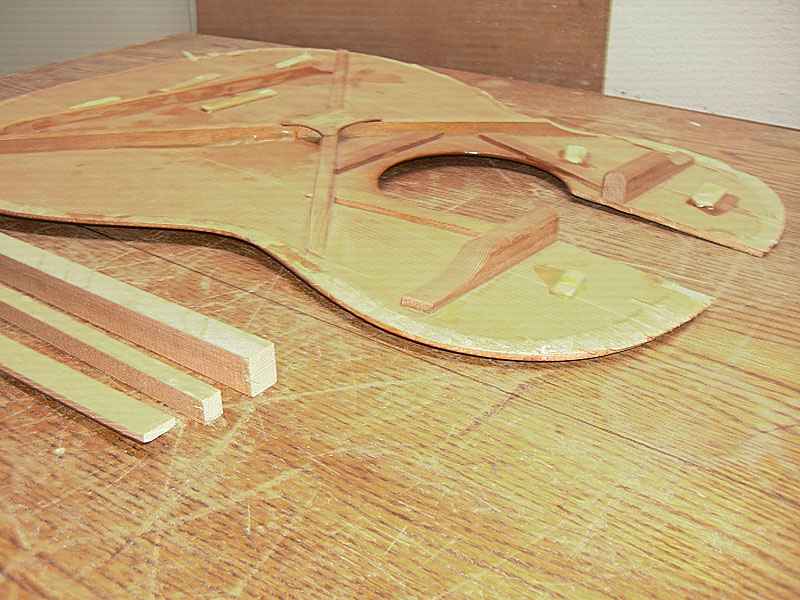


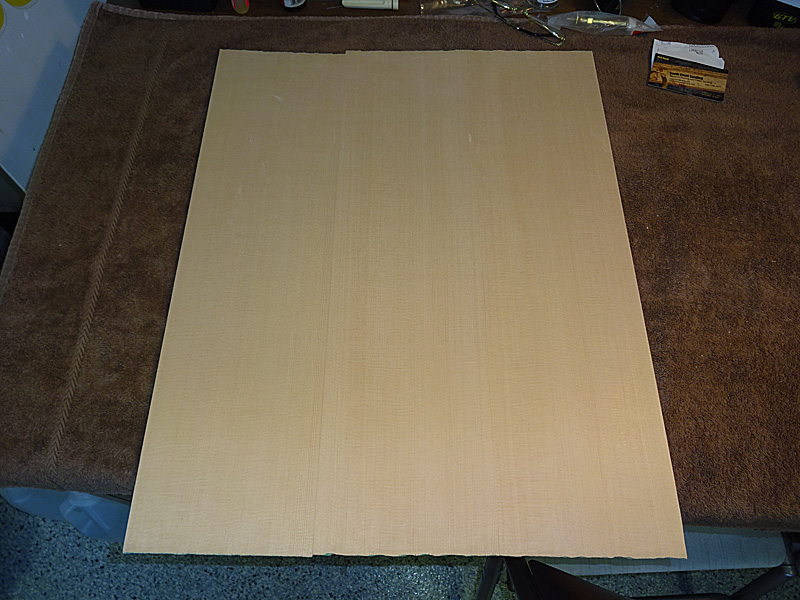
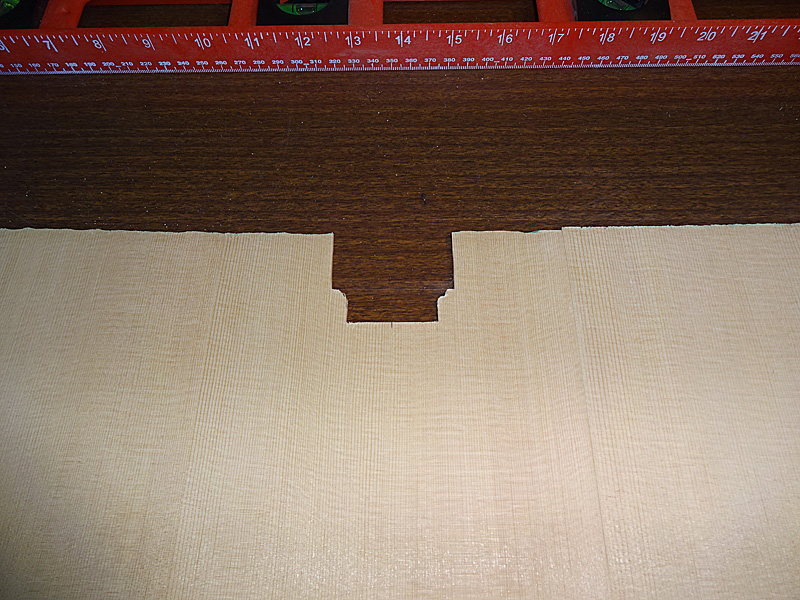
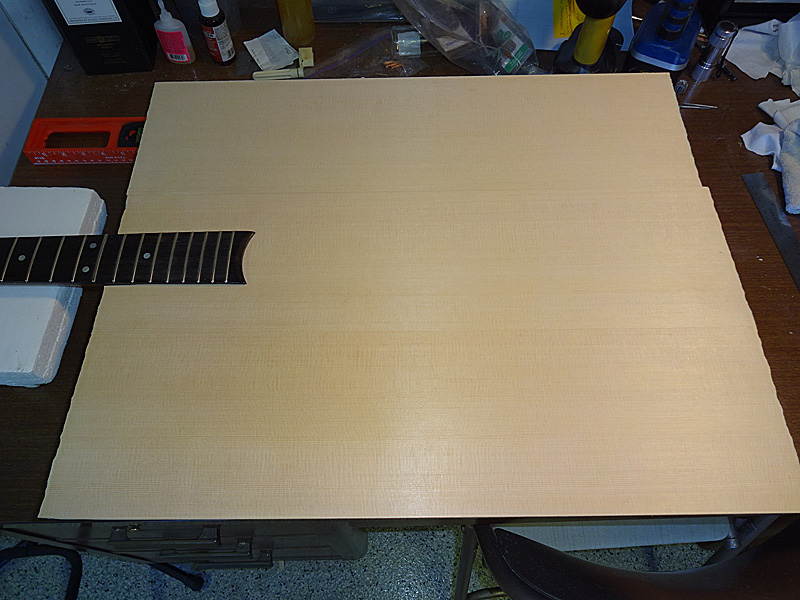
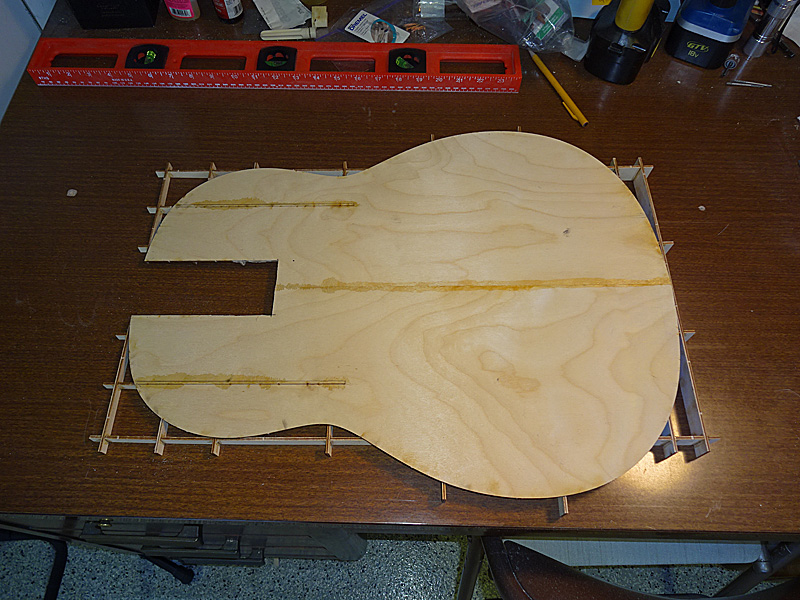
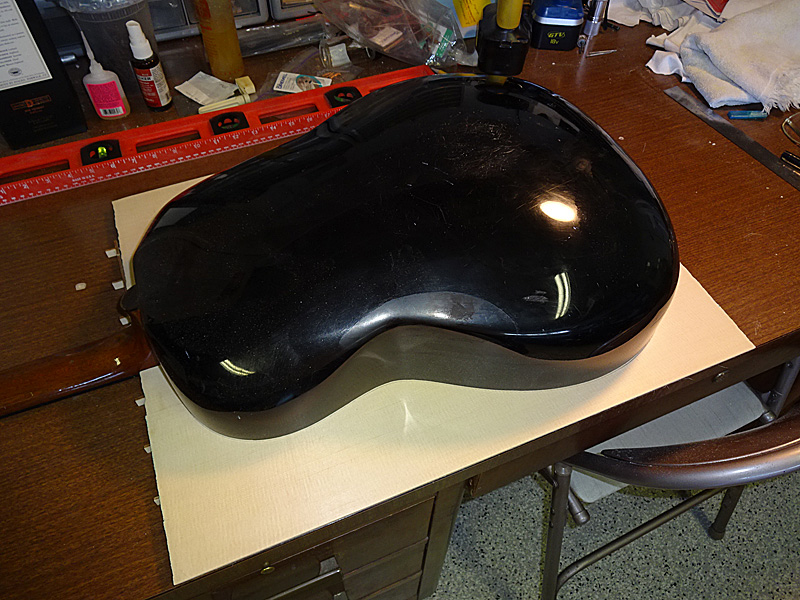

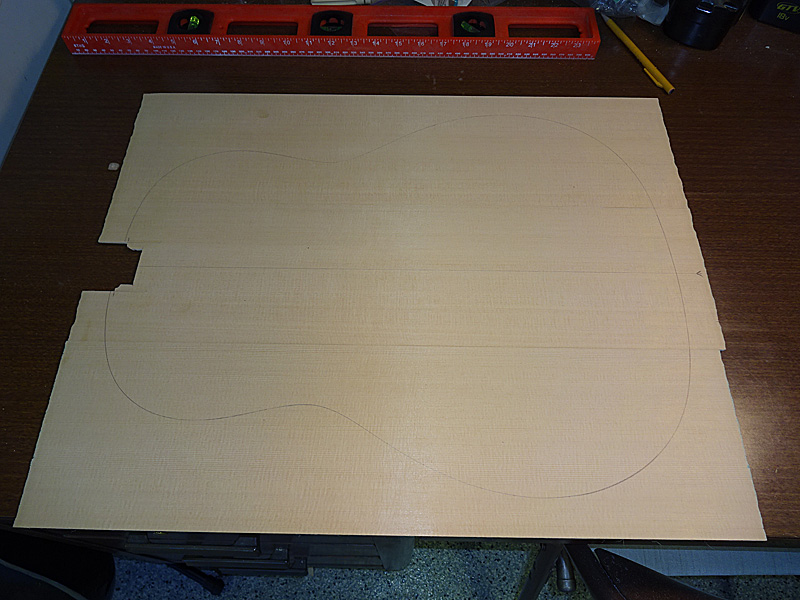
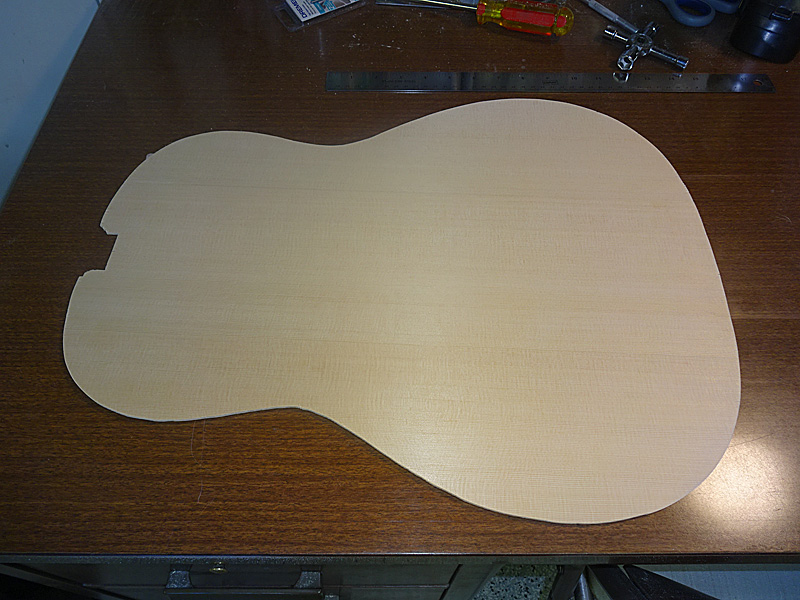
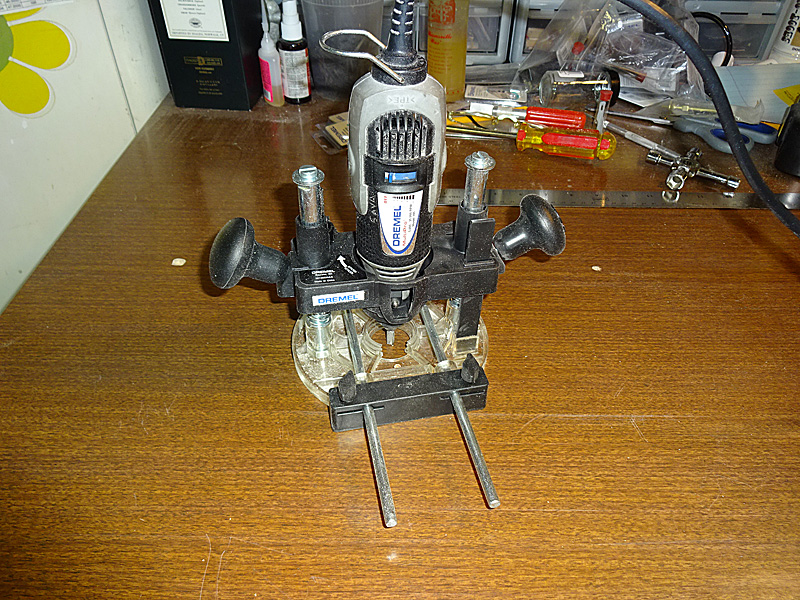
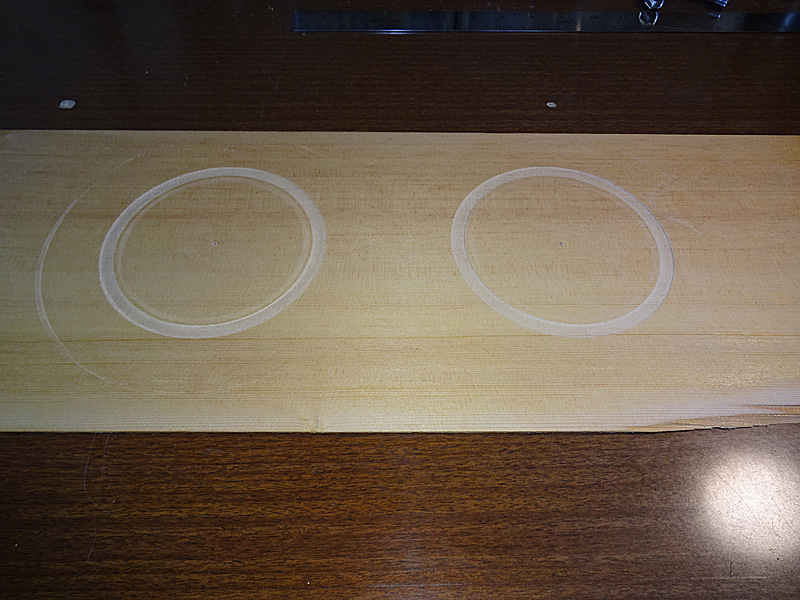

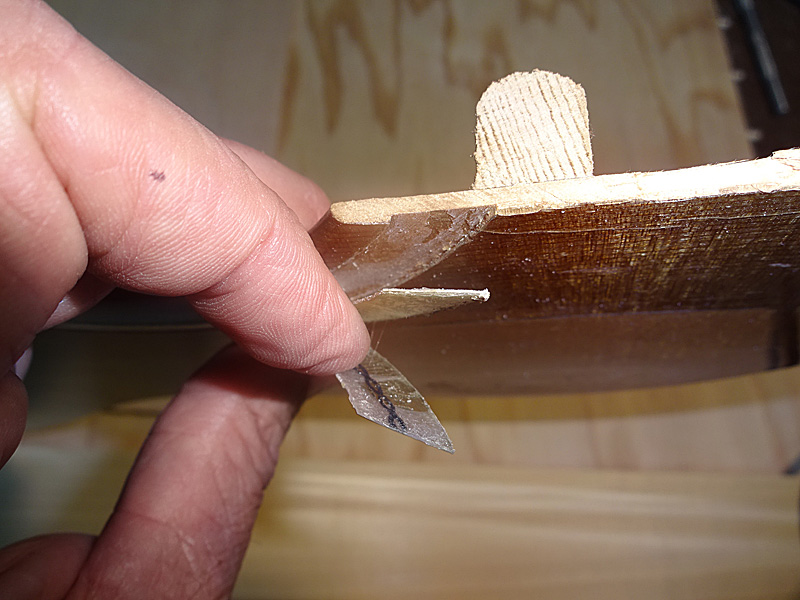
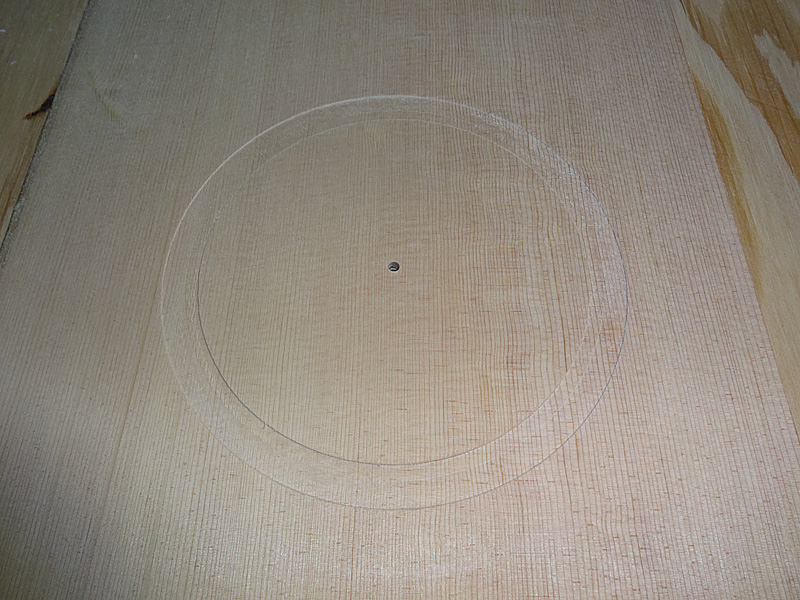
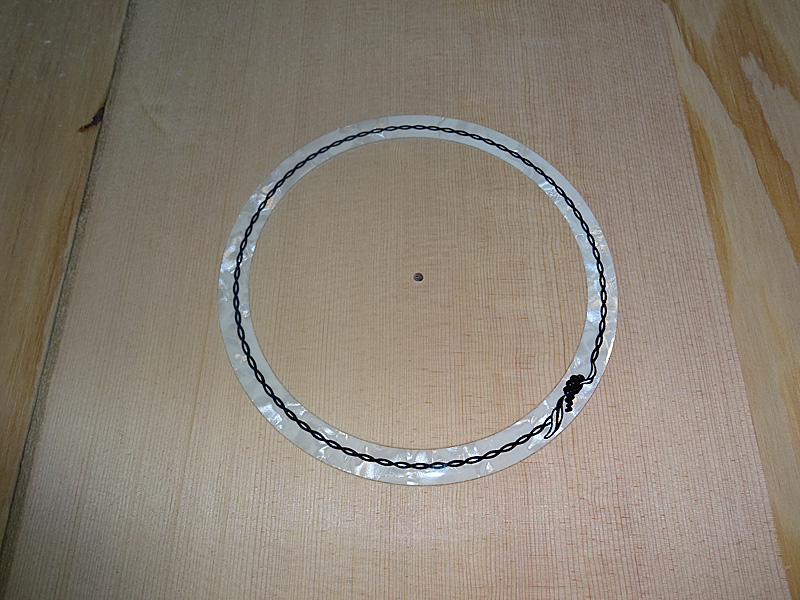
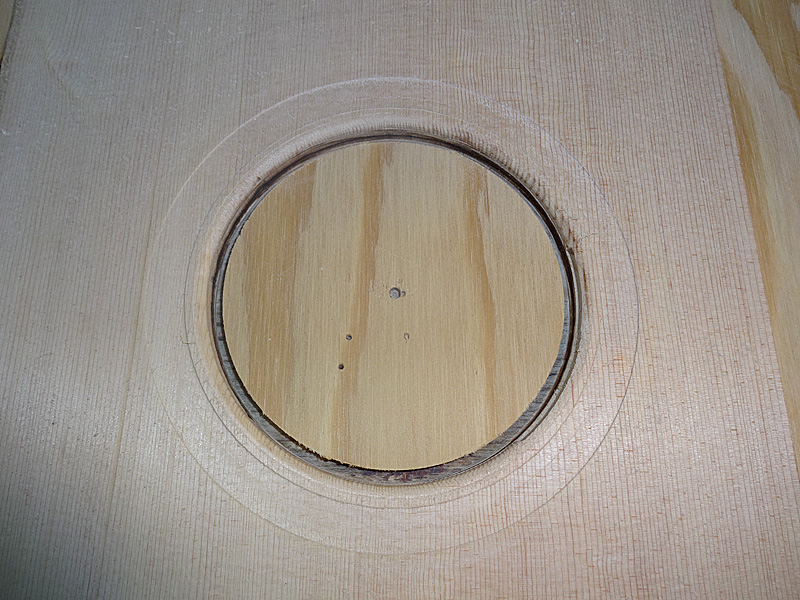
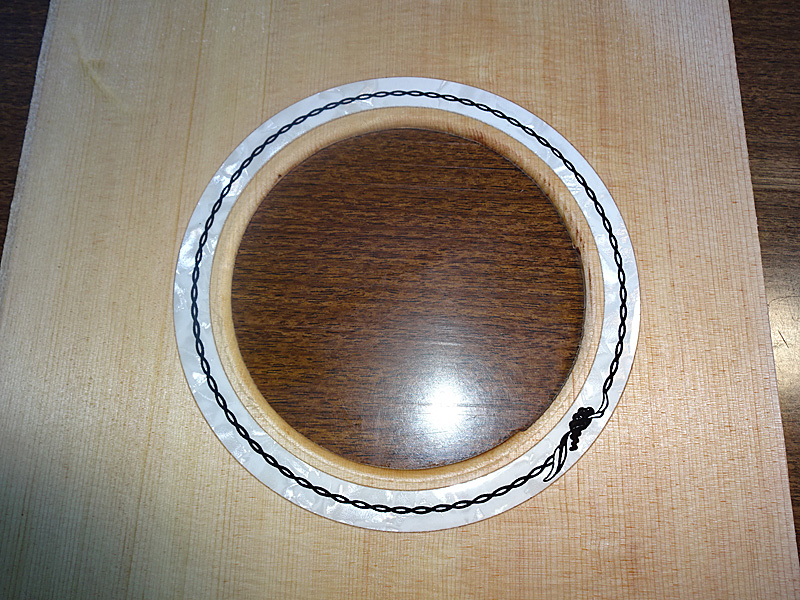
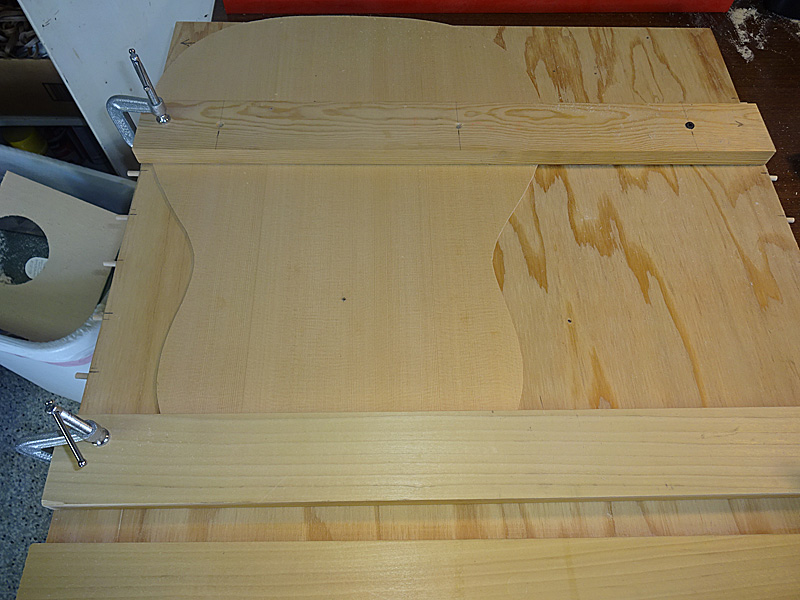
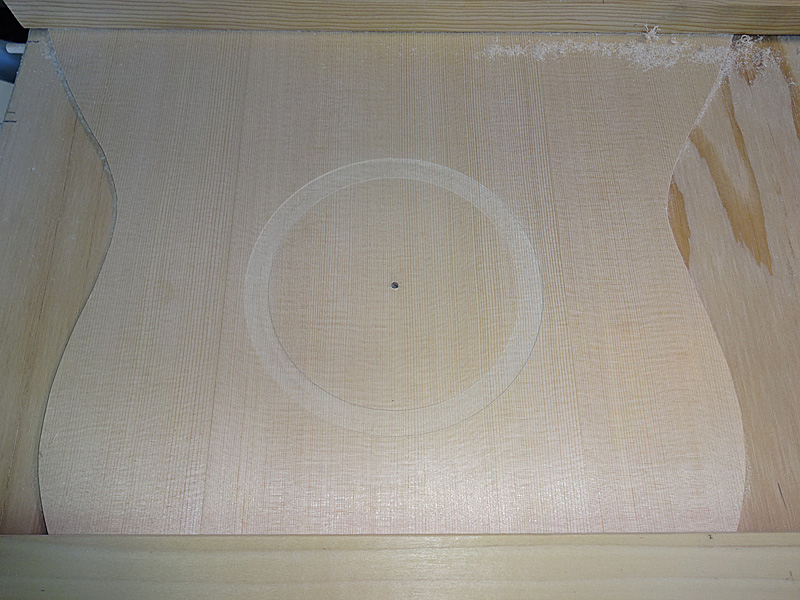
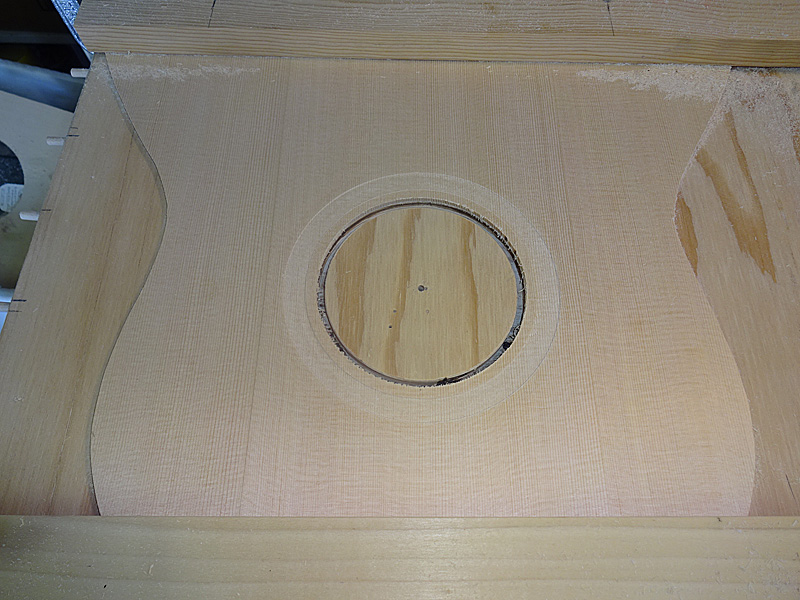
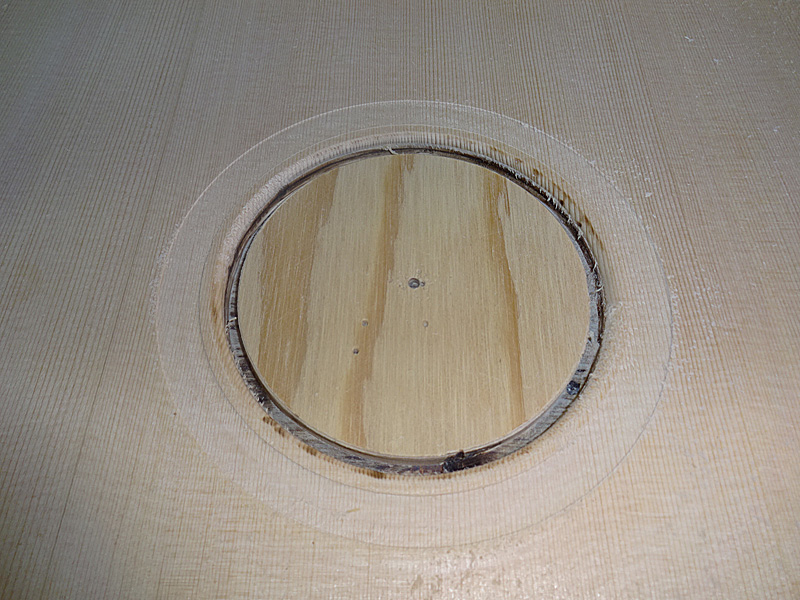
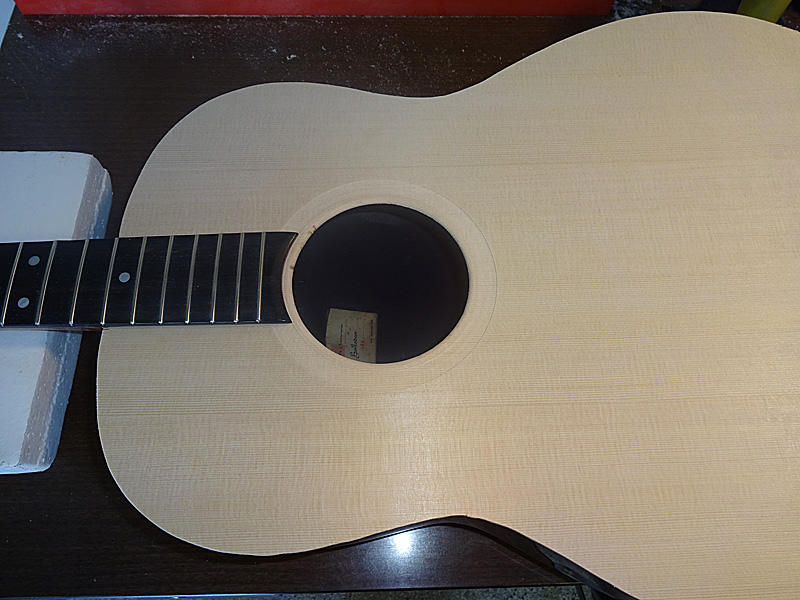

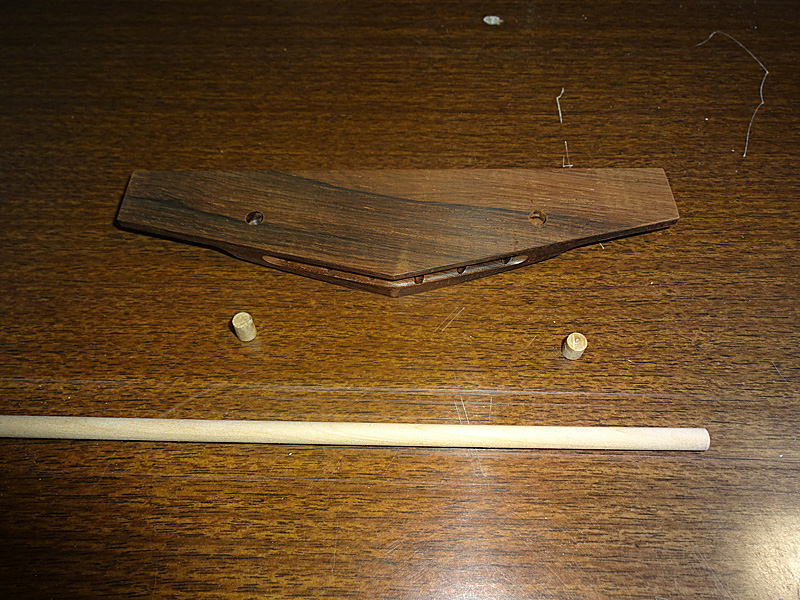
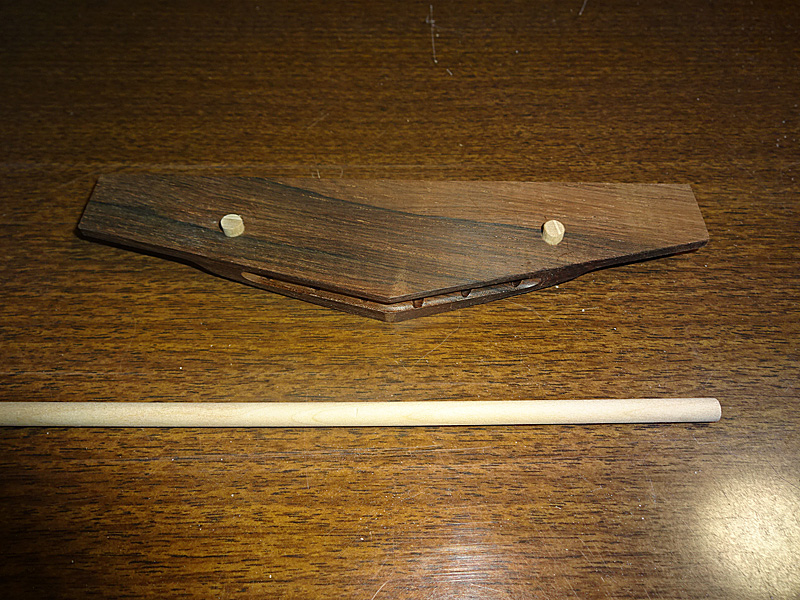
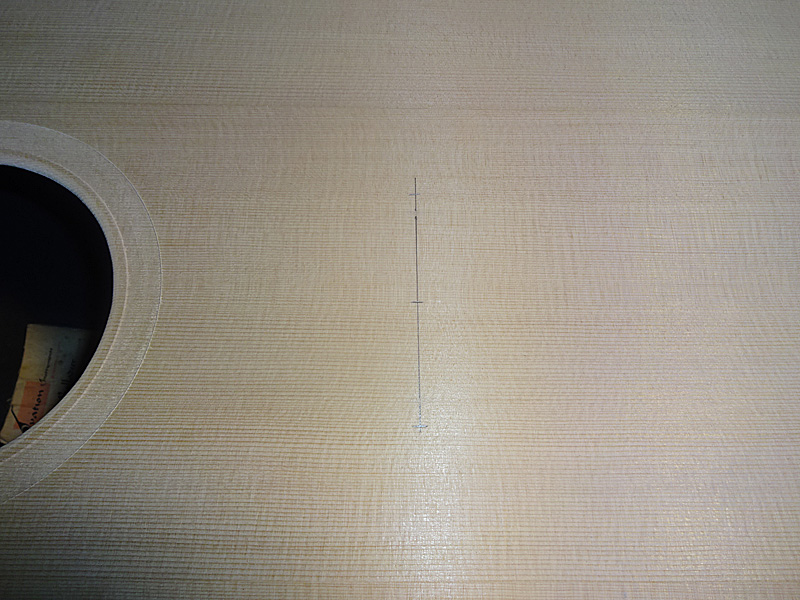
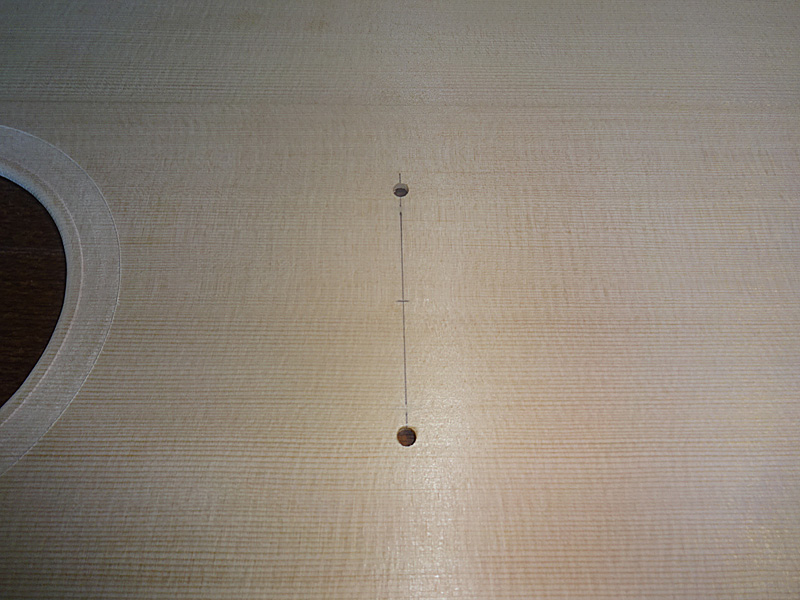
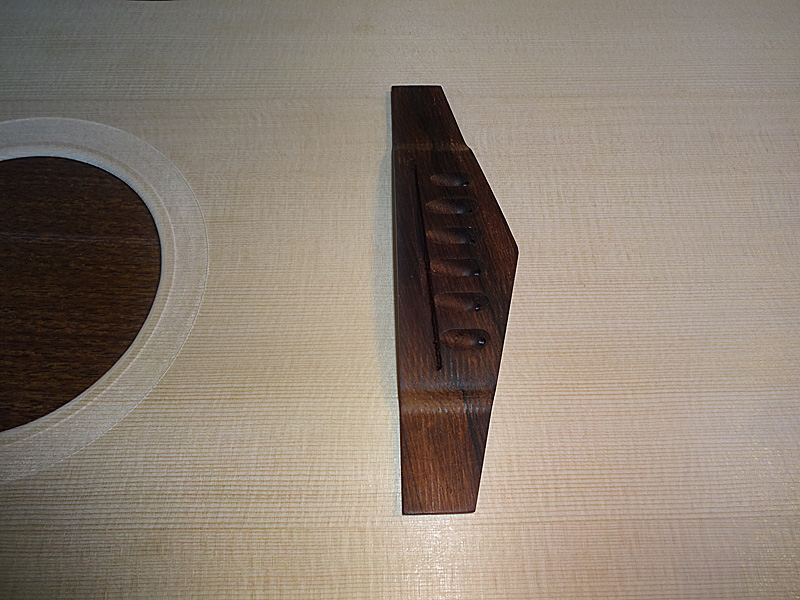
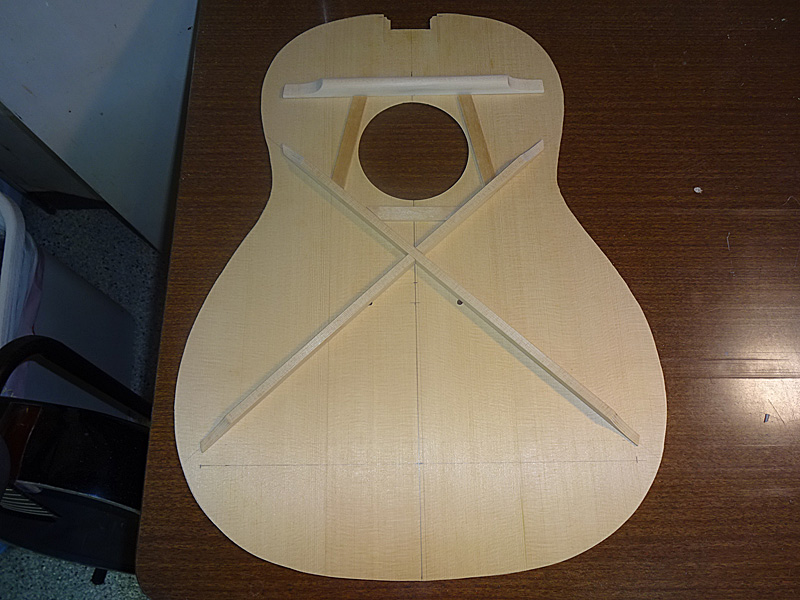
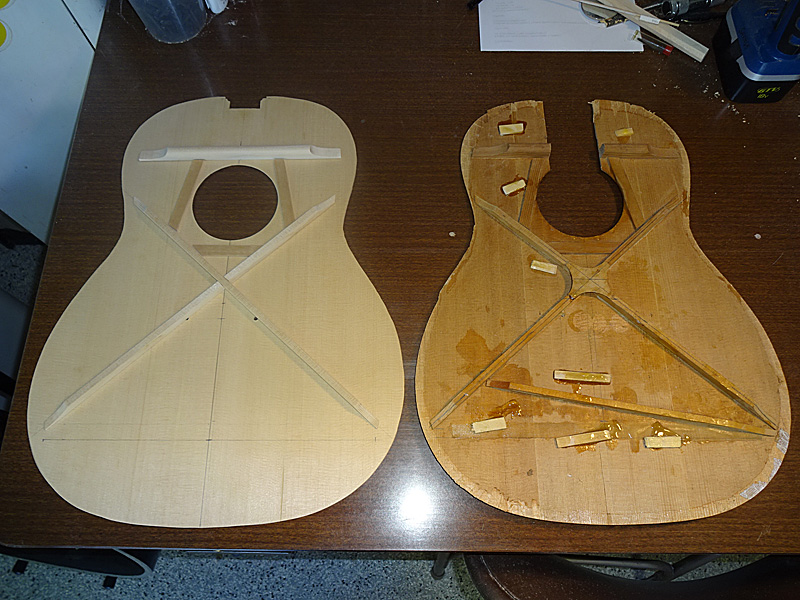
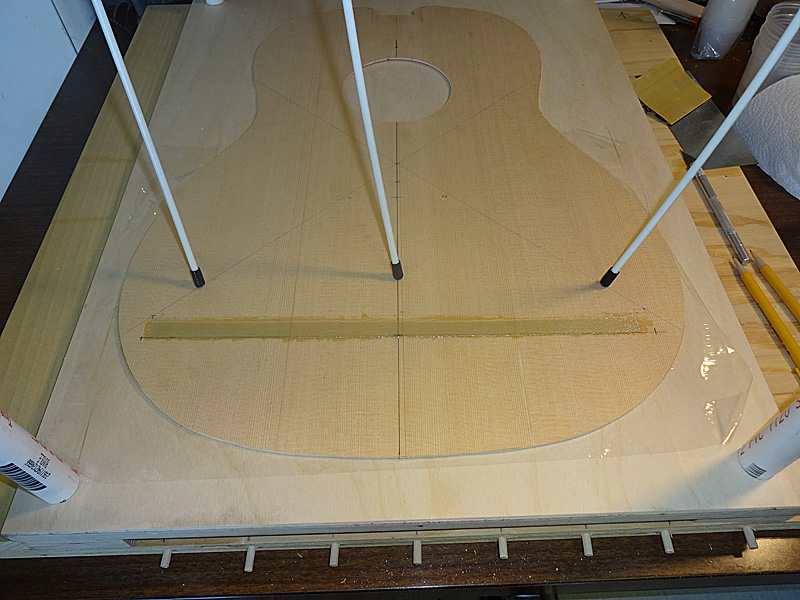
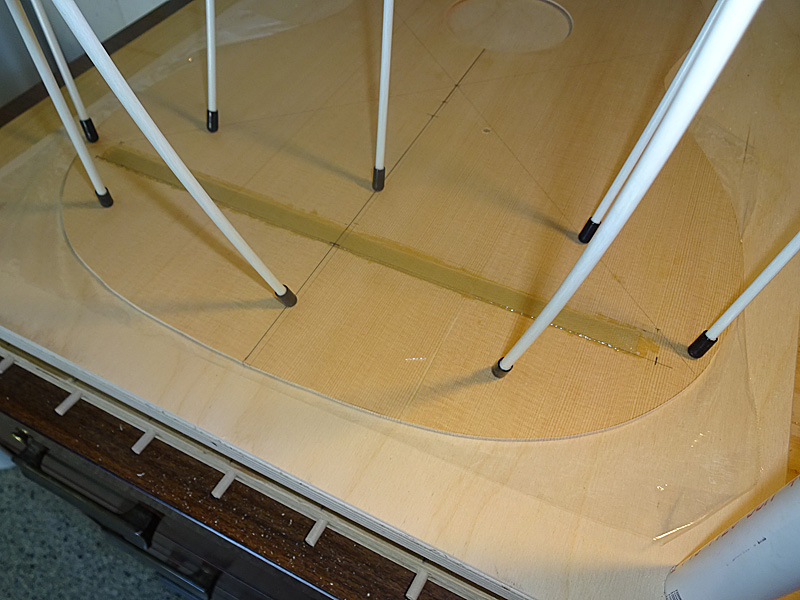
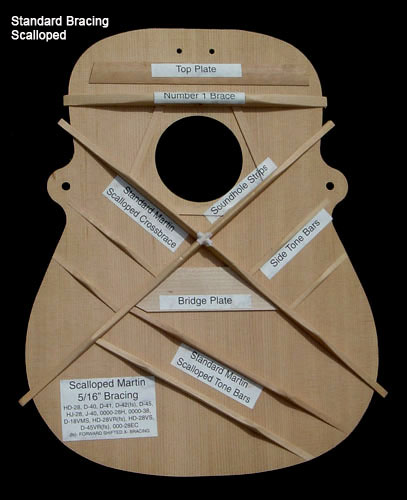

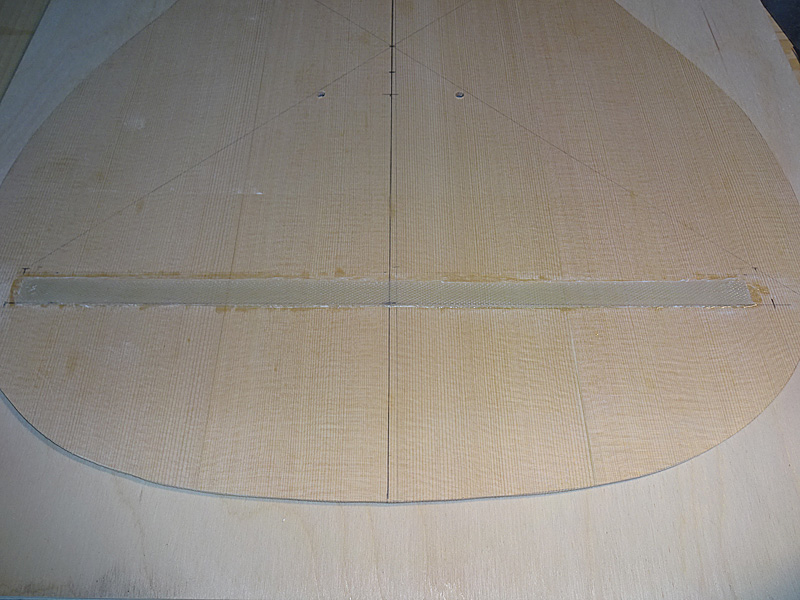
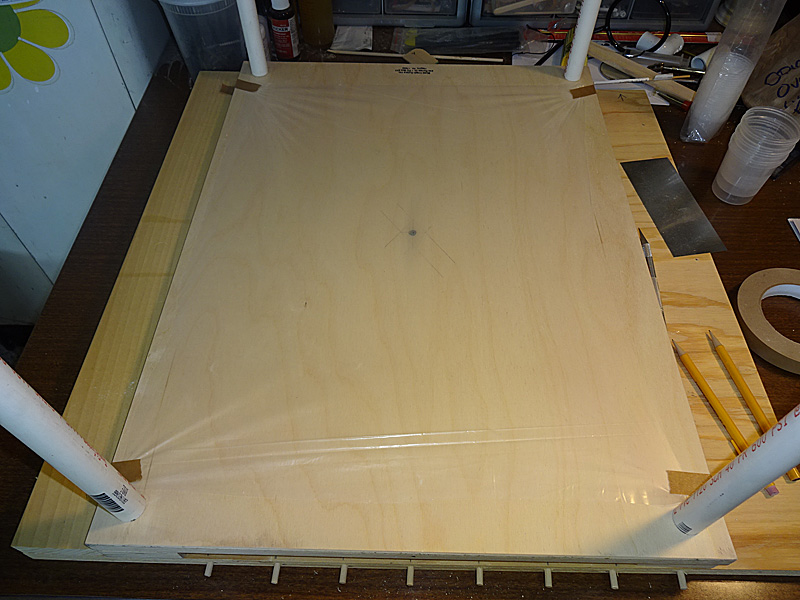
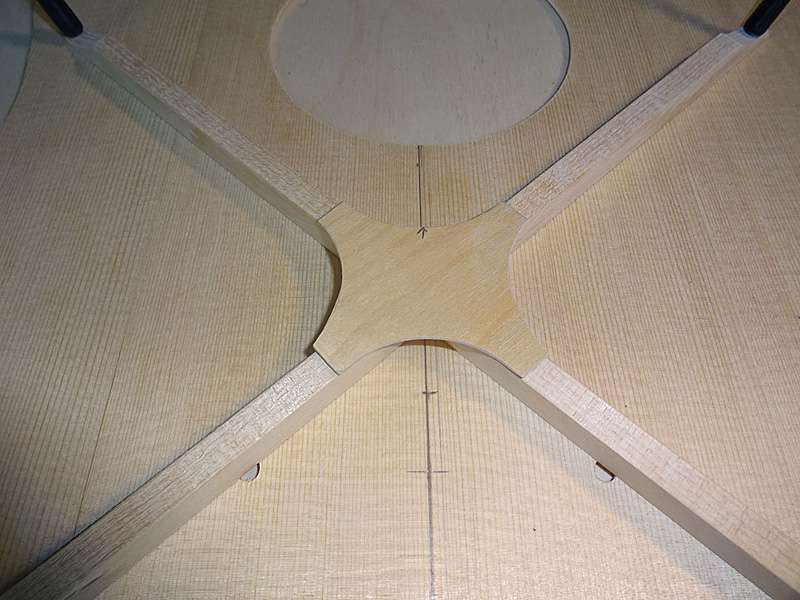
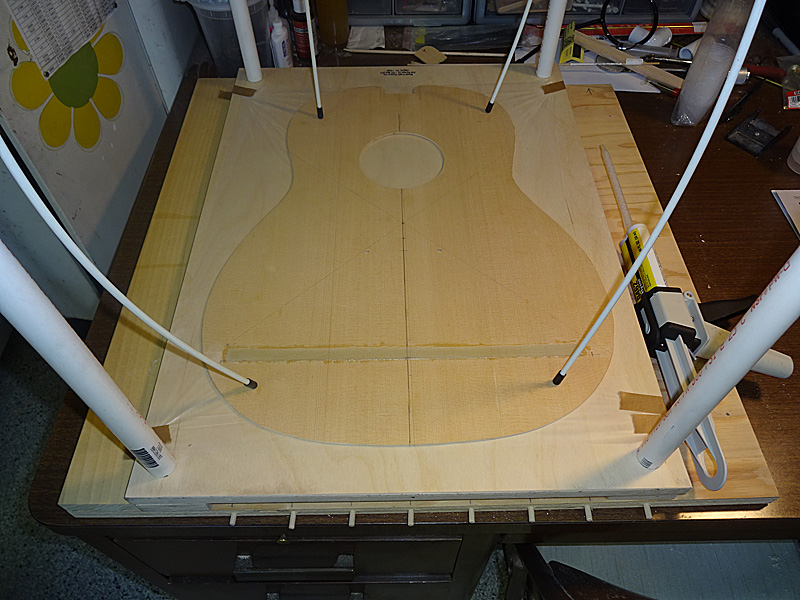
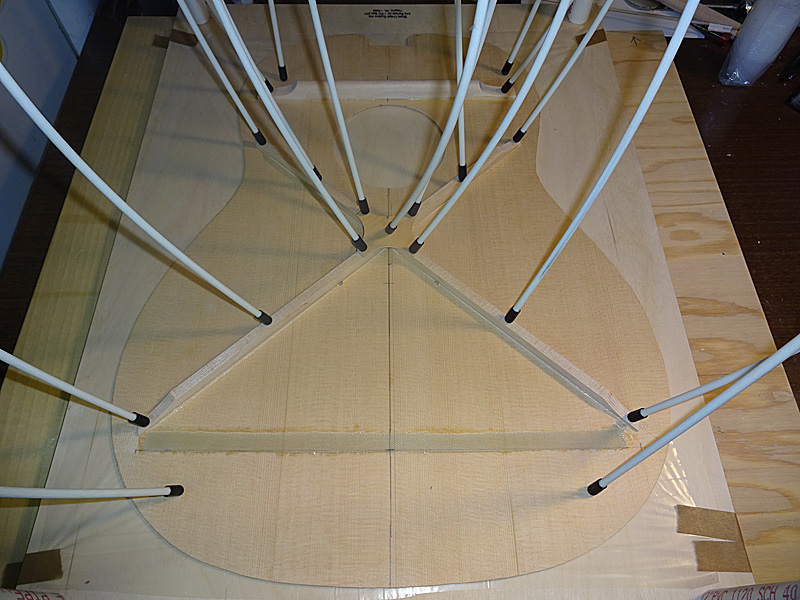


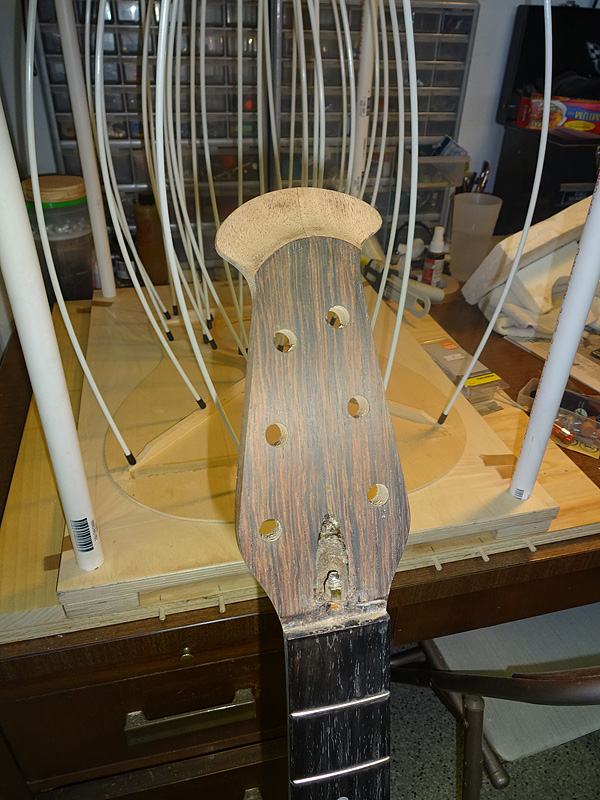
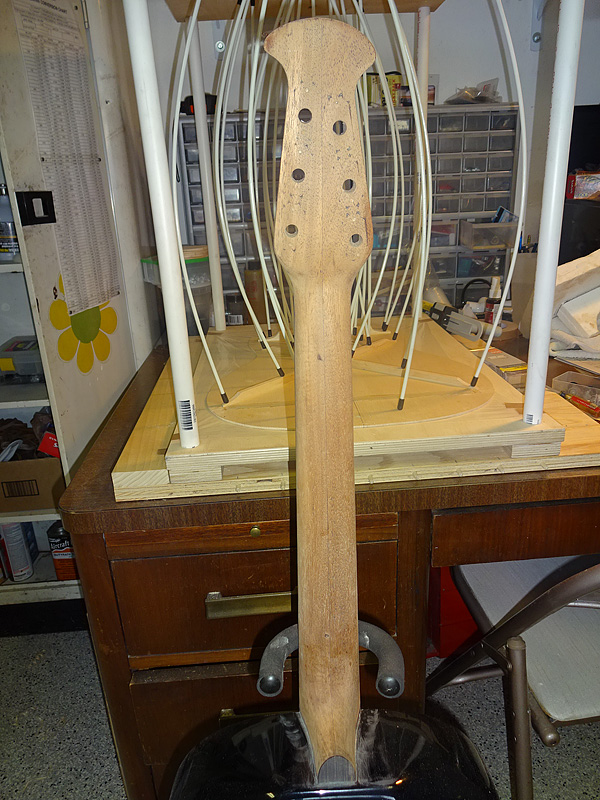
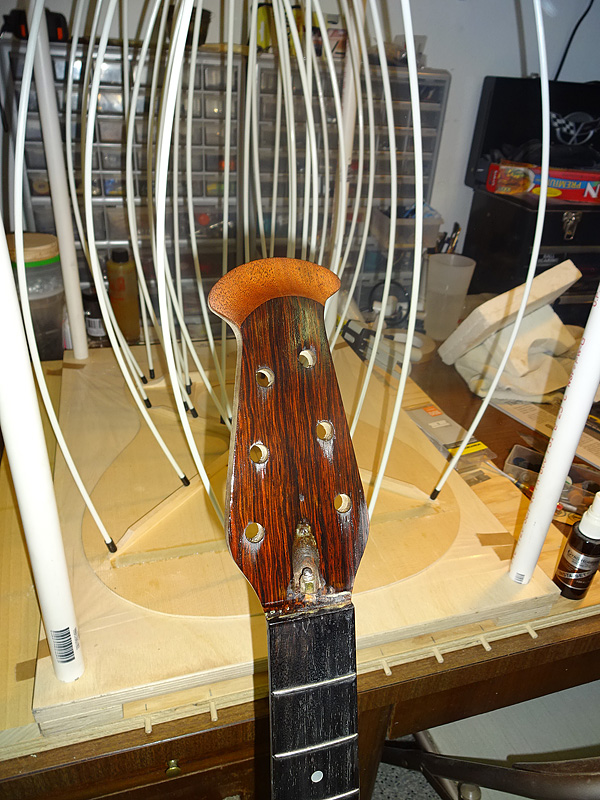
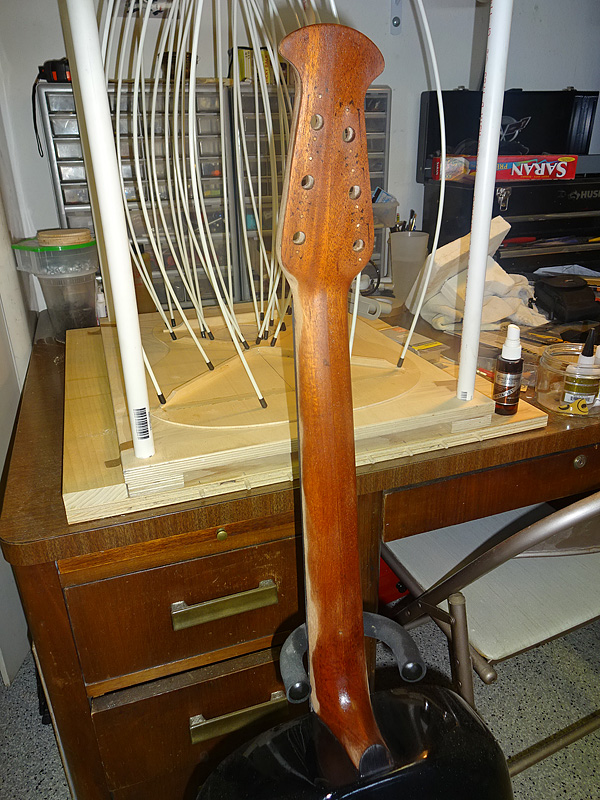
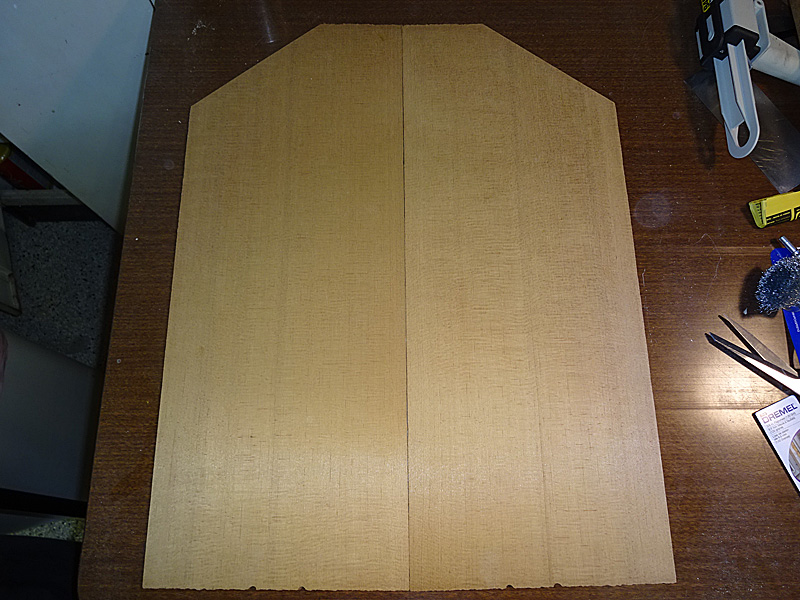
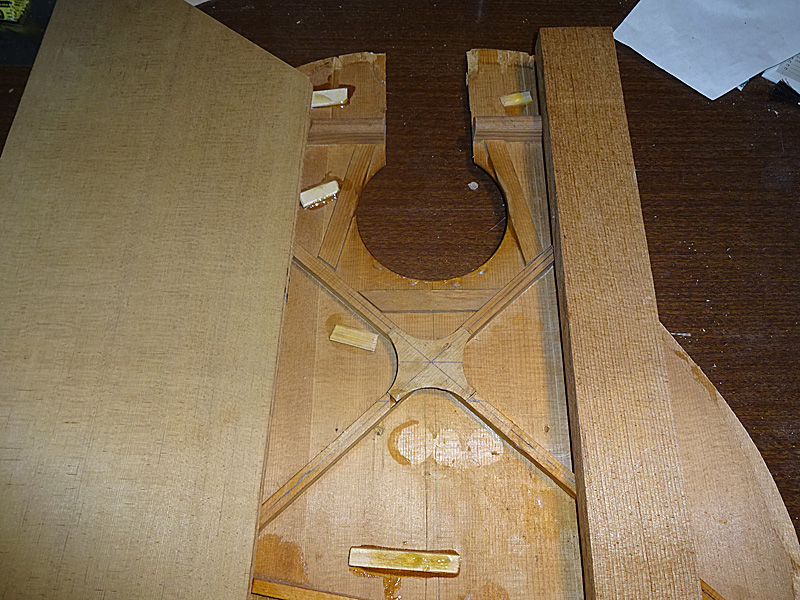
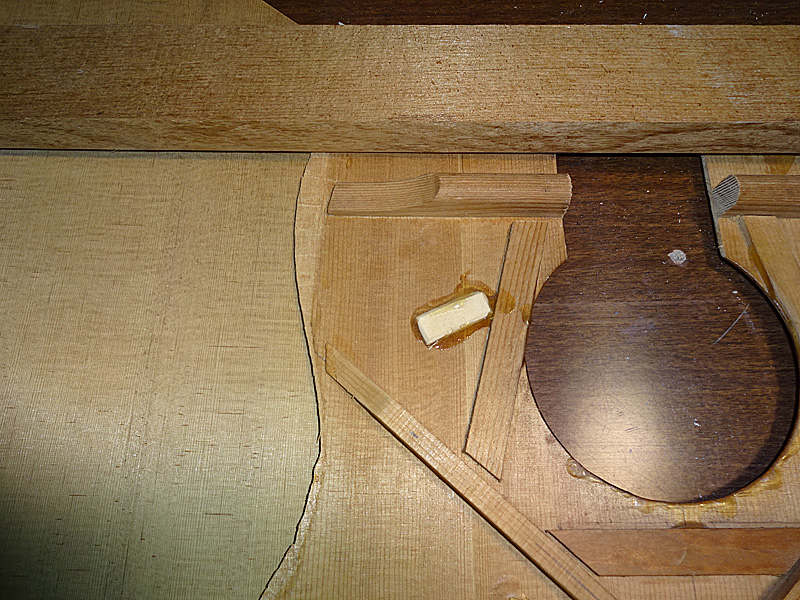
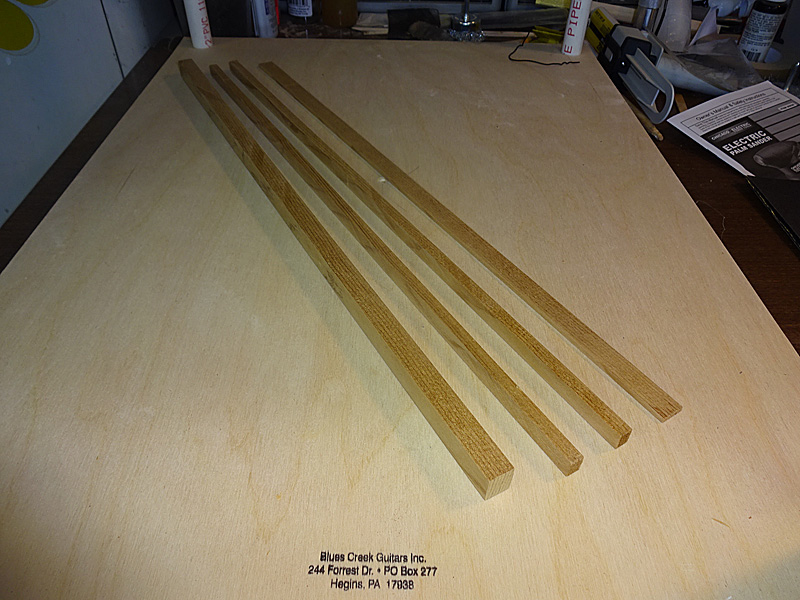
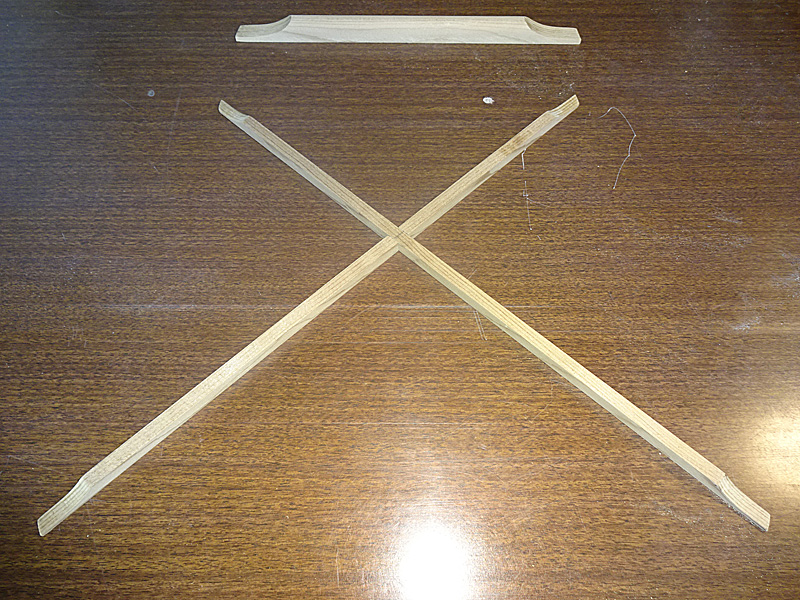
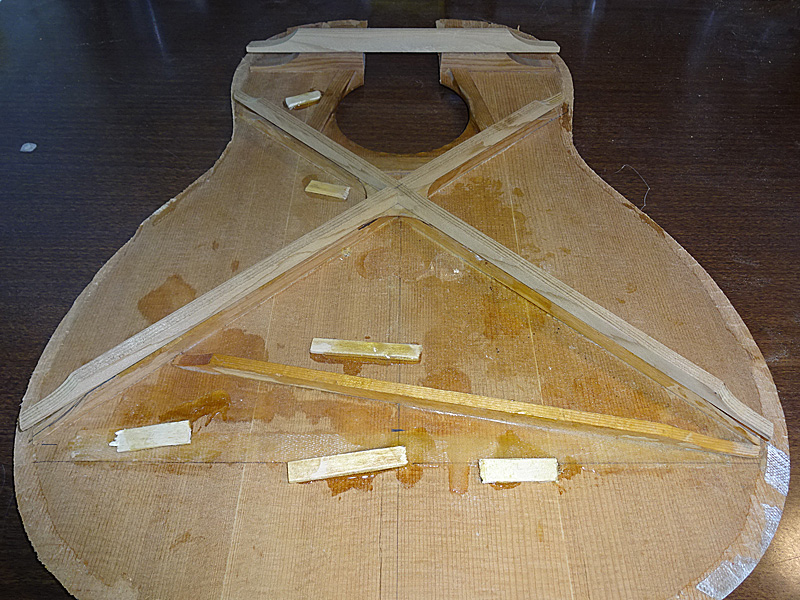
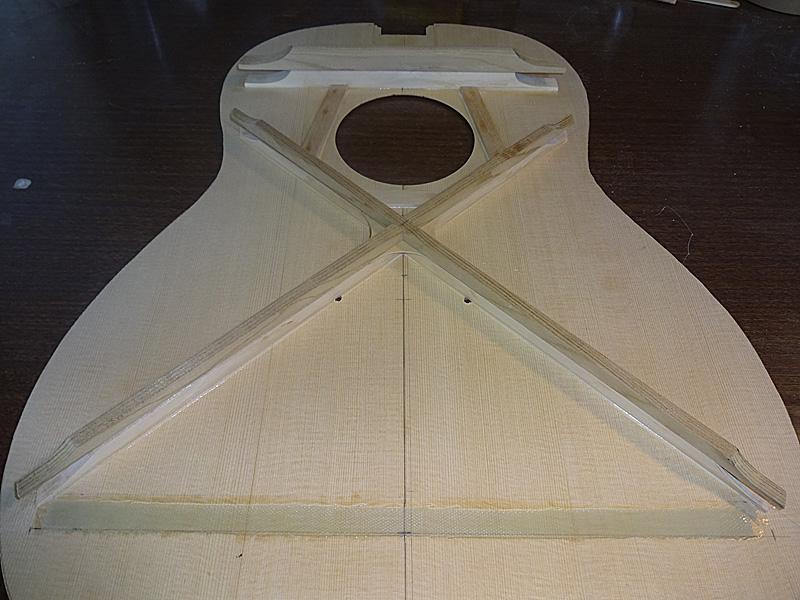
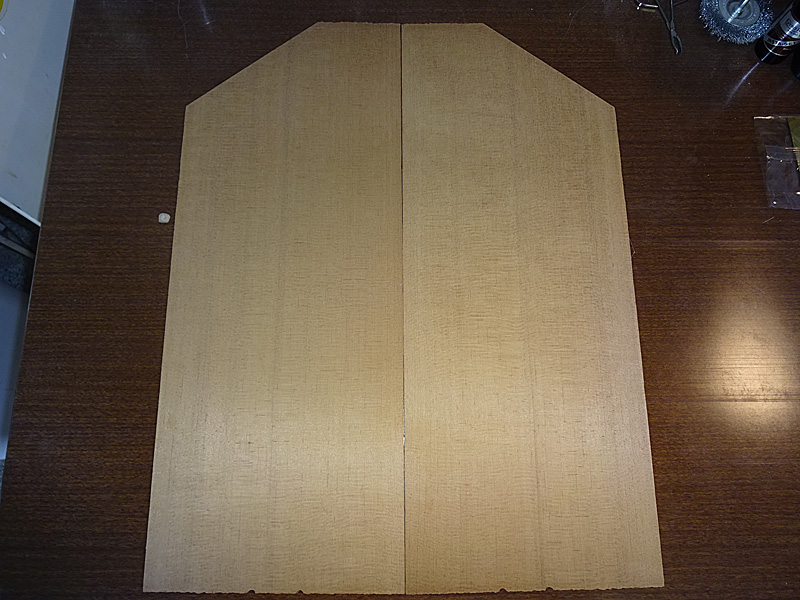
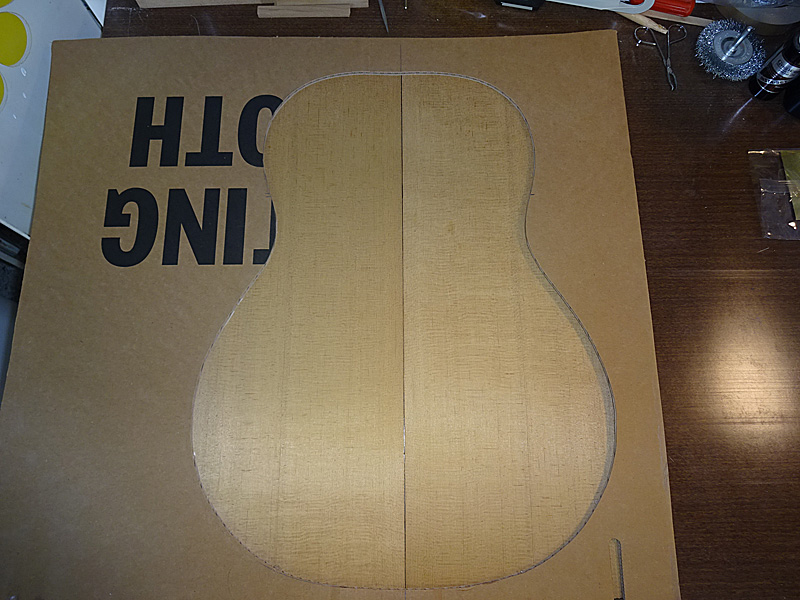
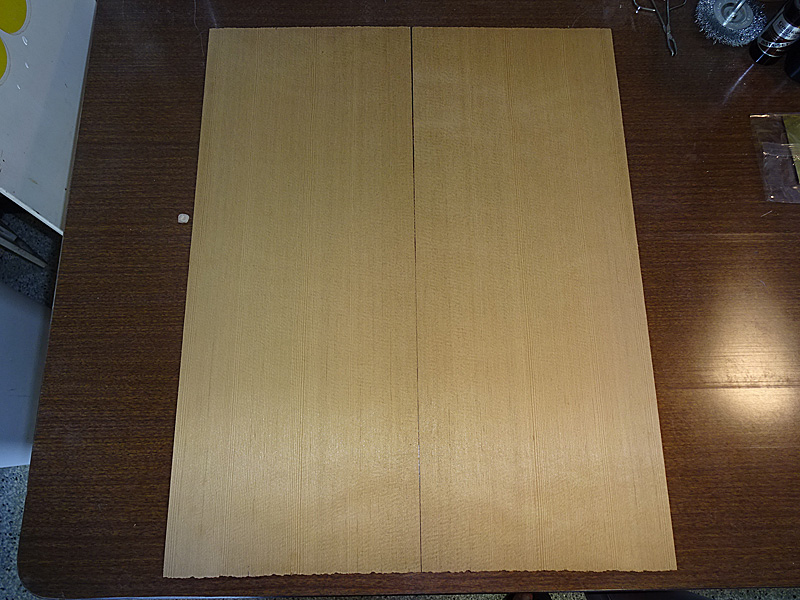
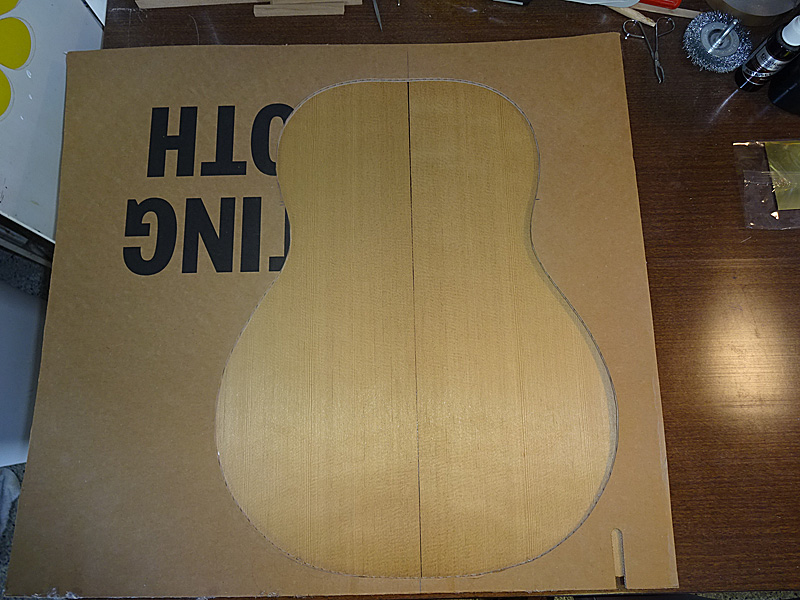
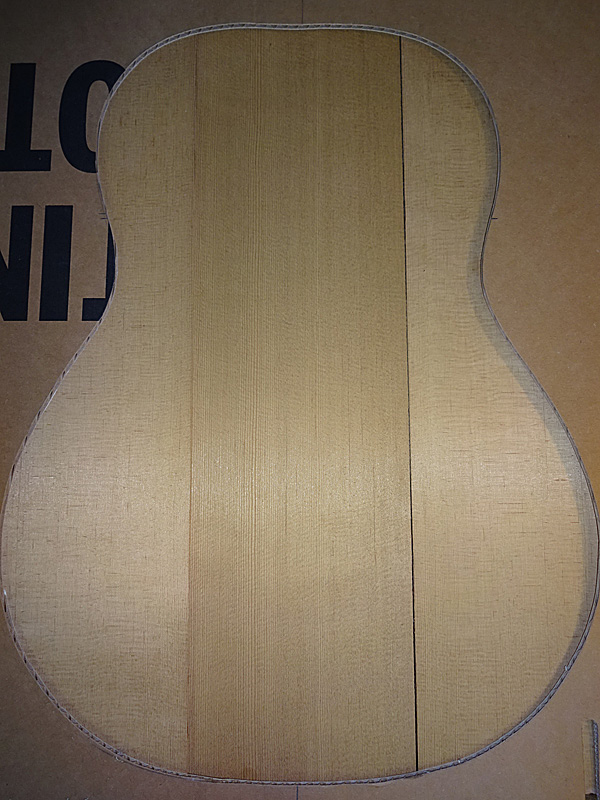
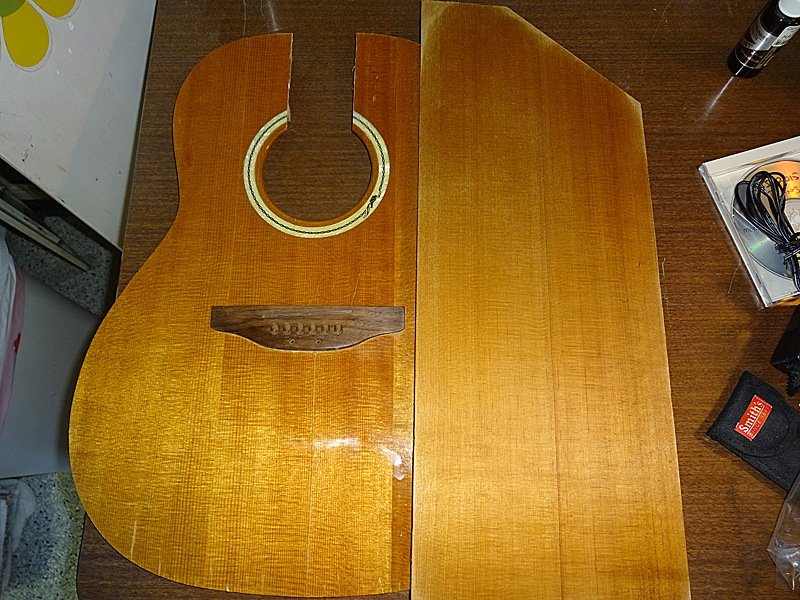
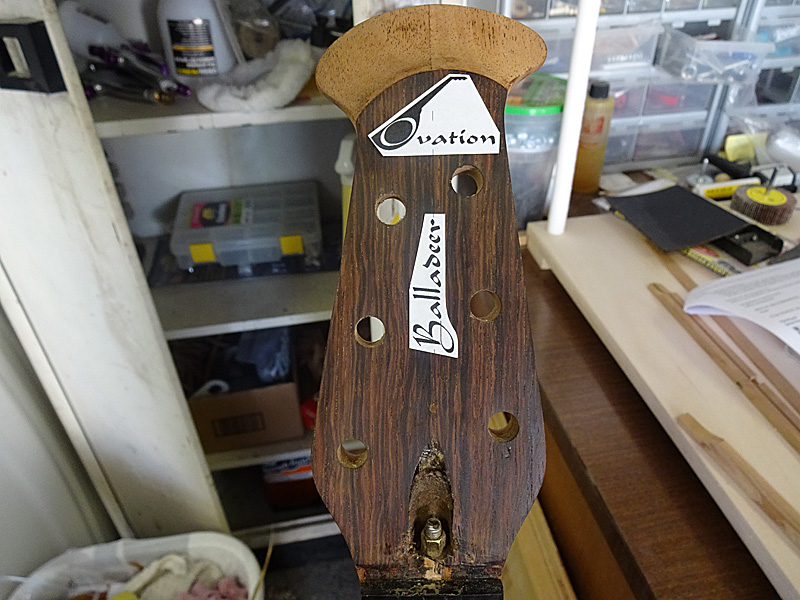

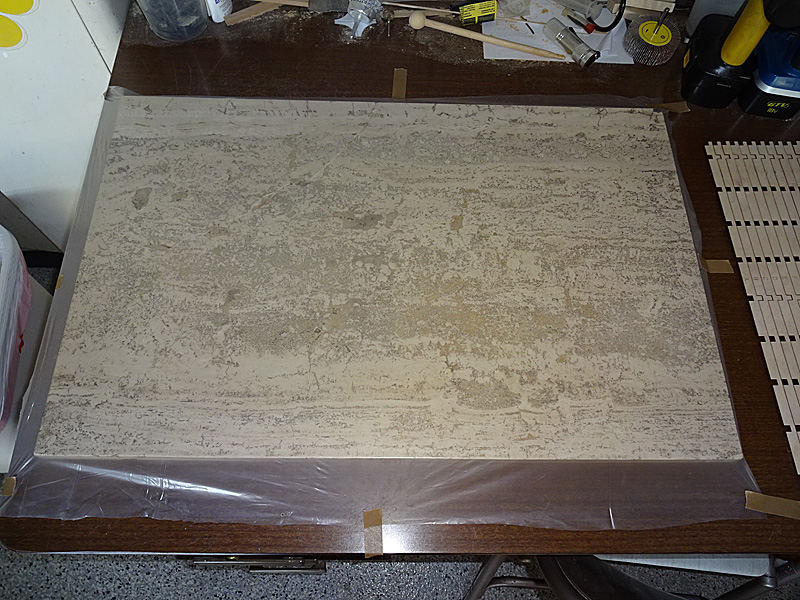
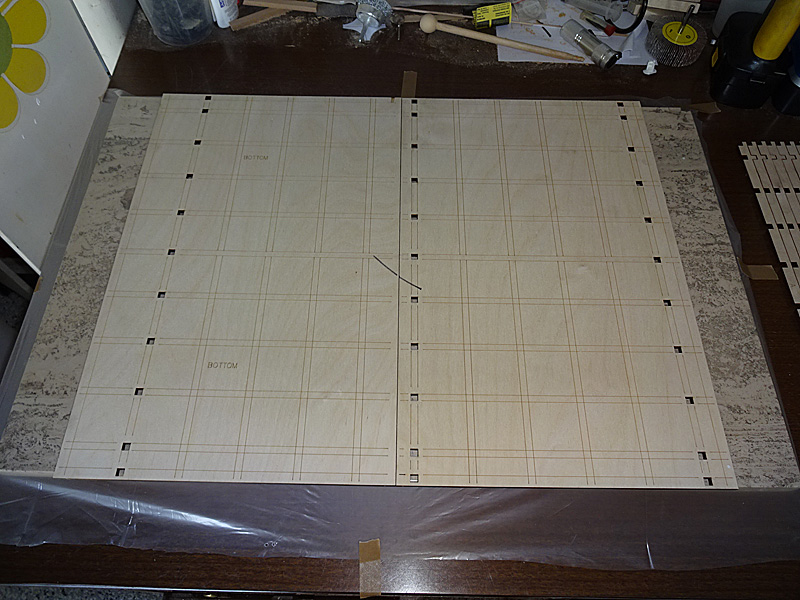
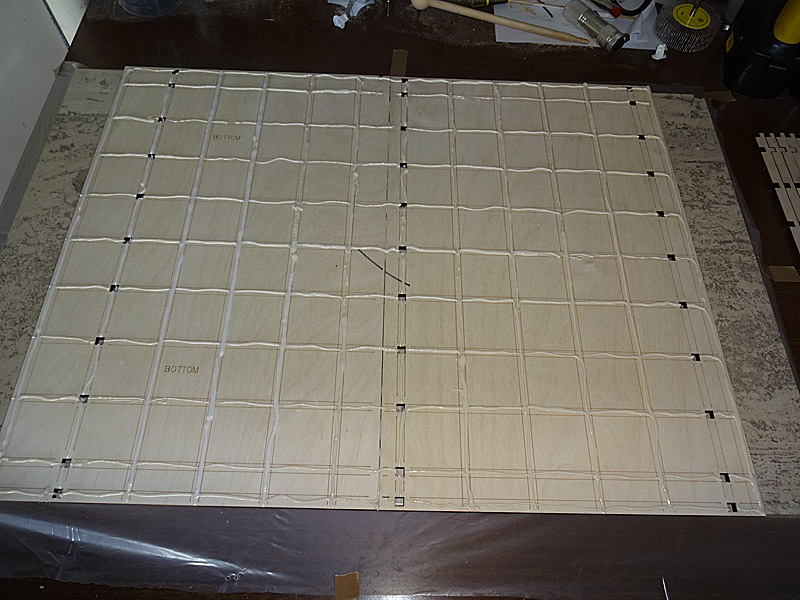
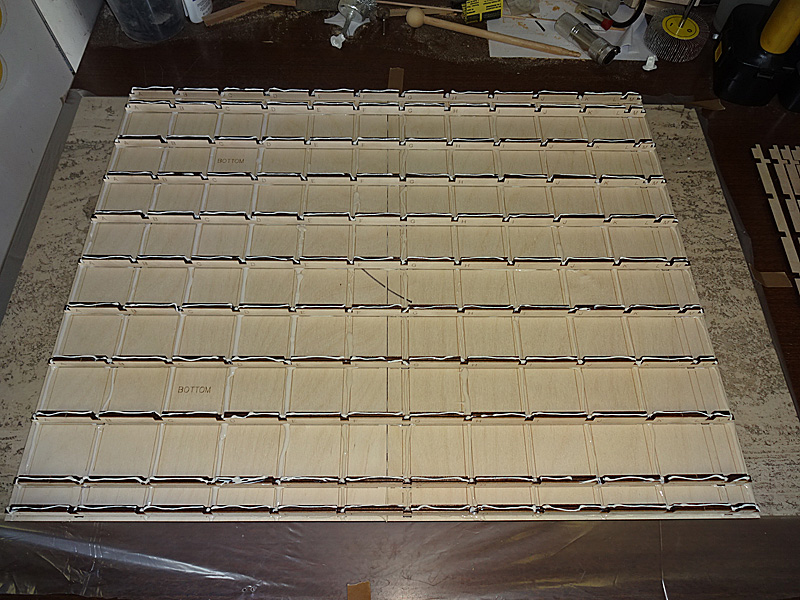
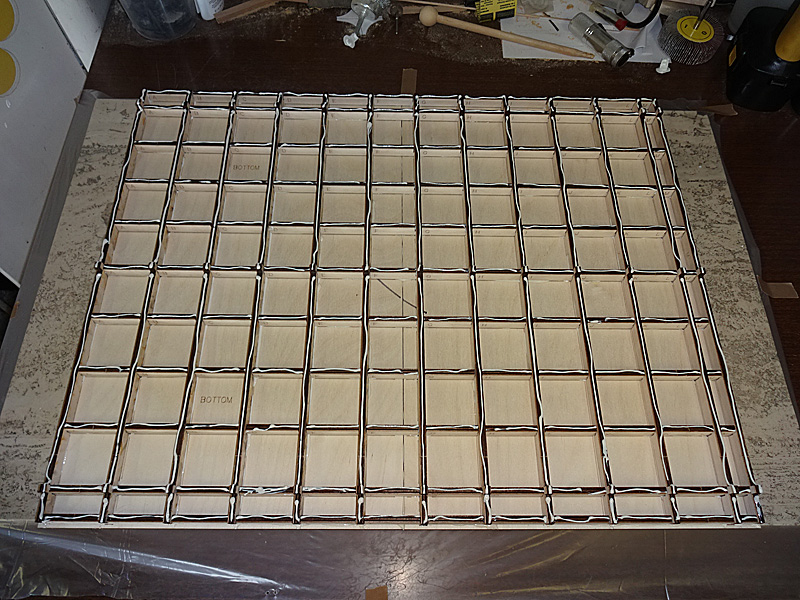
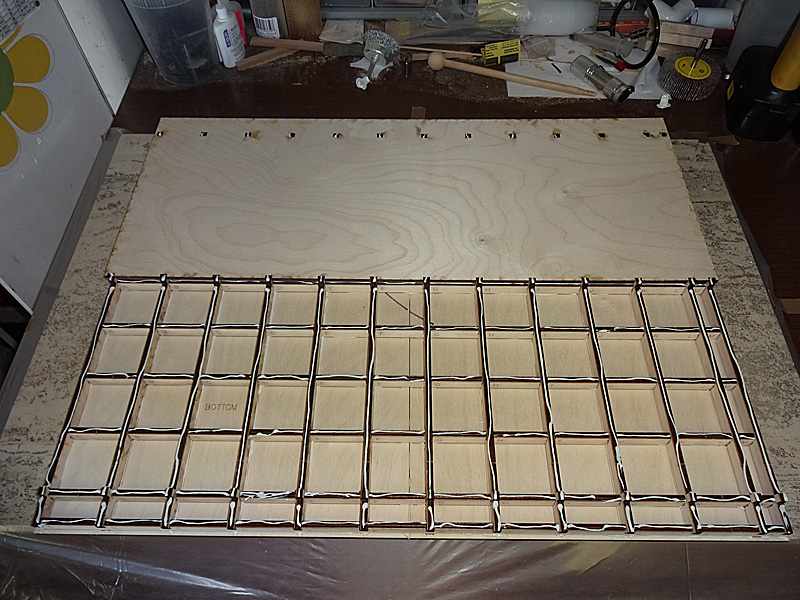
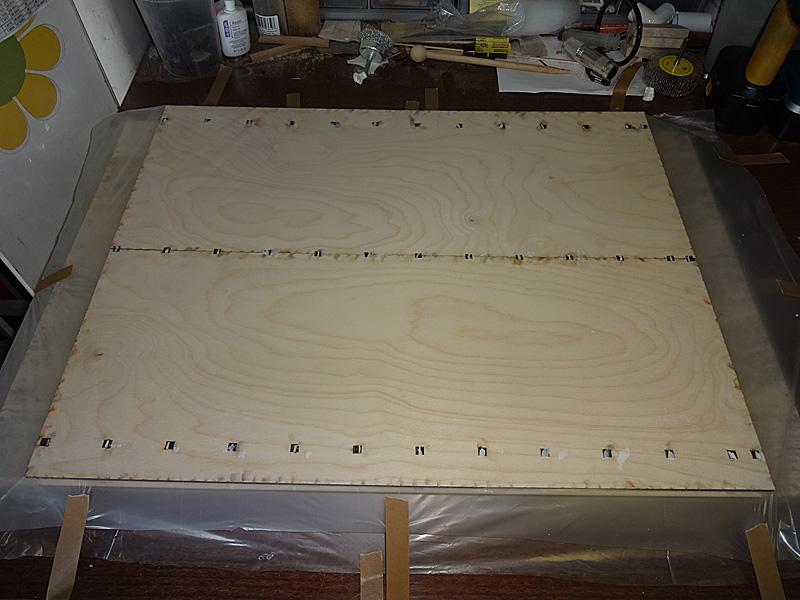
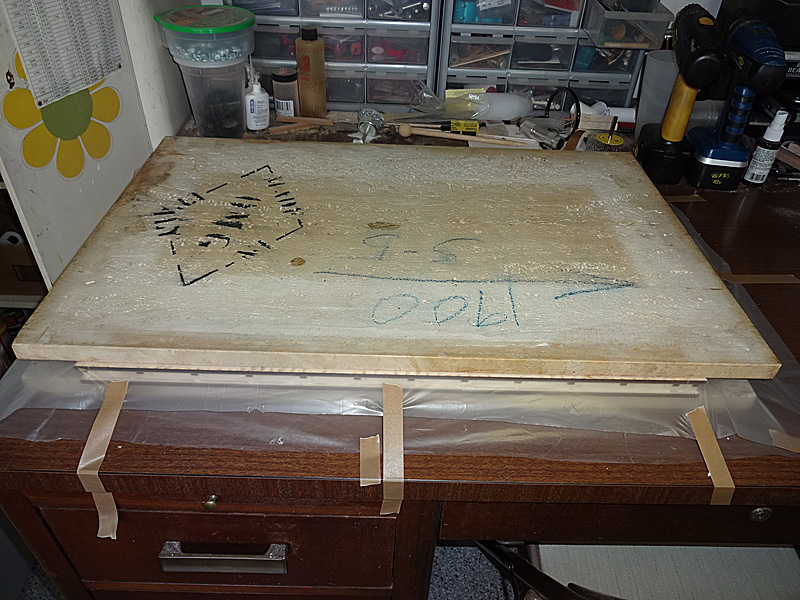
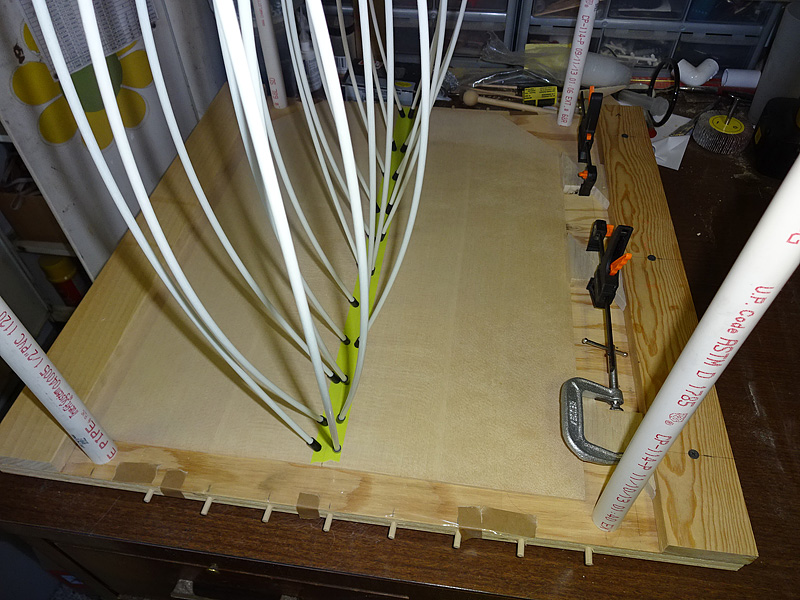

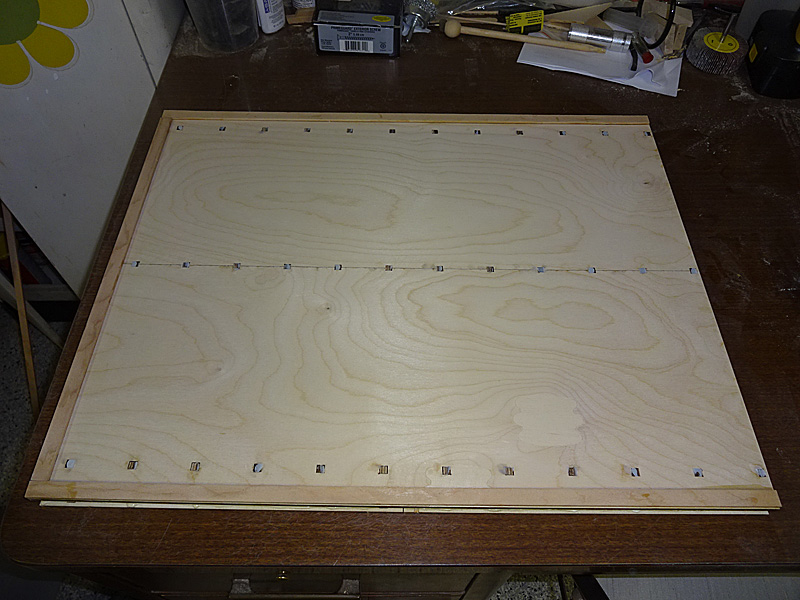
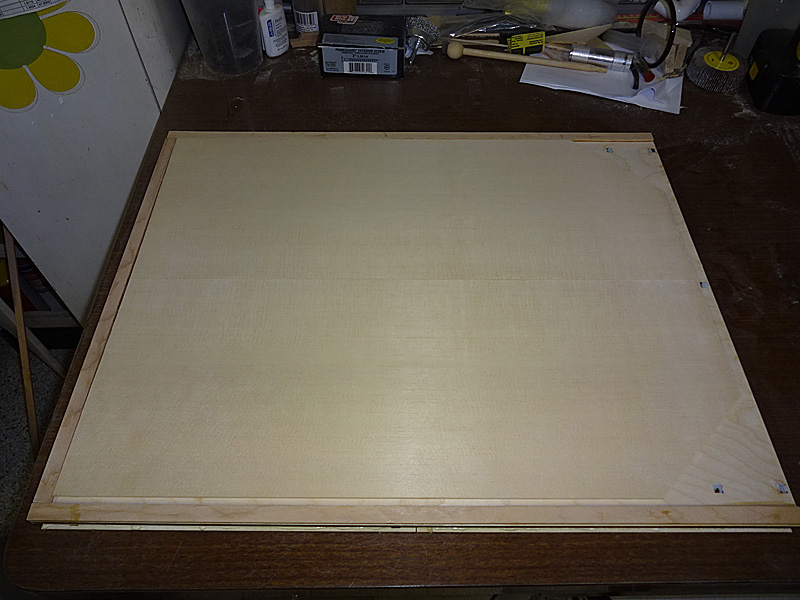
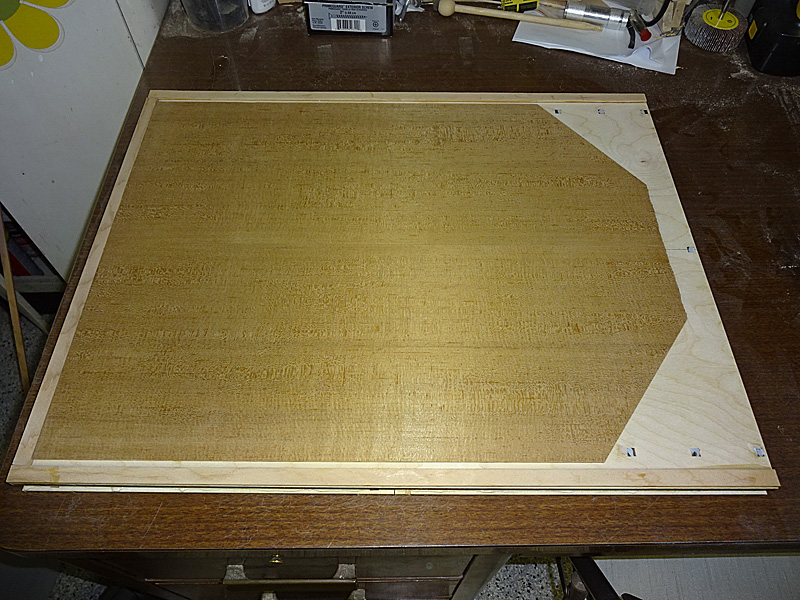
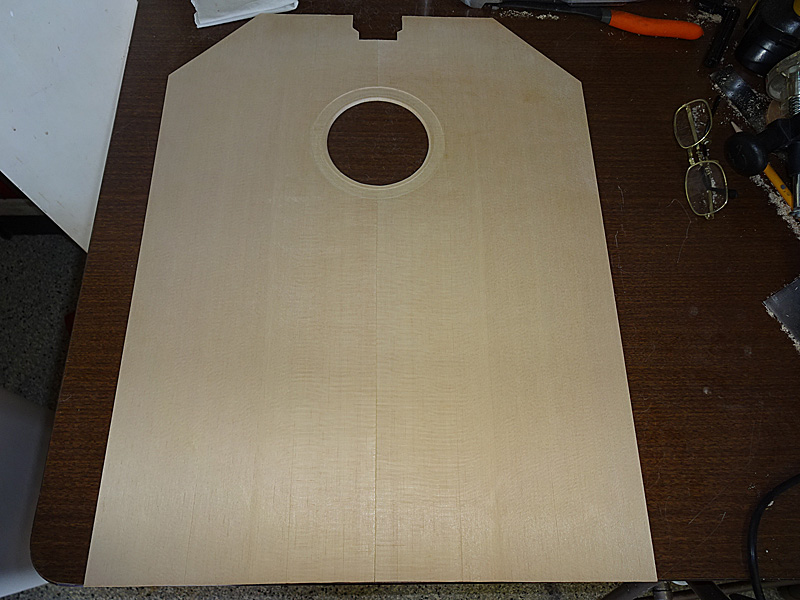
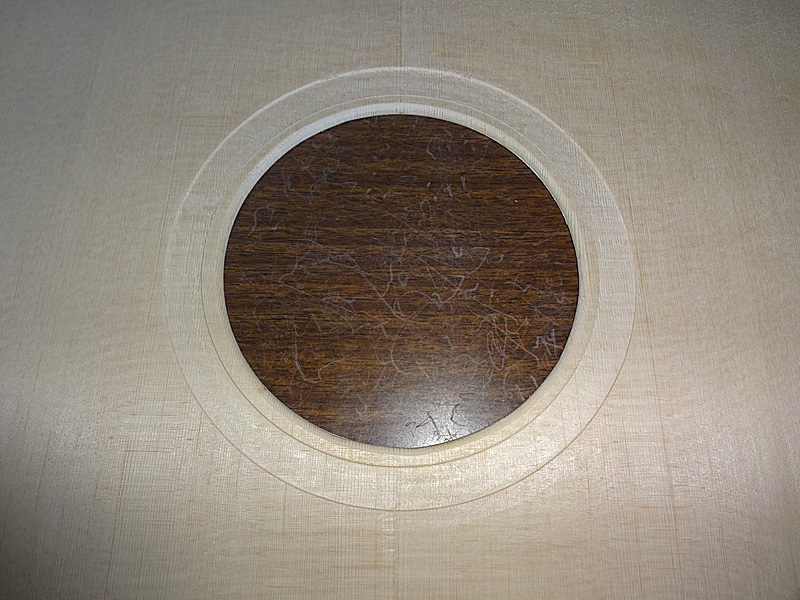
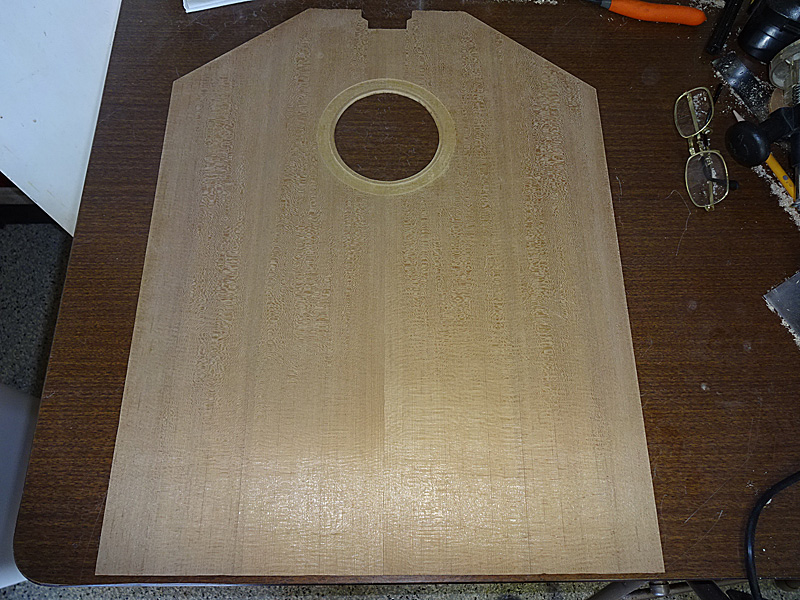
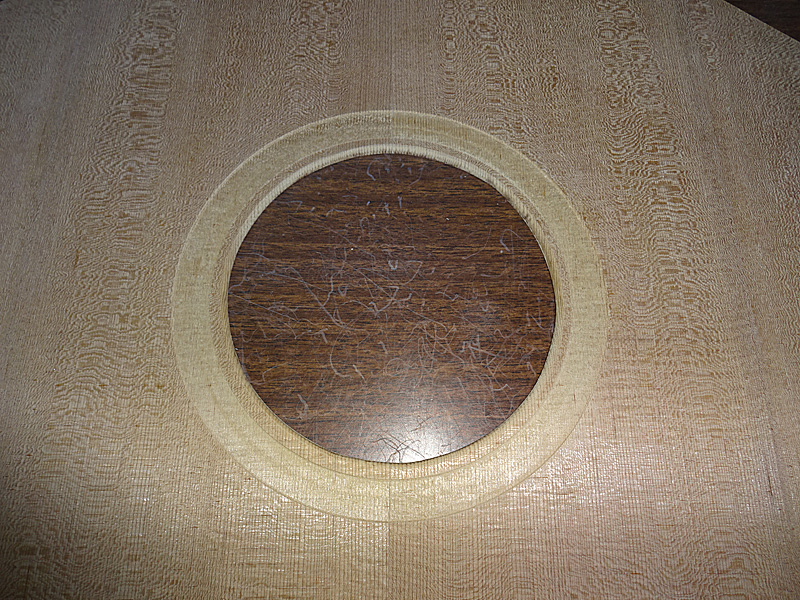
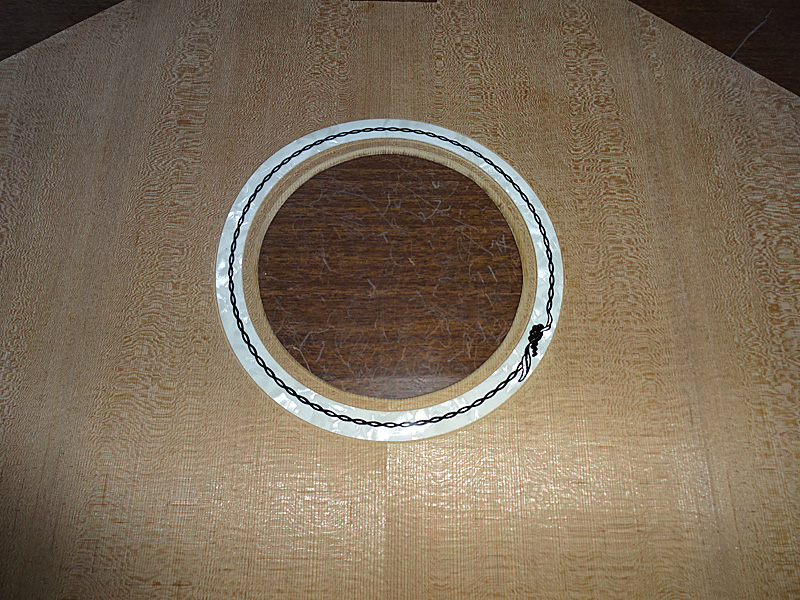
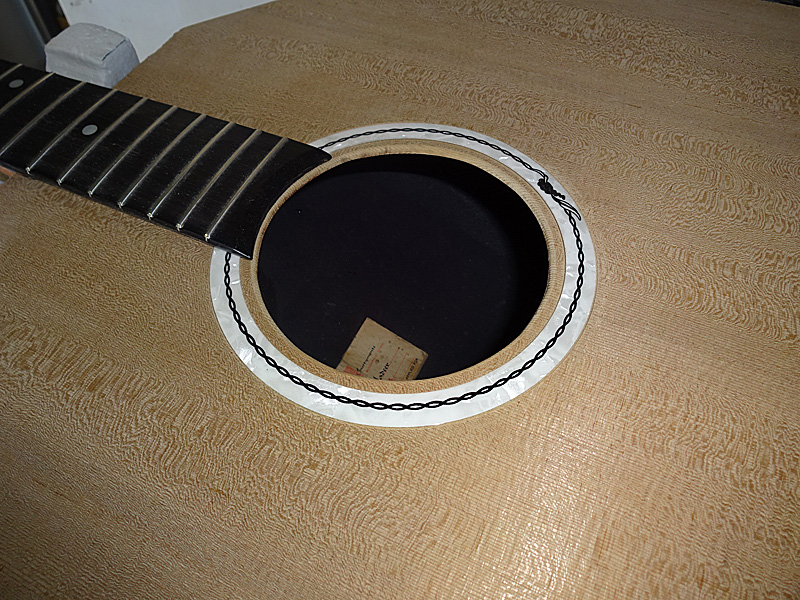
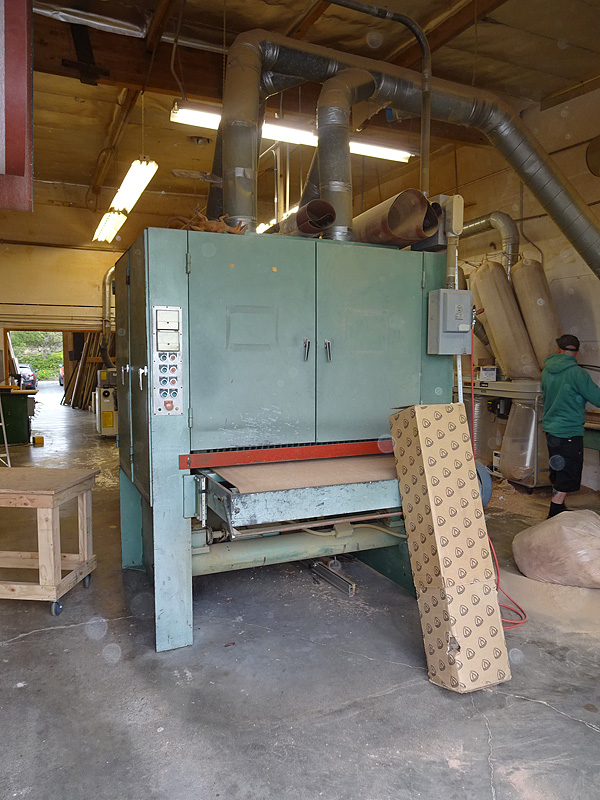
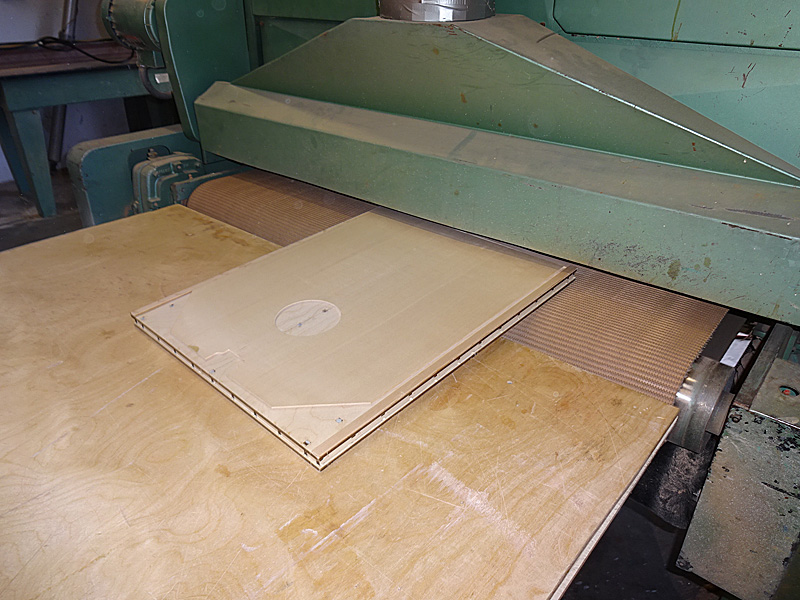
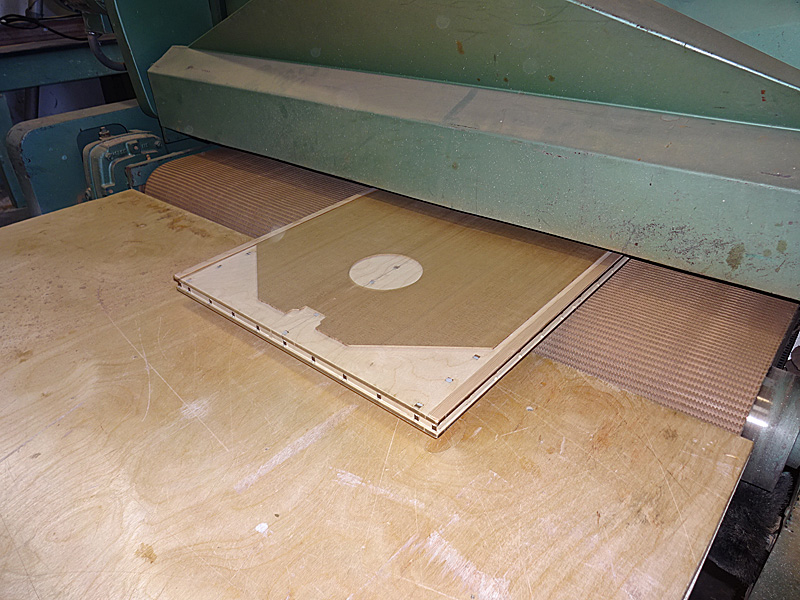

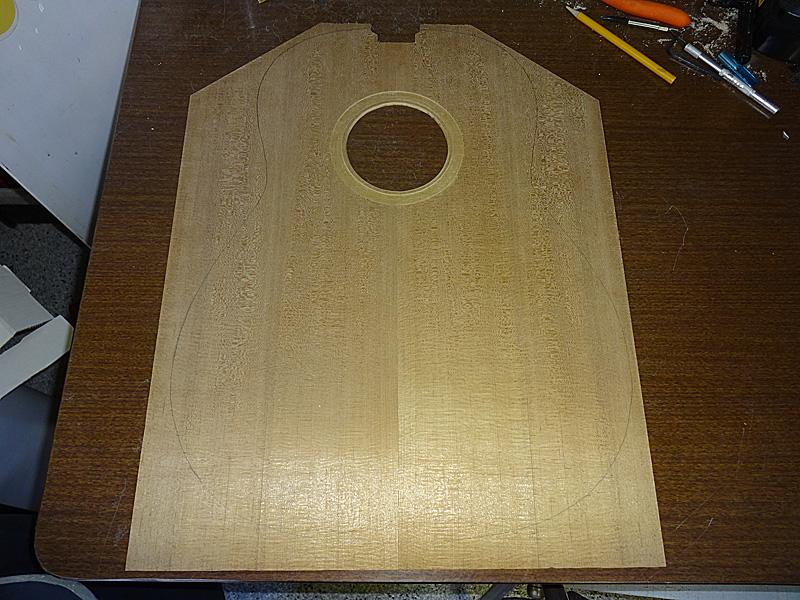
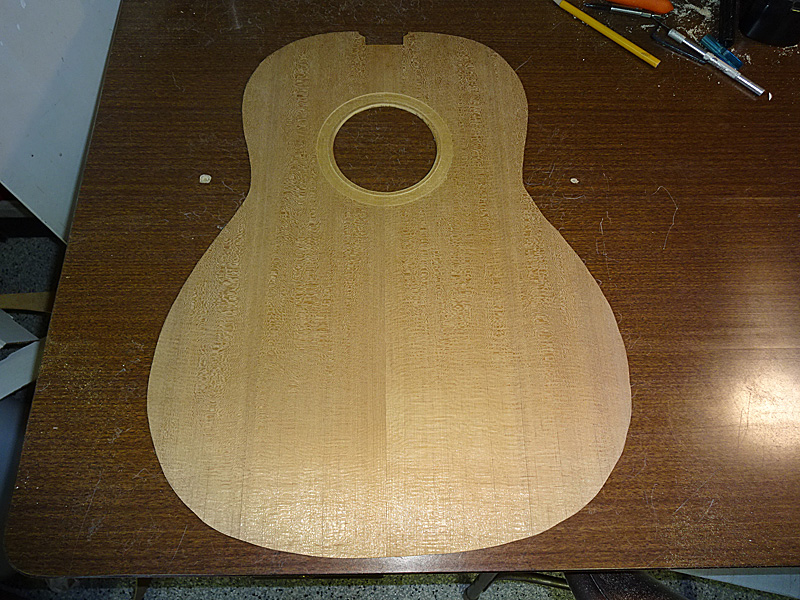
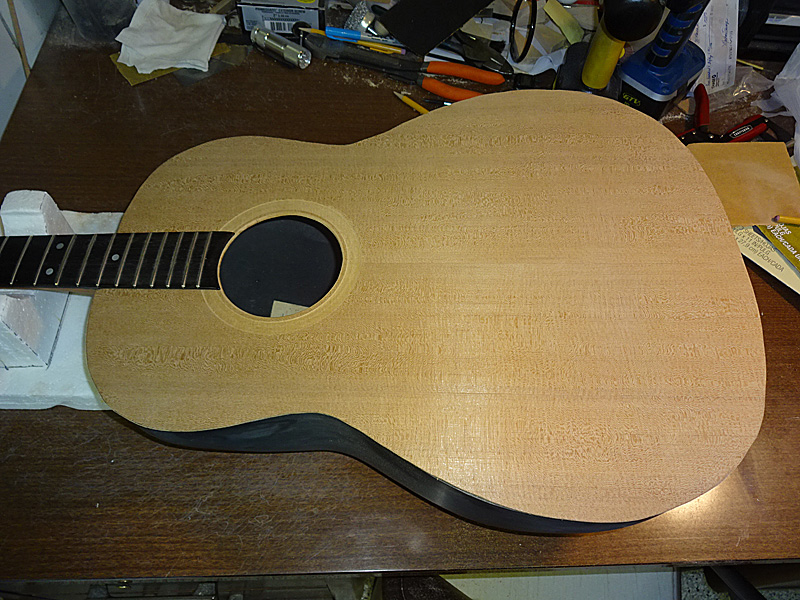
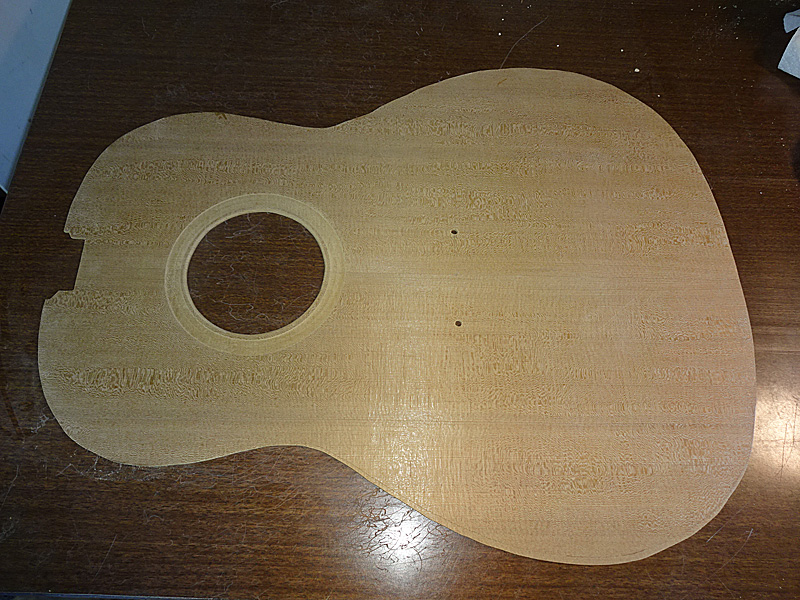
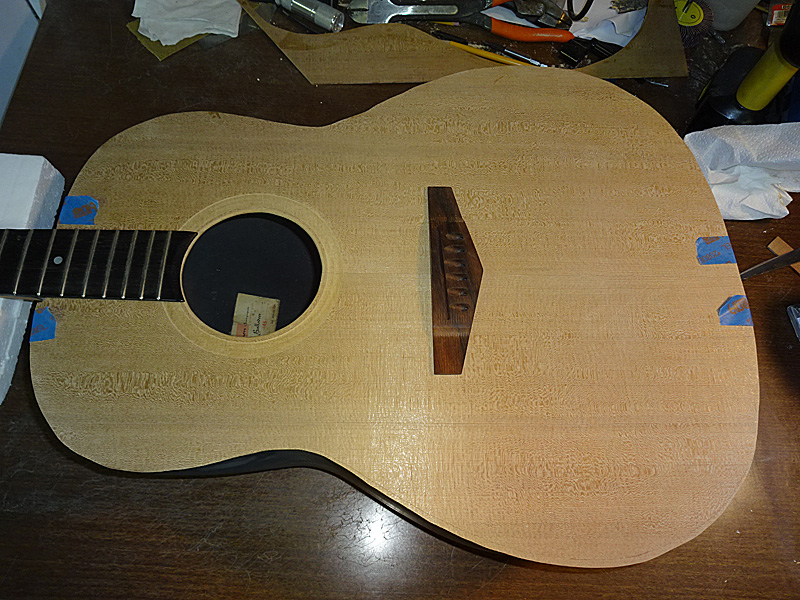
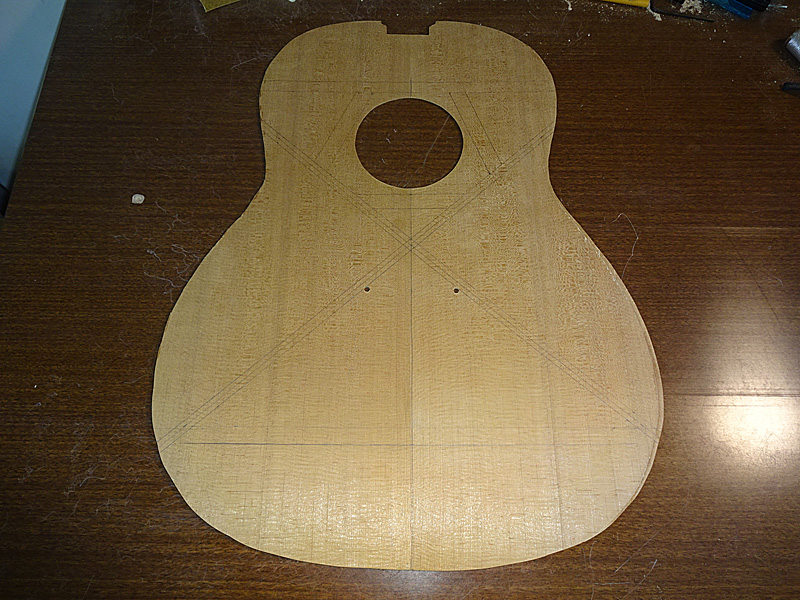


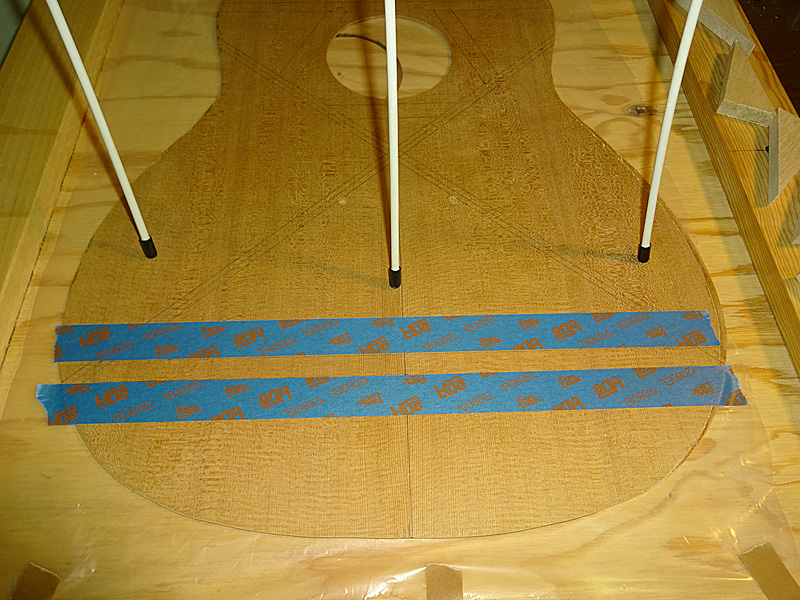
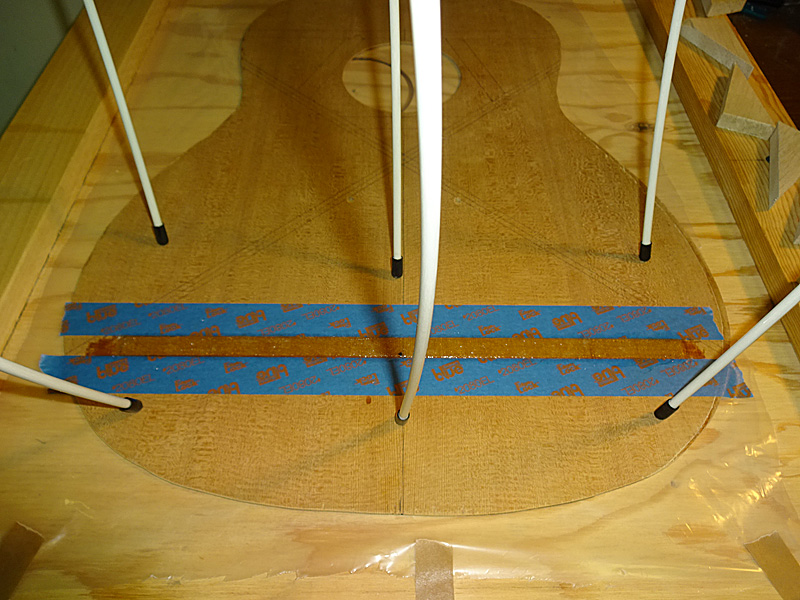
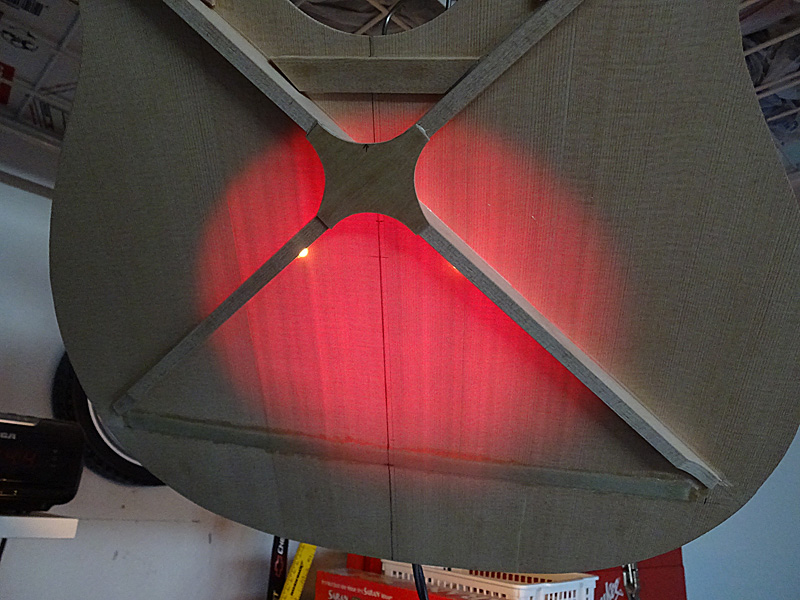
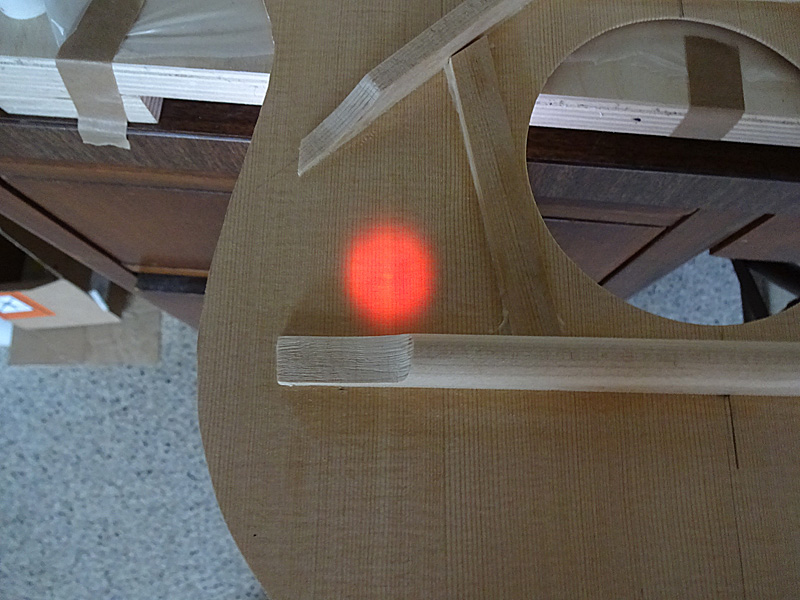
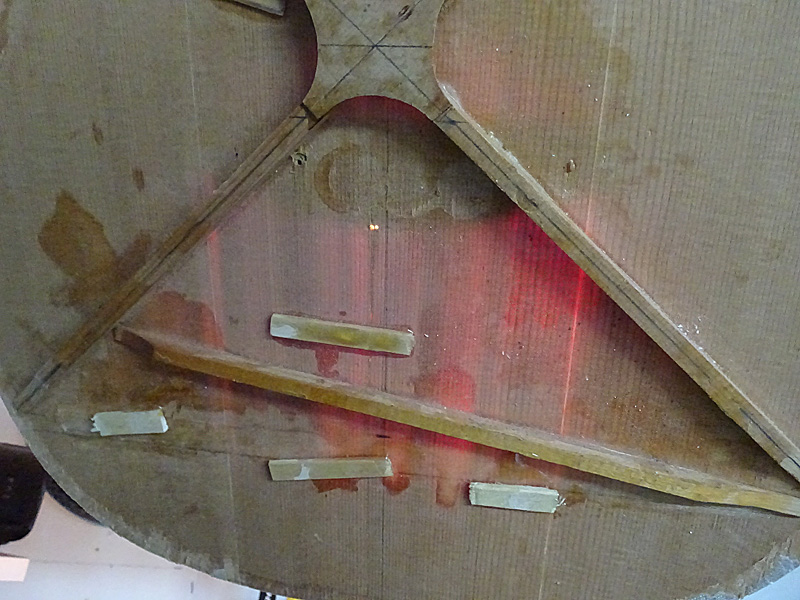
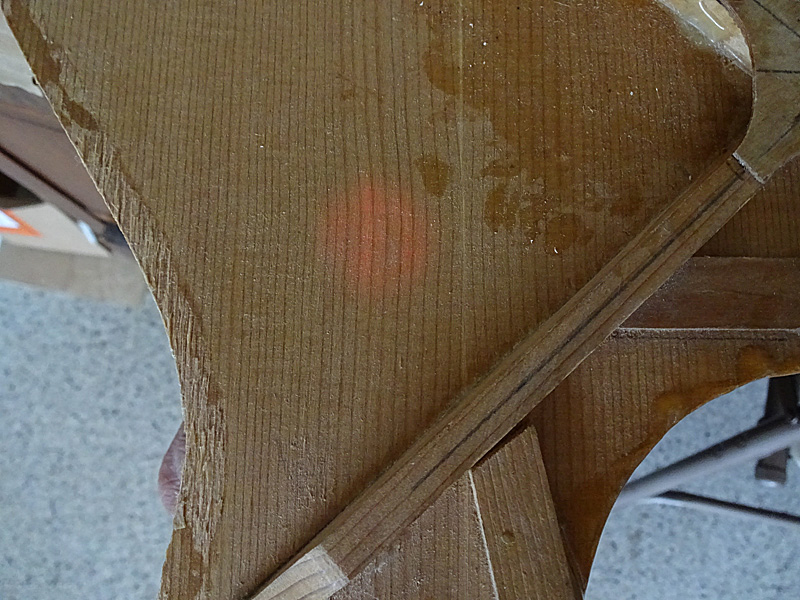
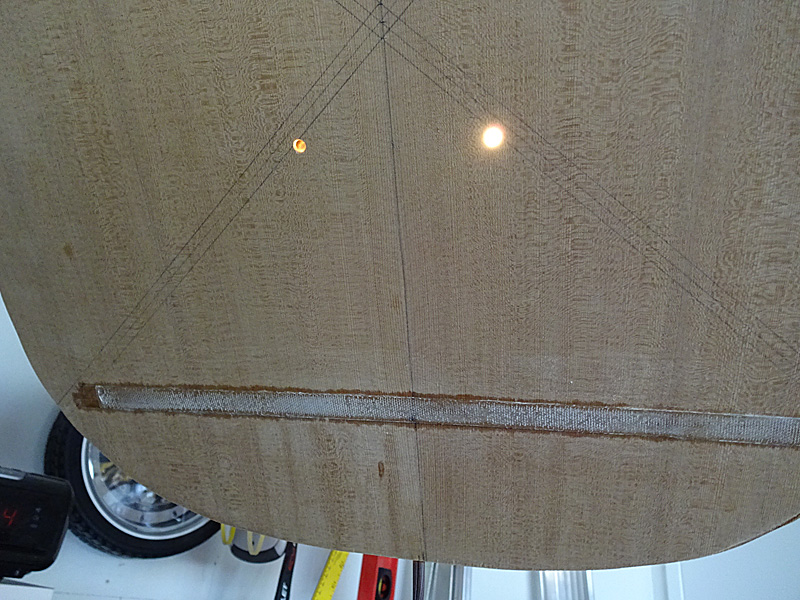

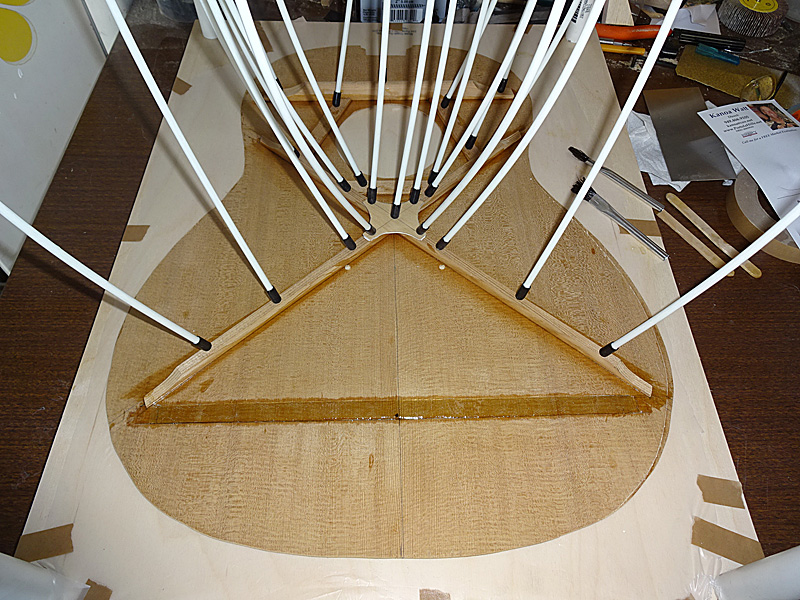
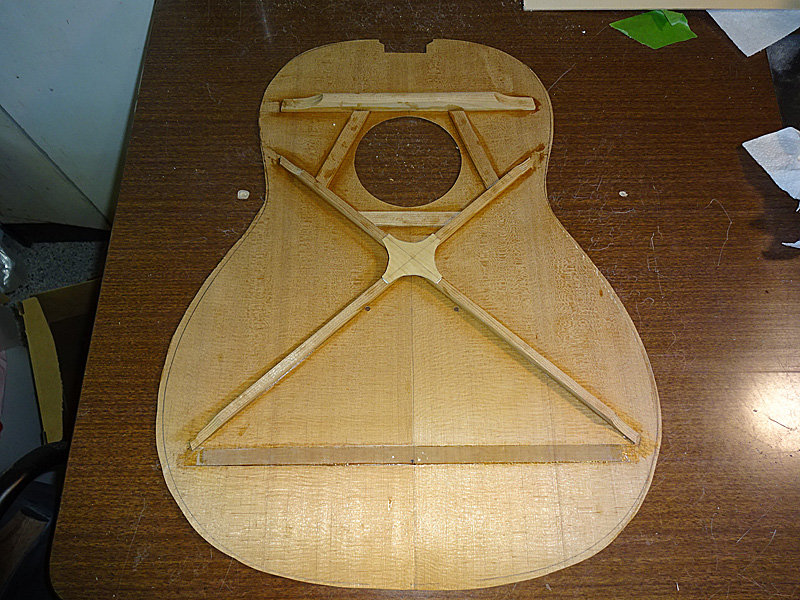
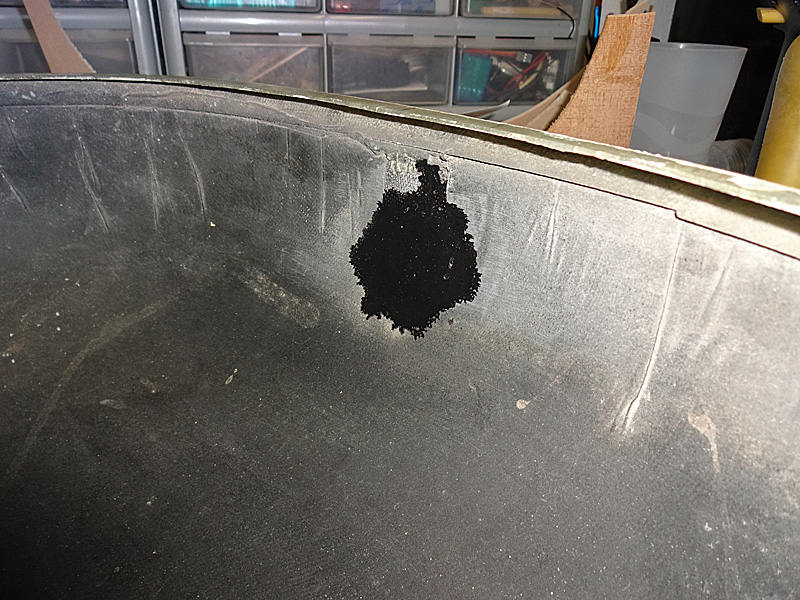
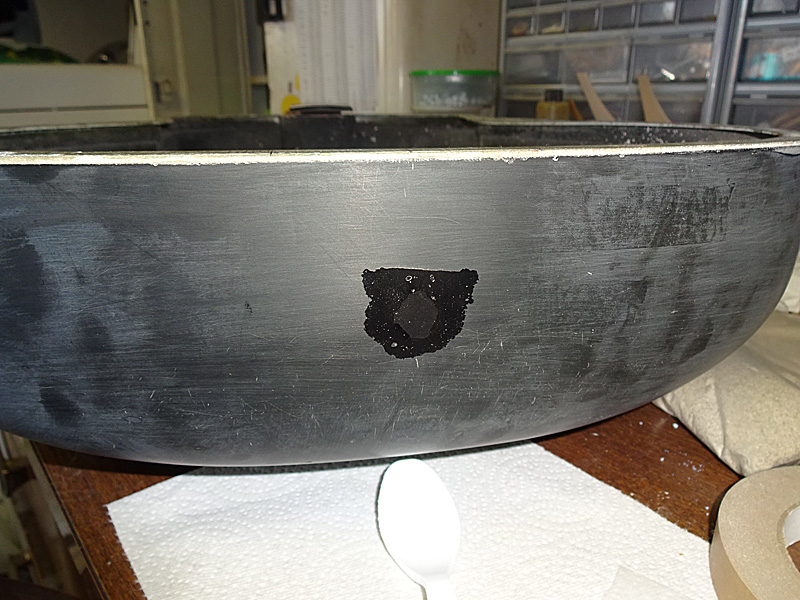
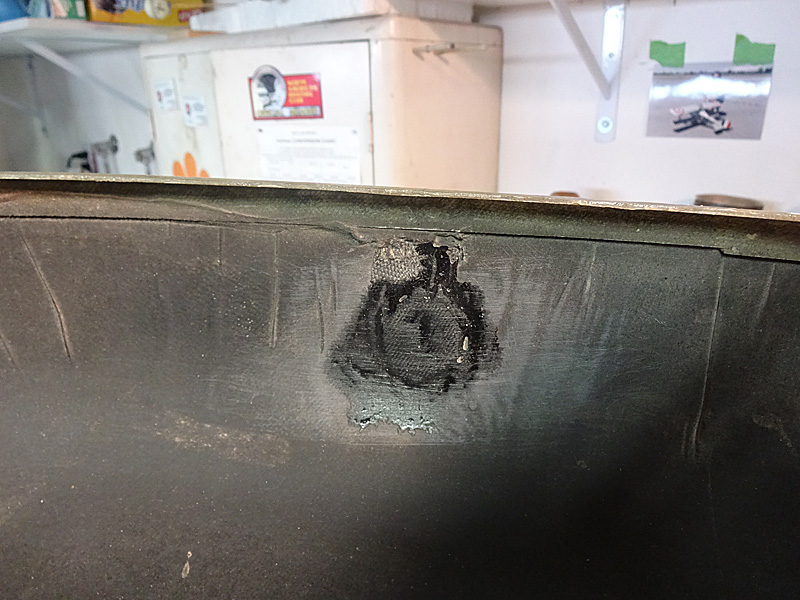
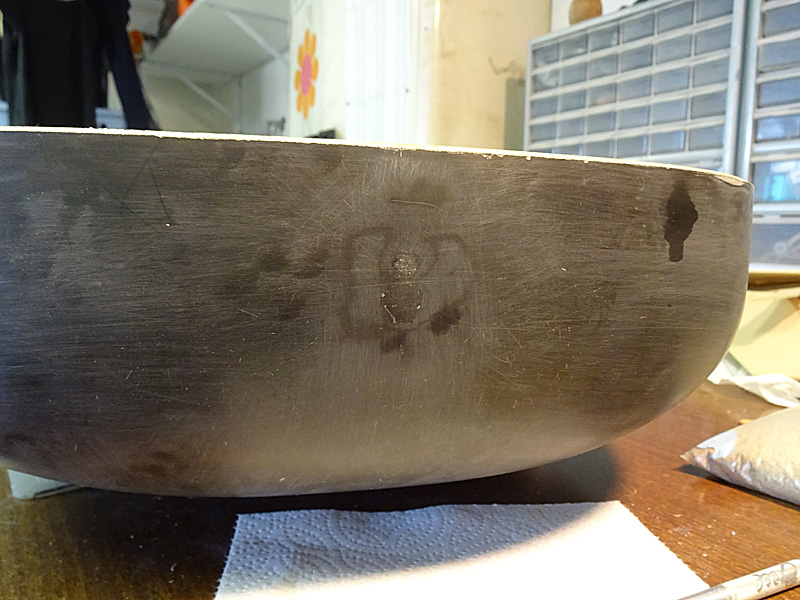
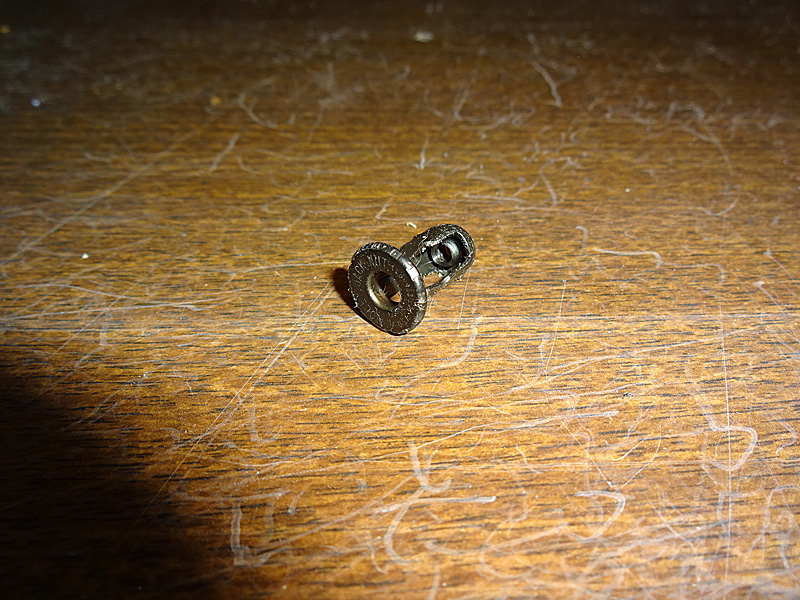

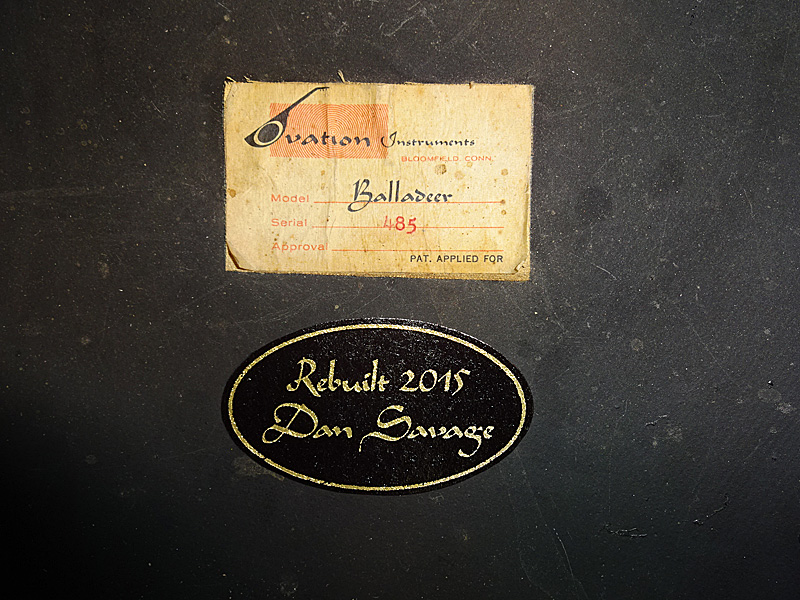
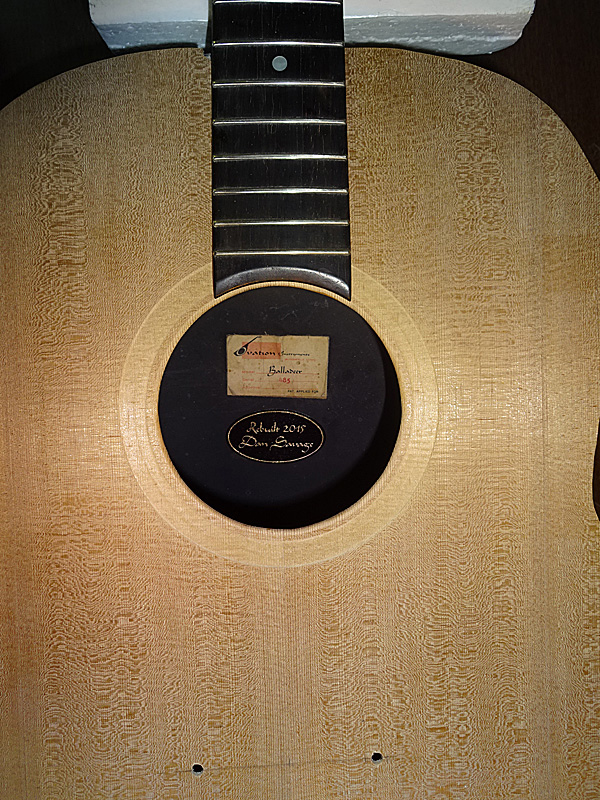
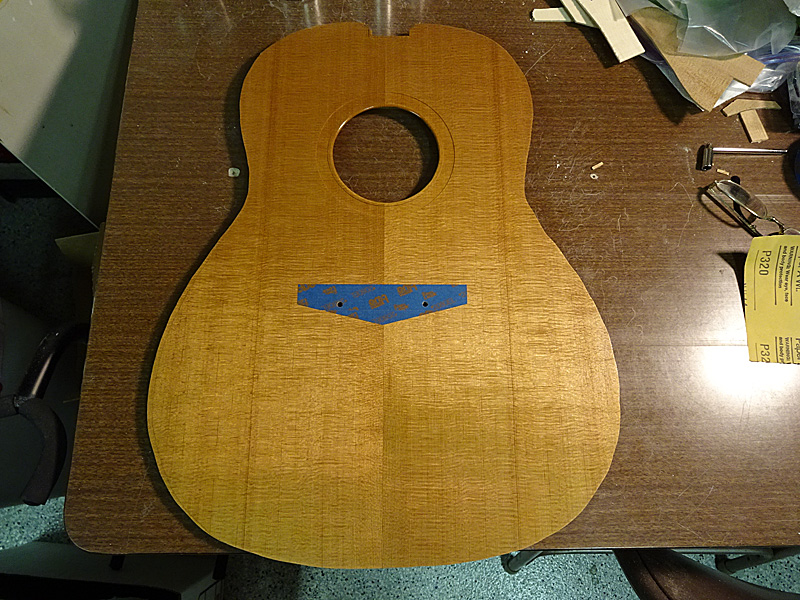
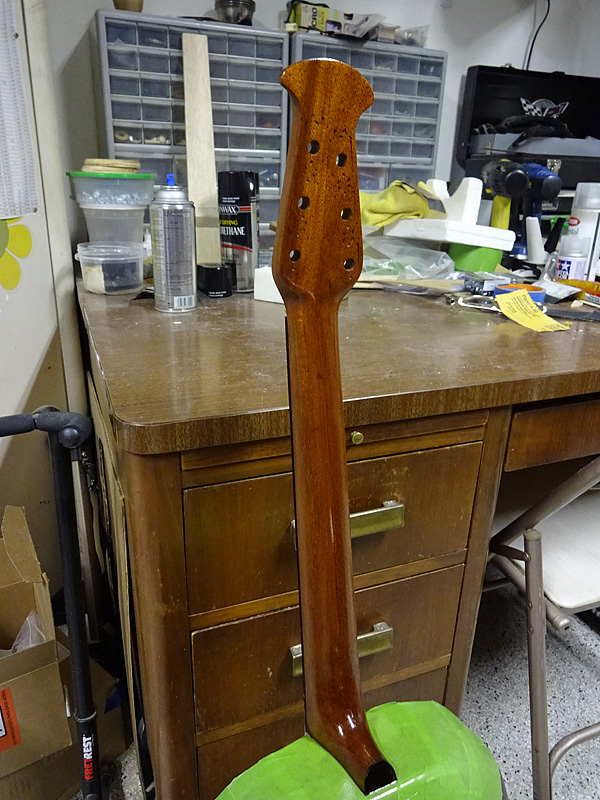
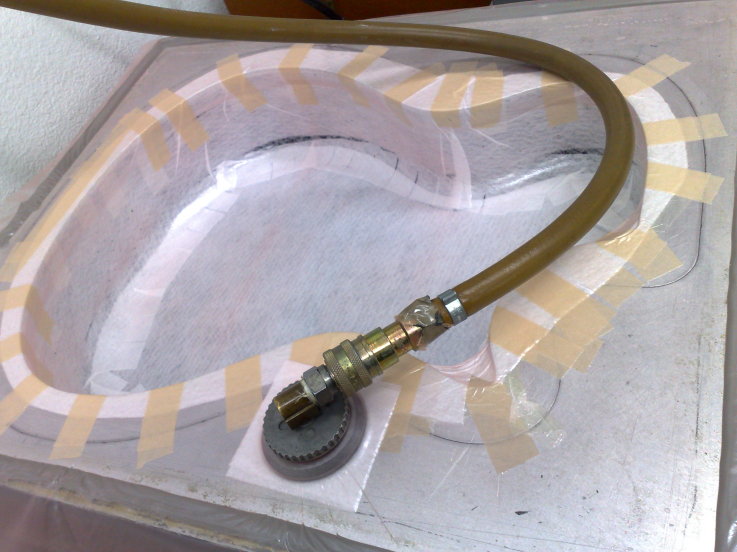
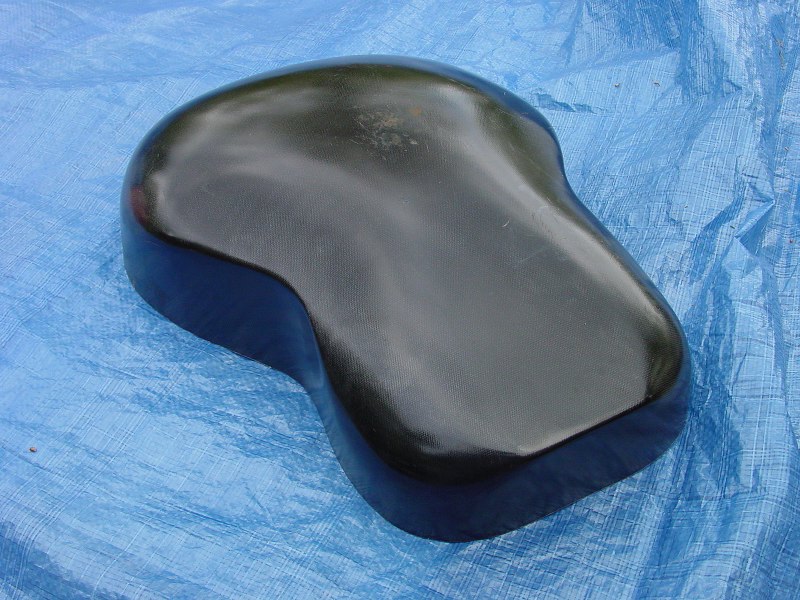
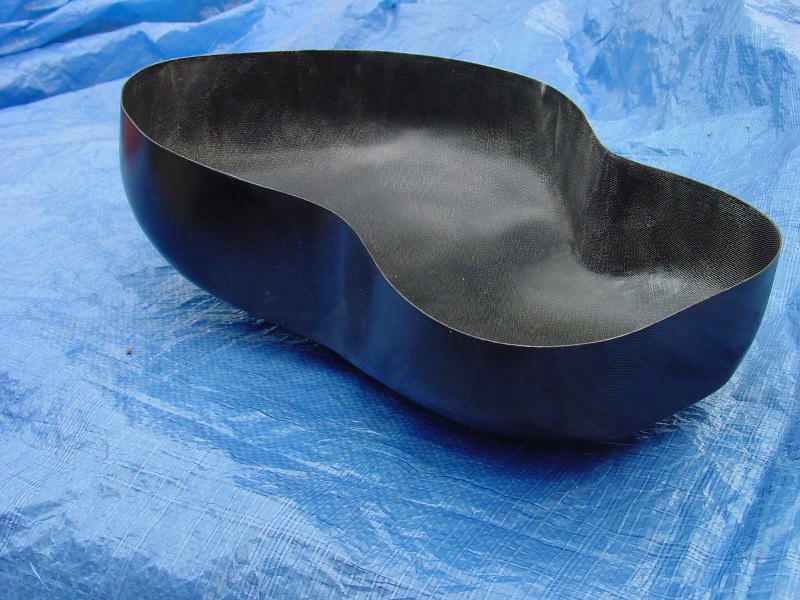
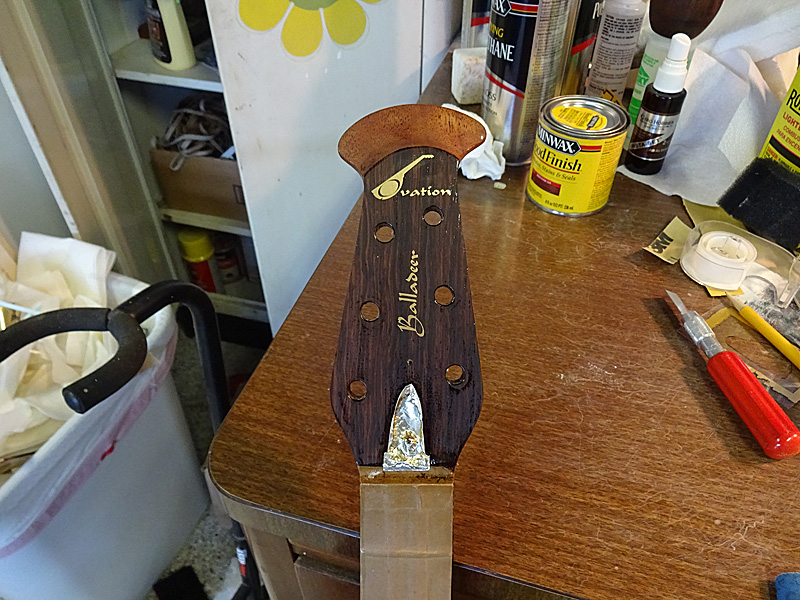
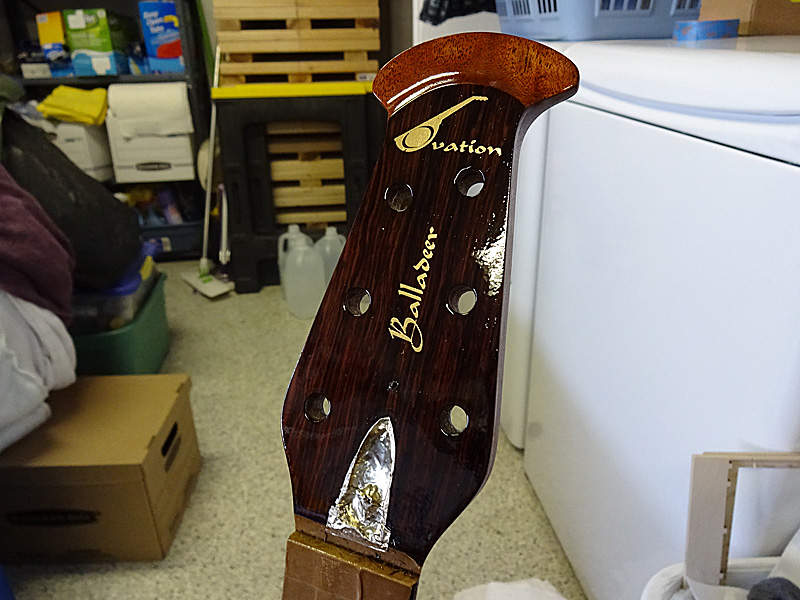
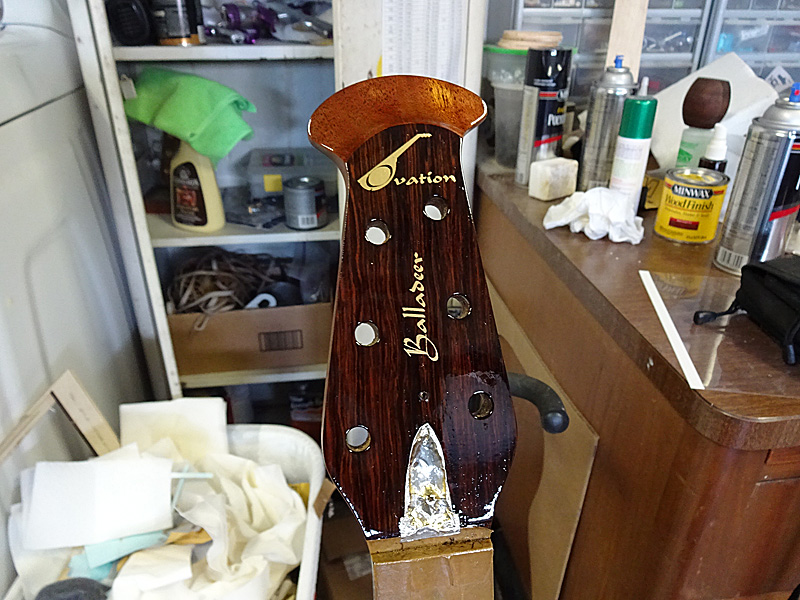

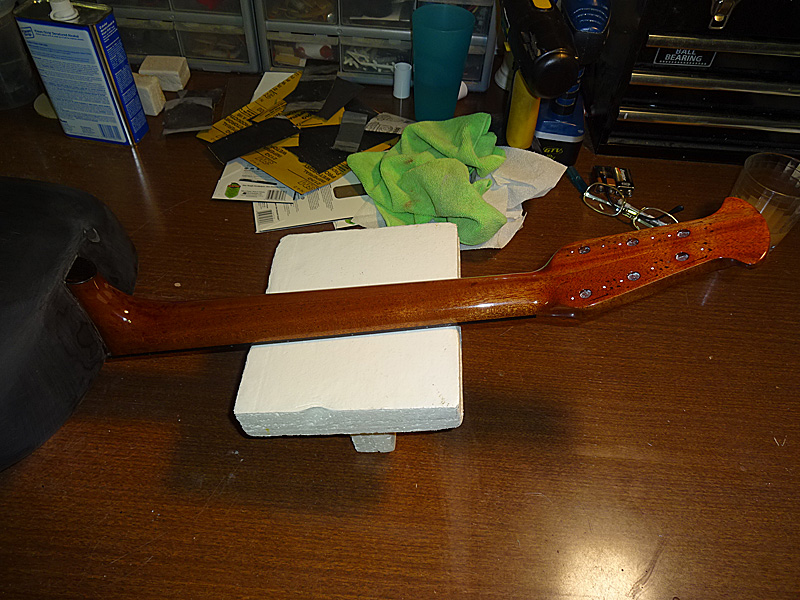
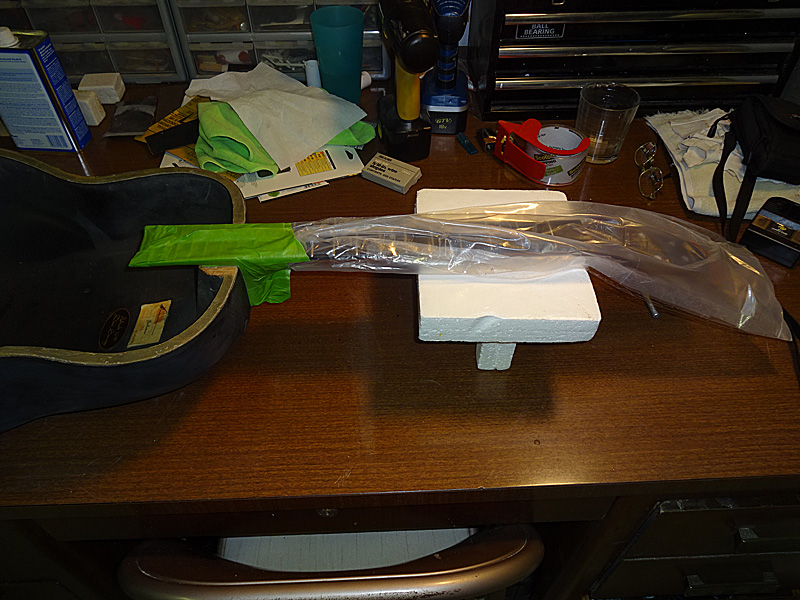
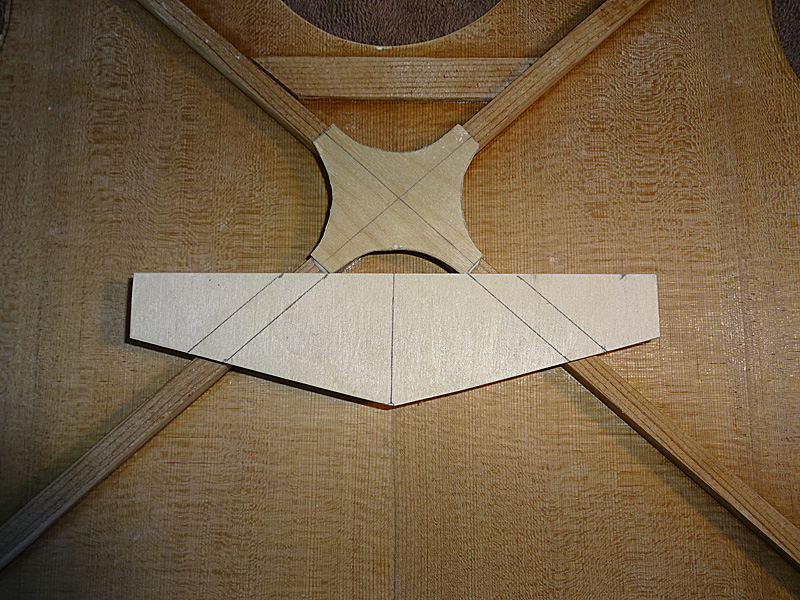
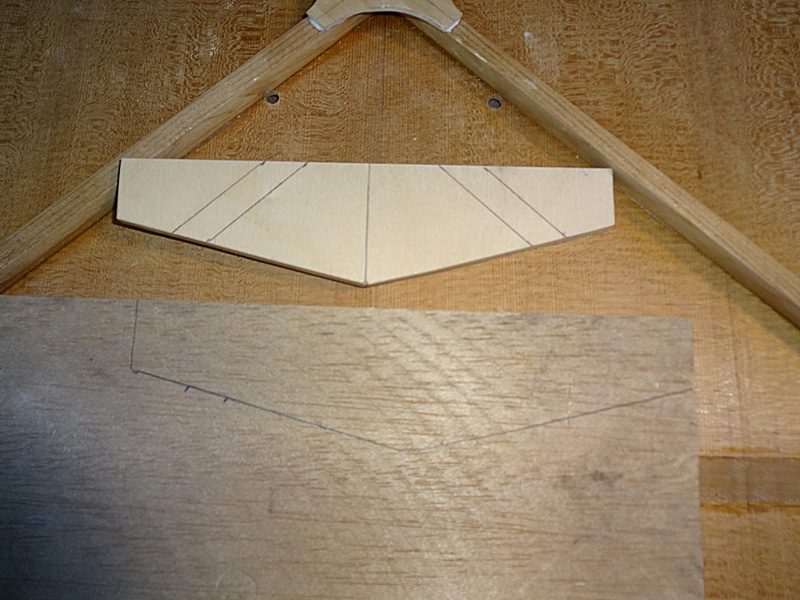
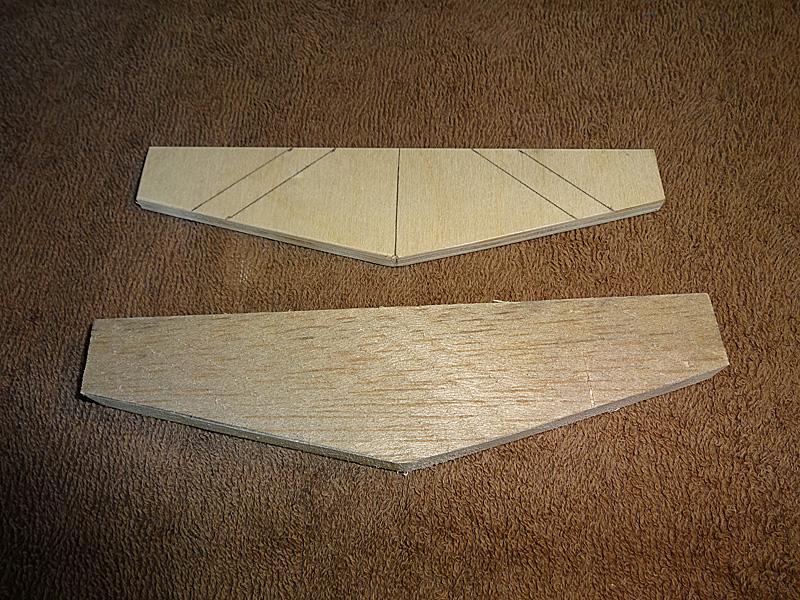
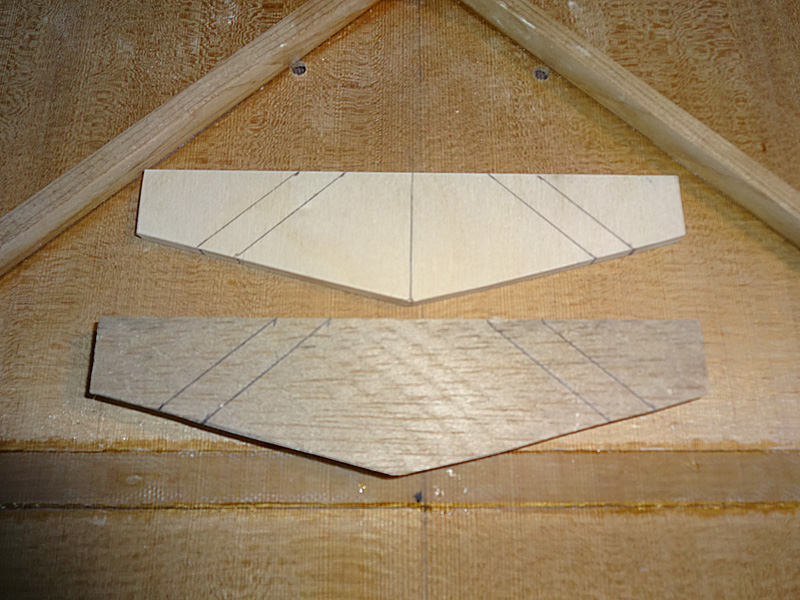
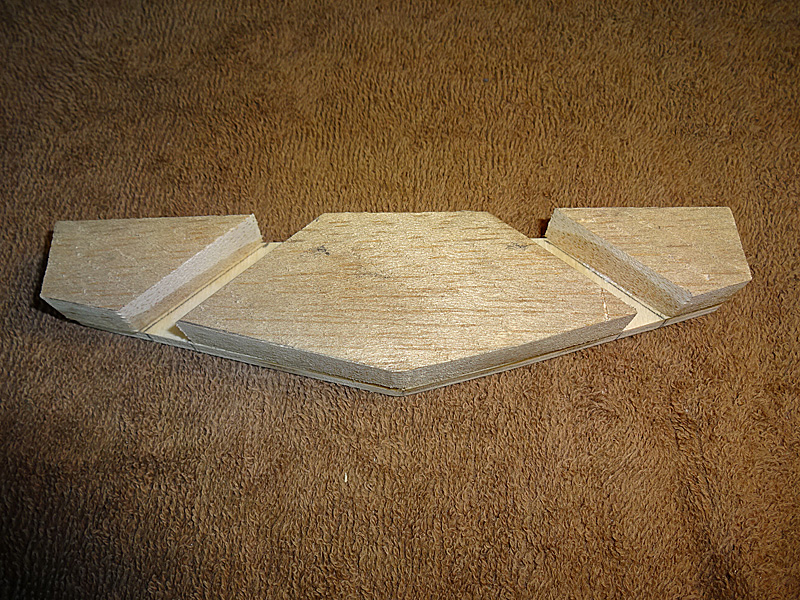
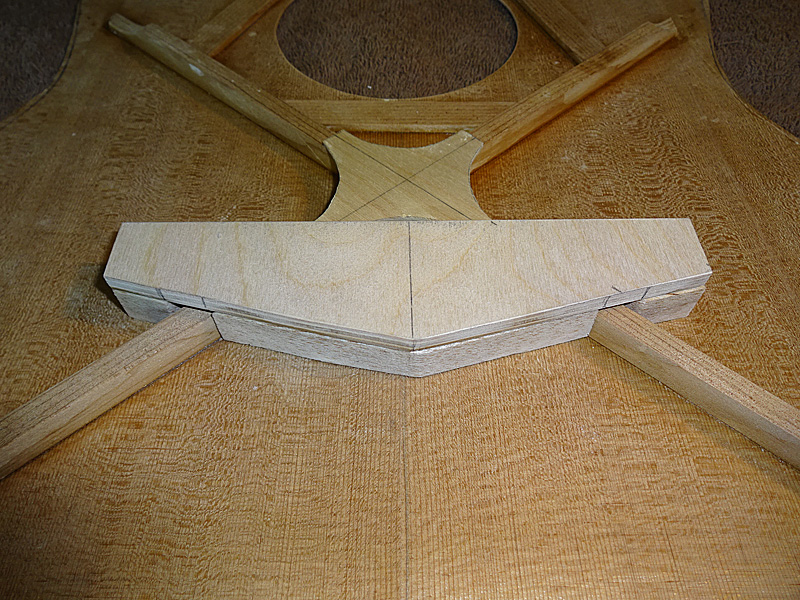
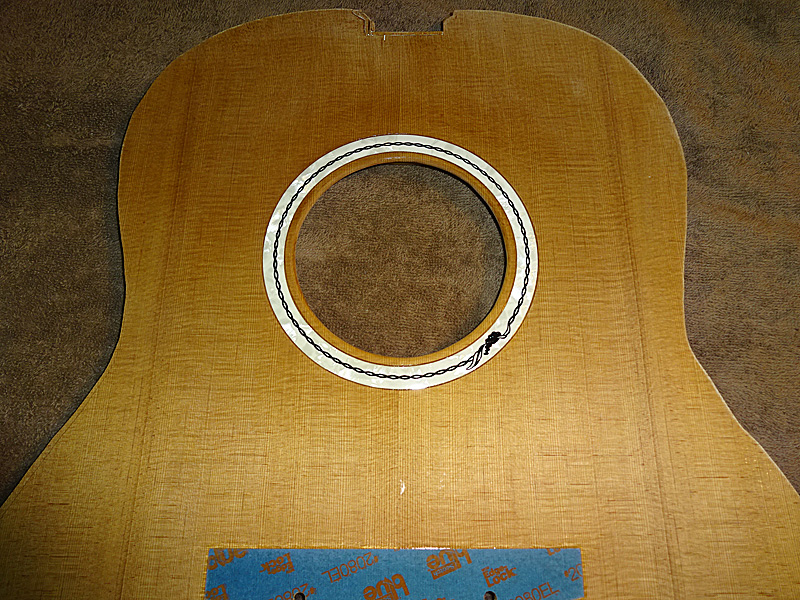
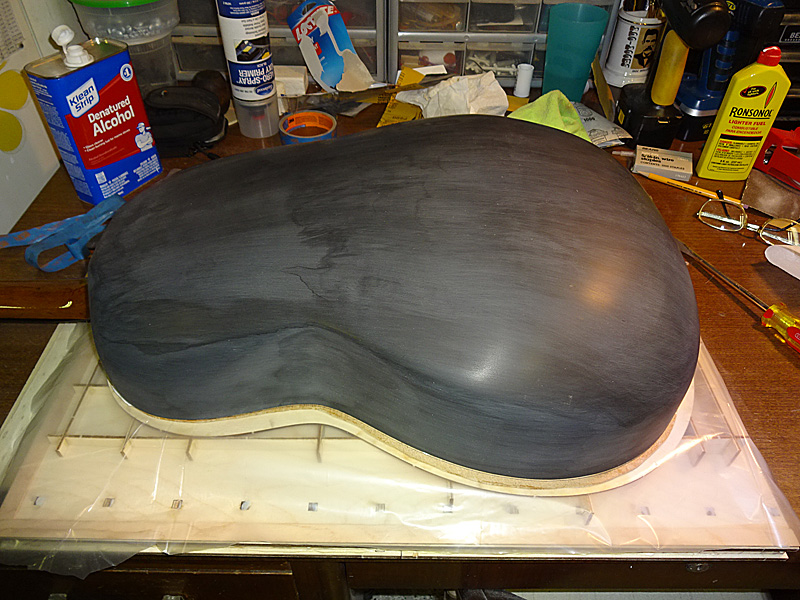
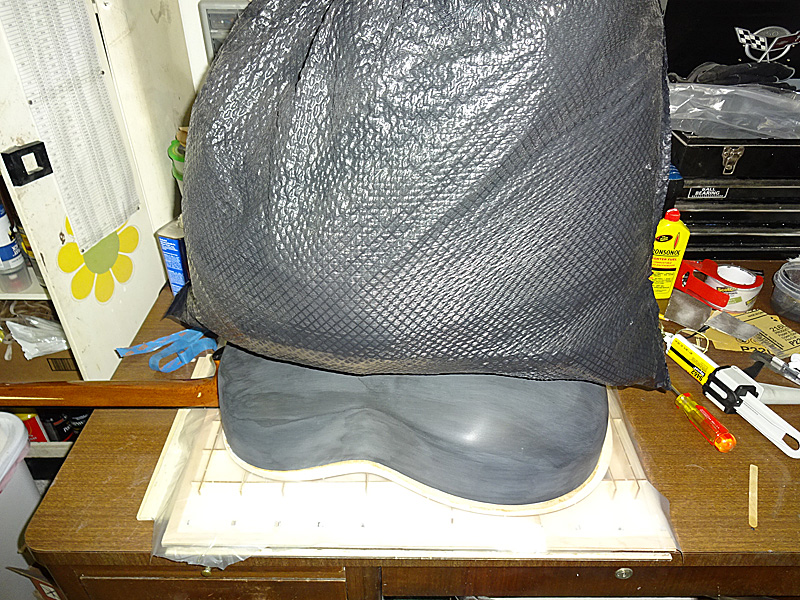
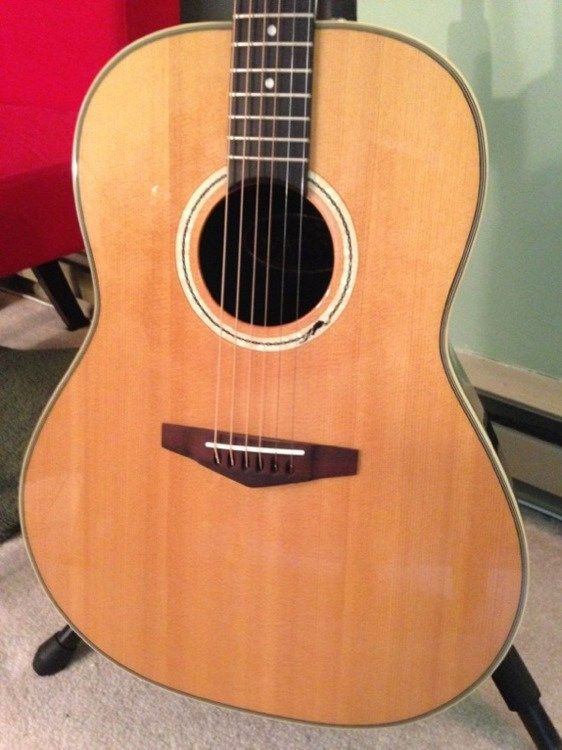


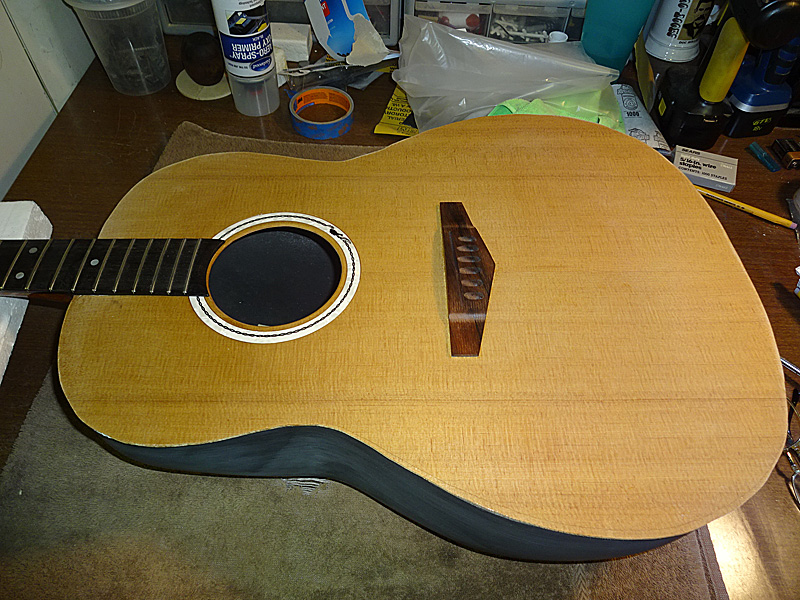

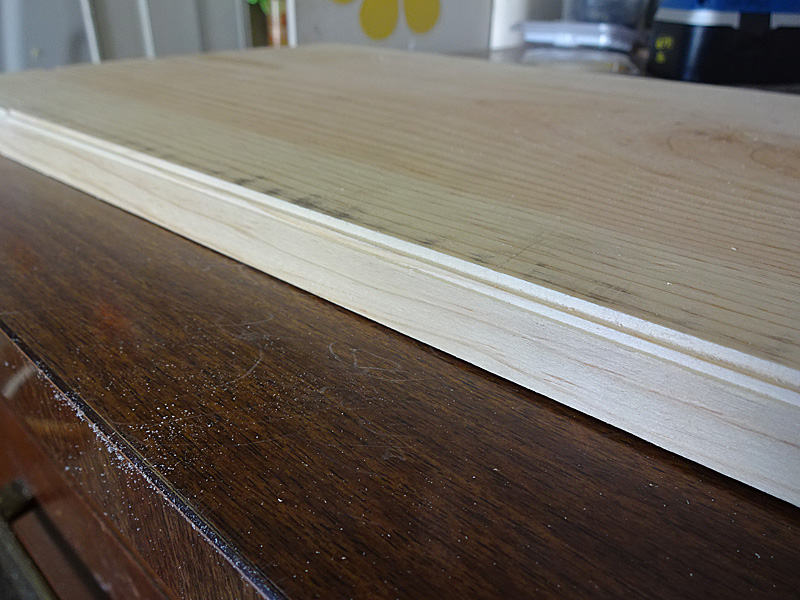
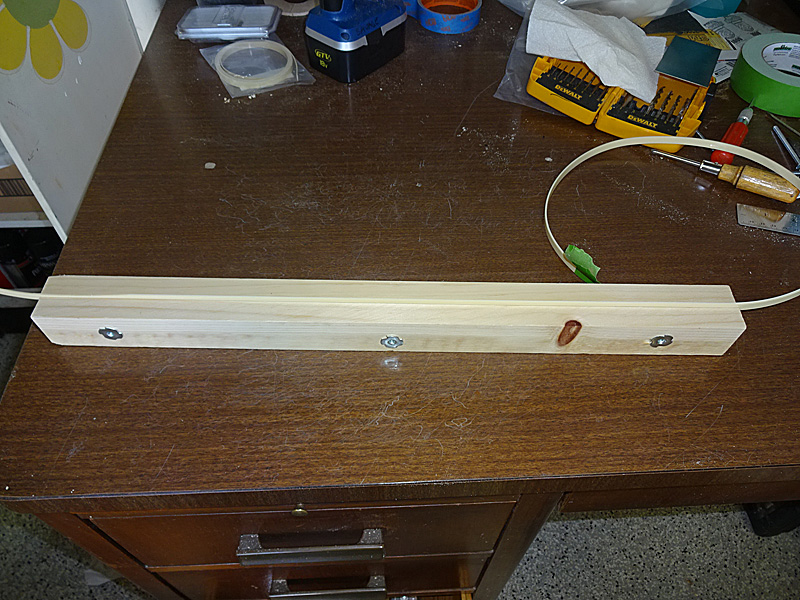
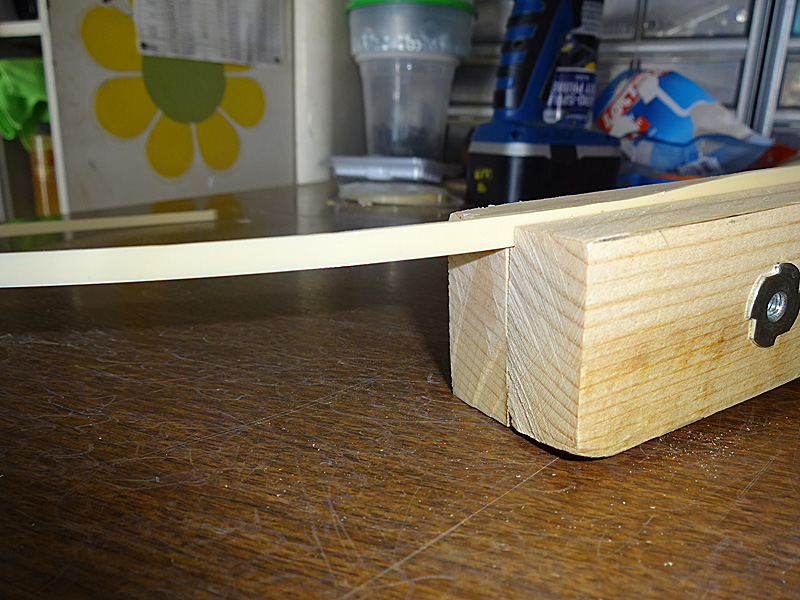
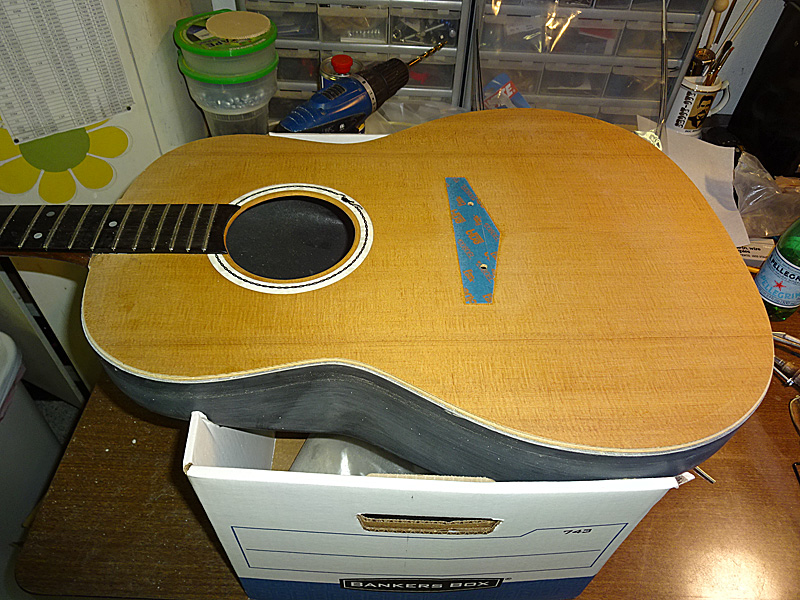
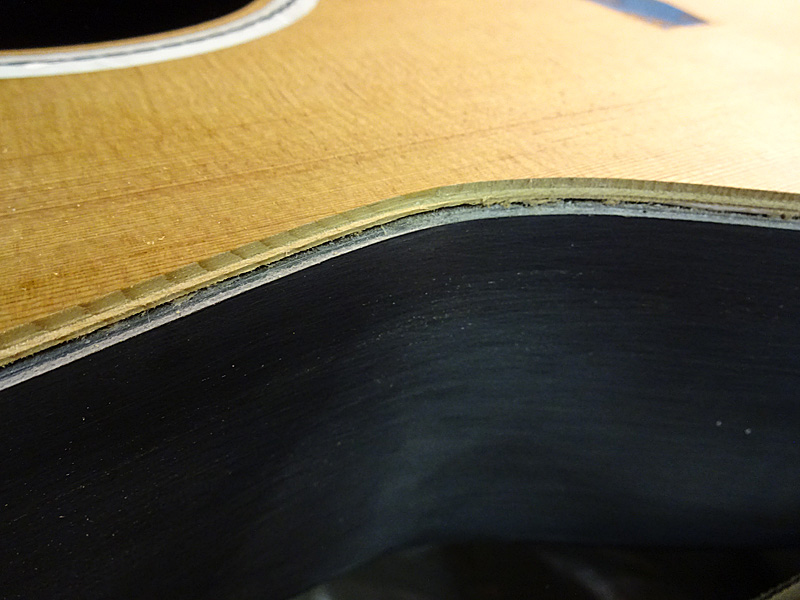
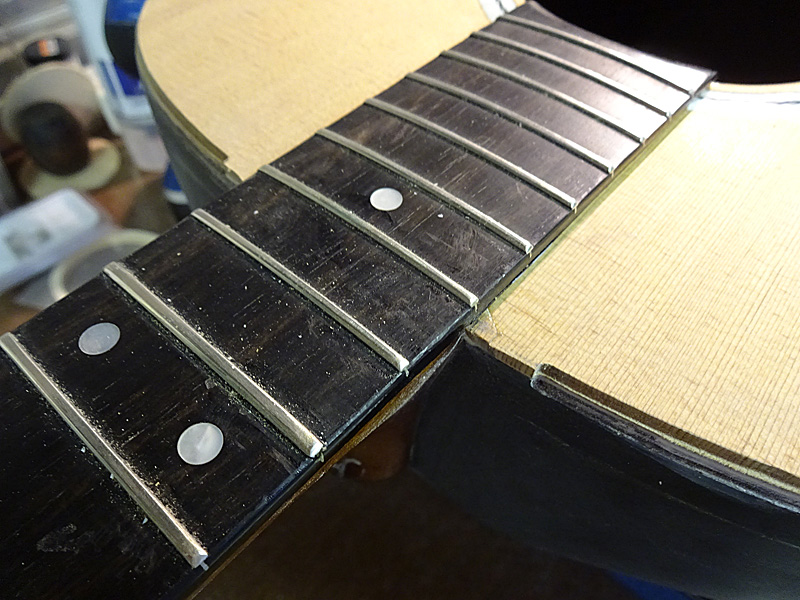
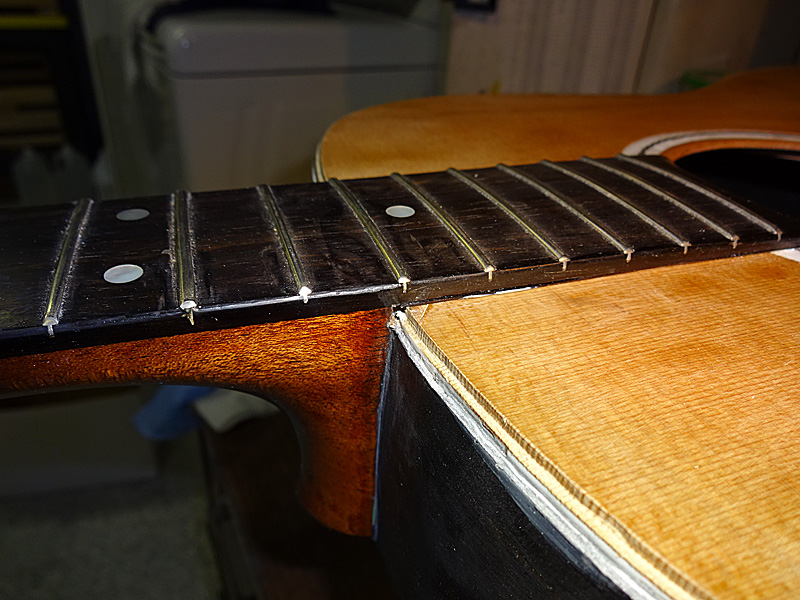
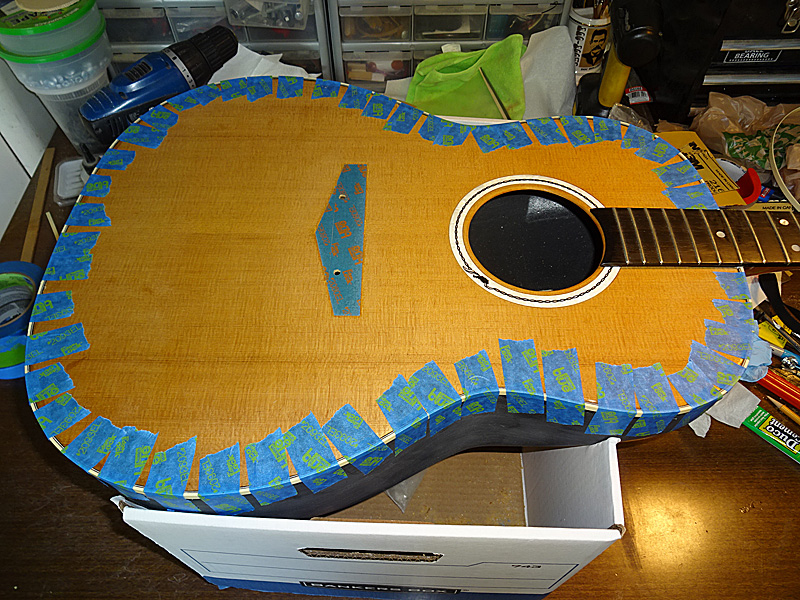

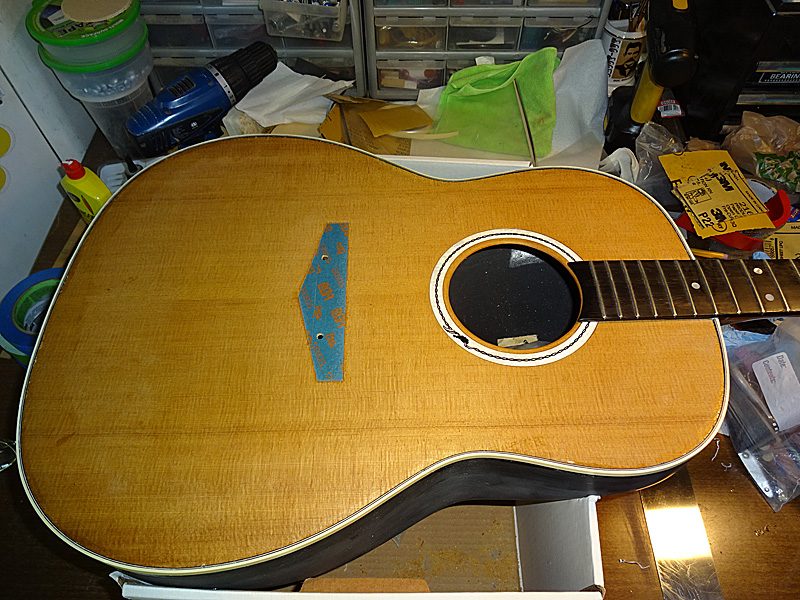
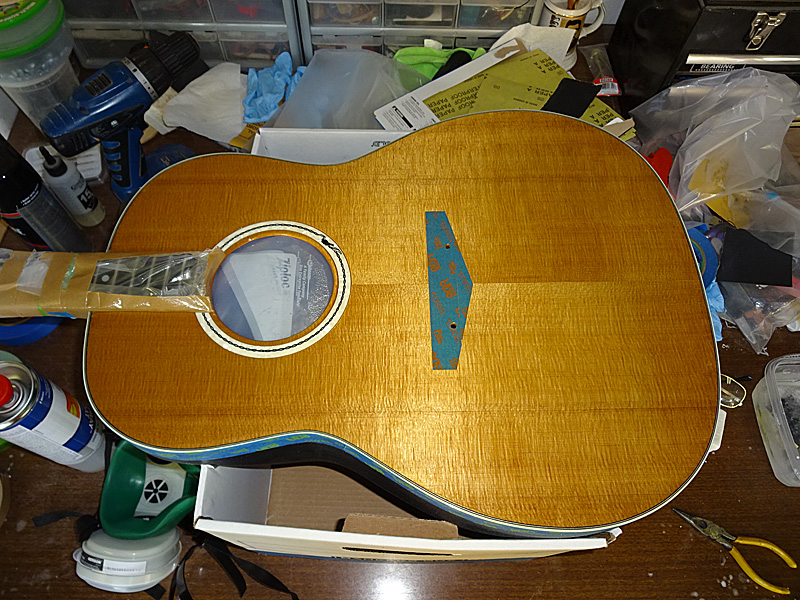
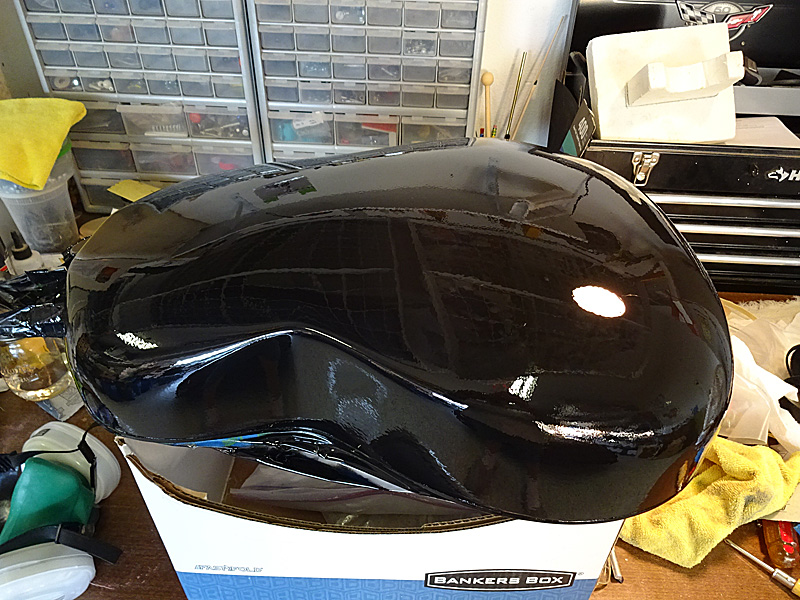
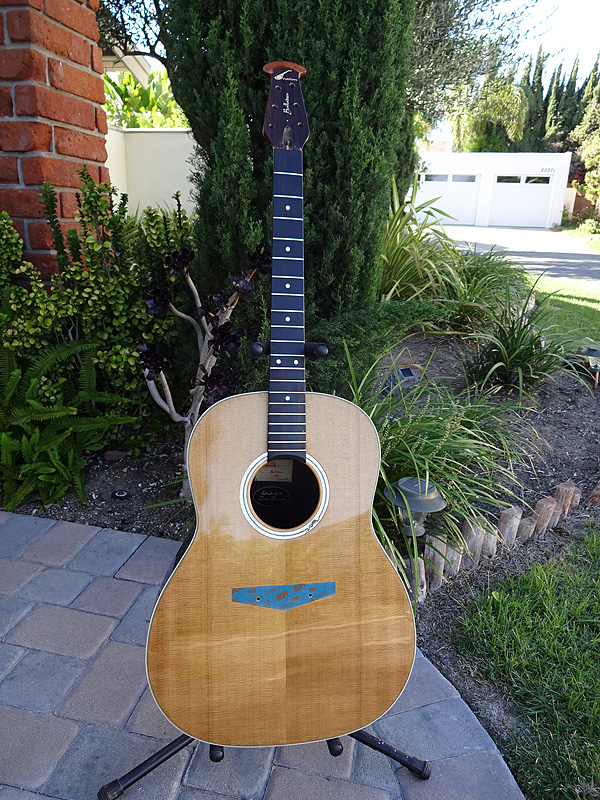
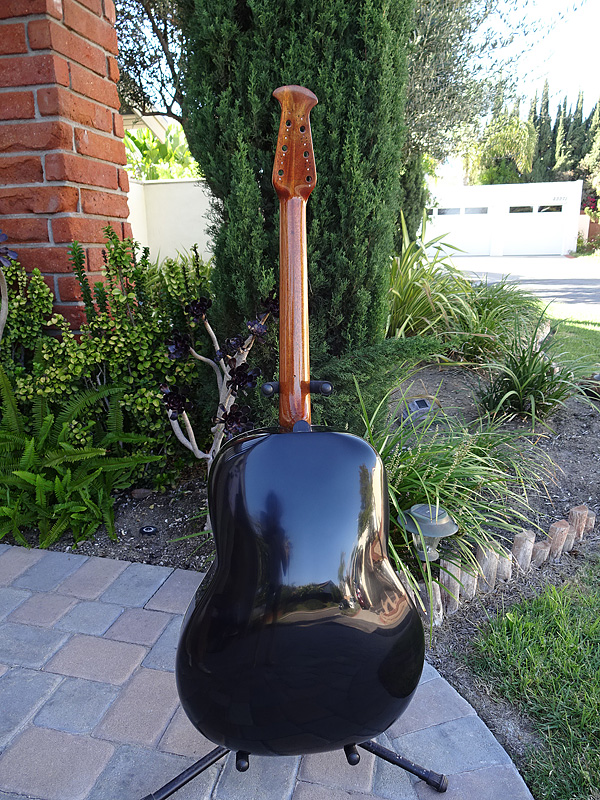
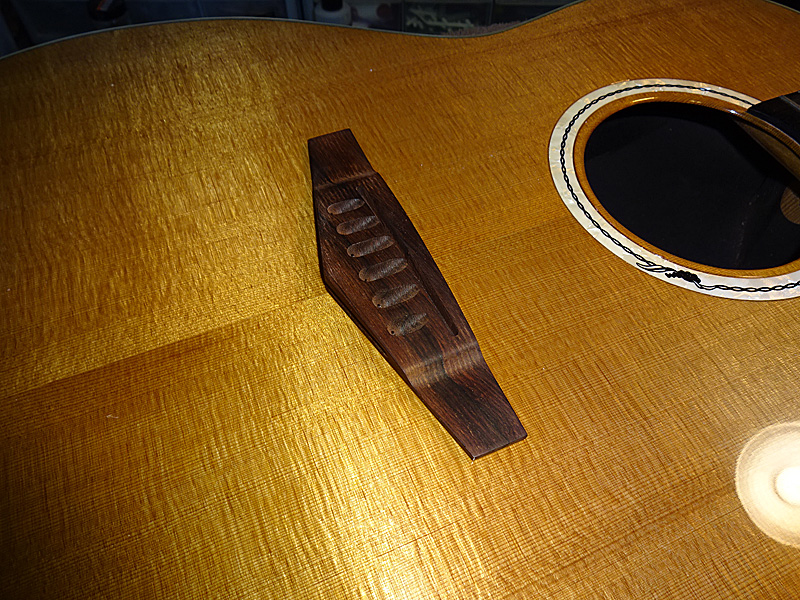

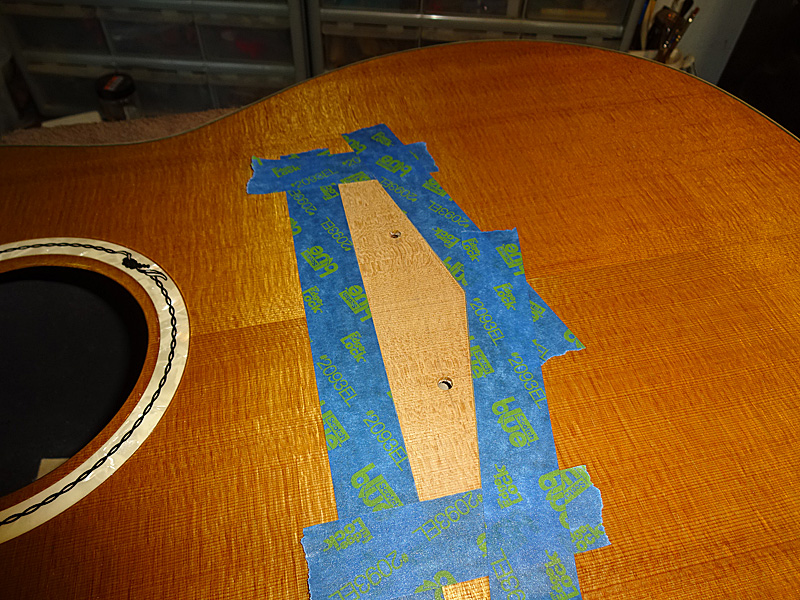
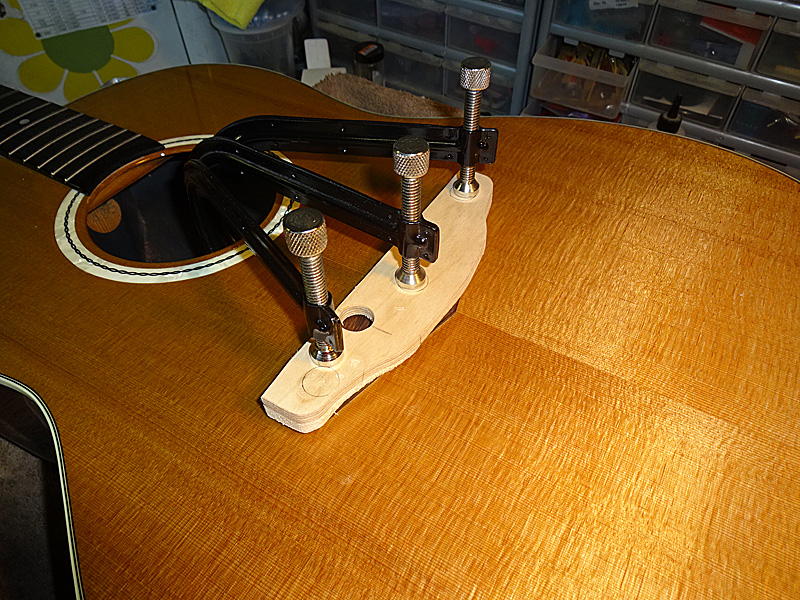
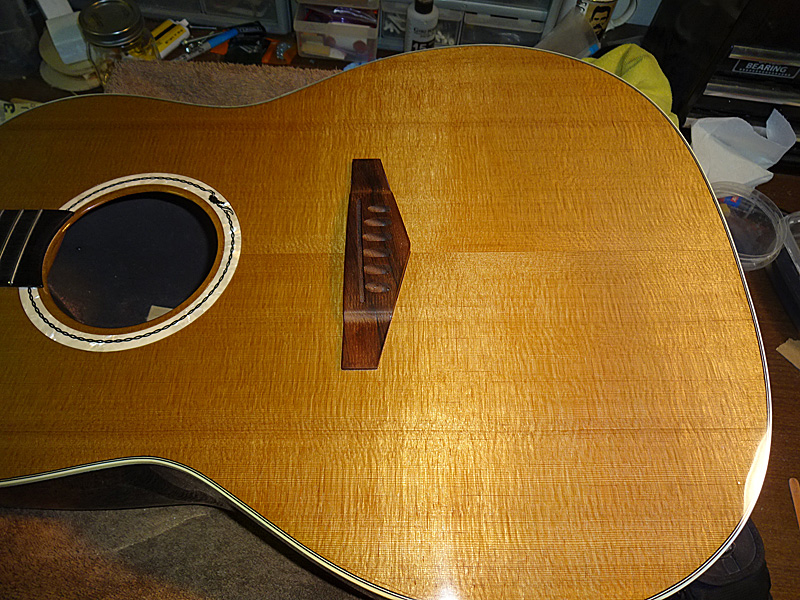
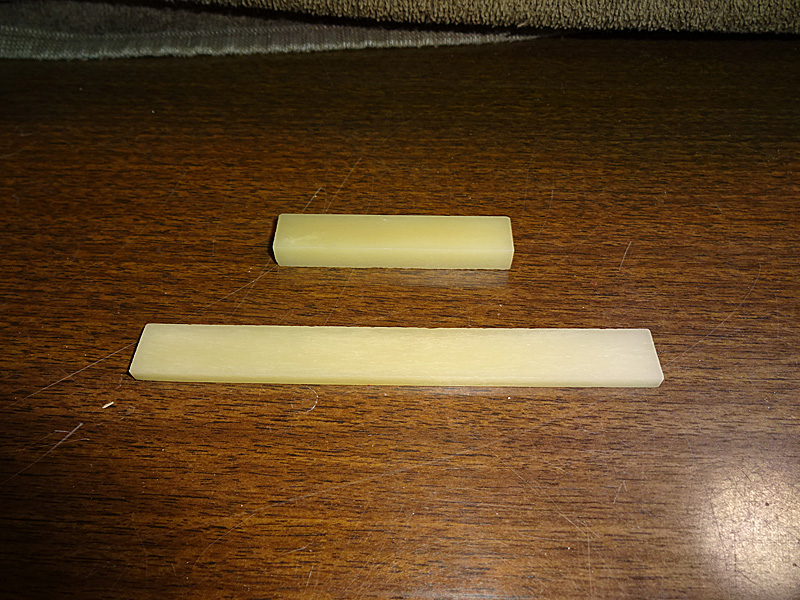
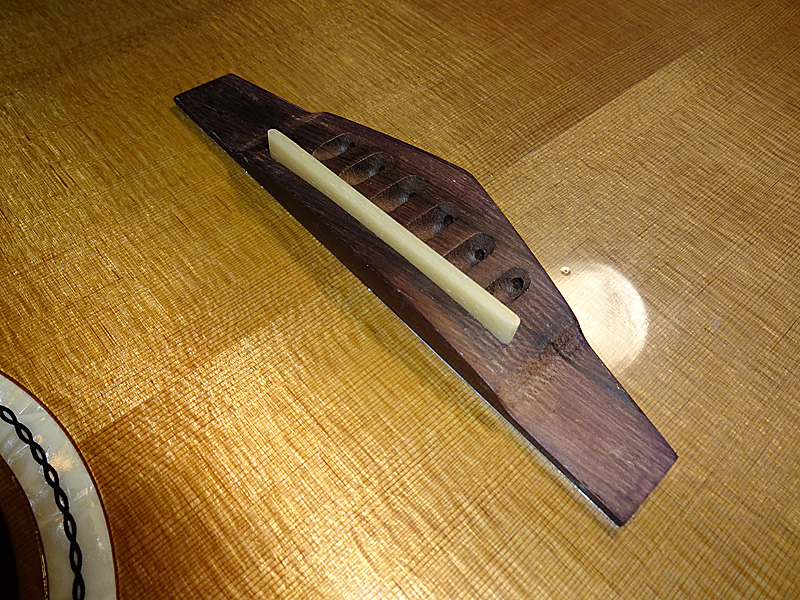
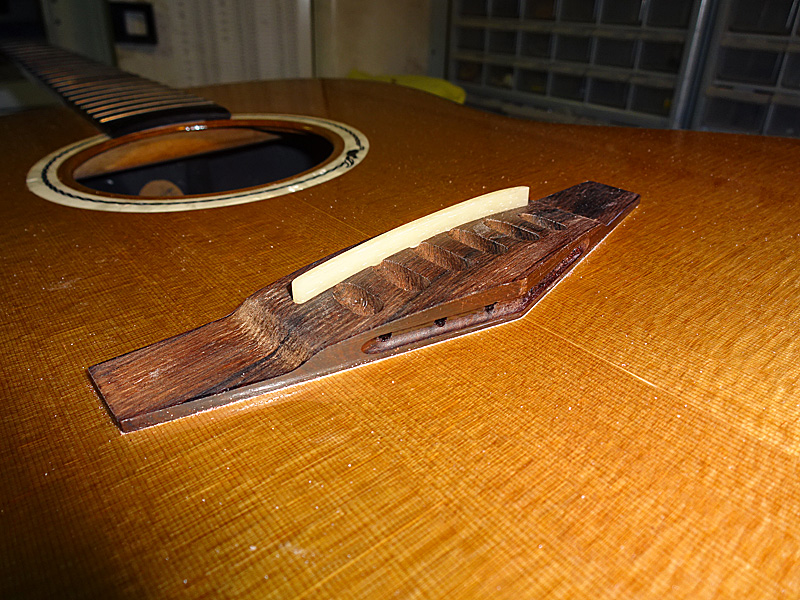
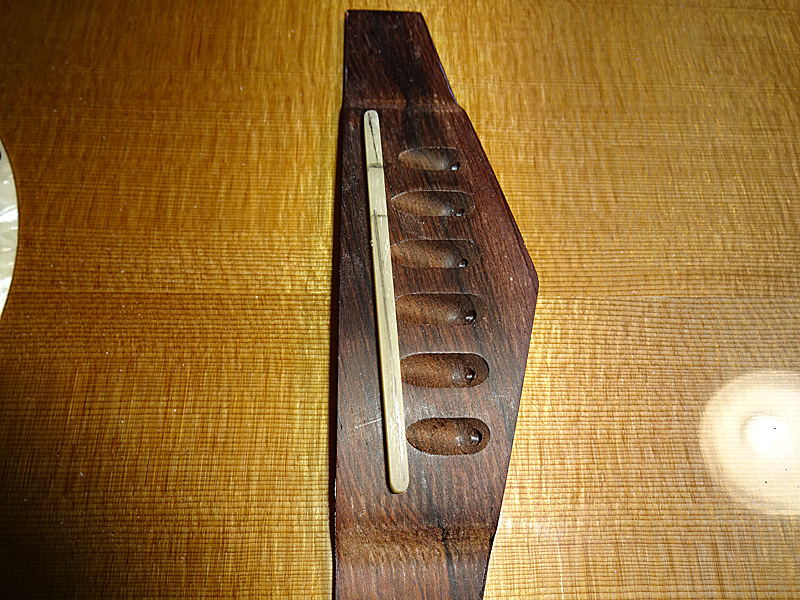
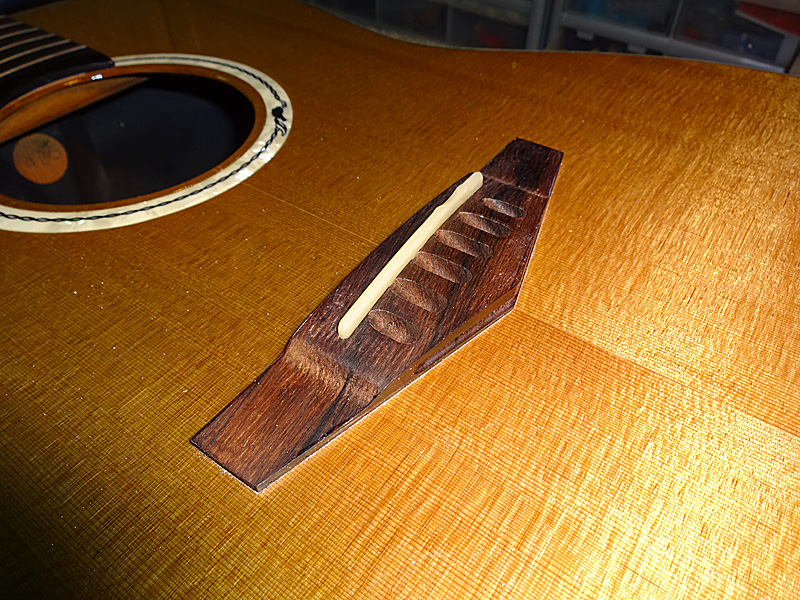

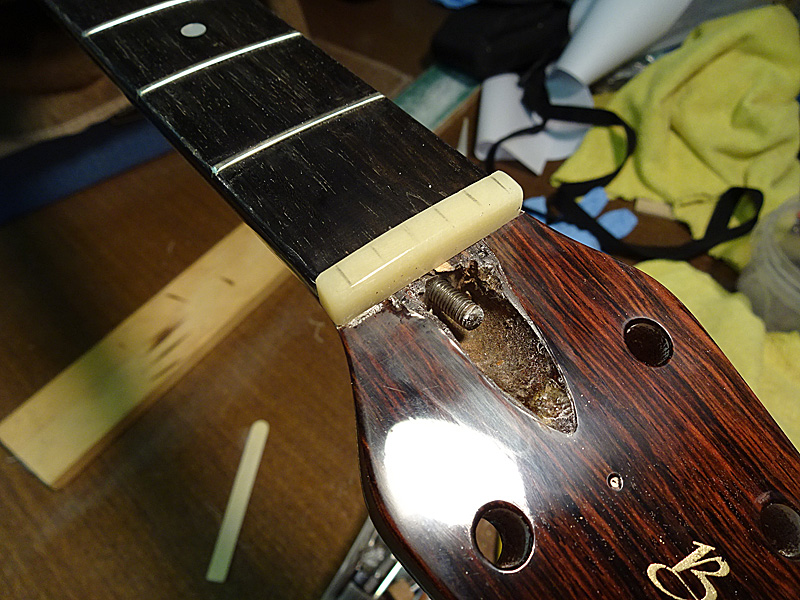

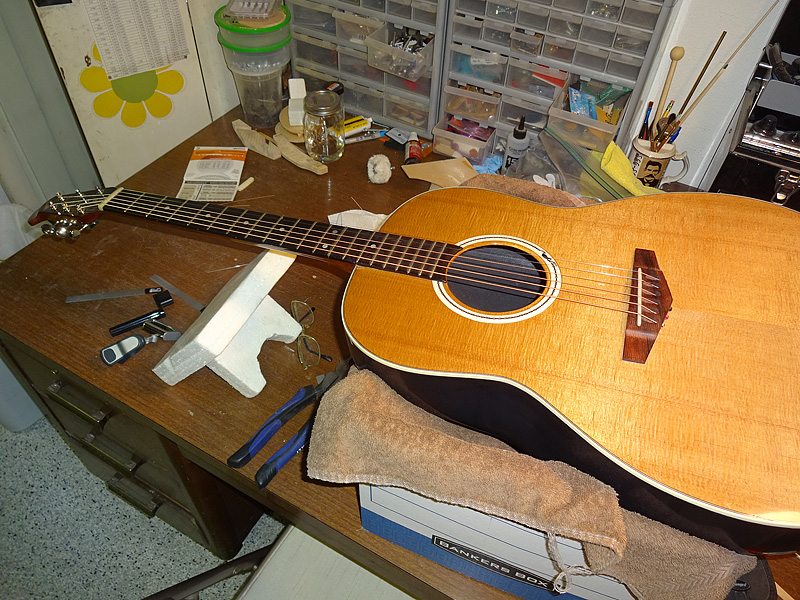
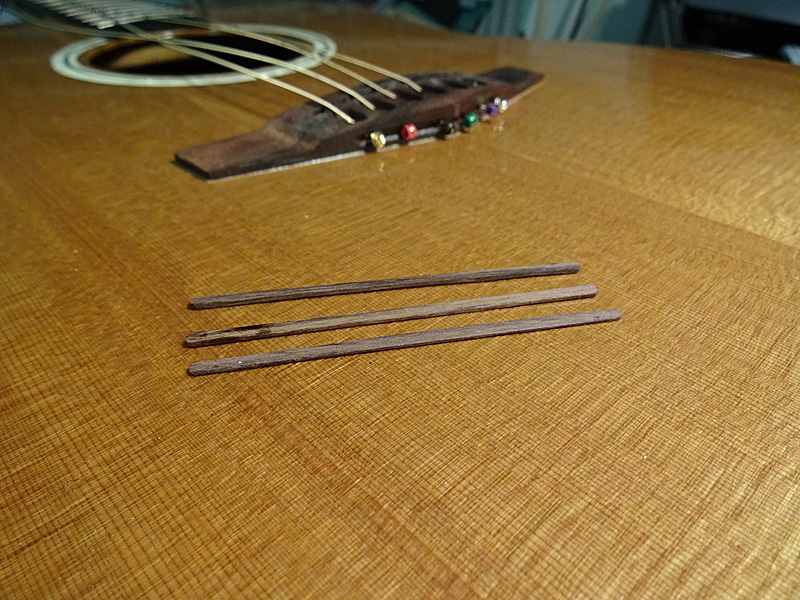
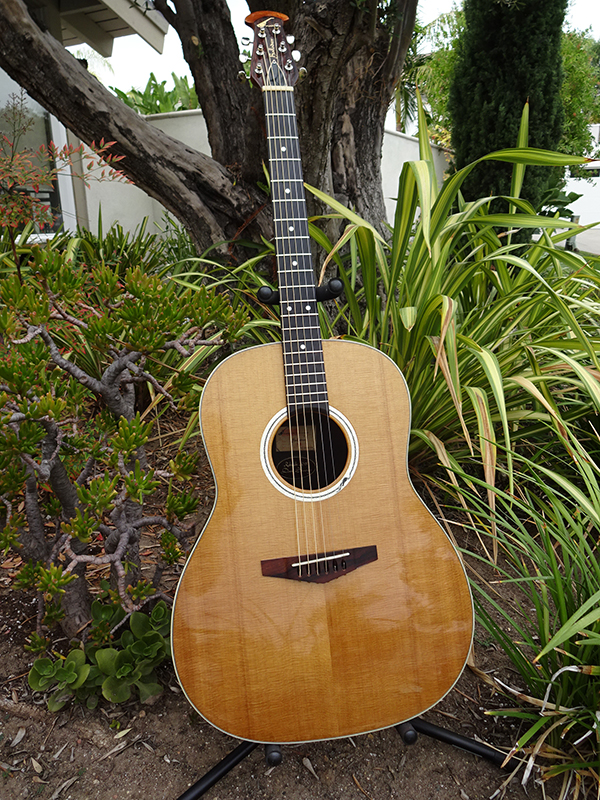
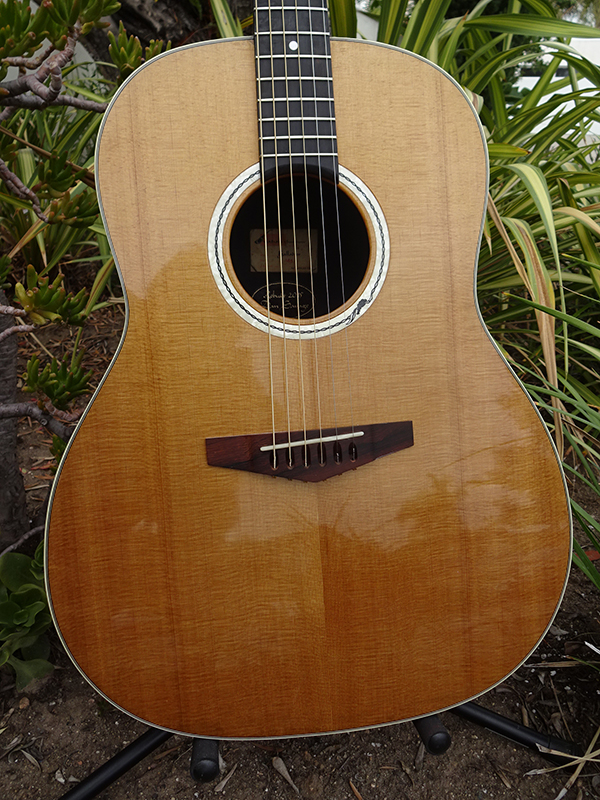
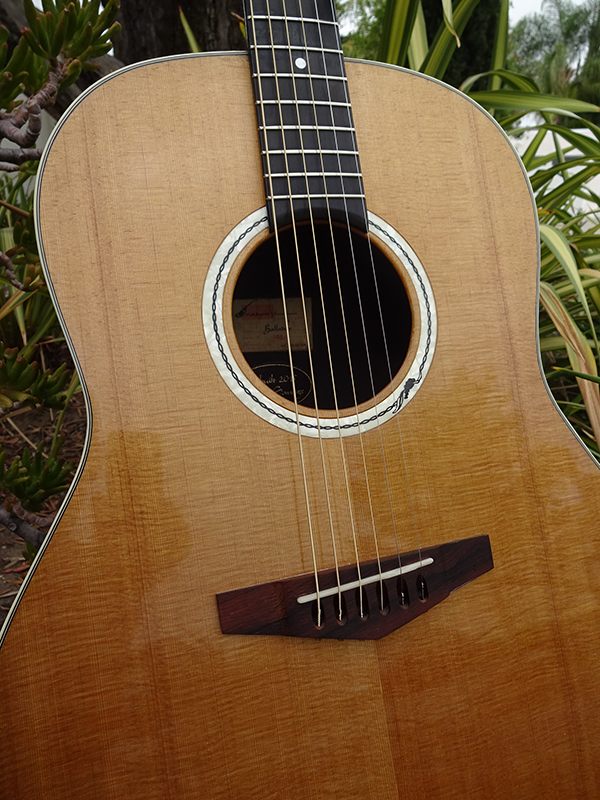
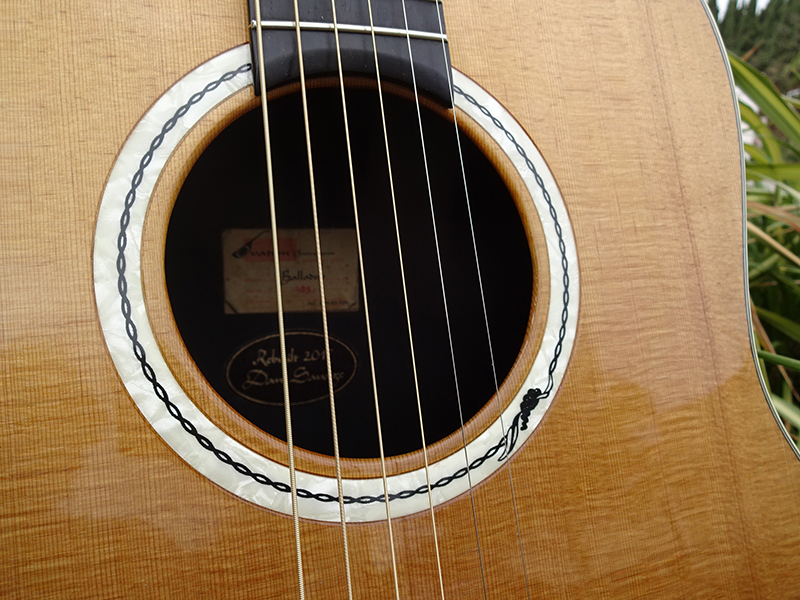
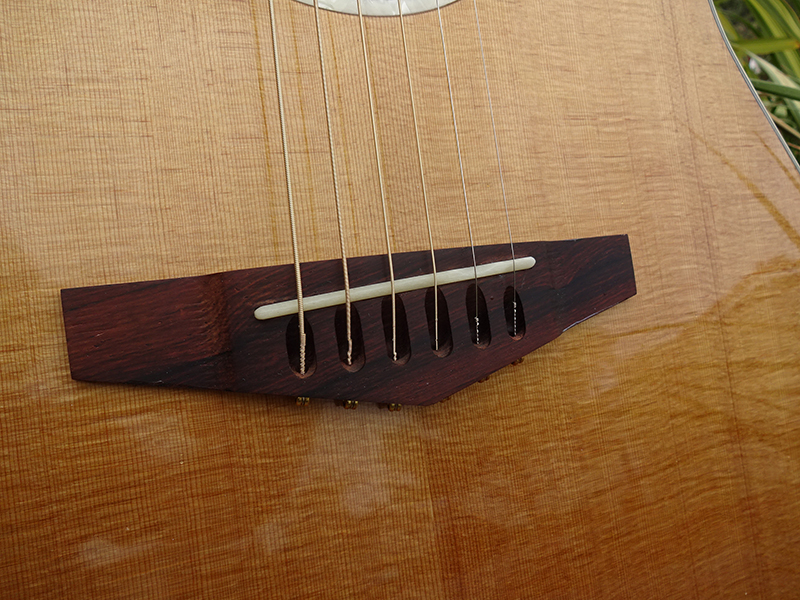
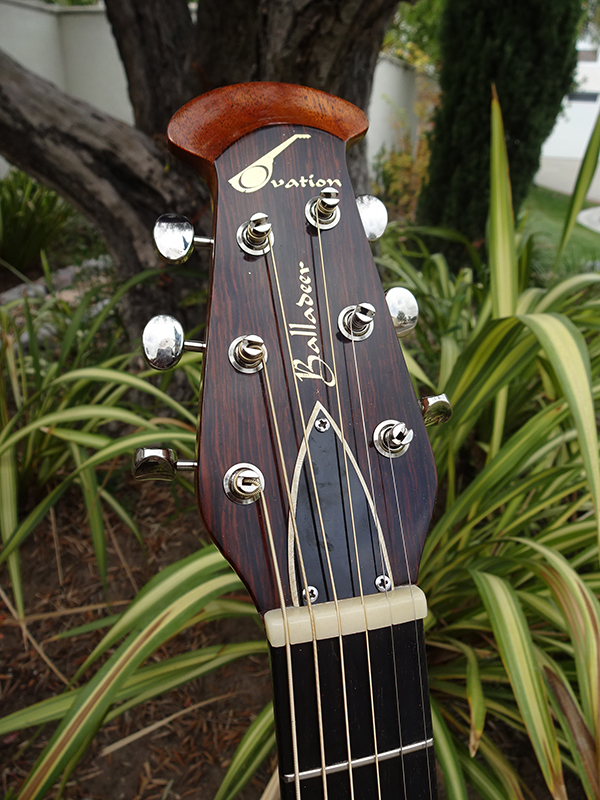
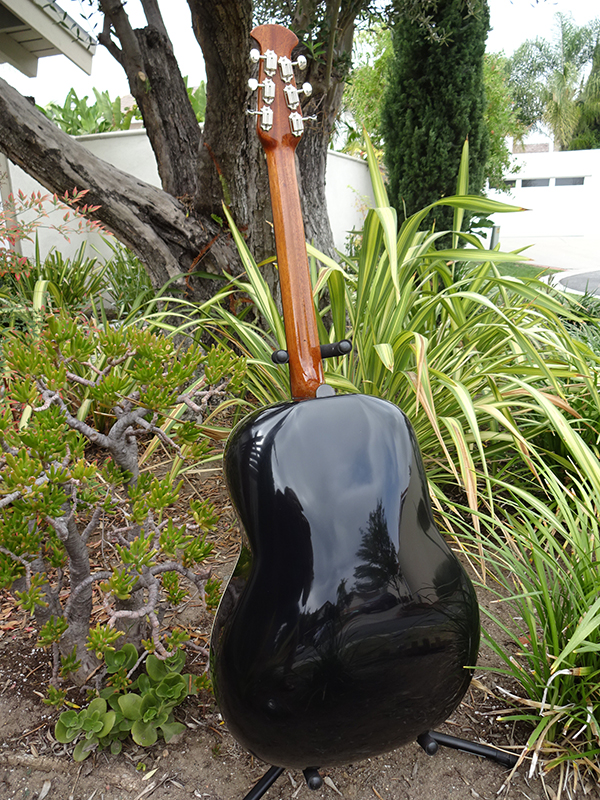
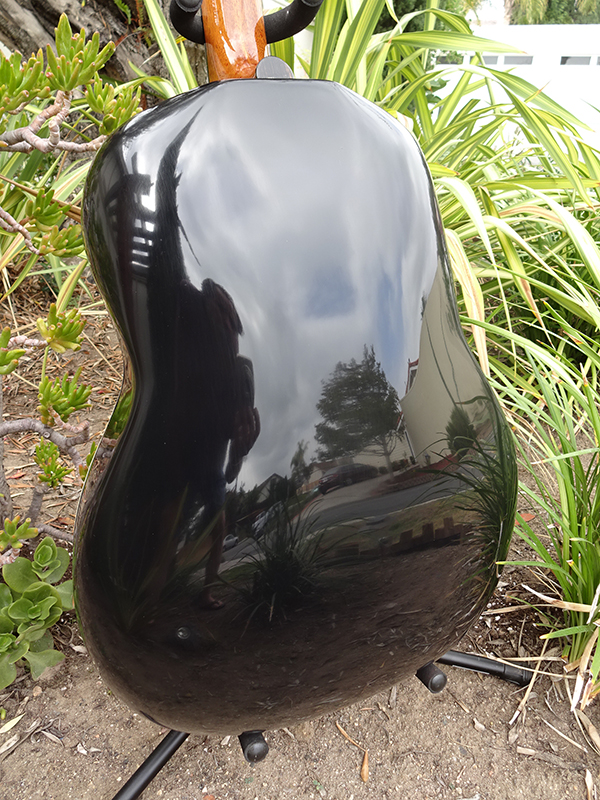
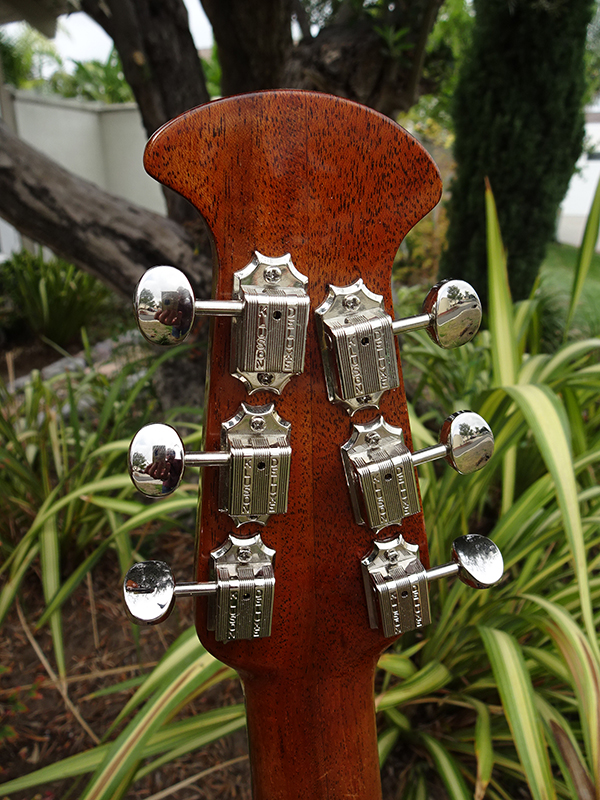