|
|

Joined:
June 2012
Posts: 2333
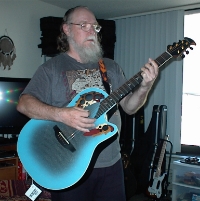
Location: Pueblo West, CO | So, I bought the circa-1976 1619-4 BFLG from TJR. 
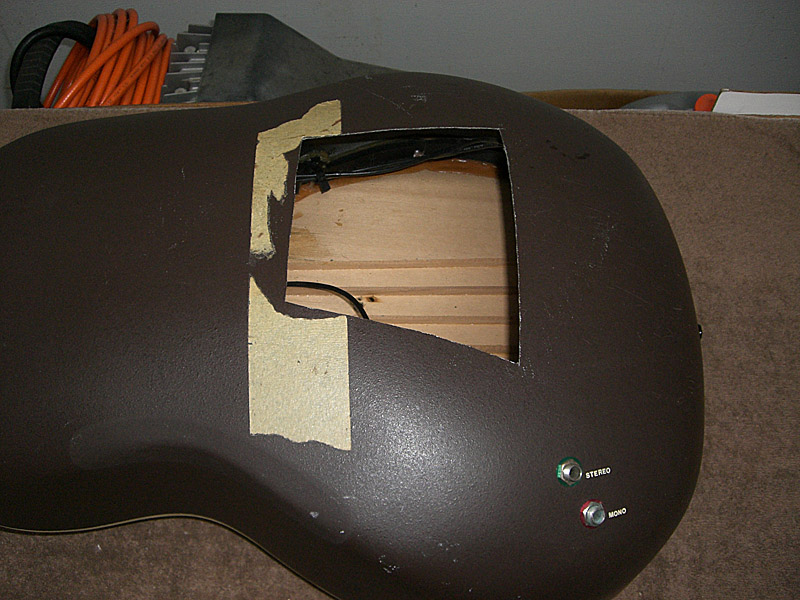
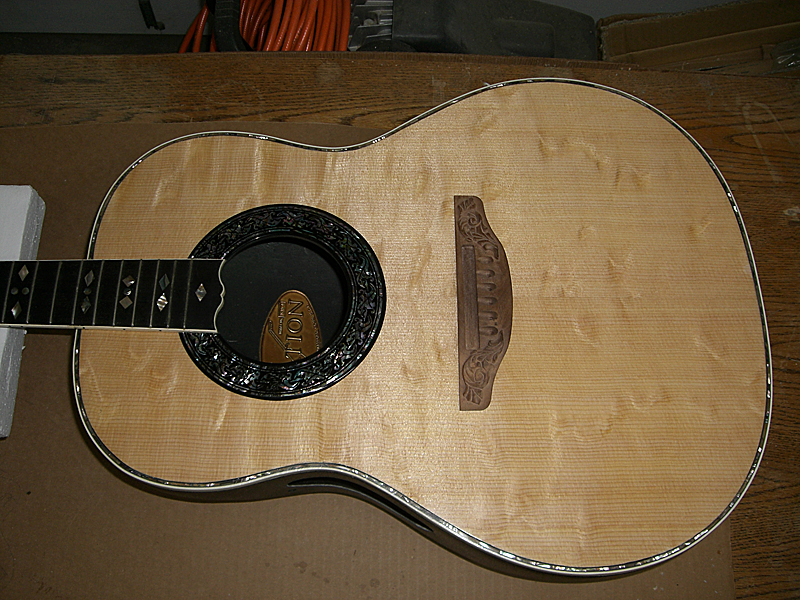
The top is pretty beat up and there's a trapazoid-shaped hole in the back. The ultimate plan is to route out the top leaving the purfling and binding in place, then replace the top with new wood using forward-shifted X-bracing. Since I've already got an A-braced 1710-1 CL, I don't need another one and I really like the lively sound of X-braced guitars. 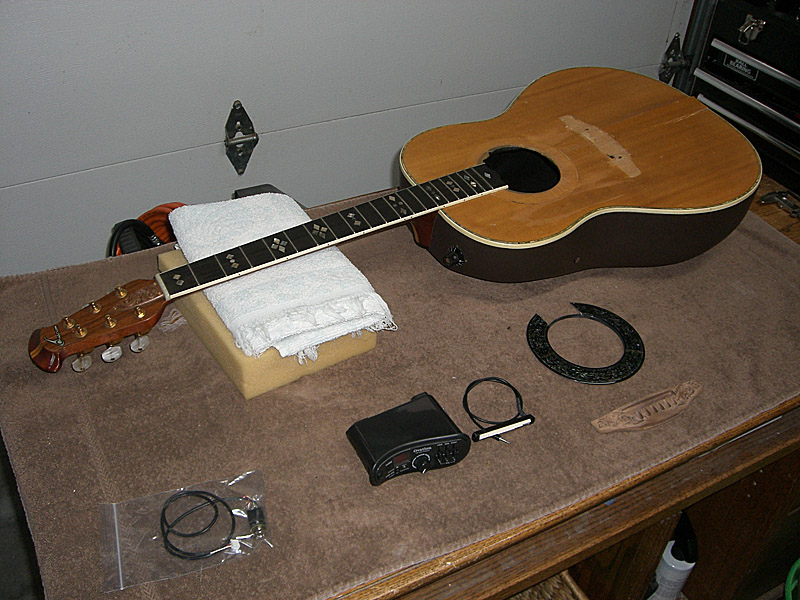
The top sits on a shelf of kerfing that will make it pretty easy to glue a new top in its place. 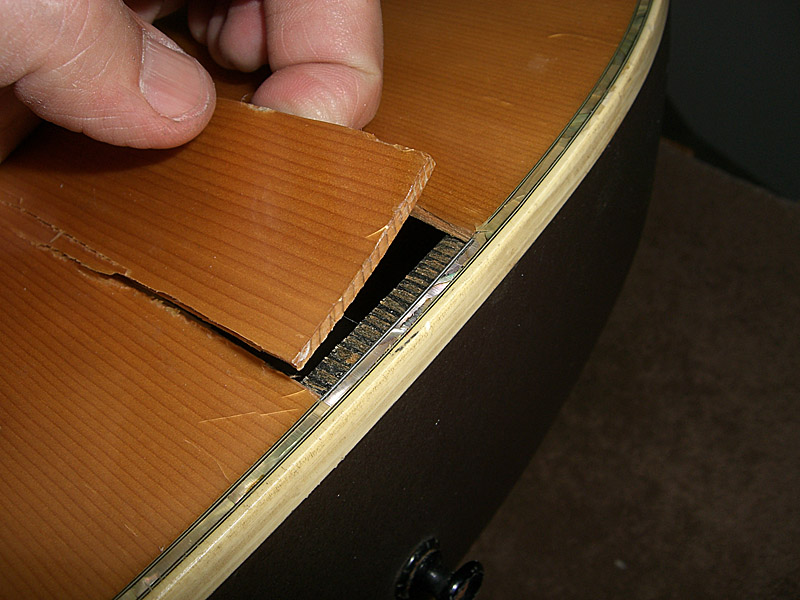
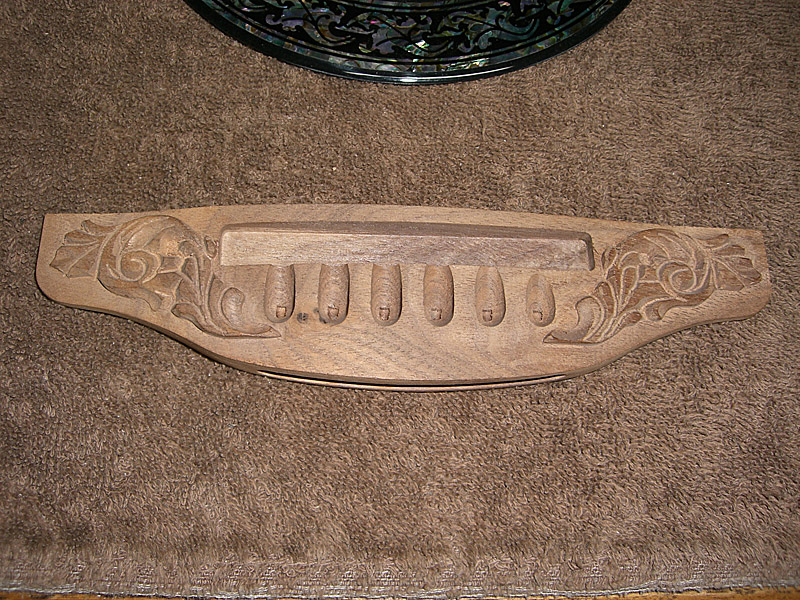
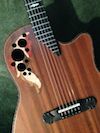
It was also missing the carved walnut bridge and abalone rosette. Luckily, I was able to obtain these from JB at the Mothership. I also got a complete OP-Pro setup including pickup and jack. 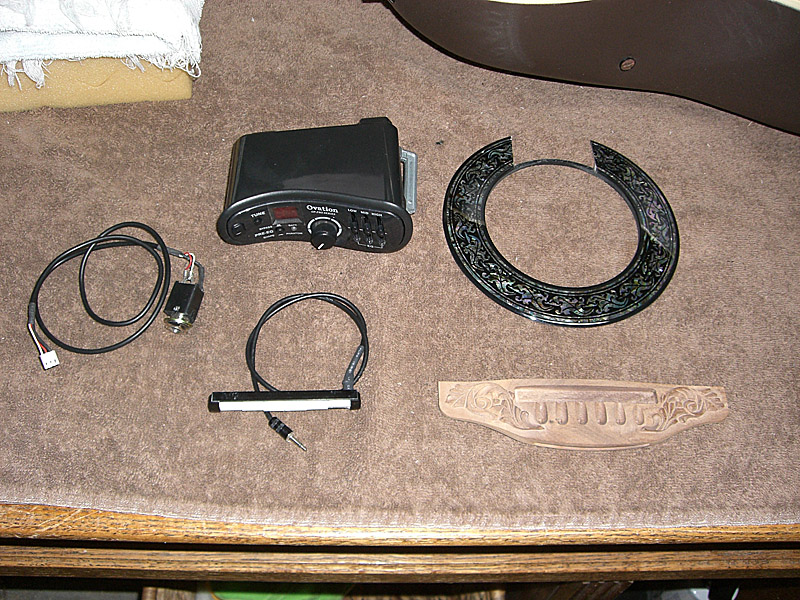
The first order of business will be to do a 3D scan on the TR cover and bridge, then 3D print them so I can use a duplicating machine to make wooden copes of them. 
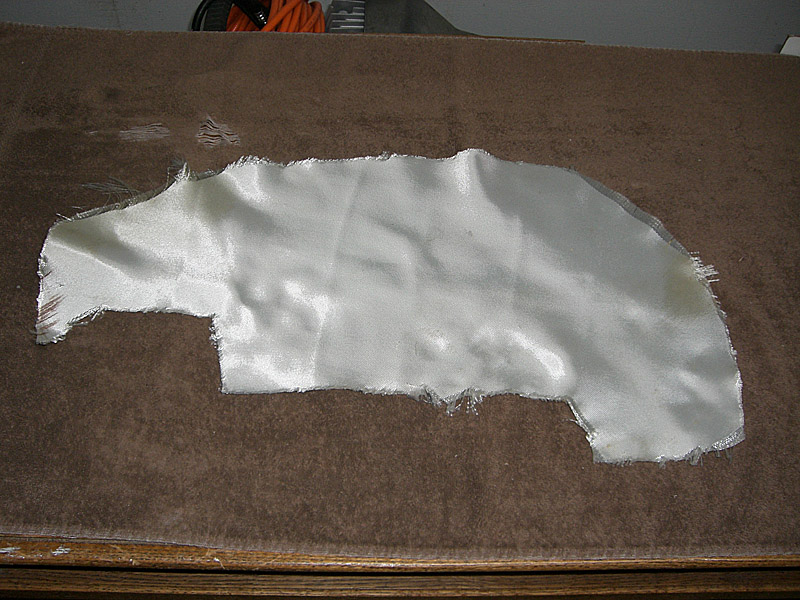
I was thrilled to learnTJR was including an unmolested, modern, hand-laid bowl in the deal as well as some scraps of the 8.5 oz. 2x2 twill cloth used by the factory to lay up the bowls. Short-term plans are to use it to lay up a patch for the hole in the back using the scraps TJR included. Long-term plans are to splash a mold off of it so I can lay up more bowls. 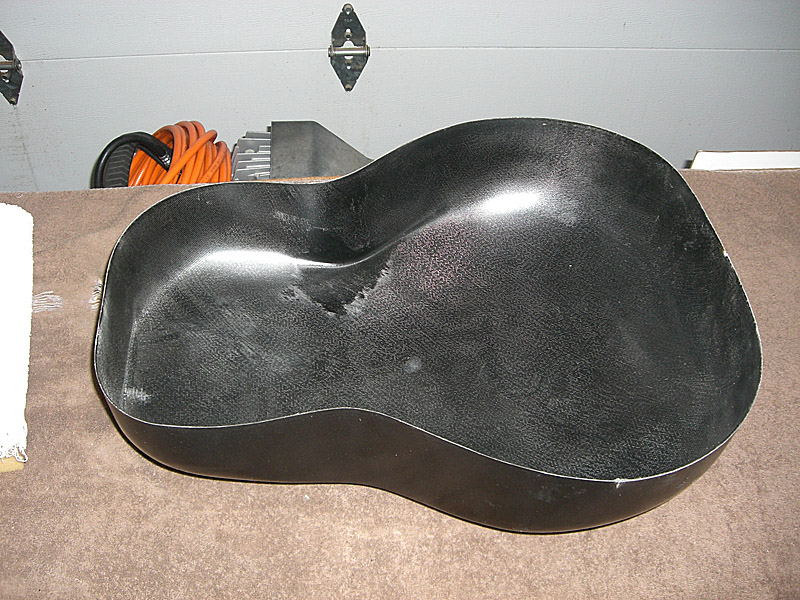
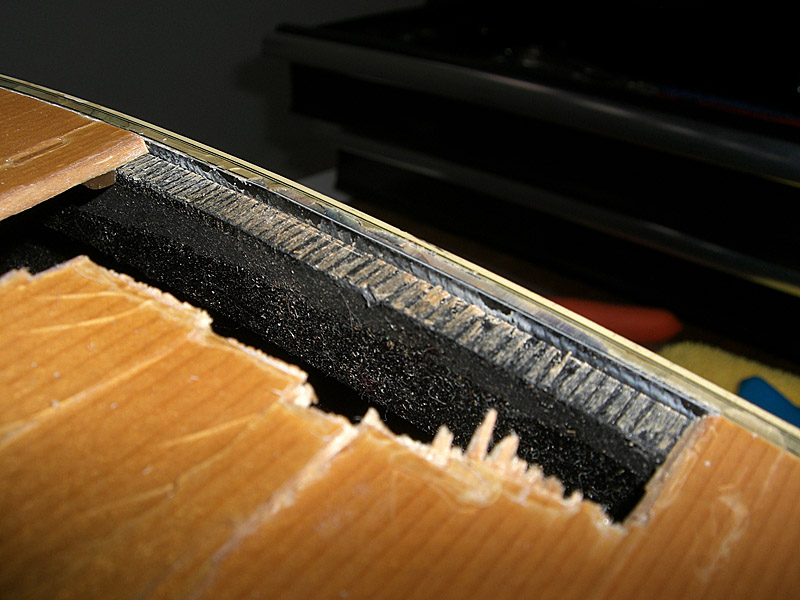
I recently did a neck-reset for a friend of mine. One think I didn't like was the excessive amount of glue the factory used to attach the top. But, compared to this one, the modern workers were quite frugal. "Do you think you used enough glue there, Butch?" 
The photos don't do justice to the quantity of glue squeezed out of these top joints. They are almost 1/4" thick and nearly 1/2" wide. 


Even the rosette had a copious amount of glue. 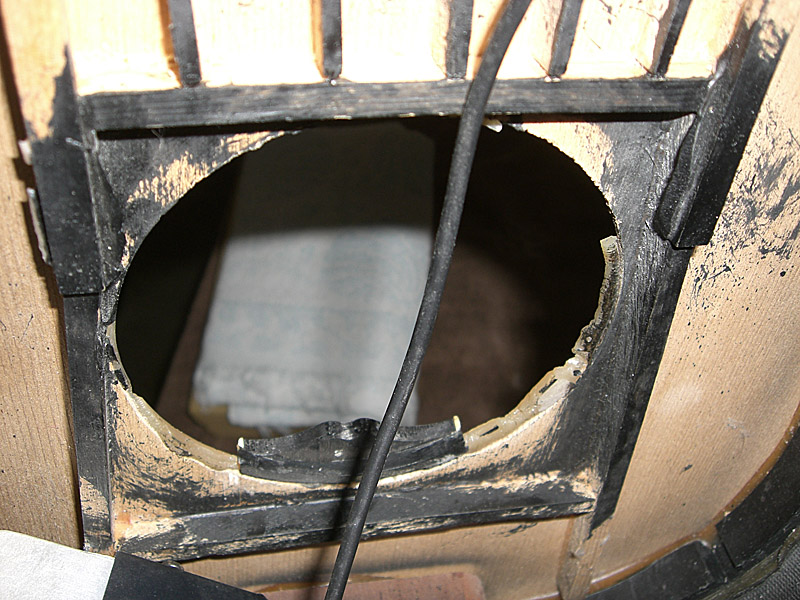
Edited by DanSavage 2014-05-09 9:18 PM
|
|
| |
|
Joined:
November 2002
Posts: 3650
Location: Pacific Northwest Inland Empire | So, Dan-
You're planning to put a new top INSIDE the purfling?! Sounds a bit tedious. And, all that glue will make getting the neck off, a real challenge.
Best of luck, & you have my admiration for rehabbing this critter. |
|
| |
|
Joined:
June 2012
Posts: 2333
Location: Pueblo West, CO | Putting a new top inside the purfling is the initial plan, though I'm certainly not wedded to it.
I would like to preserve as much of the original guitar as possible.
Having a molded cloth bowl gives me a lot of options, up to, and including cutting the old body off from around the neck and building a new one in its place.
I was originally planning to cut the neck off the body and converting it to a bolt-on neck. To that end, I looked at the German patent drawings on the OvationTribute.com site. They show the end of the truss rod on these glue-on neck models is buried deep inside the body. So, while I can do a fairly clean job of cutting the wood, cutting the steel truss rod buried inside the neck is another matter entirely.
If that's the case, then instead, I'm going to leave the neck glued into is block and on the body and cut the top off from between the fingerboard extension and the top of the neck block, or at least as much of it as I can.
I checked the alignment of the neck and it's got a decent angle to where the bridge is located, though it looks like it has some minor crush damage that pushed the top of the bowl toward the tail. Taking the top off should relieve this pressure.
Edited by DanSavage 2014-05-10 11:07 AM
|
|
| |
|
Joined:
November 2002
Posts: 3650
Location: Pacific Northwest Inland Empire | If you cut away the bowl, can you save the purfling? All things considered, I think saving the neck, intact, is the better option. Once you get the big pieces removed, heating up the neck joint should get the dovetail loose from the block, easier. Then, if you want to convert it to a bolt-on, you have the exposed joint to work with, without messing with the trussrod. |
|
| |
|
Joined:
June 2012
Posts: 2333
Location: Pueblo West, CO | I'm not sure about being able to save the purfling or separate it from the bowl.
If I can't get the top off cleanly, then I then I agree with you that it would be easier to cut the body away from the neck to expose the neck joint and build a new body to go with the neck.
Having a bare bowl makes it really nice to be able to make that choice. Splashing a mold off this body is not going to take that long, once I get started. Then, after the mold is made, laying up a new bowl will only take a couple of hours. What will take a fair amount of time is making the jig to hold the body and keep it stable enough to add the kerfing, glue the top and route it for new purfling/binding and to make a jig to hold the neck in the right position to glue the neck block to the body.
I'll make the decision about which way to go when I get ready to start cutting into the top. The main reason why I'm taking the route I am is that it will be faster and cheaper to just have to make a new top for this guitar, then making a whole new body to go with the neck.
Edited by DanSavage 2014-05-11 1:24 AM
|
|
| |
|
Joined:
September 2006
Posts: 10777
Location: Keepin' It Weird in Portland, OR | Be sure to take photos of the process.
That would be educational.
|
|
| |
|
Joined:
June 2012
Posts: 2333
Location: Pueblo West, CO | Will do. |
|
| |
|
Joined:
November 2002
Posts: 3650
Location: Pacific Northwest Inland Empire | I dunno. Any way I can figure, the neck's gotta come off. Very precise adjustment on a router table may get the existing top off the bowl, at that point. One of those Stew-Mac, Dremel-mounted purfling routers might do the job, too. It would be such a shame to lose the abalone "bling". |
|
| |
|

Joined:
July 2002
Posts: 288
Location: Maine | I'll be impressed if you can make anything out of it.
Yes I agree. The glue squeeze out is very excessiv, maybe they didn't care since the guitar seemed to be a engineering test model.
Also a bit "hack" is the black sound hole paint which doesn't match the rest of the exterior build quality and appointments.
Makes me think of home kitchen installers who hack out the cabinets to install sinks and such . Looks good from the outside but don't look under the sink
Interesting Idea to mold the patch off the spare bowl. I thought you were going to cut the patch from the spare bowl? |
|
| |
|
Joined:
June 2012
Posts: 2333
Location: Pueblo West, CO | seesquare - 2014-05-11 5:53 AM
I dunno. Any way I can figure, the neck's gotta come off. Very precise adjustment on a router table may get the existing top off the bowl, at that point. One of those Stew-Mac, Dremel-mounted purfling routers might do the job, too. It would be such a shame to lose the abalone "bling".
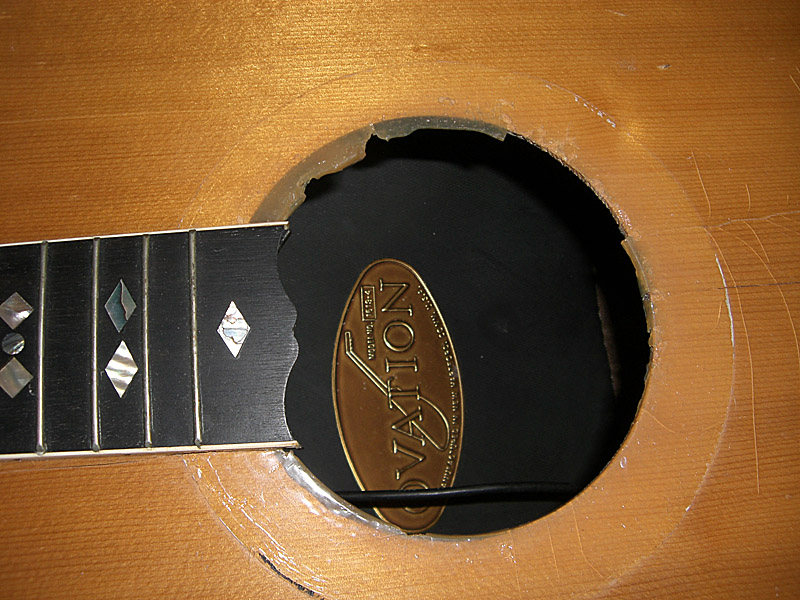
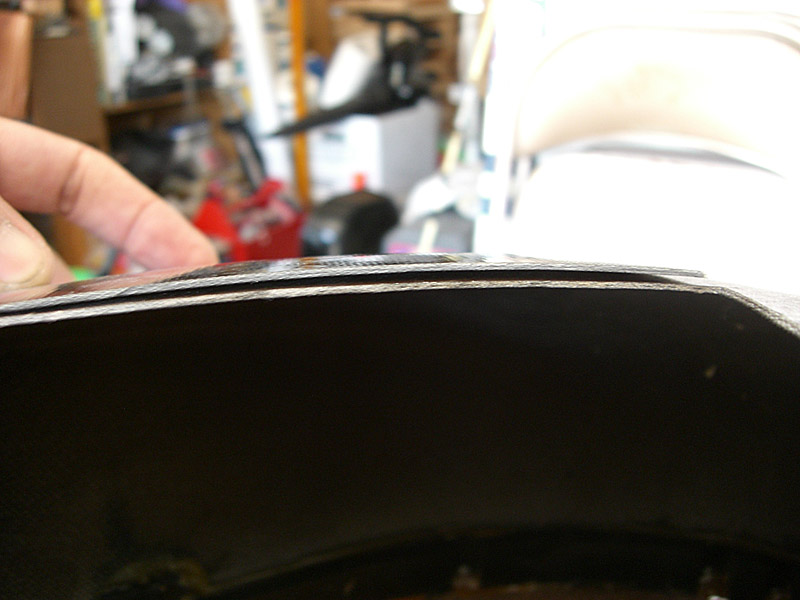
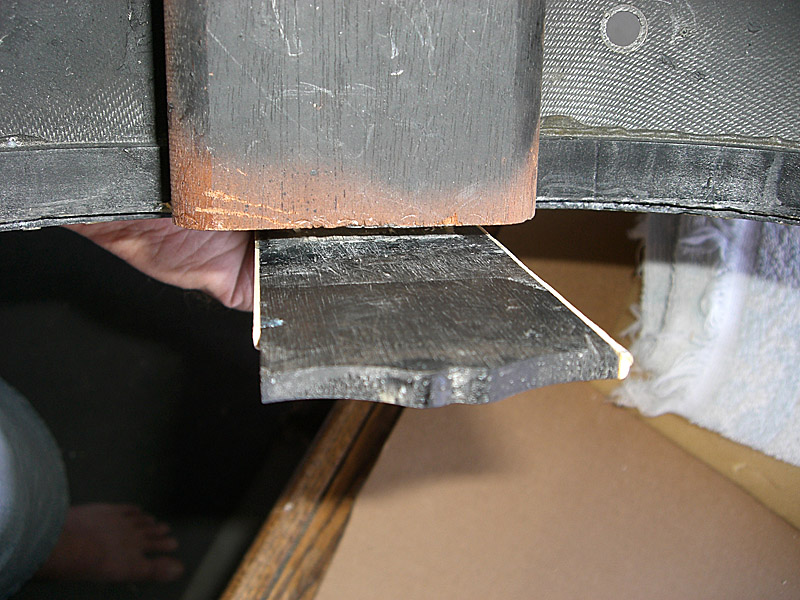
Getting the top of may be even easier than I thought.
Here's one of the damaged parts of the top as it came to me. The top has separated cleanly from both the kerfing and the purfling. Additionally, if you look closely you can see that the finish has also been pulled up off the abalone.
So, I conducted an experiment. I used a pair of Channel Lock pliers and pulled up more of the top.
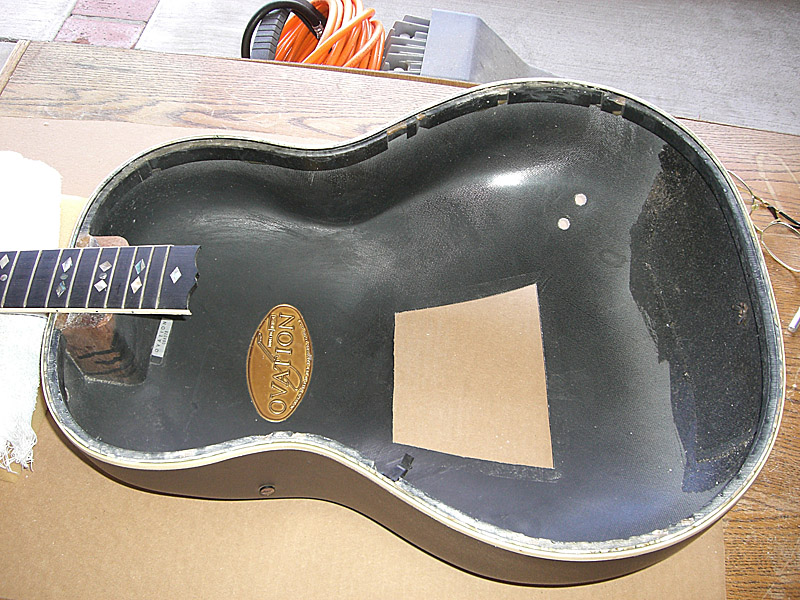
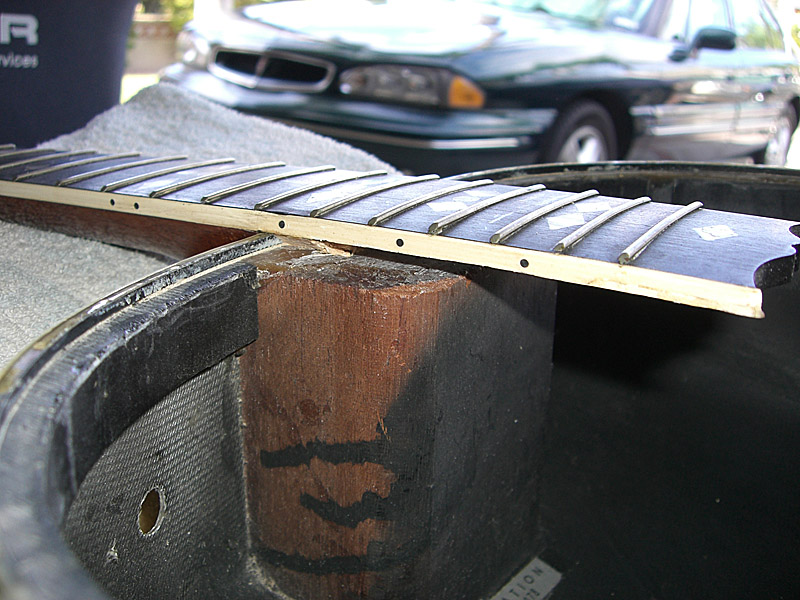
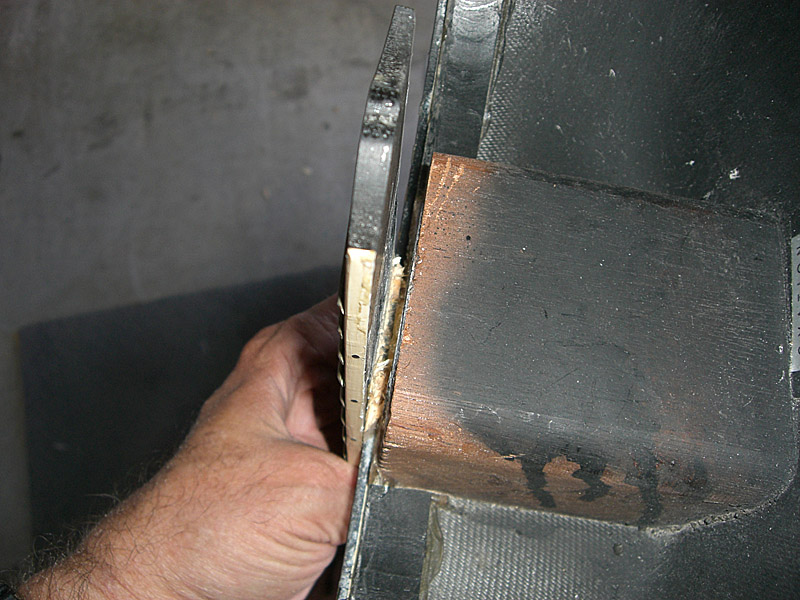
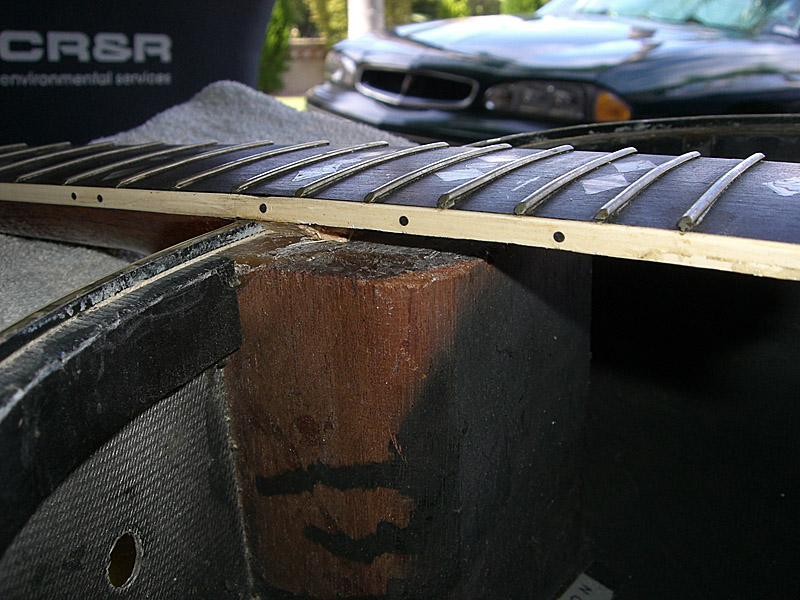
After these pics were taken I pulled up another couple of inches on either side of what you can see here, so almost the whole lower bout is free from the top. The epoxy glue globs that squeezed out of the joint fracture and separate cleanly from the kerfing. In a couple of spots the clear finish has come off the abalone and it's real purty. The old finish leaves it looking dull and yellowed. As far as getting the top off without pulling the neck, here's my plan of action. It's kind of hard to see here, but there's a gap between the top of the neck block and bottom of the top wood. The factory filled this space with epoxy. (naturally) 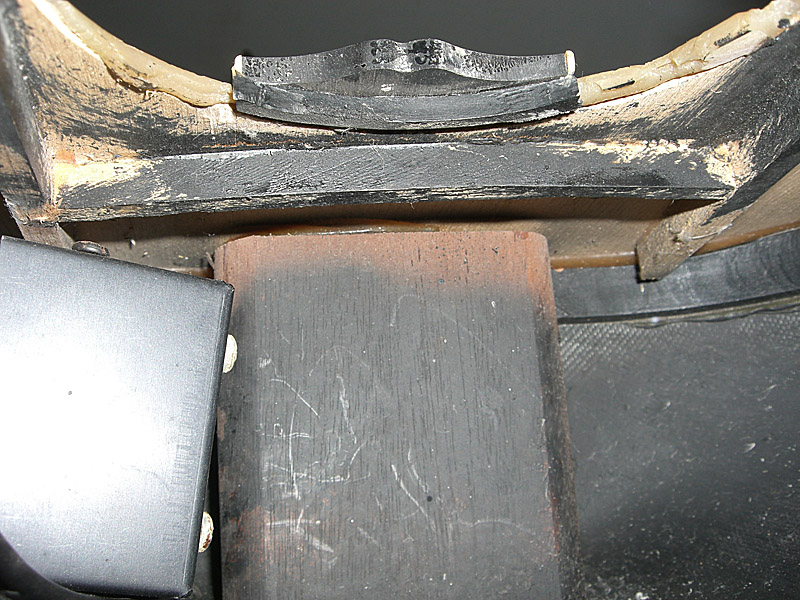
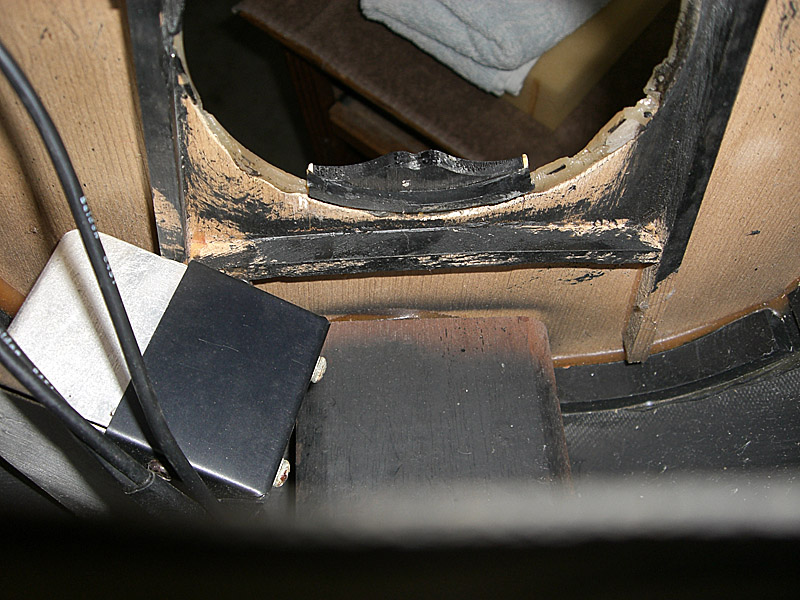
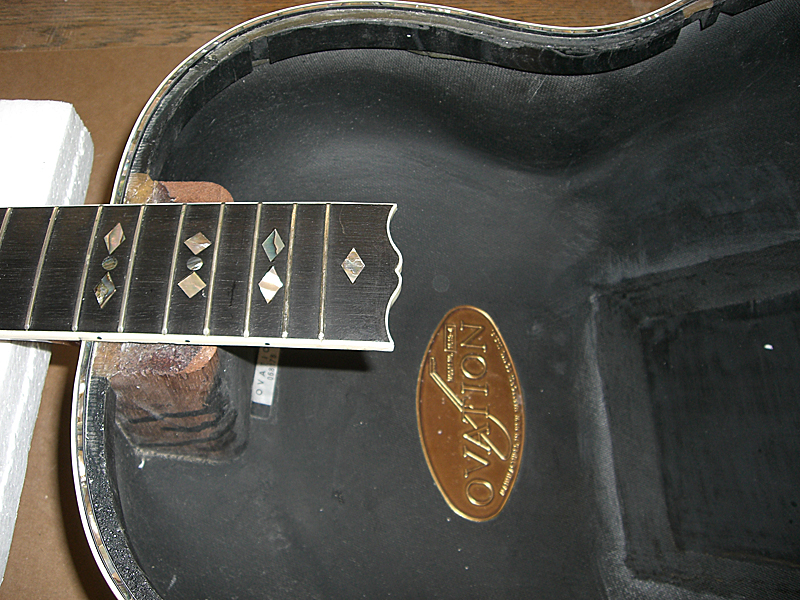
Once the top is off the body and the sides of the neck block are exposed, I'm going to use a Zona saw to cut the top free from the neck block. 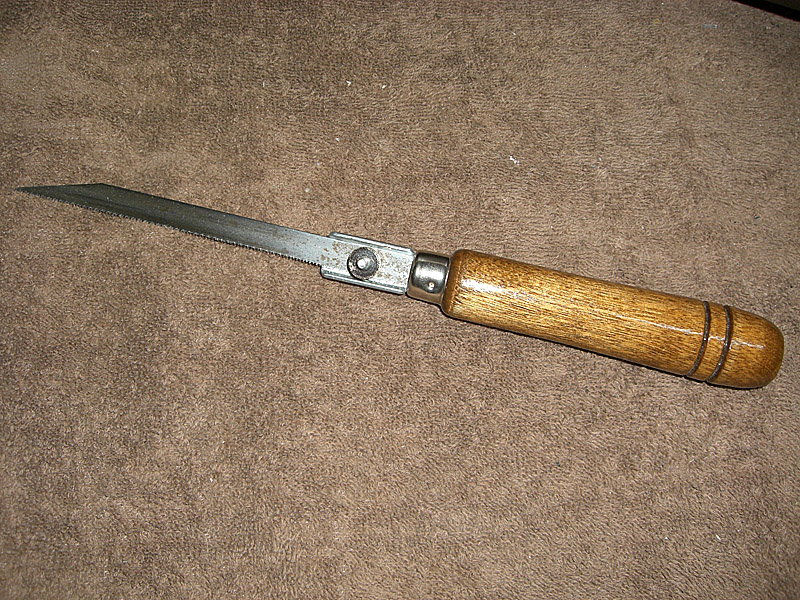
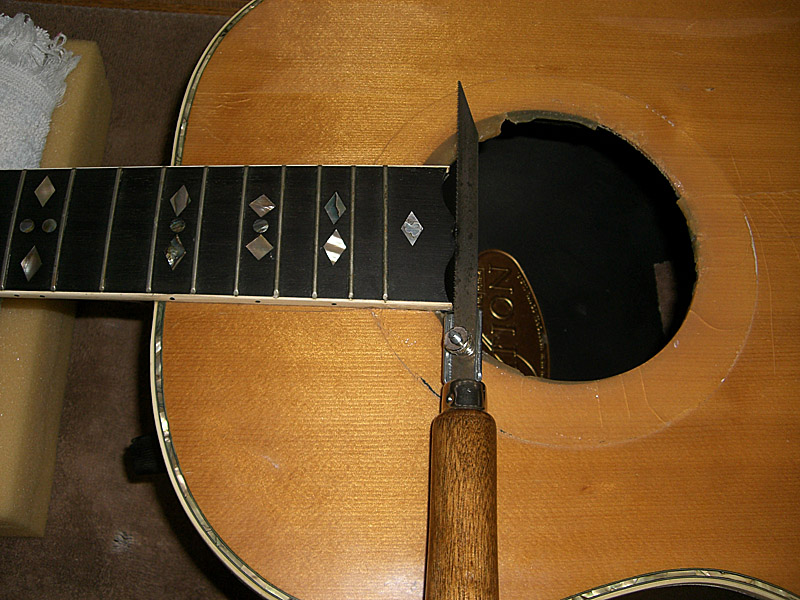
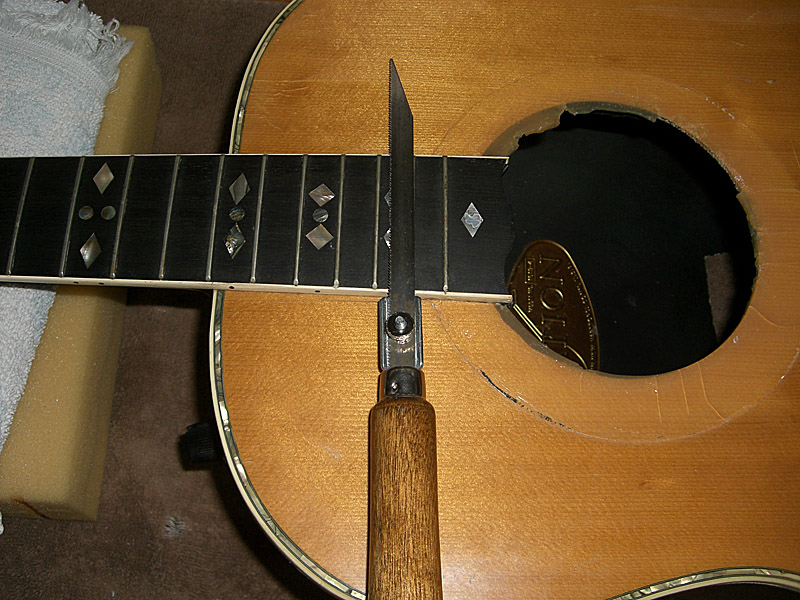
To separate the fingerboard extension from the top, I'm going to use my trim seal iron (on the right) to heat the ebony and soften the glue between it and the top. 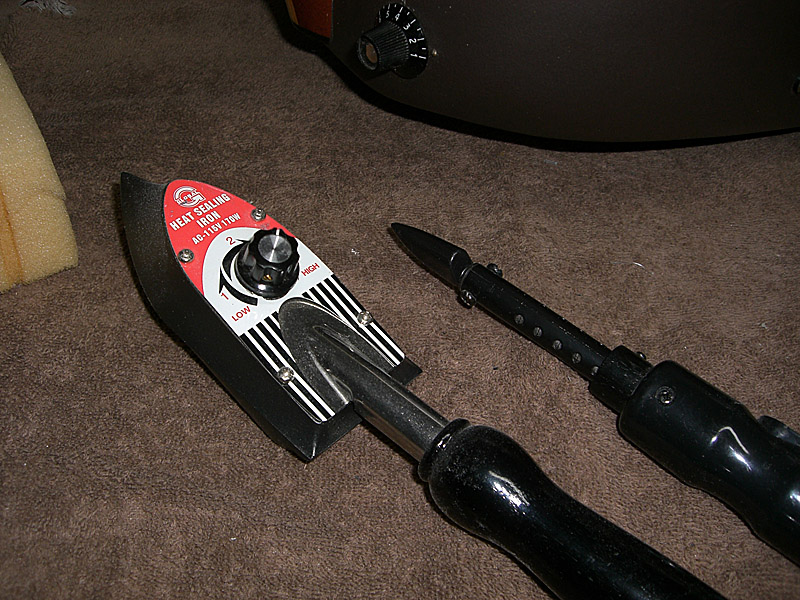
It's small and narrow enough to get between the frets so I don't melt the glue holding the fret markers or the binding. 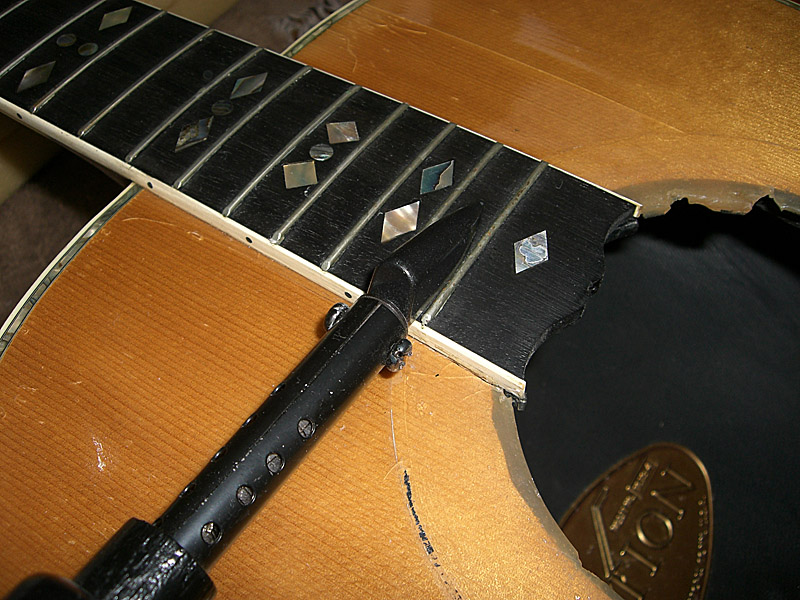
|
|
| |
|
Joined:
June 2012
Posts: 2333
Location: Pueblo West, CO | trickard - 2014-05-11 6:55 AM
I'll be impressed if you can make anything out of it.
Yes I agree. The glue squeeze out is very excessive, maybe they didn't care since the guitar seemed to be a engineering test model.
Interesting Idea to mold the patch off the spare bowl. I thought you were going to cut the patch from the spare bowl? I could cut the patch from the spare bowl, but I'd rather keep that in pristine condition. Or, at least long enough to know I'm able to make usable duplicates of it from my own molds. Making a patch off the bowl is an idea borrowd from my model airplane experience. This is the same principle as molding landing gear doors on the bottom of the wing so the finished pieces match the bottom profile of the wing perfectly. What I'm going to do is to tape some thin plastic visqueen to the back of the bowl so it smooth and wrinkle free. Then, lay up the patch over the visqueen. Lastly, lay more visqueen over the patch pulling it taut so it's also smooth and wrinkle-free. When the epoxy is fully cured, The visqueen is pulled free of the patch. The visqueen leaves the fiberglass patch glassy smooth with no print-through or pin holes. Then, I just place the patch over the hole matching it to the shape of the bowl and trace out the outline of the hole onto the patch for a perfect fit. I may or may not add a reinforcement. I'm planning to use Hysol, which is an aerospace-quality epoxy to edge-glue the patch. If I think it needs reinforcement, I'll add a thin strip of cloth and resin to the inside of the bowl around the outline of the patch. |
|
| |
|
Joined:
June 2012
Posts: 2333
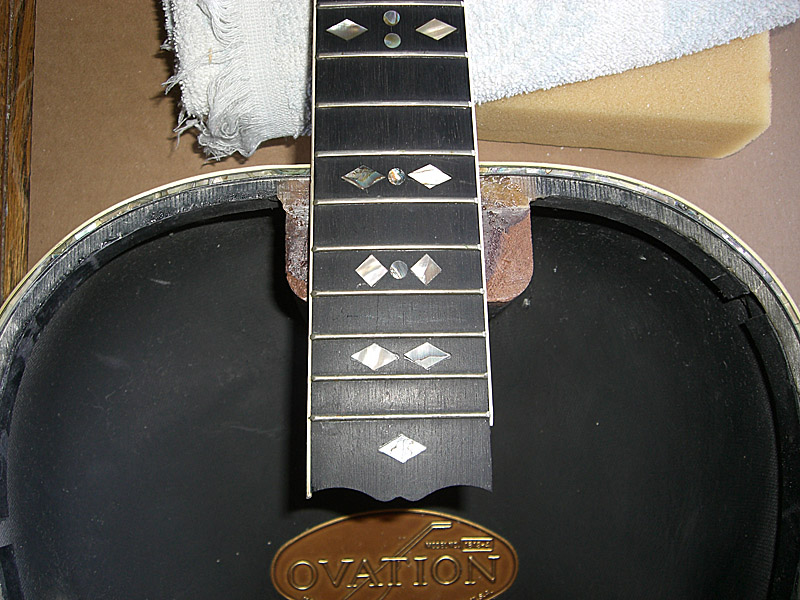
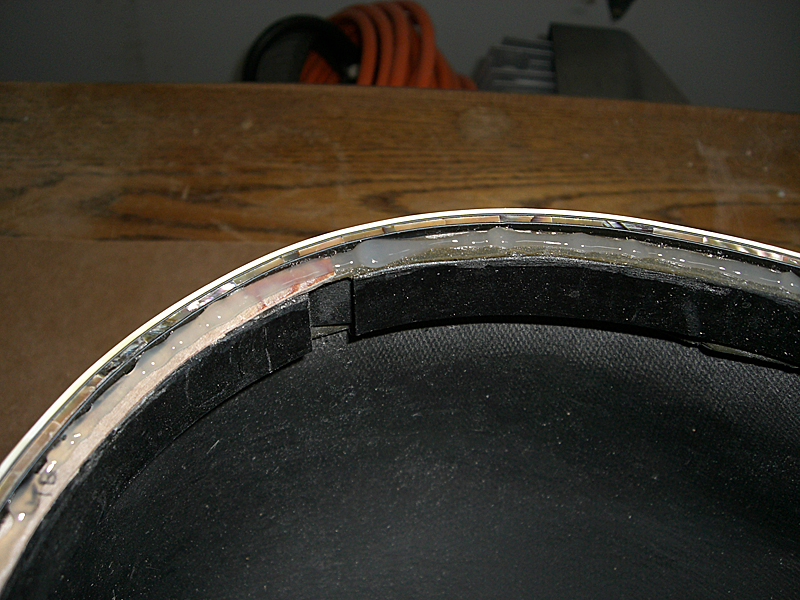
Location: Pueblo West, CO | Here's what the lower bout looks like after 10 minutes of work. Top is coming cleanly out of the pocket. I'm probably going to hold off doing any more until I get the 3D models of the TR cover and bridge done. Pics to follow. 
|
|
| |
|
Joined:
November 2002
Posts: 3650
Location: Pacific Northwest Inland Empire | Well, okay, then! Nice work, Dan. Could be the top isn't glued real strongly to the purfling, cuz the glue for the purfling isn't epoxy. I use something like airplane glue to put on plastic bindings, and I think it's just a thick, acetone-based adhesive, anyway. So, the wood may not be well-bonded to the purfling, to begin with.
Cute little saw ya got there, Dan. Should do the job.
Persevere! |
|
| |
|
Joined:
June 2012
Posts: 2333
Location: Pueblo West, CO | It looks like the top was glued with epoxy. Epoxy can be made to cure at different rates. The quicker epoxy dries, the less it's able to soak into the pores of the wood.
This looks like what happened with the top. The factory used a fairly quick-curing epoxy to glue the top, which grabbed onto surface of the wood fibers.
The epoxy was able to make a better bond between the purfling, the binding and the bowl, which is why I've been able to pry the wood out of the joint.
Also, as epoxy ages it continues to cure and continues to get harder and more brittle, and that's definitely what I'm seeing here. The epoxy has gotten so brittle that it's losing its grip on the wood. Don't misunderstand, it's still got a good grip. If I weren't going after it with a pair of pliers it would still hold the top in place. But, with the concentrated pressure I'm applying, the glue joint is failing, which in this case, is a good thing.
Thanks!
Edited by DanSavage 2014-05-12 9:26 AM
|
|
| |
|
Joined:
June 2012
Posts: 112
Location: Bristol England | Dan,
You never cease to amaze me with your knowledge and skill.
Keep up the good work.
James. |
|
| |
|
Joined:
June 2012
Posts: 2333
Location: Pueblo West, CO | trickard - 2014-05-11 6:55 AM
Also a bit "hack" is the black sound hole paint which doesn't match the rest of the exterior build quality and appointments.
Makes me think of home kitchen installers who hack out the cabinets to install sinks and such . Looks good from the outside but don't look under the sink.
Painting the wood around the sound hole and nowhere else is an old theater/show biz trick. "If the audience can't see it, don't paint it."  |
|
| |
|
Joined:
June 2012
Posts: 2333
Location: Pueblo West, CO | jamesholl - 2014-05-12 9:35 AM
Dan,
You never cease to amaze me with your knowledge and skill.
Keep up the good work.
James.
Thanks for the kind words, James.
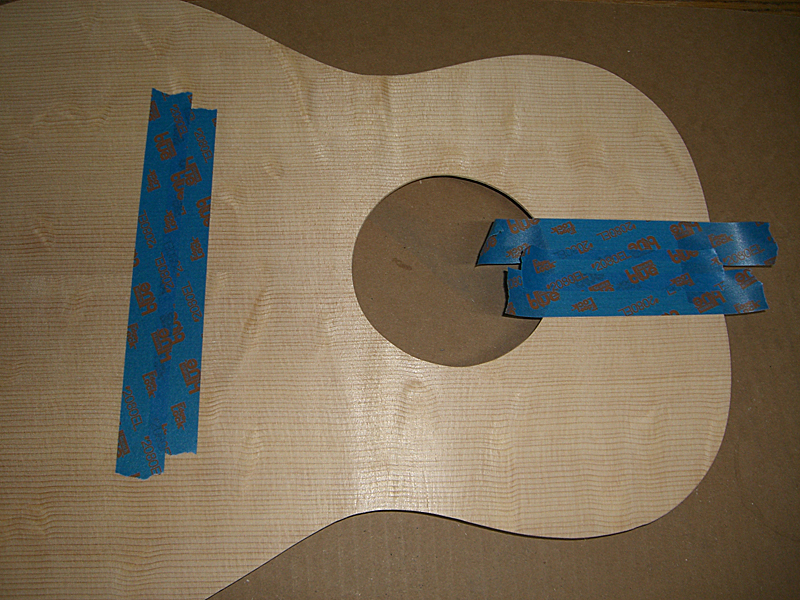
Removing the top on this guitar was made easier because Ovation didn't follow standard practices when installing the purfling/binding.Here's a pic from Stewart-MacDonald's web site showing how purfling and binding are normally installed: 
Normally, the top is routed so the purfling is glued to it and the binding is glued to the outer edge of the top and sides.
But, Ovation routed the entire thickness of the top so the purfling edge-glued to it and to the top of the kerfing.
Had they followed traditional techniques, I would not have been able to pull the top up without also pulling up the purfling/binding. I don't know if all Ovations are built this way, but the non-tradtional construction technique they used here makes re-topping this guitar much easier.
Edited by DanSavage 2014-05-12 2:45 PM
|
|
| |
|
Joined:
June 2012
Posts: 2333
Location: Pueblo West, CO | While I'm gathering the parts I need to build a new top I thought I'd make the patch for the back. The first task is the knock off the high spots on the mold so the new piece is smooth. 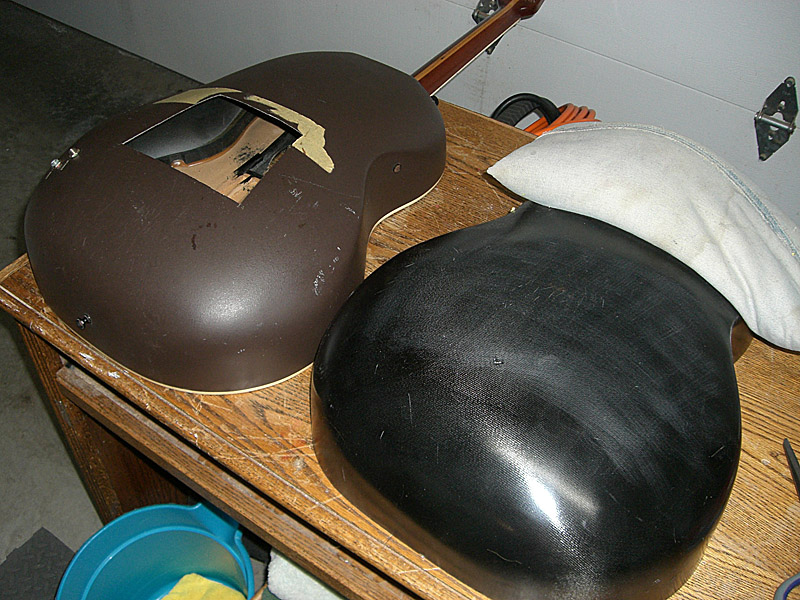
Next, I cut a piece of visqueen (aka Saran Wrap) that's oversize to the patch. 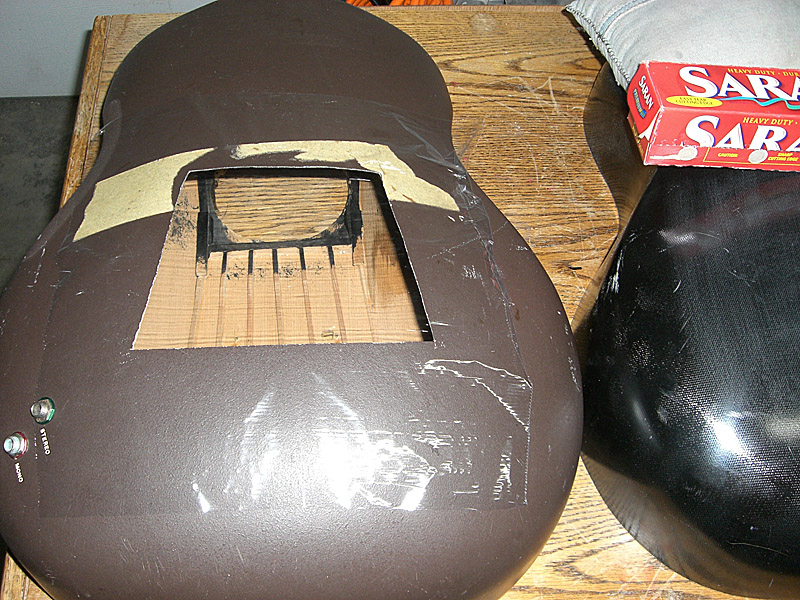
Stretch it down over the 'mold' using Gorilla tape. I've used masking tape in the past, but sometimes it comes up, so this time I thought I'd use Gorilla tape because I know it won't come up. It didn't. 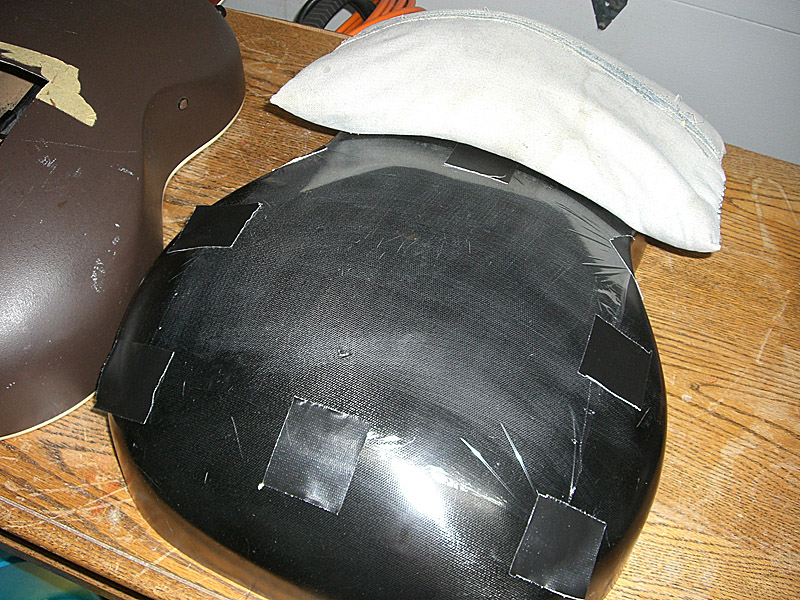
Cut out an oversized piece of cloth. 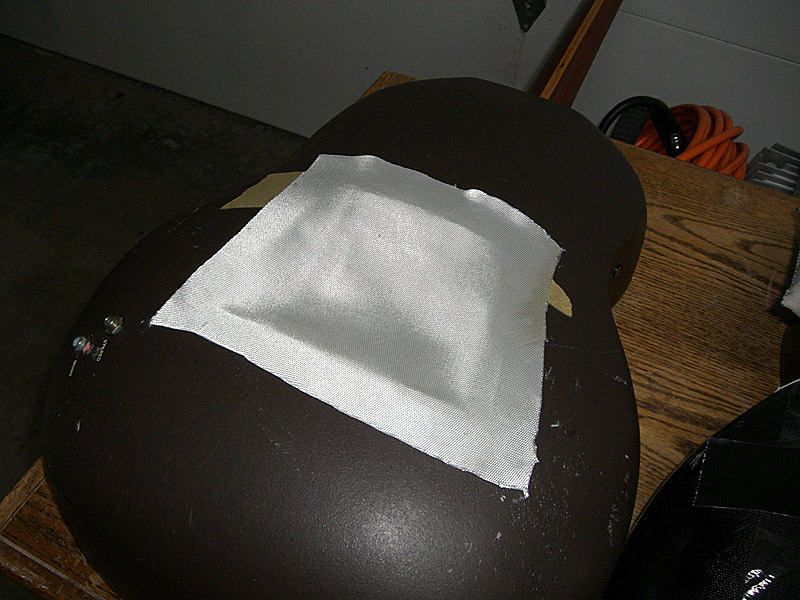
I wasn't sure if the bowls are one layer of cloth or two. I've read from other sources that they are 'two-ply', so I decided to make this patch two layers. I'll know for sure once I cut the patch to size. If it's too thick, I'll lay up another patch using only one layer of cloth. 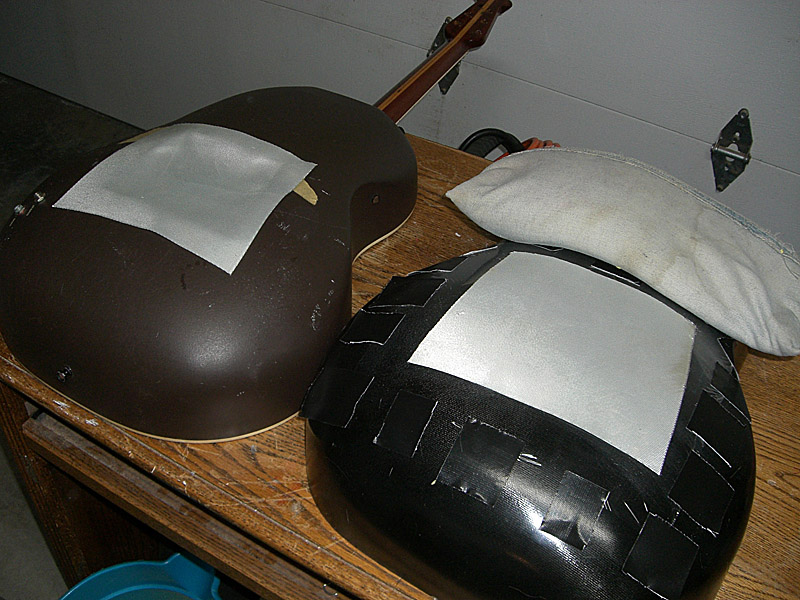
I added some graphite powder to color the resin black so it will be easier to finish later. (it will take less black paint) I mold my parts using MGS epoxy. It's an aerospace-grade epoxy from Germany. It is used on numerous full-size composite airplanes and kit planes. First, I mix the powder with the hardener to make sure the powder is completely mixed in, then add the resin and stir. 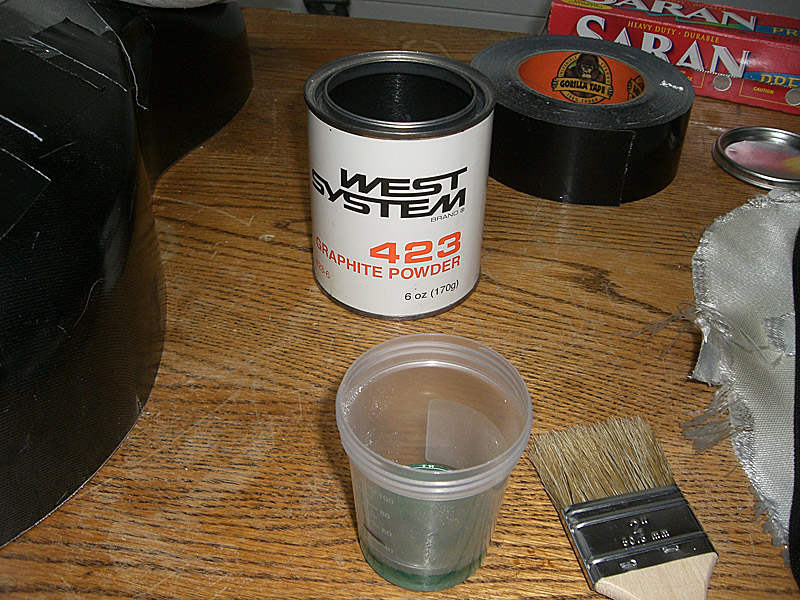
Paint on a layer of resin. 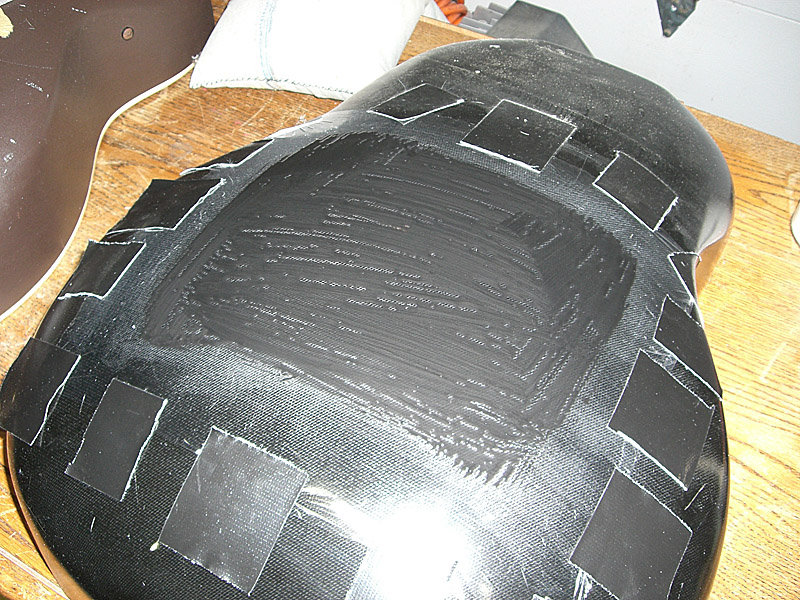
Lay on the first layer of cloth and wet it out. Then, paint on more resin and add the second layer of cloth and wet it out, too. 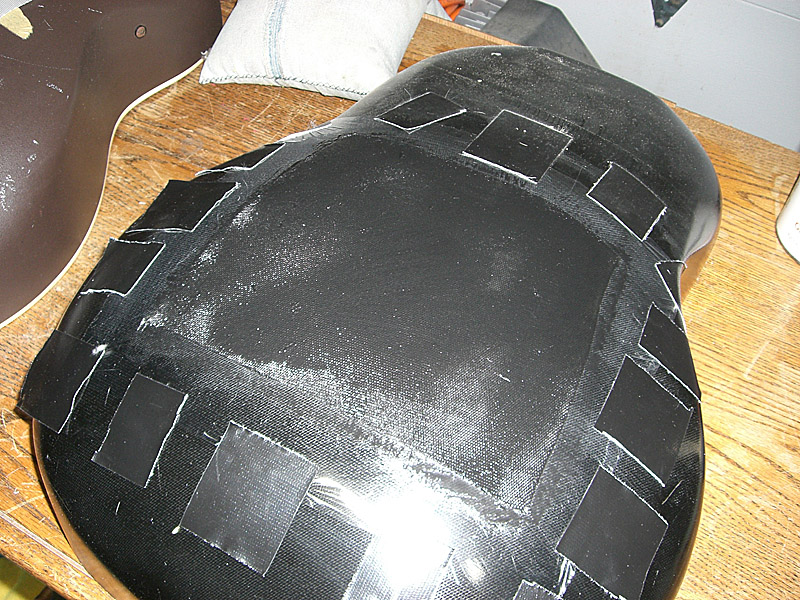
Once the cloth is uniformly wet, cut out and tape down the top Saran Wrap, er, visqueen. 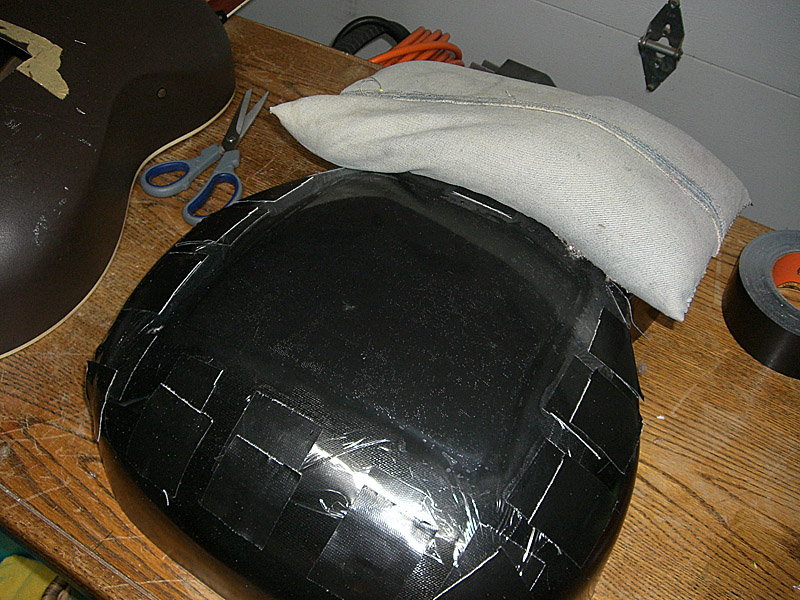
Use a thin credit card to squeeze out all the trapped air bubbles and let it dry overnight. 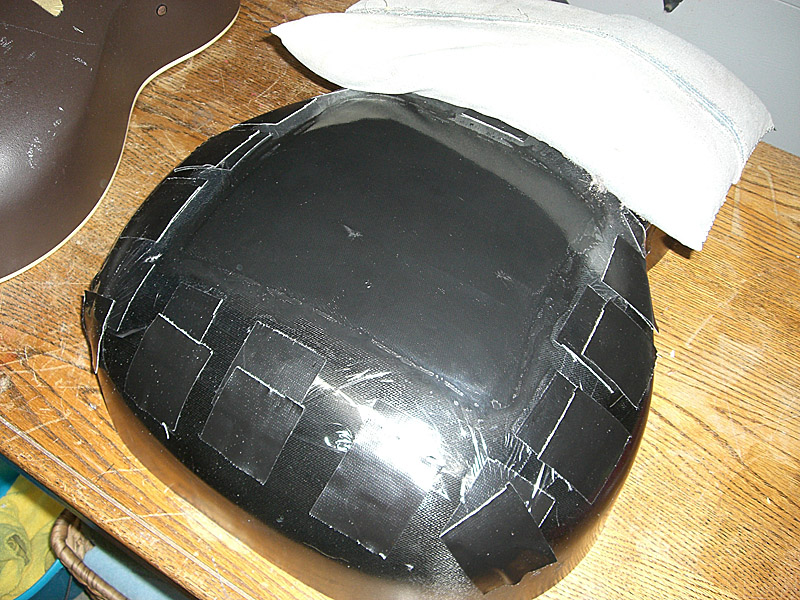
Patch is done. Test fit and it matches the contour of the bowl perfectly. 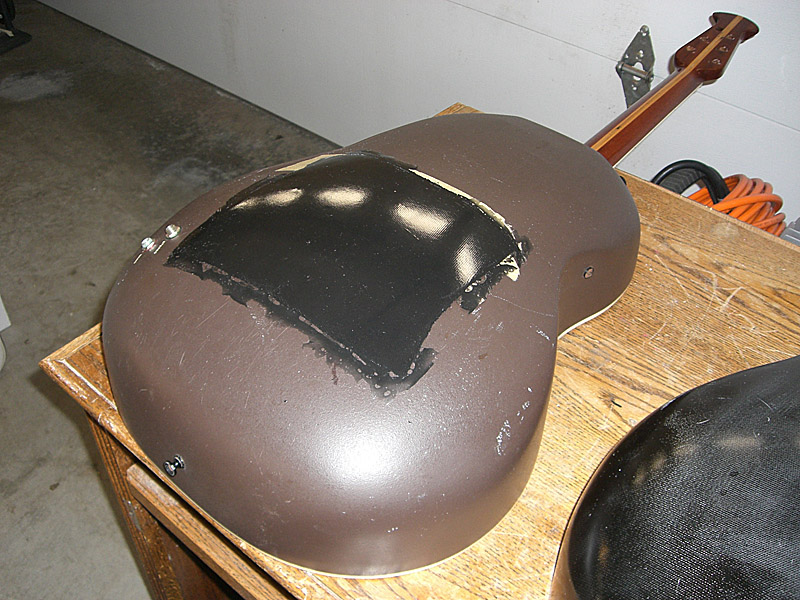
Trim the rough edges. 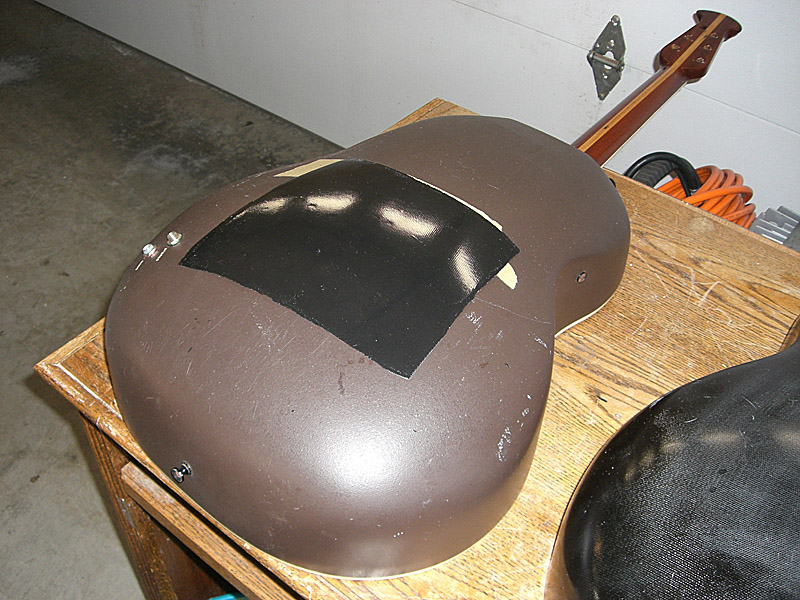
Next step will be to trace the outline of the hole and cut the patch. Pics to follow. |
|
| |
|
Joined:
December 2003
Posts: 1889
Location: Central Massachusetts | Keep it coming, Dan, this is very cool to see... |
|
| |
|
Joined:
July 2002
Posts: 288
Location: Maine | Nice. You don't waste much time. Actually looks like fun. |
|
| |
|
Joined:
June 2012
Posts: 2333
Location: Pueblo West, CO | dvd - 2014-05-15 9:02 AM
Keep it coming, Dan, this is very cool to see...
Will do. Thanks. |
|
| |
|
Joined:
June 2012
Posts: 2333
Location: Pueblo West, CO | trickard - 2014-05-15 9:42 AM
Nice. You don't waste much time. Actually looks like fun.
Thanks! I'm really looking forward to playing this guitar once it's finished.
Yeah, this kind of stuff is kind of fun. It's the 'making something from nothing' aspect that I really liked about model airplanes. What I didn't like about model airplanes is the possibility of crashing it every time it left the ground.
The patch I laid up has a semi-feathered edge that was a result of the layup process I used. I may end up simply sanding the edge down so it's completely feathered and glue it to the back of the body instead of trying to edge-glue it into the hole.
This would this make a stronger glue joint that would not need any reinforcement. It would also be easier and faster to do.
I'll probably wait to actually glue the patch into place until after the top is on the guitar just in case I need to have easy access to the underside of the top.
I even toyed with the idea of making the hole into a back door by cleaning up and evening out the hole and adding an inner lip, then making the patch into a removable hatch.
Edited by DanSavage 2014-05-15 1:34 PM
|
|
| |
|

Joined:
January 2009
Posts: 1249
Location: Texas | Dan, thanks for taking the time and effort to post all the steps of this project...its incredibly interesting and also for your continued work on "History of the Bowl". |
|
| |
|
Joined:
June 2012
Posts: 2333
Location: Pueblo West, CO | amosmoses - 2014-05-15 11:32 AM
Dan, thanks for taking the time and effort to post all the steps of this project...its incredibly interesting and also for your continued work on "History of the Bowl".
You're welcome, Jay. I'm glad you're enjoying both threads.
I think it would be pretty cool to actually make an Ovation guitar from scratch.
The cloth bowl I got from TJR has helped me overcome a major hurdle to that goal.
Edited by DanSavage 2014-05-15 1:38 PM
|
|
| |
|
Joined:
January 2009
Posts: 1249
Location: Texas | Well...I would like to get my order in first. I would like a 1967 DanSavage Classical Re-Issue. Which brings me to...the shiny bowl. What did they actually do differently to shine it up. And I guess that process was ditched because of efficiencies (which Fender masterfully used to eventually snuff out Ovation)? |
|
| |
|
Joined:
June 2012
Posts: 2333
Location: Pueblo West, CO | I've never actually held a shiny bowl, so it's difficult for me to say whether the shine was in the fiberglass itself or paint layer that was applied later.
In the parts I mold, I achieve a glossy smooth finish by using two different weights of glass. The layer closest to the final surface is a lighter weight, i.e.: finer weave. The order of the layers depends on whether I'm laying up over a male or female mold.
When laying up in a female mold, the light weight cloth goes on first, followed by the heavier cloth. Laying up over a male mold is just the opposite.
If you look closely at the pics of the patch, you can see the print-through of the fabric weave where the resin shrunk as it cured. The cloth bowl I got from TJR also has a fair amount of weave in the final surface.
Print-through is easier to control when laying up parts in a female mold because as the resin shrinks, it shrinks to the surface of the mold.
Here's a pic of a part I molded in 2003. It's an inlet duct for a ducted fan model of the Su-27 I designed. The part is laid up over a male mold. It's shiny inside and rough on the outside. I added titanium white dry artists pigment to the MGS epoxy to get the white color seen below.  . .
The 1st gen Ovation bowls were also laid up over male molds, but to get the outside smooth, they laid a plastic sheet over the wetted cloth just like I did, and then applied vacuum to suck the visqueen down. Because the photos TJR sent of the 1st gen bowl show the fabric weave as well as the wrinkles and folds of the visqueen vacuum bag, I suspect that Ovation actually sanded, filled, primed and painted the shiny bowls. It would be much easier to add black pigment to the resin and lay up the bowl in a female mold. Then, the bowl would come out of the mold black and glassy smooth.
Edited by DanSavage 2014-05-15 3:40 PM
|
|
| |
|
Joined:
July 2002
Posts: 288
Location: Maine | Dan. If you create a peripheral lap joint when using your patch , how do you plan to finish the interior ?
resin and cloth fill too ? |
|
| |
|
Joined:
June 2012
Posts: 2333
Location: Pueblo West, CO | trickard - 2014-05-15 8:20 PM
Dan. If you create a peripheral lap joint when using your patch , how do you plan to finish the interior ?
resin and cloth fill too ?
Therein lies my conundrum. I'm less concerned with having a scar on the inside than I am deadening the bowl.
One of the desirable features of the early cloth bowls was the sympathetic response, a.k.a. belly rumble.
When Ovation went to the SMC bowls, which are thicker, the bowls lost some of this. The Lyrachord GS allowed the bowls to be thinner, which gave back some of this response.
So, if I go to the lap joint, it'll be easier and stronger, but I'll be adding thickness to the back of the bowl which will deaden the responsiveness of it.
It will definitely be easier to apply a thin reinforcement to the edge glue joint with the top off, which suggests the time to do this is before replacing the top.
The more I think about it, the more I'm leaning toward cutting the patch to fit the existing hold, then edge-gluing it into place and if necessary, applying a thin fiberglass lap-joint reinforcement strip to the inside of the bowl. |
|
| |
|
Joined:
June 2012
Posts: 2333
Location: Pueblo West, CO | Progress continues.
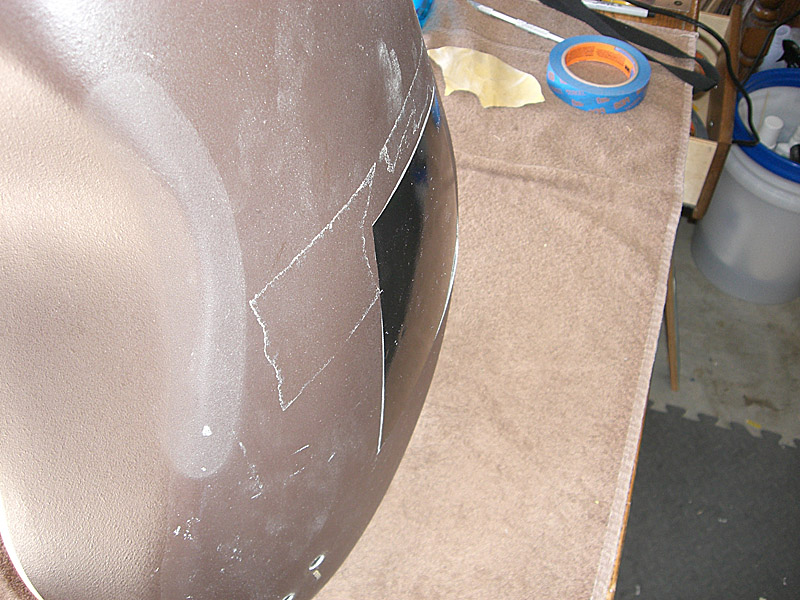
First thing was to trim the patch to size. I traced the hole using a Sharpie, but the black line on the black part was nearly impossible to see. No surprises, here. So, I taped off the part instead. 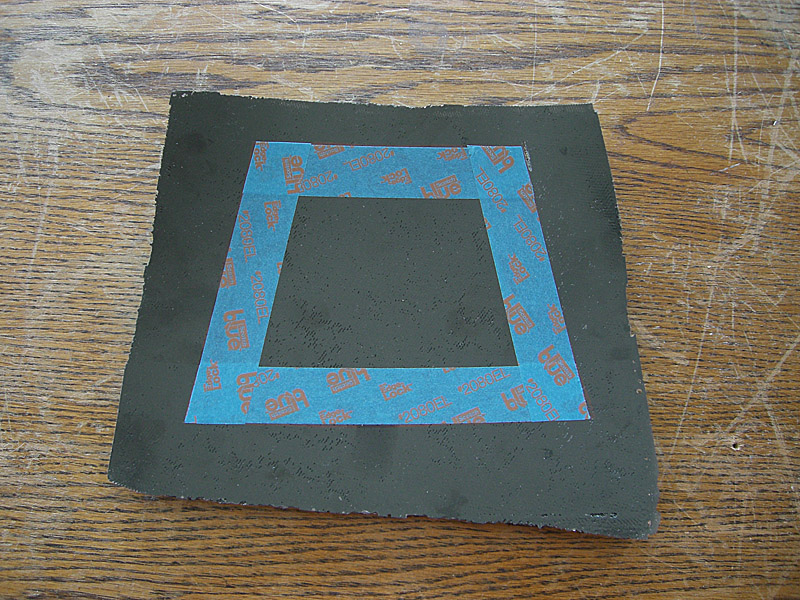
My handy-dandy Dremel and fiberglass cut-off wheel made short work of cutting out the part.
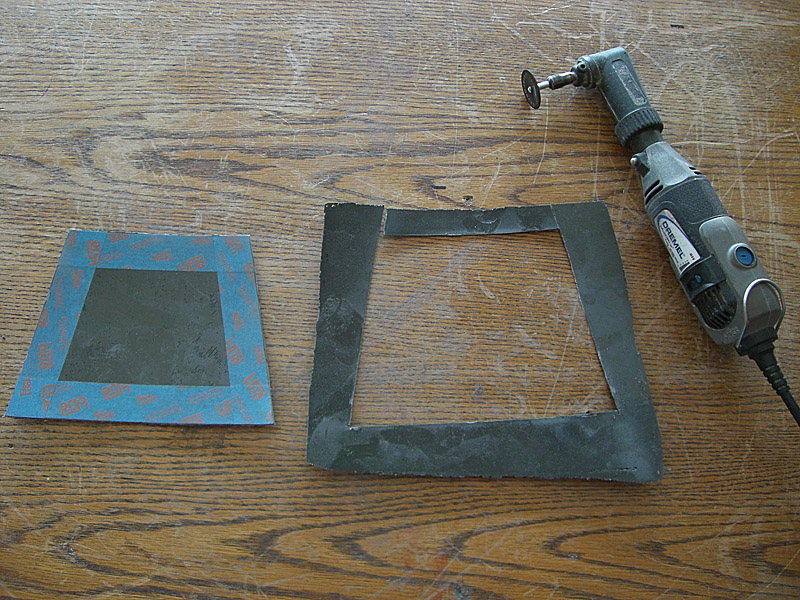
Checking the thickness of the patch compared to the bowl shows that the factory did use two layers of cloth.
Test fit. Not perfect, but good enough. The part is taped to the inside using masking tape. 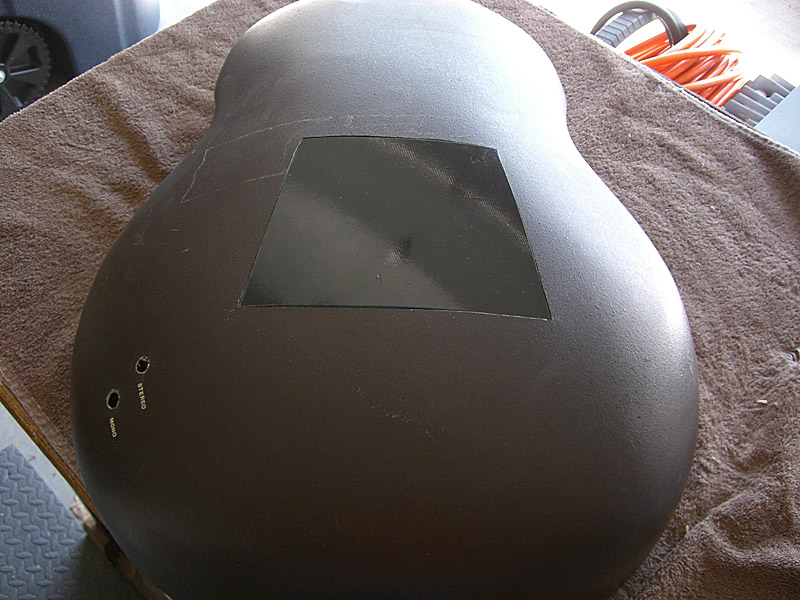
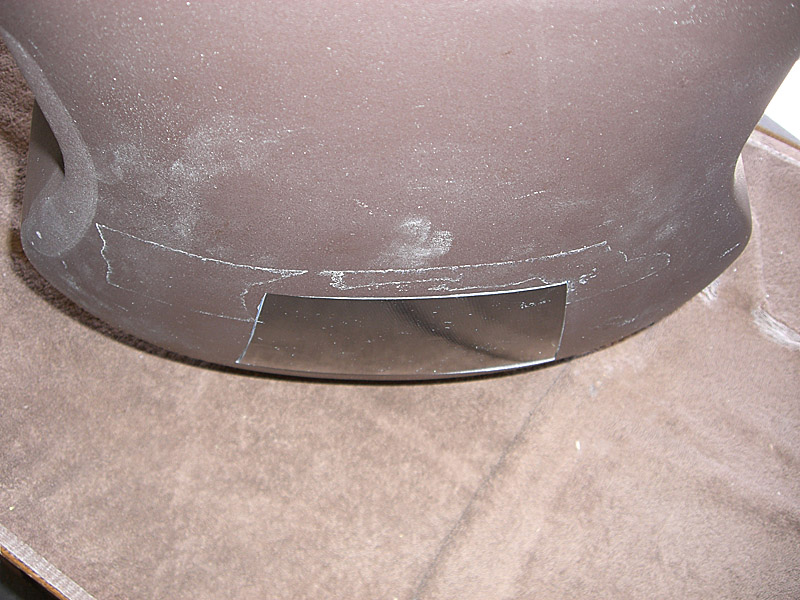
I'll probably use my favorite method of edge-gluing fiberglass parts to assure perfect alignment. First, I'll tack-glue the corners with C/A. Next, apply a fiberglass reinforcement strip and resin to the inside. Next up, removing the rest of the top.
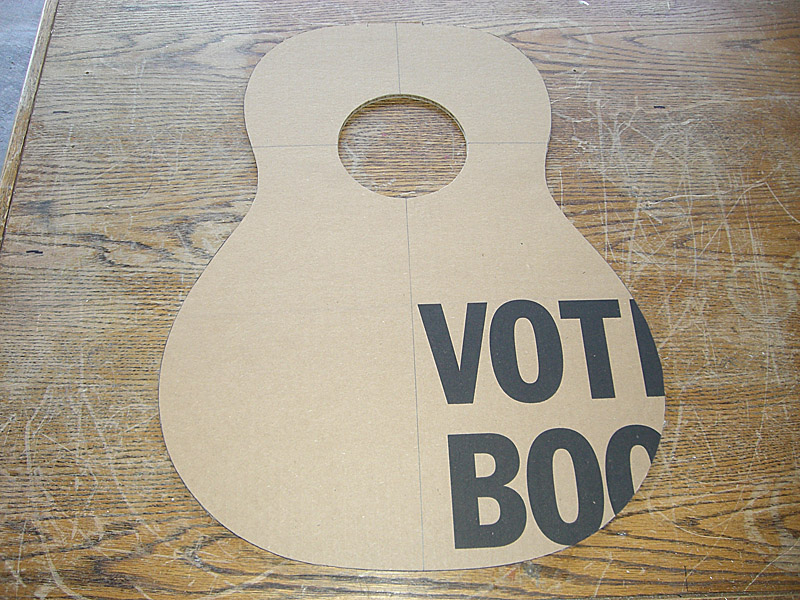
Before proceeding I made a template for the new top. Yes, that's made from a voting booth. I worked at the local precinct a few years ago and snagged all the unused cardboard booths. :D
Mostly, it went pretty smooth. I only had two small hitches. When pulling up the top from the treble bout, it split all the way up and pulled some of the inner binding away from the purfling. And, when pulling up the upper bass bout top, some of the purfling got separated from the kerfing. Both are minor and easily fixable. 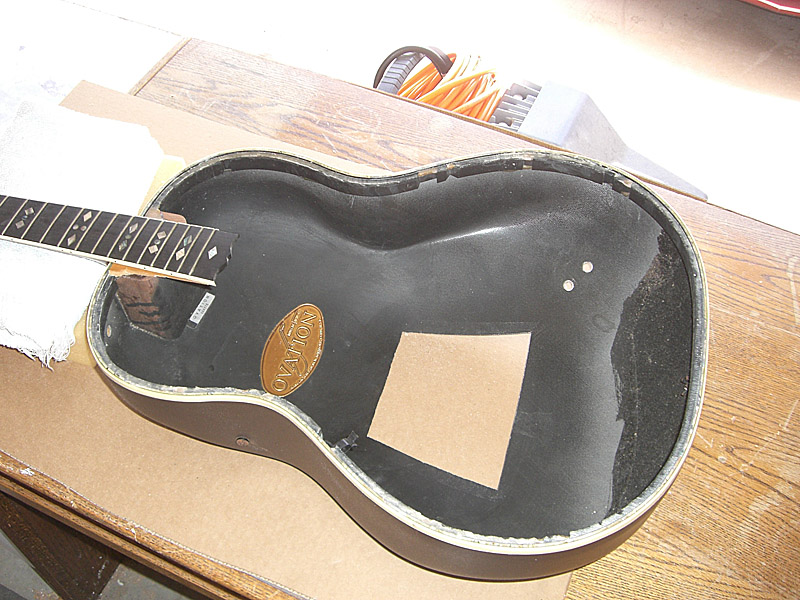
The last step, getting the top out from between the fingerboard extension and the neck block was the hardest. As always seems to be the case, the last 10% of the job takes 90% of the time and this was no exception.
The Zona saw worked okay, but with such fine pitch teeth it was taking forever to cut through the epoxy between the neck block and the bottom of the top wood. I needed to go to Lowe's anyway to buy more propane so I could grill some chicken, so I hit the tool aisle and bought a few different kinds of saws. In the end the Japanese-style double-sided, flexible pull saw was what worked the best.
It allowed me to cut all the way to the 15th free before encountering interference from the curvature of the upper bout.
The trim irons worked okay separating the fingerboard extension from the top wood up until I got to the neck block. Then, it was back to the pull saw. I needed to split the wood into small sections and break them out of the tight space between the fingerboard extension and the neck block.
So, I'll have to notch the new top, but it should be okay. And, no, I WILL NOT be slathering on the epoxy to glue the top to the neck block or to the fingerboard extension.
Speaking of neck blocks, the factory standards for centering the neck block on the body were pretty loose.
 |
|
| |
|
Joined:
June 2012
Posts: 2333
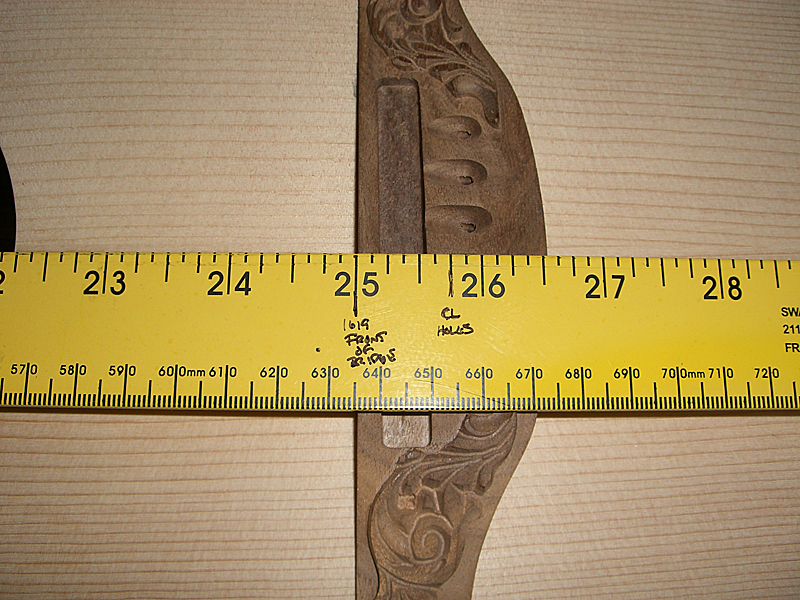
Location: Pueblo West, CO | While waiting for my top parts to arrive, I decided to verify the neck angle.
I'd planned to put a 28-foot radius top on it. Since the top wood is kind of expensive, I didn't want to glue up all the braces only to find out that the neck geometry was off.
So, I broke out my CAD program and drew up a 28-foot radius circle, then added to it the thickness of the top (9/32") and placed the bridge in the proper location, spray glued the plans to cardboard and cut them out to make a top plate simulator. 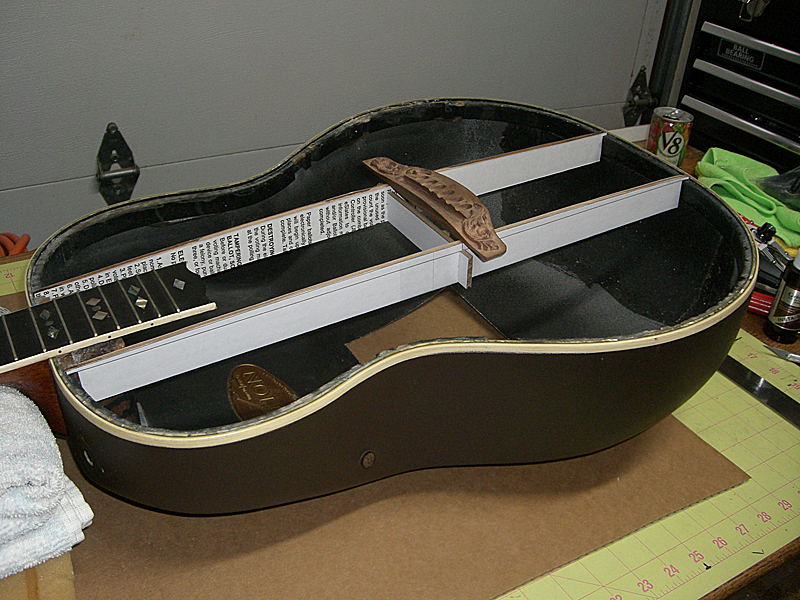
Laying a straightedge on the neck showed that it would hit the bridge about 1/4" too low. Not good.
I did a little research online to see if I could find the top radius of these guitars, but could find nothing. So, I checked the top radius my other Ovations. Essentially, they were all flat. Or, at least they started out that way. The pull of the strings over time had caused all of them to develop the characteristic hill behind the bridge and valley in front of it. On some, like my 1719, this was more pronounced and others, like the 2078, less so. I found a video online where the owner of Blues Creek Guitars was talking about how he sets up the geometry when building for a 28-foot radius top. He said that he liked to have 1/2" space between the top and the bottom of the straight edge. He also said that this usually requires a neck angle of about 1-1/2 degrees. I broke out a level and my trusty incidence meter and measured the neck angle of the Ovations. These are about 1/2 a degree. So, I cut out a section of the top plate simulator I built to simulate a true flat top, and the straightedge is now above the top of the bridge by about 1/16" or so. Much better. 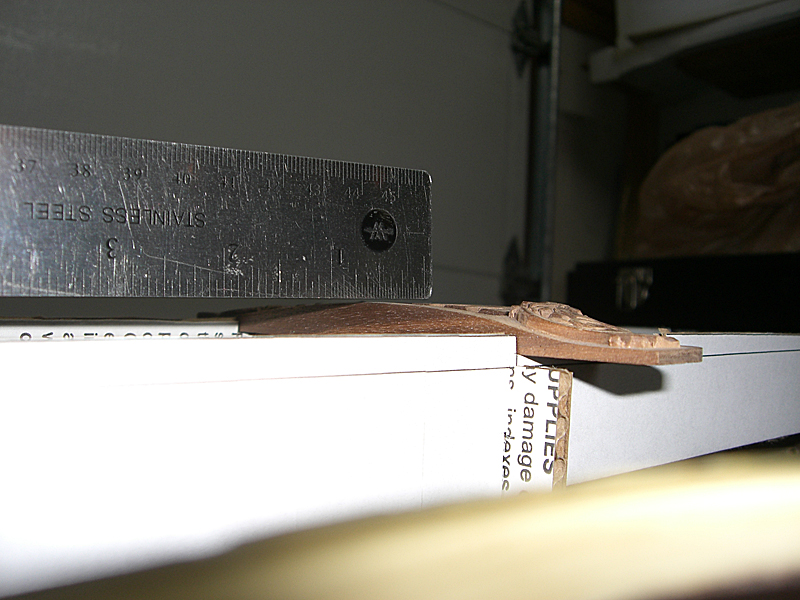
Ovations having, more or less, flat tops makes sense. In the factory tour video one of the workers is shown routing the top for the binding. On a wood box guitar this is done with the body in a jig, face-up on the workbench. But, the Ovation was being routed face-down. This would difficult to do if the top had any kind of radius to it because the top would wobble around and the router would not cut an even groove. Since the braces I ordered are made to work on a 28-foot radus top, I'll need to modify them to work on a flat plate, but that is a minor task. Disaster averted.
Edited by DanSavage 2014-05-19 9:25 AM
|
|
| |
|
Joined:
March 2007
Posts: 698
Location: Cork, Ireland | Why was the hole cut in the back in the first place? |
|
| |
|
Joined:
June 2012
Posts: 2333
Location: Pueblo West, CO | According to the ad TJR wrote, this was, or could have been, an engineering sample. Having the hole in the back wouldn't affect the playability but would allow access to the internals/electronics without loosening the strings. |
|
| |
|
Joined:
June 2012
Posts: 2333
Location: Pueblo West, CO | I found out why the neck block was offset. It looks like there was a method to the factory's madness, after all. It wasn't sloppy building. The top strap button was screwed into the neck block. Good job, guys! 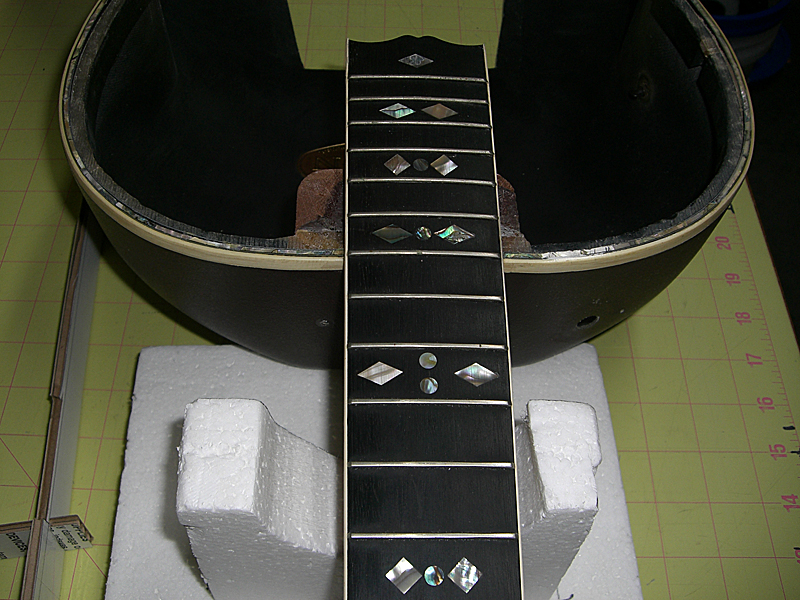
Edited by DanSavage 2014-05-19 8:52 PM
|
|
| |
|
Joined:
June 2012
Posts: 2333
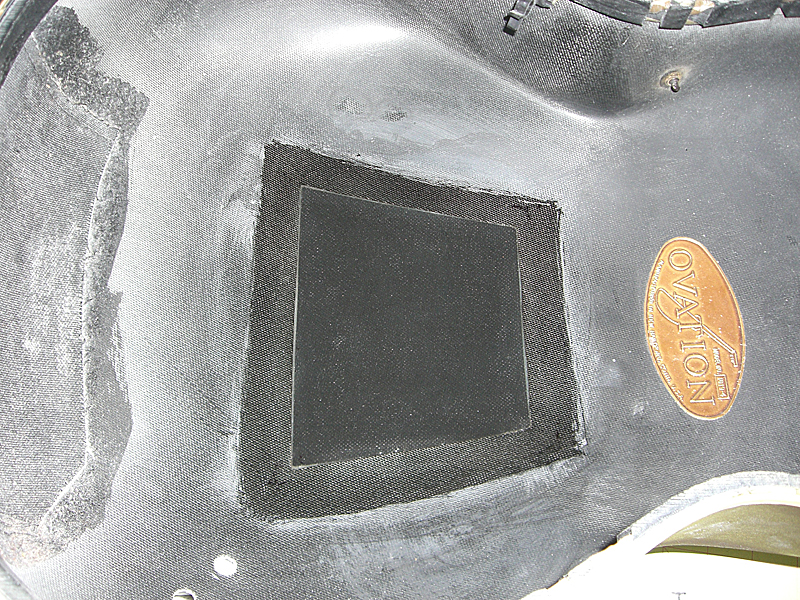
Location: Pueblo West, CO | The work continues. First task at hand is to glue the patch into the hole in the back. A short piece of tape on each side to hold the patch in place. Then, each corner is tack-glued with CA. 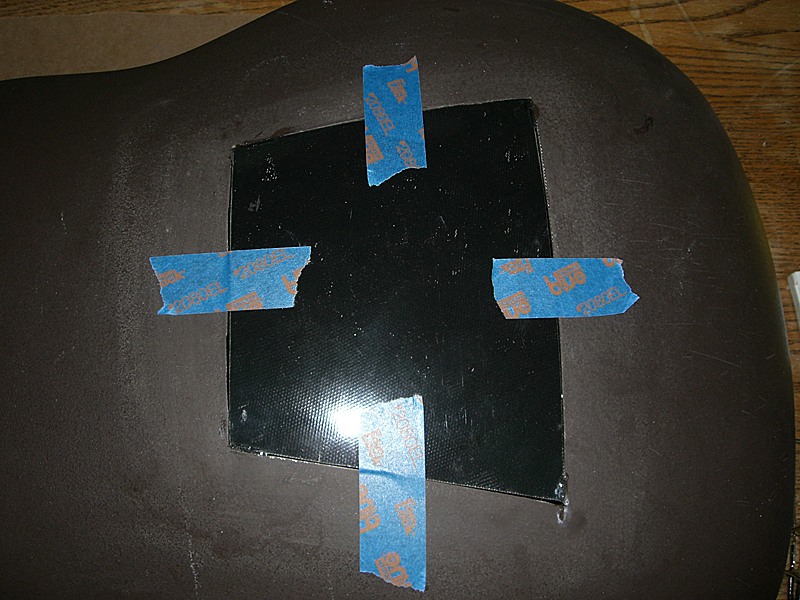
A reinforcement piece is cut from 3-oz. plain weave cloth which is slightly bigger than the patch and fiberglassed into place. When it's dry, the inside is sanded smooth to blend the edges into the surrounding area. 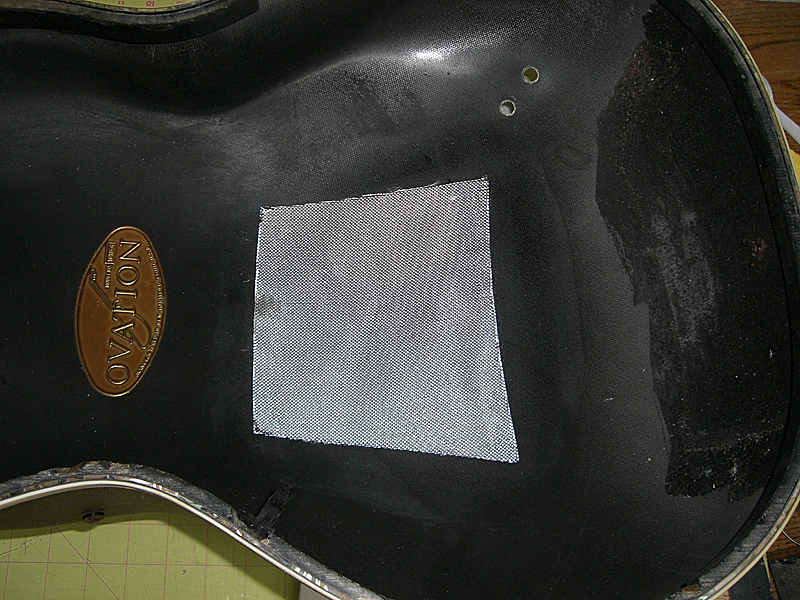
The outside is also sanded smooth. The laminating resin is mixed with cab-o-sil to make a thick putty. This is smeared over the seams to blend the patch into the back. The body is flipped over and a final, thin coat of resin is painted over the reinforcement piece. The body is left to dry overnight. The inside and outside are sanded smooth in preparation for paint. 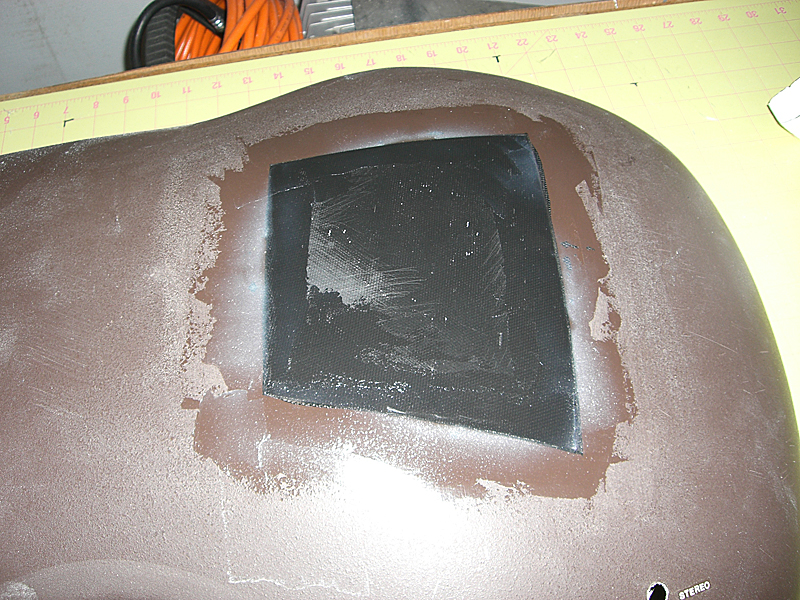
Next up, make a template from cardboard for the top that will fit inside the purfling. Fit is pretty good. This will be used to trace the top wood. I'll leave a little bit of extra wood on the outside and will bevel thei top wood so it will be a slight pressure fit. I bought some binding rubber bands from Stewmac which should squeeze the sides into the top wood. 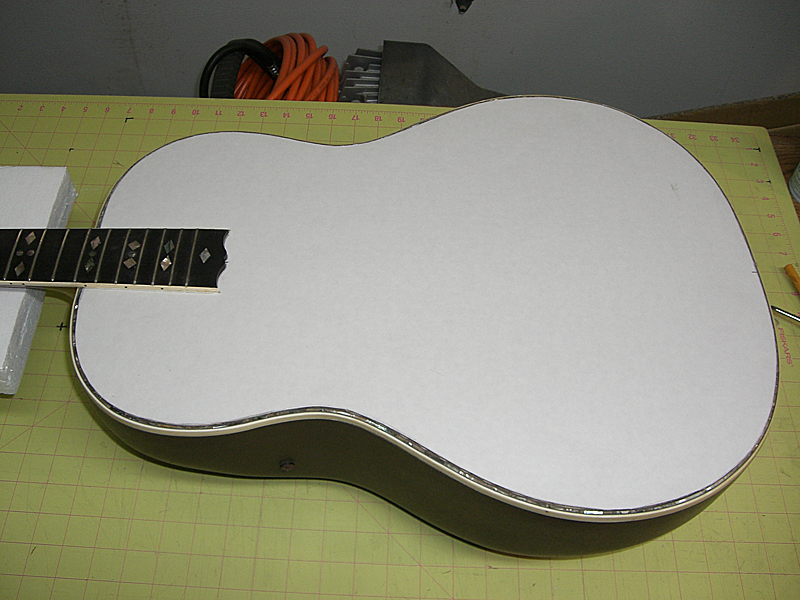
Cut the sound hole for the rosette. Measure and mark the location of the bridge and the locating holes for the alignment pegs glued into the bottom of the bridge. 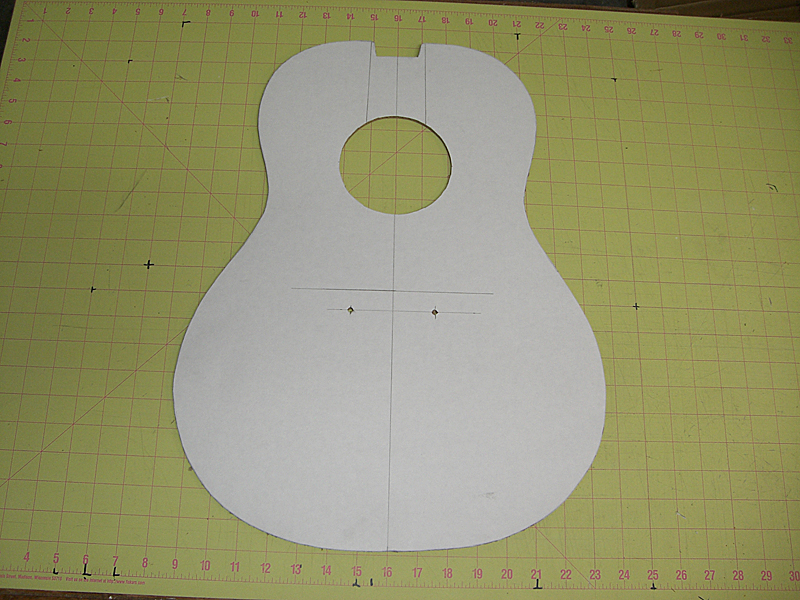
Looks good, but it has the dull sound of cardboard. 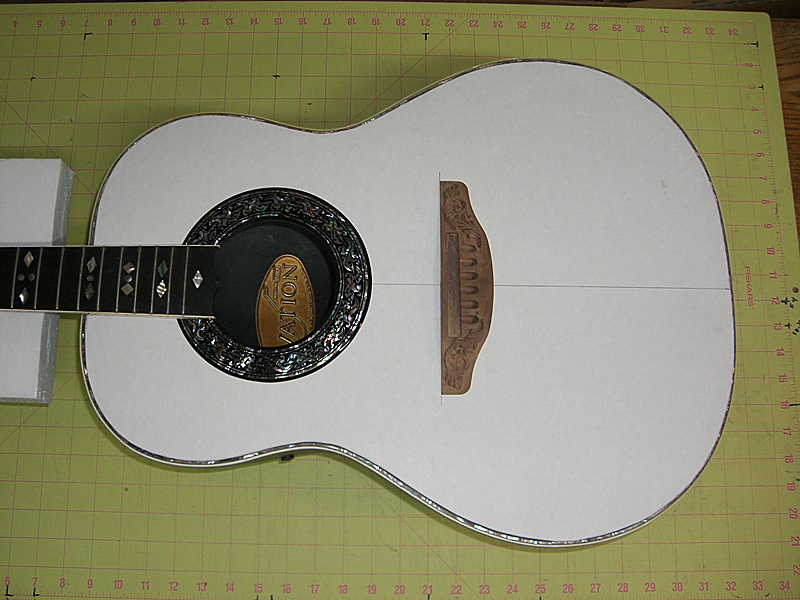
Check the neck geometry. The ruler just touches the top of the bridge. The cardboard is 3/16" and the top wood will be ~3/32", so this should put the bridge in a perfect position for nice, low action with plenty of room to grow. 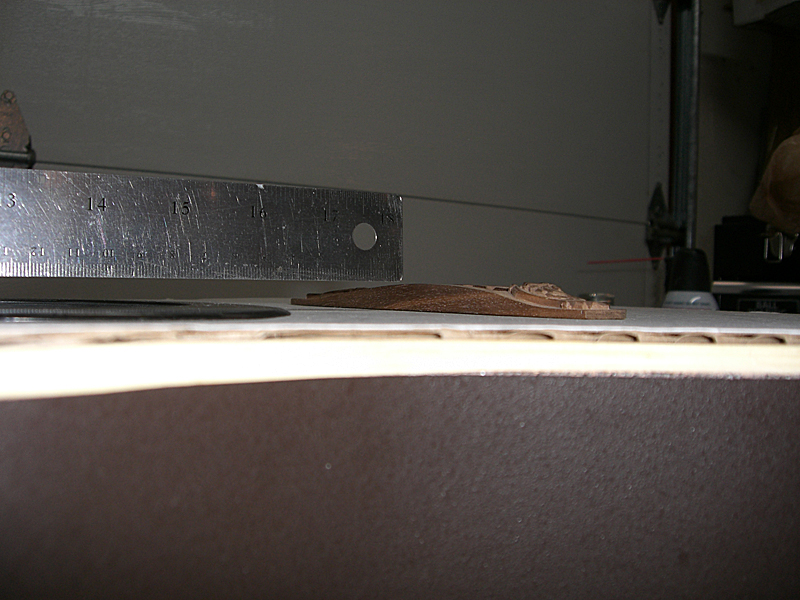
Speaking of top wood, I thought that with what this guitar has been through in its life it deserved to have something special. I bought some Master-grade bearclaw spruce from Stewmac. I sprayed some ZIP Kicker on it to highlight the grain and figuring. (mostly naptha) And, more importantly, it's got a really nice tap-tone. I'm planning to use forward-shifted X brace pattern to give the guitar a nice, bright sound. So, it should make for a nice guitar that sounds as good as it looks. 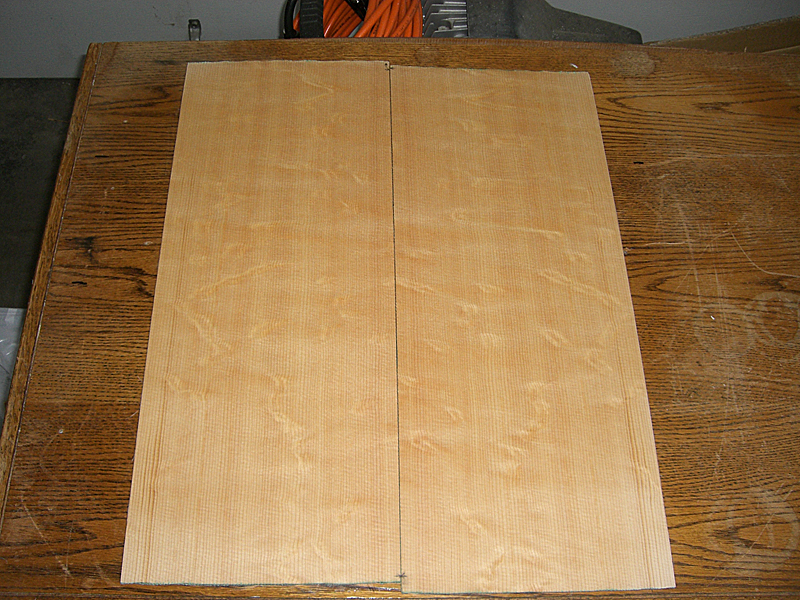
Next job is to start preparing the braces. Pics to follow.
Edited by DanSavage 2014-05-24 6:18 PM
|
|
| |
|

Joined:
August 2007
Posts: 1008
Location: Tuscany, Italy | Very nice and informative....thank you. |
|
| |
|
Joined:
July 2002
Posts: 288
Location: Maine | Dan, so what exactly are you using to cut the cardboard templates. I see you're using a CAD program to plot out various lines. Are you hand cutting all the shapes or do you have a CNC router type device? The form of your cardboard top to fit inside the purfling looks like a pretty darn good fit. |
|
| |
|
Joined:
July 2002
Posts: 288
Location: Maine | I forgot to add that your patch panel to the back looks really really great. It will hardly be noticeable through the sound hole. This has been great following your progress. |
|
| |
|
Joined:
February 2014
Posts: 714
Location: moline,illinois | You are doing some amazing work its really cool to follow your progress! |
|
| |
|
Joined:
June 2012
Posts: 2333
Location: Pueblo West, CO | trickard - 2014-05-25 8:18 AM
Dan, so what exactly are you using to cut the cardboard templates. I see you're using a CAD program to plot out various lines. Are you hand cutting all the shapes or do you have a CNC router type device? The form of your cardboard top to fit inside the purfling looks like a pretty darn good fit.
...
I forgot to add that your patch panel to the back looks really really great. It will hardly be noticeable through the sound hole. This has been great following your progress.
Hi TJ,
Just a #11 Xacto blade. Actually, those lines are pencil-drawn. Yes, all the shapes are hand-cut. I have the ability to have parts laser-cut by a guy locally who cut the parts for my model airplane kits, but for this project I'm cutting all the parts by hand. I've always hand-cut the parts for the prototypes of my kits, mainly because it's cheaper and faster than sending the parts out to be cut. Also, the photos don't show it, but this bowl is actually slightly asymmetrical in the lower bout.
The cardboard top you're seeing is actually the second one I cut. I originally put the bowl upside-down and traced it. That was the one in the one I posted earlier. I drew a line that was the offset by the thickness of the binding/purfling and cut out that template. When I tried putting it inside the purfling, it ended up being wrong in a lot of places. So, I took that one and traced a new one, then redrew the lines where it was off and hand-fitted that to the top recess. It required shaving here and there to get a decent fit. It's not 100% perfect, but it's a good starting point.
When I ordered the bearclaw spruce, I also ordered some cheapo top wood. I'm going to use that as the preliminary test piece, which will be cut slightly large. I'll taper the back slightly so it'll be a gentle press fit with the top surface mating to the inside of the purfling. Then, once I'm happy with the fit, I'll use that as the final template to cut the bearclaw spruce.
I didn't get a perfect edge glue joint with the patch. The patch ended up being slightly offset to outside, which is why I had to use the filler putty on the outside. Like you say, it won't really be visible through the sound hole and the outside of the joint is smoothly faired, so once I repaint the bowl with the textured paint, the joint should be pretty much invisible. The patched area has a consistent tap tone with the rest of the back, so I'm happy with it.
Thanks for the kind words, everyone. I'm glad you all are enjoying it.
Edited by DanSavage 2014-05-25 4:44 PM
|
|
| |
|
Joined:
June 2012
Posts: 2333
Location: Pueblo West, CO | A side job that needs to be done before gluing the top into place is to replace the missing binding around the end of the fretboard.
I looked at the binding on my 1719 and it was made from one piece. When I bought the top wood, I also bought some .040" x .25" white binding to do this job.
I was able to successfully hand-bend the binding to a reasonable facsimile of the shape, but it took a fair amount of time and effort. When trimming the ends to fit, I cut one end too short. So, that piece was unusable.
Faced with the prospect of bending a new piece and the possibility of cutting that one too short, I decided to make myself a mold to do the bending for me. 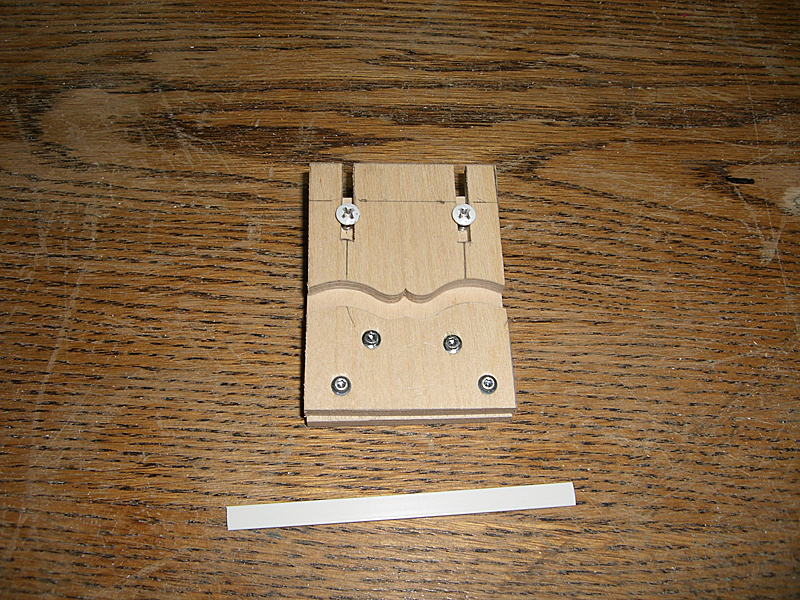
I traced the shape of the end of the fingerboard onto 1/4" plywood, then cut it out using my scroll saw. I tried bending the binding cold, but it didn't work too good.
So, I broke out my handy-dandy heat gun. I put the strip of binding into the mold, and heated it up until it got soft, then squeezed the mold halves together using a C-clamp.

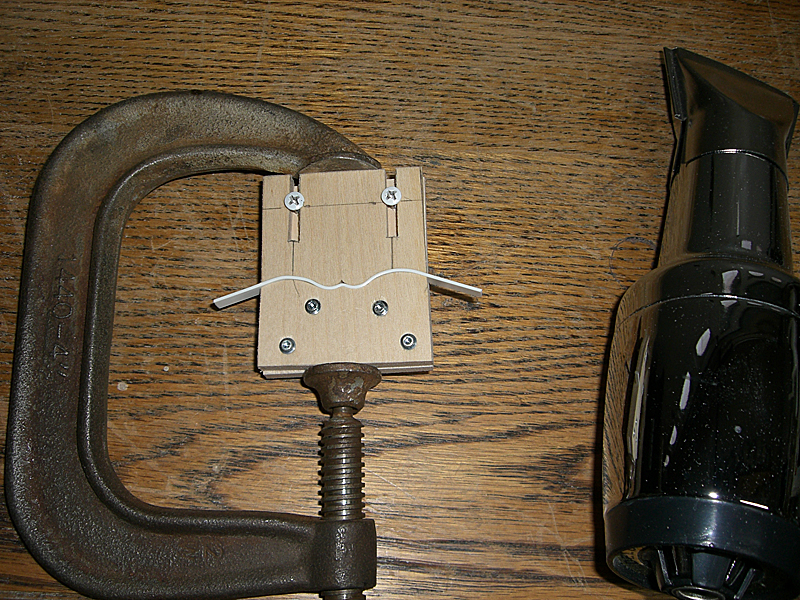
Once it cooled, I popped it out of the mold and it retained the correct shape. 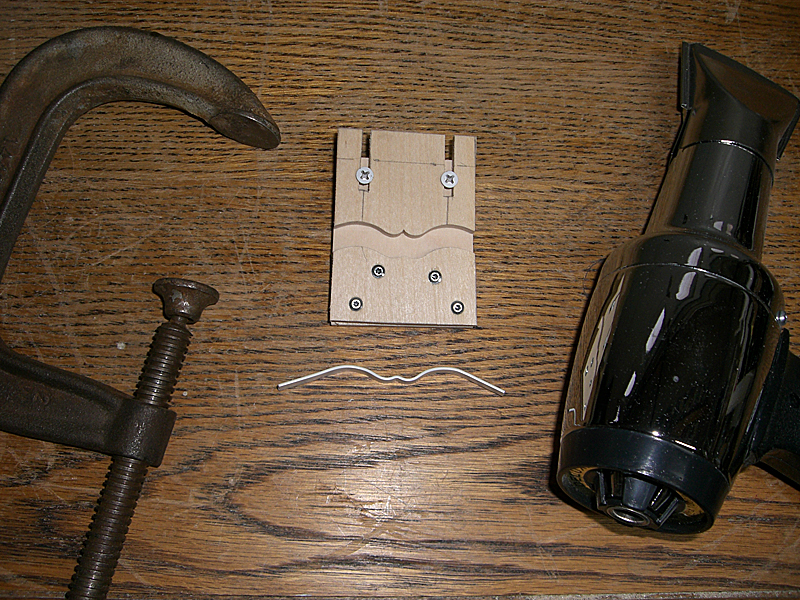
And, here's the final piece, trimmed to fit. Actually, this isn't the final piece because the binding I bought is white and the binding on the guitar is ivory-colored. I bought some cream-colored binding from Stewmac, but it's too dark, so I can't really use that, either. 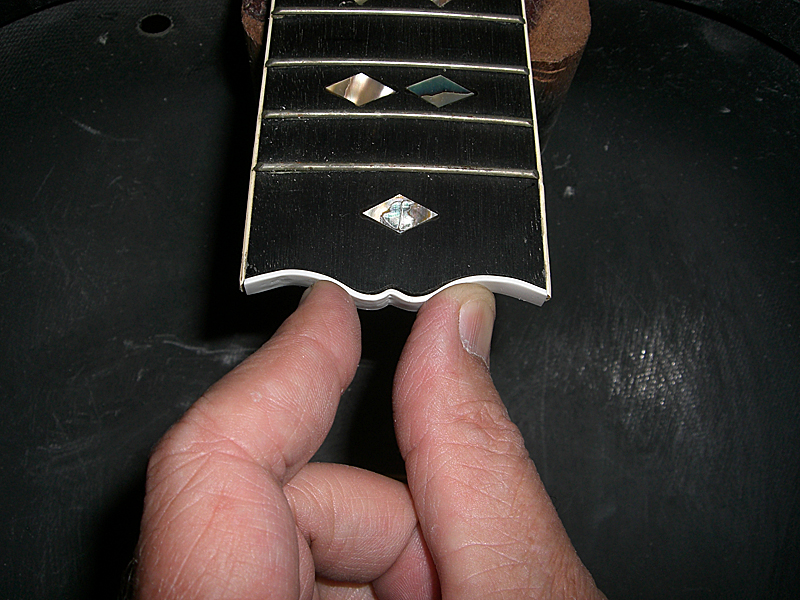
I searched around online and found what looks like the right color binding from a company called, Allparts.com. If it's the right color, I'll make a new patch, glue it into place, then scrape it to match the profile of the fretboard.
Edited by DanSavage 2014-05-29 1:00 AM
|
|
| |
|
Joined:
December 2003
Posts: 13996
Location: Upper Left USA | Coming along nicely! |
|
| |
|
Joined:
November 2002
Posts: 3650
Location: Pacific Northwest Inland Empire | Nice work, Dan!
With all the jigs & molds required, do you have an honored place in your shop, where you display these contraptions, to remind yourself, and any other interested parties, what a labor-of-love these projects can become?
As I recall, from the halcyon days of my misspent youth, there were at least 20 different devices that were custom-made, to get vintage automobile restorations accomplished, hanging in the shop. The most memorable one was the jig we made out of Ponderosa Pine, done on a camping trip at Yosemite National Park, circa 1961, for filing a differential bushing, for a 1928 Model "A" sedan. A couple of grad students from San Francisco State broke down, and were pretty-well stuck for parts & repair, until rescued by The Old Man, & my uncle. Took them 3 days, and copious amounts of fine bourbon, as I recall, to fabricate that part from a piece of oak wood, and get it installed. Got the guys back to Frisco, about a 200-mile trek!
Edited by seesquare 2014-05-29 8:44 AM
|
|
| |
|
Joined:
June 2012
Posts: 2333
Location: Pueblo West, CO | Thanks! That's a great story.
Not a special place. Mostly just where they'll fit.
The only stuff having a special place of display is the model airplanes hanging from the ceiling that were built with these types of tools. Even the, they're only there because that's the best place to keep them where they'll stay out of harm's way. (hangar rash) 
|
|
| |
|
Joined:
November 2002
Posts: 3650
Location: Pacific Northwest Inland Empire | Hmmmmmm..........a clean workshop. Novel concept. |
|
| |
|
Joined:
June 2012
Posts: 2333
Location: Pueblo West, CO | Actually I just strategically aimed the camera so you couldn't see the floor. One whole side of the garage looks like a NYC street during a garbage strike.
Edited by DanSavage 2014-05-29 11:58 AM
|
|
| |
|
Joined:
December 2003
Posts: 13996
Location: Upper Left USA | Note to self: devise and market guitar case hangars for the ceiling... and clean up the shop. |
|
| |
|
Joined:
June 2012
Posts: 2333
Location: Pueblo West, CO | When I bought my top wood, I bought the bearclaw spruce, which is what I'm planning to use and I bought some cheap spruce I could use as a practice piece. I'd planned to use hot hide glue (HHG) where ever possible. There are three main reasons for this. First, it's easier to disassemble, should the need arise, secondly, it has a stronger grip on wood/wood joints and lastly because it carries the tone better than any other glue like epoxy or PVA. One of the first HHG joints was to join the halves of the top wood. I did the practice piece and was very happy with the results, so I did the final wood next. I found a local furniture shop that was able to thickness sand the two tops for me for $30. As it turns out they do a lot of this type of work for luthiers in my area. I cut out the practice top and fitted it to the bowl. I wanted to verify the height of the bridge, so I marked the location. Seen in the pic below are the additional notes around the periphery of the top are where I needed to make adjustments when tracing outline of the practice top onto the final top. 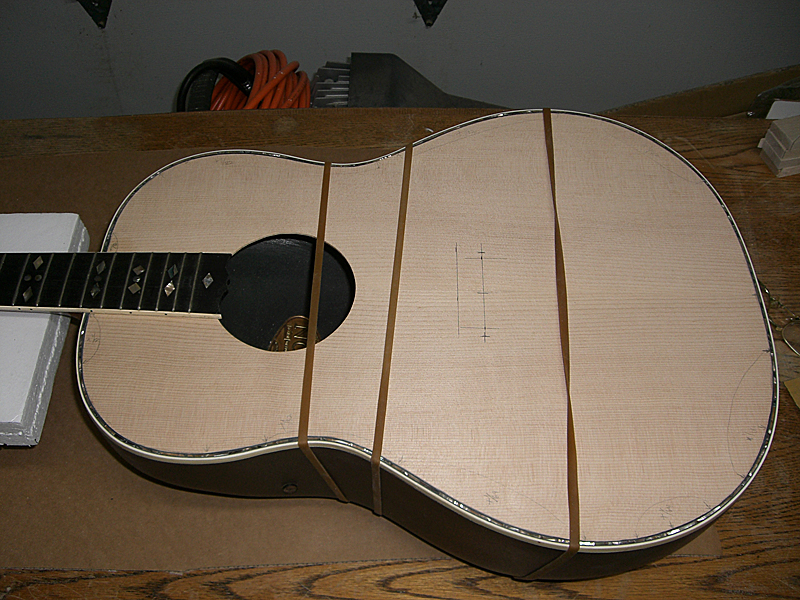
I used a 3/16" brad-point bit and drilled the locating pin holes in the pracice top. I'll need to do this with the final top before adding the bracing. 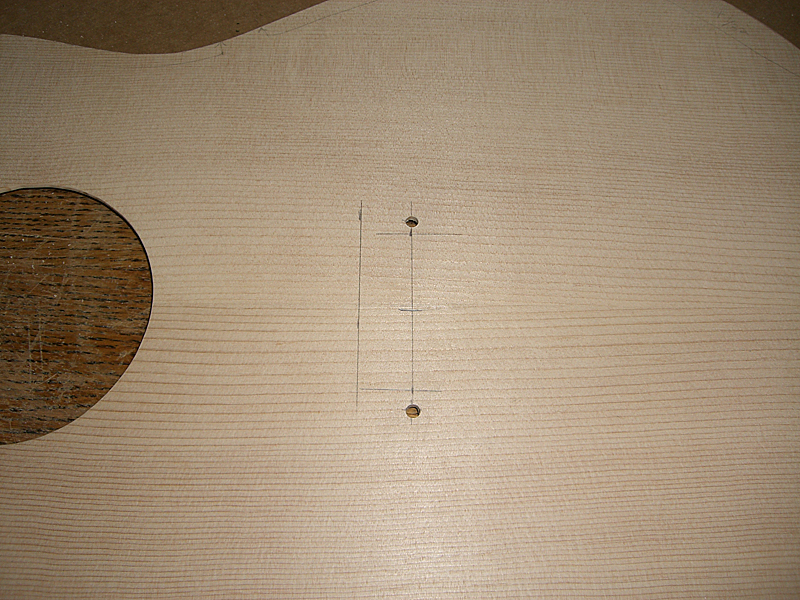
The top is back in the bowl and the bridge is put into place. 
A quick check reveals there is a gap of about 1/16" between the straight edge and the top of the bridge, which is perfect. Bridge location on the top is also spot-on. 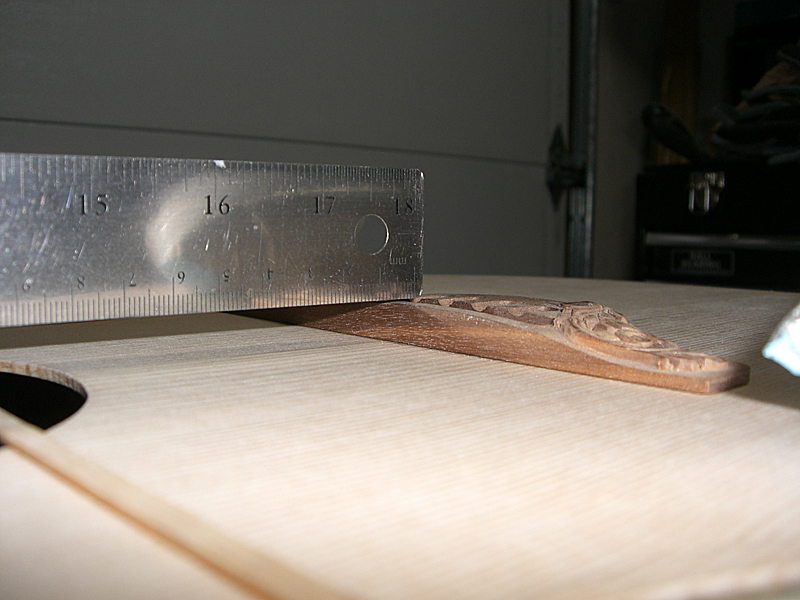
I traced the top outline to the final top wood, cut it out and started the final fitting. It fits pretty good, but I still need to make a few minor adjustments. Mostly, I'm pretty happy so far. 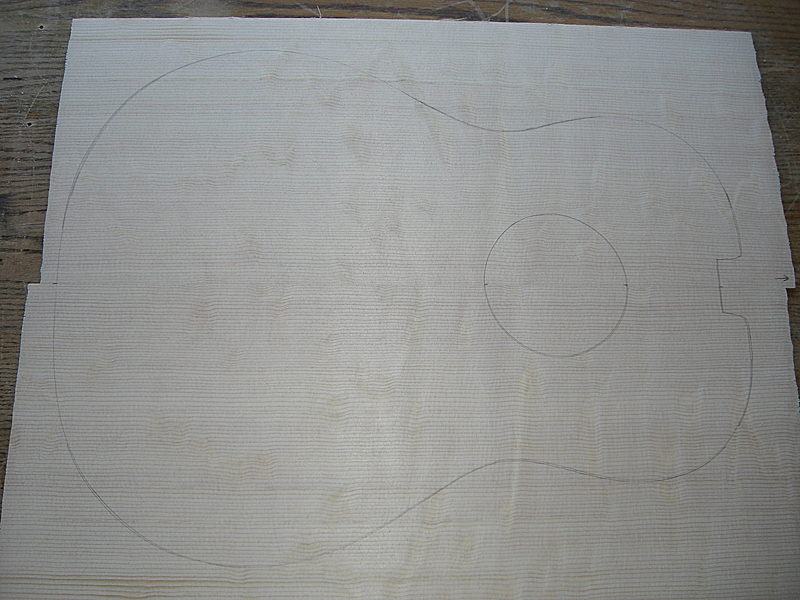
I've been thinking a lot about what X-bracing pattern I wanted to use. I was originally going to use a forward-shifted X-brace. But, after playing my 2078-TX I've decided to use the Ovation LX bracing. The LX bracing is very similar to the standard X brace pattern except for minor adjustments to the angle of the X braces. Standard X-braces are layed out with a 98-degree angle and the LX braces have a 95-degree angle. The 2009 Ovation catalog contains pics of the LX bracing for both the center hole and the epaulet-style tops. I've imported the photo below into my CAD program and I'm tracing the braces locations with the intention of printing out a full-size plan. Even though the photo below shows a cut-away bowl, the braces are identical with standard bowl except for the to brace above the sound hole. It's been shortened for the cut-away bowl. On the standard bowl it goes all the way across the top. I'll use this plan to lay out the braces on the top wood. 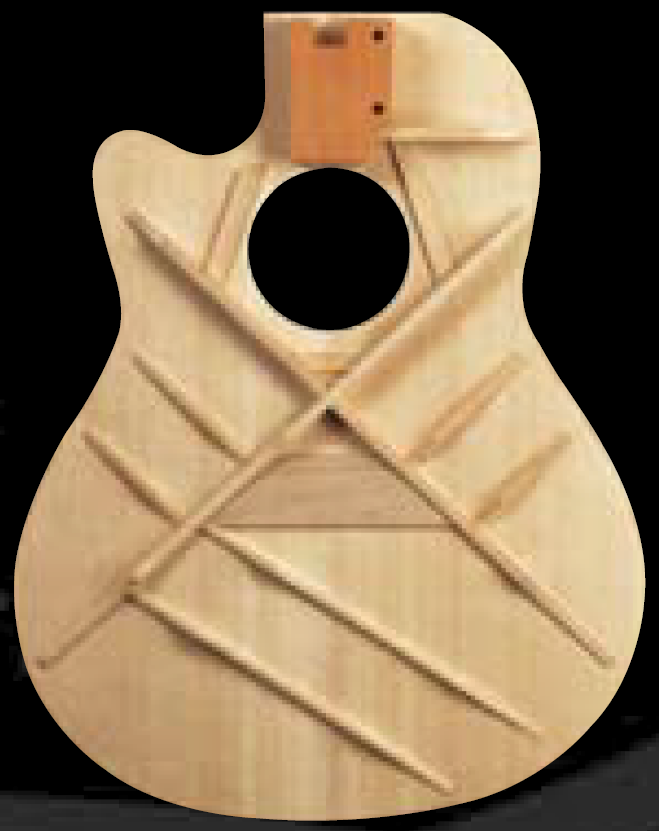
I took some measurements from my 2078-TX which will help me to scale the plans. 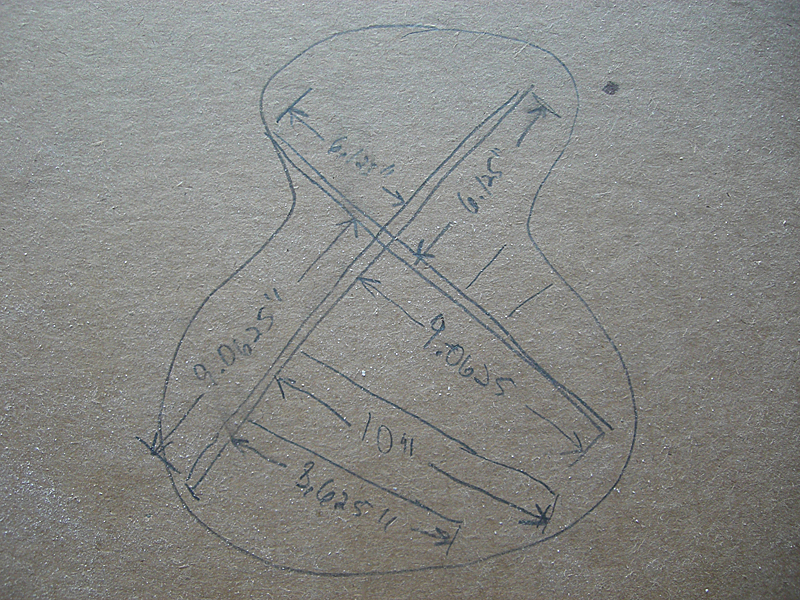
|
|
| |
|
Joined:
April 2010
Posts: 823
Location: sitting at my computer | Really interesting and informative thread! Great job Dan  |
|
| |
|
Joined:
December 2003
Posts: 13996
Location: Upper Left USA | BFLG porn! |
|
| |
|
Joined:
June 2012
Posts: 2333
Location: Pueblo West, CO | Thanks for the kind words, Jeffrey. I'm glad you're enjoying this.
MWoody,
Don't touch that dial! More BFLG porn coming up shortly.
Edited by DanSavage 2014-06-06 2:23 PM
|
|
| |
|
Joined:
July 2002
Posts: 288
Location: Maine | Nice progress.. Boy, that bear was RIPPING that tree apart! As others have said, I'm looking forward to the rest of the rebuild .. |
|
| |
|
Joined:
August 2007
Posts: 1008
Location: Tuscany, Italy | Bravo !!! |
|
| |
|
Joined:
June 2012
Posts: 2333
Location: Pueblo West, CO | Thanks!
I figure that if I'm going to use bearclaw spruce, the spruce should look like a bear clawed it. :D
Actually, I'm really happy with the figuring. The photos don't really show all the figuring it has. Even the sanding guy commented on how nice it looked. |
|
| |
|
Joined:
July 2002
Posts: 288
Location: Maine | Not my ad but in case you want to do another Custom Legend re-top project
http://nwct.craigslist.org/msg/4476492444.html
TJR
|
|
| |
|
Joined:
June 2012
Posts: 2333
Location: Pueblo West, CO | Thanks for the head's up. I'll have to talk to my accountant.  |
|
| |
|
Joined:
September 2012
Posts: 813
Location: Thredbo, NSW, Australia | DanSavage - 2014-06-08 11:21 AM
Thanks for the head's up. I'll have to talk to my accountant.
Can you talk to mine as well? :-)
I think I have terminal GAS!
|
|
| |
|
Joined:
June 2012
Posts: 2333
Location: Pueblo West, CO | Sure thing. I'm not sure it'll do any good, but I'm always willing to try.  |
|
| |
|
Joined:
June 2012
Posts: 2333
Location: Pueblo West, CO | I've finished the braces for the top.
I was originally going to use a forward-shifted X-brace. Then I decided to use the Ovation LX brace pattern.
But when I started laying out the braces I found that the pre-made dreadnaught braces I bought from StewMac wouldn't fit the LX pattern. They did fit the forward-shifted pattern with a few minor mods to the length, so that's what you see below. For those who are curious about the difference between a standard X-brace pattern and a forward X-brace pattern, StewMac has a page that explains both. See: Banjo Killer? The scoop on forward X bracing for greater guitar volume. I'm also including the LX brace photo I posted previously for comparison. The primary difference between the Ovation LX braces and the braces I'm using is that while the Ovation braces are scalloped, they are square in cross-section. The braces I'm using are scalloped and tapered to a parabolic cross-section. I laid out the pattern on my cardboard template for sizing, spacing, etc. I was going to use a cloth patch over the X braces, but after some thought I've decided to make an X-shaped patch out of birch ply and notch the tops of the braces, like what Ovation does on their LX braces. Once that's done, I'm going to draw the pattern onto the back of my top wood, then start gluing tomorrow. Progress pics to follow. 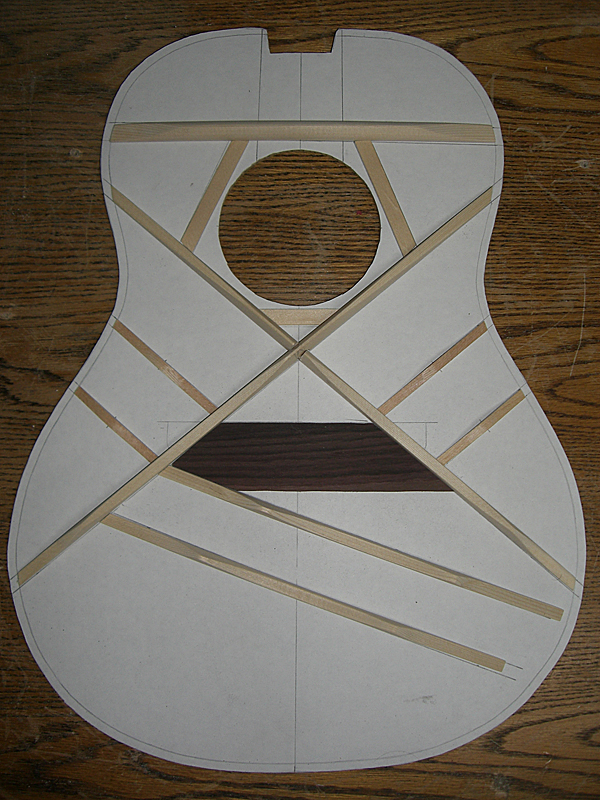
Edited by DanSavage 2014-06-13 10:32 AM
|
|
| |
|
Joined:
June 2012
Posts: 2333
Location: Pueblo West, CO | I glued the braces to the top wood today. First, get the glue pot started. 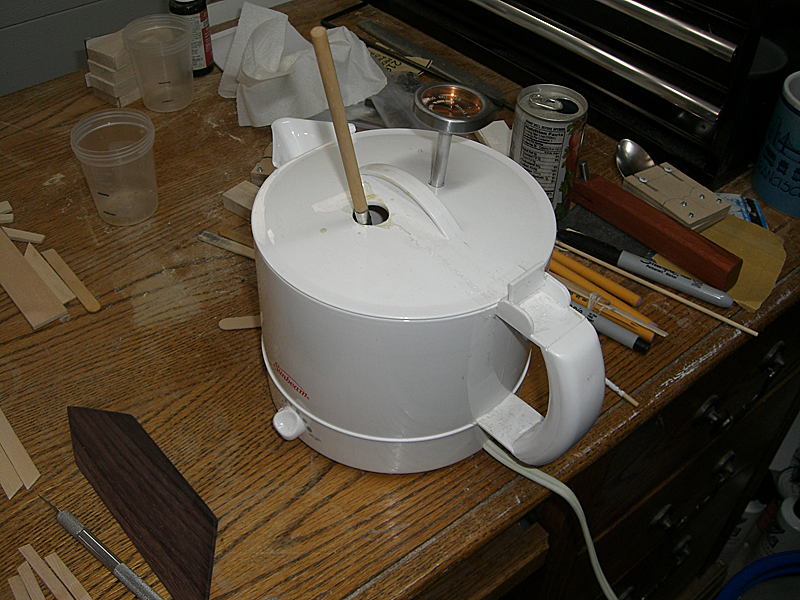
Set up the GoBar deck. 
Tape visqueen to the base to prevent any accidental gluing of the top to the base. 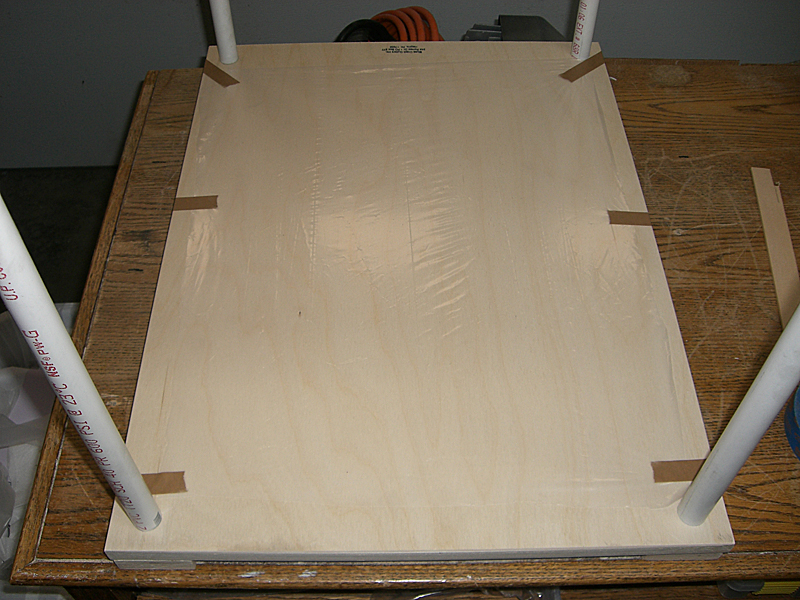
Clamp the top wood temporarily. These will get removed as I add braces. 
I figured it would be best to work from the center outwards. As I add more and more GoBars, they would get in the way of later clamping. First, the X braces. 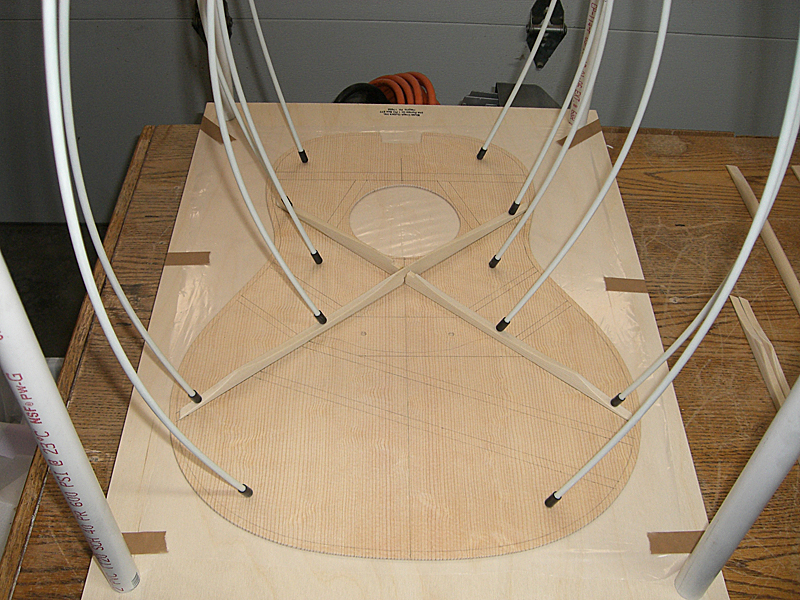
Rosewood bridge plate. 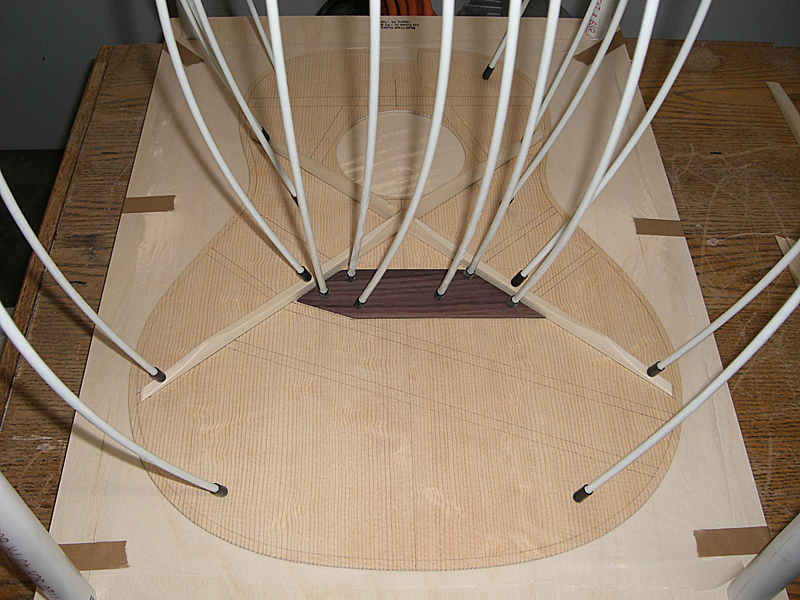
Tone bars. 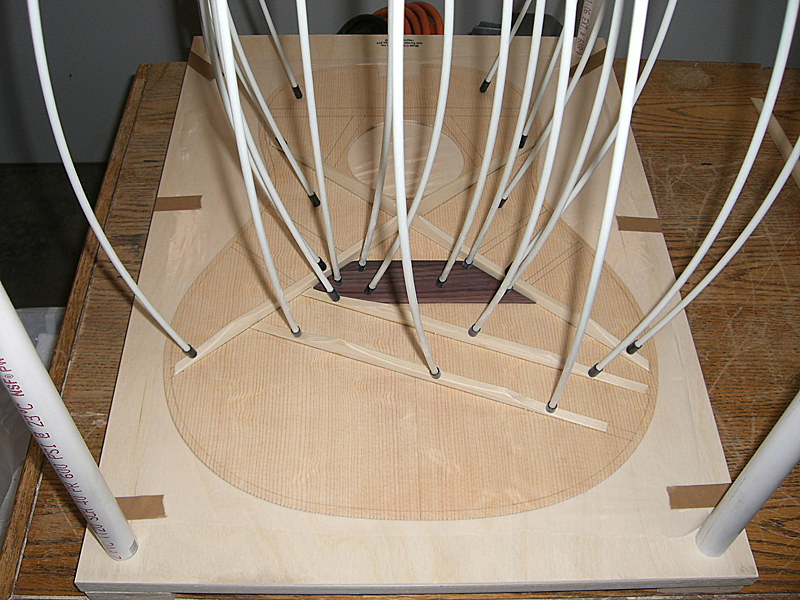
Treble finger braces. 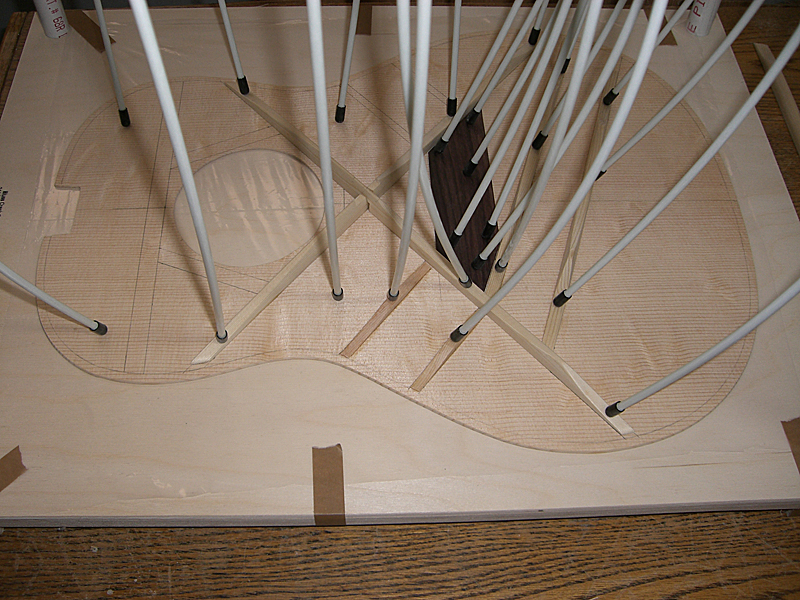
Bass finger braces. 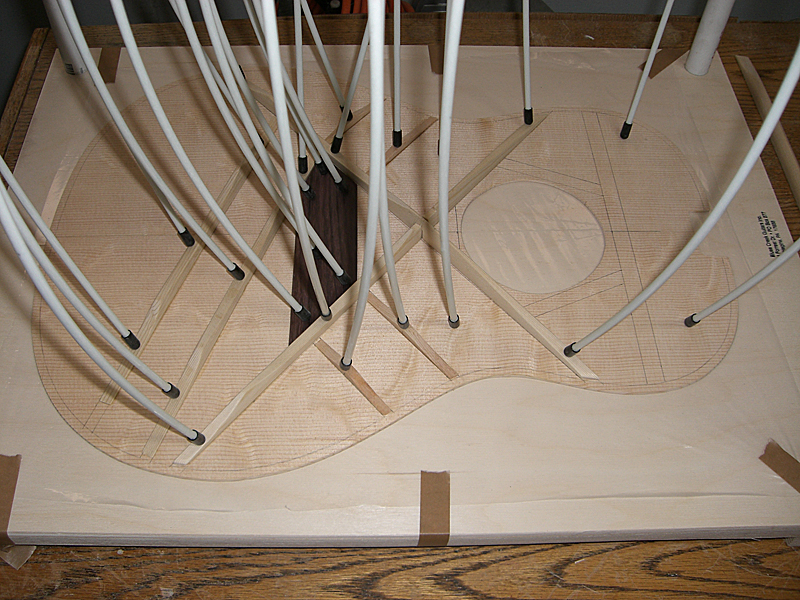
Reinforcement strips. 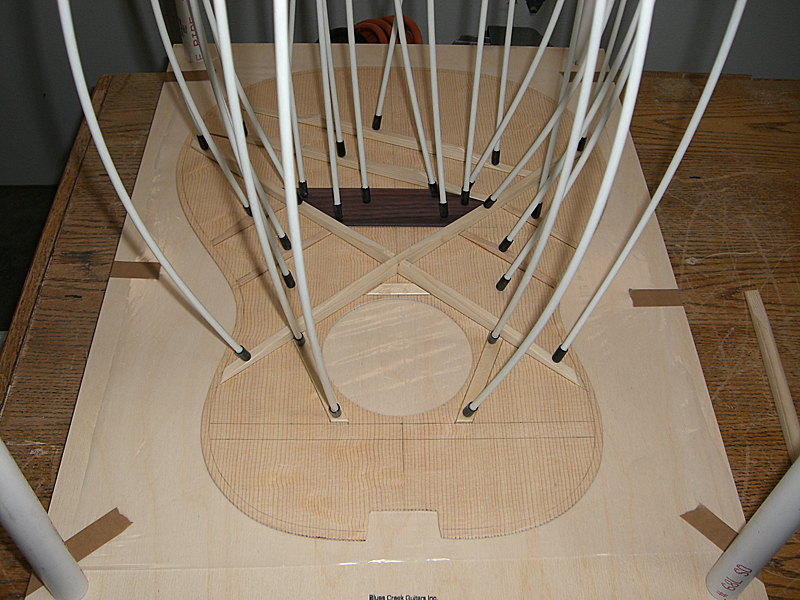
Transverse brace. 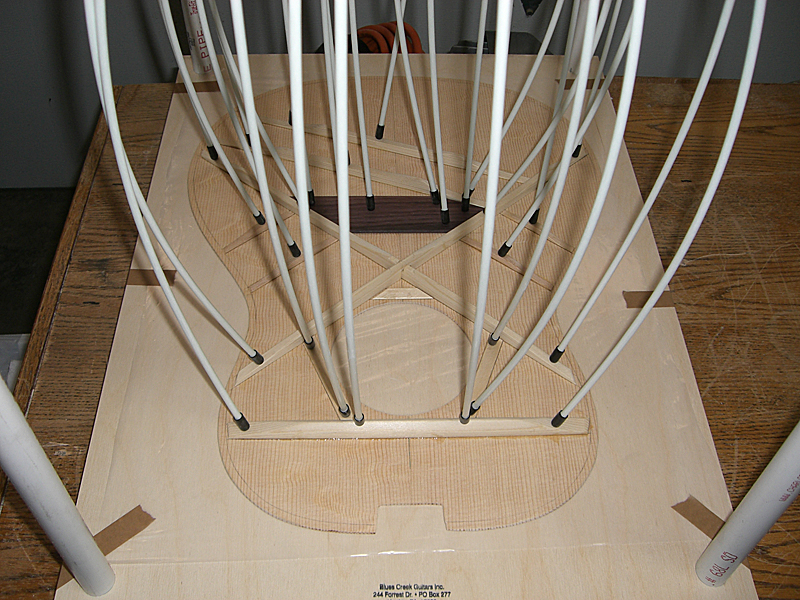
Lastly, the reinforcement strip for the X braces. I was going to use a x-shaped plywood piece, but I did a little reading on the subject and a lot of builders just use a simple strip like this. Once the glue has dried, I'll shape it to match the cross-section of the braces. 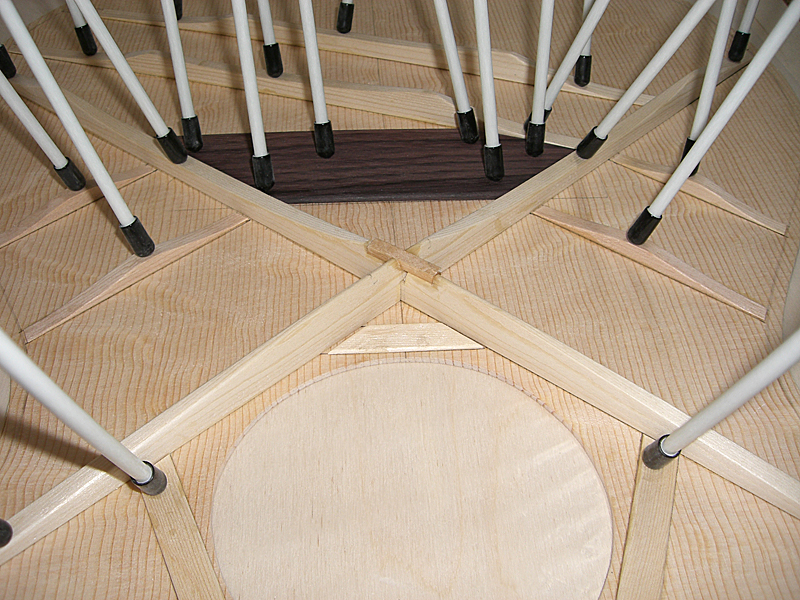
|
|
| |
|
Joined:
December 2003
Posts: 13996
Location: Upper Left USA | Very nice!
Is the bottom plate flat or concave?
I'll have to find more tent poles... |
|
| |
|
Joined:
June 2012
Posts: 2333
Location: Pueblo West, CO | Thanks!
The bottom plate is flat, though I did buy a 28' radius concave plate when I bought the GoBar deck.
I was originally going to use the concave plate, but I discovered that would have raised the bridge too much and put it out of alignment with the neck.
I checked my other Ovations and found they started out with true flat tops. If you watch the factory tour video you'll see the worker cutting the binding groove with the body upside-down against the table. If the top had any sort of radius, then this would not work out because the body would rock back and forth.
So, once I remembered seeing this in the video, I felt more comfortable building my top flat, too.
I ended up buying the GoBar deck and bars from Blues Creek guitars because they had the lowest price around for the deck, bars and plates.
Edited by DanSavage 2014-06-14 4:00 PM
|
|
| |
|
Joined:
July 2002
Posts: 288
Location: Maine | Again. Great progress ! And you kept glue off your fingers to take step by step camera shots
Was the Hide glue already in liquid form? What is the working time of the glue?
It will be interesting to see how well the top "slips " in now.
I was imagining that you would have a vacuum diaphram to hold the braces down. You went modern old school.
Talbot
|
|
| |
|
Joined:
June 2012
Posts: 2333
Location: Pueblo West, CO | Thanks, TJ.
Yeah, the glue does get sticky as it starts to set up. I had to re-glue the X reinforcement strip a couple of times because it stayed stuck to my fingers and pulled away when I tried to let go of it.
No, I bought 192-gram hide glue in granulated form. I mixed it 2:1 with distilled water, then heated it up in the glue pot to ~145-degrees. The glue itself stays in liquid form for quite a while, actually. But, once you brush it on, then stick it down it will grab within a few seconds which is enough time to put the clamps on.
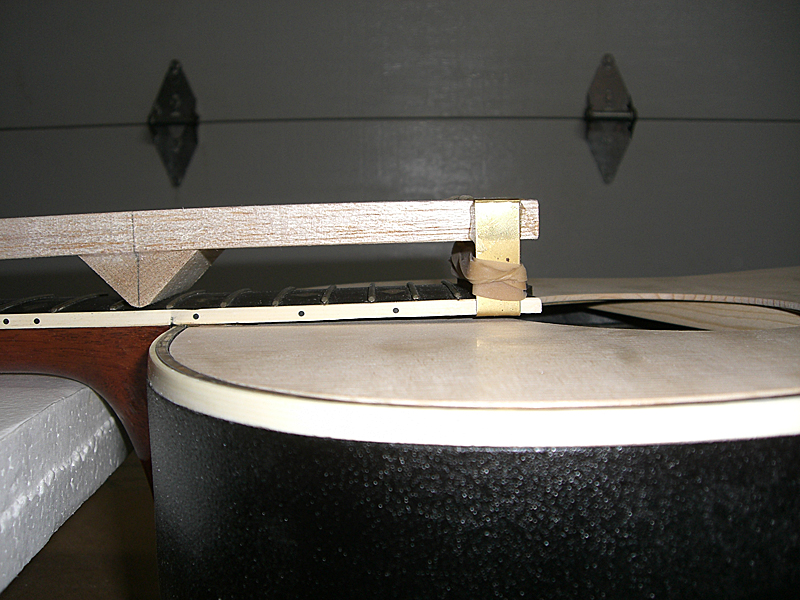
I did put the top into place to make sure the neck geometry was still in good shape. (it is) But, because the fretboard extension is warped downward, it quite a bit tighter with the braces than it was without them. I probably won't put it back into place again so I don't risk gouging the top.
I'm not sure how those guys who use a vacuum diaphragm get all the braces down before the glue starts to set up. I'm pretty happy with how the GoBar deck worked. |
|
| |
|
Joined:
June 2012
Posts: 2333
Location: Pueblo West, CO | Progress continues. The reason for the spaces of time between my posts is that I need to gather either tools, materials or both.
As I noted previously, the fretboard extension is warped downward which interferes with taking the braced top in and out. I knew this was going to cause problems when I get ready to glue the top into place and I would run the risk of scratching the top. 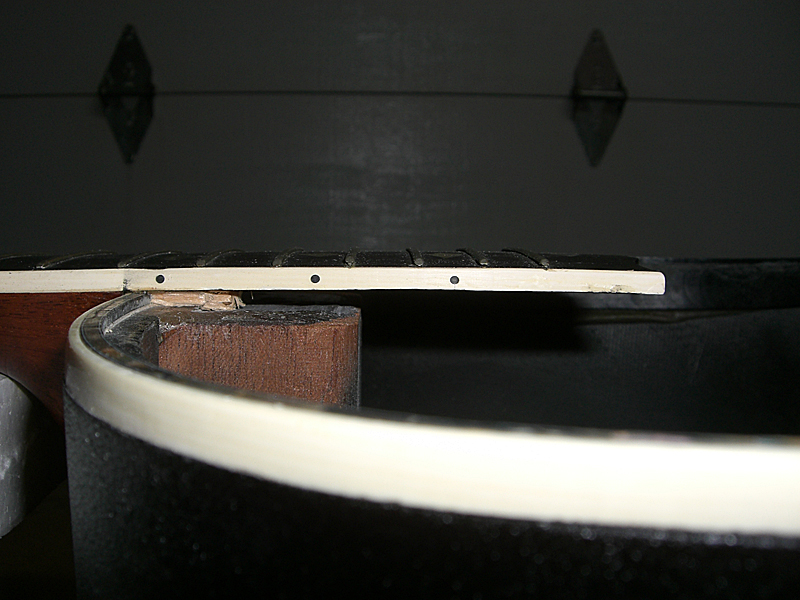
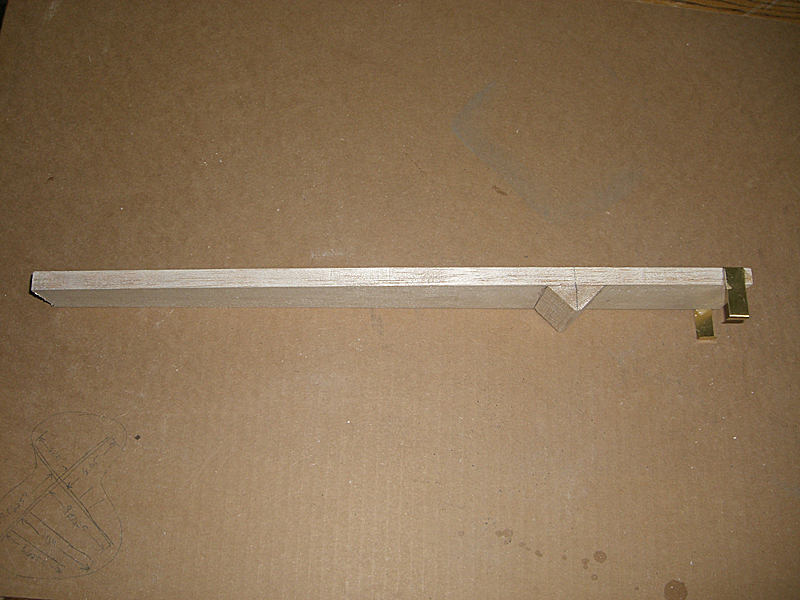
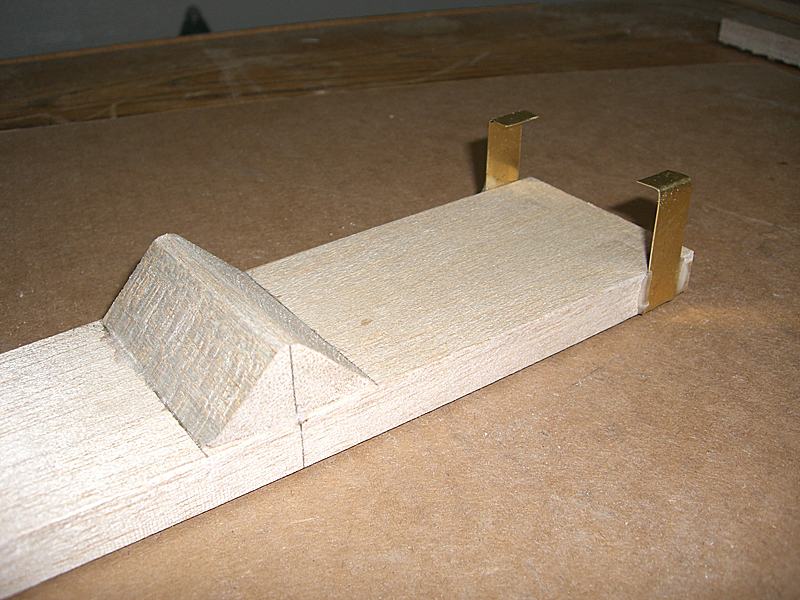
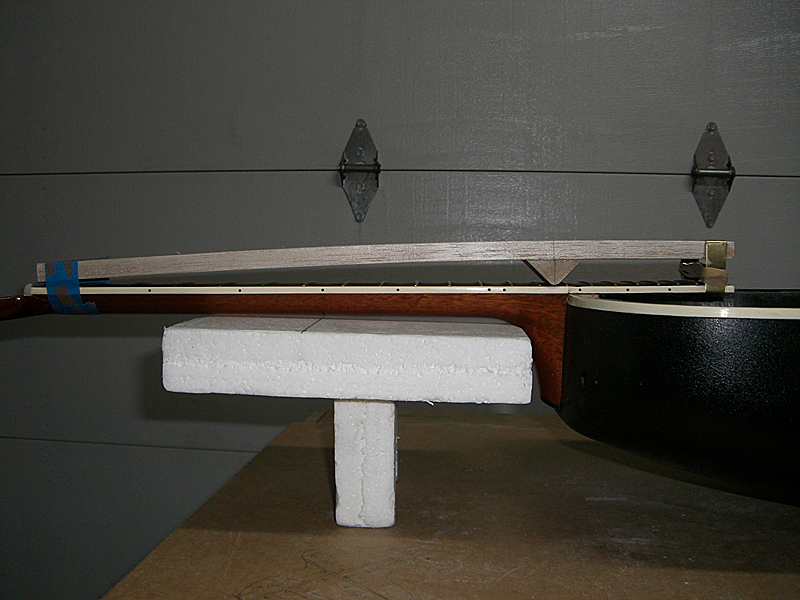
After a little thought, I built a tool that pulls the extension up out of the way. Now I can take the top in and out easily. I used a scrap 1/2" hard balsa plank and a 1" piece of triangle stock and a piece of .030" x 1/2" brass strip stock. I glued the triangle stock to the plank using CA and the brass strip using 5-minute epoxy.
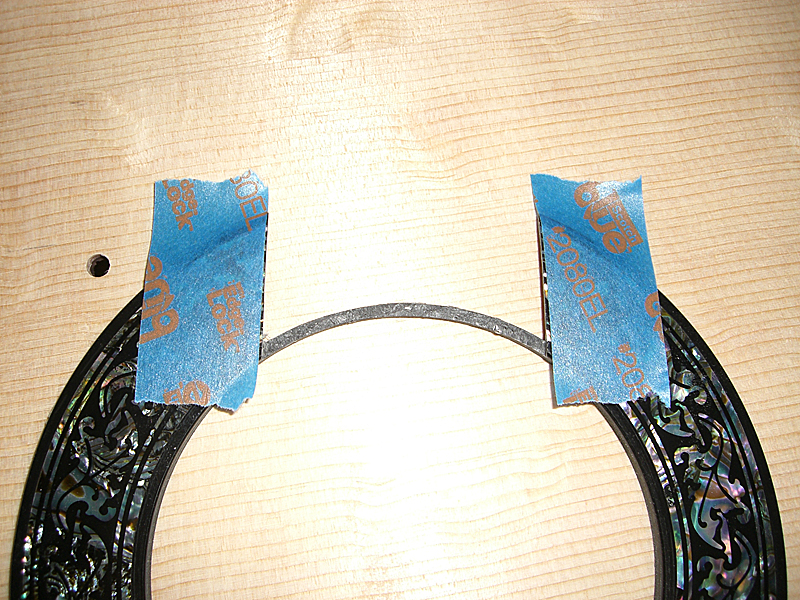
The rosette is not an exact fit to the extension, so I put it into place and used masking tape to mark where I'm going to need to trim it. 
Before gluing the top, I need to seal the wood to prevent the glue squeeze-out from staining the edges. Because I'm planning to use hide glue for the bridge and extension, so these areas need to remain bare wood. First, use tape to mark the boundaries of these areas. 
Fill the area inside with tape and remove the boundary areas. 
 Open up the bridge alignment pin holes. 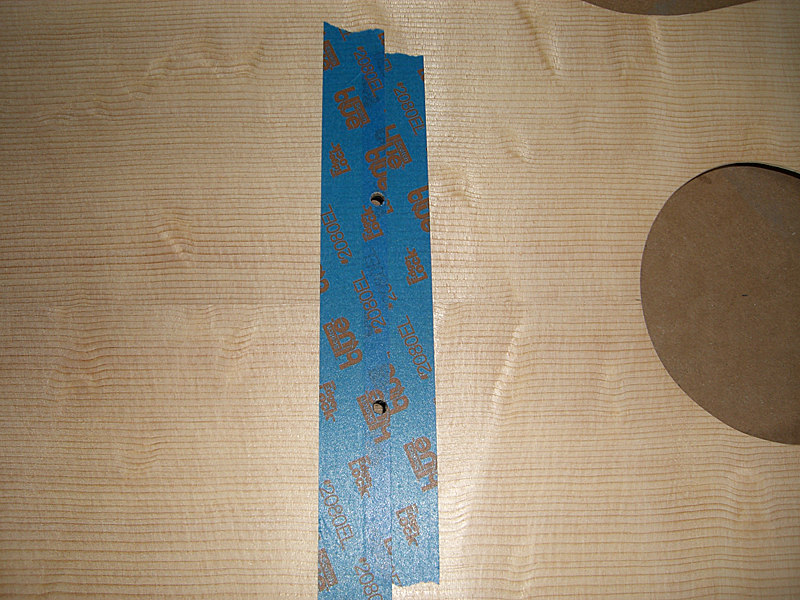
Put the bridge into place. 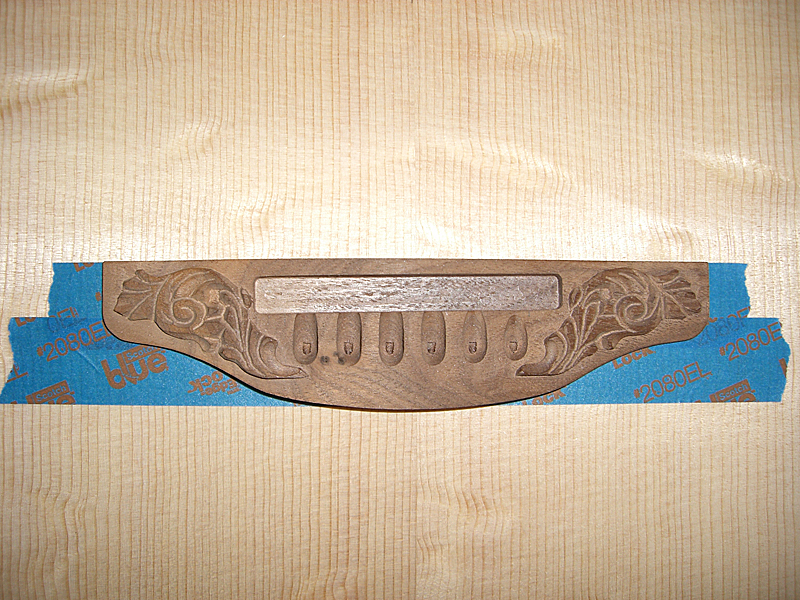 Carefully cut through the tape around the bridge making sure to not cut too deep.. 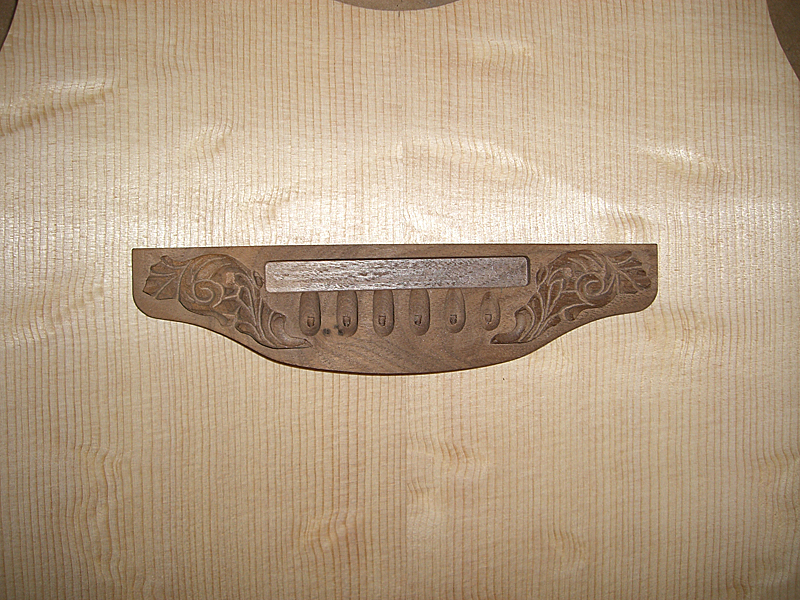 Perfect bridge mask. 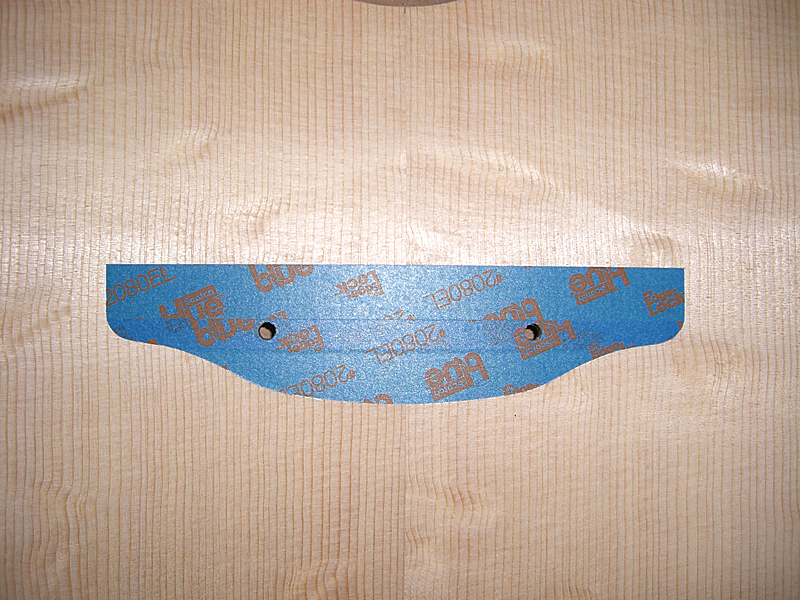 This next photo deserves a little explanation. I'm using dewaxed shellac to seal the wood because it provides a barrior between the wood and the glue and is an excellent base for subsequent finish coats. It also provides a nice color to enhance the grain of the wood. I will be putting a lacquer finish onto the top. But, shortcomings of bare nitrocelluouse lacquer are well-documented. In short, it's delicate and requires careful handling. In the aviation world, nitrocelluouse lacquer is known as nitrate dope. It is an excellent base coat because it sticks to most anything, including wood, fabric and metal. And, everything used as a finish coat will stick to it. While it makes an excellent primer, it's never used as a finish coat because of its lack of chemical resistence. That's where butyrate dope comes in. It's extremely durable as a finish coat because it's resistent to most chemicals, including gasoline, oil, nitromentane, alcohols, etc. In fact, only extremely harsh chemicals like MEK, acetone, touluene, etc. will dissolve it. But, butyrate's shortcoming is that nothing else will stick to it, but more butyrate. So, it's a terrible primer, but a fantastic finish coat. In addition nitrate and butyrate are available in two formulations: tautening and non-tautening. Tautening dope is used on natural fabrics like linen, muslim, etc. to shrink the fabric. Non-tautening dope has plasticizers added to it which weaken the shrinking. They will still shrink over time, just not as much as tautening. Non-tautening is used on synthetic fabrics like polyster, which are shrunk with heat. So, I'll be usng the nitrate dope for the build layers. Then, once the top is smooth, I'll switch to butyrate for the finish layers. In the end, I'll have all the benefits of a lacquer finish and none of the shortcomings. I would love to use hide glue to fix the top to the body, but the kerfing is plastic and hide glue doesn't stick to plastic. So, I'm pretty much stuck with using epoxy. I did a quick review of the different formulations of Hysol and decided to use 0151. It's optically clear, but more importantly it's temperature range is -35°F - +160°F and it has a 60-minute working time. If ever the time comes where I need to remove the top, I just need to heat the glue to anything over 160°F and it'll soften enough to break the bond. Of course, this also means I'll need to take care not the leave the guitar in a hot car, but that's already a given with almost any guitar.  I painted the top with a coat of shellac to start the process. I let this layer dry overnight. I sanded it with 180-grit, then 320-grit and applied a second layer. I will leave this layer alone until the top is glued into place, then I'll sand it smooth and start adding the nitrate build layers. 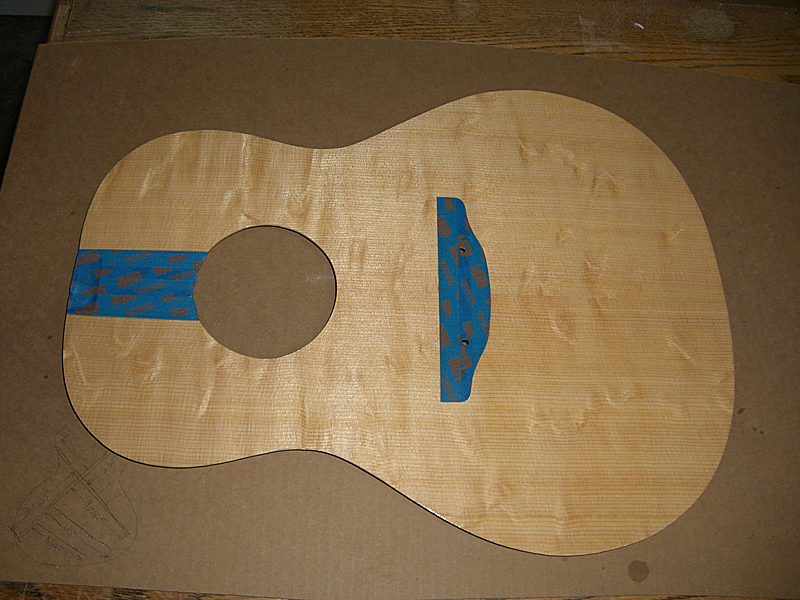
Edited by DanSavage 2014-06-20 12:29 PM
|
|
| |
|
Joined:
December 2003
Posts: 13996
Location: Upper Left USA | It's looking better all the time Dan.
|
|
| |
|

Joined:
October 2012
Posts: 1082
Location: Yokohama, Japan | Just incredibly informative stuff. Thanks a bunch. Getting all the background thoughts on the bracing, neck-jig, shellac and finish coats is so informative and fun to follow. Can't wait to see the progress...that top is looking just absolutely gorgeous. Makes me want to become a Luthier...perhaps in another life...just inspiring stuff DanSavage! |
|
| |
|
Joined:
June 2012
Posts: 2333
Location: Pueblo West, CO | Thanks for the kind words, guys. I've learned a lot about guitars while working on this project. My background in model aviation has definitely helped because a lot of the materials and tools are the same in both areas. I'me really close to gluing the top into place. One of the small jobs that needed to be done is replace the missing binding from the end of the fretboard extension. I ordered some 'cream' colored binding from StewMac, but it was too dark. I found all kinds of ivoroid binding online, but I didn't want to use that because ivoroid has 'grain' molded in and it wouldn't match the binding already on the guitar. I ordered some 'cream' colored binding from allparts.com and it's almost a perfect match. I molded it using the binding tool I made and my heat gun. I glued it on yesterday with 5-minute epoxy, then scraped it down. It's not 100% perfect, but I'm very happy with the results. 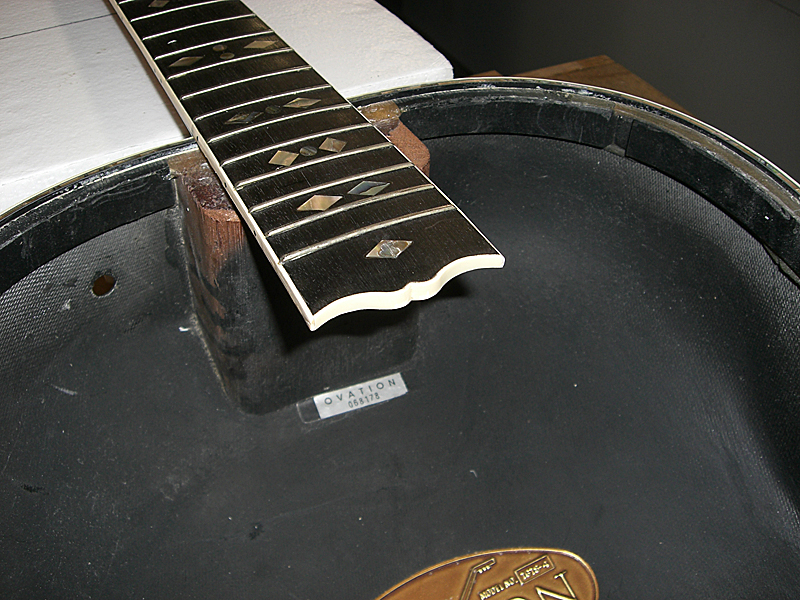
|
|
| |
|
Joined:
August 2007
Posts: 1008
Location: Tuscany, Italy | DanSavage - 2014-06-20 4:30 PM
"....My background in model aviation has definitely helped because a lot of the materials and tools are the same in both areas..."
This remind me something about aviation and guitars ....
Congratulation Dan. Very nice and informative job. We can not wait to see the finished guitar.... |
|
| |
|
Joined:
December 2004
Posts: 573
Location: Denmark | What a documentary. Thanks for sharing. Have you thoughts on coating the back surface of the top and bacings as well? |
|
| |
|
Joined:
June 2012
Posts: 2333
Location: Pueblo West, CO | maremagnum - 2014-06-21 10:51 AM
This remind me something about aviation and guitars ....
Congratulation Dan. Very nice and informative job. We can not wait to see the finished guitar....
Yes, who else do we all know that was involved with aviation and guitars? Hmmm... Let me think...
Thanks! I know the guitar will look pretty when I'm done. But, it's all for naught if it doesn't sound as good as it looks. Know what I mean? |
|
| |
|
Joined:
June 2012
Posts: 2333
Location: Pueblo West, CO | tpa - 2014-06-21 4:12 PM
What a documentary. Thanks for sharing. Have you thoughts on coating the back surface of the top and bracings as well?
Thanks and you're welcome.
Yes, I have thought about it and I'm probably going to leave it bare wood.
If I ever need to make a repair to the braces or a crack in the top having finish on the back will really complicate the process. |
|
| |
|
Joined:
September 2012
Posts: 813
Location: Thredbo, NSW, Australia | DanSavage - 2014-06-22 12:55 PM
Thanks! I know the guitar will look pretty when I'm done. But, it's all for naught if it doesn't sound as good as it looks. Know what I mean?
I know what you mean Dan. I bought a 1981 Folklore 1614 last year with both of the main braces in the X brace broken. I spent a couple of months deciding what to do and then planning how to do a repair. Long story short - I made two new braces that I glued on top off the original broken braces. The end result was a great sounding guitar that was previously a wall-hanger.
But the time after the repair, and then from when I put some strings on it and then played it was very tense indeed.
I continue to be over the moon with how good it sounds, and this old Folklore has a special place in my heart; nevertheless, I would like to compare it to Muzza's Folklore - just to see if I did a good job on the repair.
Thanks so much Dan for your ongoing documentary. You epitomise what this site is about!
|
|
| |
|
Joined:
June 2012
Posts: 2333
Location: Pueblo West, CO | BanjoJ - 2014-06-22 3:06 AM
I know what you mean Dan. I bought a 1981 Folklore 1614 last year with both of the main braces in the X brace broken. I spent a couple of months deciding what to do and then planning how to do a repair. Long story short - I made two new braces that I glued on top off the original broken braces. The end result was a great sounding guitar that was previously a wall-hanger.
...
Thanks so much Dan for your ongoing documentary. You epitome what this site is about!
Thanks for the kind words and you're welcome.
Yes, it's always best to spend time planning rather than just jumping in with both feet. |
|
| |
|
Joined:
June 2012
Posts: 2333
Location: Pueblo West, CO | Well, the top is on.
First order of business was to prepare the area where the fretboard extension gets glued to the top. I peeled off the tape and applied a coat of hide glue and let it dry. I also applied a coat of glue to the back of the fretboard extension.
After the epoxy holding the top dries, these will get a fresh coat of hot glue to reactivate the dried glue and clamped together. 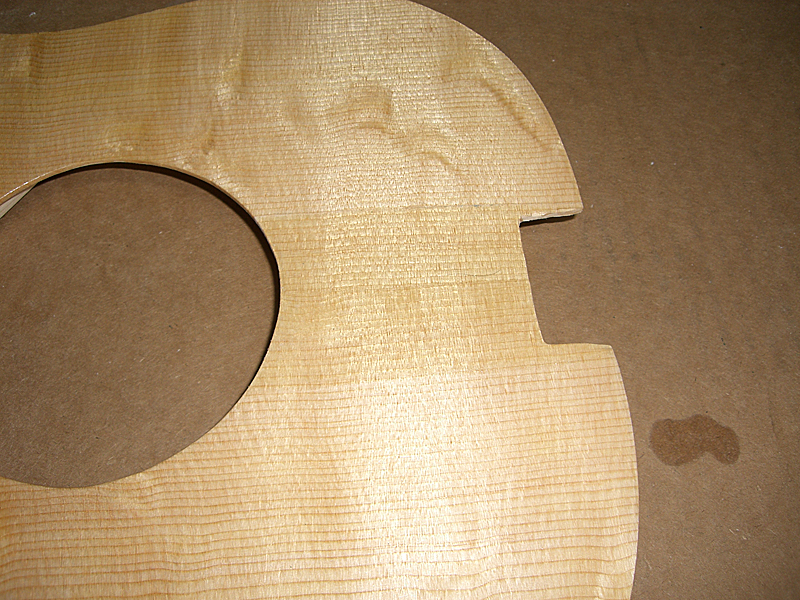
I made the bridge clamping caul out of two pieces of scrap 1/4" birch ply and glued them together with CA. This will also act as a backstop for when I drill out the pickup wiring hole so it doesn't bust how huge chunks of the rosewood bridge plate.

I applied a bead of Hysol 0151 to the kerfing and at the very top underneath the fretboard extension.
This is the applicator gun. Anyone whose seen the part of the factory tour video where the worker is gluing the rosette into the groove of the Legend top should recognize this tool as it's the same as the one shown here. I'm not sure which Hysol epoxy they used, but it's probably the quick-drying variety. The 0151 definitely takes a full 24 hours to completely harden.

Dropped the top wood into place and wrap the rubber bands around the bowl. Each wrap is a single rubber band looped either two or three times, depending on the location. Lengthwise wraps got two loops and spanwise wraps got three.
I was going to use binding tape, but the top wood warped slightly after the braces were added and parts of the top didn't want to sit flush. The rubber bands applied pressure to these areas to hold the top flat and tightly against the kerfing all the way around the bowl. They also squeezed the bowl slightly against the top. There are a few gaps between the wood and the purfling here and there, but I'll fill these with epoxy so they're level with the surface. 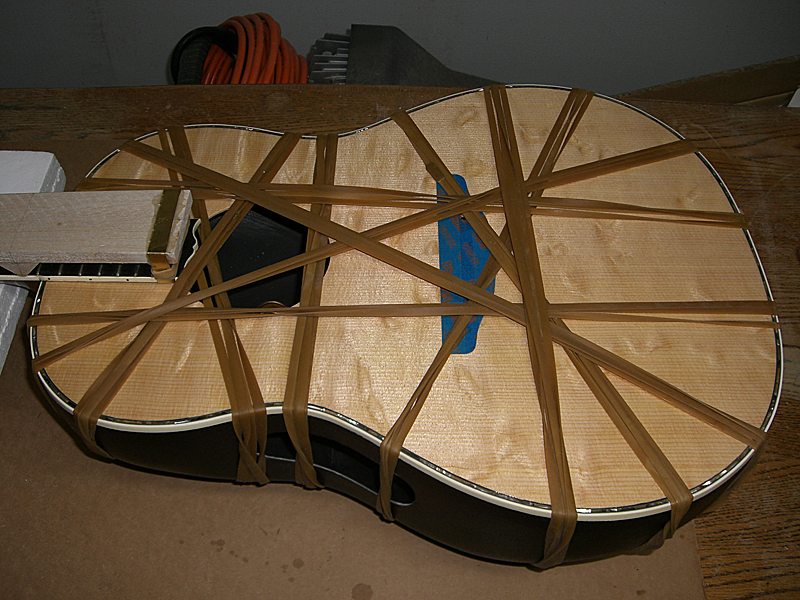
The glue is dry and I removed the rubber bands. I reactivated the glue between the fretboard extension and the top, then clamped them together for about 30 minutes to allow the glue to set.
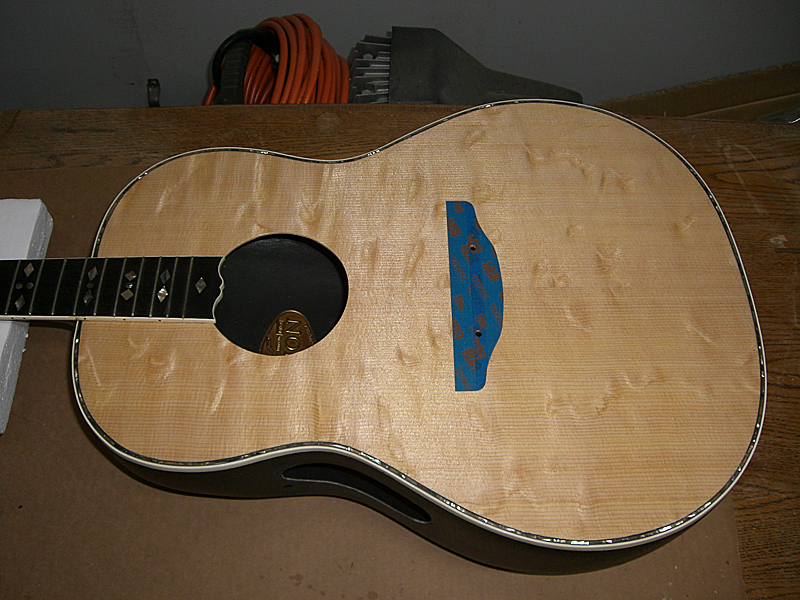
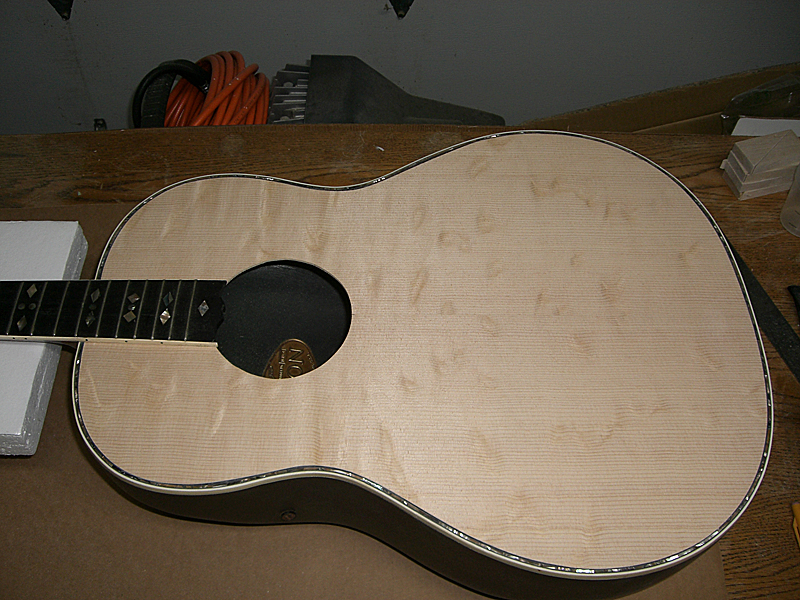
The rosette has been sanded to fit and it goes into place nicely. I also dropped the bridge into place so I check the neck angle (looks good!) and so I could ogle what the finished product would look like. (looks good!)
Now, it's onto the finishing process. First up will be to mask the entire guitar and start spraying the nitrate dope and leveling the surface.
Tap tests show the top is very resonant. I almost want to glue the bridge down and string it up to hear what it sounds like, but I will resist the temptation and finish it first so that once I finally get the bridge glued down I can just enjoy it from then on.
Fun, fun, fun!
Edited by DanSavage 2014-06-28 9:51 AM
|
|
| |
|
Joined:
March 2005
Posts: 12759
Location: Boise, Idaho | Wow, this is looking very professional! Banjo's comment reminded me of one of my very meager successes at guitar repairs. I bought my Folklore as the only bidder off ebay, which should say something. The prior owner had tried to string it with nylon's and gave up. When I put steel strings on it, it had a wicked buzz, which turned out to be a broken brace right under the bridge. I was surprised that the hole for the pickup wire went right through the brace, which led to the broken brace. The pieces were still hanging there, so I just glued them back together with carpenter's glue. Years later, it's still sounding fantastic. |
|
| |
|
Joined:
August 2007
Posts: 1008
Location: Tuscany, Italy | It is really very beautiful !!! |
|
| |
|
Joined:
June 2012
Posts: 2333
Location: Pueblo West, CO | Mark in Boise - 2014-06-28 9:16 AM
Wow, this is looking very professional! Banjo's comment reminded me of one of my very meager successes at guitar repairs. I bought my Folklore as the only bidder off ebay, which should say something. The prior owner had tried to string it with nylon's and gave up. When I put steel strings on it, it had a wicked buzz, which turned out to be a broken brace right under the bridge. I was surprised that the hole for the pickup wire went right through the brace, which led to the broken brace. The pieces were still hanging there, so I just glued them back together with carpenter's glue. Years later, it's still sounding fantastic.
Thanks!
I like Folklore guitars. I'll probably buy one some day.
Did the factory drill a hole through the brace or was it done by someone adding electronics to a non-amplified guitar?
I bought a bare 2078-TX off eBay that was a factory reject. I bought all the missing pieces and discovered it, too, had a couple of loose braces that was causing the a dead low-E and A string. Once I glued the braces down, it fixed the dead-sounding strings, but still sounded tight, with very little sustain. I put my PrimeVibe on it for a week, and it made a tremendous difference.
In fact, it was this guitar that made me decide I wanted to put X-braces on this 1619 instead of building new A-braces. The A-braces sound okay, but I like the sound of X-braces better. |
|
| |
|
Joined:
March 2005
Posts: 12759
Location: Boise, Idaho | The factory must have drilled the hole through the brace, because it has the factory preamp. I was really surprised that it was built that way. |
|
| |
|
Joined:
June 2012
Posts: 2333
Location: Pueblo West, CO | Whoa! I wonder if all Folklore guitars have a hole in the brace? Original X-brace like the one below, right? 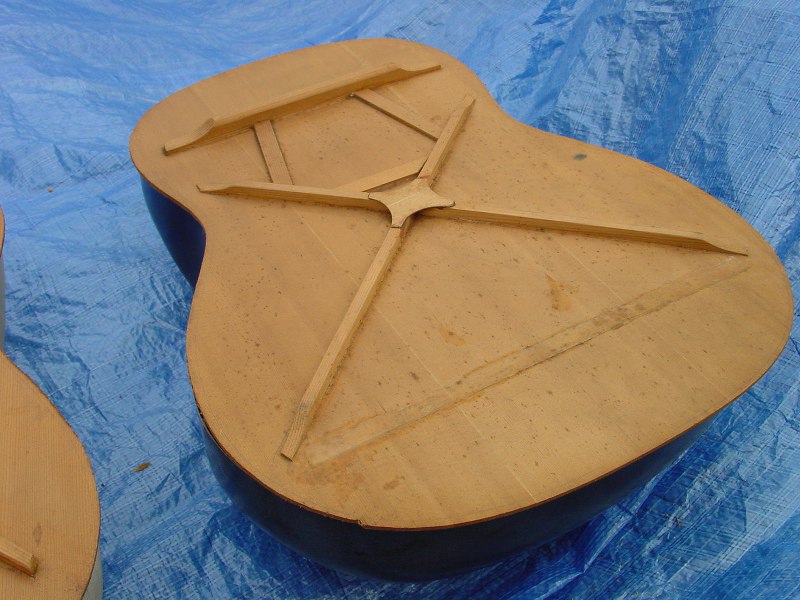
|
|
| |
|
Joined:
March 2005
Posts: 12759
Location: Boise, Idaho | It looks like the X brace from what I could see, but I couldn't see the little piece in the middle of the X that's in your pic. |
|
| |
|
Joined:
June 2012
Posts: 2333
Location: Pueblo West, CO | Mark in Boise - 2014-06-29 6:27 PM
It looks like the X brace from what I could see, but I couldn't see the little piece in the middle of the X that's in your pic. Does it look like this bracing pattern? Note that there is no x-reinforcement and the ends of the x-braces aren't scalloped. 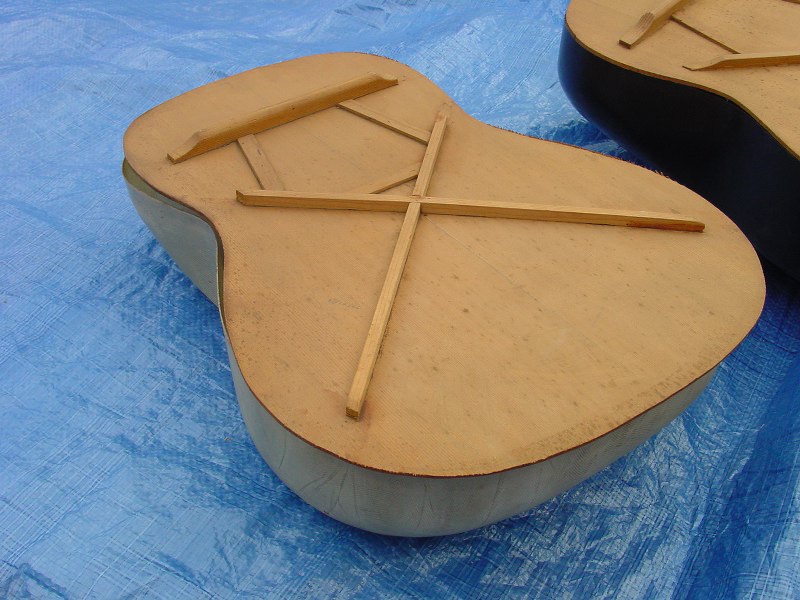
|
|
| |
|
Joined:
October 2012
Posts: 1082
Location: Yokohama, Japan | WOW! I said it before. I must say it again, "This is just so incredibly inspiring!" Thoroughly enjoying following your progress! Thanks! |
|
| |
|
Joined:
March 2005
Posts: 12759
Location: Boise, Idaho | DanSavage - 2014-06-30 12:32 AM
Mark in Boise - 2014-06-29 6:27 PM
It looks like the X brace from what I could see, but I couldn't see the little piece in the middle of the X that's in your pic. Does it look like this bracing pattern? Note that there is no x-reinforcement and the ends of the x-braces aren't scalloped.
Yes, that's it. Mine was made in 1977. I hadn't played it in a long time, so it was a nice excuse to check the bracing. I just love the sound. |
|
| |
|
Joined:
June 2012
Posts: 2333
Location: Pueblo West, CO | arumako - 2014-06-30 3:59 AM
WOW! I said it before. I must say it again, "This is just so incredibly inspiring!" Thoroughly enjoying following your progress! Thanks!
Thanks for the kind words and you're welcome
Edited by DanSavage 2014-06-30 11:52 AM
|
|
| |
|
Joined:
June 2012
Posts: 2333
Location: Pueblo West, CO | Mark in Boise - 2014-06-30 7:59 AM
Yes, that's it. Mine was made in 1977. I hadn't played it in a long time, so it was a nice excuse to check the bracing. I just love the sound. I can see how the simple brace pattern would make for a very responsive-sounding guitar. There's nothing there to impede the vibration of the top wood. |
|
| |
|
Joined:
May 2008
Posts: 1559
Location: Indiana | Excellent work Dan. |
|
| |
|
Joined:
November 2002
Posts: 3650
Location: Pacific Northwest Inland Empire | "I can see how the simple brace pattern would make for a very responsive-sounding guitar. There's nothing there to impede the vibration of the top wood."
Yeah, the 1st time i put a mirror inside my old Folklore, my thoughts were, "Seriously? That's all there is? Amazing!" And, with steel string, at concert pitch, no less.
BTW, Dan- you realize you're setting a daunting precedent here, right?
Carry On! |
|
| |
|
Joined:
June 2012
Posts: 2333
Location: Pueblo West, CO | Jonmark Stone - 2014-06-30 10:48 AM
Excellent work Dan.
Thanks, Jonmark. |
|
| |
|
Joined:
June 2012
Posts: 2333
Location: Pueblo West, CO | seesquare - 2014-06-30 12:14 PM
Yeah, the 1st time i put a mirror inside my old Folklore, my thoughts were, "Seriously? That's all there is? Amazing!" And, with steel string, at concert pitch, no less.
BTW, Dan- you realize you're setting a daunting precedent here, right?
Carry On!
The real purpose behind braces is to prevent the top from warping under the load of the strings and not impede vibration. In this respect, less is more and they don't get any more spartan than the original Ovation x-braces, do they?
Ha ha! Looks are one thing. Sound is another. |
|
| |
|
Joined:
June 2012
Posts: 2333
Location: Pueblo West, CO | Just a quick update.
I put together my little spray booth using a voting booth I acquired a few years ago. I added a visqueen curtain to keep the overspray under control. 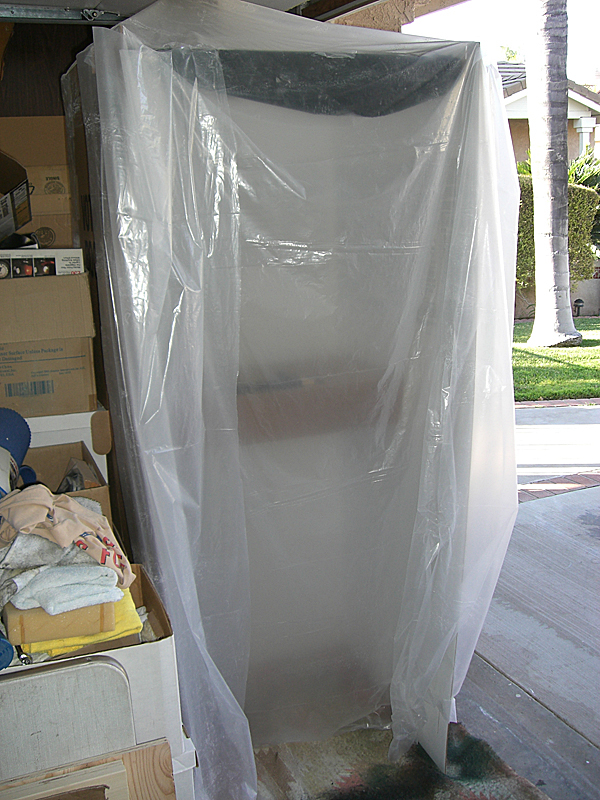
I taped down some balsa to keep the guitar from rolling around while it's being sprayed. 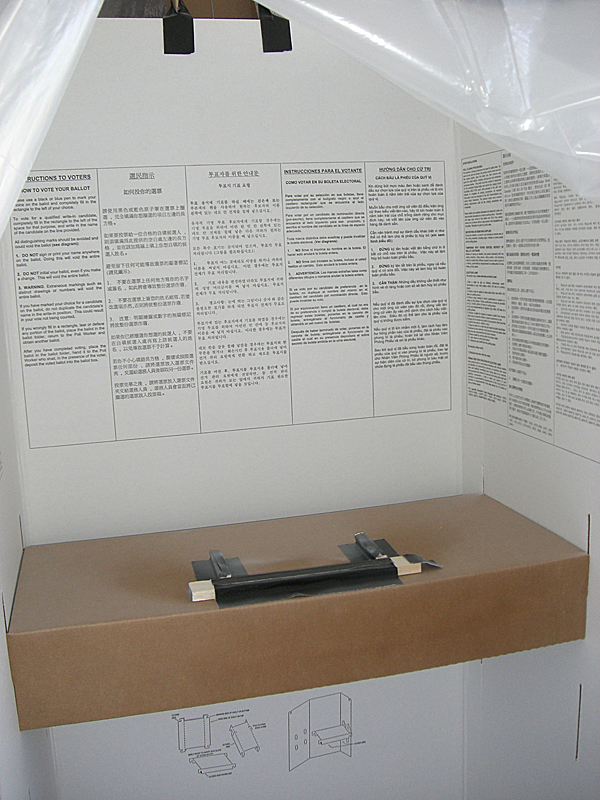
The nitrate dope has been applied and leveled. I'm ready to start applying the butyrate finish coats. 
I applied the first couple of coats of butyrate tonight. I'll let that dry for a day or so to fully harden, then wet sand it with 320-grit and apply a couple more coats. At that point I'll decide whether to go through another cycle of sanding/painting or to start the finish sanding process working up from 600-grit, to 1200-grit and 2000-grit and final polish. |
|
| |
|
Joined:
December 2003
Posts: 13996
Location: Upper Left USA | Very nice! |
|
| |
|
Joined:
June 2012
Posts: 2333
Location: Pueblo West, CO | Thanks!
It's getting there, slowly but surely. |
|
| |
|
Joined:
June 2012
Posts: 2333
Location: Pueblo West, CO | ASP trasnport error caused double-post.
Edited by DanSavage 2014-07-10 9:29 AM
|
|
| |
|
Joined:
June 2012
Posts: 2333
Location: Pueblo West, CO | Well, it's been over a month since my last post. It took longer than I expected to spray the dope. I had planned to let it harden for a full two weeks. While the dope was hardening, I refurbished/rewired a pedal box project for a friend. That project ended up taking three weeks, so the dope hardened an extra week. Here's what the finish looks like after cutting and polishing. Except for being a lot more shiny, it's not too different from the pics of the top with base shellac finish, but that was the plan. I knew the dope was, for the most part, optically clear, which is why I chose it. 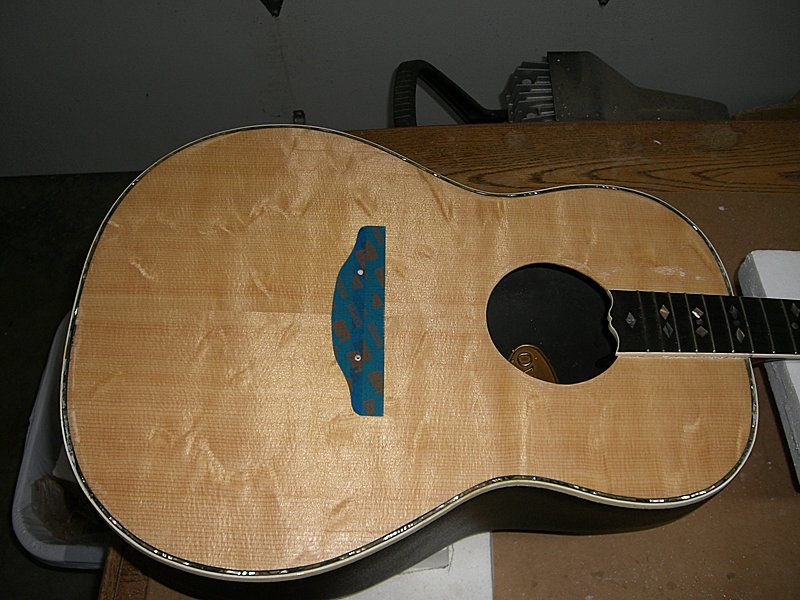
What I didn't expect was the weird clouding in certain spots. I did my best to repair these areas, but in the end there wasn't too much I could do except sand the finish down to bare wood and start over. Ther was no way was I going to do that. I don't even know how it's going to sound with the new bracing pattern I used. 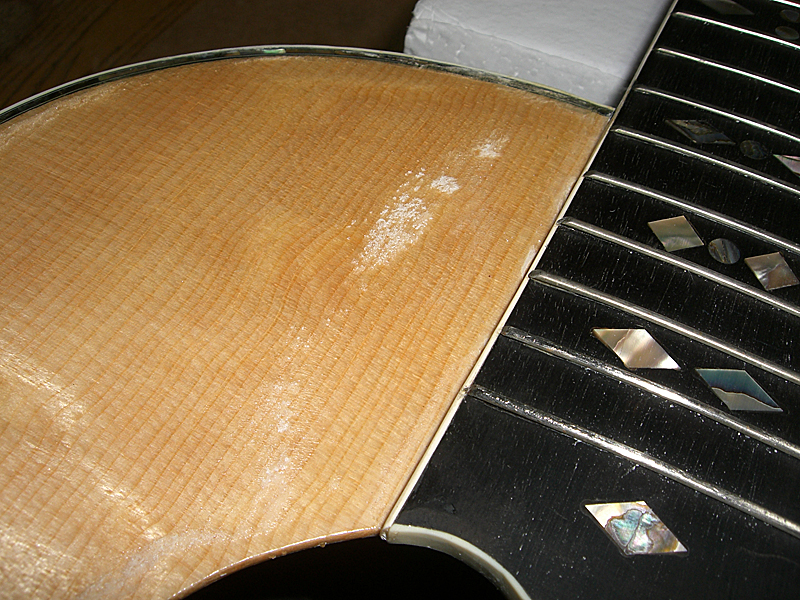
In the end I decided this was a learning experience and have decided to avoid using lacquer in the future. First, because it's a pretty tedius process having to spray on so many thin coats and secondly because if the lacquer happens to seep through the base shellac, the solvents in the lacquer melt plastic, as what happened with the bottom binding around the lower bout. 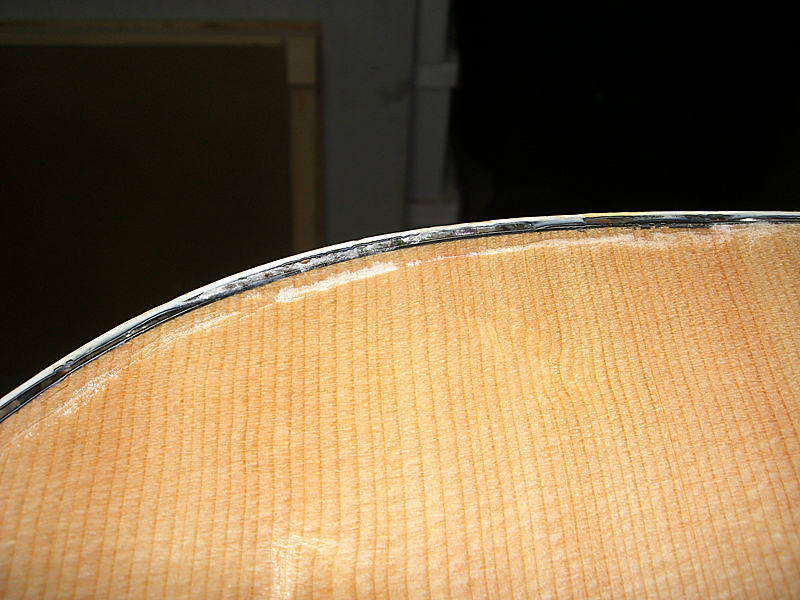
On to removing the bridge masking. First step is to remove the build-up of sanding dust and lacquer from the alignment holes. 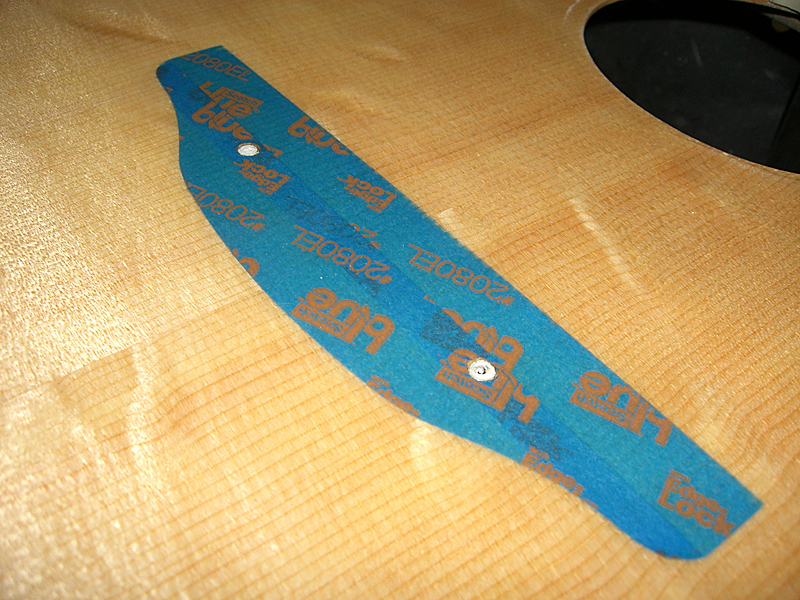
Drop the bridge into place, then using a sharp #11 Xacto knife, score the finish around the bridge to ensure a clean separation line. 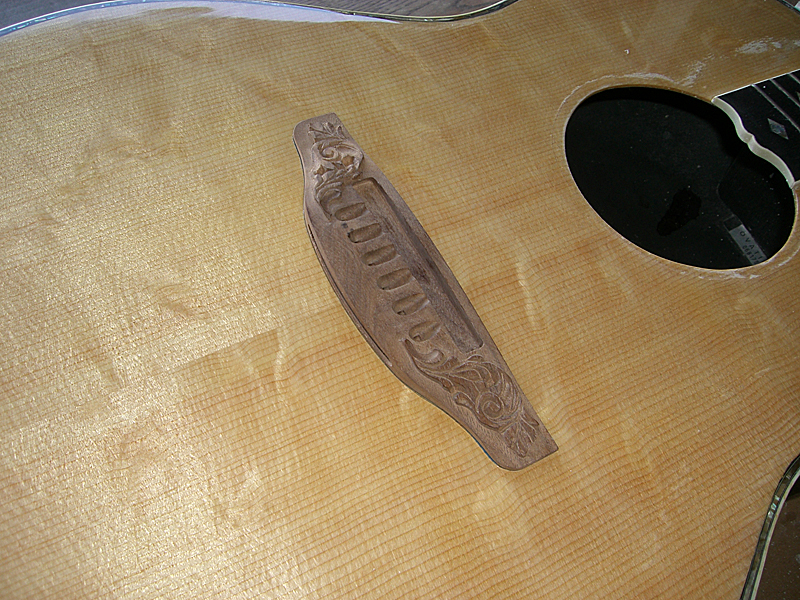
Peel the tape off, leaving the clean top wood ready for gluing the bridge using hide glue. 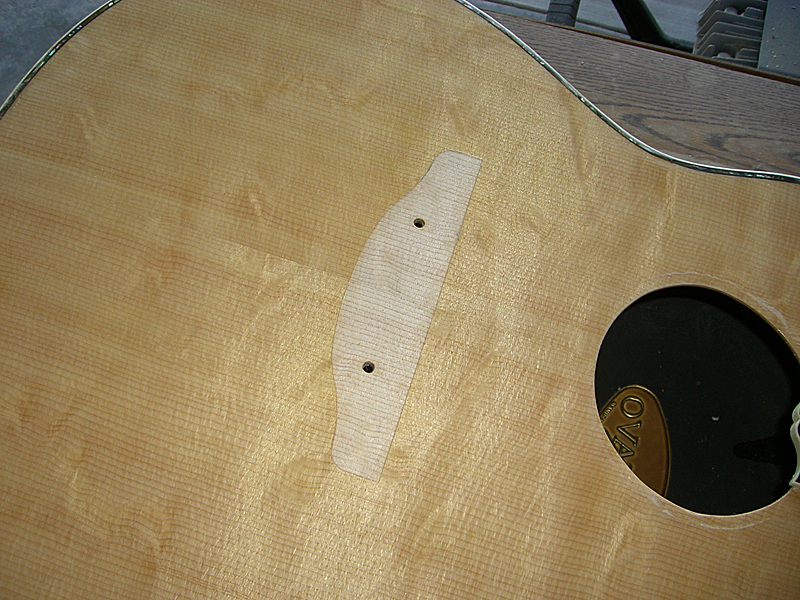
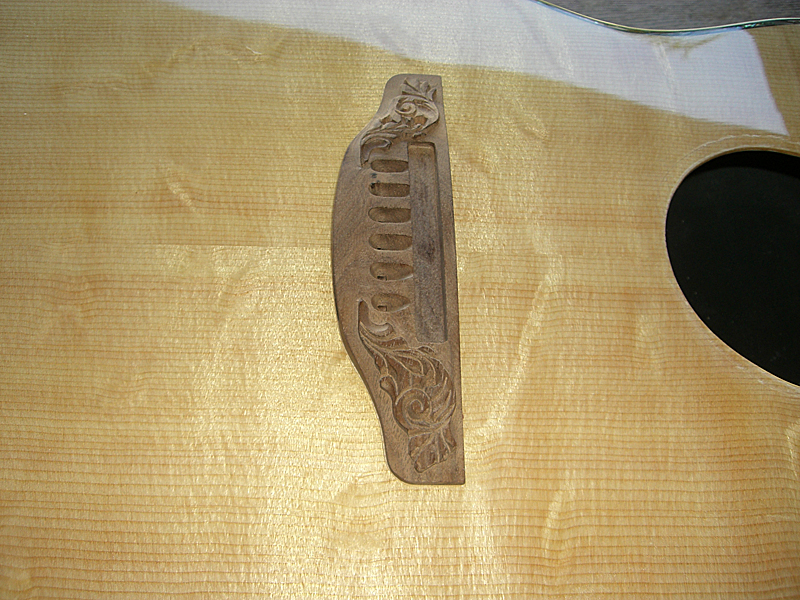
Right now I'm staining and sealing the bridge so it matches the TRC. Once that's done I'll glue it down.
Edited by DanSavage 2014-08-22 9:53 AM
|
|
| |
|
Joined:
August 2007
Posts: 1008
Location: Tuscany, Italy | I cannot see the pics......I wonder if it is me or a system error......
It seems all pics of the post have been deleted.... |
|
| |
|
Joined:
January 2009
Posts: 1249
Location: Texas | "It seems all pics of the post have been deleted" Thats what I thought too at the very beginning, but they were just slow to load |
|
| |
|
Joined:
June 2012
Posts: 2333
Location: Pueblo West, CO | I just checked from my work computer and the pics are showing up.
I noticed that the server hosting the pics was slow to respond when I was writing the post, so that's probably the problem.
If you're on a Windows machine, press Ctrl-F5 and that will force a reload from the server. |
|
| |
|
Joined:
December 2003
Posts: 13996
Location: Upper Left USA | Astounding! I hope you realize how encouraging your posts are and what hobby shop carnage will ensue by those of us with a lot less patience and skill. It must be time to make some sawdust fly!
Edited by MWoody 2014-08-22 11:24 AM
|
|
| |
|
Joined:
January 2009
Posts: 1249
Location: Texas | Mike, My thoughts exactly. John & Co. should be getting a lot of "clean up" jobs from those of us that are thinking "hell, piece of cake" |
|
| |
|
Joined:
August 2007
Posts: 1008
Location: Tuscany, Italy | All is ok now......nice job Dan. Thanks for all the information. |
|
| |
|
Joined:
June 2012
Posts: 2333
Location: Pueblo West, CO | Thanks, guys.
Yeah, I realize I'm setting a dangerous precedent here that will probably result in a lot of guitar carnage and a lot of business for John & Co. ()
I should be ready to glue the bridge on this afternoon. Then, I should be ready to glue the rosette on tomorrow. After that, the only thing left to do is to install all the hardware and string it up to see how it sounds/plays. Needless to say, I'm getting pretty excited to be this close to finishing it.
Once this is done, and assuming the frets don't need immediate replacement, my next major project will be to use the bare bowl I've got as a plug to make a mold to make more bowls.
I've pretty much decided to attempt to make an Ovation knock-off from scratch. There will be some differences, such as the shape of the headstock and the rosette, but it will have a fiberglass bowl.
After that, I'd like to attempt to make a bowl-back guitar using molded wood for the bowl instead of fiberglass. I've been doing some research and bowl-back guitars aren't really all that new. Traditionally, the bowl-shape on the back guitars are called vaulted-backs.
Edited by DanSavage 2014-08-22 1:24 PM
|
|
| |
|
Joined:
March 2005
Posts: 12759
Location: Boise, Idaho | Back in the olden days, we passed around a wood bowl backed imitation Ovation that Jeff bought in Indonesia or someplace. It was a shallow bowl, if I remember correctly. I like the sound of fiberglass or Lyrawhatever backs better. |
|
| |
|
Joined:
April 2010
Posts: 823
Location: sitting at my computer | Cool, er Glossy! The clouding issue and lacquer seepage may be a bit of bummer to ya, but gosh, still an impressive and inspiring job Dan. imho DanSavage - 2014-08-22 10:50 AM In the end I decided this was a learning experience... excellent attitude. amosmoses - ... those of us that are thinking "hell, piece of cake" I've attempted makin' cake... wasn't pretty ... 'n barely edible. |
|
| |
|
Joined:
October 2012
Posts: 1082
Location: Yokohama, Japan | Thanks for sharing DanSavage! Well worth the summer long wait! How weird that the finish clouded up on you, but I must say your recovery and final finish is nothing short of inspiring! The carnage is already beginning in Japan! |
|
| |
|
Joined:
June 2012
Posts: 2333
Location: Pueblo West, CO | Mark in Boise - 2014-08-22 12:31 PM
Back in the olden days, we passed around a wood bowl backed imitation Ovation that Jeff bought in Indonesia or someplace. It was a shallow bowl, if I remember correctly. I like the sound of fiberglass or Lyrawhatever backs better.
Alvarez-Yairi made a wooden bowl guitar back in the 80s. (DY92) I wanted one, but they are extremely rare and seldom come up for sale. When they do, they're pretty pricey. One sold on eBay last September for $2k.
While searching around I found there are a few high-end designers making vaulted back guitars. The bowls on these aren't as pronounced as Os or the DY92.
We'll see. Once I get the tooling done to make my Ovation tribute guitar, then I'll make a wood bowl and see how it turns out. |
|
| |
|
Joined:
June 2012
Posts: 2333
Location: Pueblo West, CO | SOBeach - 2014-08-22 1:00 PM Cool, er Glossy! The clouding issue and lacquer seepage may be a bit of bummer to ya, but gosh, still an impressive and inspiring job Dan. imho DanSavage - 2014-08-22 10:50 AM In the end I decided this was a learning experience... excellent attitude. amosmoses - ... those of us that are thinking "hell, piece of cake" I've attempted makin' cake... wasn't pretty ... 'n barely edible. Thanks for the kind words. Like I say, I've learned my lesson and I'm done with lacquer. I'll stick with petroleum-based finishes from now on. I can get a finish that's just as thin as lacquer, but without all the hassles. |
|
| |
|
Joined:
June 2012
Posts: 2333
Location: Pueblo West, CO | arumako - 2014-08-22 11:43 PM
Thanks for sharing DanSavage! Well worth the summer long wait! How weird that the finish clouded up on you, but I must say your recovery and final finish is nothing short of inspiring! The carnage is already beginning in Japan!
You're welcome. I got the bridge glued on yesterday and took the clamps off last night. I'll post some pics shortly. |
|
| |
|
Joined:
June 2012
Posts: 2333
Location: Pueblo West, CO | It's bridge-gluin' time...
As it comes from the factory, the bridges have a minor recess milled into the bottom. I have no idea what purpose these serve. It could be this gives a little more gluing surface for the epoxy, or it could be their way of roughing up the wood to give the epoxy some tooth.
Regardless, this wouldn't work with the hide glue because, unlike epoxy, hide glue has poor gap-filling capabilities. So, I sanded off the lip so the bottom of the bridge was completely flat. This did thin the bridge slightly, but only about .001". (~1/128")
Here's a look at the underside of a bridge that still has the recess and the CL bridge. 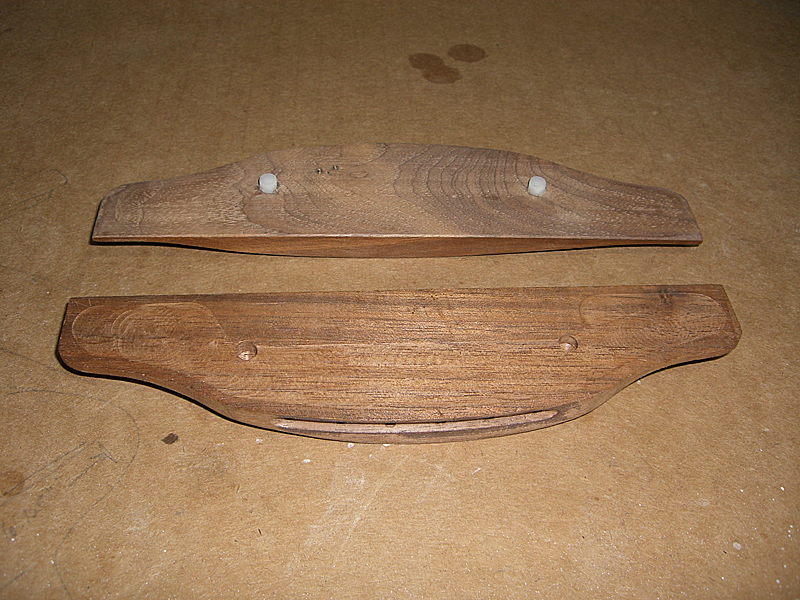
I wanted my bridge to match the color of the TRC, so I painted on some clear butryrate dope. When the dope was wet, it looked pretty good. After it dried, it went back to the color of the bare walnut. Since I couldn't add stain over the dope, I added some burnt sienna and raw umber dry artists pigment to the clear dope to make a dope stain. In the pic, the TRC looks a lot darker, but in real life they're pretty close to the same color. The bridge looks real nice on the guitar. 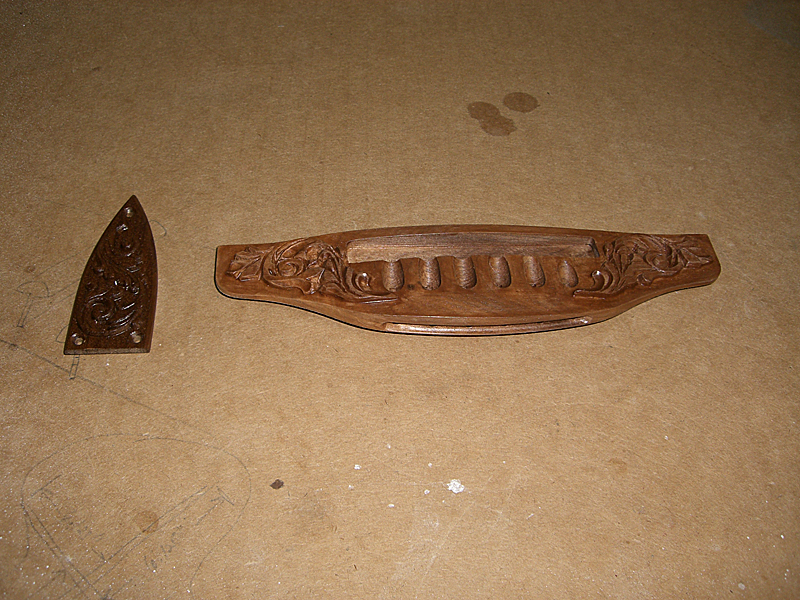
I glued together some scrap 1/4" marine ply and 1/2" medium balsa to make a bridge clamping caul. I used the balsa, first, because it's easy to carve and second, because I knew it wouldn't dent the carving on the bridge. It's a pretty crude-looking affair, but it works.
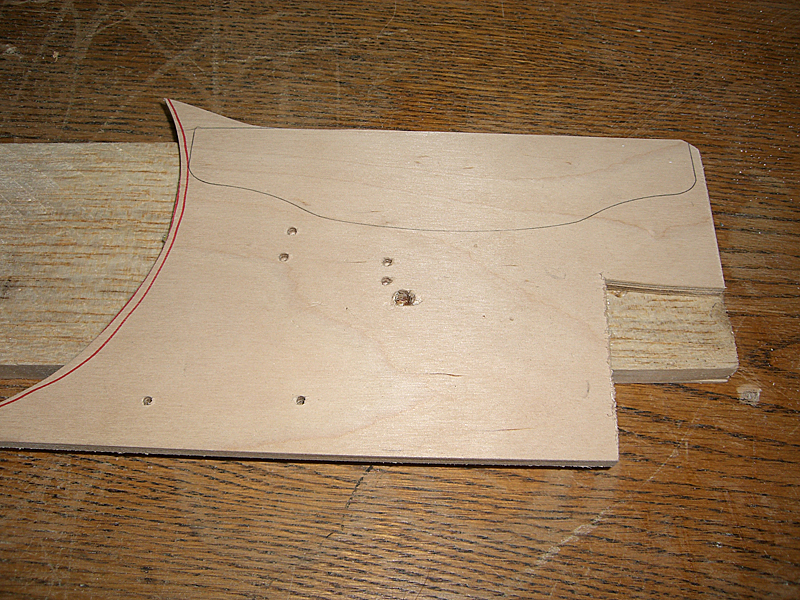
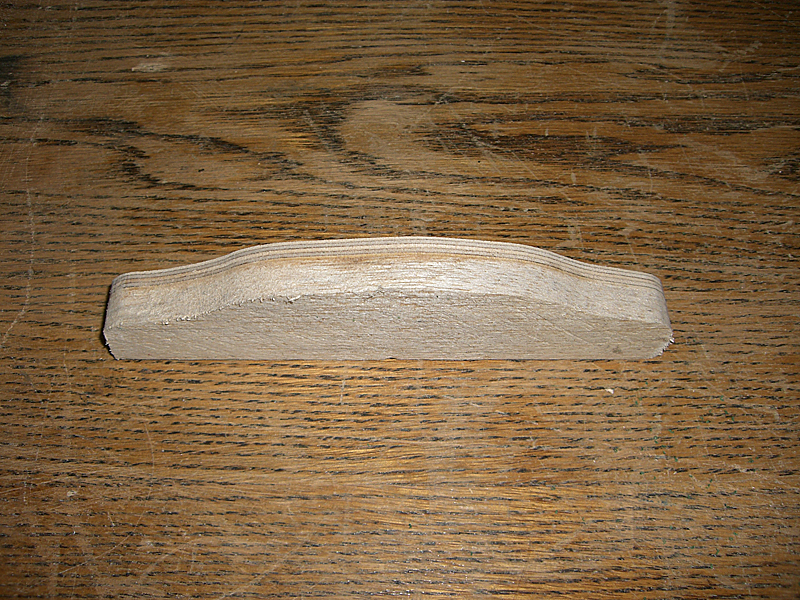
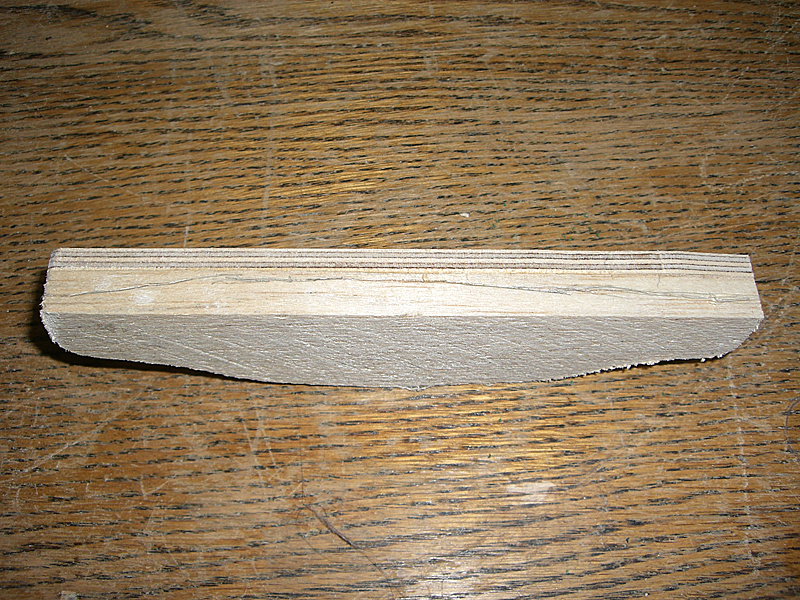
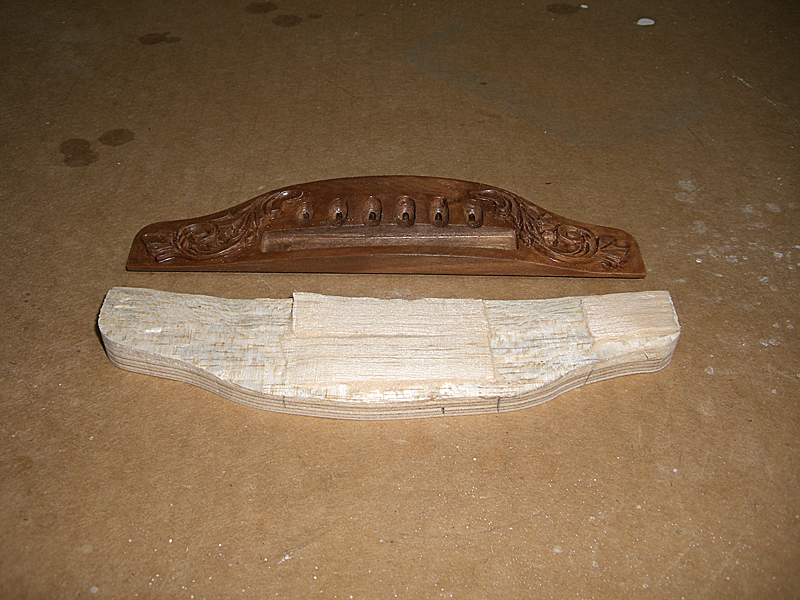
I cut out some scrap 1/8" basswood sheet stock to prevent the clamps from scratching/denting the finish.
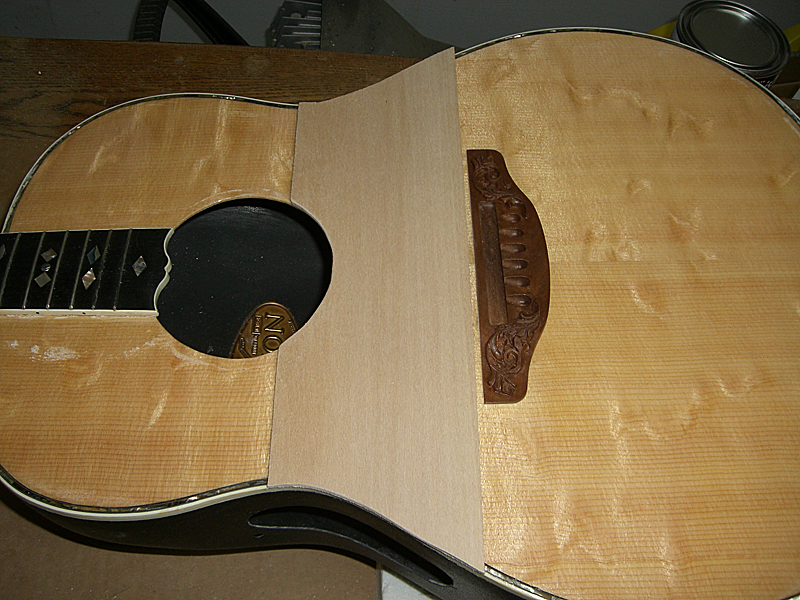 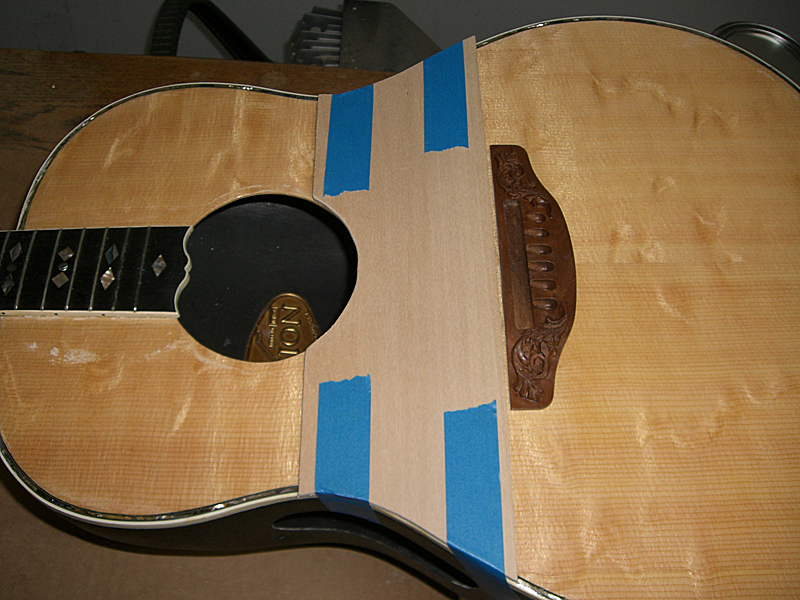
I used some binding tape to keep the bridge plate clamping plate in place. Because the hide glue has such a short working time, I wanted to make sure I didn't have to mess around with keeping this plate aligned while putting the clamps in place.
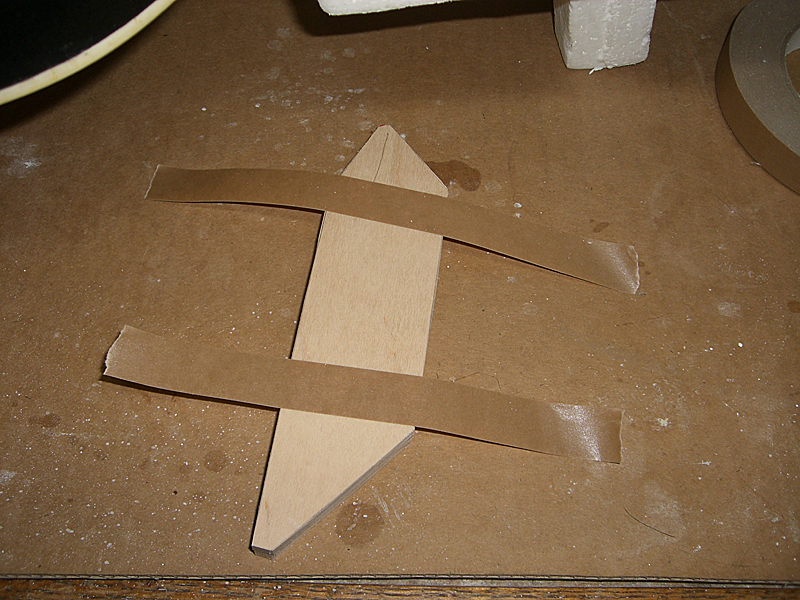 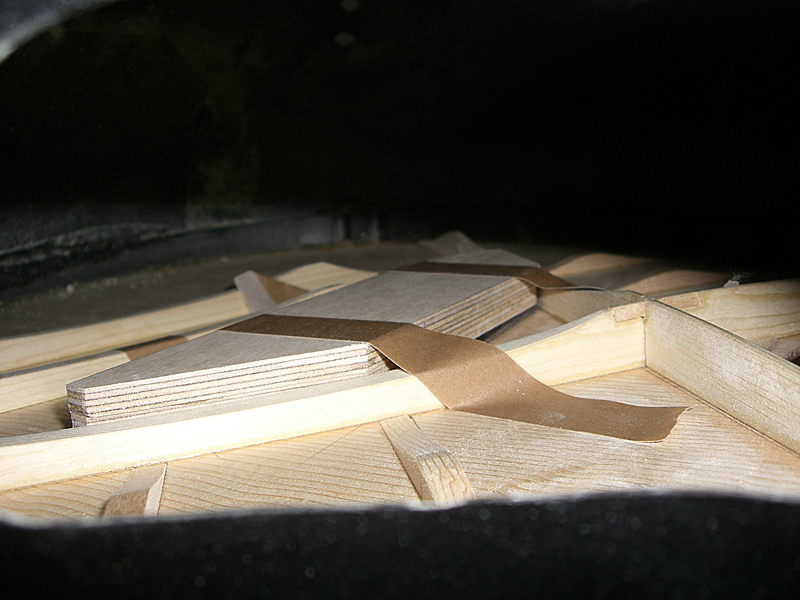
I did a dry run to get the clamps preset and to practice which order they would be applied.
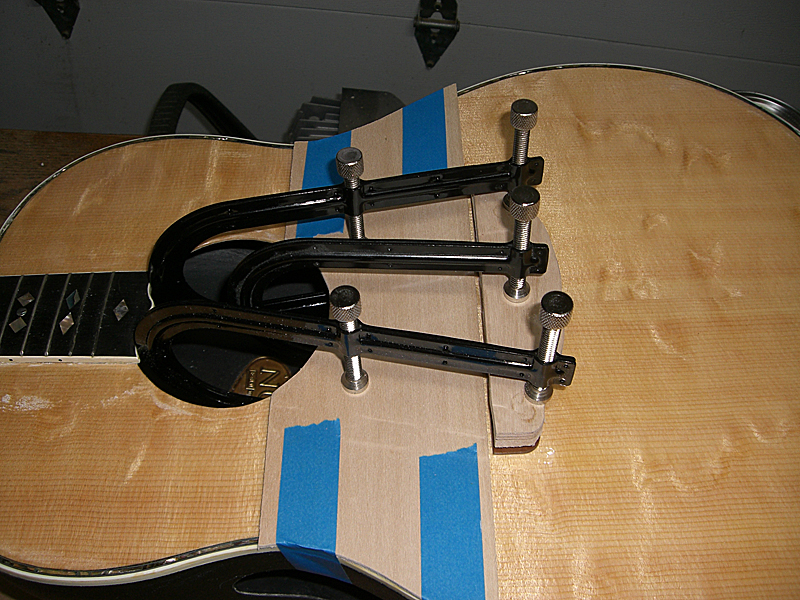 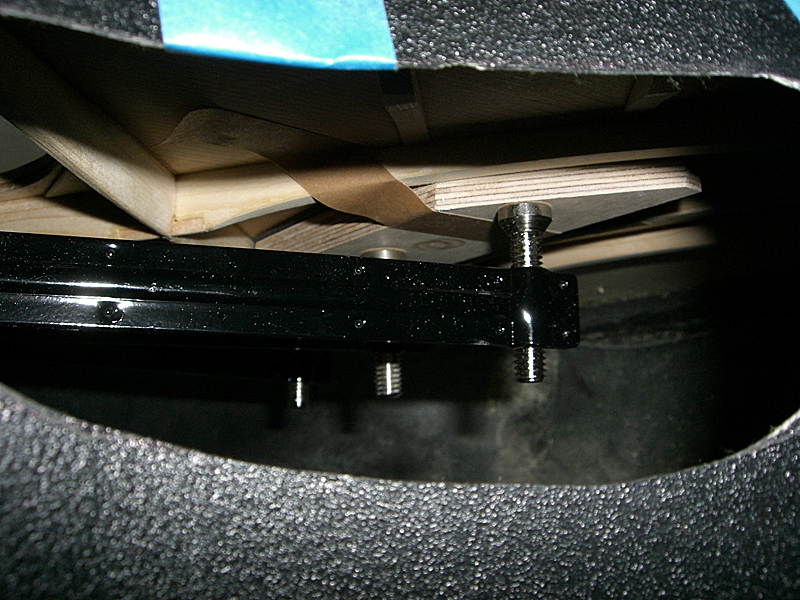
To increase the working time of the glue, I preheated the gluing surfaces of the bridge and top wood with my heat gun.
The bridge is glued and clamped and I got a nice squeeze-out of glue. I wiped this up with a moist paper towel and left the clamps in place for about 4 hours to let the glue harden. Once I took the clamps off I checked the neck geometry and it's still perfect with the top of the frets about 1/16" above the top of the bridge.
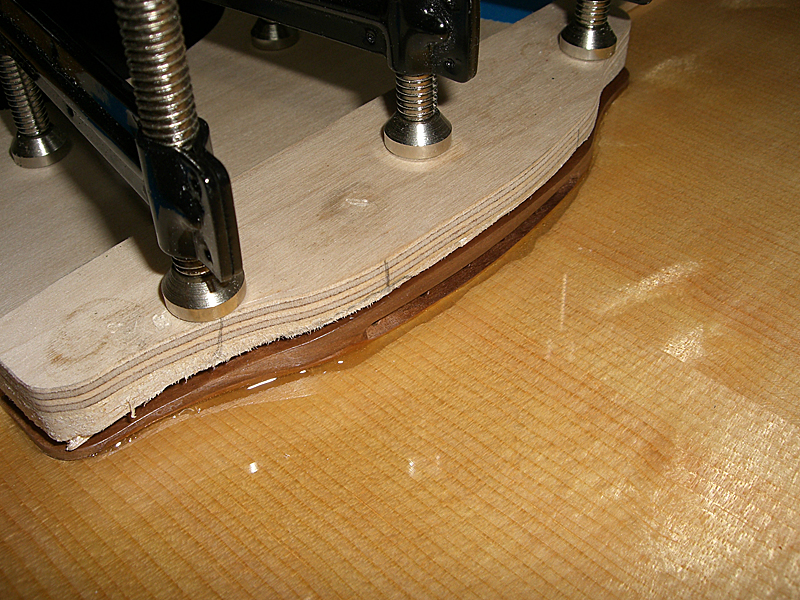 The next job is drilling the hole for the pre-amp wire and glue the rosette into place. Pics to follow. |
|
| |
|
Joined:
December 2003
Posts: 852
Location: Canada | DanSavage - 2014-08-23 8:14 AM Mark in Boise - 2014-08-22 12:31 PM Back in the olden days, we passed around a wood bowl backed imitation Ovation that Jeff bought in Indonesia or someplace. It was a shallow bowl, if I remember correctly. I like the sound of fiberglass or Lyrawhatever backs better. Alvarez-Yairi made a wooden bowl guitar back in the 80s. (DY92 ) I wanted one, but they are extremely rare and seldom come up for sale. When they do, they're pretty pricey. One sold on eBay last September for $2k. While searching around I found there are a few high-end designers making vaulted back guitars. The bowls on these aren't as pronounced as Os or the DY92. We'll see. Once I get the tooling done to make my Ovation tribute guitar, then I'll make a wood bowl and see how it turns out. I was always intrigued by these as well. Based on the design of a medieval Lute. In Japan they actually had three models. but these are probably just as difficult to find (I'm also trying to find a Tama TG-190). 
|
|
| |
|
Joined:
October 2012
Posts: 1082
Location: Yokohama, Japan | Just thoroughly enjoying your project, DanSavage. The bridge perfectly accentuates the Bear Claw soundboard - beautiful work. I've never seen Balsa used for any kind of a clamping much less a bridge caul! What an interesting idea. I would have thought the balsa would crush under the pressure of the clamps. How much clamping force are you applying on the bridge?
DanSavage - 2014-08-22 3:21 AM
Once this is done, and assuming the frets don't need immediate replacement, my next major project will be to use the bare bowl I've got as a plug to make a mold to make more bowls.
I've pretty much decided to attempt to make an Ovation knock-off from scratch. There will be some differences, such as the shape of the headstock and the rosette, but it will have a fiberglass bowl.
After that, I'd like to attempt to make a bowl-back guitar using molded wood for the bowl instead of fiberglass. I've been doing some research and bowl-back guitars aren't really all that new. Traditionally, the bowl-shape on the back guitars are called vaulted-backs.
You're ever in pursuit of the next challenge! I hope you'll be sharing those too! After more practice projects, I'm going to change the soundboard of my CC54i into Japanese Sakura (Cherry blossom). I already bought some highly figured Sakura blanks, and your "1619-4 Rebuild" will definitely provide valuable guidance! Can't wait to see your completed 1619-4!
Edited by arumako 2014-08-23 10:44 AM
|
|
| |
|
Joined:
June 2012
Posts: 2333
Location: Pueblo West, CO | Final 'construction' steps:
Drill the bridge for the pick-up wire. First, mark the location. 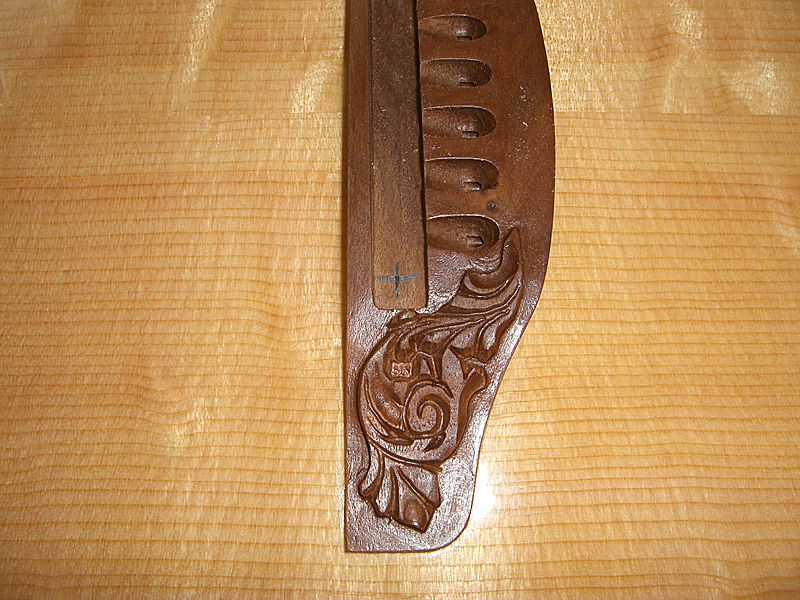
Transfer the location to the bridge caul. The idea is that I'm going to use the bridge plate clamping plate as a drill backing so I don't blow out the rosewood bridge plate. 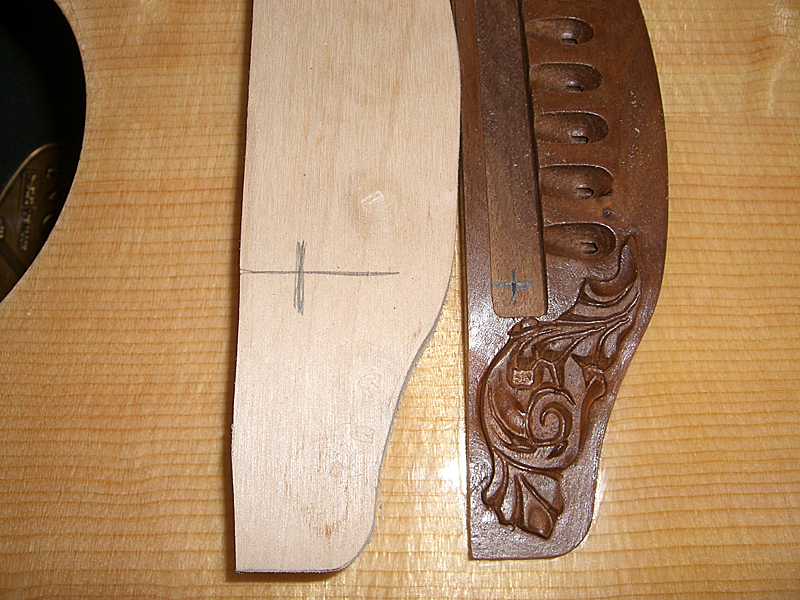
Use a spade bit to make a 9/16" hole which will be big enough to allow me to see the pick-up wire location once the bridge caul is clamped into place. 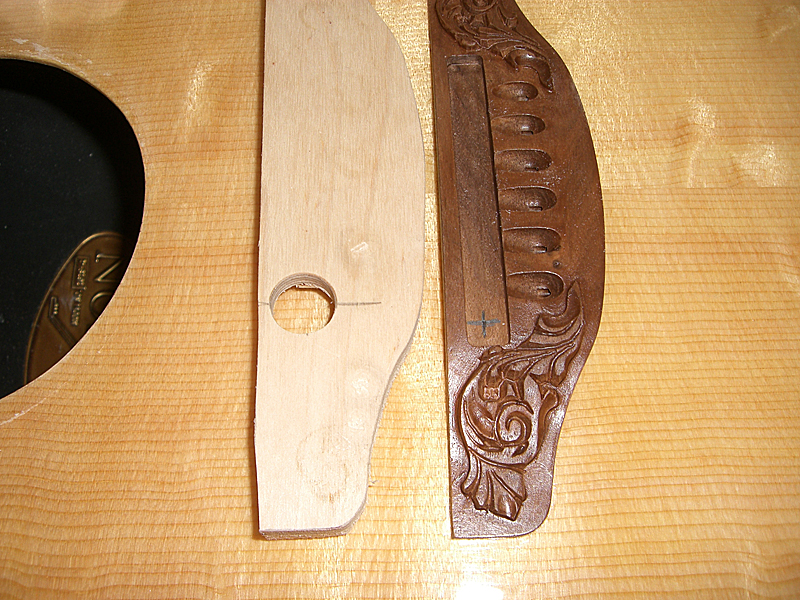
Hole is drilled. It needed a little sanding to enlarge it enough to allow the plug to pass through. 
I used 5-minute epoxy out of a pre-mix nozzle to glue the rosette into place. 
As of now, the guitar is pretty much done. I'm going to let the glue(s) dry until tomorrow, then install all the hardware and string it up. I can hardly wait. Pics to follow. |
|
| |
|
Joined:
June 2012
Posts: 2333
Location: Pueblo West, CO | merlin666 - 2014-08-23 8:04 AM I was always intrigued by these as well. Based on the design of a medieval Lute. In Japan they actually had three models. but these are probably just as difficult to find (I'm also trying to find a Tama TG-190). Here's a couple of pics of the DY92. 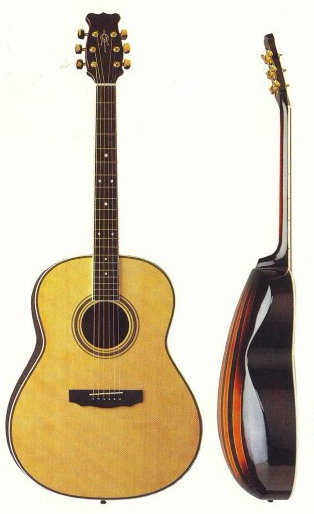 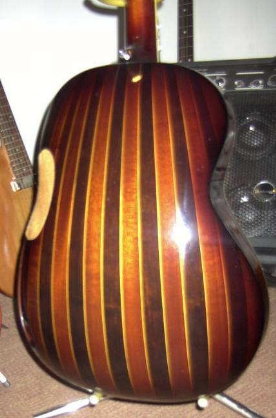
|
|
| |
|
Joined:
June 2012
Posts: 2333
Location: Pueblo West, CO | arumako - 2014-08-23 8:43 AM
Just thoroughly enjoying your project, DanSavage. The bridge perfectly accentuates the Bear Claw soundboard - beautiful work. I've never seen Balsa used for any kind of a clamping much less a bridge caul! What an interesting idea. I would have thought the balsa would crush under the pressure of the clamps. How much clamping force are you applying on the bridge?
...
You're ever in pursuit of the next challenge! I hope you'll be sharing those too! After more practice projects, I'm going to change the soundboard of my CC54i into Japanese Sakura (Cherry blossom). I already bought some highly figured Sakura blanks, and your "1619-4 Rebuild" will definitely provide valuable guidance! Can't wait to see your completed 1619-4!
Thanks! I've been enjoying your work on the 1117, too!
Yes, I'm very happy with the bridge color. The bare walnut color looked nice, but it made the guitar look plain. The stained wood looks much richer.
WRT balsa, it comes in several hardnesses. The lightest balsa is very soft, but some can get very dense and hard, almost as hard as spruce. I used a medium weight balsa that was hard enough to not be crushed by the clamping force, but soft enough to carve and sand.
I applied a moderate amount of force to the clamps --enough to dent the birch plywood clamping plates.
Interestingly, balsa has many varied uses in industry. End-grain balsa is used as the core for airliner bulkheads, such as cockpit, galley and restroom walls. End-grain balsa was also used as the core for the floor of every 1997-2004 Corvette. The balsa was sandwiched between two fiberglass panels.
Believe it not, pound for pound, balsa is stronger than steel.
Sakura is really pretty wood. I'll bet it would make a nice top on a guitar. |
|
| |
|
Joined:
April 2010
Posts: 823
Location: sitting at my computer | The 1619 sure looks great! D'ya get them strings on it yet? ps - that DY92 is neat, all Renaissance looking. But to really show it off, ya gotta play it backwards ...I ain't that good!! |
|
| |
|
Joined:
June 2012
Posts: 2333
Location: Pueblo West, CO | You betcha! Got it strung up this afternoon. I was busy all morning and couldn't wait to get home to get the strings on and see how it sounds.
In short, I'm very, very happy with it. The top wood and brace pattern are everything I'd hoped. It's bright, loud and has terrific sustain on all six strings. Plus, it looks real neat, too!
Here's the finished product. 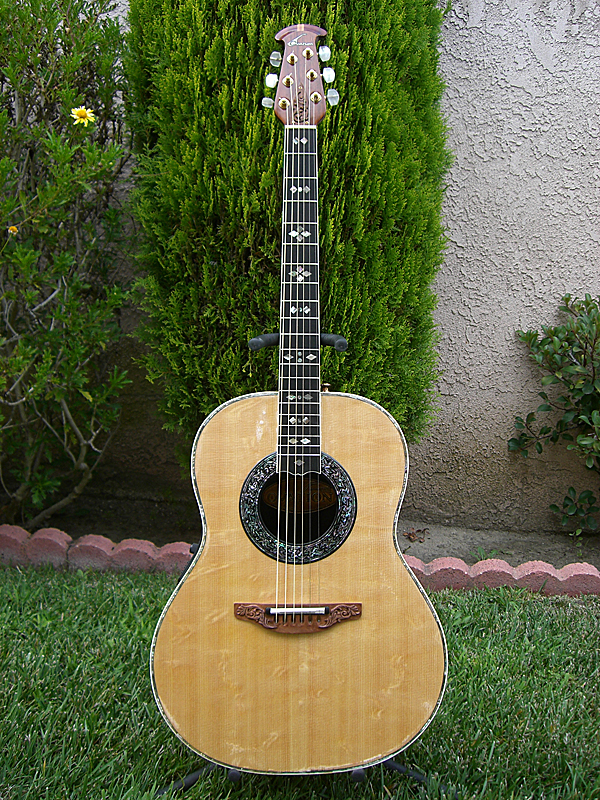
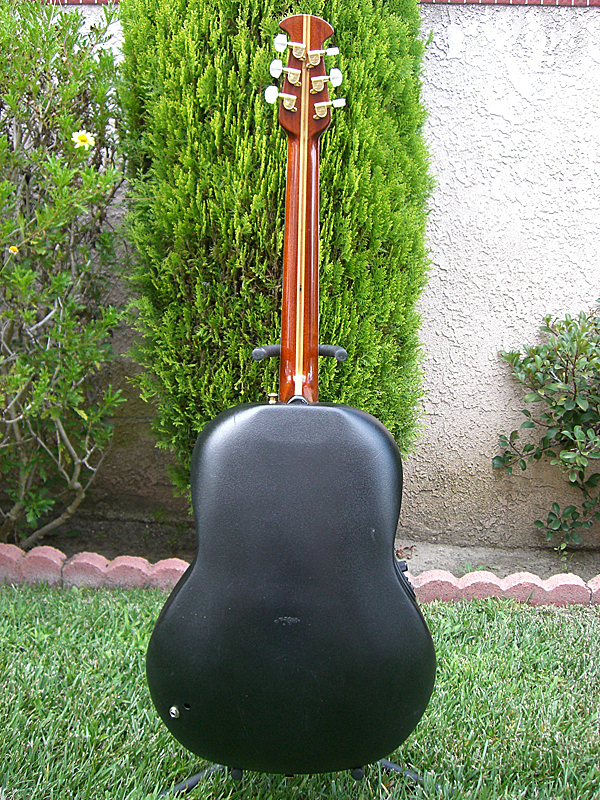
|
|
| |
|
Joined:
November 2002
Posts: 3650
Location: Pacific Northwest Inland Empire | Gorgeous.
Nice work, Dan.
Just avoid drunken orgies with it. |
|
| |
|
Joined:
January 2009
Posts: 1249
Location: Texas | Man! That is beautiful Dan. You should be very proud of what you created. Pretty doggone impressive! I wished I could play it to hear what she has to say. Thanks for sharing your journey with us. |
|
| |
|
Joined:
March 2002
Posts: 15676
Location: SoCal | Dan, I just realized that you live by me. Have we met? |
|
| |
|
Joined:
April 2010
Posts: 823
Location: sitting at my computer | amosmoses - 2014-08-24 8:50 PM Man! That is beautiful Dan. You should be very proud of what you created. Pretty doggone impressive! I wished I could play it to hear what she has to say. Thanks for sharing your journey with us. +1!!!  |
|
| |
|
Joined:
August 2007
Posts: 1008
Location: Tuscany, Italy | Congratulation Dan ! |
|
| |
|
Joined:
June 2012
Posts: 2333
Location: Pueblo West, CO | seesquare - 2014-08-24 5:44 PM
Gorgeous.
Nice work, Dan.
Just avoid drunken orgies with it.
Oops! Too late.
Thanks! |
|
| |
|
Joined:
June 2012
Posts: 2333
Location: Pueblo West, CO | amosmoses - 2014-08-24 5:50 PM
Man! That is beautiful Dan. You should be very proud of what you created. Pretty doggone impressive! I wished I could play it to hear what she has to say. Thanks for sharing your journey with us.
Thanks, Jay. |
|
| |
|
Joined:
June 2012
Posts: 2333
Location: Pueblo West, CO | immoody - 2014-08-24 6:19 PM
Dan, I just realized that you live by me. Have we met?
Hi Paul,
Yes, we have. My wife and I met up with you and the guitar gang at the Trabuco Canyon General Store, either last summer or the one before. I played your OFC Slothead and led the gang in "Keep on The Sunny Side".
It was a fun night. Are you guys still playing at the General Store on Friday nights?
Dan |
|
| |
|
Joined:
June 2012
Posts: 2333
Location: Pueblo West, CO | SOBeach - 2014-08-24 6:39 PM
+1!!!
Thanks, Jeffrey. :D |
|
| |
|
Joined:
June 2012
Posts: 2333
Location: Pueblo West, CO | maremagnum - 2014-08-25 6:39 AM
Congratulation Dan !
Thanks. I'm very happy with how it turned out and I am looking forward to my next project. I'm definitely using the same style braces and brace pattern. It makes the guitar really come alive. |
|
| |
|
Joined:
March 2002
Posts: 15676
Location: SoCal | Dan, we are. I remember meeting you. Bring that CL out this Friday night. Let's play and get some pictures...... |
|
| |
|
Joined:
December 2003
Posts: 852
Location: Canada | Dan, congratulations and thank you for sharing this amazing project. She sure looks beautiful. |
|
| |
|
Joined:
June 2012
Posts: 2333
Location: Pueblo West, CO | immoody - 2014-08-25 8:37 AM
Dan, we are. I remember meeting you. Bring that CL out this Friday night. Let's play and get some pictures......
Sounds like a plan. What time do y'all meet up? |
|
| |
|
Joined:
June 2012
Posts: 2333
Location: Pueblo West, CO | merlin666 - 2014-08-25 9:24 AM
Dan, congratulations and thank you for sharing this amazing project. She sure looks beautiful.
Thanks for the kind words and you're welcome. It's been a pleasure. |
|
| |
|
Joined:
March 2002
Posts: 15676
Location: SoCal | DanSavage - 2014-08-25 10:07 AM
immoody - 2014-08-25 8:37 AM
Dan, we are. I remember meeting you. Bring that CL out this Friday night. Let's play and get some pictures......
Sounds like a plan. What time do y'all meet up?
7-9 pm. Maybe I'll bring my A braced Legend for comparisons. |
|
| |
|
Joined:
June 2012
Posts: 2333
Location: Pueblo West, CO | immoody - 2014-08-25 11:02 AM
7-9 pm. Maybe I'll bring my A braced Legend for comparisons.
I think that's a good idea. It should be interesting to get everyone's opinion of the differences between the two.
What model is yours? I've got an A-braced 1719 in addition to this forward X-braced 1619.
Edited by DanSavage 2014-08-25 1:32 PM
|
|
| |
|
Joined:
December 2004
Posts: 573
Location: Denmark | Congratulations with the good result. A beauty to the eye, she is. All of my guitars a fairly basic or below blingwise (tele, strat, SG, Adamas) it could be nice to have such a piece of art also. |
|
| |
|
Joined:
March 2002
Posts: 15676
Location: SoCal | Dan, my Legend WAS a 1978 1117. Always hated the sound. Sent it to the factory in late 2008 and got it back early in 2009 as an A braced Legend, with beautiful wood on the top and a 5 point rosewood bridge. Same neck. What kind of strings do you have on your rebuilt CL? I'll have phos/bronze lights on the Legend. |
|
| |
|
Joined:
May 2008
Posts: 1559
Location: Indiana | Really well done Dan. |
|
| |
|
Joined:
June 2012
Posts: 2333
Location: Pueblo West, CO | tpa - 2014-08-25 12:39 PM
Congratulations with the good result. A beauty to the eye, she is. All of my guitars a fairly basic or below blingwise (tele, strat, SG, Adamas) it could be nice to have such a piece of art also.
Thanks!
I, too, have always admired guitars with bling. Even though I can't really see the bling when I'm playing, it's nice to look at when it's sitting in the stand. |
|
| |
|
Joined:
June 2012
Posts: 2333
Location: Pueblo West, CO | immoody - 2014-08-25 1:00 PM
Dan, my Legend WAS a 1978 1117. Always hated the sound. Sent it to the factory in late 2008 and got it back early in 2009 as an A braced Legend, with beautiful wood on the top and a 5 point rosewood bridge. Same neck. What kind of strings do you have on your rebuilt CL? I'll have phos/bronze lights on the Legend.
That's interesting. I thought that all Legends/Custom Legends were A-braced. I checked the archive on the factory site the only real difference I can see between the 1117 and the 1119 is that the top on the 1117 is Sitka Spruce AAA and the 1119 uses Sitka Spruce Hand-Picked.
According to the archive, it shows the 1619 also having Hand-Picked top wood, but the 1719 used AAA Sitka spruce and the 1717 using AA Sitka spruce. So, according to the archive, the quality of wood went down as time went on.
My 1719 is a 1996 model. I'm using Elixir 80/20 Light Nanowebs on both of my CLs. On deep body/dreadnaught guitars, I prefer the brighter sound of 80/20s over PBs.
I guess to do a true comparison, we should have the same strings on both guitars.
Edited by DanSavage 2014-08-25 4:33 PM
|
|
| |
|
Joined:
June 2012
Posts: 2333
Location: Pueblo West, CO | Jonmark Stone - 2014-08-25 2:05 PM
Really well done Dan.
Thanks, Jonmark. |
|
| |
|
Joined:
March 2002
Posts: 15676
Location: SoCal | Thru the 70's, Legends were braced with VT11 (I think) bracing. Custom Legends, from the git go had A bracing along with some prototype Legends. By the late 70's to the early 80's, Legends were made to have A bracing and a Kaman bar.
I'll put 80\20 lights on my Legend |
|
| |
|
Joined:
December 2003
Posts: 1889
Location: Central Massachusetts | It's cool to go back and see the first pictures in this thread and compare them to the final product. Well done, sir! And thanks for taking us through the process step by step! |
|
| |
|
Joined:
June 2012
Posts: 2333
Location: Pueblo West, CO | immoody - 2014-08-25 5:59 PM
Thru the 70's, Legends were braced with VT11 (I think) bracing. Custom Legends, from the git go had A bracing along with some prototype Legends. By the late 70's to the early 80's, Legends were made to have A bracing and a Kaman bar.
I'll put 80\20 lights on my Legend
Paul,
What you write about the bracing on the early Legends makes sense given the pics arumako posted on his 1117 thread that show the brace pattern.
In them we can see a transverse brace across the lower bout that isn't present in the A brace pattern.
Here's the different brace patterns and the inside of arumako's 1117.Comparing these, it's easy to see the transverse bar and that the spacing on the fan braces is a lot wider on this guitar than on the A brace shown above. Not to mention the different model numbers are shown next to the pattern that used them. 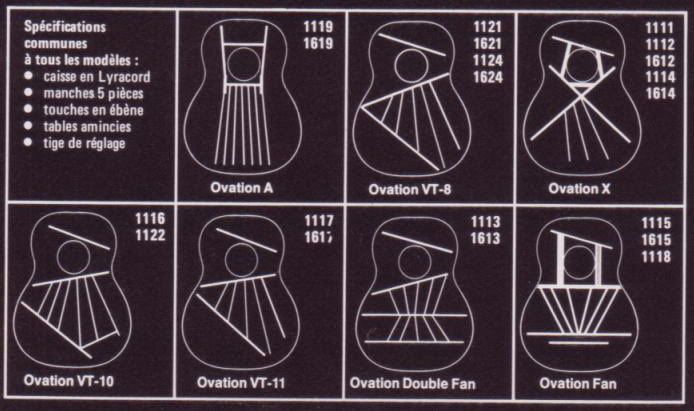


|
|
| |
|
Joined:
June 2012
Posts: 2333
Location: Pueblo West, CO | dvd - 2014-08-25 7:31 PM
It's cool to go back and see the first pictures in this thread and compare them to the final product. Well done, sir! And thanks for taking us through the process step by step!
Thanks for the kind words, and you're very welcome. |
|
| |
|
Joined:
May 2008
Posts: 1559
Location: Indiana | Hey Dan... thought I'd pass this along regarding your fogging issue. I had a similar situation with a refinish job a few years back and used this product from Stew-Mac with success.
http://tinyurl.com/nrtf8t7
Once again, really enjoyed watching this rebuild. |
|
| |
|
Joined:
June 2012
Posts: 2333
Location: Pueblo West, CO | Hi Jonmark,
Thanks for the suggestion. The flaws in the finish aren't really fogging as much as foaming, i.e.: microscopic bubbling.
Since I used Randolph butyrate dope as the top coat, I'd be wary of using anything nitrocellulose (aka nitrate dope) on top of it since I know it wouldn't adhere.
Because it's just a cosmetic flaw and doesn't really affect the playability or sound, I'm just going to chalk it up to experience and move on.
Plus, it gives the guitar 'character'. LOL!
Dan
Edited by DanSavage 2014-08-26 10:07 PM
|
|
| |
|
Joined:
October 2012
Posts: 1082
Location: Yokohama, Japan | Wow! DanSavage, cloudy finish or not, you've done an amazing (and precedent setting) job on your 1619! The Bear Claw top is stunning, and the way you patched the back is just phenomenal. It doesn't look like there ever was an opening in the bowl at all! You've obviously done a lot of work with fiberglass/resin.
The info regarding the balsa wood was very interesting as well. Your extensive and diverse knowledge is so impressive. I hope you'll post sound clips. She must just sound awesome! Congratulations! |
|
| |
|
Joined:
June 2012
Posts: 2333
Location: Pueblo West, CO | Thanks, arumako.
WRT the patch, it is visible in person, but it's a lot better than it was.
Yes, I have done a fair amount of work with fiberglass, mostly molding parts and using it to reinforce wood joints. |
|
| |
|
Joined:
June 2012
Posts: 2333
Location: Pueblo West, CO | Paul (moody p.i.) and I got together with the guitar gang at the Trabuco Canyon General Store tonight and traded guitars for a while.
Here's a video clip of a song he did on my 1619. This is the first time I've been able to hear what it sounds like from in front of it instead of behind it.
Enjoy!
https://www.youtube.com/watch?v=GTlSo8PLhao |
|
| |
|
Joined:
March 2002
Posts: 15676
Location: SoCal | Crappy singer, but I really liked the guitar. It was similar to my A braced Legend, but to my ears, it had a little more depth and a little more in the balls department. A little different than any other Ovation I've ever played. I liked it a lot and could be very tempted to have Dan re-top an old beat up Legend, if I could scrape the money together (have to find the guitar too!). When Ovation came out with the LX, they got close to this, but this is what they should have done at that time. Deep bowl and this bracing, I think on sound alone, they would have kicked ***.
Dan wants to build his own bowls. I think he could do well just re-topping existing Ovations. But if he does one for me, I want a good deal from him 'cause I'm his first endorsee...... |
|
| |
|
Joined:
March 2002
Posts: 15676
Location: SoCal | immoody - 2014-08-29 11:53 PM
Crappy singer in that video, but I really liked the guitar. It was similar to my A braced Legend, but to my ears, it had a little more depth and a little more in the balls department. A little different than any other Ovation I've ever played. I liked it a lot and could be very tempted to have Dan re-top an old beat up Legend, if I could scrape the money together (have to find the guitar too!). When Ovation came out with the LX, they got close to this, but this is what they should have done at that time. Deep bowl and this bracing, I think on sound alone, they would have kicked ***.
Dan wants to build his own bowls. I think he could do well just re-topping existing Ovations. But if he does one for me, I want a good deal from him 'cause I'm his first endorsee...... |
|
| |
|
Joined:
March 2002
Posts: 15676
Location: SoCal | Crappy singer in that video, but I really liked the guitar. It was similar to my A braced Legend, but to my ears, it had a little more depth and a little more in the balls department. A little different than any other Ovation I've ever played. I liked it a lot and could be very tempted to have Dan re-top an old beat up Legend, if I could scrape the money together (have to find the guitar too!). When Ovation came out with the LX, they got close to this, but this is what they should have done at that time. Deep bowl and this bracing, I think on sound alone, they would have kicked a@@.
Dan wants to build his own bowls. I think he could do well just re-topping existing Ovations. But if he does one for me, I want a good deal from him 'cause I'm his first endorsee......
Edited by moody, p.i. 2014-08-30 1:55 AM
|
|
| |
|
Joined:
October 2012
Posts: 1082
Location: Yokohama, Japan | Awesome Moody, p.i.! Looks like so much fun! I am just amazed by the sound of your 1619-4 DanSavage - so impressive! The tonal characteristics of the bracing, fiberglass bowl and Bear claw spruce top are just phenomenal. Vintage Ovation for sure, but more than that...it almost sounds like a 12-string...very complex, full, punchy and clear...just...wow! It's been a good summer, but this just kind of rounds it out for me! Thanks for sharing! |
|
| |
|
Joined:
June 2012
Posts: 2333
Location: Pueblo West, CO | immoody - 2014-08-29 11:54 PM
Crappy singer in that video, but I really liked the guitar. It was similar to my A braced Legend, but to my ears, it had a little more depth and a little more in the balls department. A little different than any other Ovation I've ever played. I liked it a lot and could be very tempted to have Dan re-top an old beat up Legend, if I could scrape the money together (have to find the guitar too!). When Ovation came out with the LX, they got close to this, but this is what they should have done at that time. Deep bowl and this bracing, I think on sound alone, they would have kicked a@@.
Dan wants to build his own bowls. I think he could do well just re-topping existing Ovations. But if he does one for me, I want a good deal from him 'cause I'm his first endorsee......
Thanks, Paul.
I agree. It has a sound all its own, a very unique timbre.
If you decide to have me re-top a guitar for you, I'll make you the best deal in town, just because you're my first endorsee. :D
Dan |
|
| |
|
Joined:
June 2012
Posts: 2333
Location: Pueblo West, CO | arumako - 2014-08-30 1:11 AM
Awesome Moody, p.i.! Looks like so much fun! I am just amazed by the sound of your 1619-4 DanSavage - so impressive! The tonal characteristics of the bracing, fiberglass bowl and Bear claw spruce top are just phenomenal. Vintage Ovation for sure, but more than that...it almost sounds like a 12-string...very complex, full, punchy and clear...just...wow! It's been a good summer, but this just kind of rounds it out for me! Thanks for sharing!
Thanks, arumako.
I definitely stumbled upon a great combination. Everything I did came together perfectly to give the guitar a unique voice that makes it really stand out from the crowd. I'm very curious to see if I duplicate the voice on the next guitar I do.
Dan |
|
| |
|
Joined:
October 2012
Posts: 1082
Location: Yokohama, Japan | Btw, I meant to ask if you thought the nitrate dope and butyrate finish coats have contributed to the stunning voice of your 1619-4. I've never used the stuff much less even heard of it until I read your post, but the finish must be different than any lacquer of polyurethane based finish? In the past, I used some hand rubbing wax finish on one of my electrics and it affected the tone quite a bit...just curious... |
|
| |
|
Joined:
June 2012
Posts: 2333
Location: Pueblo West, CO | Actually, nitrate dope is the same thing as nitrocellulose lacquer. It's just known by a different name in aviation circles. But, in that realm, it's strictly used as a primer because of its delicacy. Butyrate dope is also a lacquer, but because it has a different formulation, it has more chemical resistance.
At this point I couldn't say how much the dope finish contributes to how the 1619 sounds. Aircraft finishes, such as dope are usually applied to fabric. So, they have to be flexible and endure being out in the direct sunlight and cold damp night air. I've read a little bit about the subject of lacquer finishes vs. polyurethane and a lot of people are of the opinion that what really matters is keeping the finish as thin as possible. This makes a lot of sense to me because the thinner finishes allow the wood to resonate better.
I think the unique sound of my 1619 is the product of a lot of things. I used a high quality top wood, known for good resonance. I thinned the top wood to 3/32" (.09375" instead of the usual .10". I hand-scraped both the top and bottom of the top wood after thinning. I used a shaped, scalloped X-brace set made from Sitka spruce. I carefully sanded all the braces smooth and rounded the sharp corners. I forward-shifted the braces to allow the lower bout to vibrate more freely. I tapered the transverse brace instead of leaving it half-round. I didn't tuck any of the braces. Instead, I spaced them so there was a 1/8" gap between all the braces. I used a 3/32" rosewood bridge plate instead of the usual 1/8" maple. I used hide glue to attach the braces and bridge. I was careful to keep the amount of glue to a minimum. And, finally, I applied a (fairly) thin lacquer finish.
So, I think it's a lot like building a light model airplane. It's not any one thing you do, but a lot of little things add up. I'm sure that if I were to change any one of these things, the guitar would sound different. And, the more I were to change, the larger the difference would be. |
|
| |
|
Joined:
July 2002
Posts: 288
Location: Maine | Dan , Excellent rebuild! I've thoroughly enjoyed watching your progress from a relic to a gem.
I think we're all waiting for the video slide show and sound clips of the final project
,Talbot
|
|
| |
|
Joined:
June 2012
Posts: 2333
Location: Pueblo West, CO | Hi Talbot,
I'm not sure if you saw the post with this info, but Paul Moody and I got together with the guitar gang on Friday night. He brought his re-topped 1117 and I, my 1619. We swapped guitars and he played my 1619 for a while. My wife videotaped him during one of the songs he played and I uploaded the video to YouTube.
https://www.youtube.com/watch?v=GTlSo8PLhao
Enjoy!
Dan |
|
| |
|
Joined:
October 2012
Posts: 1082
Location: Yokohama, Japan | DanSavage - 2014-08-30 2:47 PM
Actually, nitrate dope is the same thing as nitrocellulose lacquer. It's just known by a different name in aviation circles. But, in that realm, it's strictly used as a primer because of its delicacy. Butyrate dope is also a lacquer, but because it has a different formulation, it has more chemical resistance.
At this point I couldn't say how much the dope finish contributes to how the 1619 sounds. Aircraft finishes, such as dope are usually applied to fabric. So, they have to be flexible and endure being out in the direct sunlight and cold damp night air. I've read a little bit about the subject of lacquer finishes vs. polyurethane and a lot of people are of the opinion that what really matters is keeping the finish as thin as possible. This makes a lot of sense to me because the thinner finishes allow the wood to resonate better.
I think the unique sound of my 1619 is the product of a lot of things. I used a high quality top wood, known for good resonance. I thinned the top wood to 3/32" (.09375") instead of the usual .10". I hand-scraped both the top and bottom of the top wood after thinning. I used a shaped, scalloped X-brace set made from Sitka spruce. I carefully sanded all the braces smooth and rounded the sharp corners. I forward-shifted the braces to allow the lower bout to vibrate more freely. I tapered the transverse brace instead of leaving it half-round. I didn't tuck any of the braces. Instead, I spaced them so there was a 1/8" gap between all the braces. I used a 3/32" rosewood bridge plate instead of the usual 1/8" maple. I used hide glue to attach the braces and bridge. I was careful to keep the amount of glue to a minimum. And, finally, I applied a (fairly) thin lacquer finish.
So, I think it's a lot like building a light model airplane. It's not any one thing you do, but a lot of little things add up. I'm sure that if I were to change any one of these things, the guitar would sound different. And, the more I were to change, the larger the difference would be.
Thanks for the reply DanSavage. It's amazing how much thought went into the "not so obvious" areas of the guitar. No wonder she sounds so fabulous. As usual, your information regarding the finish is super informative and helpful. I can't wait to see your next project!
Edited by arumako 2014-08-31 8:47 AM
|
|
| |
|
Joined:
June 2012
Posts: 2333
Location: Pueblo West, CO | arumako - 2014-08-31 6:42 AM
Thanks for the reply DanSavage. It's amazing how much thought went into the "not so obvious" areas of the guitar. No wonder she sounds so fabulous. As usual, your information regarding the finish is super informative and helpful. I can't wait to see your next project!
Thanks, arumako.
Everything I did was done for one purpose, to make the top as responsive as I could.
Actually, I made a couple of mistakes that turned out okay. The first was that I put the finger braces in the wrong spot according to the Stewmac plans I was using. The second was the finger braces had the wrong shape. But, now, since the guitar sounds so good, I'm probably going to keep these the same. The last thing I'd want to do is to change these and have the guitar end up not sound as good as mine.
You're welcome. When I start the next project I'll post a new thread to document it.
Dan
Edited by DanSavage 2014-09-01 1:11 AM
|
|
| |
|
Joined:
July 2002
Posts: 288
Location: Maine | DanSavage - 2014-08-31 7:49 AM
Hi Talbot,
I'm not sure if you saw the post with this info, but Paul Moody and I got together with the guitar gang on Friday night. He brought his re-topped 1117 and I, my 1619. We swapped guitars and he played my 1619 for a while. My wife videotaped him during one of the songs he played and I uploaded the video to YouTube.
https://www.youtube.com/watch?v=GTlSo8PLhao
Enjoy!
Dan
Yes I missed it. I had read earlier that you may get together with Moody.
Thanks for the link. I Check it when I get home from the holiday weekend
|
|
| |
|
Joined:
May 2008
Posts: 1559
Location: Indiana | Guitar sounds great Dan.
Nice job Paul. |
|
| |
|
Joined:
June 2012
Posts: 2333
Location: Pueblo West, CO | Thanks, Jonmark. |
|
| |
|
Joined:
July 2002
Posts: 288
Location: Maine | Wow! You've set a new standard on saving the damaged ones
Looks and sounds great. I'm glad I never band sawed the bowl off to simply save the neck
Do you think others will be as easy to get the old top wood seperated from the bowl ?
What's most impressive to me is how you saved all the abalone binding
A+++
Edited by TJR 2014-09-02 3:00 PM
|
|
| |
|
Joined:
June 2012
Posts: 2333
Location: Pueblo West, CO | Thanks, Talbot.
Yes, I'm glad you never sawed the neck off. This has turned into a great guitar that will hopefully provide another 40 years of playing and listening pleasure.
As long as the epoxy on other guitars is as brittle as what it was on this one, then I can see no reason why it shouldn't work. Luckily, the factory used very fast-drying epoxy, so it never really got a chance to soak into the top wood. Instead it relied on biting into the surface irregularities for grip. This makes it good for removing the top from the kerfing.
Actually, I'm about to find out shortly. I've been asked to replace the top on another old Ovation gem and to do to that guitar what I did to mine. (bearclaw spruce, forward x-brace)
The guitar should be arriving after I get back from vacation and I'll start a new thread once I've got it in my hands and have had a chance to look it over.
Thanks! I'm really glad I was able to save the abalone, too. This guitar really deserved to be restored, even if the process left it with a few flaws, er, beauty marks. ;^)
Edited by DanSavage 2014-09-02 3:18 PM
|
|
| |
|
Joined:
January 2009
Posts: 1249
Location: Texas | "I've been asked to replace the top on another old Ovation gem " Yep! Dan agreed to give #485 a fresh look. This guitar has more cracks on the soundboard than the Prof has guitars. Nick Black at one time owned this guitar, gave up on it and sold it to a guy up north,from whom I bought it from. Due to its condition, it has been the guitar that is always in some room leaning against a wall that someone picks up and plays. It is a sweet sounding guitar with a fantastic neck, which is a two piece. I really appreciate Dan accepting my request to replace the soundboard. We are hoping that John B. can find a 40th RI rosette tucked away somewhere. Needless to say...I am stoked about this project. Thanks Dan! |
|
| |
|
Joined:
June 2012
Posts: 2333
Location: Pueblo West, CO | You're welcome, Jay.
I am curious to hear how the original, simple X-brace used on this guitar sounds to the X-brace I used on mine. I'm sure the simple X-brace is the major reason it sounds as good as it does. There's nothing to impede the top from vibrating freely.
|
|
| |
|
Joined:
December 2003
Posts: 13996
Location: Upper Left USA | Forget the Show me your Woody Guitar posts.
In with the Savage Salvages!
Sweet! |
|
| |
|
Joined:
June 2012
Posts: 2333
Location: Pueblo West, CO | #485 should be a real interesting restoration. I'm looking forward to starting it.
New top and braces, definitely. Some sort of inlaid rosette.
Refinish headstock/neck with new decals & new body binding and bowl paint --possibly.
Here's a few rosette pics.
First, an OEM 1st-gen Balladeer rosette. Although this looks like real white MOP, I suspect it's imitation MOP with the rope and grapes printed on top. Real MOP is not available this large in one piece. I'll be able to tell once I get Jay's guitar in front of me. 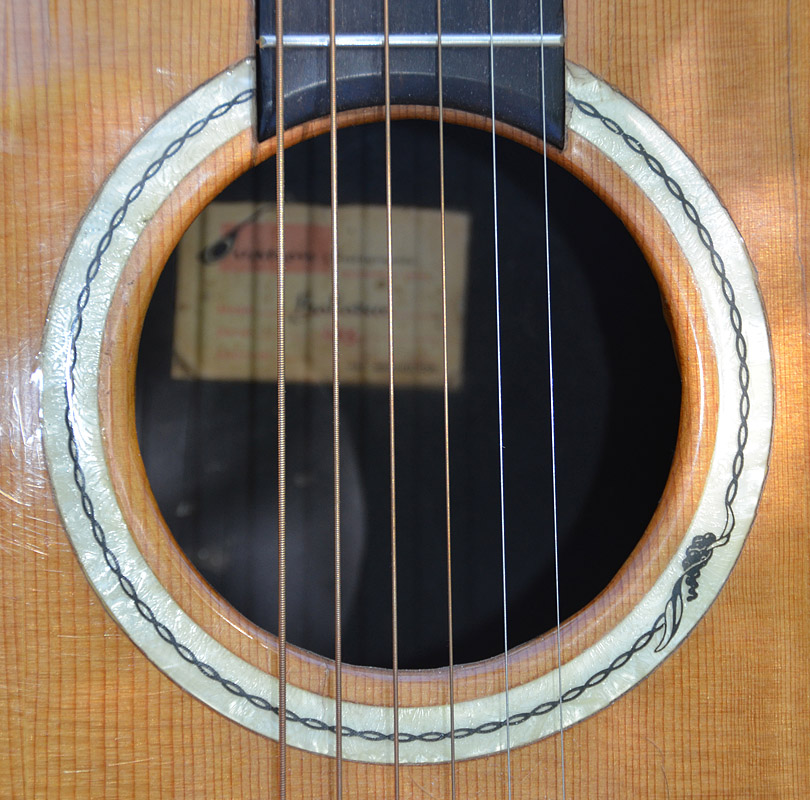
In searching online I found some really cool alternative rosettes that I bought.
Diamond #1. Black/White MOP & abalone. Not Ovation, but it looks nicer in real life than it does in the pic below.
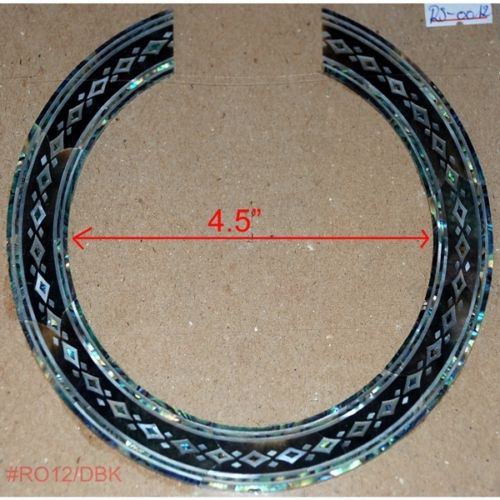
Diamond #2. White MOP & abalone. Not as stunning as the one above, but still really pretty to look at. 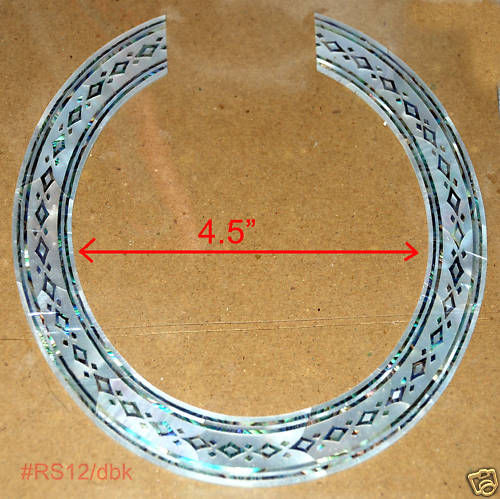
The pièce de résistance, an Ovation knock-off in white MOP & abalone. This one is interesting because I contacted the vendor asking if they could do one in black MOP and abalone. They agreed, but when I asked to exchange this one for the custom one they told me to get lost. Too bad, so sad... 
Edited by DanSavage 2014-09-04 1:08 AM
|
|
| |
